Printable Version of Topic
Click here to view this topic in its original format
914World.com _ 914World Garage _ New wheels means GT flares
Posted by: URY914 Jul 4 2004, 06:17 AM
I found some 8" "Centerline" wheels on Ebay afew months ago for $300. After I got them they are really "look-a-likes". They are not real Centerlines. These are one piece with fake rivets. Real Centerlines are two or three pieces. Oh well, they're 8" wide and weigh the same as my 7" Revolutions. But they also have a shollow backspacing so they stick out more. After the 225/50 tire is mounted, they end up being 5/8" wider at the tire and 1" wider on the car.
This is your typical 914 story. Where one thing leads to another.
To get my new 8" wheels to fit I needed to install GT flares. Back to Ebay I went. I found a set of fiberglass GT flares still in the box for $200. Now I take a jigsaw to my very nice, recently painted fender and cut the crap out of it. I then butt mounted the flare, instead of lapping it on.
I'm not done yet but here are some pictures.
Paul
Posted by: URY914 Jul 4 2004, 06:18 AM
Here is the new (to me) 8" FAKE Centerline.
Attached image(s)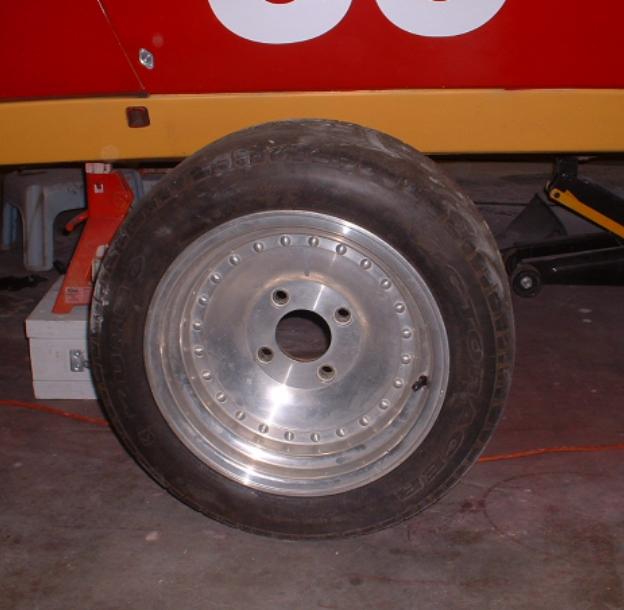
Posted by: URY914 Jul 4 2004, 06:19 AM
Here is the differance.
Attached image(s)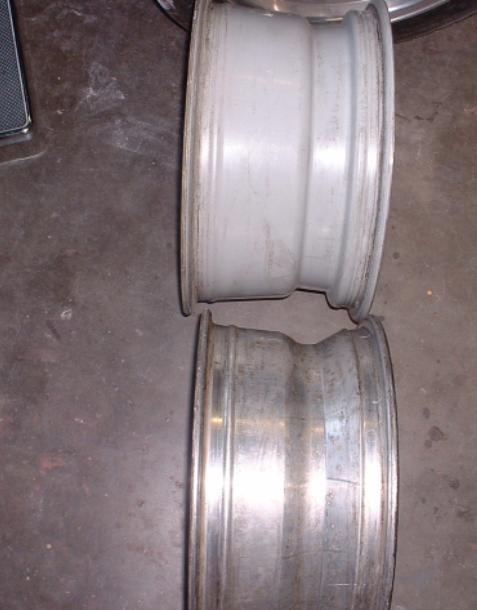
Posted by: URY914 Jul 4 2004, 06:20 AM
Time to cut. Jigsaw, please. 
Attached image(s)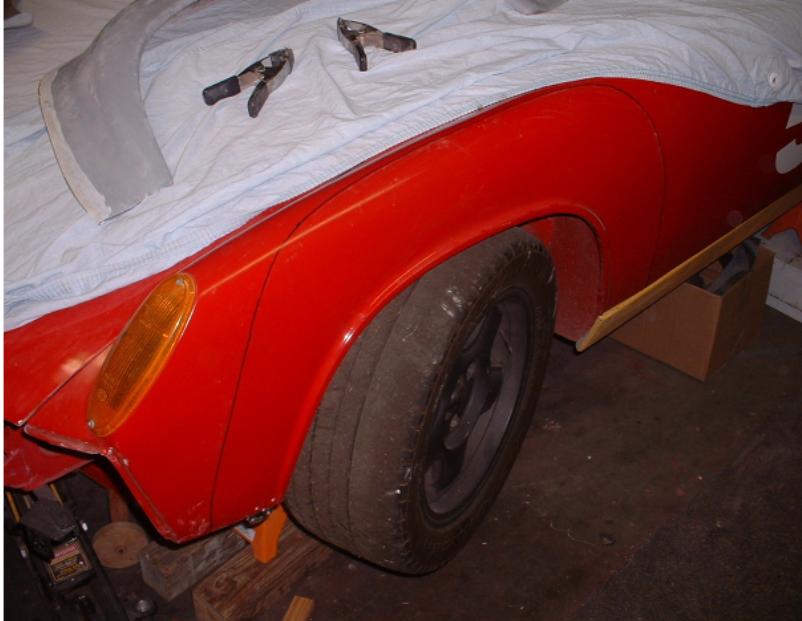
Posted by: URY914 Jul 4 2004, 06:22 AM
Oh the pain!!! 
Attached image(s)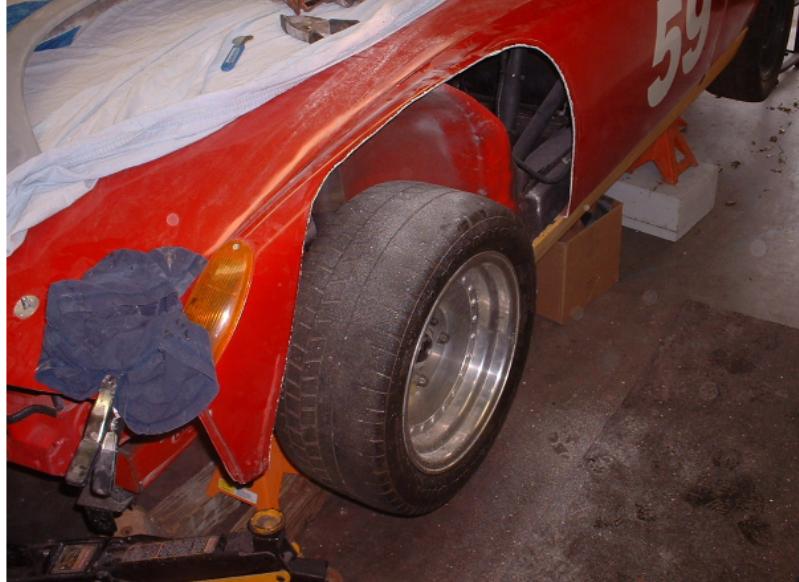
Posted by: URY914 Jul 4 2004, 06:23 AM
Fit up and let the 'glassing begin...
Attached image(s)
Posted by: URY914 Jul 4 2004, 06:23 AM
Now time for the bondo...
Attached thumbnail(s)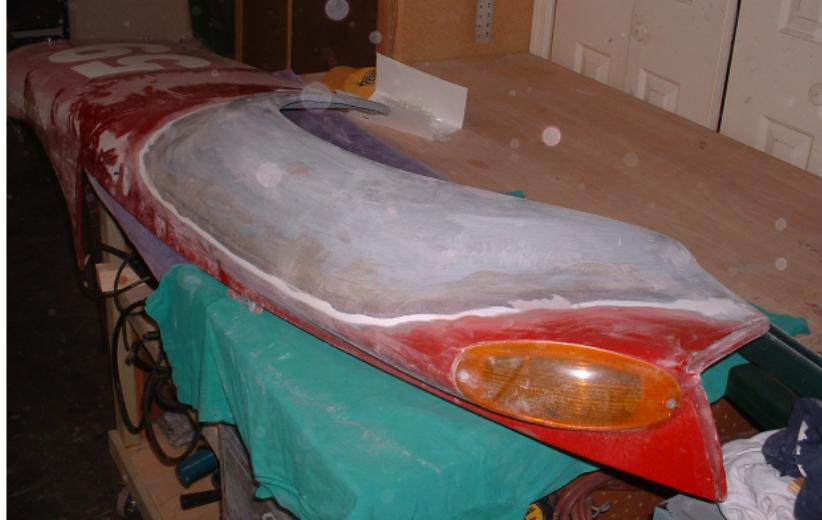
Posted by: Part Pricer Jul 4 2004, 06:55 AM
How much weight do they add? 
Posted by: URY914 Jul 4 2004, 07:04 AM
The wheels are the same weight, 7" vs. 8".
The flares will add a little, but not much. The f/g fenders I cut out were street weight not racing pieces, so they were relativly heavy. They were about 3/16" thick. The GT flares are thinner.
Paul
Posted by: morgan Jul 4 2004, 08:27 AM
Will the maddness everstop
JM
Posted by: URY914 Jul 5 2004, 09:54 AM
more pain. this time on the right.
Attached thumbnail(s)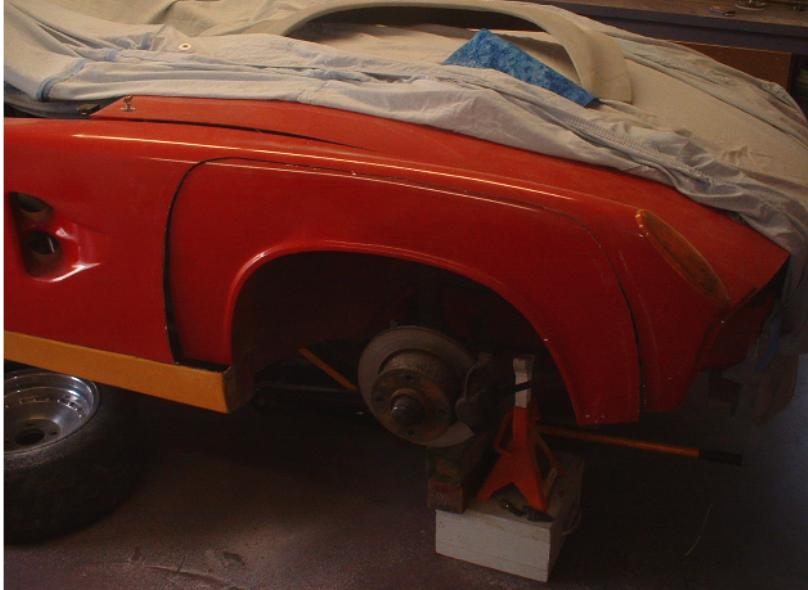
Posted by: URY914 Jul 5 2004, 09:54 AM
And the left side is coming along nicely...
Attached image(s)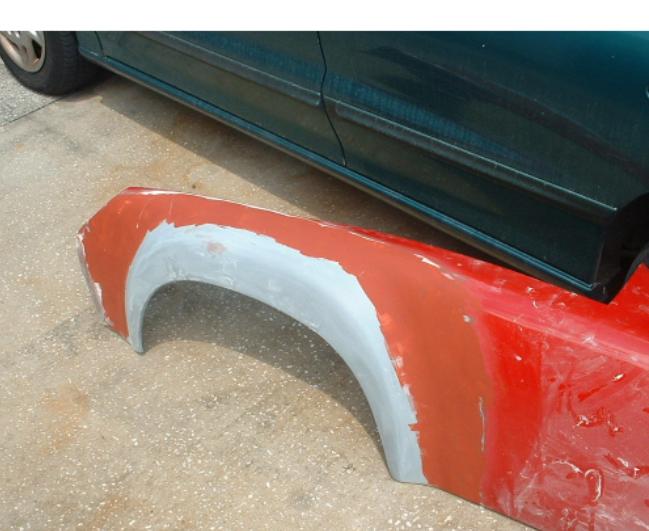
Posted by: SirAndy Jul 5 2004, 12:59 PM
will the flare on the right interfere (sp?) with your air-intake in the door ????
looks cool otherwise! can't wait to see the finished product.
 Andy
Andy
Posted by: URY914 Jul 5 2004, 01:02 PM
I'm going to take out the NACA duct in the door. I couldn't get the f/g to bond to the ABS plastic of the duct. It kept cracking.
Paul
Posted by: URY914 Jul 5 2004, 03:51 PM
Problem.
When I installed the fender panel and bumper/spoiler for a test fit. Things didn't line up. The bottom edge of the fender was about an inch away from the edge of the spoiler. And the bumper at the turn signal was about 1/2" off.
see...
Attached image(s)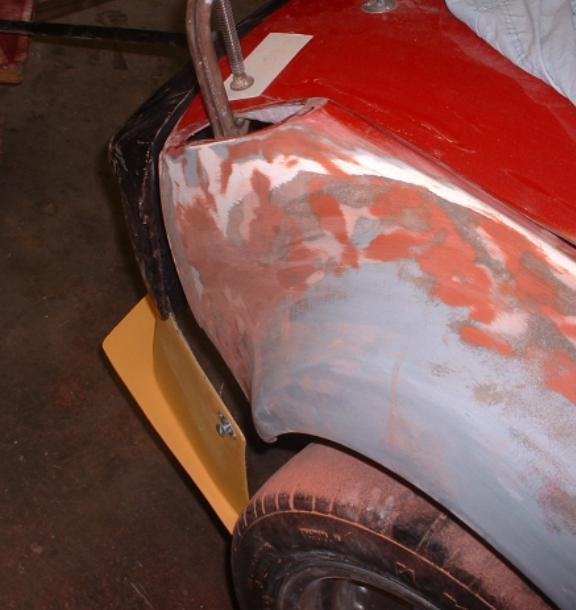
Posted by: URY914 Jul 5 2004, 03:52 PM
Its kinda hard to make out the line of the bumper in the last shot.
here is another...
Attached image(s)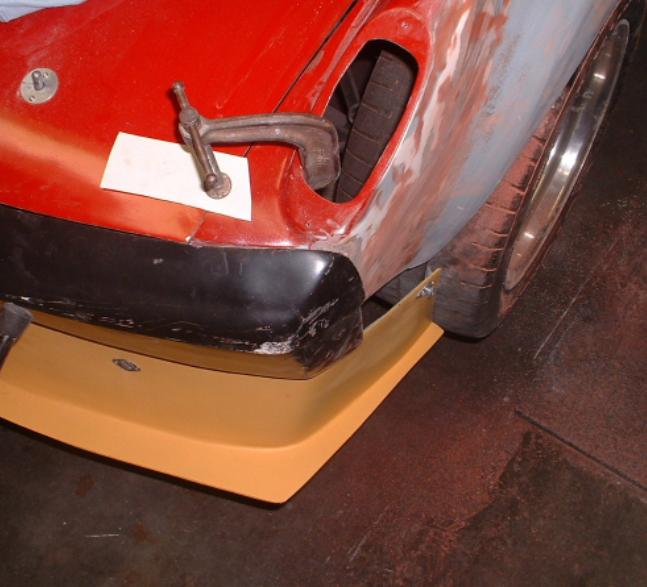
Posted by: SirAndy Jul 5 2004, 03:53 PM
huh? how could that be? isn't that the same fender that came off the car?
confused,
 Andy
Andy
Posted by: URY914 Jul 5 2004, 03:55 PM
With fiberglass you can't pull it and hammer it into place so what to do?
Attached image(s)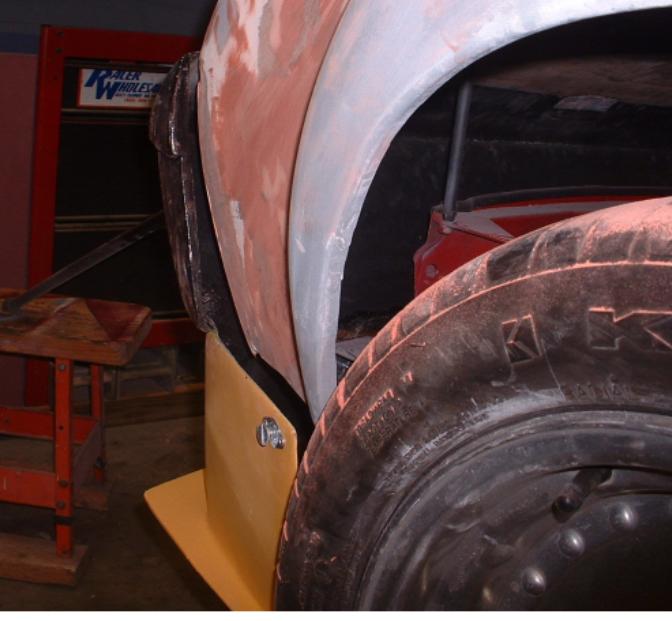
Posted by: URY914 Jul 5 2004, 03:59 PM
Andy,
Yes same fender, but I cut so much out of the front, when I glassed in the flare I didn't hold the remaining piece in the correct position. I glassed in the flare while it was laying on the table, not mounted on the car. 
Paul
Posted by: TimT Jul 5 2004, 03:59 PM
Make some dive planes that cover the gap
Posted by: URY914 Jul 5 2004, 04:03 PM
So I drilled a few holes in the fender at the bending point to releave the stress of the glass. Then I used the c-clamps to hold it in the correct position. Than I built it up with glass. After it cures it will hold it's position. I'll than go on the inside and grind the glass off to get the weight out of it. Right now it about 3/8" thick. I'll get it down to about 1/8".
Attached image(s)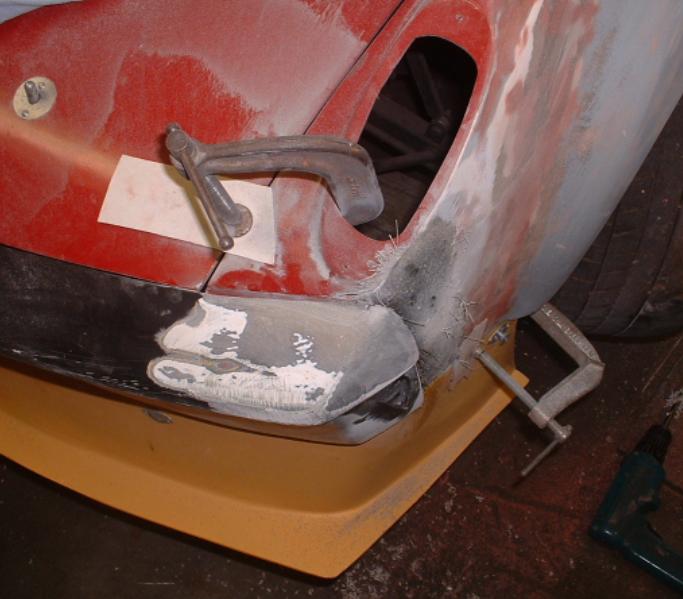
Posted by: URY914 Jul 5 2004, 04:10 PM
And I took some material off the outside surface of the bumper and will build up the inside of the bumper and than grind the outside again. To get it to where I need it.
A lot of work to build up than grinding off but by working both sides you can bring everything into line.
I could just mud it up with bondo but way too heavy and it could sperate from the glass if too thick.
Paul
Attached image(s)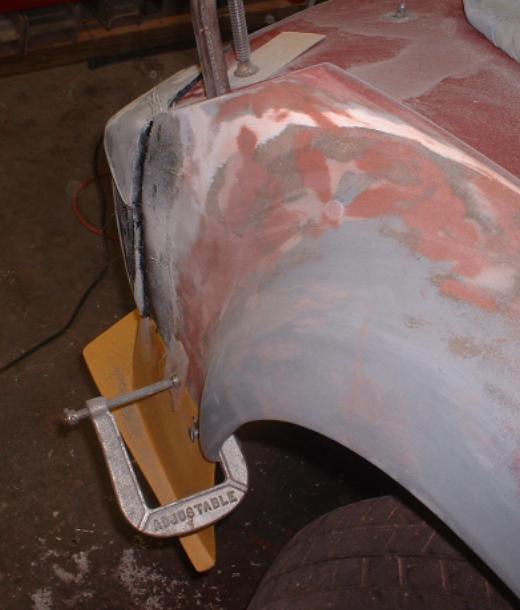
Posted by: URY914 Jul 5 2004, 05:59 PM
I'm going to plan B.
I took some modelers putty and used it for filler. I spread it over the area and applied two layers of 1.5 oz cloth. That way when I grind from the back side and I get into the putty I know when to stop.
In the picture you can see the putty around the bottom of the turn signal openning. I've already covered the putty with cloth on the side.
Paul
Attached image(s)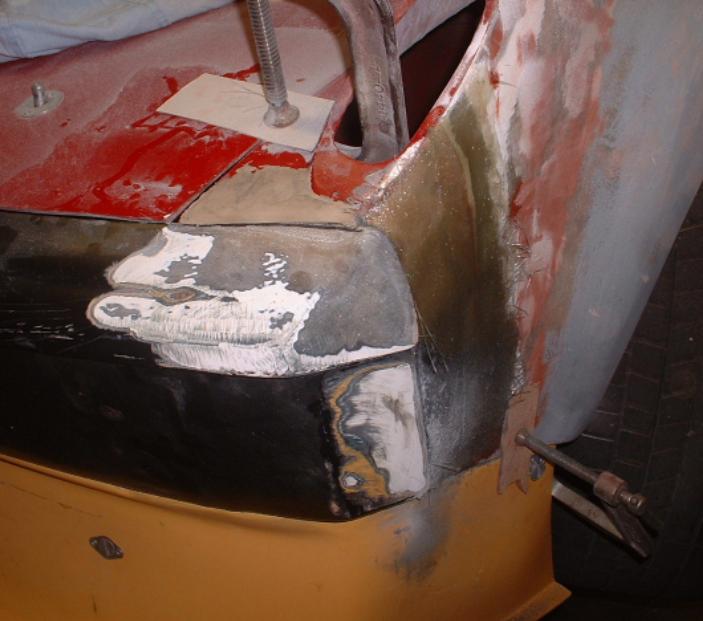
Posted by: URY914 Jul 5 2004, 06:01 PM
wwww
Attached image(s)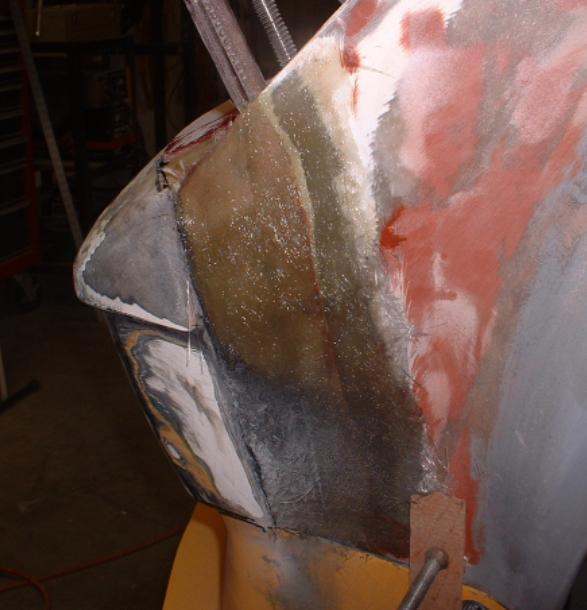
Posted by: SirAndy Jul 5 2004, 06:29 PM
make sure you wear a respirator.

seems like it'll be just fine!
Andy
Posted by: URY914 Jul 5 2004, 06:55 PM

My garage is covered in white dust from this little project. I take the yard blower and clean it out.
Paul
Posted by: carr914 Jul 6 2004, 08:02 AM
Paul I wish I'd known you were doing this project, as I'm sawing my car up to put flares on too. Good luck with the rest.
Posted by: URY914 Jul 6 2004, 11:22 AM
Come on over to my house and share the pain.
Paul
Posted by: Mueller Jul 6 2004, 12:15 PM
Hey Paul,
look'n good....
for your C-clamps, is that the brand or a constant reminder that you can turn the little handle on the tool??? 
Attached image(s)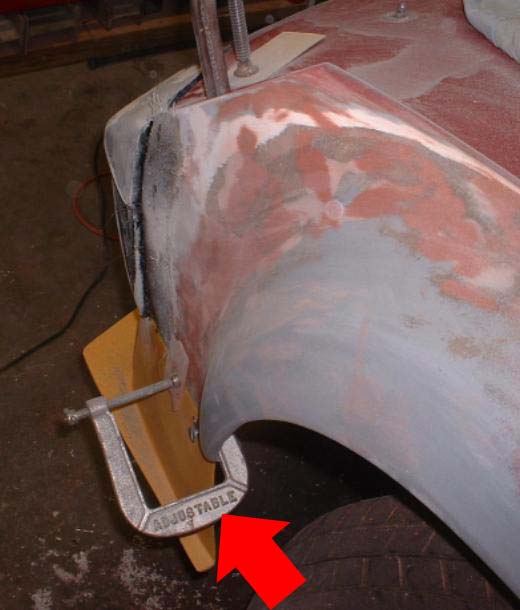
Posted by: URY914 Jul 6 2004, 12:19 PM
Mike,
Sometimes my wife uses them and she'll take them and walk in the house. In a little while she'll come back into the garage and says, "These aren't big enough, they won't work." I'll have to take them and show her that they are "adjustable" when you turn that little handle. 
Paul
Posted by: URY914 Jul 6 2004, 07:45 PM
Tonight I ground (grinded?) the f/g from the inside of the fender off. This left me with about 3/32" of glass which was enough to hold it's shape. Than I added another layer on the outside. I also layed up glass around the base of the turn signal as this was low and not meeting the bumper edge. Tomorrow nite I'll grind this down from the back side.
Attached image(s)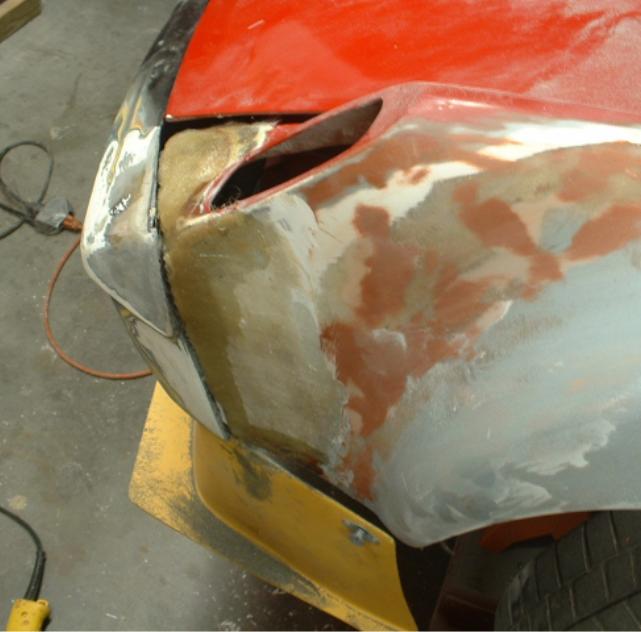
Posted by: URY914 Jul 6 2004, 07:51 PM
As you can see in the above pic the top edge of the spoiler end panel does not follow the curve of the flare. I'll change this by grinding the inside of the spoiler end panel until paper thin, than contour it to match the shape of the front of the flare. Than I'll add glass cloth back on it to strengthen it and hold the shape. I'll have to move the location of the dusz fastener so it is on a flatter section of the fender.
Paul
Attached image(s)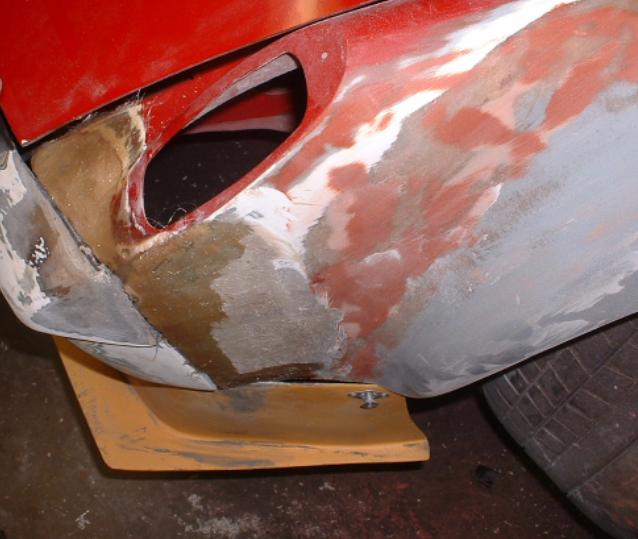
Posted by: watsonrx13 Jul 6 2004, 07:52 PM
Wow Paul, I go out of town for the weekend and you go crazy.
I'll try to come by Saturday, if you're going to be home...
Looking good.
Posted by: URY914 Jul 7 2004, 08:00 PM
I'm back at it tonight. I found that the pieces still weren't lining up right so I decided to add a little "prestressing" to the glass. I rigged up a c-clamp and a line to pull the edge of the fender out. Than I glassed up the area. Hopefully tomorrow when I remove the clamp the fender will remain in position or close to it. You can see tha I pulled it out beyond the point that it hits the end piece of the spoiler.
Attached image(s)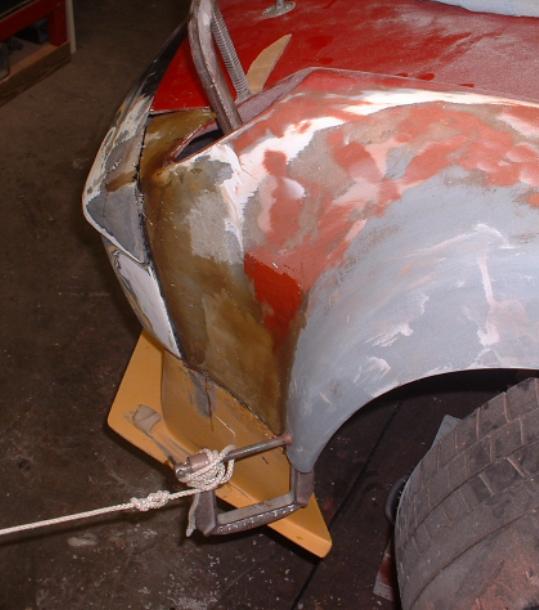
Posted by: URY914 Jul 7 2004, 08:04 PM
I'm also fitting the fender so it butts up to the end of the bumper. On a stock car the fender tucks under or inside the bumper on the ends. Why? well its less work to butt the pieces together than it is to have everything interlock.
Attached image(s)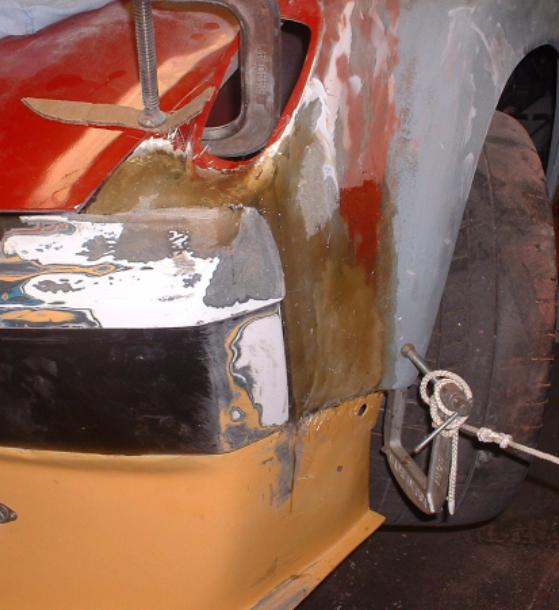
Posted by: URY914 Jul 7 2004, 08:10 PM
I also took my grinder to the back side of the spoiler end plate so I can pull it out to meet the lower fender line.
If everything holds and lines up when I release the clamps tomorrow, I'll take the belt sander to it and take off the high spots of the glass. Than I'll put the first layer of bondo on it. Most of the first layer will get sanded off anyway but its easier to see what you have after that first bondo pass. If the glass gets too thin after the belt sander I'll add a layer of glass on the inside.
Paul
Attached image(s)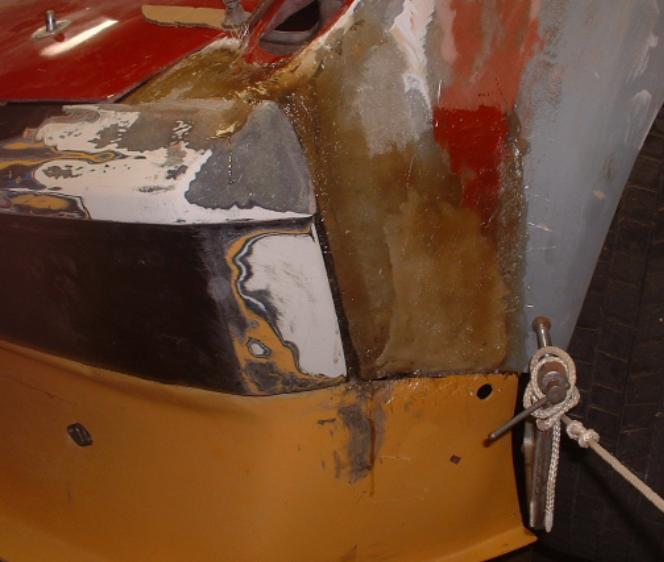
Posted by: URY914 Jul 7 2004, 08:18 PM
This is not your typical f/g job because with f/g you want to be working from a mold. So the finish side of your piece is toward the smooth side of the mold. You lay up the glass in a mold, the glass cures, you pop it from the mold and with a little sanding you're done. When you're working like I am, I working on the unfinshed side of the part so I have to glass, grind, belt sand, bondo, sand, bondo, glass, sand, prime, sand, finish paint.
Much more work.
Paul
Posted by: East coaster Jul 7 2004, 09:19 PM
Ahhhhhhhh! I'm getting itchy just lookin' at the pics!
Looks good! When people marvel over fibreglass creations I tell'em it's easy it comes in a can!
We need an itchy smiley  This will have to do
Posted by: rick 918-S Jul 7 2004, 09:54 PM

Posted by: URY914 Jul 10 2004, 06:07 PM
Well I took a few days off so my lungs could clear up from the f/g dust. Here is the lastest...
Roughed up the 'glass with the grinder than spread on some bondo to see how it looks.
Attached image(s)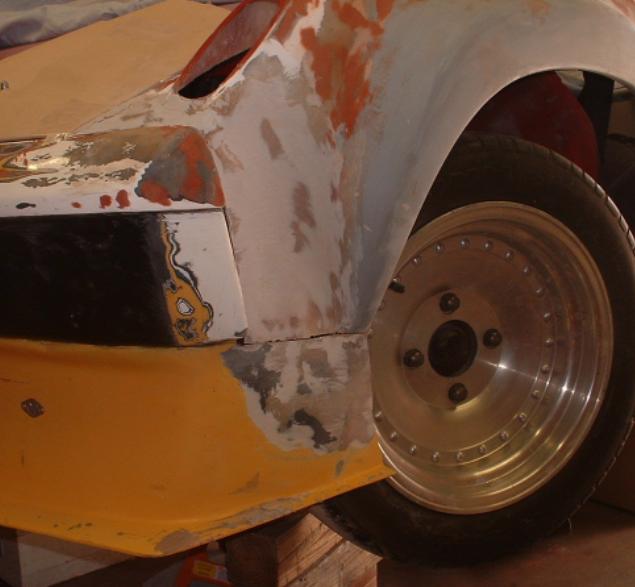
Posted by: URY914 Jul 10 2004, 06:10 PM
I need to do some detail work at the edge of the panels where they meet. I need to grind it down, apply glass to each side at the edge than file and shape it so it is meets the ajoining piece nice and tight.
Attached image(s)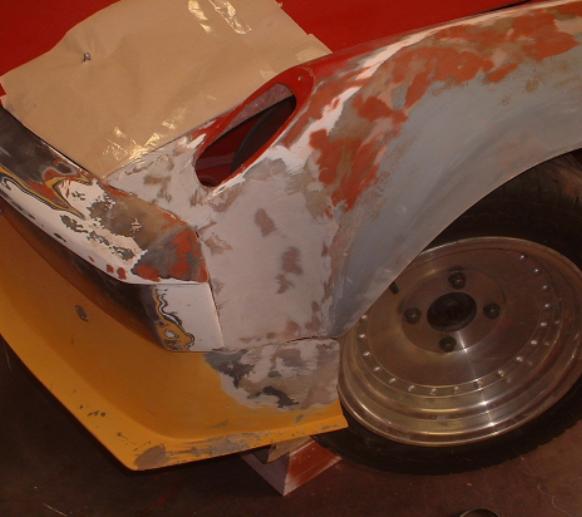
Posted by: URY914 Jul 10 2004, 06:17 PM
The bright white is the gelcoat on the glass, the dull white is the bondo, the tan or light brown is the fiberglass without the gelcoat, the dark red is the crack filler. Everything else is paint. I covered the corner of the hood 'cause I don't want to nick it and have to repaint it.
I also have to do the final shaping of the end plate of the spoiler where it ends at the tire. I want it to follow the line of the fender opening down until it ends. The radius of the fender carrys through. The 996 GT's front spoilers do this. 
Paul
Posted by: URY914 Jul 10 2004, 06:19 PM
I forgot the pic 
Attached image(s)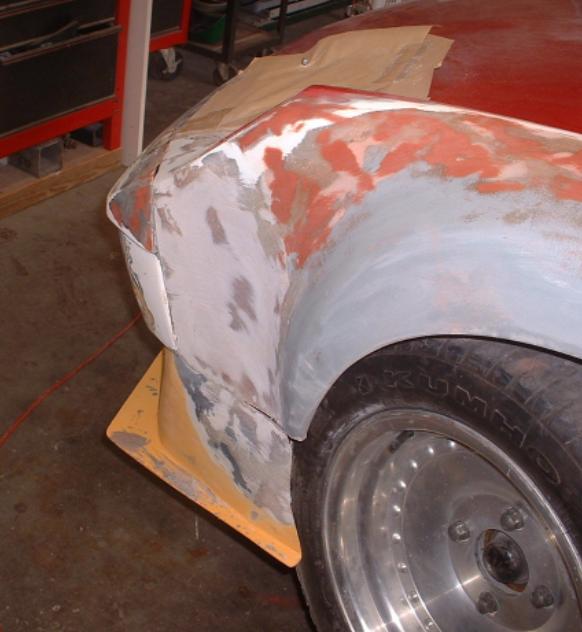
Posted by: URY914 Jul 11 2004, 04:40 PM
This is thickening up the edges so I can grind them down and the will fit right and be strong. If you don't do this you'll sand the edge down and it will crack.
Attached image(s)
Posted by: URY914 Jul 11 2004, 04:41 PM
After sanding and shaping.
Attached image(s)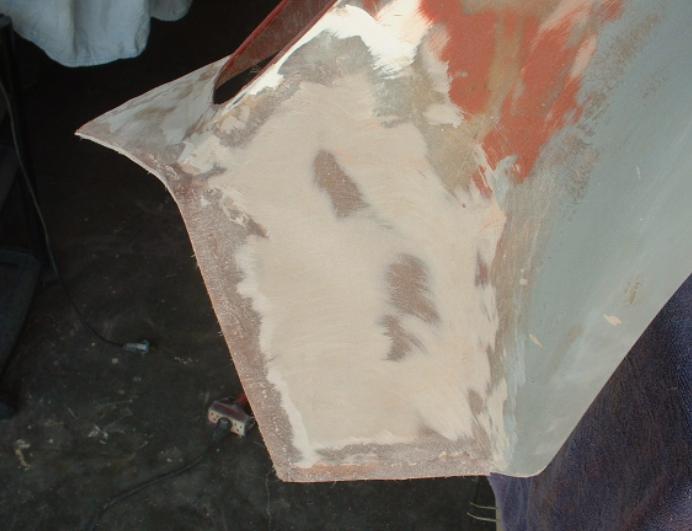
Posted by: URY914 Jul 11 2004, 04:43 PM
Now I have enough material to put the pieces together and sand them as one piece without the fear of sanding through.
Attached image(s)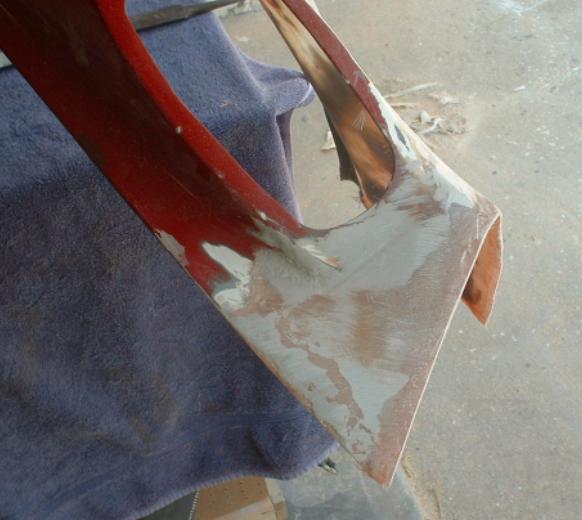
Posted by: URY914 Jul 11 2004, 04:48 PM
I also cut out the right side and test fit the flare. It doesn't fit worth a crap. So I have a lot more work to do here to.
I think the problem is fitting two f/g pieces together that are made by different companies. No two pieces are the same. If you ever buy glass parts get ready to do some work.
Paul
Attached image(s)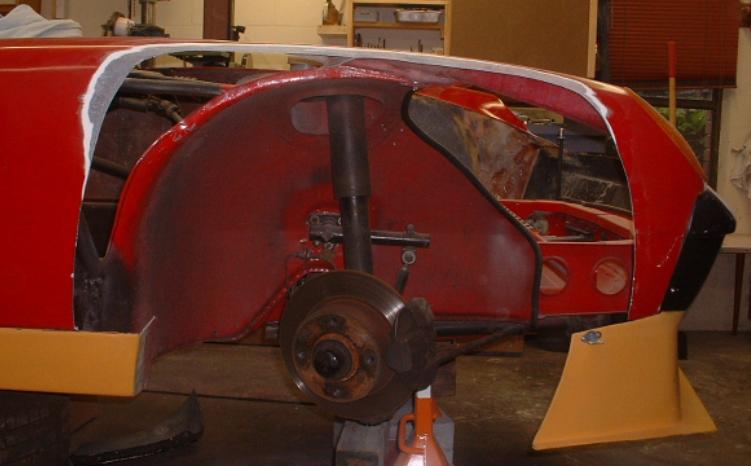
Posted by: URY914 Jul 11 2004, 07:03 PM
Here it is clamped and taped on as best as I could get it. I'll fill in the lower left corner. This fit is a little different because the right rocker panel is molded to the door/fender.
From this angle it doesn't look too bad, now does it?
Attached image(s)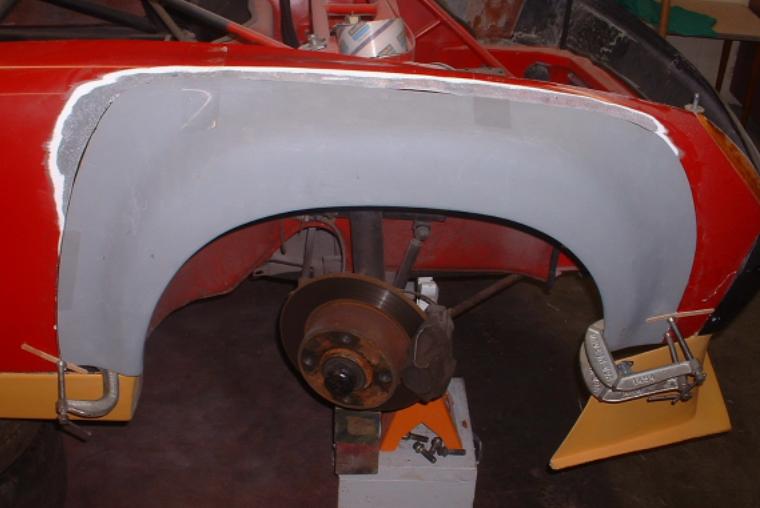
Posted by: URY914 Jul 11 2004, 07:08 PM
Now check out the front view. Oh well.
The stock f/g reproduction fender has a diffenent radius than the flare. So I'll have to remove a section of the flare to get things to line up. I'll glass the left side of the flare to panel than cut and fit as I work it toward the front.
Paul
Attached image(s)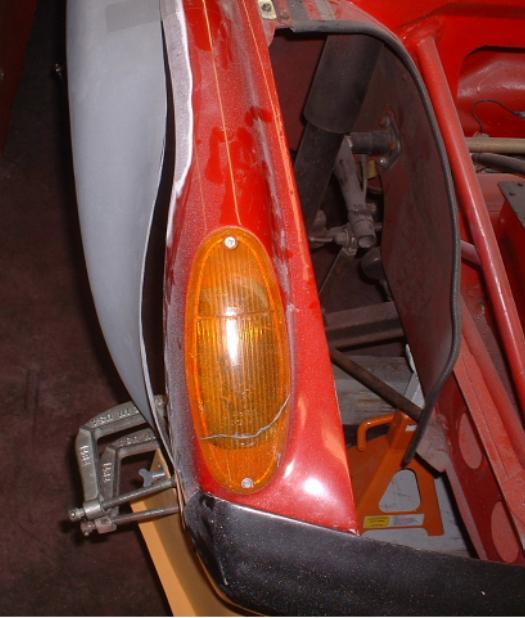
Posted by: watsonrx13 Jul 11 2004, 07:24 PM
Paul, you're an animal. 
Great seeing you and the car this weekend, keep up the good work.
Posted by: URY914 Jul 11 2004, 07:27 PM
A friggin' fiberglass animal.
I end up grinding off 75% of the glass I put on. 
PAul
Posted by: redshift Jul 11 2004, 09:29 PM
Alright! That looks like a great job!
I need to quit working for a month, and worki-oni-cari..
M
Posted by: URY914 Jul 14 2004, 08:41 PM
The left side got it first shot of raddle can primer.
More sanding to follow.
Attached image(s)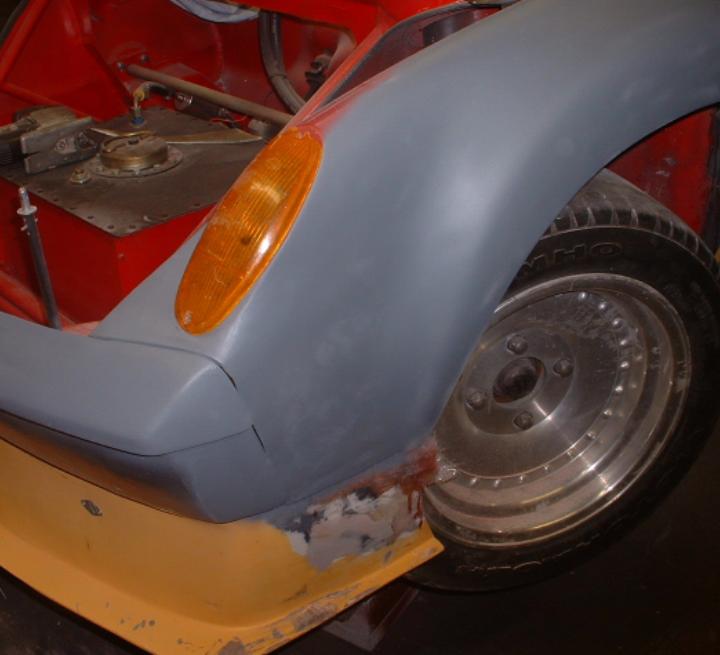
Posted by: URY914 Jul 14 2004, 08:48 PM
I glassed in a few spots to hold the right one on but I still have to deal with the big-ass gap at the front.
Attached thumbnail(s)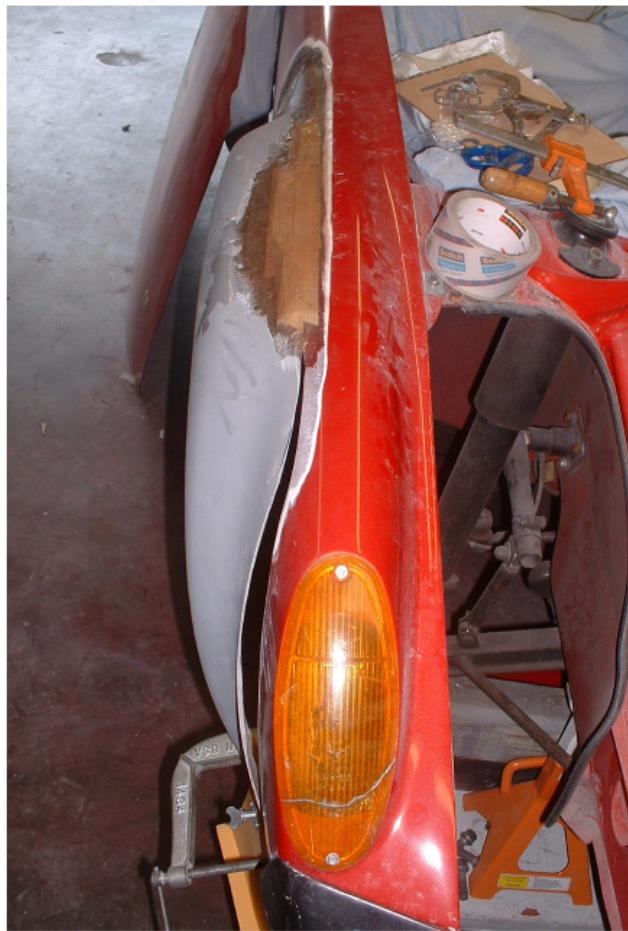
Posted by: URY914 Jul 14 2004, 08:50 PM
First I need to cut back the flare so I can reform the radius to where it meets the panel.
Attached thumbnail(s)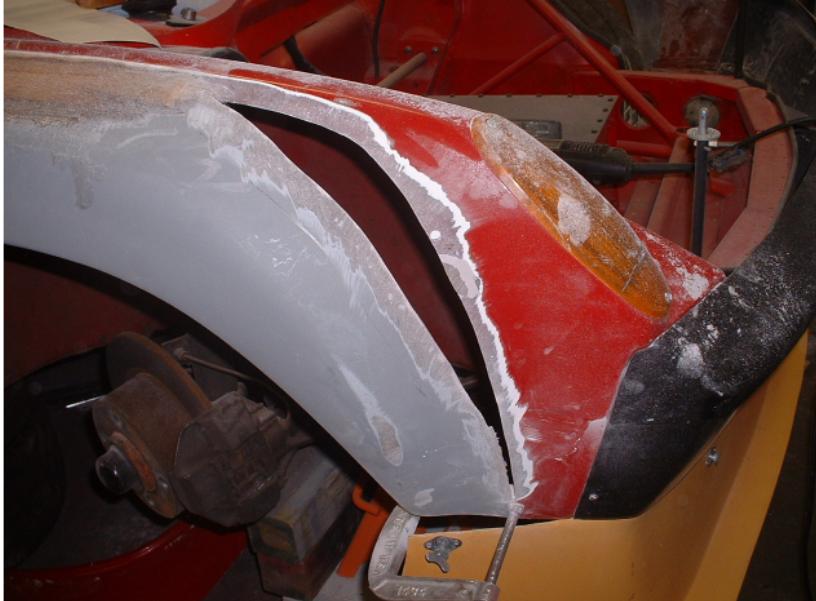
Posted by: URY914 Jul 14 2004, 08:55 PM
From the back side I taped in a piece of cardboard to hold the shape and act as a form.
Than lay up a bunch of glass. I want to add more than I need so I have enough to sand and shape it. I'll go inside remove the cardboard and sand it clean and lay in more glass mat.
Attached thumbnail(s)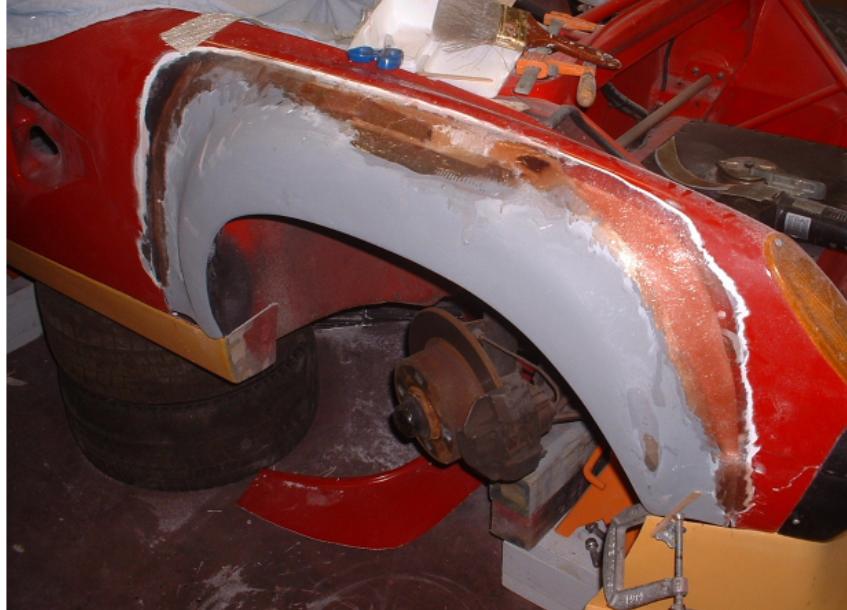
Posted by: Aaron Cox Jul 14 2004, 10:47 PM
youre insane!!!
Posted by: VegasRacer Jul 14 2004, 11:23 PM
AA might be able to build a 914 out of rust flakes.
I think you have them beat.
You can build one out of thin air.
Posted by: East coaster Jul 15 2004, 05:33 AM
Metal tape works fantastic as a backer for filling large voids like that. When it sets up just peel off the tape and it's even smooth on the back side. It's real easy to form and holds it shape well if you're careful on the first lay up. Looks good!
Posted by: maf914 Jul 15 2004, 10:55 AM
Any truth to the rumor that Gunar Racing is trying to contract you for fiberglass restoration and fabrication?
Good work, Paul!
Posted by: matrixops Jul 15 2004, 11:17 AM
I thought I had some experience with glassing from my days working on UAV's in the Marine Corps, but you have some great skill. Seeing all the work and the finished product is inspiring me to get my hands a little dusty.
Keep us up to date on the progress.
MatrixOps
Posted by: URY914 Jul 15 2004, 04:18 PM
I told Gunnar I only work on 914's. None of that 917, 908, 904, 910 crap for me
Thanks everyone, I 'll keep posting as I progress.
Paul
Posted by: campbellcj Jul 15 2004, 10:50 PM
So when can I bring my car by for a f/g 'makeover' ? Nice work Paul...please keep us posted...and PM me if you are potentially interested in building fenders or doors for my "914R" project
Posted by: URY914 Jul 16 2004, 06:26 PM
Tonight I took it off the jackstands (I love it when I say that) and rolled it out for a looksee. Needed to see how it all looks with it on the ground. The wheels (or rims for the under 30 guys) were installed with a 1/4" spacer to get them out a little more. As you can see, there's now a lot of tire showing.
Attached image(s)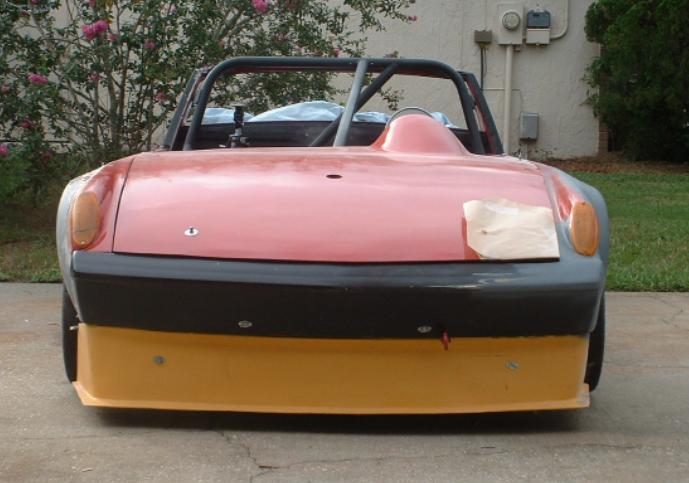
Posted by: URY914 Jul 16 2004, 06:27 PM
A little closer...
Attached image(s)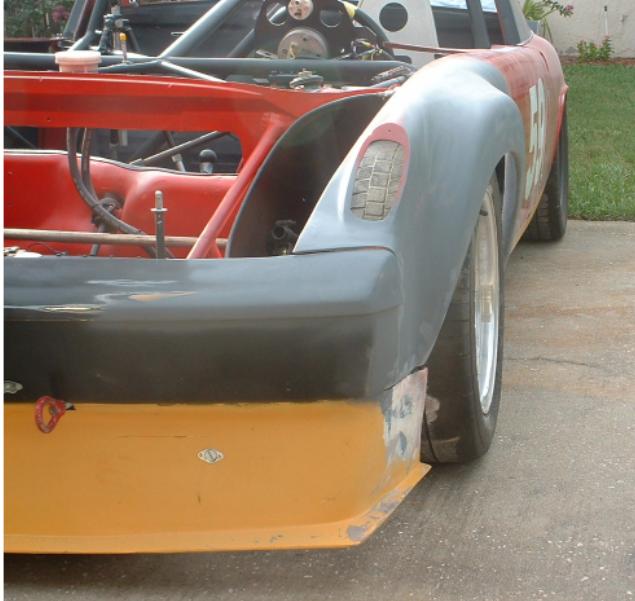
Posted by: URY914 Jul 16 2004, 06:28 PM
and the rough right side.
Attached image(s)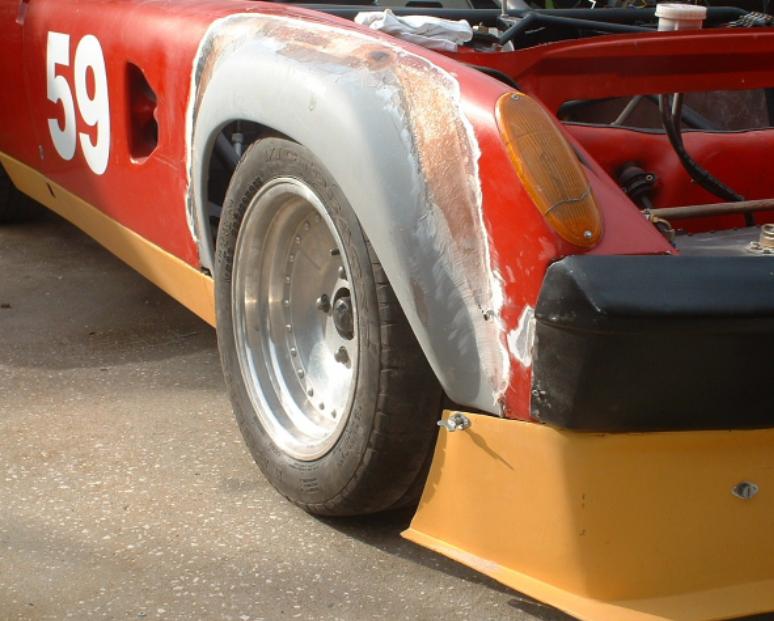
Posted by: URY914 Jul 16 2004, 06:29 PM
from the top
Attached image(s)
Posted by: URY914 Jul 16 2004, 06:31 PM
PROBLEM!!!
Tire hits the fender when I crank it over to the right.
Attached image(s)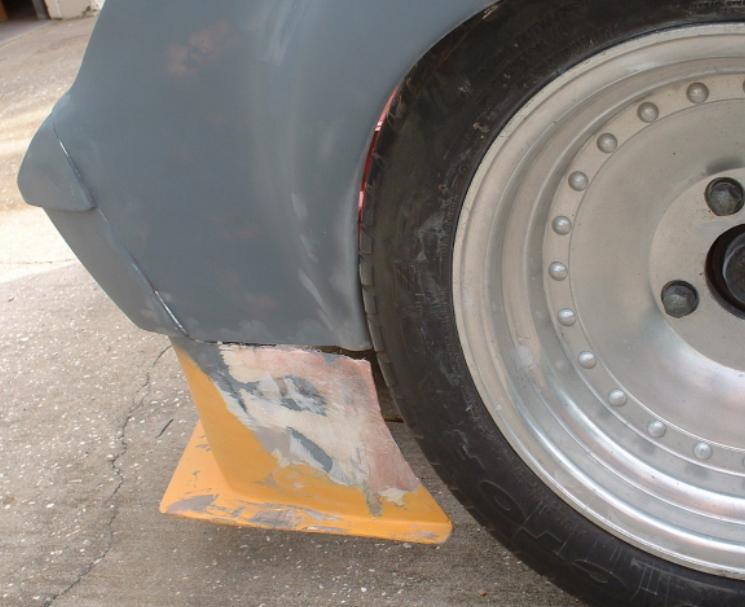
Posted by: URY914 Jul 16 2004, 06:32 PM
From the inside.
Nothing a 50 grit sanding disk won't take car of.
Attached image(s)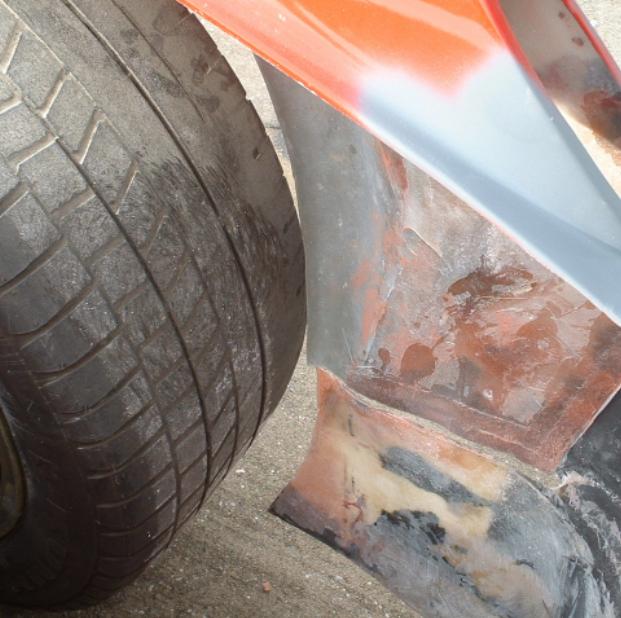
Posted by: URY914 Jul 16 2004, 06:33 PM
I like it a whole lot more with the flares.
Attached image(s)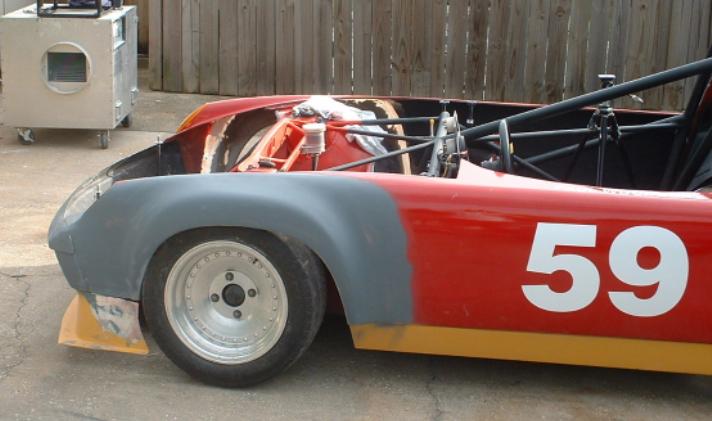
Posted by: URY914 Jul 16 2004, 06:34 PM
Looks meaner... 
Attached image(s)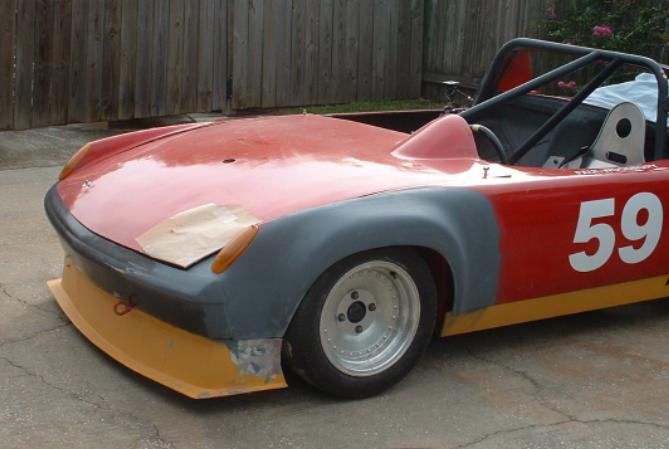
Posted by: URY914 Jul 16 2004, 06:39 PM
another angle.
This weekend I'll glass back in the left side inner fender panel. That keeps rocks from hitting me in the face. When you take the door post out, there is a big hole that is left so I had to make a panel to cover it.
Attached image(s)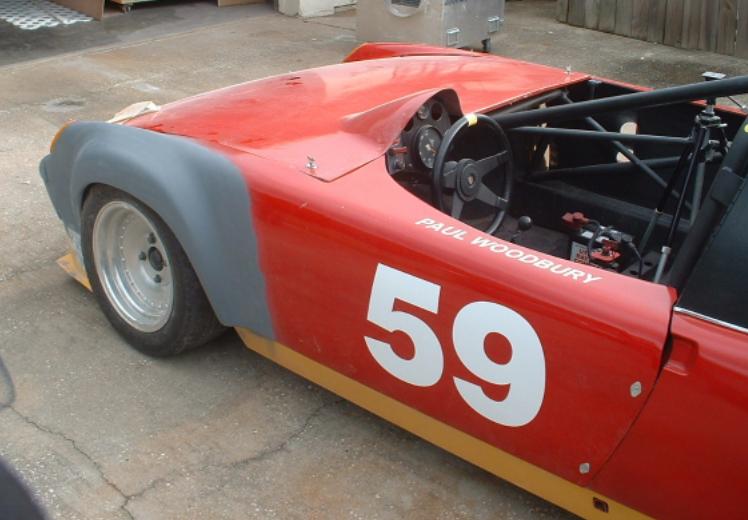
Posted by: URY914 Jul 16 2004, 06:43 PM
For you new guys, this what it looked like right after painting. My "narrow bodywork" look. This was for the top speed runs at Bonnieville.
Ain't it preeeety?
stay tuned,
Paul
Attached thumbnail(s)
Posted by: URY914 Jul 18 2004, 08:18 PM
I sanded down the inside and added back in some strips of glass mat. After sanded on the outside it was getting a little thin so I added this material to the inside.
Attached image(s)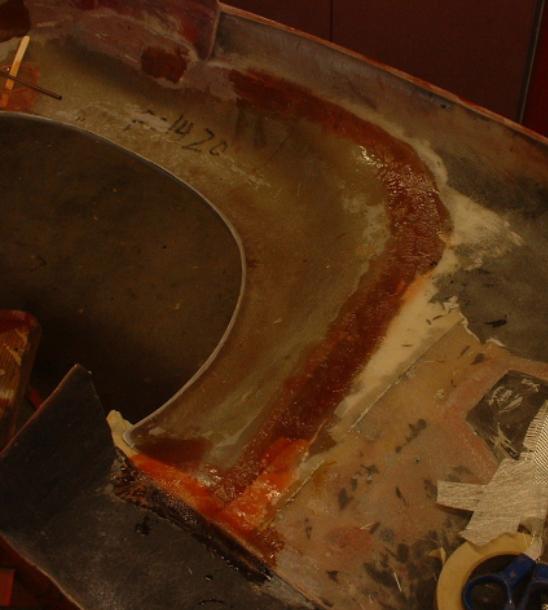
Posted by: URY914 Jul 18 2004, 08:18 PM
more of the same. The resin is sorta red before it sets up.
Attached image(s)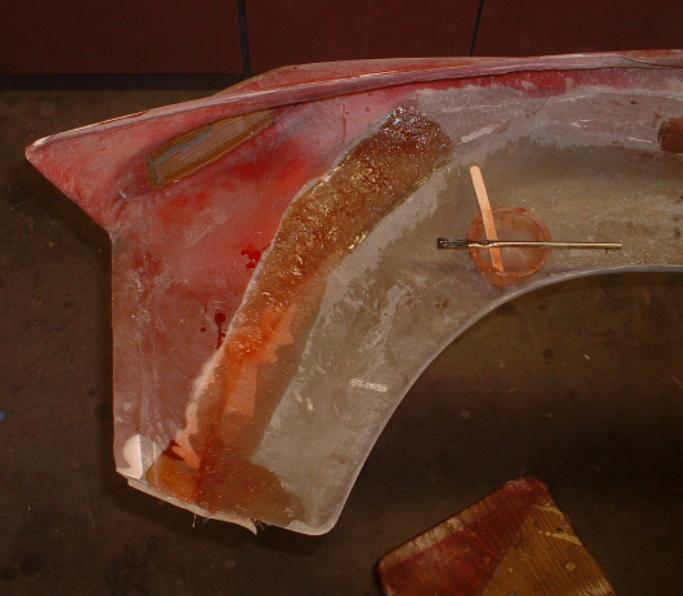
Posted by: URY914 Jul 18 2004, 08:20 PM
I had area that I needed to fill where the flare didn't meet the rocker panel. So I had to glass it in.
Attached image(s)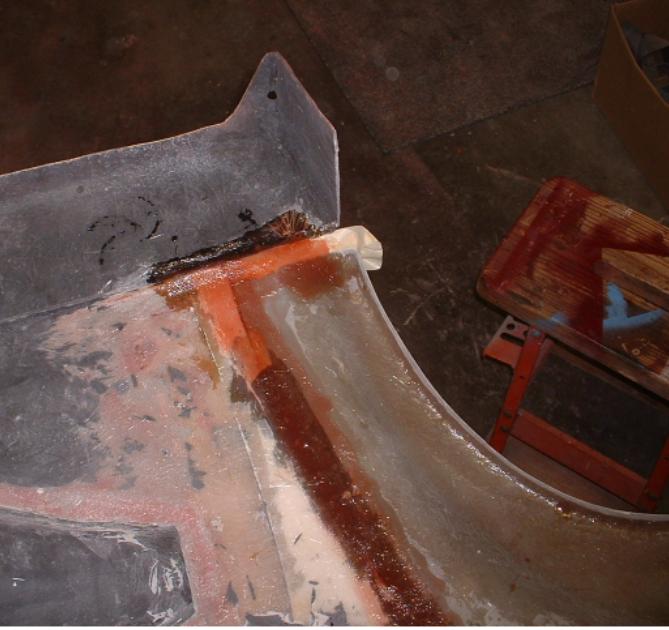
Posted by: URY914 Jul 18 2004, 08:26 PM
This is the outside after I removed the tape. I'll have to sand this whole area down to get it to make the transition between the door and the flare. Than I'll have to maintain the seam of the rocker panel to the door/fender. I'm not going to taper the rocker panel ends out to meet the flares. If it was a street car I'd do it. Once you see a car with flared rockers it adds a nice finishing touch and completes the look.
Attached image(s)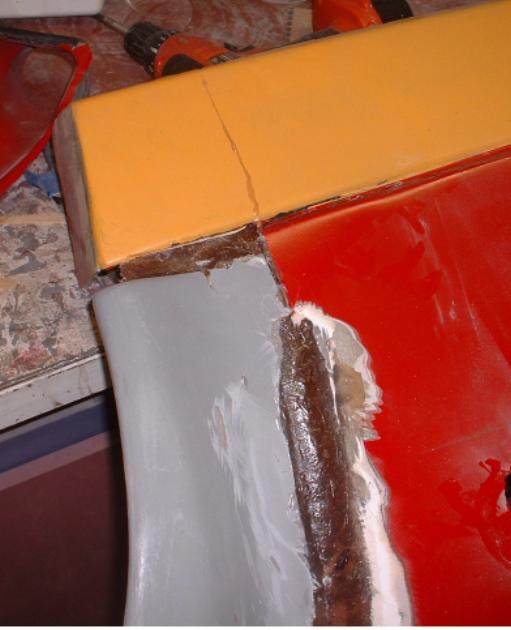
Posted by: redshift Jul 18 2004, 08:29 PM
Rockin' Paul! Looks like master grade work.. as you've had much practice.
Miles
Posted by: URY914 Jul 18 2004, 08:55 PM
Thanks Little Buddy!
Once you learn a few tricks its pretty easy. And besides, if you screw up you're just a sanding disc away from trying again.
Paul
Posted by: john rogers Jul 18 2004, 09:28 PM
Damm, looks really good. Now I remember why I riveted mine on..... Of course you know a car with flares is slightly slower than one without due to the added frontal area?
Posted by: redshift Jul 18 2004, 10:20 PM
It's faster, thanks to the 3rd law of relative pseudodynamics; looks.
M
Posted by: Root_Werks Jul 19 2004, 01:49 PM
Wow! You have some skill when it comes to glassing! I don't, well, I can glass, but cannot finish. I can get something down to the 90%, but that is not good enough to paint. I just turned my 914 into a shop last week to finish things up for me. I will post some pics of my GT glass flares. I used a 1/4" lap and bonded from both sides. It worked really great. The strength in the flares is amazing. Plus, it puts them out that much further although you have to feather out a little more with filler to make them look right. Oh well, what a little bondo between friends? ;^)
Here you can see the chop process.
Attached image(s)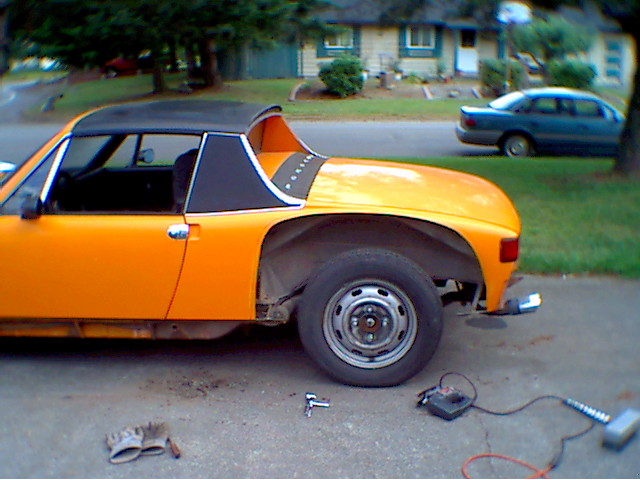
Posted by: Root_Werks Jul 19 2004, 01:51 PM
A few screws to pull things tight.....
Attached image(s)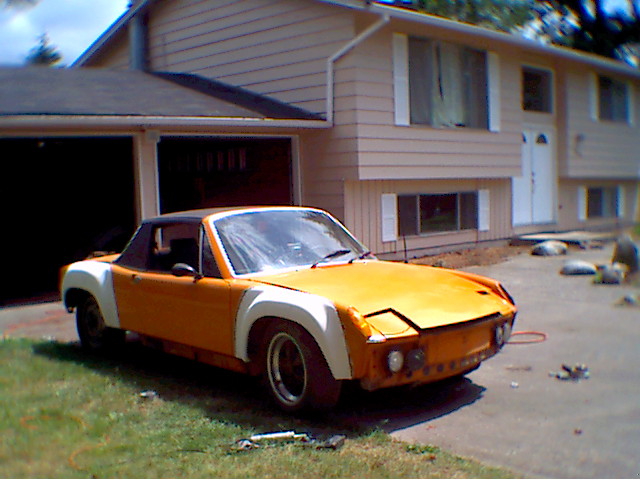
Posted by: Root_Werks Jul 19 2004, 01:54 PM
Thus begins the bonding process. Like I said before, I used glass on the inside and outside, you cannot feel a lip inside the fender, only a small bump. You can run your fingers right over it and the gel makes a smooth surface. It looks very seemless and clean on the inside. By this picture, I have bonded the flares, pulled the screws, sanded the glass, re-glassed and have put on the first layer of that fiberglass filler. That stuff is tuff.
Attached image(s)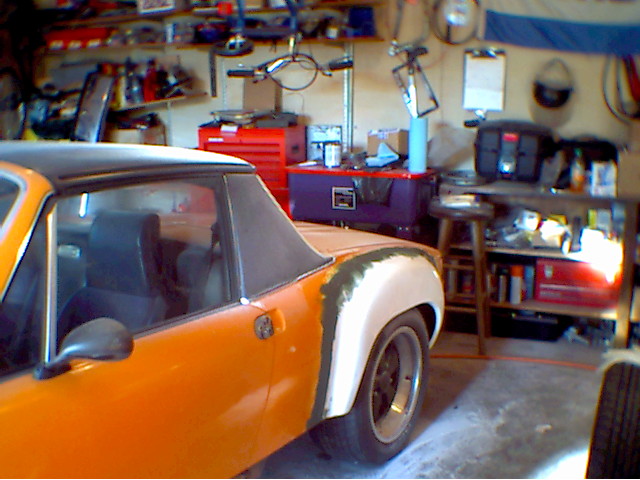
Posted by: Root_Werks Jul 19 2004, 01:58 PM
After that I moved to the regular filler and after that, the Ever Coat stuff because it is easy to work with. Here you can see things finally coming together. Oh, yes I did sand the paint off before applying the filler, but my eyes are too small I guess, because I always seem to go beyond what I sand paint off of. 
Attached image(s)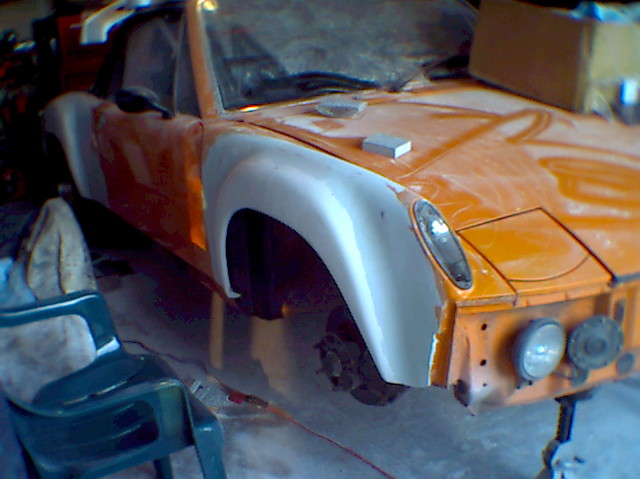
Posted by: Root_Werks Jul 19 2004, 02:00 PM
These last couple are from last week just before bringing the 914 into the paint shop. That is as good as I get. It is close, really close, just not good enough though.
Attached image(s)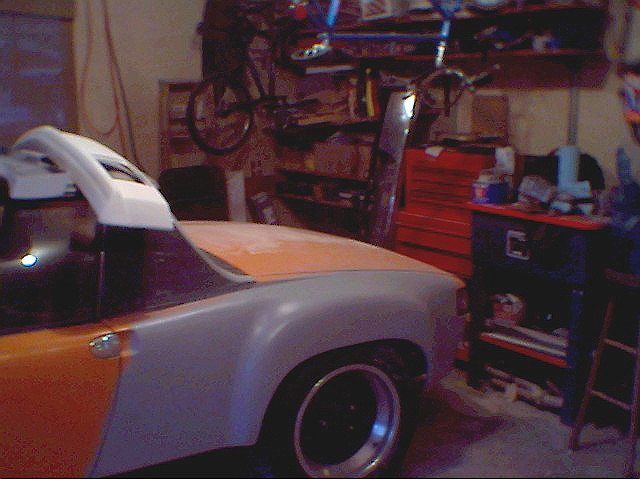
Posted by: Root_Werks Jul 19 2004, 02:03 PM
And one of the front flares. If I get the 914 back this week, I will post some pics right out of the shop.
-Dan Root (Root's German Werks)
Attached image(s)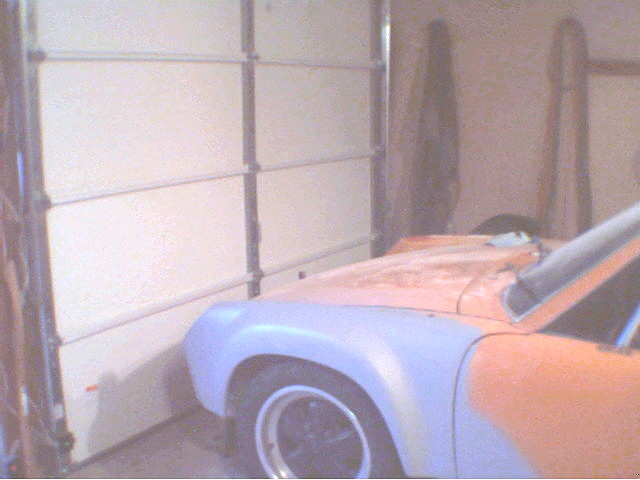
Posted by: URY914 Jul 19 2004, 04:40 PM
You know what they say about a project- the last 5% takes 50% of your time.
I was the same way with my project, just when I thought I was ready for paint, I spend three more weeks sanding.
Paint does not hide anything.
You did right by doing as much as you can yourself than letting someone else finish it.
Paul
Posted by: redshift Jul 19 2004, 04:45 PM
HAH!
You guys should try carving a spruce archtop, 98% of the work is done in 2% of the time... guess what you do for the other 98% of the time..
Yah, and you can't add wood.
Looks great doods!
M
Posted by: URY914 Jul 19 2004, 04:50 PM
Miles,
Can you carve one of those bears out of a tree stump with a chainsaw?
Now that is REAL art!
Paul
Posted by: TimT Jul 19 2004, 05:24 PM
Paul, you should make some dive planes that go from the top if the flare to the lip of the splitter... hides the wheels when they are straight ahead, and gives some downforce before turn in....
Posted by: URY914 Jul 19 2004, 05:43 PM
Tim,
I was looking at what to do there. But I kinda like the look of the tire showing from the front.
I'll keep kicking it around and come up with something.
Paul
Posted by: VegasRacer Jul 19 2004, 06:03 PM
Now that is REAL art!
LMFAO

Posted by: Root_Werks Jul 20 2004, 09:16 AM
You did right by doing as much as you can yourself than letting someone else finish it.
Paul
How true that is. The last car I painted (one of my worst paint jobs) was Camp's (Craig laughlin)914-6 he bought from me a few years back. To add insult to injury, it was a black car, so black paint. Eeeew, that didn't turn out pretty at all. I think he said he was going to strip it and re-paint it right away.
Posted by: URY914 Jul 22 2004, 07:45 PM
Back on page one, Sir Andy asked about the NACA duct that I had in the passenger door. I've decided to remove it and glass over the hole. Have a look.
Attached image(s)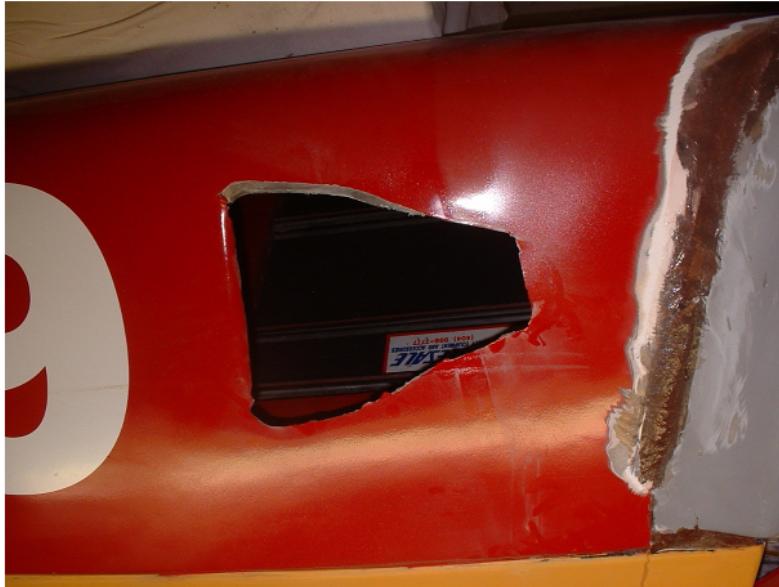
Posted by: URY914 Jul 22 2004, 07:52 PM
The problem was the ABS plastic would not bond to the f/g and it would crack at the joint. I also had a bunch on bondo and f/g built up to hold it in place and it just never worked out.
I cut it out in the above pic and in this one I've sanded down the edges so I can in-fill with glass.
Attached image(s)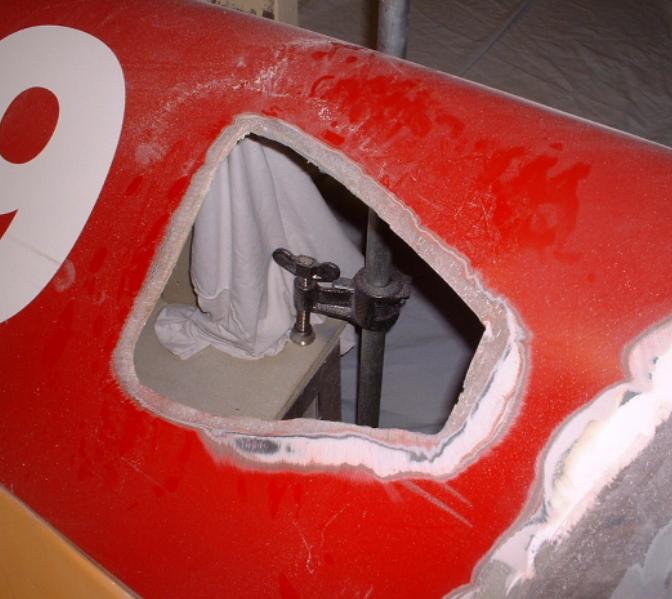
Posted by: URY914 Jul 22 2004, 07:56 PM
I was smart enough to save the original piece I cut out of the door to install the duct. In this shot I have it held in place with tape, paint stir sticks, popcicle sticks, and a cloth pin. I needed to have it held so the front exterior face would be as close as I could get it to the surrounding door surface. Looks like crap, but it worked.
Attached image(s)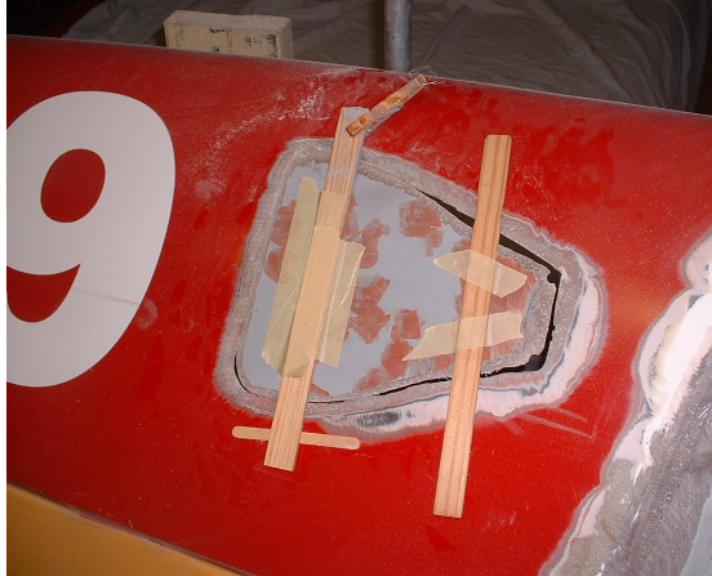
Posted by: URY914 Jul 22 2004, 07:58 PM
Then I layed on a ample amount of glass.
Looks like a bad case of road rash.
Attached image(s)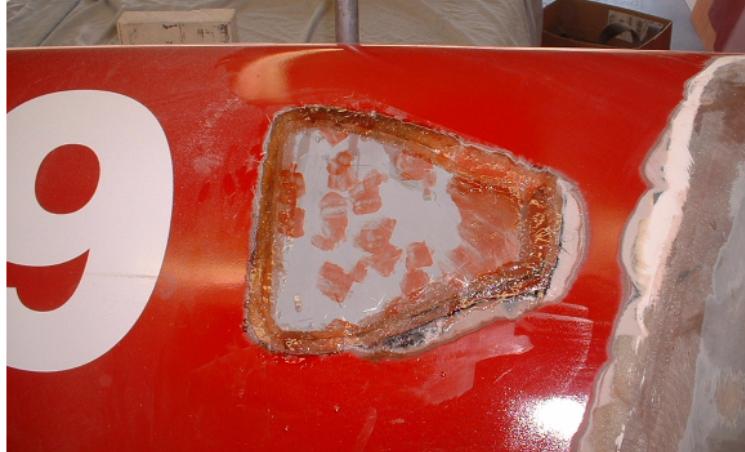
Posted by: URY914 Jul 22 2004, 08:03 PM
This was all done over the last three nights. Tonight I sanded it down and got through all that bondo down to the glass. The flare is also ready so I'll put on a thin layer of bondo and tie it into the flare and sand.
Attached image(s)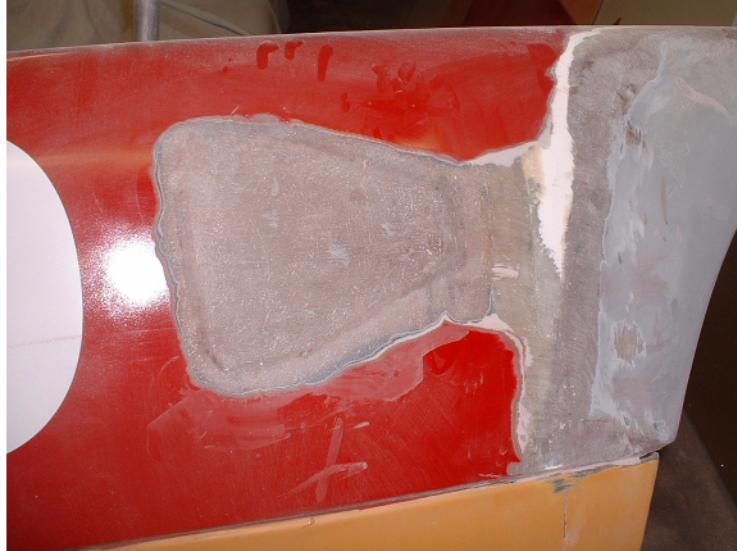
Posted by: URY914 Jul 22 2004, 08:05 PM
You can also see in the last shot how I was able to close up the gap at the rocker panel. Next I'll get on the inside and sand it down and clean it all up.
Posted by: Andyrew Jul 22 2004, 08:22 PM
Paul, I know that you just got done layin the glass... But You took the plastic dam out because it was cracking the paint.. Did you also take it out because you didnt need it? Because I think you could make a mold from the fiberglass and make your own dam out of fiberglass.... Then you wouldnt have to worry about cracks....
Anyways, thats some pretty nice fiberglass work you've got goin on.
Andrew
Posted by: URY914 Jul 22 2004, 08:47 PM
I could make a f/g mold form the plastic duct but it would be more work than it would be worth. I installed the duct when I was road racing and it did direct air to the engine. But was it enough to make a difference? Who knows. Now that I only autox, I don't see the need to make a f/g duct and stick it in the door.
I actually have two f/g NACA ducts that I could install but why make more work if it won't make me go faster?
Paul
Posted by: Andyrew Jul 22 2004, 10:31 PM
Thats why I asked if it made a diff..
No diff, no reason..
So, are you going with the FWD look in flared front fenders only?
hehe
Posted by: Root_Werks Jul 23 2004, 09:09 AM
Well here is a pic or two of the 914 back from the paint shop. Looks great, but you know how you go around the car and circle areas you want them to work on? Yeah, I didn't circle a few thinking my work would be good enough. Should have just circled those as well. You can see on the rear of both front fenders the bonding work. Ugh. The rest of the 914 turned out awsome. It is not a show are by any means, so you can find a mistake here and there. Only the front fenders bug me. I will re-paint the car(fenders) next spring. My wife and I want to use it the rest of this summer for PCA events. So for now, it is good enough. I bet every other person will point out my front fenders for me though. <_<
Attached image(s)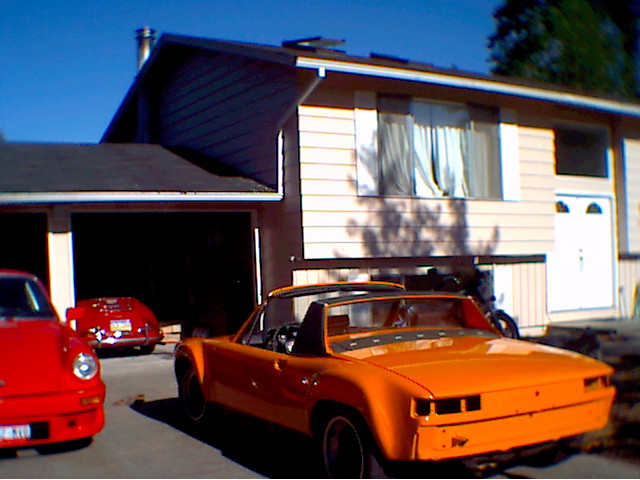
Posted by: Root_Werks Jul 23 2004, 09:14 AM
One more from the front, sorry for the sun in the eyes thing. My $25 digital camera doesn't do so well.
Attached image(s)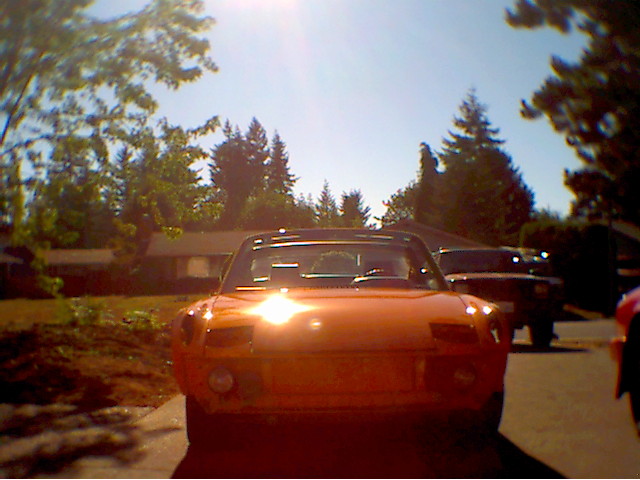
Posted by: URY914 Jul 23 2004, 12:15 PM
Andy,
The rear fenders will be much more work, stay tuned.
Root_Werks,
Looks great. I really like the color. Post the pic is a seperate thread so very one can see it.
Paul
Posted by: Root_Werks Jul 23 2004, 01:53 PM
Looks great. I really like the color. Post the pic is a seperate thread so very one can see it.
Paul
Thanks!
L20E or Signal Orange is my favorite color!Keep posting pictures of your 914 Paul. I like reading the progress and watching how it should be done. Looks great so far. Isn't it amazing how different a 914 looks with these flares? I love 'em!
Posted by: URY914 Jul 24 2004, 09:25 PM
Todays work.
Sanding-bondo-sanding-bondo-sanding-glaze
Attached image(s)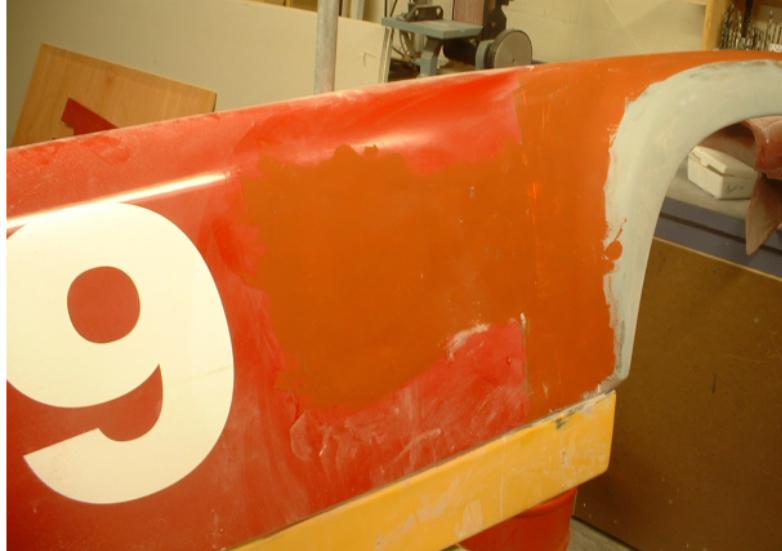
Posted by: URY914 Jul 24 2004, 09:25 PM
front...
Attached thumbnail(s)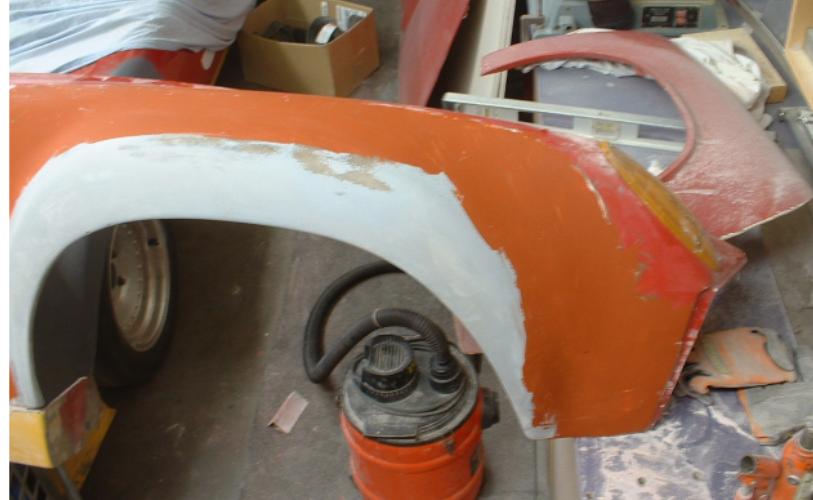
Posted by: URY914 Aug 7 2004, 07:36 PM
OK, my internet connection has been fixed.
I'm back in the saddle.
Now where were we.
Oh yea, front right.
Here it is after sanding primer.
Attached image(s)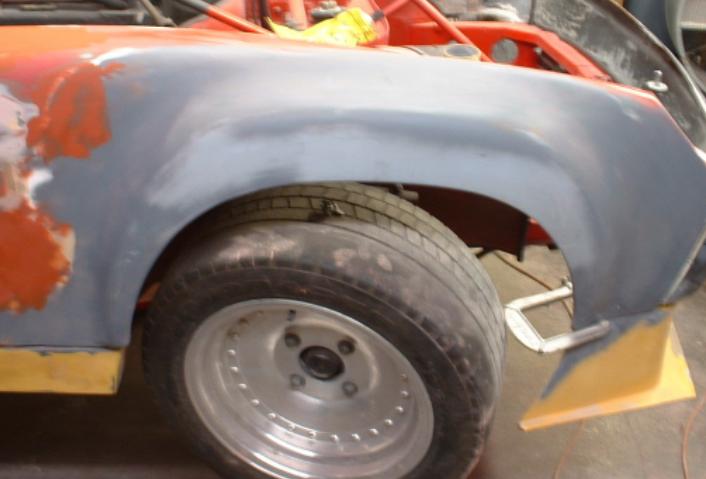
Posted by: URY914 Aug 7 2004, 07:42 PM
After a test fit with the hood I found I had a 1/4" gap tween the hood and the front of fender.
Attached image(s)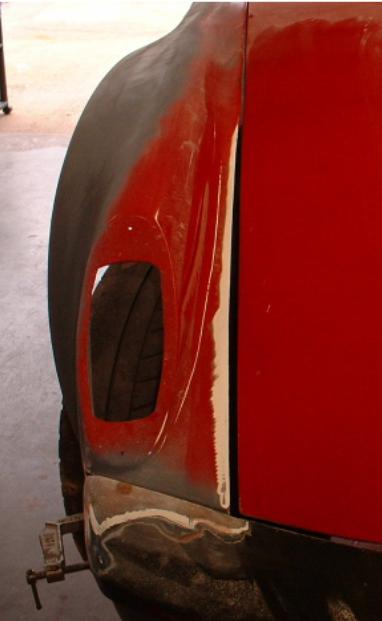
Posted by: URY914 Aug 7 2004, 07:44 PM
So I need to fill this in.
I start by grinding/sanding the edge of the fender back to expose the f/g.
I've added tape to hold the f/g cloth in place.
Attached image(s)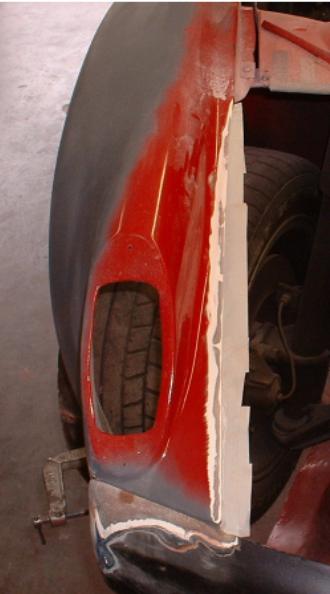
Posted by: URY914 Aug 7 2004, 07:46 PM
This shows the f/g that I've added. I've added about 1/2" which I'll have to cut back down to fit.
Attached image(s)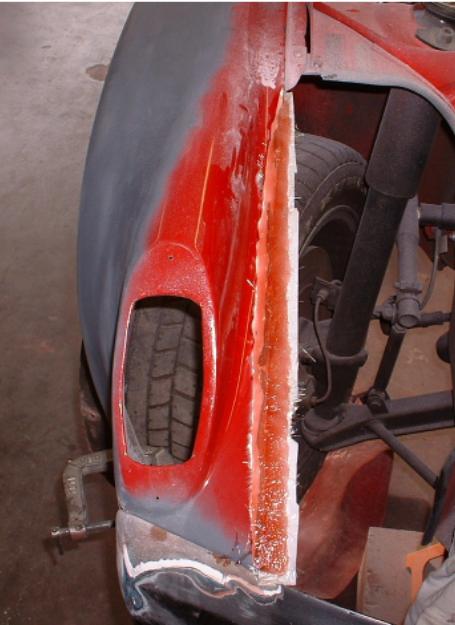
Posted by: URY914 Aug 7 2004, 08:03 PM
After some sanding...
Attached image(s)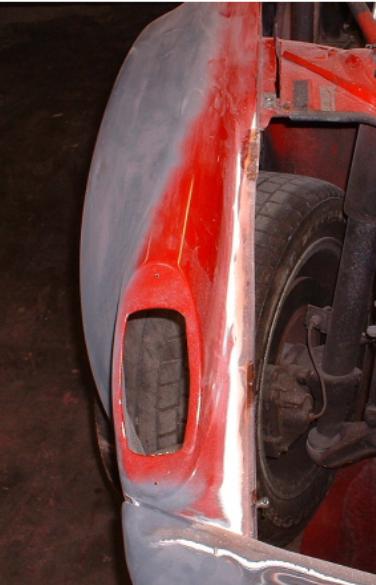
Posted by: URY914 Aug 7 2004, 08:03 PM
I have to do a little work at the top but it is almost there.
Attached image(s)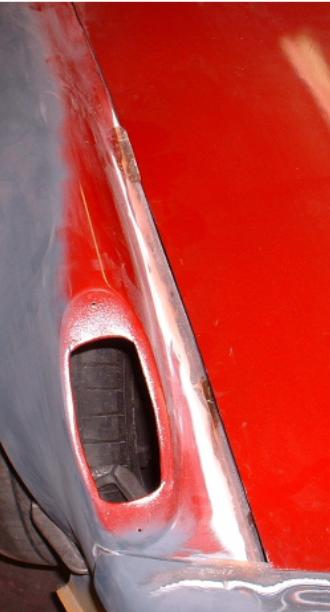
Posted by: URY914 Aug 7 2004, 08:10 PM
Next I'll will be mounting a dzus spring plate to the lower edge of the fender. This will hold the end plate of the spoiler to the fender.
The spring plate is a piece of 1/16" stamped sheet metal. I could pop rivet it to the fender but that won't work for long. The rivets work loose and the plate falls off.
So I pop riveted the plate to a larger piece of alumumin and will glass it to the fender.
This is the inside of the fender.
Attached image(s)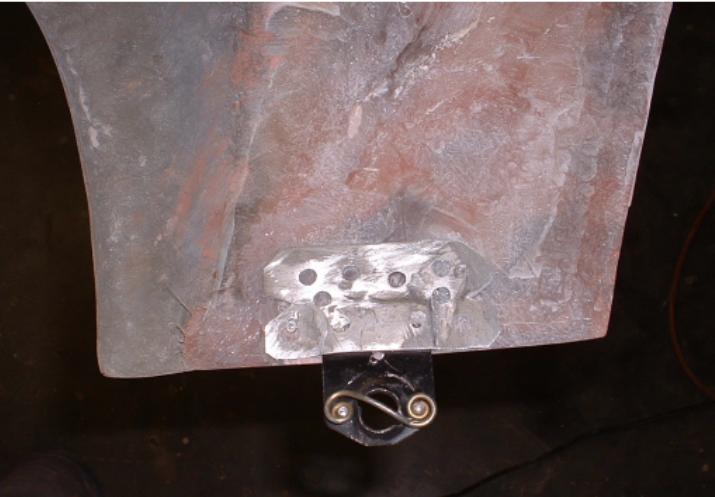
Posted by: URY914 Aug 7 2004, 08:11 PM
Held on with a clamp during set up.
Attached image(s)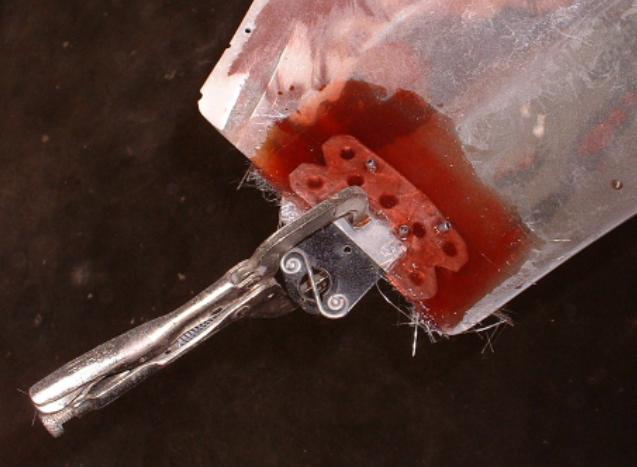
Posted by: URY914 Aug 7 2004, 08:14 PM
I'll sand it down to clean it up. I drilled some 1/4" holes it it so the resin would get in to the fender and I also cut the notches in the edges. If you don't and the resin doesn't stick to the aluminum, the piece will work loose.
Attached image(s)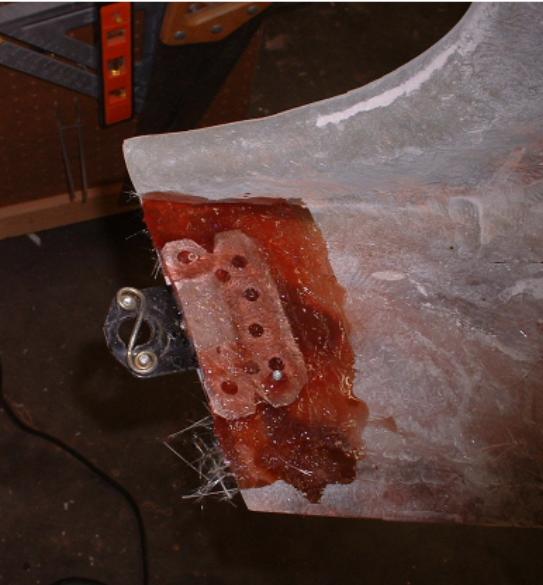
Posted by: URY914 Aug 7 2004, 08:15 PM
Done.
After painting I'll pop it to the end plate. I don't like painting them as the paint chips off.
Attached image(s)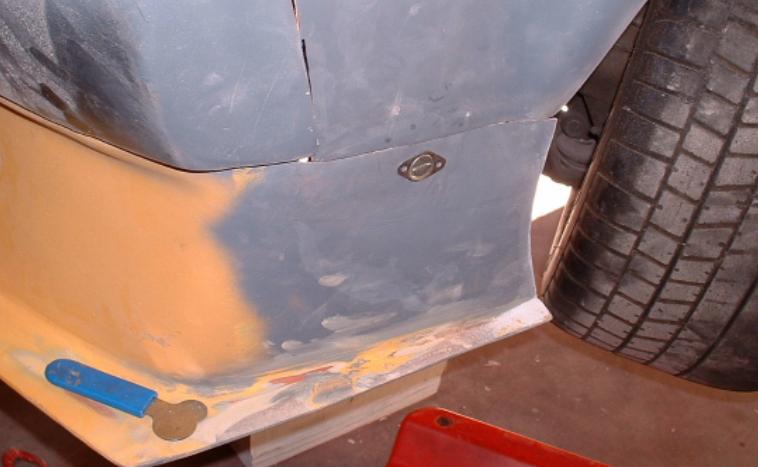
Posted by: URY914 Aug 7 2004, 08:29 PM
When I cut the windshield off and cut out the door posts there is a big gap left. This needs to be filled or your lap get filled with sand.
On left side I had the "inner fender" mounted to the fender/door combo. But the new flares I decided to cut it off, widen it and mount to the car
This shows the inner fender tek screwed to the sheet metal of the car. I than installed the fender/door and taped popcycle sticks every few inches which butted up to the inside of the fender. Than I used metal tape to act as my backer for the f/g cloth. I removed the fender/door and I than have my mold. The ends of the sticks follow the inside line of the fender.
Attached image(s)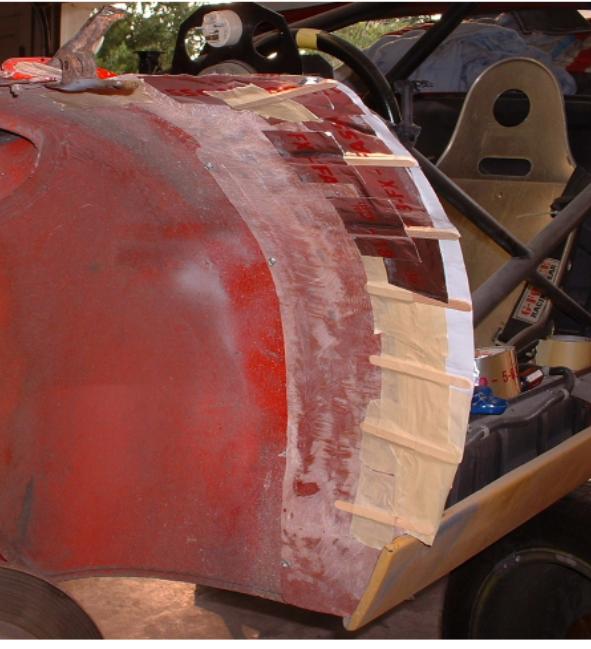
Posted by: URY914 Aug 7 2004, 08:30 PM
From the other side.
Attached image(s)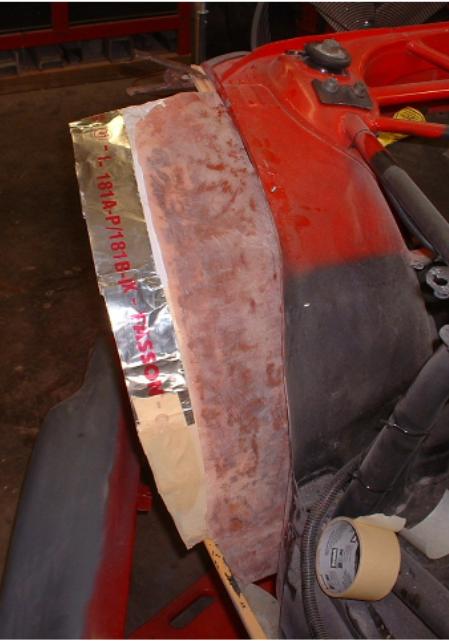
Posted by: URY914 Aug 7 2004, 08:38 PM
This taken from the inside. It show the fit of the new piece to the inside of the fender.
Attached image(s)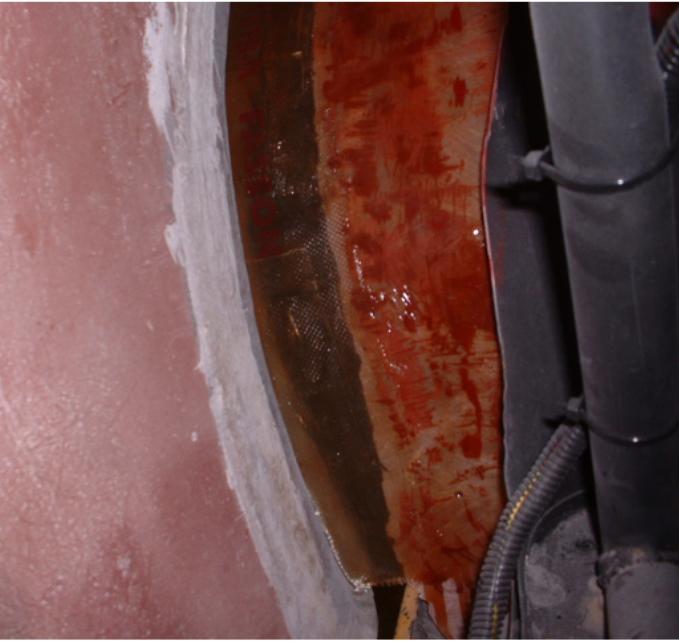
Posted by: URY914 Aug 7 2004, 08:40 PM
This may be a better shot.
From the right looking from the inside, the grey is the edge of the fender, the dark area is new f/g, the light area is the sanded f/g and the red is the metal of the car fender.
Attached image(s)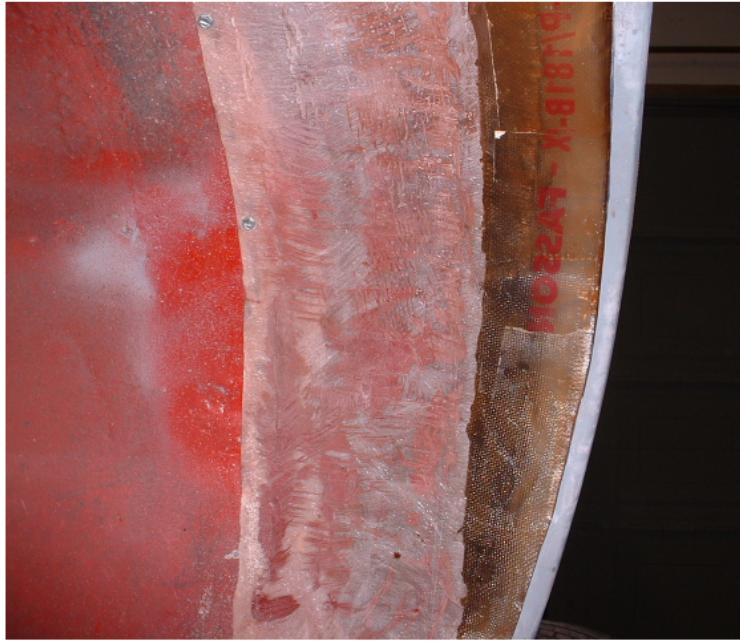
Posted by: watsonrx13 Aug 7 2004, 08:49 PM
Paul, I'll repeat myself again, you are a F/G ANIMAL
Great job.
Posted by: Andyrew Aug 7 2004, 09:48 PM
looks like a pro!! I need to do fiberglass work next week... Hope it turns out anything like that...
Good luck man!!
Andrew
Posted by: URY914 Aug 19 2004, 06:42 PM
I've busy block sanding, but I've almost got the front end done. I had to do more work to the bumper/spoiler than I thought. Here is the latest...
Attached image(s)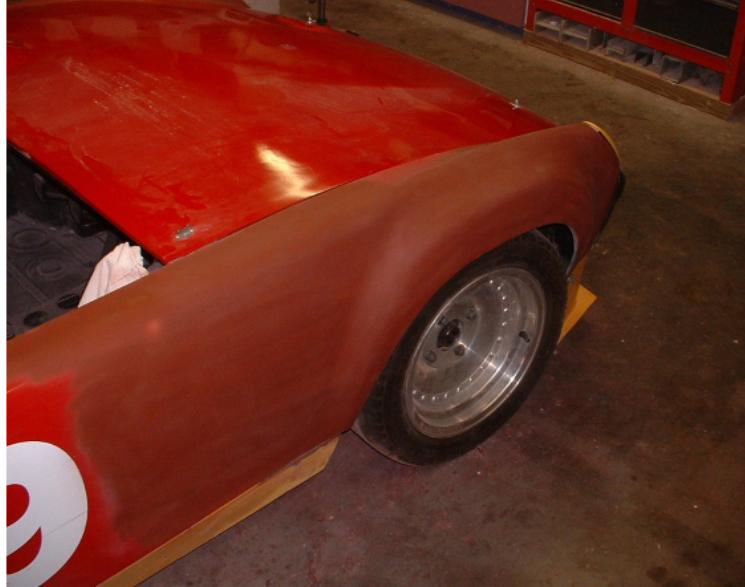
Posted by: URY914 Aug 19 2004, 06:43 PM
The NACA has been filled.
Go ahead and ask me about that turn signal lense.
Paul
Attached image(s)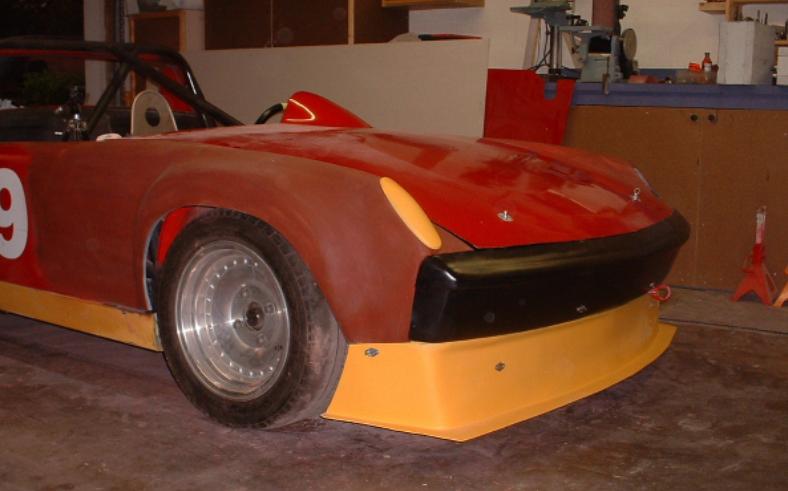
Posted by: URY914 Aug 19 2004, 06:47 PM
www
Attached thumbnail(s)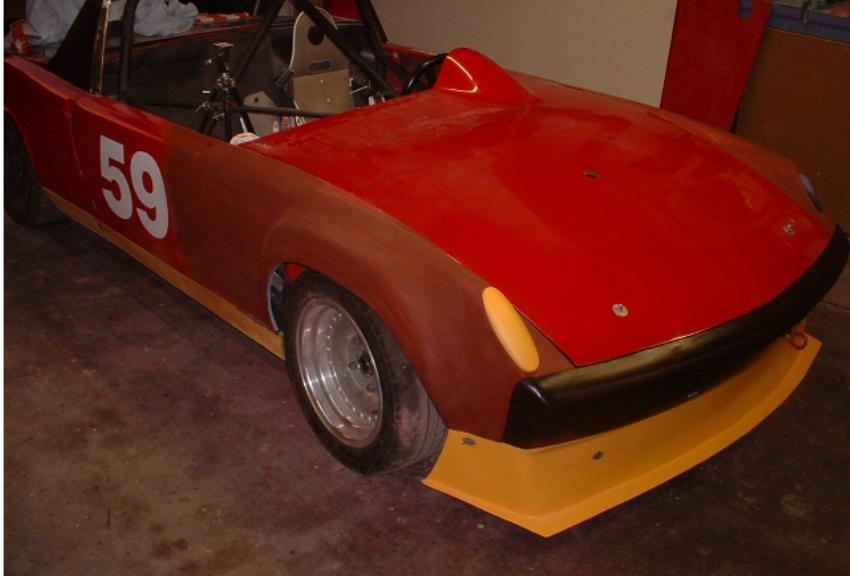
Posted by: TimT Aug 19 2004, 06:48 PM
what about the turn signal lense?
Impressive work as always Paul 
Posted by: spare time toys Aug 19 2004, 06:52 PM
Impressive work as always Paul
Yes please do tell

Posted by: URY914 Aug 19 2004, 07:00 PM
Thought you'd NEVER ask.
I had one that was cracked and I JB Weld'd it back together, but I dropped and and it broke like glass.
So....
I made a mold and made an knock-off.
Attached thumbnail(s)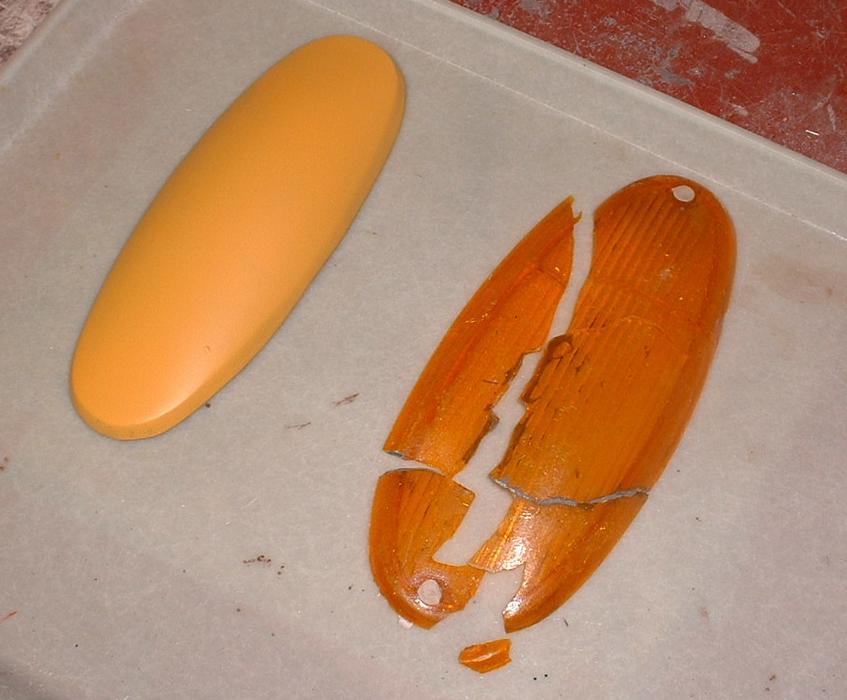
Posted by: URY914 Aug 19 2004, 07:06 PM
Anybody want some???
Here is the mold.
Attached image(s)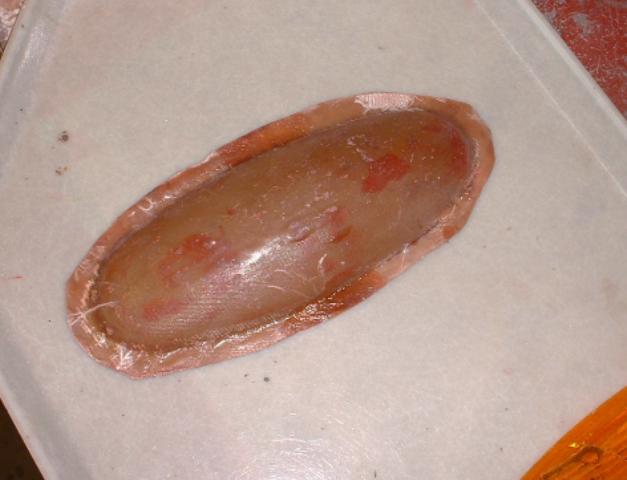
Posted by: spare time toys Aug 19 2004, 07:30 PM
Here is the mold.
Sure I need 2.
 Been tryn to figure out what to do with the holes in the front fenders. How much? If i send you some carbon fiber ya want to try doing the outside layer in that? Then I could clear coat it and have the ricer look I would like to get 2 though if you make extras and I can get carbon fiber if you want.
Posted by: URY914 Aug 19 2004, 07:36 PM
I've created a monster!
CF may be a little tough because the mold isn't perfect.
I'm sticking with FG for now.
I've only made the one so let me spit out a few more before I start going into mass production.
I guess I'll need to find a factory in China or India to help me out.
Paul
Posted by: carr914 Aug 19 2004, 07:58 PM
Paul, how do the lenses attach? When can I come pick them up?
T.C.
Posted by: URY914 Aug 20 2004, 05:37 AM
T.C.,
I just popped it out of the mold three days ago. I need to work out the details. But I'm thinking you'd use the original hardware and be able to mount them like the stock ones. That way a you could change them out for a DE real easy.
Paul
Posted by: URY914 Aug 22 2004, 07:01 PM
OK boys and girls,
Lets more to the back of the car and start the process on the rear flares. Now don't fall asleep, this will take awhile.
The rear end is a little different from the front because the rear fenders are still steel. Therefore the plan is to 'glass the flares to the steel, make a mold of the entire quarterpanel including the targa bar/sail section. Than make a new complete f/g q-panel. No problem! Should be done around this time next year.
Here is a real pretty q-panel that has had the lip rolled under. I have about 1/8" between the fender and my tire.
Attached thumbnail(s)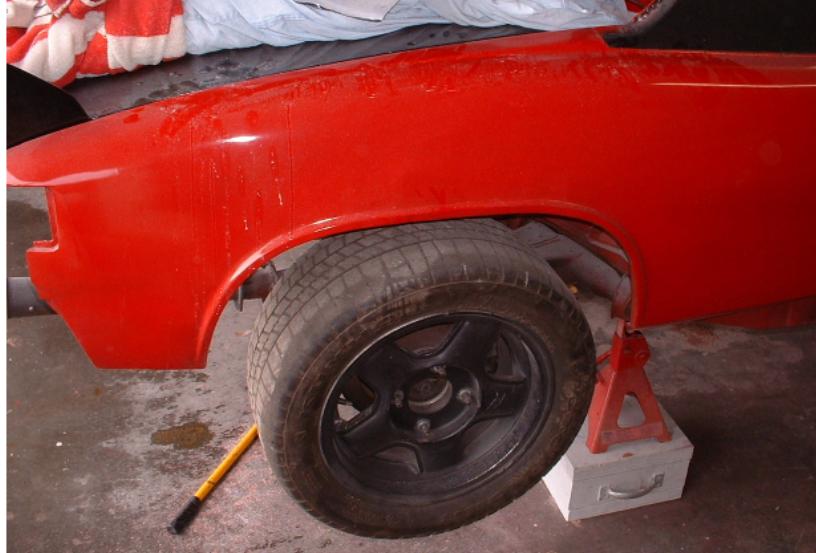
Posted by: URY914 Aug 22 2004, 07:03 PM
Strange looking pattern on the paint in the above pic. Must be the light picking up the dust on the car.
Next I mock up the flare. Not a great fit but now big deal.
Attached image(s)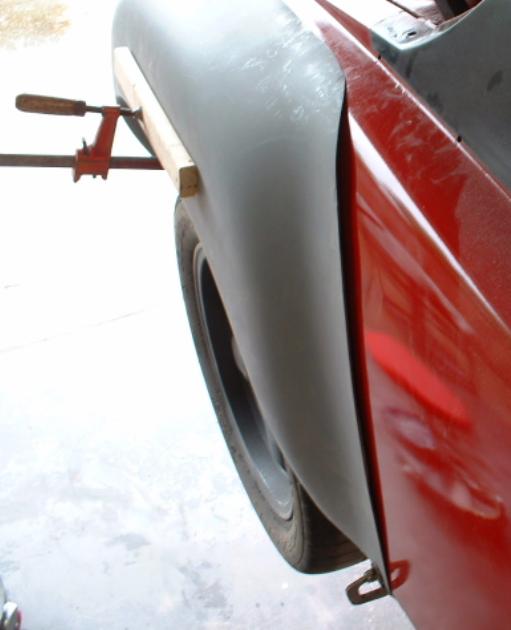
Posted by: URY914 Aug 22 2004, 07:05 PM
rear view
Attached image(s)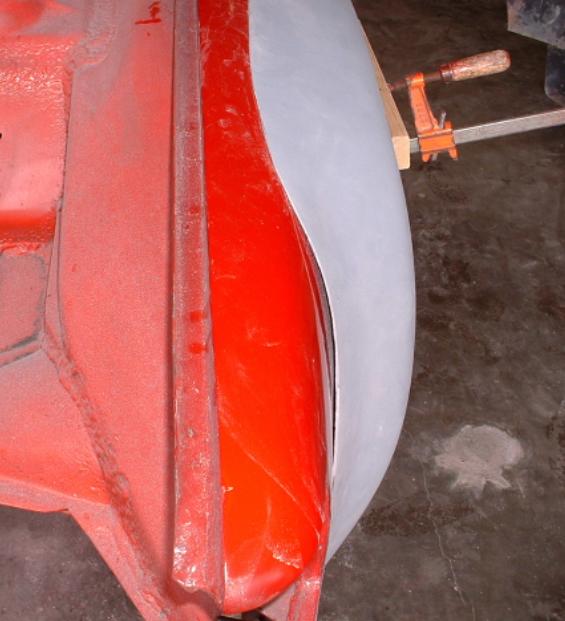
Posted by: URY914 Aug 22 2004, 07:08 PM
State of the art clamping method...
Take a Sharpie and draw a line.
Attached image(s)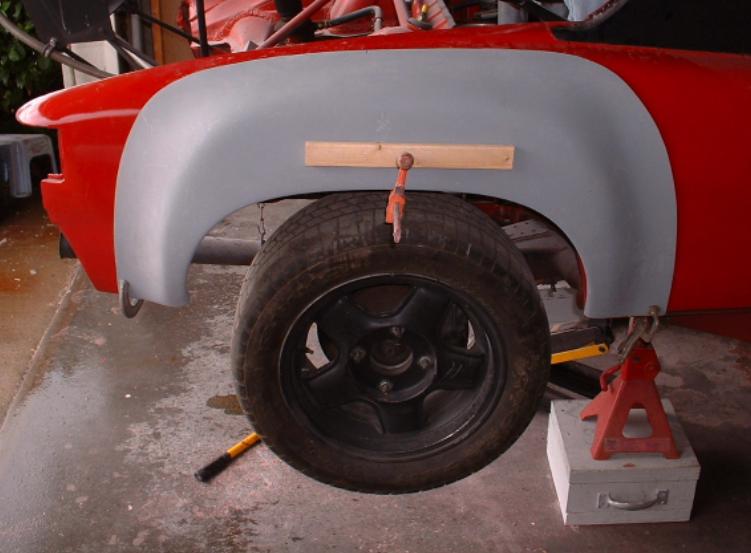
Posted by: URY914 Aug 22 2004, 07:10 PM
Now install a new bi-metal blade. put on my gloves and glasses and .....
Two pounds of sheet metal hits the floor.
(love that sound)
Attached image(s)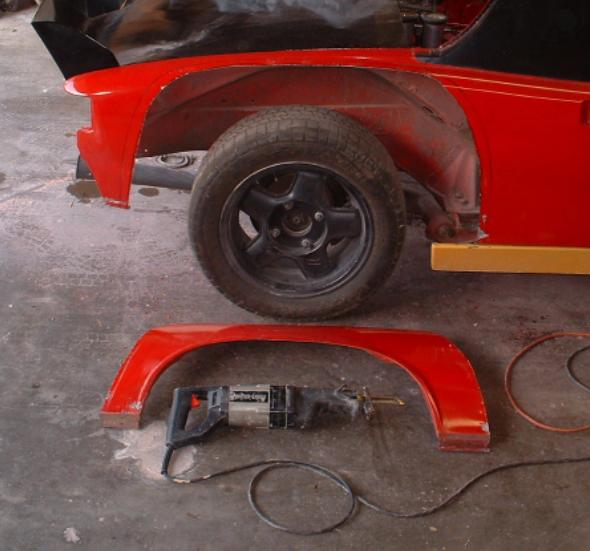
Posted by: URY914 Aug 22 2004, 07:12 PM
is by Porter Cable
Blade by Dewalt
Attached image(s)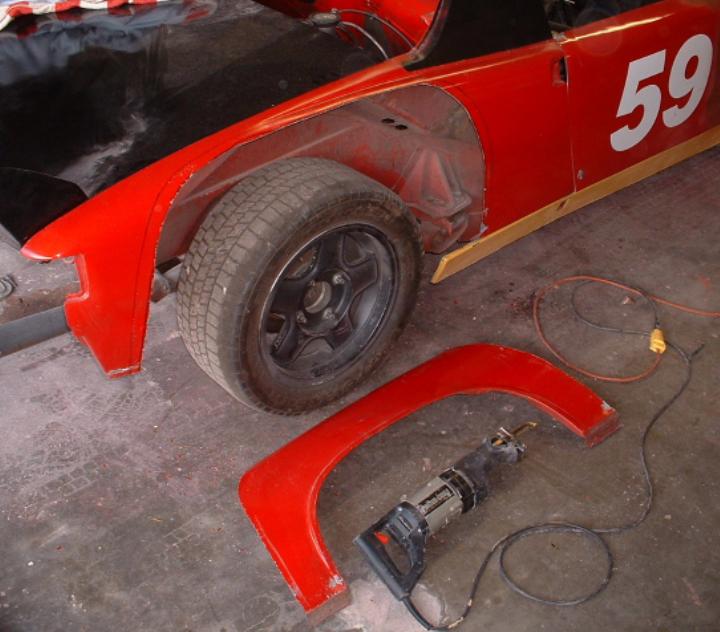
Posted by: URY914 Aug 22 2004, 07:13 PM
Mock up again.
Attached image(s)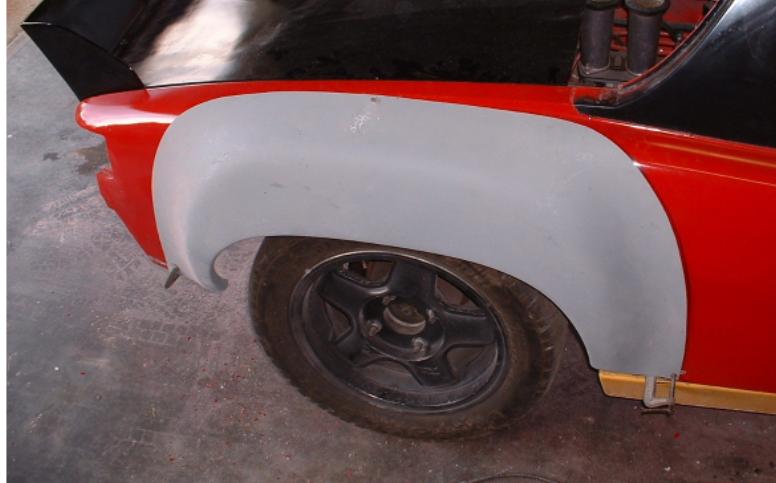
Posted by: URY914 Aug 22 2004, 07:15 PM
Better fit now. I sanded the glass thinner so it will conform to the shape of the car.
Attached image(s)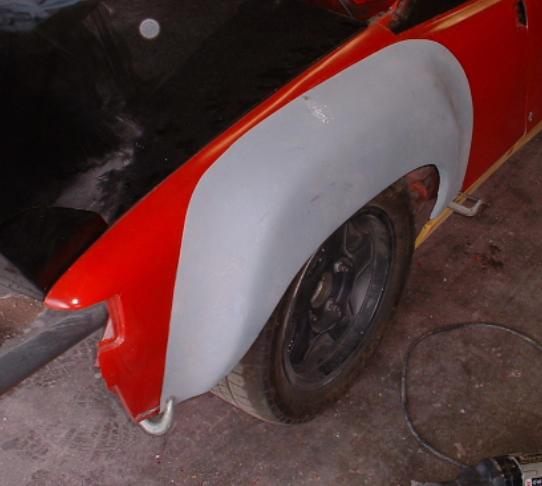
Posted by: URY914 Aug 22 2004, 07:15 PM
front with out the 3/16" gap
Attached image(s)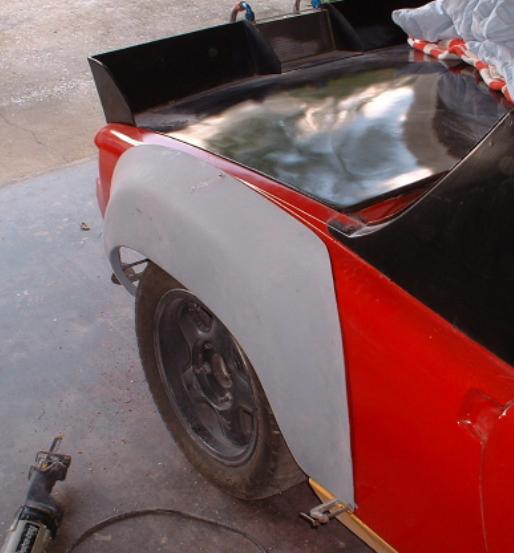
Posted by: URY914 Aug 22 2004, 07:22 PM
Next I'll use some sheet metal screws to hold it in place and I'll start grinding/sanding it expose the metal. This will allow for a solid bond of the glass.
I could have made a mold of only the sheetmetal that was not cut out. Than I would 'glass the flare to it. But this way I will have a entire q-panel mold when I'm done.
Stay tuned, boys and girls
Your friend,
Paul
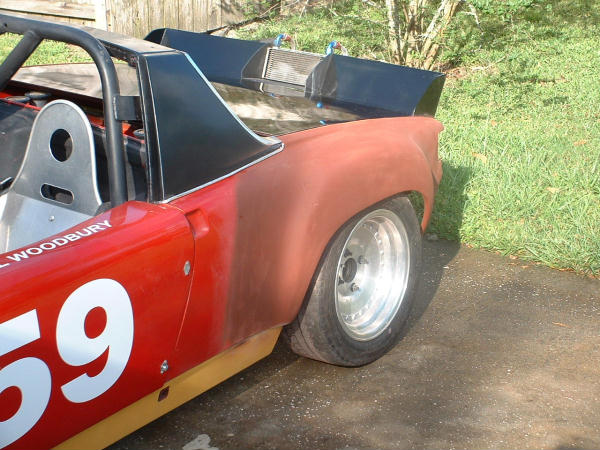
Posted by: URY914 Sep 25 2004, 07:47 PM
Ok, its been about a month, four hurricanes and a screwed up 'puter. But I didn't stop working in the garage. I glassed the flare to the metal. (I guess I didn't take any pics of the fender before I installed the flare, sorry) This is the first ROUGH layer of bondo. 90% of this gets sanded off.
Attached image(s)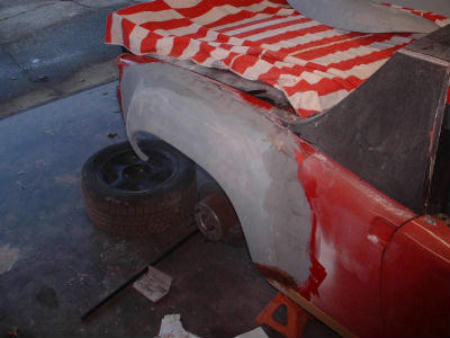
Posted by: URY914 Sep 25 2004, 07:48 PM
rear view
Attached image(s)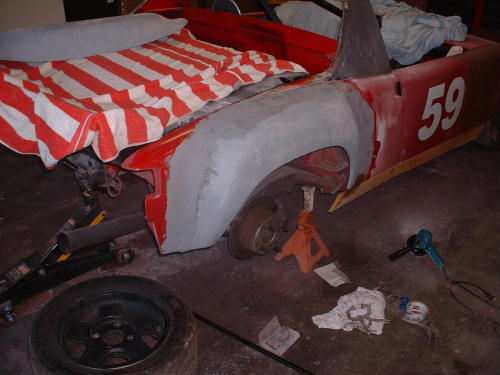
Posted by: URY914 Sep 25 2004, 07:49 PM
glaze or crack filler in red
Attached image(s)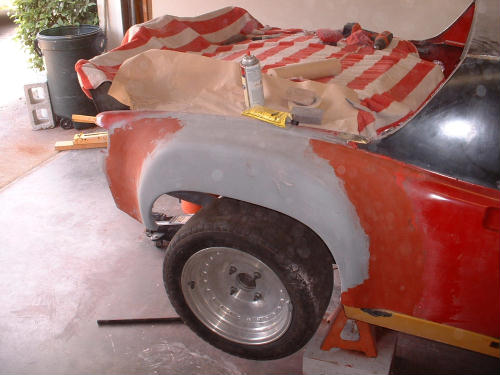
Posted by: synthesisdv Sep 25 2004, 07:50 PM
Nice
I have fender envy...
Posted by: URY914 Sep 25 2004, 07:50 PM
Primed and in the sun
Attached image(s)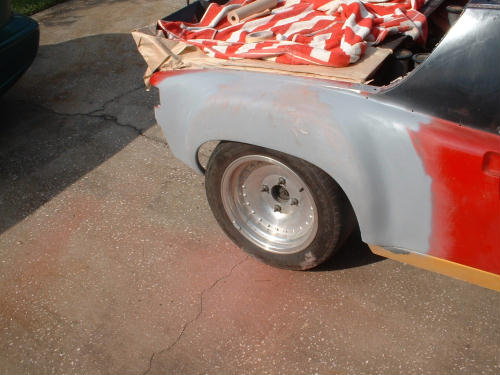
Posted by: URY914 Sep 25 2004, 07:51 PM
Nice FAT rubber. 225/50's
Attached image(s)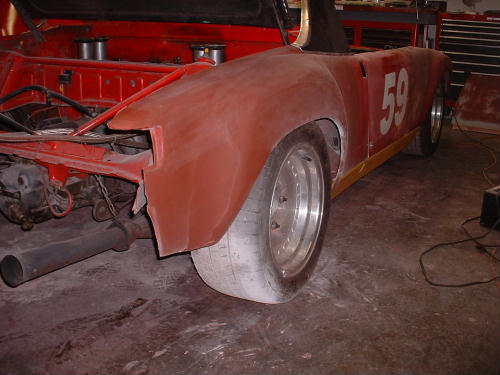
Posted by: URY914 Sep 25 2004, 07:53 PM
I've got 1/2" spacers on the rear and about 1/4" between the fender and the tire.
Attached image(s)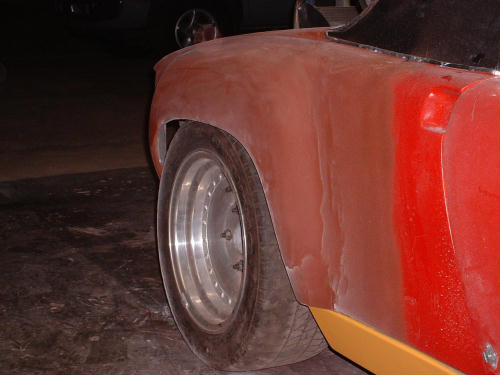
Posted by: URY914 Sep 25 2004, 07:53 PM
from the top
Attached image(s)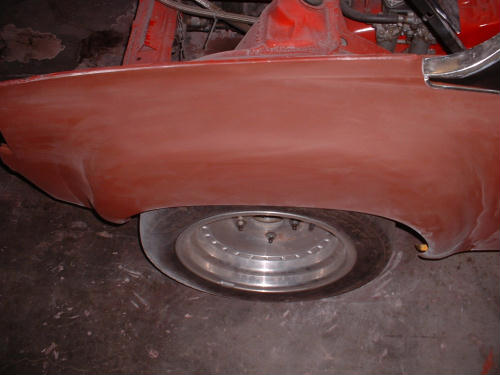
Posted by: URY914 Sep 25 2004, 07:54 PM
Today.
Attached image(s)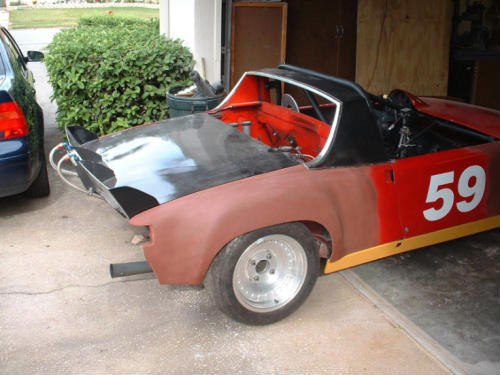
Posted by: URY914 Sep 25 2004, 08:02 PM
Let do the left side, shall we...
Mark out the cut line.
Attached image(s)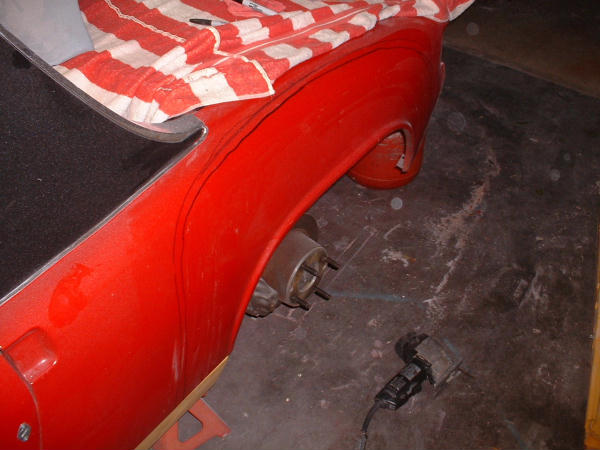
Posted by: URY914 Sep 25 2004, 08:03 PM
Grind/sand away the bondo...I mean paint so to get a good bond with the glass.
Attached image(s)
Posted by: URY914 Sep 25 2004, 08:04 PM
Looking to the front.
Attached image(s)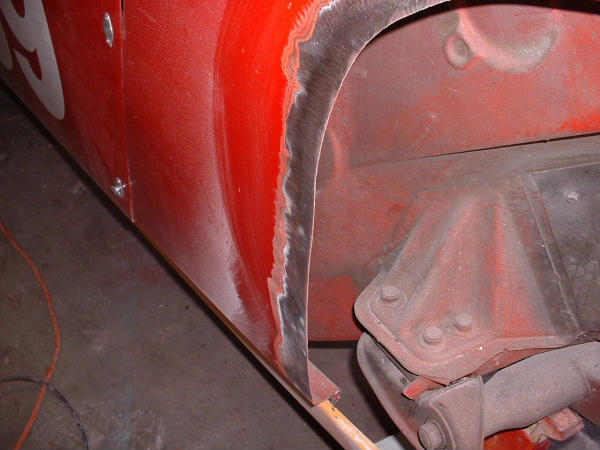
Posted by: URY914 Sep 25 2004, 08:05 PM
Fitting in the glass mat strips. you can see them laying on top.
Attached image(s)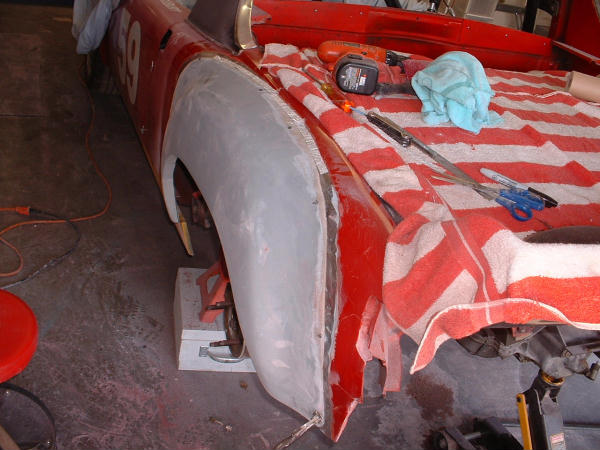
Posted by: URY914 Sep 25 2004, 08:07 PM
Here it is with the glass bonded over the flare and the fender.
Attached image(s)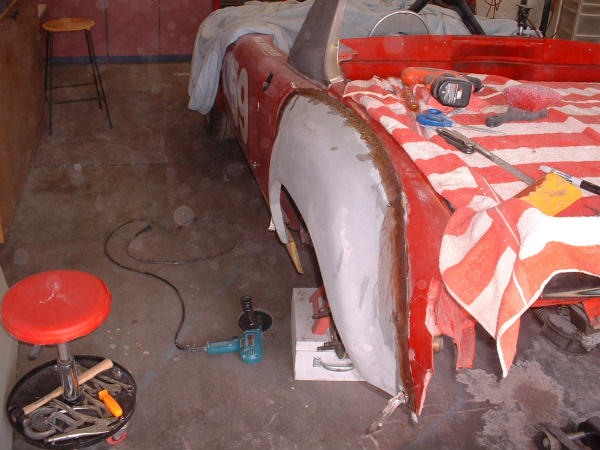
Posted by: URY914 Sep 25 2004, 08:09 PM
Out baking it the sunshine.This must have been between the hurricanes.
BTW, that's my helper on the left.
Attached image(s)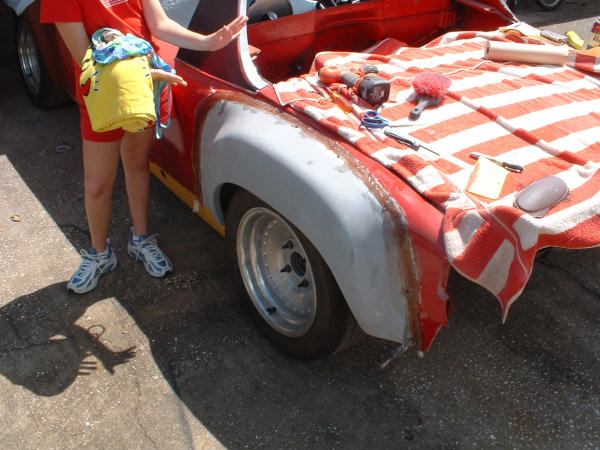
Posted by: URY914 Sep 25 2004, 09:06 PM
I've actually sanded/bondo'd/primed the left rear now. I'll post some tomorrow.
Posted by: URY914 Oct 2 2004, 08:42 PM
OK, maybe I didn't post the next day. But there was a f---- HURRICANE pounding us.
Now back on track. Tommorrow I have an autox so I've spent the week tighting up some loose ends. Here is what it looks like.
Attached image(s)
Posted by: URY914 Oct 2 2004, 08:44 PM
I've got 1/2" spacers on the rear wheels and I can just get my finger between the tire and the inside of the fender. Maybe 1/2" clear.
Attached image(s)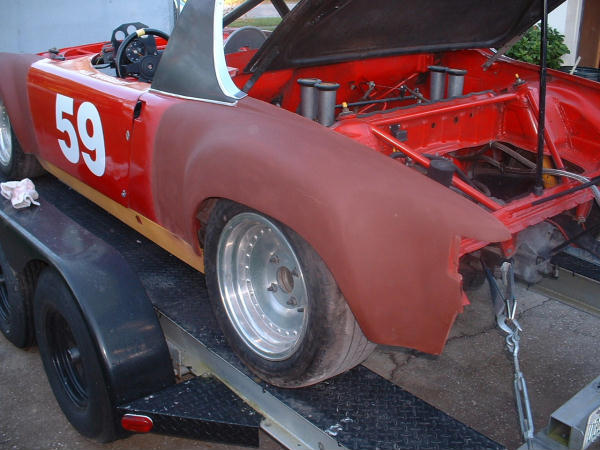
Posted by: URY914 Oct 2 2004, 08:45 PM
These were shot after loading on the trailer.
But you knew that.
Attached image(s)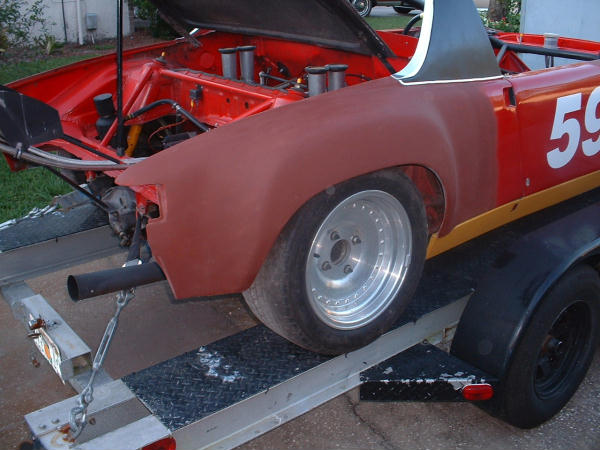
Posted by: URY914 Oct 2 2004, 08:47 PM
I use to run my tie down straps through the wheels but now with the solid wheels I'm having to run the straps around the tranny mounts. Not the best but it is easy to get them on and off. I dont think it will hurt anything.
Attached image(s)
Posted by: URY914 Oct 2 2004, 08:48 PM
HERE IT IS.....
Attached image(s)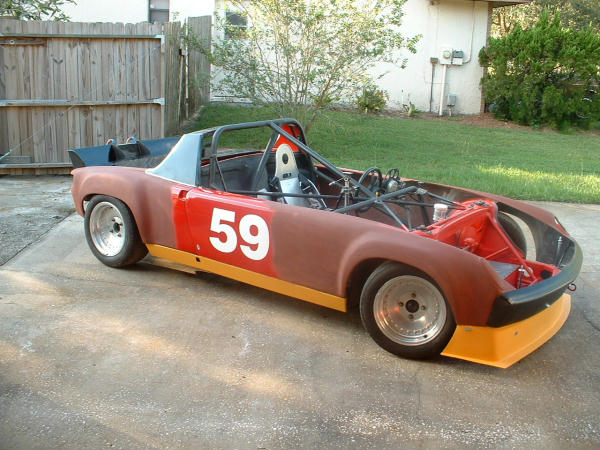
Posted by: URY914 Oct 2 2004, 08:50 PM
I'll get some pics tomorrow at the event with the hood on. If you look close you'll see my front turn signal covers I've made. They are .0002 grams lighter than the stock ones.
Paul
Posted by: trekkor Oct 2 2004, 11:34 PM
Those pics make me VERY HAPPY!
KT
Posted by: redshift Oct 3 2004, 12:15 AM
You are an animal.
You should scratch-build a '67 vette.
M
Posted by: bob91403 Oct 3 2004, 02:42 AM
Looks nice. Looks like a lot of work. I'm too lazy. I would have spent the $675 and bought whole fiberglass front fenders, and fiberglass rear rocker panels with the flares already there. Then sold the original metal to someone who needed them for repairs. Probably end up spending the same kind of money, not near as much work. Might even be less money. I think I saw a replacement metal fender priced at about $400. But, like I said I'm lazy.
Posted by: McMark Oct 3 2004, 03:04 AM
Is this fender held on with Red RTV?
Posted by: Racer Chris Oct 3 2004, 05:00 AM
That's looking real good Paul!
You need to lower it another inch and a half though.
Raised rear pickup points and raised spindles ought to do the trick.
Good luck at the auto-x today!
Posted by: URY914 Oct 3 2004, 06:32 PM
Chris,
I agree, needs to be lower.
Low, lean, wide and mean.
Paul
Posted by: Root_Werks Oct 4 2004, 11:07 AM
You are a fiberglass animal! I wish I had you around when I was doing my flares. They look great!
Posted by: URY914 Oct 4 2004, 07:23 PM
Here are some shots from the autox yesterday.
Attached image(s)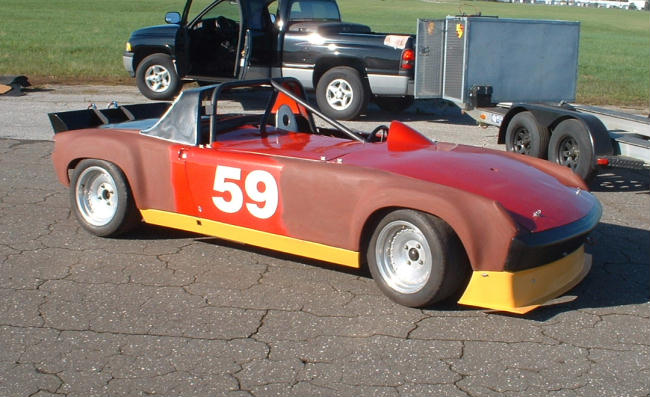
Posted by: URY914 Oct 4 2004, 07:24 PM
money shot
Attached image(s)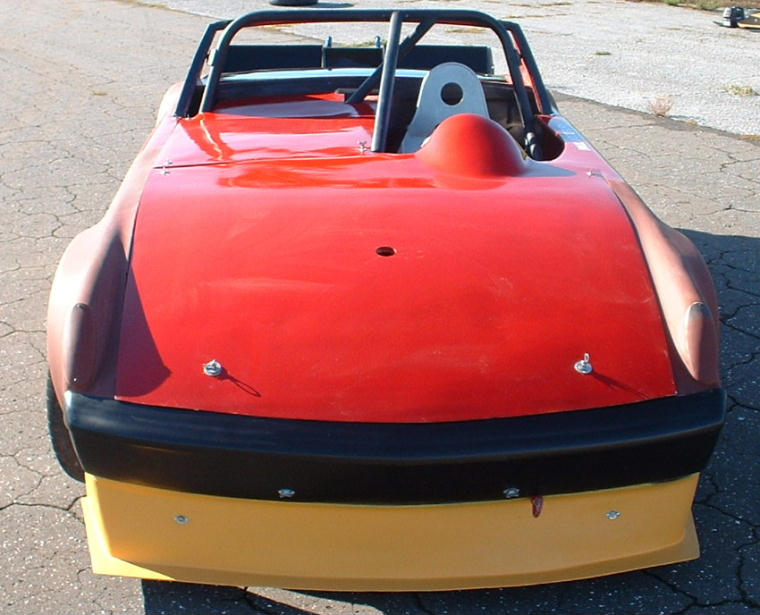
Posted by: URY914 Oct 4 2004, 07:28 PM
my new avatar
Attached thumbnail(s)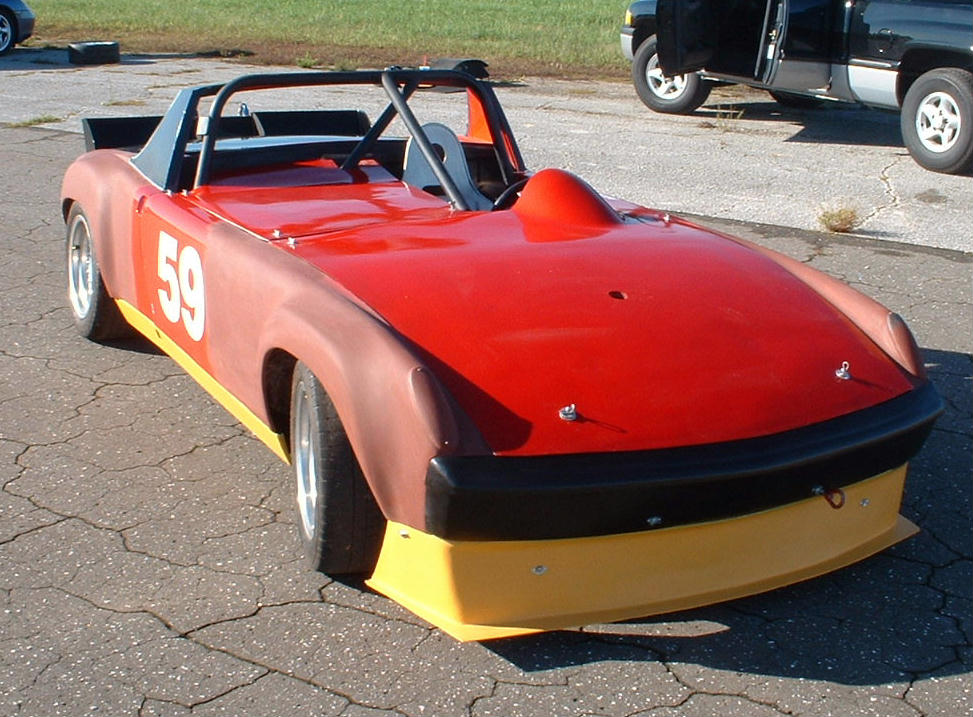
Posted by: bob91403 Oct 4 2004, 08:46 PM
Looks great. A lot of work.
Posted by: maf914 Oct 5 2004, 07:30 AM
Paul,
Way to go! Good work. Thanks for all of the photos.
So, are you going to paint it again or are you just gonna do the JP primer thing? Remember, paint equals weight.
Posted by: MJHanna Oct 5 2004, 08:22 AM
Paul great work !!! What type of resin are you using? Do you get it from an auto supply house or is it the Generic stuff you can get at Home Depot? On tying down the car we made some brackets out of some flat metal and drilled a hole to mount them to the lowers shock bolt and a hole to put the tow hook through. Made it easy to hook the back tie down straps.
Posted by: URY914 Oct 5 2004, 08:50 AM
I got the resin from a fiberglass supply house locally.
I've seen those "hook-eyes" but I thought there wasn't enough room for them on the bolt. The shock bolt is short and nut just covers the trhreads now.
Show us a picture.
Paul
Powered by Invision Power Board (http://www.invisionboard.com)
© Invision Power Services (http://www.invisionpower.com)