Printable Version of Topic
Click here to view this topic in its original format
914World.com _ 914World Garage _ Sheet metal replacement
Posted by: peteyd May 3 2013, 02:45 PM
I'm starting this thread for people who need reference or a guide to install some of the parts that we produce. We will be making how to videos also that will be posted on our youtube channel.
We bought this car off a member here, Enhoover.
When we received the car we stripped it and built a rotisserie (plans for these are available).
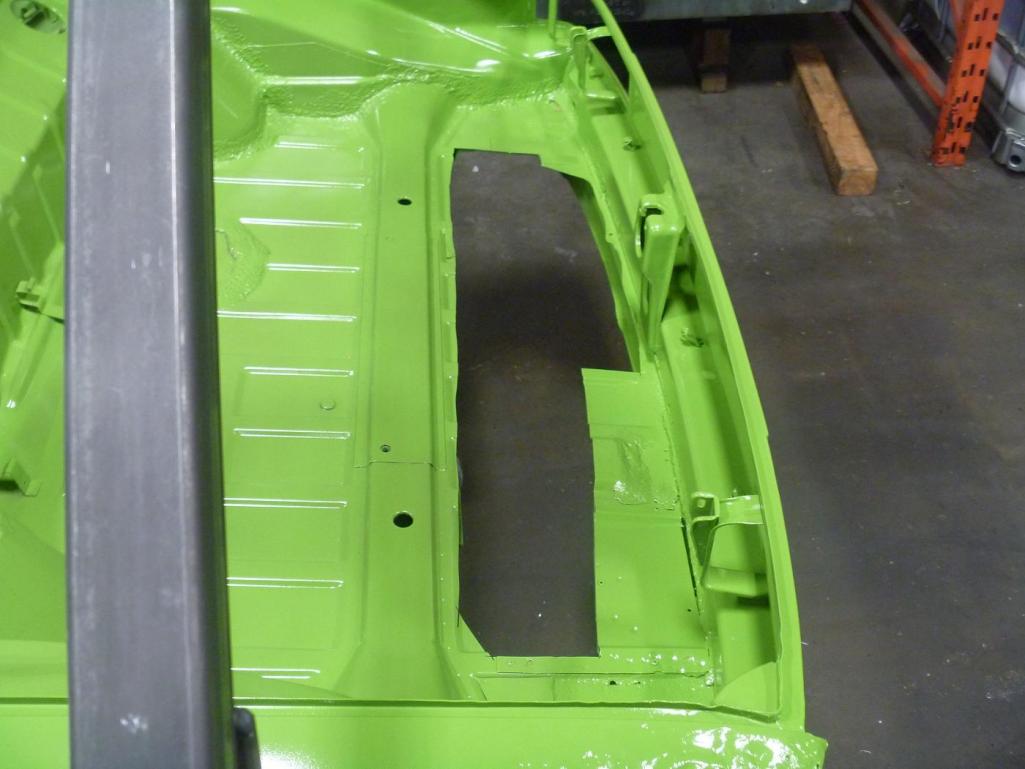
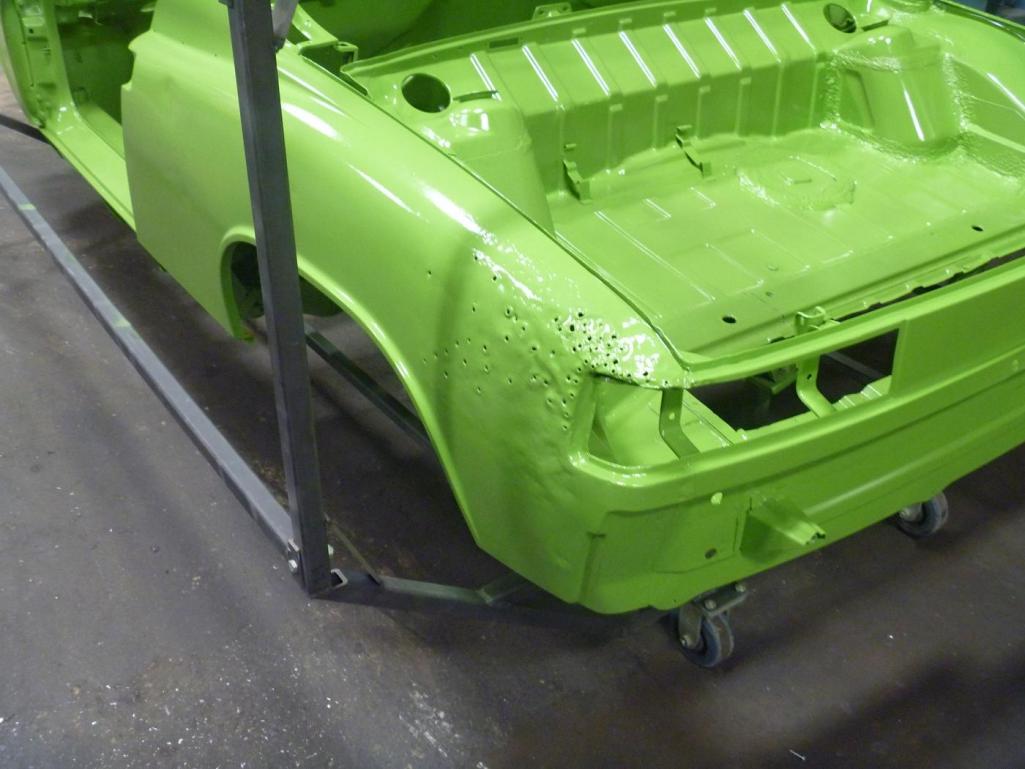
We removed the right rear quarter panel to better illustrate some of the installations that will be done.
Here is the car right after we got the rear quarter removed.
the rotisserie we built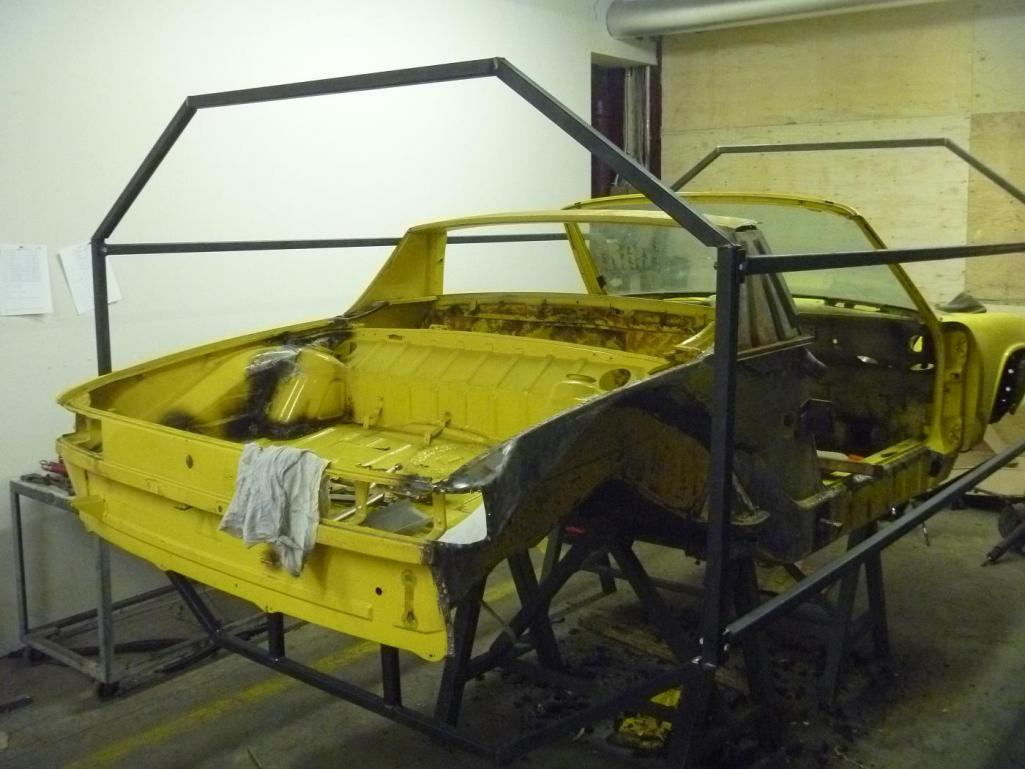
off to the blaster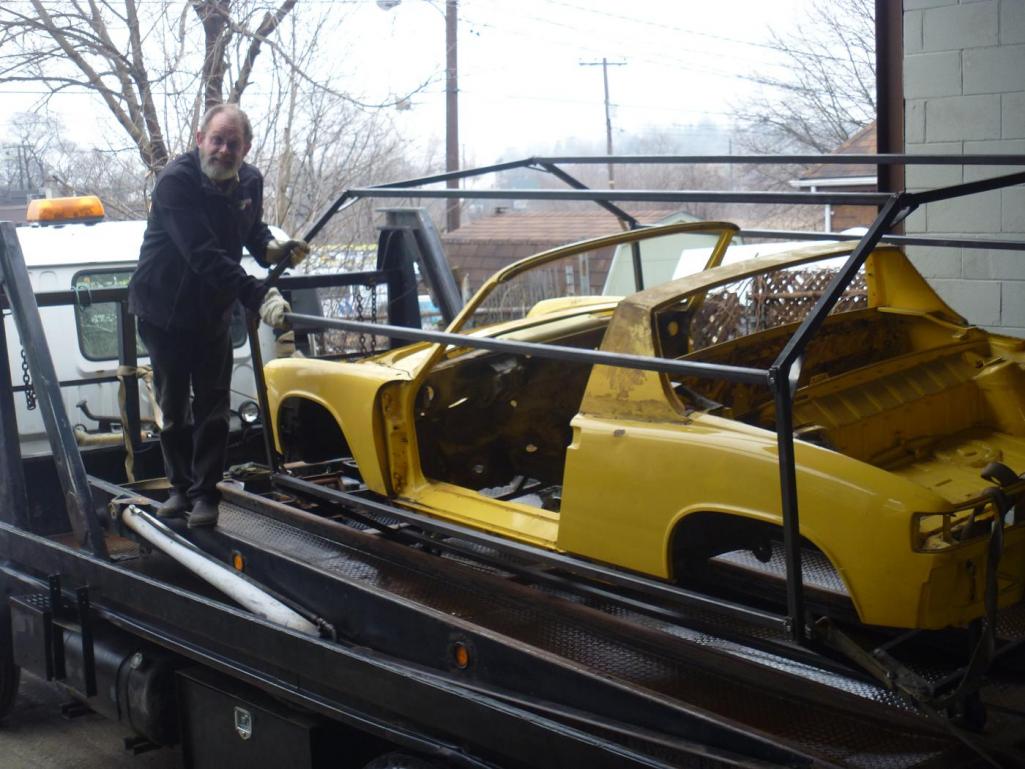
Posted by: veltror May 3 2013, 02:52 PM
looks like mine !!! care to donate any parts 
Posted by: peteyd May 3 2013, 02:57 PM
Now that we have the car back we can start to install some of the parts that we produce.
we will be starting with the clam shell stiffening kit we sell.
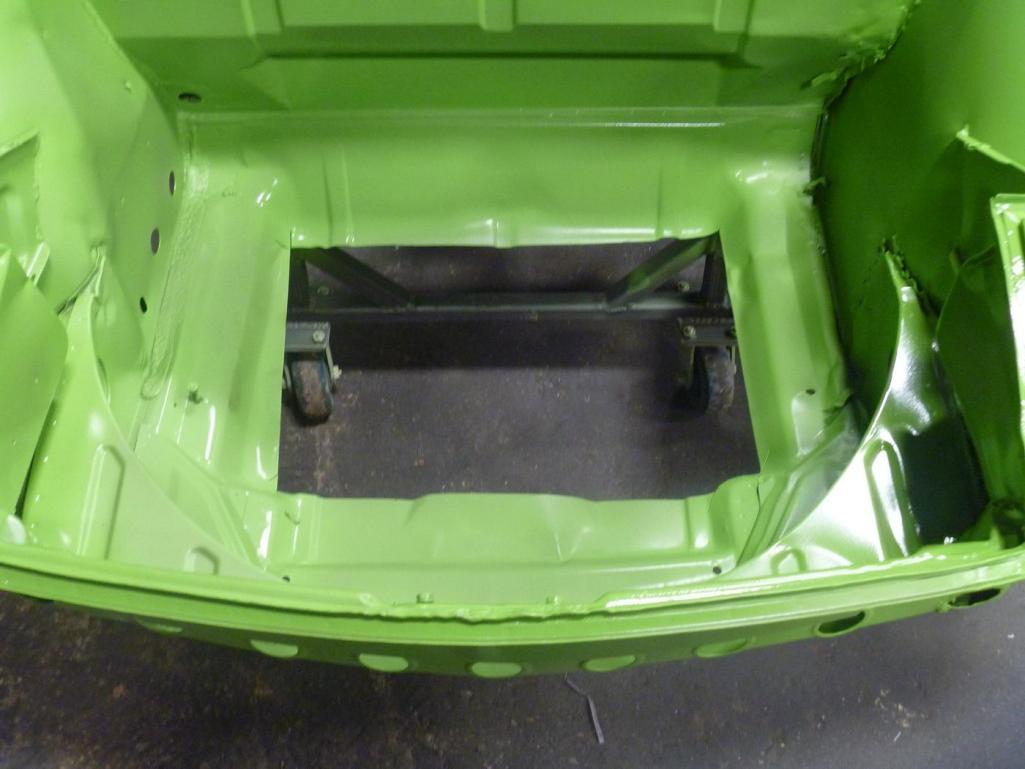
We painted the car green so when we bring the car to shows it will stand out.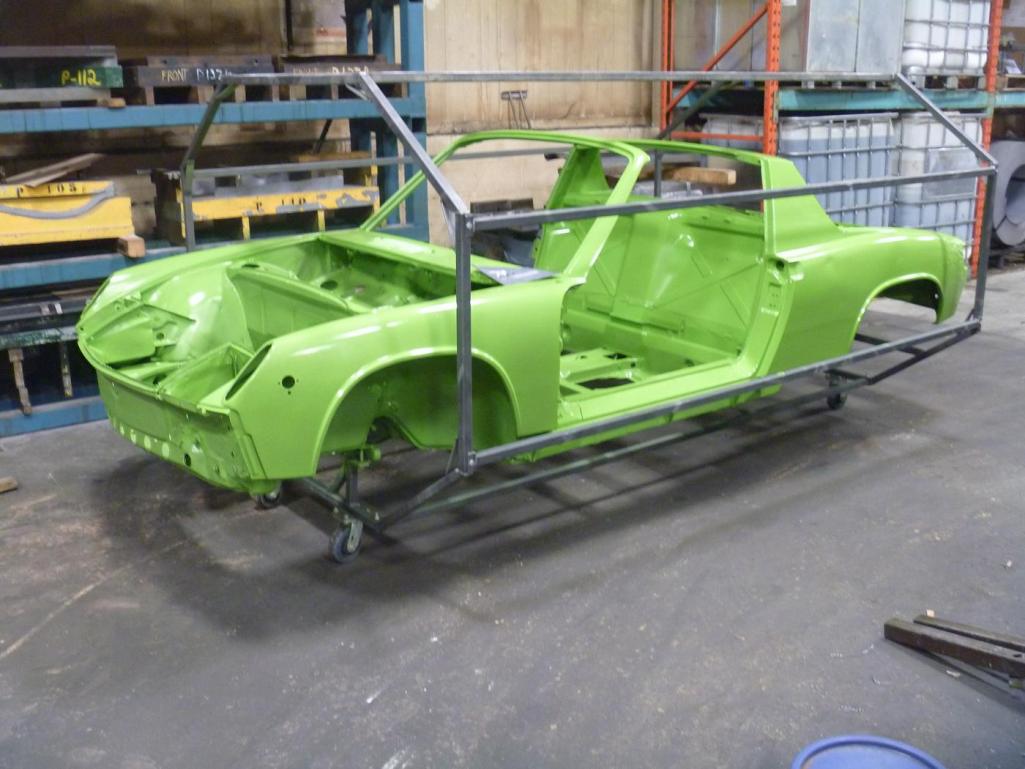
there was front end collision damage that was repaired at one point, so we will have to redo this properly.
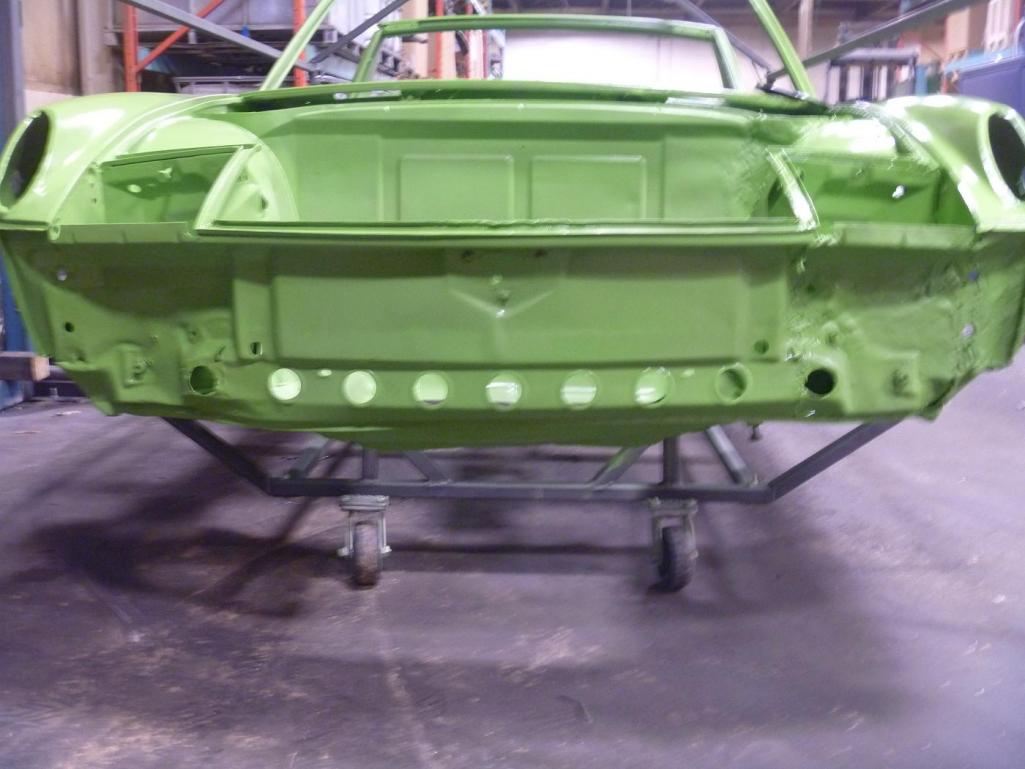
we will also have to install floor pans, rear trunk floor, left rear quarter and the front trunk floor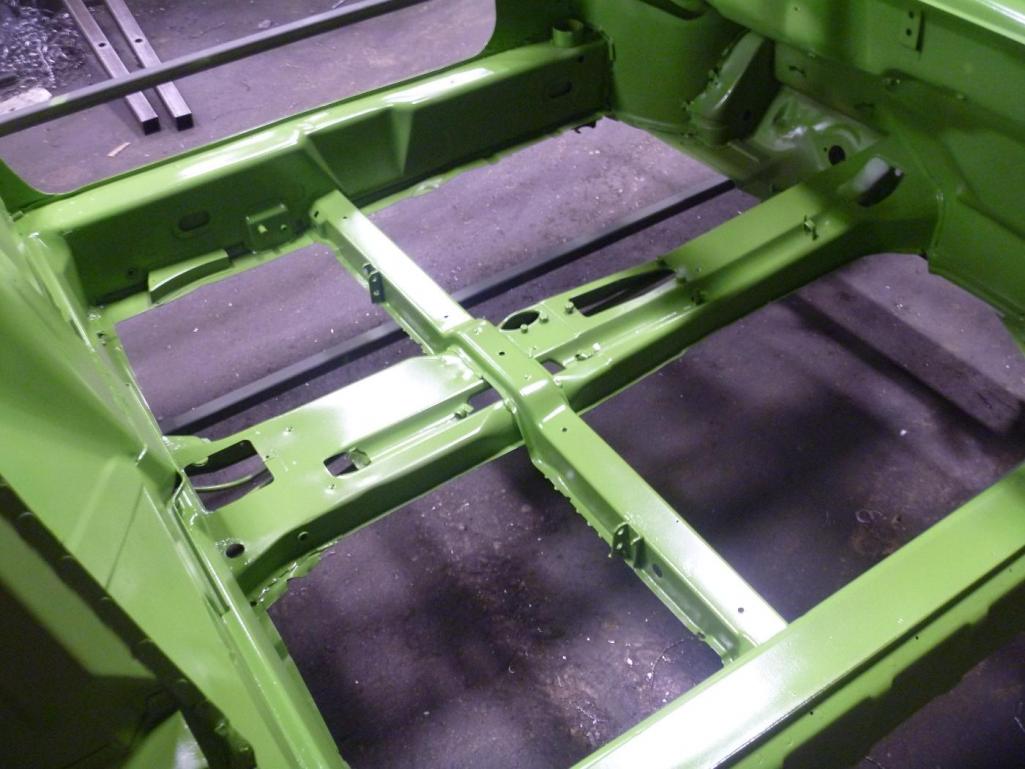
Posted by: Cairo94507 May 3 2013, 03:07 PM
What a great idea. Looking forward to seeing this all happen. 
Posted by: FourBlades May 3 2013, 04:53 PM
I agree that this is an excellent idea. 
Looking forward to watching this. 
John
Posted by: gothspeed May 3 2013, 04:55 PM
Petey, how about an entire new chassis that we can just move our tags over to? 
Posted by: doug_b_928 May 3 2013, 05:33 PM
This is going to be great to watch!
Posted by: bandjoey May 3 2013, 06:56 PM
At the end it needs to move to the Restoration thread area.
Is this Rotisserie simply a roll the entire cage over on its side and upside down or is there something I can't see?
Waiting on the next edition!
How 'bout showing us the presses in action - how you make the parts?
and yes to complete bodies!
Posted by: wingnut86 May 3 2013, 07:19 PM
...agreed.
What they said;-P
Posted by: bulitt May 3 2013, 08:55 PM
This can only help the end user because when you (the manufacturer) start installing metal, you will identify design tweeks to make them better and easier to install. Like the Engman kits that progressed over time through many iterations. And somewhere in the build process you are going to say to yourself "dang, I wish someone made this replacement master cylinder/pedal floor area". Then you will!
Posted by: Luke M May 4 2013, 08:07 AM
Hi Pete...
Perfect timing. My brother just placed that big order for the sheet metal this past week. Time to  &
&  .. I'm sure this will help in some areas.
Any plans on installing the R/R inner control arm mount on your car?

Posted by: peteyd May 4 2013, 09:54 AM

Is this Rotisserie simply a roll the entire cage over on its side and upside down or is there something I can't see?
How 'bout showing us the presses in action - how you make the parts?
and yes to complete bodies!
The rotis rolls right over. Its much easier with two people, but manageable with one.
Maybe some day the whole car can be made!
This can only help the end user because when you (the manufacturer) start installing metal, you will identify design tweeks to make them better and easier to install. Like the Engman kits that progressed over time through many iterations. And somewhere in the build process you are going to say to yourself "dang, I wish someone made this replacement master cylinder/pedal floor area". Then you will!
Ya for sure we will find areas we need to tweak, and then we will make improvements. If the pedal area get more demand, that is a possibility in the future.
Hi Pete...
Perfect timing. My brother just placed that big order for the sheet metal this past week. Time to
& .. I'm sure this will help in some areas.Any plans on installing the R/R inner control arm mount on your car?
No immediate plans to replace the control arm. This car surprisingly does not have rust in that area.
This will be a fun progression from start to finish. Im looking forward to giving updates on this project. Its going to take some time to install all these parts but be patient and I think the outcome will be very informative and fun to watch.
Pete
Posted by: Dave_Darling May 4 2013, 08:38 PM
No immediate plans to replace the control arm. This car surprisingly does not have rust in that area.
Famous last words....
(They often rust from the inside out; it appears that a lot of them didn't get enough paint in between the multiple layers of metal.)
--DD
Posted by: rick 918-S May 5 2013, 03:27 PM
![popcorn[1].gif](style_emoticons/default/popcorn[1].gif)
Posted by: kid914 May 5 2013, 05:44 PM
WOW!
This is perfect timing as I will be doing my floors, and many other parts.
Looking forward to seeing this unfold and learn at the same time.
Thanks PETE!
Posted by: r_towle May 5 2013, 05:51 PM
Is this Rotisserie simply a roll the entire cage over on its side and upside down or is there something I can't see?
How 'bout showing us the presses in action - how you make the parts?
and yes to complete bodies!
The rotis rolls right over. Its much easier with two people, but manageable with one.
Maybe some day the whole car can be made!
This can only help the end user because when you (the manufacturer) start installing metal, you will identify design tweeks to make them better and easier to install. Like the Engman kits that progressed over time through many iterations. And somewhere in the build process you are going to say to yourself "dang, I wish someone made this replacement master cylinder/pedal floor area". Then you will!
Ya for sure we will find areas we need to tweak, and then we will make improvements. If the pedal area get more demand, that is a possibility in the future.
Hi Pete...
Perfect timing. My brother just placed that big order for the sheet metal this past week. Time to
& .. I'm sure this will help in some areas.Any plans on installing the R/R inner control arm mount on your car?
No immediate plans to replace the control arm. This car surprisingly does not have rust in that area.
This will be a fun progression from start to finish. Im looking forward to giving updates on this project. Its going to take some time to install all these parts but be patient and I think the outcome will be very informative and fun to watch.
Pete
Well, I would like to see how you deal with that area in a transition between new floor pans and old thin rusted pedal area.
Without super long arms, or a help, using a hammer and dolly is that area is challenging to say the least.
One place I would like to have you observe closely as the installation of the pan happens.
It's ugly, and a weld in panel would be small and helpful.
Rich
Posted by: cary May 6 2013, 10:53 PM
Ya for sure we will find areas we need to tweak, and then we will make improvements. If the pedal area get more demand, that is a possibility in the future.
Plus one for me.
I had to buy a used one for my project.
Posted by: peteyd May 14 2013, 11:24 AM
Here are the drawings for the rotisserie we made.
Rear hoop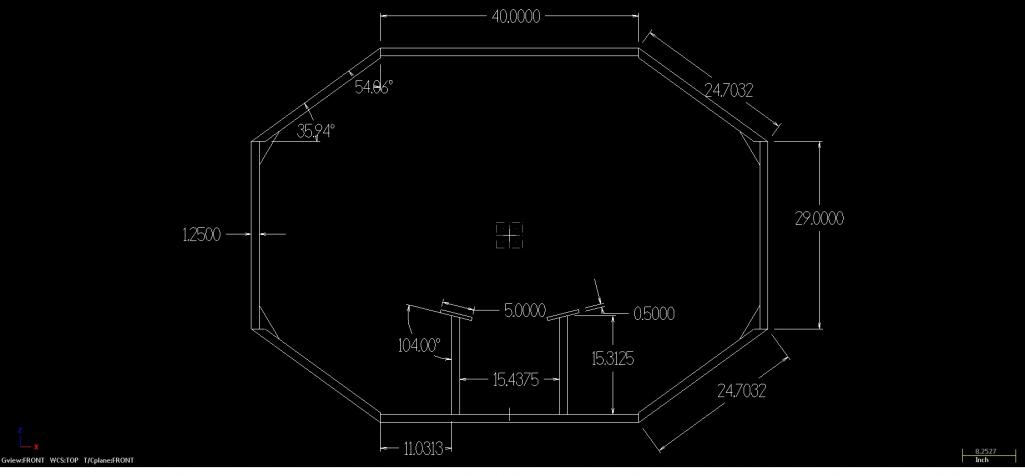
Front hoop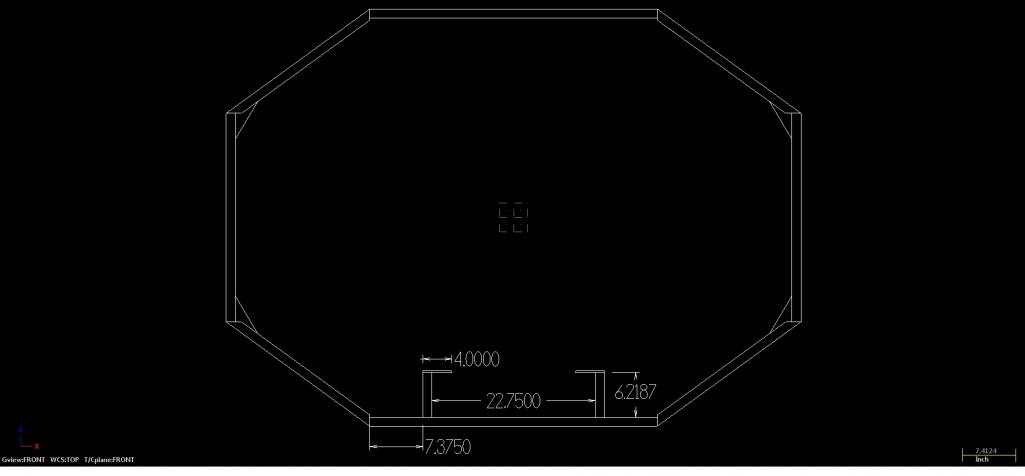
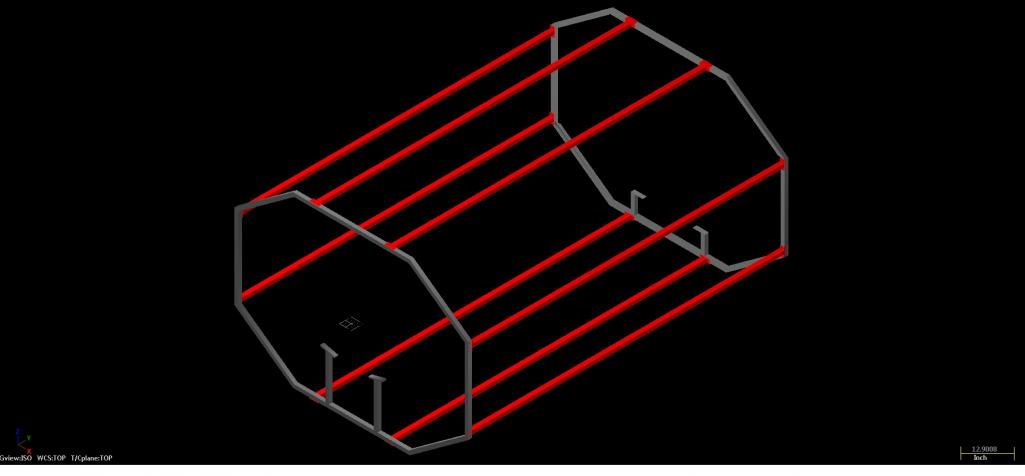
close up of horizontal tubes.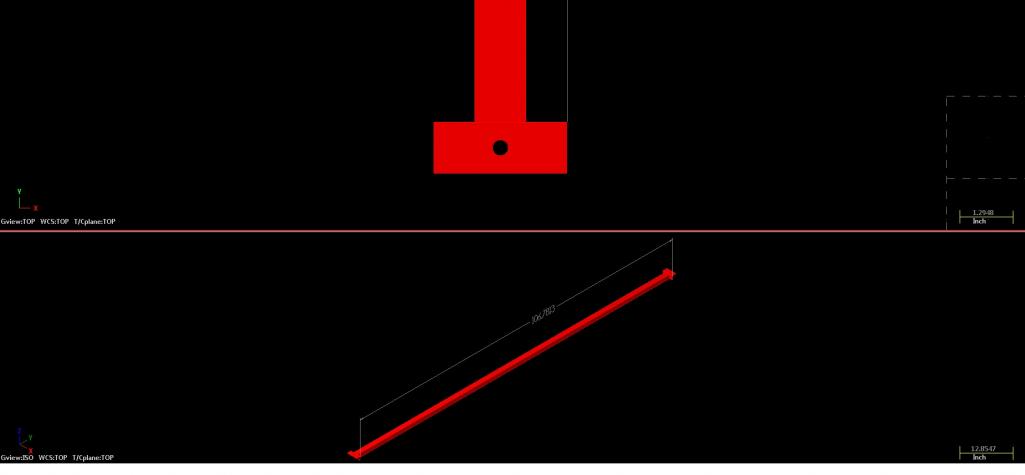
Posted by: SirAndy May 14 2013, 11:29 AM
You should add it to the VIN database under your name ...

Posted by: peteyd May 14 2013, 11:44 AM
Posted by: peteyd May 14 2013, 12:11 PM
Installation of the frame stiffener
https://www.youtube.com/watch?v=IVrmUHRfbCs
Posted by: Luke M May 15 2013, 09:18 AM
Hi Pete,
We ( being my brother & I ) received all of the new metal to do the repairs on our cars. It was a fast order to receive even with all the tins. I must say a job well done at your end. I have a question on the stiffener kit install. Can they be installed w/o having to cut off a portion of the rear lower fenders ?
I plan on doing the install within the next month.
Thanks for adding the videos.
TIA.
Posted by: moparrob May 15 2013, 09:28 AM
Subscribed.
Posted by: Jon H. May 15 2013, 07:26 PM
At the end it needs to move to the Restoration thread area.
Is this Rotisserie simply a roll the entire cage over on its side and upside down or is there something I can't see?
Waiting on the next edition!
How 'bout showing us the presses in action - how you make the parts?
and yes to complete bodies!
Here's how the front trunk is done.
http://www.914world.com/bbs2/index.php?showtopic=145738&st=0
Jon
Posted by: cary May 15 2013, 08:07 PM
Man, Pete your fast .................. LOL.
Nice work ................
Posted by: r_towle May 15 2013, 09:32 PM
Well done.
Might want to put the frame stiffener overlay on your website....I can't find it.
D your guys make the piece up front on the long that goes over the long and under the front fender?
Rich
Posted by: peteyd May 16 2013, 06:16 AM
Well done.
Might want to put the frame stiffener overlay on your website....I can't find it.
D your guys make the piece up front on the long that goes over the long and under the front fender?
Rich
Here is the part on the web
http://www.restoration-design.com/mm5/merchant.mvc?Store_Code=rd&Screen=PROD&Product_Code=P346R
If you are referring to the lower box shape piece that is part of the hinge post, we dont make a replacement piece for there yet. The boxy shape piece that is part of the stiffener up front we make and that fits right over the original.
Posted by: peteyd May 16 2013, 06:21 AM
Hi Pete,
We ( being my brother & I ) received all of the new metal to do the repairs on our cars. It was a fast order to receive even with all the tins. I must say a job well done at your end. I have a question on the stiffener kit install. Can they be installed w/o having to cut off a portion of the rear lower fenders ?
I plan on doing the install within the next month.
Thanks for adding the videos.
TIA.
I cut off the lower fenders on my personal car as well. It would be tight in there if you didnt cut some away. It would be much easier for sure to cut away the lower fender, but you should try anyways. It wouldnt hurt to make the attempt.
Posted by: Chris H. May 16 2013, 02:26 PM
Sorry for the ignorance but are the frame stiffeners an alternative to the "Engman kit" or would you do both? It depends on the application I'm sure.
Posted by: peteyd May 17 2013, 06:30 AM
Sorry for the ignorance but are the frame stiffeners an alternative to the "Engman kit" or would you do both? It depends on the application I'm sure.
I'd say that it would be an alternative. Having both would probably be overkill.
Posted by: peteyd Aug 12 2013, 01:27 PM
We just completed replacing the front and rear floor pans as well as the seat mount reinforcement pieces and the peddle cluster bracket.
I will have another installation video up shortly, but here are a few photos of the process.
Here is the prep work before drilling out the spot welds.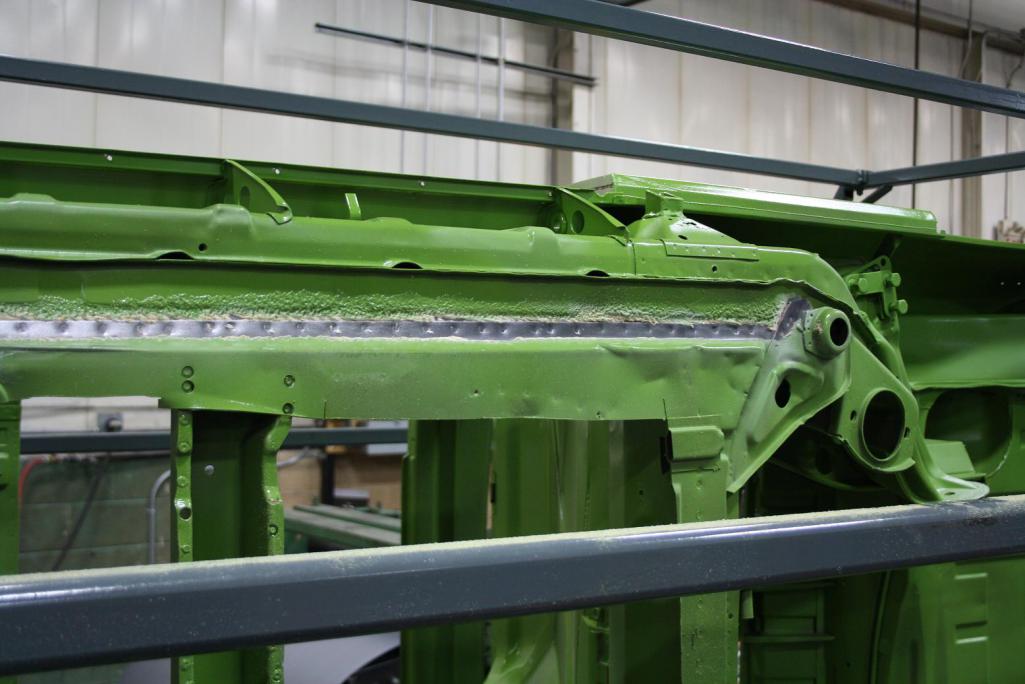
After the spot welds are drilled we have to chisel off the edges of the pan.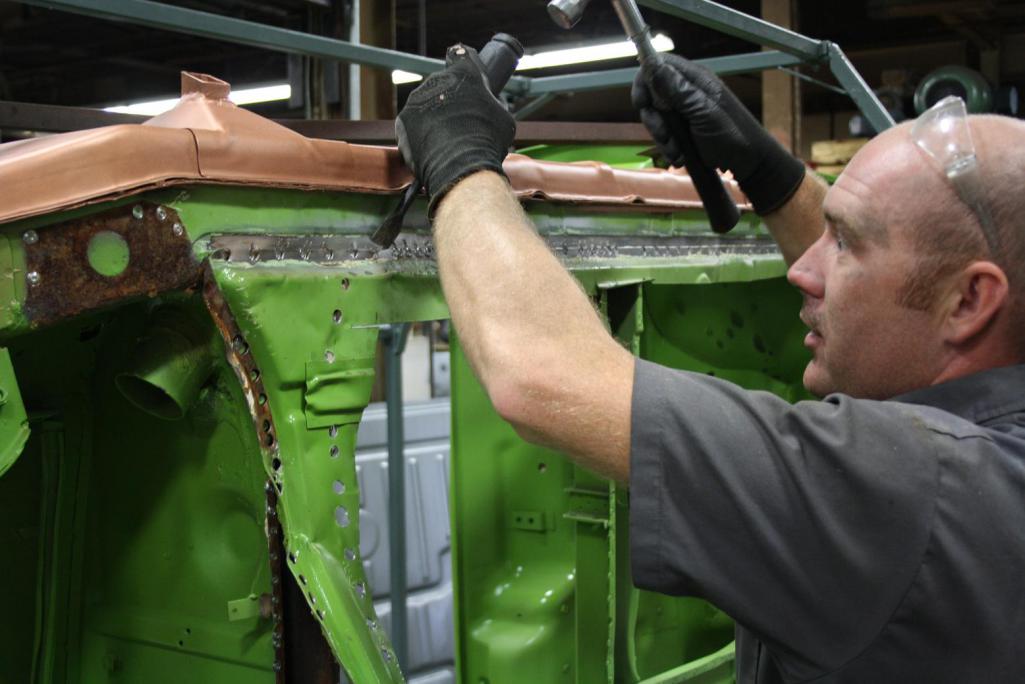
You can see all the rust that is hiding between the pans, so when someone tells you their car is "100% rust free" you know thats BS.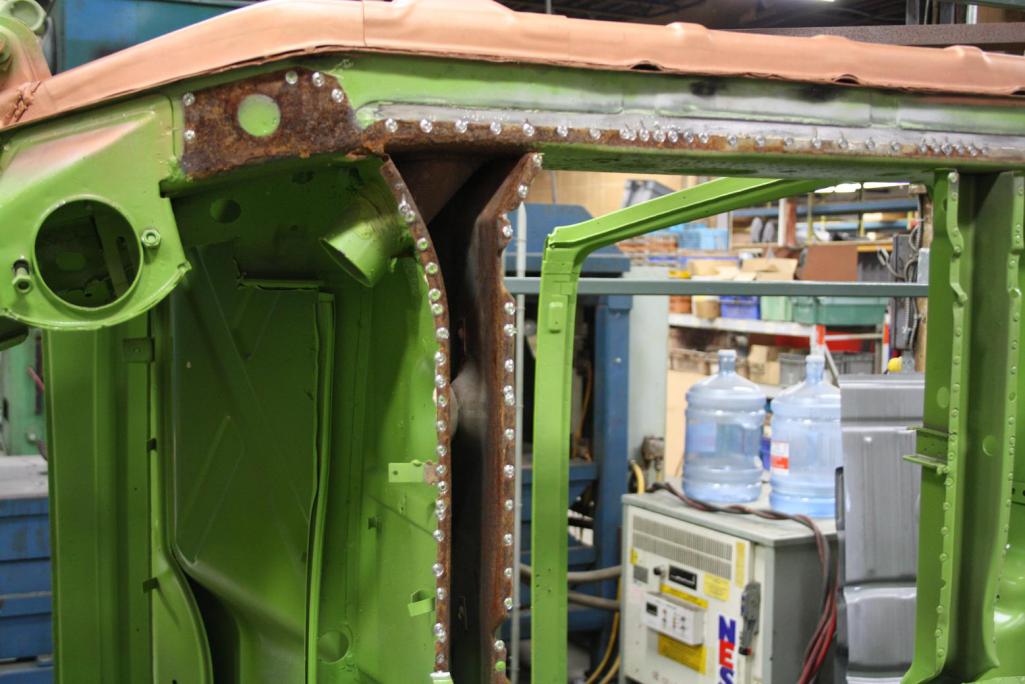
Test fitting the front pan.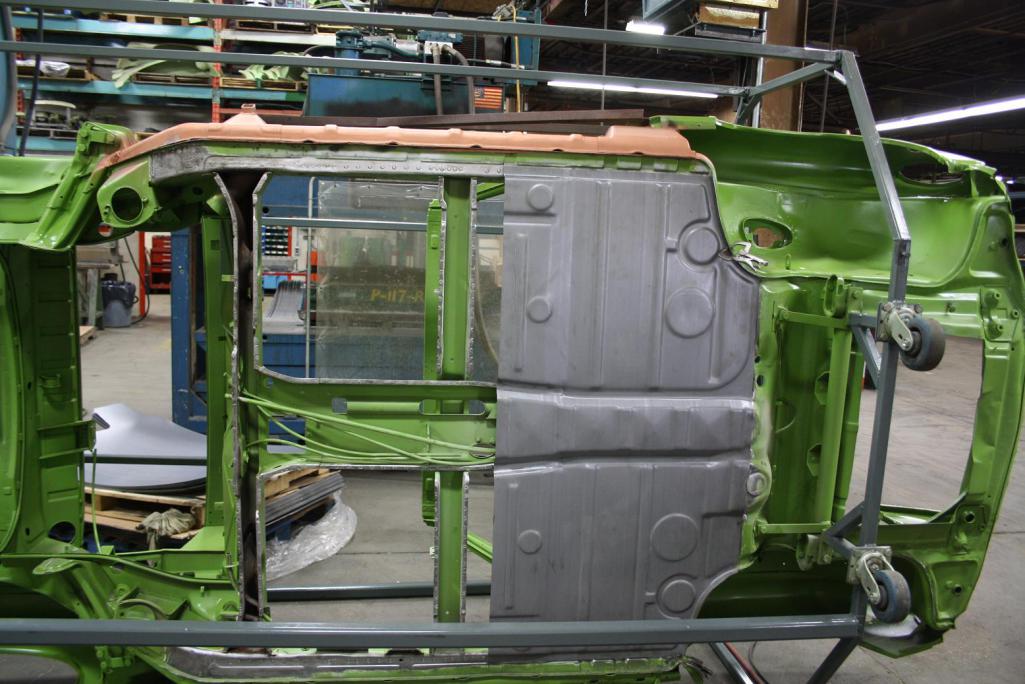
Holes punched in the pans for rosette welds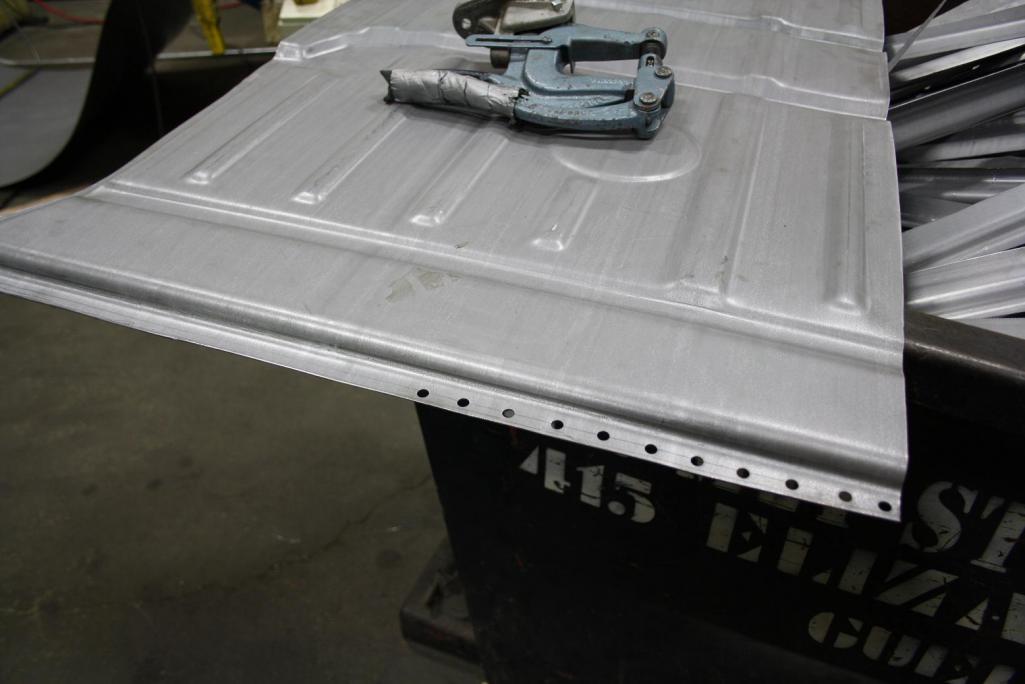
Boths pans and jack points being test fit with butt weld clamps in the middle. The seat mount reinforcements have been spot welded in and the peddle cluster bracket was located with the peddle cluster. The holes were drilled then the bracket was spot welded in also. 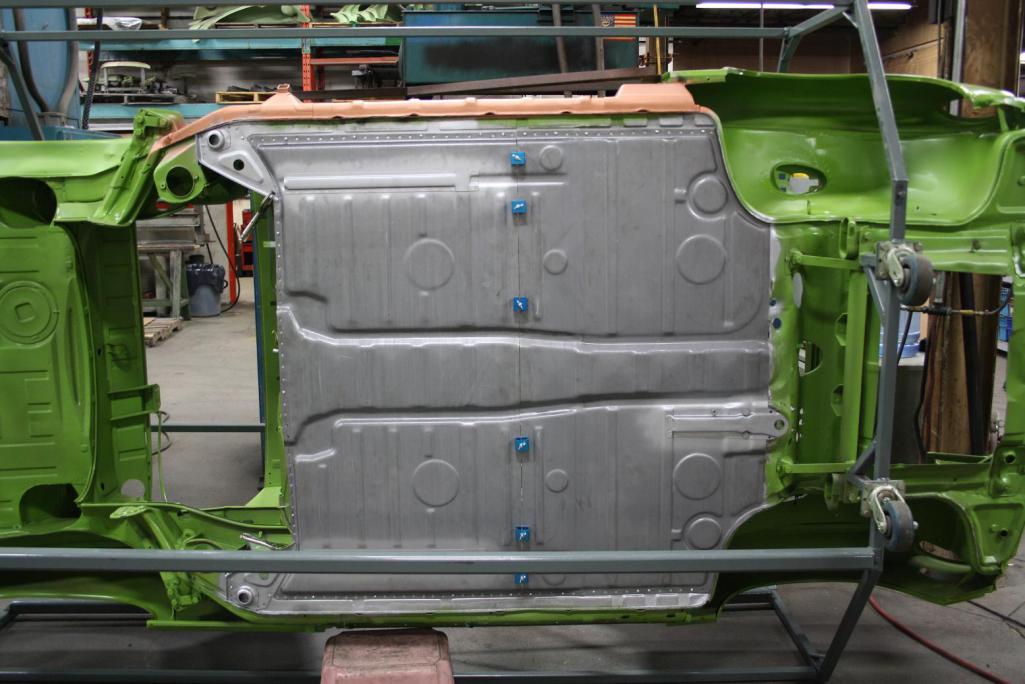
Heres the finished product.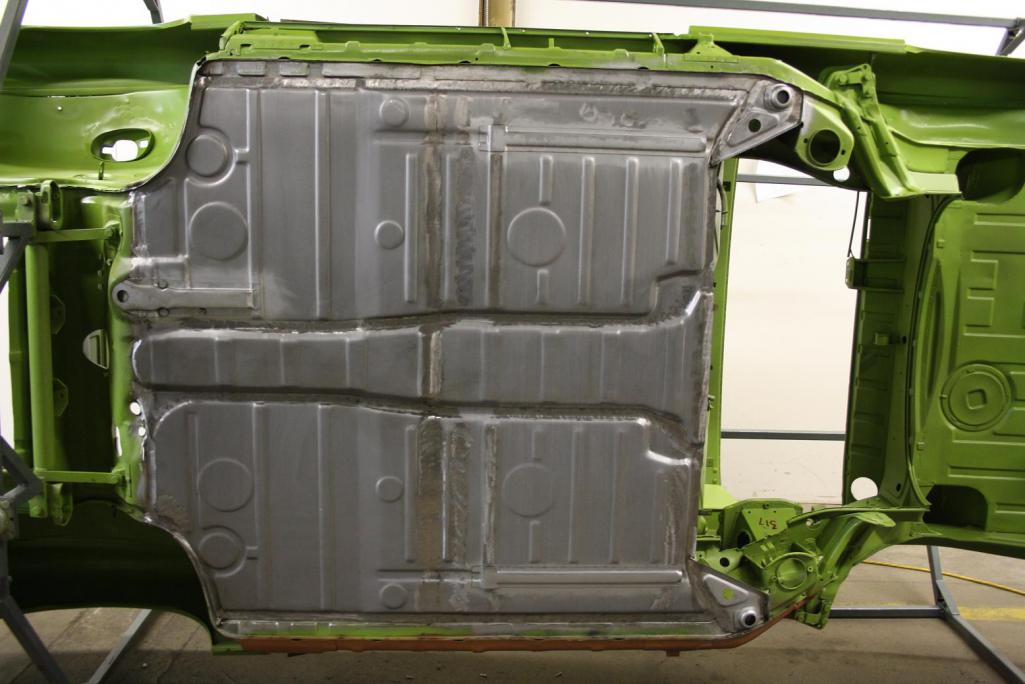
Posted by: peteyd Aug 13 2013, 08:24 AM
Here is our latest installation video...
enjoy
https://www.youtube.com/watch?v=3kMOMNhxg-A
Posted by: peteyd Aug 28 2013, 08:09 AM
We have updated the YouTube channel with another video of a rear trunk installation.
We also have made the rear trunk reinforcement that lays over the transaxle cross member mount. This new part is P335A
check it out and enjoy!
https://www.youtube.com/watch?v=GBmJkP8I_rI
Posted by: solex Aug 28 2013, 09:35 AM
This is great, i really need to do something about my floor next. Thank you
Posted by: peteyd Sep 20 2013, 08:19 AM
We put together another video for your viewing pleasure.
Adam demonstrates the installation of the seat hinge risers and the hinges.
If your interested in the cooling gel used in the video, it is a wurth product. Spray it on a nearby location and that area will not heat up. There are some youtube videos demonstrating it in use. Pretty amazing stuff actually.
http://www.wurthcanada.com/media/en/documents/catalogues_and_product_info/newproducts/03.2012%20-%20Protective%20Welding%20Spray%20&%20Paste.pdf
https://www.youtube.com/watch?v=PWgt8AaqnUI
Posted by: Sleepin Sep 20 2013, 09:45 AM
I agree with most on here that this came along just in time! I am doing a passenger side floorpan replacement very shortly!
To fix this mess:
http://s171.photobucket.com/user/Sleepin1974/media/Erics%20914%20New%20Paint/50ca95a0-1b58-4001-b7b3-1f600dba25ba_zpsc3e0a4c0.jpg.html
Does Restoration design make anything for the cowl/fender seam? My passenger side is also in bad shape.
Posted by: peteyd Sep 20 2013, 10:17 AM
Currently we dont have any repair piece for that seam. If you have rust in there, it probably goes deeper.
You might want to get a piece from a donor car. Make sure you get all the rust or else you will see rust coming to the surface again in a couple years.
Posted by: worn Sep 20 2013, 12:47 PM
Currently we dont have any repair piece for that seam. If you have rust in there, it probably goes deeper.
You might want to get a piece from a donor car. Make sure you get all the rust or else you will see rust coming to the surface again in a couple years.
I am curious why you had the car painted at the outset, since obviously it will need to be at least partially painted at the end again. Was it for contrast in the videos?
Posted by: peteyd Sep 20 2013, 01:26 PM
I am curious why you had the car painted at the outset, since obviously it will need to be at least partially painted at the end again. Was it for contrast in the videos?
We painted the car green so it would stand out at shows and swap meets. It also works well for contrast as you said.
Yes it will need to be painted again in the end, but this is more of a demonstration car and will most likely remain a bare shell for quite some time.
Posted by: peteyd Feb 27 2014, 08:39 AM
We have shot a few more videos of the green 914, but I wanted to put this video up first.
A day in the Life of Restoration Design.
https://www.youtube.com/watch?v=C6CEx0UB8FM
Posted by: mepstein Feb 27 2014, 08:47 AM
Good to see that you guys are doing well. Always a pleasure to order from you.
Posted by: doug_b_928 Feb 27 2014, 08:50 AM
Nice piece of Canadiana. Where the heck did you get that tractor? It's a beaut!
Posted by: bulitt Feb 27 2014, 09:19 AM
Love you guys!
Pedal cluster panel next? Soon? Maybe? 
Posted by: peteyd Feb 27 2014, 09:19 AM
Nice piece of Canadiana. Where the heck did you get that tractor? It's a beaut!
Thanks,
At one point we had about 8 Porsche tractors all in different stages of disrepair. We picked them all up in Ontario at a few different locations. My Dad restored this one and several others. He has sold a few and shipped several overseas. We still have two others, one of which is still midway through its restoration.
Posted by: peteyd Feb 27 2014, 09:42 AM
Love you guys!
Pedal cluster panel next? Soon? Maybe?
I have three other 914 parts that I am in the midst of working on.
I will give updates on these pieces when they are ready. As for the pedal cluster, that is something I will have to look into still.
Posted by: 76-914 Feb 27 2014, 09:50 AM
Wow. I just noticed that you make the rear trunk reinforcement piece so I ordered one. Thx Pete.
Posted by: bandjoey Feb 27 2014, 10:11 AM
Thanks for the updates...I've bought your metal and it's always top shelf!
When will the new complete body shells be available???  I've seen complete new Mustang body shells online ( 64 - 78 models) for $15k. New. Just a thought....
Posted by: skeates Feb 27 2014, 11:42 AM
These are awesome! Wish they were around when I started tearing into my project...would have saved me some headache for sure...
Posted by: rsrguy3 Feb 27 2014, 12:41 PM
Can any of you gents direct me to a thread with a comprehensive front quarter r&r with pics?-Guy
Posted by: CptTripps Feb 27 2014, 01:35 PM
So you only ship one thing a day?

Seriously though...thanks for making the awesome stuff you make.
Posted by: peteyd May 2 2014, 06:48 AM
We have made another video for the installation of the suspension console.
Adam fabricated a jig before he cut out the old console to ensure that the new one was put in the exact same location.
https://www.youtube.com/watch?v=v40ZpRL1Osw
Here is a diagram of the rear console specs taken from another poster on the 914world. I don't recall who initially put it up, but thank you. 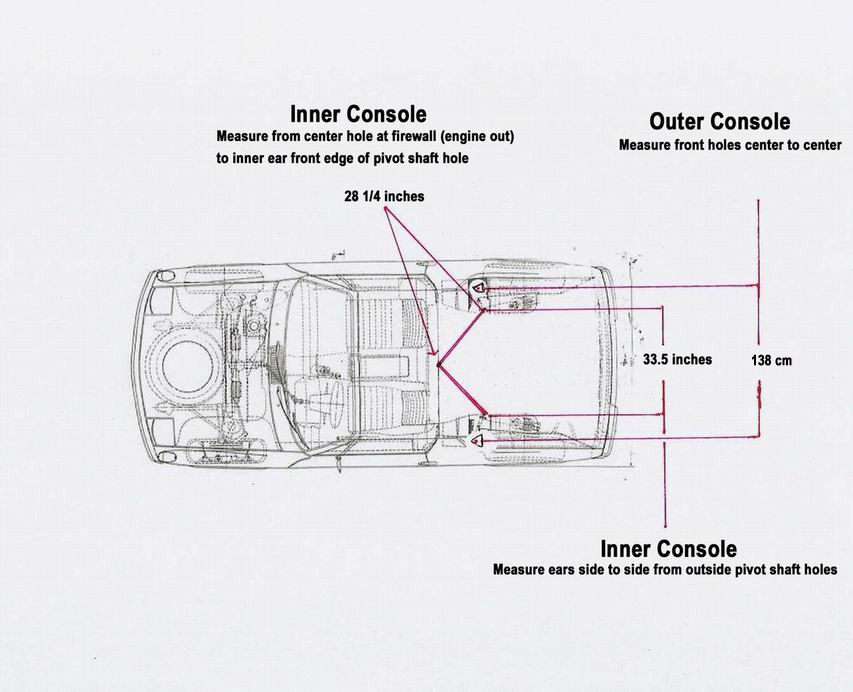
Posted by: bulitt May 2 2014, 08:11 AM
Nice Jig! So you told me once- the steel you use is treated to prevent rust? So the inside of the ears should be good to go? Adam stated he used POR? IMH opinion there may be better rust treatments, the Eastwood products as example, but possibly the experts will chime in.
Posted by: peteyd May 2 2014, 10:48 AM
Nice Jig! So you told me once- the steel you use is treated to prevent rust? So the inside of the ears should be good to go? Adam stated he used POR? IMH opinion there may be better rust treatments, the Eastwood products as example, but possibly the experts will chime in.
Yes the steel we use is Galvanneal. It is used to prevent future rusting on our parts. Adam put the POR15 on the original metal of the car. People have their opinions on what is a better product to use for rust prevention. We use POR 15 and it works fine. I have not used any other product so I dont know which product is better.
Use whatever rust prevention product you want, but make sure you use something on the original steel.
Posted by: Moneypit May 2 2014, 01:49 PM
This is great stuff guys! My driver floorpan is like above, with a hole. The seat bracket also rusted and broke on one side. Is it possible to do floorpan repairs without pulling the car all the way down and putting it on a rotisserie?
Also, looks like you guys need a Porsche tank to go with those tractors. I think Bovington in the UK has a King Tiger with the Porsche designed turret...
Posted by: balljoint May 2 2014, 05:12 PM
Hey Pedro, where do you guys buy your galvanneal from? I'm curious if it's a Dofasco product.
Posted by: peteyd May 15 2014, 06:16 AM
Hey Pedro, where do you guys buy your galvanneal from? I'm curious if it's a Dofasco product.
The steel is purchased from a supplier in Michigan. Same company that supplies the other car companies like Toyota, Ford, GM, etc....
Posted by: Luke M May 15 2014, 06:51 AM
Hi Pete,
How's the progress on the lower engine firewall coming along?
BTW, I like the videos of the new metal installs.
Posted by: Moneypit May 15 2014, 09:14 AM
Have you guys ever considered renaming your business to Rustoration Design? Maybe as a joke on 9/14/2014?
Posted by: peteyd May 16 2014, 08:26 AM
Hi Pete,
How's the progress on the lower engine firewall coming along?
BTW, I like the videos of the new metal installs.
Luke,
I have made a few modifications to the die and it is waiting to get into the press. I hope to get it in there very soon.
Posted by: rick 918-S May 16 2014, 08:46 AM
I love your parts and videos but Please consider wearing sleeves when you weld. I had a friend develop melanoma from tacking without gloves. They took a finger, then his hand, then his arm to the shoulder before the cancer finally took his life. 
Please continue supporting our little cars. With your parts our cars will last generations.
Posted by: Dr Evil May 16 2014, 06:30 PM
Pete, you are the fricken MAN! Always good to see you and your work at Hershey.
Posted by: Cairo94507 May 17 2014, 07:48 AM
I love watching your videos to see how this is done. Very informative. Thanks so much.
It would be extremely cool if you guys actually did make a chassis in white for our cars.
Posted by: Luke M May 17 2014, 08:53 AM
Hi Pete,
How's the progress on the lower engine firewall coming along?
BTW, I like the videos of the new metal installs.
Luke,
I have made a few modifications to the die and it is waiting to get into the press. I hope to get it in there very soon.
Hi Pete,
Good to hear about the progress. I'll be patiently waiting for the the finished product.
Thanks,
Luke
Posted by: bandjoey May 17 2014, 11:27 AM
I bought a third of a car from your original owners and the quality was 110%. I recommend you all the time. If you are in Dallas -Ft Worth you need to stop in at Zims. I argue with them about your quality but they keep ordering from some guy in Denmark (356 body parts).
One day......your new 914 body....
Posted by: jmill May 17 2014, 01:53 PM
I appreciate you guys taking the time to produce these videos. Top notch! I also hope it creates an additional sales jump. Companies that produce good quality, affordable parts for our little cars are getting scarce. 
Posted by: Dave_Darling May 17 2014, 07:57 PM
It could be that they got burned too badly by the previous owners. The parts were always good, as I recall, but the delivery times and the communication was really horrible near the end. I know that is why Pelican stopped ordering from them.
It sounds like you guys are about a thousand times better with orders and customer support. Hopefully someone can make the point with Zim's--and I'll see if I can talk to Wayne about Pelican as well.
--DD
Posted by: peteyd May 30 2014, 02:22 PM
Hello All!,
Thanks for all the positive remarks. We are glad to be able to provide these videos to give a little bit more instruction on how to install all these pieces.
I bought a third of a car from your original owners and the quality was 110%. I recommend you all the time. If you are in Dallas -Ft Worth you need to stop in at Zims. I argue with them about your quality but they keep ordering from some guy in Denmark (356 body parts).
One day......your new 914 body....
Zims is a distributor for the Simonsen brand that is produced in Europe. They dont move too much volume, but their margins are bigtime. I dont think he wants to start pushing our stuff, there would be too much to stock.
Anyways,
I have another video for you guys. Adam is installing the engine shelf on the passenger side. (sorry Rick, hes still in his short sleeve shirt because we shot all these vids in the same day. But I will tell him to wear a long sleeve next time.)
In a couple months we will have the engine shelf available for the driver side. So subscribe to our youtube channel or newsletter to get notified of new things happening around Restoration Design.
I guess one day we will be making a whole body, but I think it will be a 911 before the 914...
https://www.youtube.com/watch?v=uZGf9yaFHEk
Posted by: peteyd Aug 13 2014, 06:08 AM
I have one more installation video of the battery tray and support. Enjoy!
https://www.youtube.com/watch?v=6ExKXK0UXpI
Posted by: snflupigus Jun 25 2018, 12:43 AM
Over 110degrees outside in the pic below 
Thanks for the design guys! I added a few inches to the mounts to raise the shell, maybe not a good idea but fixable if it makes it harder to roll over? Not finished welding yet, need more bracing! but for now it is fine as it sits. This is my 'bad' shell that has holes EVERYWHERE and was used just to test fit. The nice shell is in the garage
Changed it up a bit other places too:
41" horizontals
25" diag/vert mitered all 22.5degrees. I was thinking of having some 135deg gussets made on a waterjet/laser/plasma somewhere.
107 1/8" connections.
1/4" plate mounting.
Link to more pics.
https://photos.app.goo.gl/H4bwWScZuNJN89N68 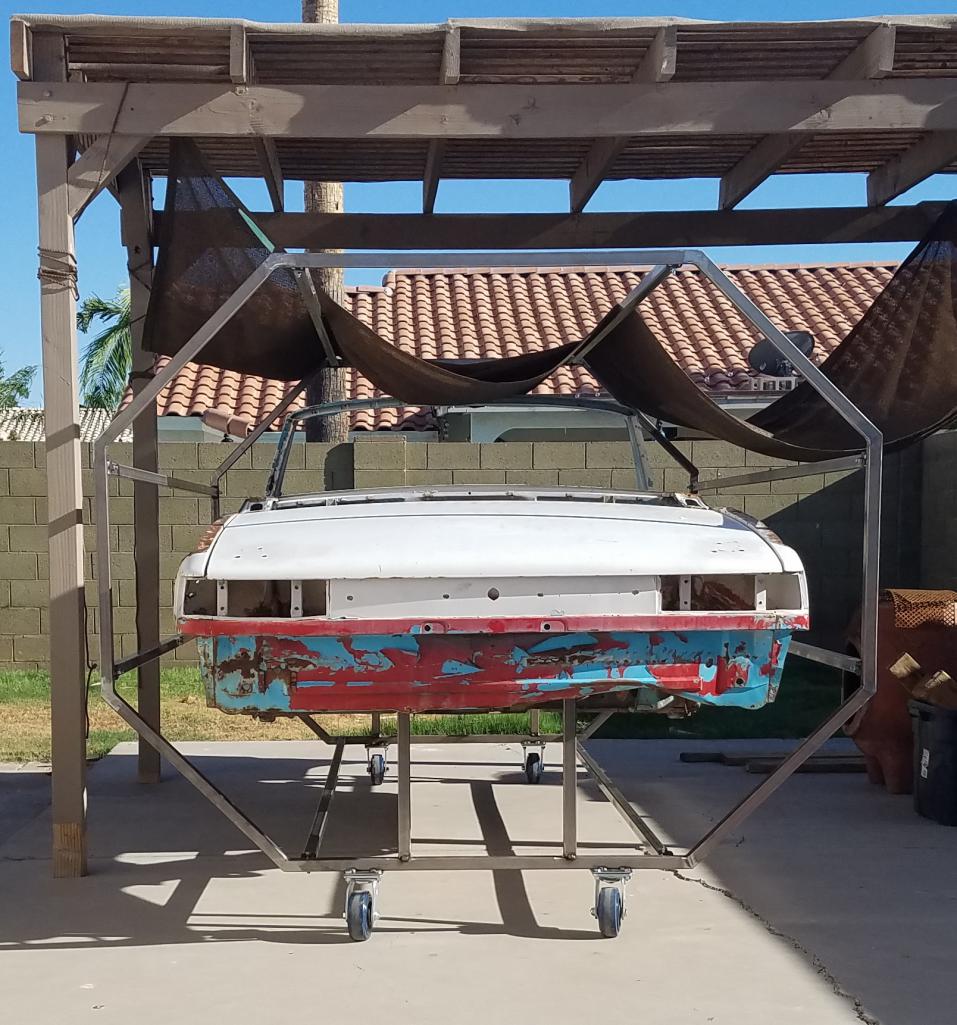
Posted by: peteyd Jun 26 2018, 09:40 AM
Over 110degrees outside in the pic below
Thanks for the design guys! I added a few inches to the mounts to raise the shell, maybe not a good idea but fixable if it makes it harder to roll over? Not finished welding yet, need more bracing! but for now it is fine as it sits. This is my 'bad' shell that has holes EVERYWHERE and was used just to test fit. The nice shell is in the garage
Changed it up a bit other places too:
41" horizontals
25" diag/vert mitered all 22.5degrees. I was thinking of having some 135deg gussets made on a waterjet/laser/plasma somewhere.
107 1/8" connections.
1/4" plate mounting.
Link to more pics.
https://photos.app.goo.gl/H4bwWScZuNJN89N68
Great job!
Posted by: Ninehundredfourteen Oct 21 2021, 09:22 AM
Here are the drawings for the rotisserie we made.
Hello from the uk. Im interested in creating this design. Could you or anyone here illustrate what the dimensions for the rotisserie are in ie feet & inches or metric. Just need the centre point between the 2 mounting points so a guy with cad who only works in metric can work out how much approximately this is going to cost?
hope ya'll understand my request

thanks Robbie
Rear hoop
Front hoop
close up of horizontal tubes.
Powered by Invision Power Board (http://www.invisionboard.com)
© Invision Power Services (http://www.invisionpower.com)