Printable Version of Topic
Click here to view this topic in its original format
914World.com _ 914World Garage _ metal fabbers...report.
Posted by: trekkor Dec 30 2004, 12:00 AM
I'm repairing the battery tray and related hot spot. 
I need your tech advice on the procedure.
I want to first make paper templates and then fit the sheet metal. Maybe hang it with rivets or screws before the big weld off.
Stock look is not important to me. Just needs to drain and support the new battery tray and pedestal.
I will sand off the remaining surface rust before applying rust converting primer. I'm scratching the naval jelly approach.
Also, please post pics of your repaired areas.
Here's my project.
Thanks, as usual! 
KT
Attached image(s)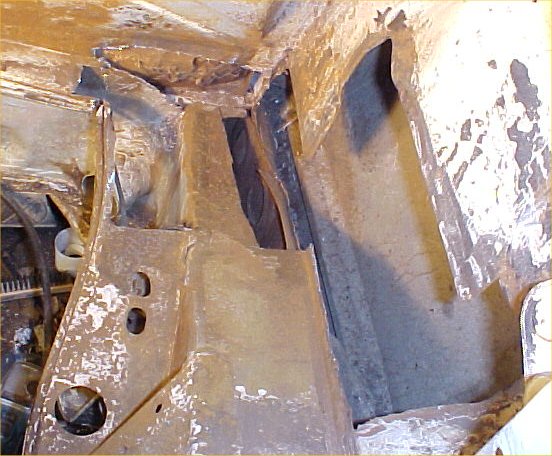
Posted by: J P Stein Dec 30 2004, 12:25 AM
I see the specter of Dirk Wright hovering over your project.....hopefully he won't be back here for a while. 
Fit the pieces.... hold them in place with magnets & weld the suckers up.
Found a lovely paint removing/ metal finishing tool today.
It fits on my favorite tools....die grinders.
I show you a pic, but my camera batteries are daid. 
Posted by: trekkor Dec 30 2004, 12:28 AM
| QUOTE |
| Dirk Wright |

KT
Posted by: JOHNMAN Dec 30 2004, 12:36 AM
Man, that's a big hole.
You have your work cut out for you (pardon the pun).
I would make up some templates as you suggest and then start filling in the holes. I would not use rivits, but clamps/magnets/etc. to hold the parts in place while you weld them in.
I would probably start with the longitudinal repair and work "up" from there. I would suggest to leave a large drain area and not necessarily duplicate what the factory did in that area (BTDT).
As for the battery tray and support, I would buy the parts and weld in the support and then screw the tray to the support so you can clean under it annually.
Posted by: airsix Dec 30 2004, 12:46 AM
In the picture below I've marked off the pieces I'd cut and numbered them in the order I'd weld them in. The first piece would be the firewall patch. I'd clean out all the seam sealer goop and weld this in from inside the passenger compartment. Then touch it up if needed from the engine side. Next would be the vertical portion of the longitudinal because if you save it for later you won't be able to get to it. Also, it provides something to weld too when you get to the horizontal top patch. Since the tongitudinal top is curved you'll need to do some 'beat to fit' as they say. Rough out your patches with plenty of overlap. I put a question mark on the longitudinal top patch because I'm undecided whether I'd make it short, or longer (into the area with the question mark). It depends on how weakened that area looks to you. Since I've shown a top patch with so much overlap I'd probably drill holes above the overlap areas for some rosette welds to tie it together really strongly. This is just my suggestion and I do not have an advanced degree in rustoration science.
-Ben M.
Attached image(s)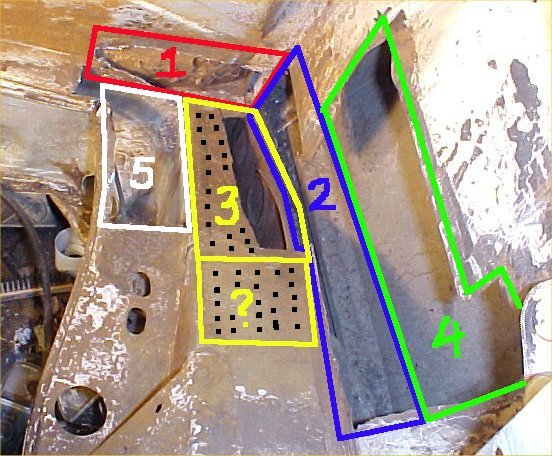
Posted by: GWN7 Dec 30 2004, 01:48 AM
You can also trim the holes to make square patches fit. Cut the patches to fit snuggly and butt weld them in...grind the welds down and you won't hardly see the patch. You can even add bondo over the welds so it look like it's factory fresh.... 

Posted by: J P Stein Dec 30 2004, 01:52 AM
Drik Wright........this is 914 lore so listen up..........
Dirk Wright's Disease (DWD....otherwise knowed as the "While I'm Here Syndrome"....WISH....artistic license  ) effects those foolish folks doing projects on 914s. He found "surprises"
while working on his 30 year car and found an ever expanding list of things to "take care of" while buying parts and continually disassembling his project. He drove him self over the edge, solt all his stuff at pennies on the dollar and checked into a monastary in Tibet...I heard. Personally, I think he was so anal that he crawled up his own asshole and disappeared.....but I have no proof 
Speaking of anal.... Hi, Ben. Seen Dirk lately?
Posted by: DJsRepS Dec 30 2004, 06:44 AM
This is a great Form good post AirSix I just did all that but mine was not as bad. Should the surrounding metal be treated with the osphos treatment before welding ? Good or bad? I was concerned about inhaleing the welding fumes from the treated metal.
Posted by: Bleyseng Dec 30 2004, 07:16 AM
Set up your pieces like Ben said but buy the engine shelf as its pretty hard to make the curves fit right. Clean everything first to bare metal then use a weld thru primer. Spray the rust stuff down into the long and into the wheelhouse. To get a stock look lay the pieces over the hole, tack them in, and then cut along the new piece to get a perfect seam to butt weld. or just slap the new metal on over the hole and stitch weld it in slowly.
DWD, we all get it sometime!
Guess I and getting my fair share this winter with the engine repair. 
Geoff
Posted by: Gint Dec 30 2004, 07:17 AM
Ben's plan makes sense to me. Id prolly also drill out te spot welds for the engine shelf and just pop the $$$ for a replacement from Restoration Design. Taking it off will also give you (DW's LOL) more room to work while you're in there.
Posted by: McMark Dec 30 2004, 11:56 AM
I like Ben's plan. I think Trekkor should use rivits. I don't think he should buy the R.D. engine shelf piece. I think "beat-to-fit" will work fine for him.*
*This message was custom tailored from Trekkor and does not in any way represent the way I would do things. But I know Trekkor and this is his way.
Posted by: greg.treadway Dec 30 2004, 12:10 PM
Looks to me like you need an engine shelf, inner wheel house, upper longitudinal and then a small piece to cover that back firewall.


I hope this helps.
Posted by: Aaron Cox Dec 30 2004, 12:15 PM
wow.... that looks like the way to go greg,
how much do those 4 pieces add up to through you??
Posted by: greg.treadway Dec 30 2004, 12:31 PM
The pieces are not cheap. The engine shelf retails for $175, the wheel house retails for $250 and the longitudinal piece retails for $275 and they are all in stock. For club members I will personally give a 5% discount. I hope this helps.
As always feel free to contact me via any of the instant messenger programs.
Posted by: airsix Dec 30 2004, 12:50 PM
Let me elaborate a little on my 'beat to fit' comment. What I would do specifically is get some card stock (like standard paper manila folders) and cut templates out that fit the way you want them too. You'll be able to bend them to fit the curves and trim them up until you like the fit. Test each piece to see where you need to attach it first so that as you press it into place everything lines up correctly. You'll apply your sheet metal patches the same way. Then flatten the cardboard pieces back out and use them as paterns to cut your sheet metal pieces. Now when you start to work with your flat sheet metal patches you can hammer form them as you weld them in - alternately welding and hammering as you go. You should be able to form the pieces nicely into possition this way.
If this was a concourse show car I'd get AA or Restoration Design's repair pieces, or make accurate patches and butt-weld them. But to clean up a driver on a budget, or if building a autocross/track car I'd use the overlapped/seam-welded patch method. I would trust it to be stronger than butt-welded perfect-fit patches (at least if it was me doing the welding).
I'd do the metal prep just like Geoff said. I'd also apply some POR-15 'Metal Ready' (like Ospho) before I sprayed the weld-through primer, but that's probably not necessary if you've done a good job of grinding all the scale away.
-Ben M.
Posted by: trekkor Dec 30 2004, 02:52 PM
Thanks for the report.
I'll be back at it in a little while. 
| QUOTE |
| standard paper manila folders |
I put them in the car last night.
| QUOTE |
| 'beat to fit' |
Of course...

| QUOTE |
| I know Trekkor and this is his way |
Function before fashion. All the way. who's gonna stick their head in my engine compartment, besides me?

Greg, thanks for your pics!
I would like to see some more top view shots of completed work.
KT
Posted by: trekkor Dec 30 2004, 07:26 PM
Good things are happening
Used the grinder and wire wheel to remove most of the surface rust.
Attached image(s)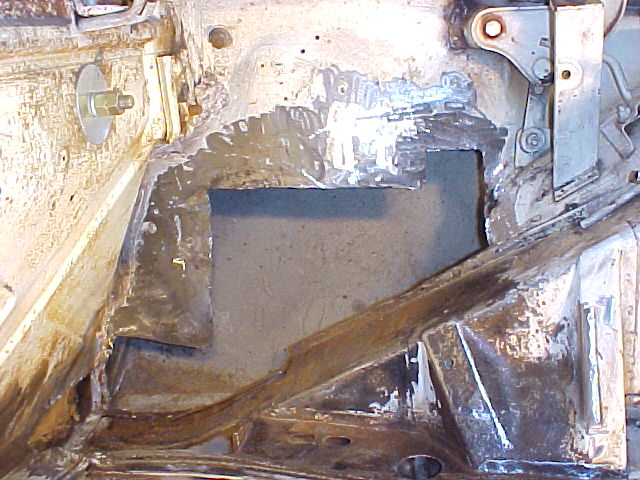
Posted by: trekkor Dec 30 2004, 07:28 PM
Painted with rust converting primer. 
Attached image(s)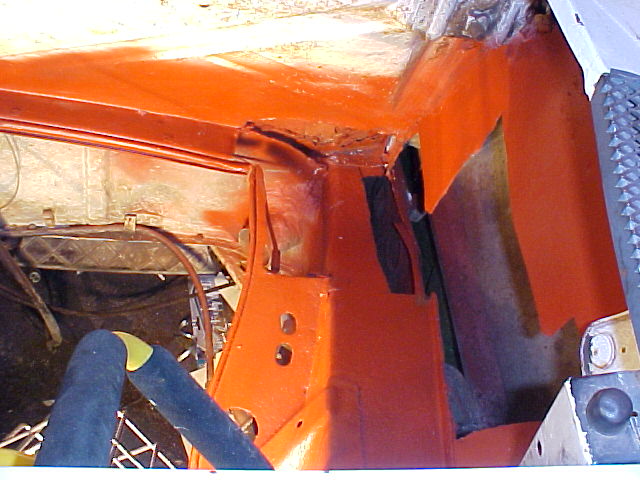
Posted by: trekkor Dec 30 2004, 07:33 PM
Here's the pieces ready to weld in.
Firewall patch, engine shelf in 22g and the long patch is in 16g.
After this post I'll go weld 'em in.
Attached image(s)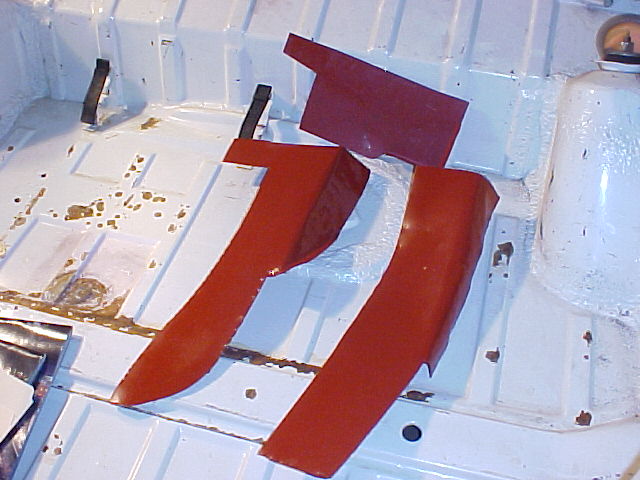
Posted by: trekkor Dec 30 2004, 07:36 PM
One more
I made a matching engine shelf for the other side.
Covers the hole and blower pedestal butchery.
I'm goin' back...now!
Attached image(s)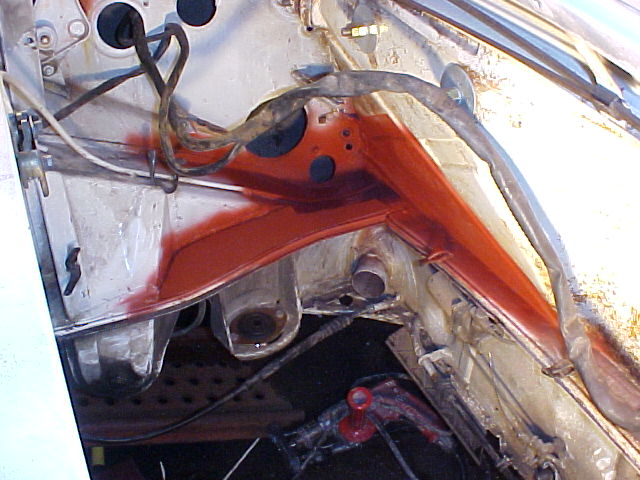
Posted by: trekkor Dec 30 2004, 09:16 PM
![]()
Attached image(s)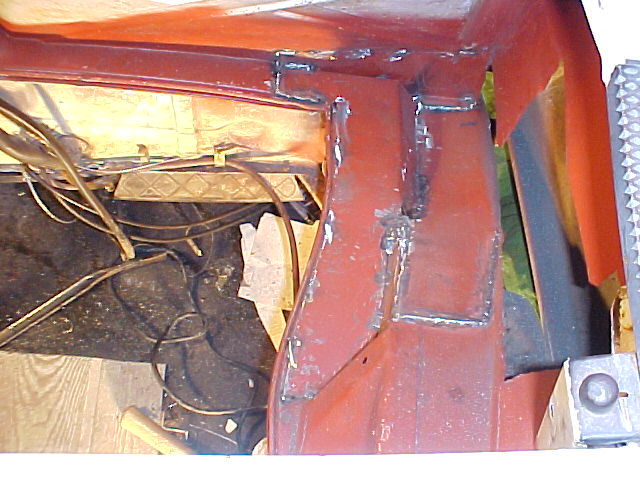
Posted by: GWN7 Dec 30 2004, 10:55 PM
Dude....you were asking us for help? Ever thought about teaching?
Great job 
Posted by: JOHNMAN Dec 30 2004, 11:38 PM
Hey man,
That's lookin good.
Don't forget the drain hole or it will become a "hell hole" once again.
Again, it's lookin very good.
Keep up the good work.
P.S.
| QUOTE |
| What I would do specifically is get some card stock (like standard paper manila folders) and cut templates out that fit the way you want them too. |

Posted by: trekkor Dec 31 2004, 02:29 AM
Thanks for the kind words.
Yep, one more template to make.
BTW I'm using an air chisel to cut out these pieces.
Does pretty well. Also red tin snips and grinder.
As to the drainage, I've left a small gap under the engine shelf in the lower long section so the water can just roll away. 
This will be done tomorrow. Yay!
KT
Posted by: jones Dec 31 2004, 01:11 PM
Wow that is inspirational. Great work! I will be doing the same @ some time. Thanks for the great pics. One can really see what goes where and a logical sequence.
Posted by: bryanthompson Dec 31 2004, 01:24 PM
Wow, you're a freakin' rockstar!
Posted by: trekkor Dec 31 2004, 05:38 PM
O.K. guys, here's where I am now.
I having a blast, you ought to know that
template.
Attached image(s)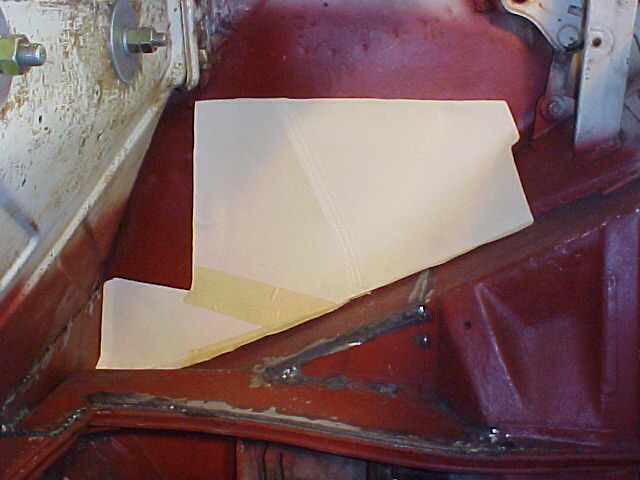
Posted by: trekkor Dec 31 2004, 05:40 PM
It's in!
I'm a rookie no mo'
Attached image(s)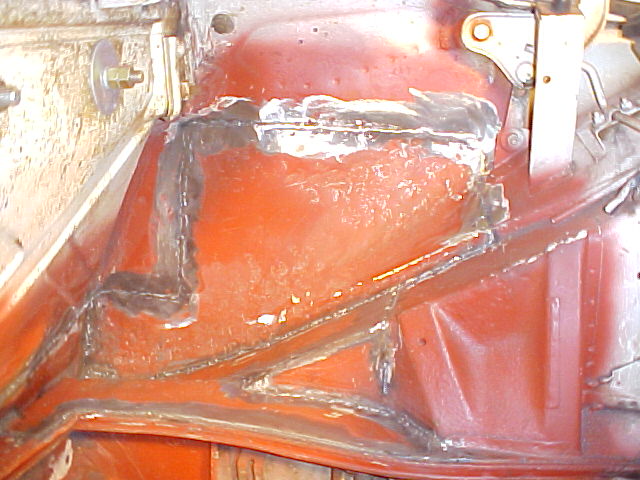
Posted by: greg.treadway Dec 31 2004, 05:42 PM
I think you did an excellent job. I must admit I am more of a purist and would have used repro parts, but you did a great job and should be very proud of your work. Want a job??!?
Posted by: trekkor Dec 31 2004, 05:43 PM
I'll put in the battery tray in a few minutes.
Attached image(s)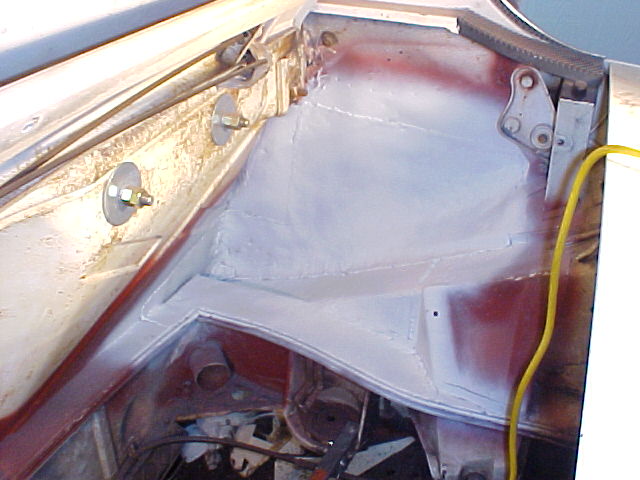
Posted by: trekkor Dec 31 2004, 05:45 PM
Other side 
Attached image(s)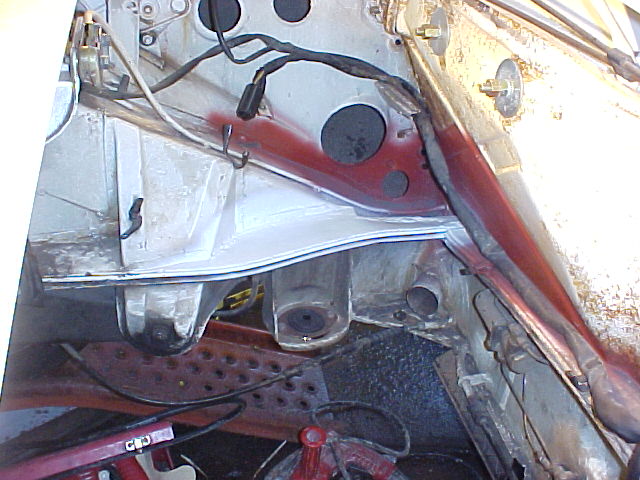
Posted by: URY914 Dec 31 2004, 06:10 PM
Go, man Go!!!
Great work. But boy it sure looks heavy
Paul
Posted by: trekkor Dec 31 2004, 08:14 PM
Done! 
KT
Attached image(s)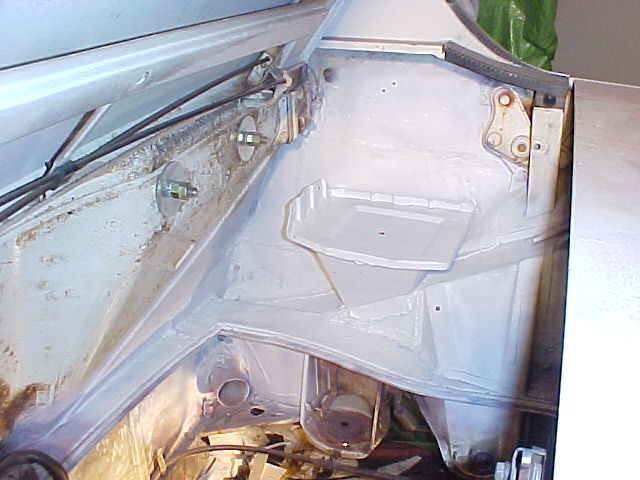
Posted by: DJsRepS Jan 1 2005, 06:36 AM
What are the two big bolts through the cab firewall. Roll cage? Seatbelts? NOS tank?
Posted by: greg.treadway Jan 1 2005, 02:08 PM
Finally a repro piece. Whew!! Are the bolts for a seat harness?
Posted by: markb Jan 1 2005, 02:51 PM
Nicely done!
Posted by: Engman Jan 1 2005, 03:29 PM
Nicely done! Proof positive that you CAN make your own pieces and save some $!
M
Posted by: Gint Jan 1 2005, 05:58 PM
Looks great Trekkor!
Get that 6 in there!
Posted by: McMark Jan 1 2005, 06:15 PM
The bolts are for a 5 point harness.
Posted by: watsonrx13 Jan 1 2005, 06:30 PM
Great job Trekkor. 
When I replaced the right suspension ear, I also replaced the engine shelf and the battery tray with Restoration Design parts...
Attached image(s)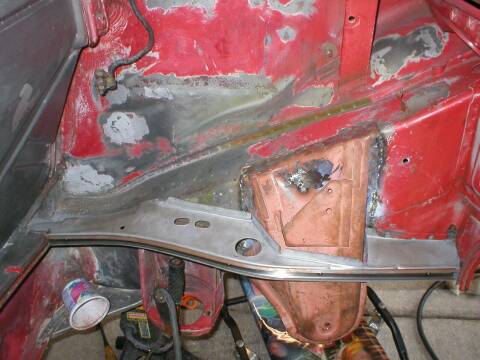
Posted by: Brando Jan 1 2005, 06:39 PM
Wow, that is freakin awesome! 
A job well done!
Posted by: trekkor Jan 1 2005, 08:21 PM
Thanks...
I gave myself a little pat on the back for my first "attempt" at body work.
Yep, those are the bolts for my clip in harness mounts.
KT
Posted by: xsboost90 Jan 1 2005, 08:53 PM
excellent job dude! Mine looks kinda like that. Ive done plenty of patch making but my battery tray was done by the po in a body shop. Nothing like saving money and getting the job done to boot! 
Attached image(s)
Posted by: Randal Jan 1 2005, 10:11 PM
| QUOTE |
| What are the two big bolts through the cab firewall. Roll cage? Seatbelts? NOS tank? |
Stuff only a real racer like Mr. T would know !!!!
Posted by: mattillac Mar 29 2005, 07:39 PM
could someone explain a seam weld? does one piece overlap the other? i'm gonna have to do this when i learn me to weld.
Posted by: scotty b Mar 29 2005, 08:39 PM
My dads car started out looking like this
Attached image(s)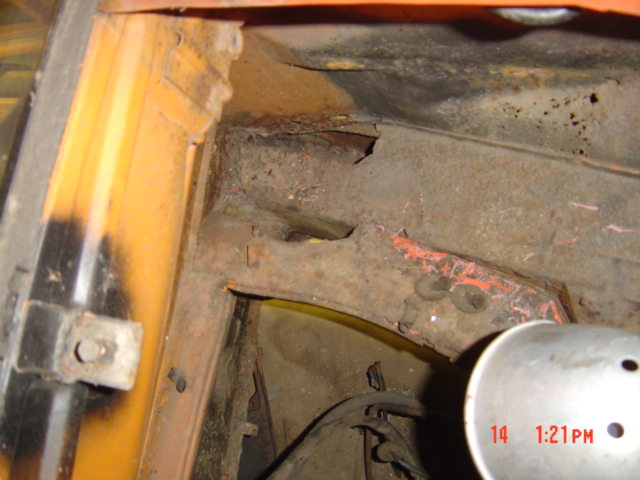
Posted by: scotty b Mar 29 2005, 08:41 PM
Then as i looked fuirther it looked like this
Attached image(s)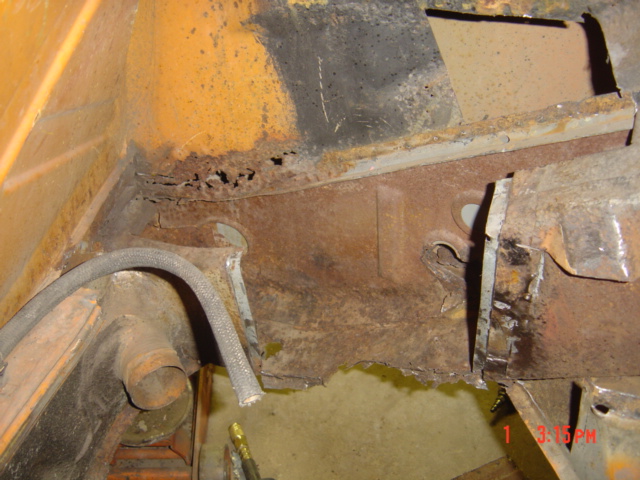
Posted by: scotty b Mar 29 2005, 08:45 PM
as of yesterday it looked like this. The silver is ALL new metal. I have found that most of the time people don't go far enough when repairing this area. It is usually ALOT worse than it appears.Engine mount almost rusted through, susp. console rusted through in 2 spots not visible until removed.
Attached image(s)
Posted by: scotty b Mar 29 2005, 08:48 PM
this was behind the engine support. Don't mean to scare you just to inform and enlighten as to what mat be lurking
Attached image(s)
Powered by Invision Power Board (http://www.invisionboard.com)
© Invision Power Services (http://www.invisionpower.com)