Printable Version of Topic
Click here to view this topic in its original format
914World.com _ 914World Garage _ Monster Garage Day2 or 5 depending..
Posted by: Andyrew Aug 30 2003, 10:05 PM
We're to the point of routing the FI wiring and hoses. We'll cut new hoses once we get them all situated.
Does any one have any good pictures of the engine with the Air filter off that would show where the wires/hoses are suppose to sit?
Thanks progress is being made!!!! 
Posted by: Andyrew Aug 30 2003, 10:26 PM
Some pics for you to gawk at..
Attached image(s)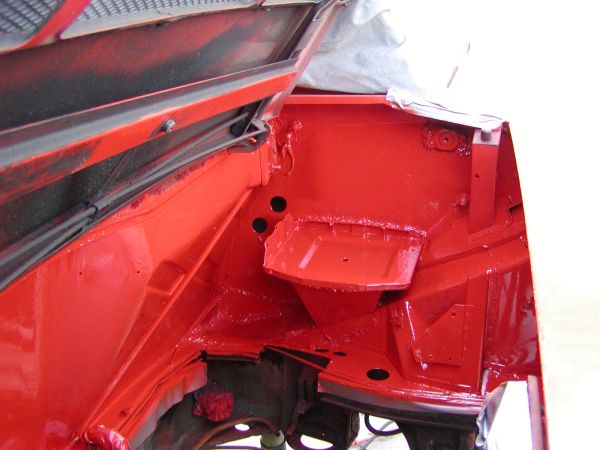
Posted by: Andyrew Aug 30 2003, 10:27 PM
Yes very fresh.. havent taken masking off..
Attached image(s)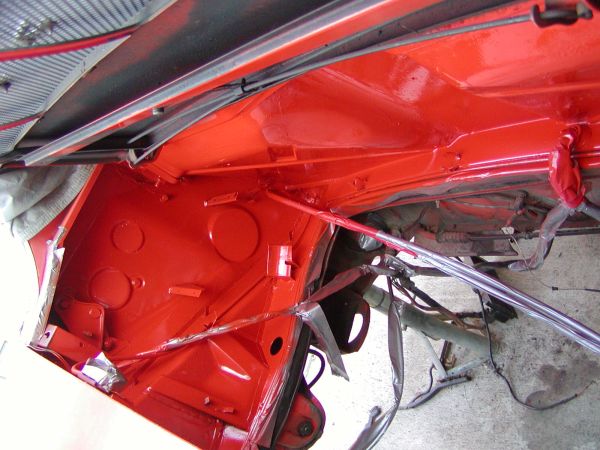
Posted by: Andyrew Aug 30 2003, 10:30 PM
Sorry, its a little blurry..
Like the color scheme?
That pic is where I am right now..
Attached image(s)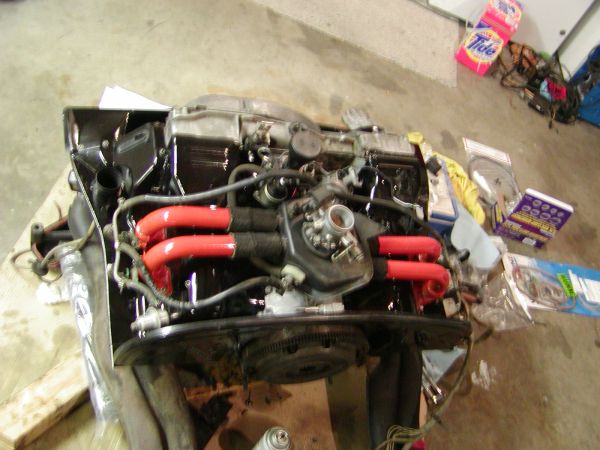
Posted by: Brad Roberts Aug 30 2003, 10:33 PM
Andy was with me today..
B
Posted by: Andyrew Aug 30 2003, 10:46 PM
Huh? 
I was not with you..
But the other andy maybe.. Let me reiterate..
Huh?
Andrew
Posted by: Andyrew Aug 30 2003, 11:17 PM
Never mind about the picture. I think this one will tell us what we need to know. (but the more the merrier (easier))
Daddie DanD
Attached image(s)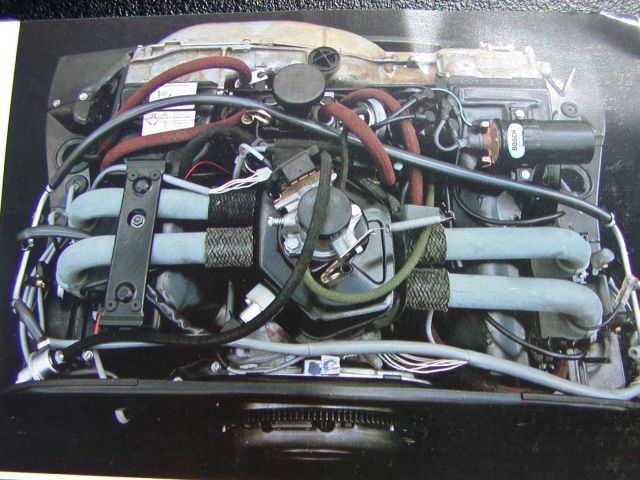
Posted by: Eric Taylor Aug 31 2003, 12:14 AM
WOW!  Andy i'm jealous of your battery tray and engine! I hope my teener's engine area turn's out so nice.
Eric
P.S.
That's some fast metal work. Wasn't it a week ago you posted rotted pic's?
Posted by: Andyrew Aug 31 2003, 12:52 AM
Yup that was pretty fast repair.. I spent alot of time doing this, and for about 5 days now I havent been doing anything else but getting the car ready.. Unfortunately it seems that I wont be getting my caliper pistons in time (susposed to be here friday.. not here yet, and I dont think that USPS delivers monday..), so even though it seems all in vein, I still have alot of work done. Hey I have a rear handbrake, I aint need no stinkin front brakes!! 
Posted by: dan10101 Aug 31 2003, 01:01 AM
Hummm..... YES.... You Do!
I'm not riding in that thing with just a handbrake. 
Posted by: rhodyguy Aug 31 2003, 08:23 AM
you removed the pad too, nice. doing mine gave me much satisfaction with the finnished product. but like mine you forgot to clean the bottom of the engine lid. i looked and looked, something was wrong. pull and clean that mother.
kevin
Posted by: sharper Aug 31 2003, 08:39 AM
Nice job. Now you need to come out here and fix mine for me. My battery area isn't quite as bad as yours was but still needs repair.
Posted by: Dave_Darling Aug 31 2003, 10:13 AM
Andrew, is that motor pic from a Porsche brochure? If not, I'd be interested to know where you got vacuum hoses that are the right colors and everything!
BTW, if you're still looking for more "where do the hoses go" info, check on Pelican's site.
--DD
Posted by: dan10101 Aug 31 2003, 11:41 AM
Yes dave, that is a pic of a pic.. the orange on black is mine.. I cant remember where I took a pic of the factory engine..
Oh and thanks, I already printed the "Daves hose diagram" and am using it for reference..
Andrew
edit, I hate switching computers...
Posted by: Andyrew Sep 1 2003, 12:50 AM
Alright, after a days work, we have the engine and trani all mounted, valves checked to speck.. some other things done in relation to it.
Left to do, is
Change trani oil
Change engine oil
finish the wireing on the engine and so forth
Install the harnesses
rebuild calipers (after I get them tues  )
)
Align the car good enough to drive.
Bleed the brakes
And some other minor things..
Today we had a long brake, only worked for about 5 hours..
Andrew
Attached image(s)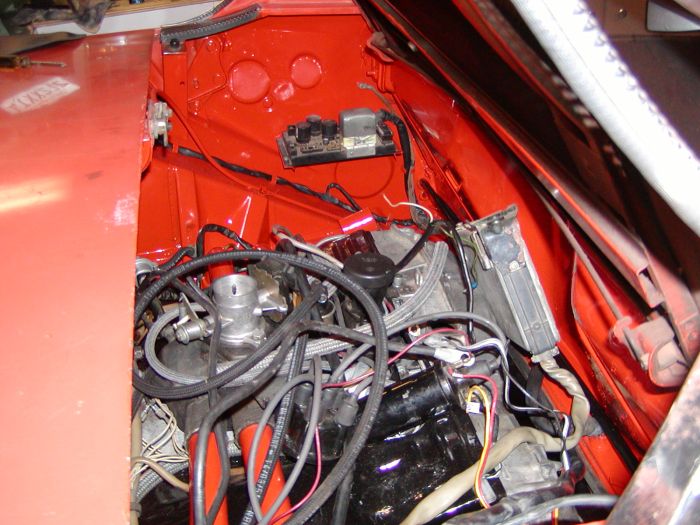
Posted by: Bleyseng Sep 1 2003, 09:24 AM
Here is a hose layout
Geoff
Attached image(s)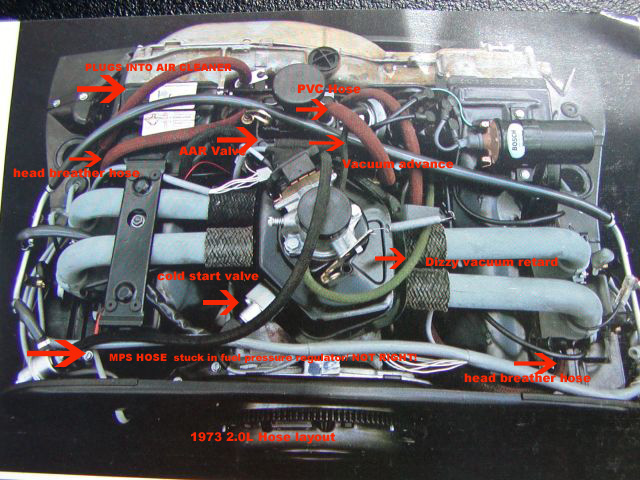
Posted by: seanery Sep 1 2003, 09:40 AM
Geoff make a new thread with that pic and let's get it into the "Classic" section.
Very good info for folks!
Posted by: Aaron Cox Sep 1 2003, 10:17 AM

Posted by: Eric Taylor Sep 1 2003, 10:41 AM
YES! How about a pic for the 1.7 and 1.8 ?
Eric
Posted by: dan10101 Sep 1 2003, 11:09 AM
Geoff,
Thanks for the labeling. It helps confirm what we thought we knew.
A question for the group. Where does the vaccum advance plug into? It looks like it plugs into the throttle body on the diagrams. Is that true or does it plug into the intake under the throttle body?
Thanks,
DanD
Posted by: dan10101 Sep 1 2003, 11:12 AM
I forgot my main point. His throttle body doesn't have a fitting. It's just a blank. You can kinda see it in the picture above.
Posted by: Bleyseng Sep 1 2003, 11:15 AM
It plugs into the throttle body only on 73 throttle bodies. On later cars Porsche plugged or didn't install the port on the Throttle body. You can install a port to install the vacuum advance hose. This helps the engine have alittle more umph at lower rpms.
If its not there just leave the hose hanging off the dizzy.
Geoff
Posted by: dan10101 Sep 1 2003, 11:26 AM
Ya, this FI came from a 75 I think. So one of our projects down the road will be to drill for the advance. Probably a smog thing.
Any other gotchas we need to worry about on using a later FI?
For those who didn't know. We bought this car with Weber 34s. Andrew decided to go back to stock.
Posted by: Andyrew Sep 1 2003, 11:54 AM
You say that like its a bad thing. I wanted a little more than 60 hp.. give me the 90 stock hp.
Geof, thanks for all your helpful info, it will all help a whole heck of alot.
Thanks,
Andrew
Posted by: Bleyseng Sep 1 2003, 02:25 PM
Match the ECU, MPS, and the CHT if they don't you will have some minor problems like crappy idle or the worst case- too lean and drop valve seats.
What are the #'s??
Geoff
Posted by: dan10101 Sep 1 2003, 03:11 PM
Everything came off the same car. ECU, MPS, (what's a CHT?), But basically, it's off the same car. We're using the distributor from the 73 2.0 and the relay board off the 73 and that's about it. That brings me to the next questions.
How do these wires hook up to the distributor? Only one was hooked up when we had it running.
Attached image(s)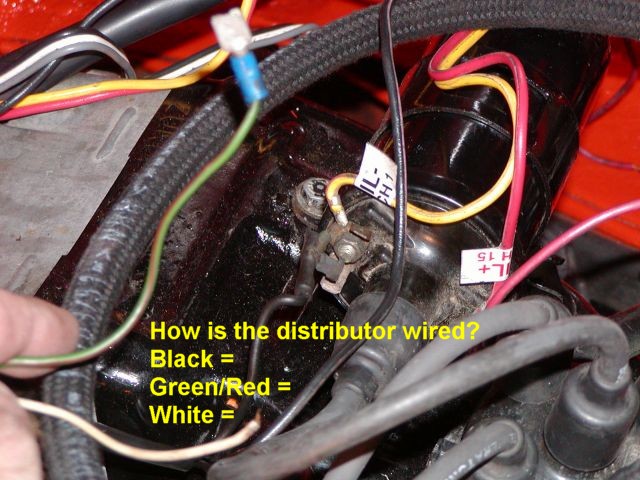
Posted by: dan10101 Sep 1 2003, 03:12 PM
The next question (probably not the last) has to do with these wires to the relay board. The red wire comes from the alternator and the green/red wire are cut and are on the harness under the relay board.
Attached image(s)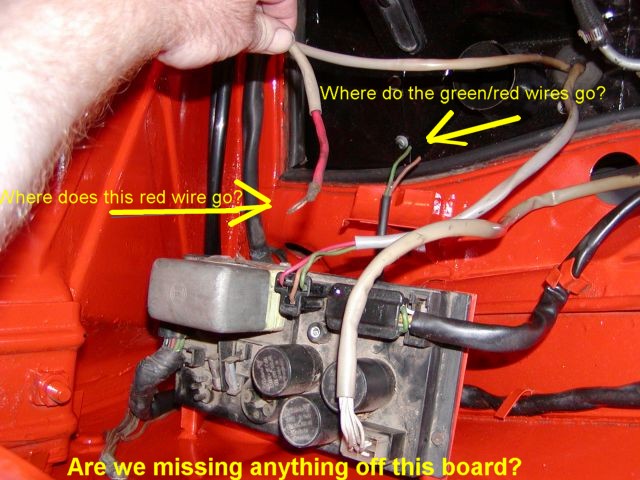
Posted by: dan10101 Sep 1 2003, 04:56 PM
Well, we figured out from the wiring diagram that the red wire goes to the starter. Still working on the gr/rd wire...
The distributor has a smaller black wire, apparently the big black wire goes to the neg side of the coil and the small black wire goes to the positive side of the coil.
The green/red wire goes to the oil sending unit??
White ??
Ahh, CHT, Cylinder head temp. May need to order one of these to match the 75 system. That was one of the things that didn't come with the system we bought.
Sorry for all the questions, but we really appreciate all the help..
Thanks all! 
Posted by: dan10101 Sep 1 2003, 05:00 PM
Looks like the white wire goes to the Supplimentary air valve. Is that the same as the AAR valve?
Posted by: Bleyseng Sep 1 2003, 05:27 PM
The red/green should be the heater fan booster.
The white wire should go to the AAR valve.
Posted by: dan10101 Sep 1 2003, 11:46 PM
Well time is ticking down and we're not done. I guess we'll just get a 50cal machine gun and fill it full of lead. 
http://dsc.discovery.com/fansites/monstergarage/mpegs/gallery/encoded/jesse_misfitparts.mp3
Maybe not.
We got a lot done, but the factory fuel lines were plugged solid. We need to run some replacements. Plus the brake calipers didn't arrive yet and that will keep the Junior in HS from driving his Porsche to the first day of school. Oh well, we're a LOT further than if we didn't attempt it. Maybe by the weekend.
Thanks for all the help, Especially Geoff!!!
Posted by: Bleyseng Sep 2 2003, 05:53 AM
try 100 lbs of air on those lines to clean them out, worked for me.
Geoff
Posted by: Dave_Darling Sep 2 2003, 05:06 PM
The first pic, those wires appear to all be in the "engine wiring harness". That is the one that plugs into the 12-pin connector on the right-rear of the relay board. There should be a somewhat-thick black wire that connects to coil (+) and supplies +12V when the ignition switch is on. There should also be a thinner black/purple wire (the purple fades and can be tough to see) that connects to the coil (-) terminal and is the tach signal wire. The green/red hooks up to the oil light sender just aft of the distributor. And the white one hooks to the AAR (yes, supplemental air valve is another name for it).
The other wires are all alternator-related. The alternator should have four wires coming from it. One harness with red, green, and black wires, and a separate big thick red wire. You've already found that the thick red wire goes to the starter, same terminal that the fat cable from the battery fits on. (That's the primary charging path, alt->starter->batt.) The other three wires connect to the relay board by a plug. Looks like you have the plug on your board but the harness was cut.
[EDIT!] Oh, uh... Nope! On second look, those two wires in the second pic are the two wires to the heater blower motor. That would live in the left-front corner of the engine bay on a metal stand on 73+ cars. 70-72 1.7s had the blower in the middle on a bracket bolted to the engine fan housing.
--DD
Posted by: dan10101 Sep 2 2003, 11:56 PM
Day 8 - Jesse would have blown this one up for sure. Thank goodness we have a bit more patience.
Well we tried 100psi and it worked for the large tube, but the small one is just too gummed up to be used. Tried jamming a coathanger down there and still wouldnt' budge, It's now history. Have a couple of brake lines per Pelican tech tip. We'll Monster up a fuel system and get it running soon. (after he POR15s the channel).
DaveD, Right on brother...  Just confirmed everything I was guessing,. Except I guessed wrong on the big and little black wire, and I couldn't find the oil sending unit because our new breather hose was hiding it. All is well wiring wise. (except for a couple wierd ones under the car...Hmmm)
WWIT (while we're in there), we decided it would be a good time to install the front sway bar since the fuel tank is out. Not sure how it mounts on the inside. The top two bolts seem fine, but the bottom one goes thru a double wall about 1.5" deep. Is that normal? Just use a long bolt? The picts I've seen show a notch cut out for the bottom bolt. Andyrew, (do I have to call you that on this board?) Can you post that picture you found?
Posted by: Andyrew Sep 3 2003, 12:07 AM
Here is how andy did it.. I am guessing this is the accepted way of practice since I am also guessing it was done at brads shop..
Just cruzin through andy's pics and saw it..
Andrew
Posted by: Bleyseng Sep 3 2003, 08:33 AM
Thats how you install the front sway bar if the car doesn't have the factory mount.
Geoff
Posted by: dan10101 Sep 4 2003, 11:40 PM
Does anyone have a picture of the factory sway bar from the fuel tank side?
I've seen a few from the wheel well side.
Andy spent the big bucks and bought aftermarket...
Posted by: Brad Roberts Sep 4 2003, 11:45 PM
They are done the same way... the bottom bolt is hidden (Nuts welded to chassis).
B
Posted by: dan10101 Sep 4 2003, 11:47 PM
Ok, day hmmm. must be about 10 by now..
Pistons came in from sunny Florida yesterday. The only problem is they were surrounded by these UGLY calipers. We spend hours trying everything to get them out. Finally got one out and were releved to find it in good condition. (we thought they would be pitted to death).
Spend a couple more hours tonight. Then it dawned on me. Cut the suckers in half! So we did. 45 mins later they were all out. We cut until we were within a few mm of breaking through. Then hammered them apart. Worked like a charm.
Attached image(s)
Posted by: dan10101 Sep 4 2003, 11:50 PM
B
So, there is not a plate on the inside. Just 3 bolt holes and the large hole acording to the template.
I suppose we can cut a notch like Andy did to put a bolt on the bottom.
Thanks Brad.
Posted by: dan10101 Sep 4 2003, 11:52 PM
Here's a cross section of a caliper for someone who was wondering what it looks like. Well, at least I was.. 
Attached image(s)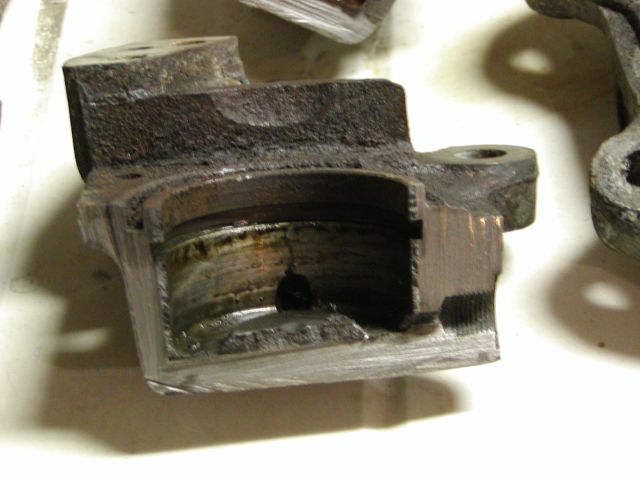
Posted by: MarkV Sep 5 2003, 12:02 AM
That looks like a lot of effort. Did you try compressed air? You could have wrapped a rag around it hooked it up to the car & pumped the brakes. 
Posted by: Andyrew Sep 5 2003, 12:08 AM
130psi did nothing. we did that for a day (seriously) and only one piston out.. Acutally not much work. maybe 10 mins each (sawing)...
We got them out and im happy.. car WILL run sunday. I guarantee it
Posted by: dan10101 Sep 5 2003, 12:09 AM
Tried everything. Eventually would have gotten them out, just got tired and frustrated.
Didn't try on the car, the brakes weren't even close to applying pressure. We would have had to install old calipers and bleed the entire system before we'd have any brake pressure. Plus the seals around the pistons were leaking air. It would move a bit from the compressor, then we would push it back in and try again. Each time it moved a bit more.
It's actually quite easy to cut in half. But, it kinda ruins the calipers. 
Posted by: dan10101 Sep 5 2003, 12:10 AM
hey go to bed! 
Posted by: Andyrew Sep 5 2003, 12:12 AM
But, "I feel like dancin, ya ya ya"

Fine
Posted by: MarkV Sep 5 2003, 12:13 AM
I agree, it's a school night. 
Posted by: Andyrew Sep 6 2003, 09:52 PM
Alright, everything is ready to roll (except the brakes, will do tonight..), so we tryed to start it.. well at first it wouldnt turn over, period. checked some things, then dad found something not put in all the way. Next it turns over, but know it doesnt fire, and I dont hear the fuel pump, and it looks like it leaked (  ), so we checked for spark and the wires arnt getting any spark, what things should we check for troubleshooting?
Anything helps,
Andrew
Posted by: Andyrew Sep 6 2003, 11:07 PM
Alright, maybe your stumped.. heres some more info, We have been trying the fuel pump, and we dont seem to be getting any power to the pump. Any clues?
Thanks
Andrew
Posted by: dan10101 Sep 6 2003, 11:31 PM
Ok, jumping the fuel pump relay, we get 12 volts to the pump, but no action out of the pump. Plus the pump is seeping fuel.
Still troubleshooting... 
Posted by: Brad Roberts Sep 7 2003, 01:01 AM
With power to the pump.. tap on it with the end of a screw driver. They can get gummed up when they sit for too long. Dont worry about the seeping fuel right now.. the seals are probably dry and will need to have gas on them for awhile. You might get lucky and have the pump come back to life.
B
Posted by: Brad Roberts Sep 7 2003, 01:02 AM
Oh.. check your ground at the pump. Make sure you have continuity to the ground on the battery (easy to do with the battery above it).
B
Posted by: Andyrew Sep 7 2003, 12:50 PM
The ground is from the big cluster of grounds by the relay board right? I think I have a good ground on that, I'll double check.
I will try this, but I am also thinking of taking the fuel pump out and taking it apart, any reason or referance for doing this? Are they rebuildable?
Thanks
Andrew

Posted by: ChrisReale Sep 7 2003, 04:10 PM
I think fuel pumps are rebuildable, but I seem to recall one of the gaskets is hard to come by. I might be wrong. It would probably be worth your time to find a good used one..
Posted by: Andyrew Sep 7 2003, 05:14 PM
I just picked up another fuel pump, dont know if it works, but its a just in case thing.. I'll try getting the one I have on there now working, if not, I'll open it up and try and swich good parts for bad...
Does anyone know of a tech article for rebuilding it? I have heard of one, and I didnt see it in the tech places I looked at..
Thanks
Andrew
Posted by: Andyrew Sep 7 2003, 08:56 PM
Alright, fixed the fuel pump (temporarily) and the pump was good, the wires, no..
Now it doesnt have spark..
It has spark from the coil, but not from the Dizzy.. New cap, new rotor. Electronic ignition..
Any ideas? I really want this thing on the road tonight..
Thanks
Andrew
Posted by: Bleyseng Sep 7 2003, 09:29 PM
Put points in it to get it running. Keep it simple
Geoff
Posted by: Andyrew Sep 8 2003, 12:01 AM
Thanks, I did that, but it seemed to be that the wire attaching the coil to the dizzy wasnt in completely on the coil side (we found this after we changed points) And it now has fuel, and has spark.. So we'll do the timing next.. I think we almost have it.. Brakes bleed, pedal feels good. umm the drivers harness is installed, I think im going to need a harness bar, the shoulder one is not taunt, and the seat is holding my shoulders, so thats going to be fixed, later.
Andrew
Needing to drive, not wanting, needing 
Posted by: dan10101 Sep 9 2003, 12:31 AM
Monster Garage Day..  .. 15....
IT RUNS!!!
Andrew no longer NEEDs to drive the Teener. Now he just want's to drive it more.
Here's where we are at. We ran new wires to the fuel pump. Direct to the battery. It works. Then we started playing with the ignition. I must have tried setting it to TDC 3 or 4 times before I finally got it right. WAY out of practice. Heck, I was doing this 30 years ago when I was Andrews age. Anyway after we were almost ready to back it out of the garage and put it up on blocks, it finally started. We checked dwell and set the timing. Beat on the fenders a bit to make the 225x16 tires roll. And took it on it's maiden voyage. Hey, we even got it home without calling a tow truck.
But, we're not done. Here's just the ones I can think of..
- Most important - figure out the fuel pump wiring problem
- brakes still a bit sluggish
- slight misfire - probably go back to the Crane EI
- Beat some more on the fenders
- High Idle - possible vaccum leak
- dash lights, tail lights, turn signals.
- finish putting the interior back together
- probably a lot more...
Attached image(s)

Posted by: Brad Roberts Sep 9 2003, 12:35 AM
Congrats gang !!  Andrew.. I'll buy your dad a beer the next time I see him.
B
Posted by: dan10101 Sep 9 2003, 12:35 AM
Here's a couple picts..
Attached image(s)
Posted by: dan10101 Sep 9 2003, 12:36 AM
and another. (you guys don't really care about these, but we do!)
Attached image(s)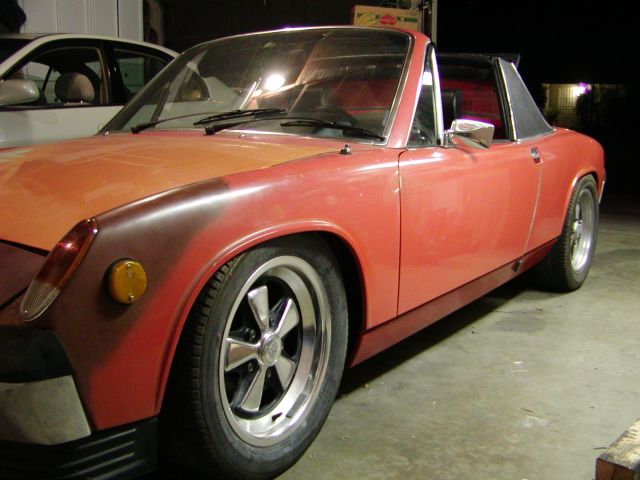
Posted by: dan10101 Sep 9 2003, 12:36 AM
Gee thanks!! 
Attached image(s)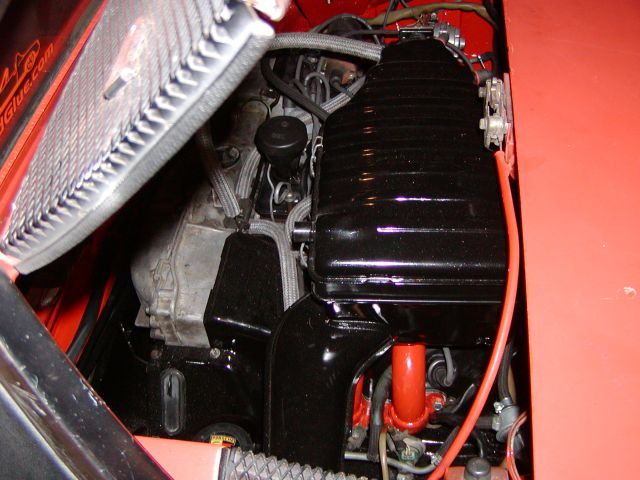
Posted by: Andyrew Sep 9 2003, 12:38 AM
Thanks,
Dad, show them why we need to bang the fenders....
Andrew
If the Cookie cutters have more clearance, they will be going on once I put some decent paint on them.
Posted by: Brad Roberts Sep 9 2003, 12:45 AM
75/76 2.0 air cleaner.. cool. I forgot they have a larger a breather tube inlet. I see you also chose the cheap cool air ducting for the air cleaner...LOL It works well.
I think the car looks COOL with the 16x7's on it.
B
Posted by: Brad Roberts Sep 9 2003, 12:45 AM
In the pic above.. had you JUST lowered the car from a floorjack ??
B
Posted by: Andyrew Sep 9 2003, 12:47 AM
probably...
let me fire his comp up again and look for some after drive pics..
Andrew
Posted by: Andyrew Sep 9 2003, 12:49 AM
actually I think we bounced and rolled it a little to see if the tires would fit, they didnt, so we found some jack handles and went for it, rolled out, nope, rolled back in, took some plyers and bent the lip in and then pulled it out again..
rest of story in another post..
Andrew
Posted by: Brad Roberts Sep 9 2003, 12:49 AM
If it wasnt just dropped.. the rear has WAY too much pos. camber.
B
Posted by: elmonte Sep 9 2003, 12:49 AM
Looks like it could ues a little more neg camber in the rear
Posted by: elmonte Sep 9 2003, 12:50 AM
Beat me to it brad
Posted by: dan10101 Sep 9 2003, 12:52 AM
I have not alligned it yet... I will add in alot more neg camber, yes I can see what your saying. pics in a sec.
Andrew
Posted by: dan10101 Sep 9 2003, 12:58 AM
Continue of story
Then I took it around the block a few times, brakes, well they brake, not what you would expect, we'll work on that.. I didnt think there was much power, I thought it was kinda dogish.. then I stop and let Dad drive, and we take it back home. all the time making long turns because we cant turn the wheel much.. we get back home and I can hear the rear wheels rub..
I guess this solves the dogish problem...
Drivers rear wheel
Attached image(s)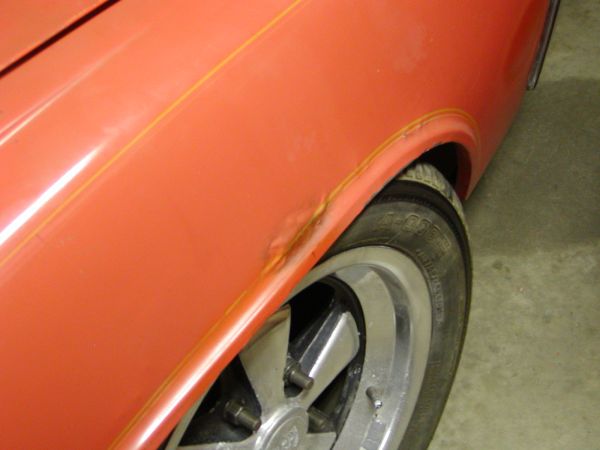
Posted by: dan10101 Sep 9 2003, 12:59 AM
before drive
Attached image(s)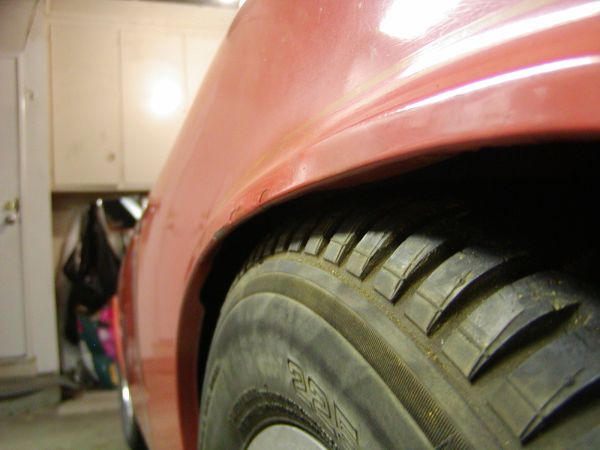
Posted by: dan10101 Sep 9 2003, 01:00 AM
Gnight, i'll post more pics later, school tomorrow.
Thanks everyone for everything!
Andrew
Posted by: RustyWa Sep 9 2003, 05:15 PM
Lets go back to the air cleaner photo...isn't the bottom section of the air cleaner box rotated 180 degrees out of whack?
I didn't think you could turn them around like that and make them sit on the rubber nubs..
Posted by: Bleyseng Sep 9 2003, 05:18 PM
I run mine like that all the time! The intake sits right on the wheelhouse and get fresh cool air feeding it from the small grill. You can run pipe up to the grill if you want also.
Geoff
Posted by: RustyWa Sep 9 2003, 05:52 PM
Hmm, I'll have to try that. The air temp on that side is mucho cooler over there in my engine.
Posted by: Andyrew Sep 9 2003, 05:56 PM
I ran it this way to get some fresh air from the side, decided that it would get more air from the side of the car than the middle.. Especially when I put the rain tray on (in the rainy season, for the "just in case")
Posted by: Andyrew Sep 9 2003, 06:25 PM
Heres some fresh pics.
Attached image(s)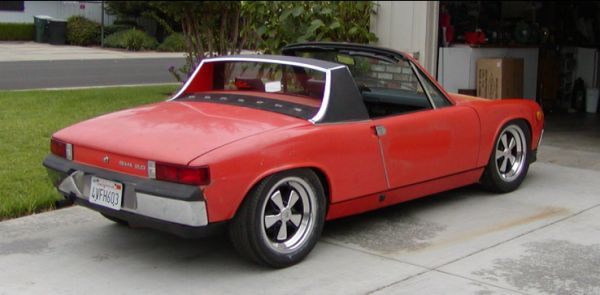
Posted by: Andyrew Sep 9 2003, 06:27 PM
Next
Attached image(s)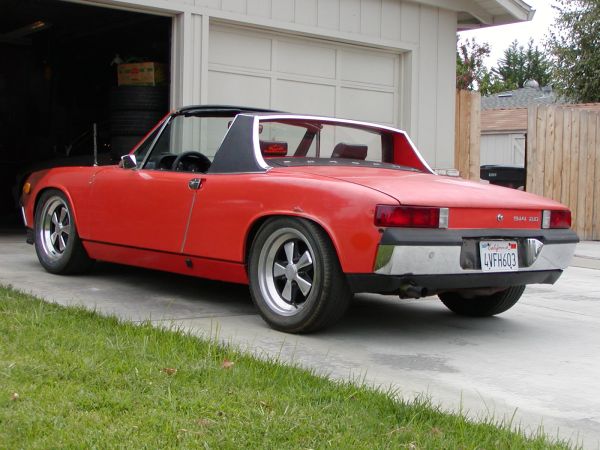
Posted by: Andyrew Sep 9 2003, 06:28 PM
bout 1.5 camber on the front now, put the strut assymblies all the way in
Attached image(s)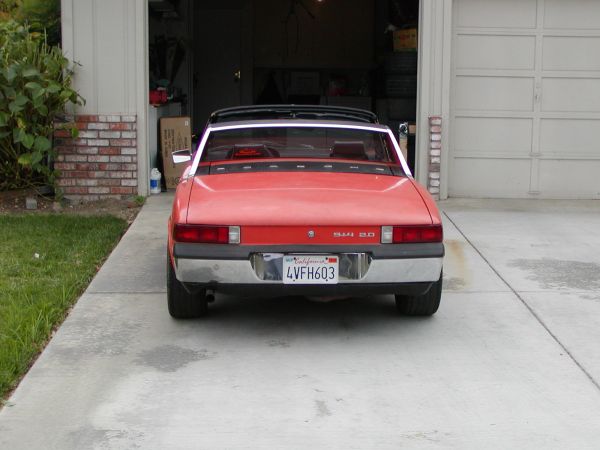
Posted by: Andyrew Sep 9 2003, 06:49 PM
My purdyest fuch
Attached image(s)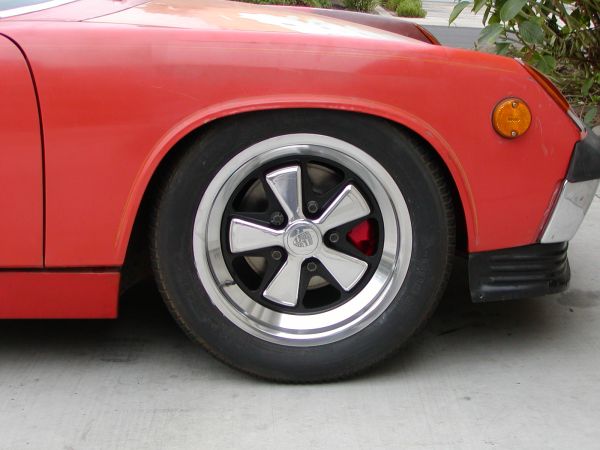
Posted by: Andyrew Sep 9 2003, 06:52 PM
Now, Im trying to debate what to paint my track cookie cutters.. Im thinking all silver (Im going to try that chrome paint from autozone) or silver rim black inside, silver rim with body collor inside.
What do you guys think? I will drive them on the street till my fenders are bigger...
Andrew
Attached image(s)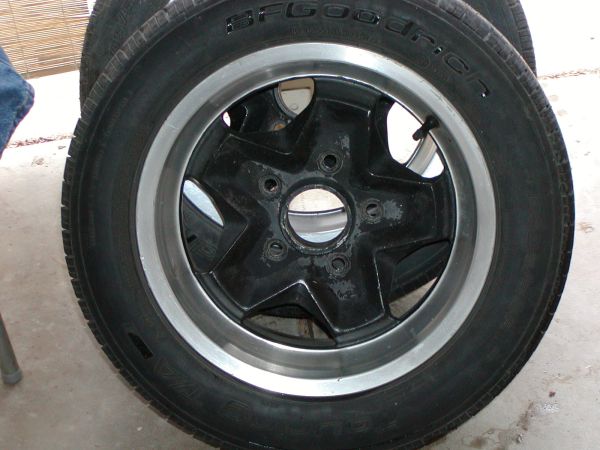
Posted by: seanery Sep 9 2003, 07:17 PM
i like black centers silver lip
Posted by: Qarl Sep 9 2003, 07:32 PM
I'm a little late... but... WOO HOO!!!!
Congrats guys! Sounds like you had fun and learned a lot in the process.
Thanks for sharing your triumph (errr... I mean your Porsche pics) !!!
Posted by: Bleyseng Sep 9 2003, 07:52 PM
Way to go Guys! Nothing like a father/son team to fix up an ole Porsche.
Car looks great, did you drive it to school yet?? Love to see the faces of the school guys with their Honda when you pull up..lol
Geoff
Posted by: Andyrew Sep 9 2003, 08:03 PM
Actually its the girls with the honda's...
No I didnt drive it to school, It was rubbing too much on the tires, Im trying to fix that.. dads doing the rear camber right now...
Progress on the cookies
Attached image(s)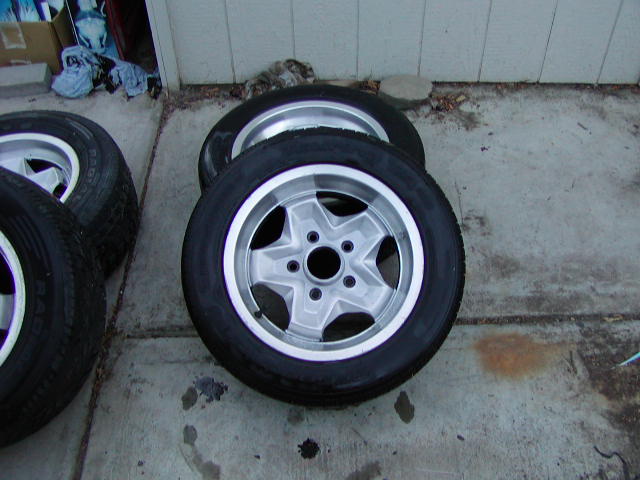
Posted by: Andyrew Sep 9 2003, 08:04 PM
pic makes it look too good, all I did was chemically strip them..
Andrew
Posted by: Eric Taylor Sep 9 2003, 08:10 PM
Andy That car looks awsome. I love the fuch's but those cookies cutters are really growing on me! Awsome to see another 16 year old fixing up a teener. Driving it to school is a lot of fun. No one know's what it is and they all want a ride. Hopefully I can get mine running strong soon! ( insert praying emoticon)
Eric
Oh yeah, did you rebuild the 2.0, or just re do the FI?
Posted by: ChrisReale Sep 10 2003, 12:45 AM
way to go You guys worked hard. I think it looks sweet with the Fuchs. A little troubleshooting and a proper alignment and you're on your way
Posted by: RustyWa Sep 10 2003, 01:27 PM
That photo with the Fuchs sure makes me want to do the 5-bolt upgrade.
Posted by: Aaron Cox Sep 10 2003, 03:32 PM
yeah i wish my car looked that good when it debuted at high school last year. soon it will, thanks for motivating me.
Posted by: peridotian Sep 10 2003, 03:38 PM
There is a color coded vacum hose set on evilbay right now.
Patrick
Posted by: Andyrew Sep 10 2003, 08:13 PM
Hey, thanks for all the comments. I'm sure Andrew is too. He's over in Asilimar Conference center for a couple days. (Monterey). The Christian school he goes to, sends all the High Schoolers there to kick off the school year. (Guess who pays..)
We didn't get very far last night. So hopefully we'll finish up this weekend and he'll drive it to school on Monday. I did get the camber on the back to 1.5 and 2.0, Andrew set the fronts to about 1.5, but still don't think it will be enough once it starts bouncing off the bumps in the road.
If someone want's color coded hoses for a 1.7, our friend Jim has a set. New in the box. He's the one that want's to get rid of a passle of 914s in various array of partedness. I'm going over there right now to help him get his 944 running. I don't have to do much, but stand around and say "are you done yet?". He has all the skills necessary, just needs motivation. Jim, you out there?
Posted by: Andyrew Sep 10 2003, 08:14 PM
Woops Andrews account. Oh well..
Hey, I get a vacation from 914s!
Now, on to that 944...
Posted by: Qarl Sep 10 2003, 08:18 PM
Man! Those cookie cutters look good as is! Clear coat 'em or paint the centers silver!
Good job... both of you!
Posted by: Eric Taylor Sep 10 2003, 08:25 PM
I would be intrested in those hose's. How Much?
Eric
Posted by: Andyrew Sep 11 2003, 12:10 AM
Here's his email. I don't know what he what's for them.
Jim Cooper [xdecman@comcast.net]
Actually, that's the only cookie cutter that looks good, (got them from Jim). The others need paint. So we're looking for something silver or chrome. They will be track wheels, so no big outlay for them.
Dan
Posted by: seanery Sep 11 2003, 08:23 AM
Jim Cooper is a regular on the 924/944/968 rennlist board.
He's infamous on his, hmmm, "tragedies", "mishaps", what do I call them....
They have come up with a fictional award for bad things happening while working on your car. It's called the "Cooper Cup"
Posted by: Dave_Darling Sep 11 2003, 04:34 PM
Fuel pump diagnosis:
http://www.914fan.net/fuelpump.html
http://members.rennlist.com/pbanders/FPChecklist.htm
--DD
Posted by: dan10101 Sep 11 2003, 07:38 PM
Thanks Dave,
That was my assignment while he is gone. I'll go through those steps. I do have a question. When is there supposed to be battery voltage to the pos on the pump?
Posted by: dan10101 Sep 11 2003, 07:41 PM
Wow, I just checked the second link. I wish I had the internet back when I had my 71 1.7. I would have never sold it, because, I could have troubleshot the FI instead of putting the naughty webbers on it.
Very nice info.
Thanks again.
Posted by: Bleyseng Sep 11 2003, 08:38 PM
yeah, Brad Anders has pretty much figured out all the Bosch secrets to Djet! There is soo much info and is pretty easy to understand too. Brads a good guy too.
Geoff
Powered by Invision Power Board (http://www.invisionboard.com)
© Invision Power Services (http://www.invisionpower.com)