Printable Version of Topic
Click here to view this topic in its original format
914World.com _ 914World Garage _ Adding dog-ear reinforcement
Posted by: michel richard Mar 12 2006, 04:17 PM
On my /6 project, I have decided not to add the tub reinforcements on the inside rear wheel well, for a variety of reasons. I did decide that I wanted the dog-ear reinforcement, also for a variety of reasons.
I am building the whole thing from scratch and I will post a detailed picture sequence in the hope that some will find it interesting.
I first bought some cold-rolled flat stock, 1/4 inch by 1.5 inch. I will say that I did not try to calculate if this resulted in a tang of the right strength, but it's what I used.
There's 8 tangs required, 6 the same and 2 a little longer. To make the tangs, I began by drilling a 3/8 inch hole:
Attached image(s)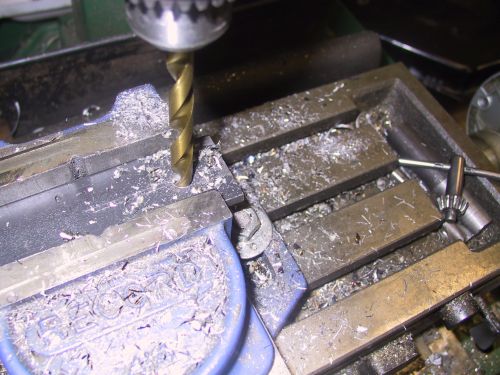
Posted by: michel richard Mar 12 2006, 04:18 PM
Then I cut the outboard corners off:
Attached image(s)
Posted by: michel richard Mar 12 2006, 04:20 PM
Back to the mill, I rounded the ends. I had a small pice of steel in which I inserted a 3/8 bolt, used to hold the tang material down. When the bolt is tightened, the plate can be rotated against the end mill and the end rounded.
Attached image(s)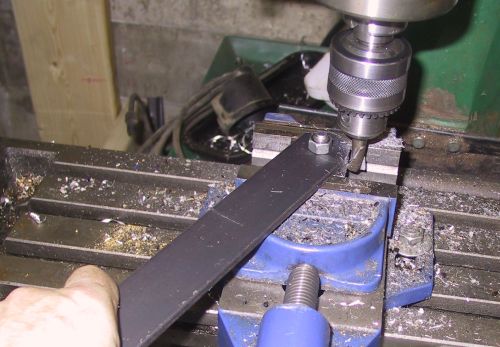
Posted by: michel richard Mar 12 2006, 04:21 PM
The picture is frozen, in the previous shot, but the mill was spinning !
Then I cut the tang to approximate length, and started over.
Attached image(s)
Posted by: michel richard Mar 12 2006, 04:23 PM
To make sure all the tangs were the same length, I put a 3/8 pice of round stock in the holes, stacked the tangs, and cut them down to final length on the lathe. Once again, the lathe is spinning in this shot:
Attached image(s)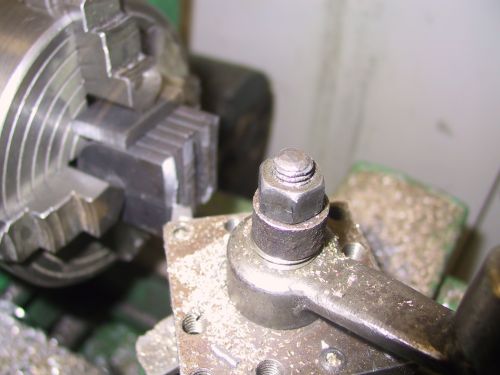
Posted by: michel richard Mar 12 2006, 04:25 PM
The next step is to cut some more steel plate (or sheet, I'm not sure what the exact terminology is) from 1/8 inch stock. I made this 5 inches by 3.5 inches, simply based on measurements on the tub, and comparisons to Armando Serrano's site. This is what it'll look like:
Attached image(s)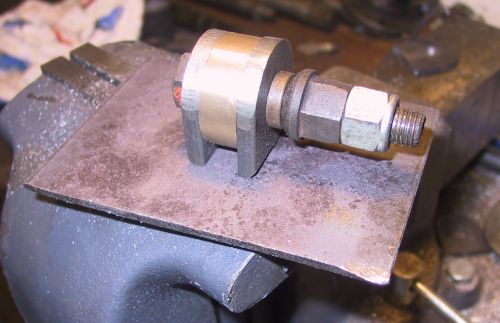
Posted by: michel richard Mar 12 2006, 04:27 PM
Okay, so the bolt I had was too long.
In the previous picture, you can see that I chamfered the tangs so that I would get better penetration when welded, which I did with my trusty Mig:
Attached image(s)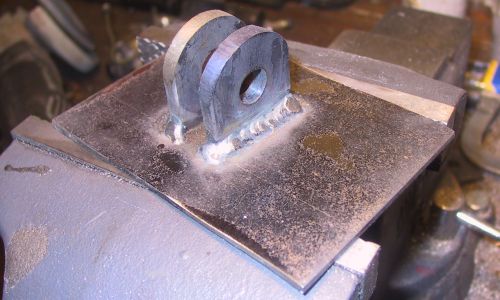
Posted by: michel richard Mar 12 2006, 04:28 PM
And this is what it's going to look like with the rod-end (I'll post details on that part later)
Attached image(s)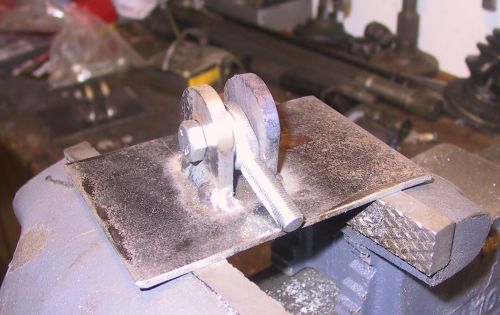
Posted by: michel richard Mar 12 2006, 04:32 PM
This part gets welded to the main bulkhead, as shown below.
What remains is to (1) put together the tangs that will be welded to the dog-ear itself, (2) and to make the rod that will go between the bulkhead and the dog-ear and (3) do the welding to the tub.
Picture below from Armando Serrano's site:
Attached image(s)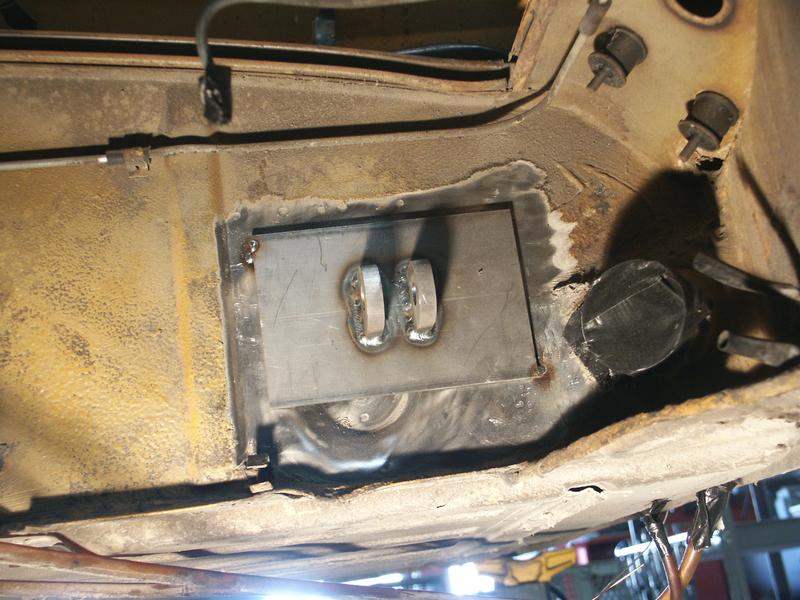
Posted by: okieflyr Mar 13 2006, 11:35 AM
Watching with great interest !  KB
KB
Posted by: Andyrew Mar 13 2006, 11:43 AM
Seems like welding a tube in there would be much easyer..
But complexity is gud!!
Unless your going to be racing in a class that says no weld in reinforcements.. bolt in only.
Posted by: alpha434 Mar 13 2006, 12:32 PM
| QUOTE (Andyrew @ Mar 13 2006, 09:43 AM) |
| Seems like welding a tube in there would be much easyer.. But complexity is gud!! Unless your going to be racing in a class that says no weld in reinforcements.. bolt in only. |
Has to be removable so that the engine will come out.
Posted by: Andyrew Mar 13 2006, 12:37 PM
Interesting..
guess I dont think about that unremovable engine tin now adays....
Posted by: Brad Roberts Mar 13 2006, 12:38 PM
| QUOTE |
| Has to be removable so that the engine will come out. |
I have welded in 20+.. all the engines come out without issue.
I do agree that removable is more better (easier to adjust valves)
The issue is rust inside the ear. They are plenty strong up until a 12inch wide slick is used on a good ear (and a good driver)
B
Posted by: Andyrew Mar 13 2006, 12:41 PM
Brad, real quick...
My left ear hole is ovaled out.. and I assume the right one is slightly ovaled as well. Both bolts come loose after driving them.
I have a lincoln mig now, and was going to replace the metal with 1/8in or something simular, then reinforce it a little on both sides. (with a welded in bar from the front firewall to the ear)
Does that sound right?
thanks..
Posted by: michel richard Mar 13 2006, 01:36 PM
| QUOTE (Andyrew @ Mar 13 2006, 09:43 AM) |
| Seems like welding a tube in there would be much easyer.. But complexity is gud!! Unless your going to be racing in a class that says no weld in reinforcements.. bolt in only. |
Agreed.
Not going into any racing class. I just think that welding in a permanent tube is something that could come back to haunt me sometime down the road.
And the thing with the rod ends is that it's kinda fun to do.
Posted by: michel richard Mar 13 2006, 01:49 PM
I got the Aurora CM-6 rod end, locally, it has a 3/8 inch hole, and a 3/8 inch fine thread shaft, but I think that's on the small side and I will probably get some CM-8 fittings. These are basic run-of-the-mill items. Here's the link to the manufacturer's site. I paid C$40 for the four ends that I got.
http://www.aurorabearing.com/
You can download their catalog free, it contains a lot of info.
Posted by: brant Mar 13 2006, 01:56 PM
Nice..
but you can buy those mounts and ends pre-made too.
here are the ones we used:
Attached thumbnail(s)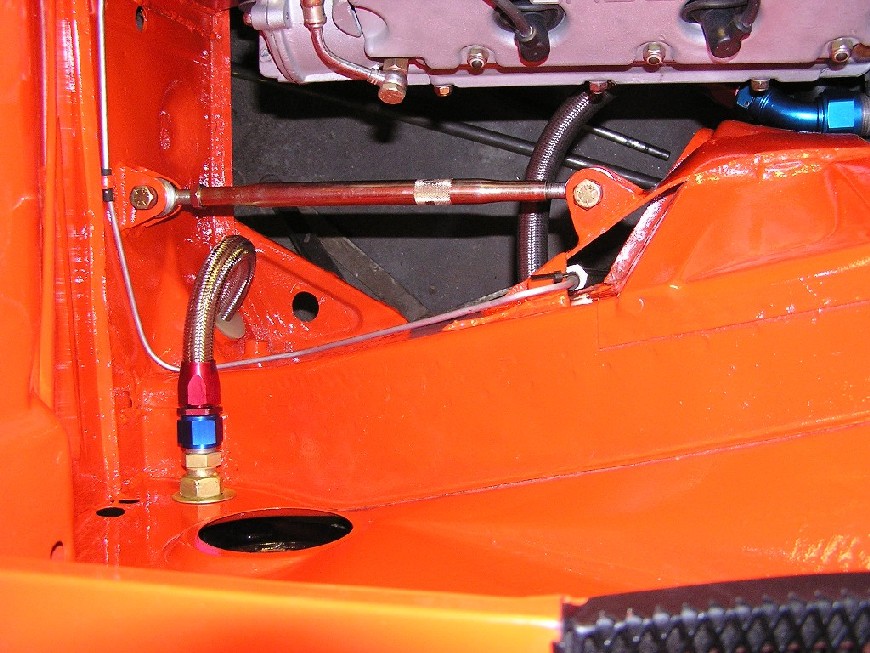
Posted by: brant Mar 13 2006, 01:57 PM
both sides are connected so they can be lighter weight and retain their strength. Close up:
Attached thumbnail(s)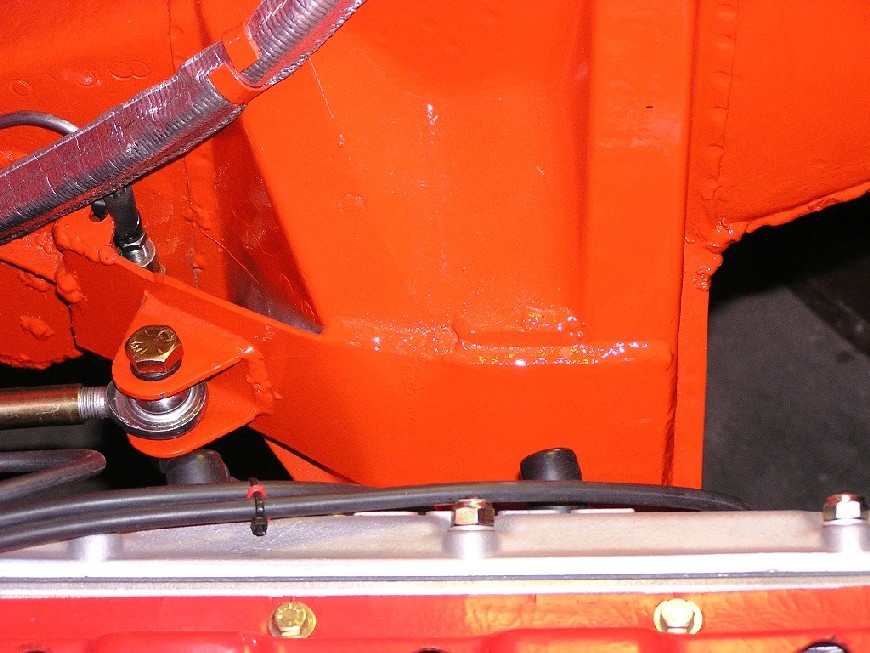
Posted by: michel richard Mar 13 2006, 02:08 PM
Brant, what size rod-ends do you use ?
In my case, part of the fun is making the things myself.
Posted by: brant Mar 13 2006, 02:19 PM
| QUOTE (michel richard @ Mar 13 2006, 01:08 PM) |
| Brant, what size rod-ends do you use ? In my case, part of the fun is making the things myself. |
I'm not absolutely certain.
should have it on a receipt buried somewhere...
I know the threaded portion of the rod is about 3/8 - 1/2, if that helps add any point of reference to the picture.
On my -4 car my similar brace rods are angled like yours.
but on our -6 we made them straight forward and back to clear the larger motor.
brant
Posted by: michel richard Mar 13 2006, 07:40 PM
Meanwhile, back in the shop . . .
At the other end of the stay, the tang assembly is a little more complicated, because it meets the surface of the dog-ear at an angle. Here's the assembly, before welding. I attempted to get better penetration with a good chamfer on the part:
Attached image(s)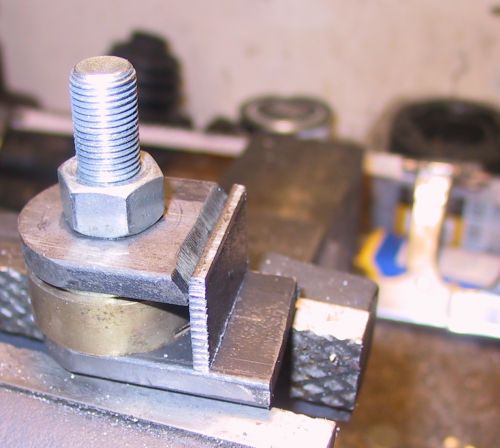
Posted by: michel richard Mar 13 2006, 07:43 PM
And after welding. I know weld penetration does'nt look fantastic, but it's actually better than it appears in the picture.
The next step will be welding these assemblies to the tub. Stay tuned.
Attached image(s)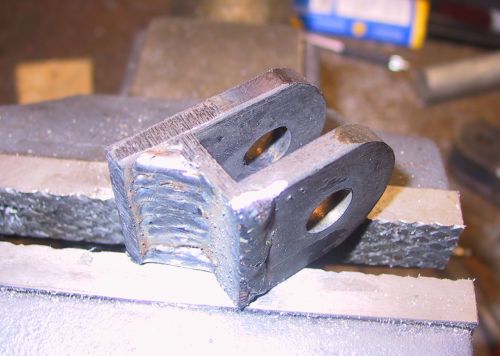
Posted by: michel richard Mar 13 2006, 08:05 PM
Here's what it's going to look like (hopefully) when done. From Armando Serrano's site:
Attached image(s)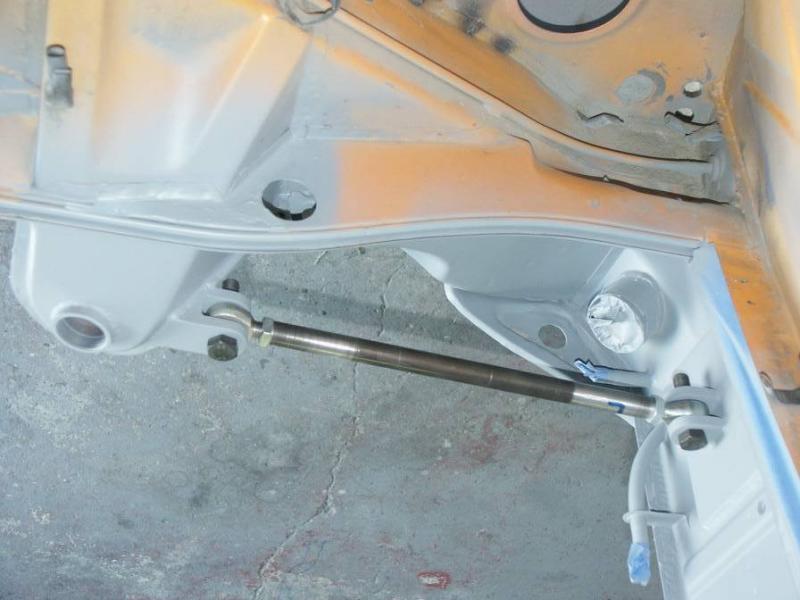
Posted by: andys Mar 13 2006, 08:54 PM
| QUOTE (michel richard @ Mar 13 2006, 11:49 AM) |
| I got the Aurora CM-6 rod end, locally, it has a 3/8 inch hole, and a 3/8 inch fine thread shaft, but I think that's on the small side and I will probably get some CM-8 fittings. These are basic run-of-the-mill items. Here's the link to the manufacturer's site. I paid C$40 for the four ends that I got. |
I think you'd be surprised at the amount of static axial load a 3/8" quality rod end can take; 4,000lbs+. The link (tube) between them needs to be appropriate for the loading you expect. A larger diameter tube with swaged or welded ends would be best.
Andys
Posted by: drew365 Mar 13 2006, 09:03 PM
Your work looks very good. After splitting my dog ear once we reinforced it to the rear against the tranny mount beam. TRE did the work.
Attached image(s)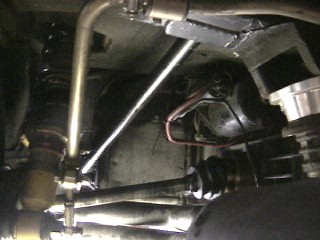
Posted by: andys Mar 13 2006, 09:04 PM
Nice work!
BTW, what kind of bearing or (?) are you using for the trailing arm pivot shaft on the dog ear?
On a general note, it has always seemed to me that this type of re-eforcement link has a down side. Any chassis flex that changes the distance between the two mounting points will transfer the load and perhaps over stress the weakest point , which I speculate is the dog ear. I know some of the race guys do this, but I have seen at least one instance where the dog ear cracked on a caged car from this. Some data would end my speculation 
Andys
Posted by: brant Mar 13 2006, 10:42 PM
| QUOTE (andys @ Mar 13 2006, 08:04 PM) |
| Nice work! BTW, what kind of bearing or (?) are you using for the trailing arm pivot shaft on the dog ear? On a general note, it has always seemed to me that this type of re-eforcement link has a down side. Any chassis flex that changes the distance between the two mounting points will transfer the load and perhaps over stress the weakest point , which I speculate is the dog ear. I know some of the race guys do this, but I have seen at least one instance where the dog ear cracked on a caged car from this. Some data would end my speculation Andys |
I think the Dog ear cracks from not doing this...
I ripped out 2 of them in 2 years.
The first time I attributed it to old metal.
the second time I didn't have that excuse.
the dog ears crack and rip out due to side loads generated from tires these cars were never meant to have...
the reinforcement makes a significant difference in reducing the flex that causes cracking and ripping.
Pre-suspension brace we used to have the inner and outer swingarm bolts come loose every single day of track event.
after putting in the 2nd brand new console and the bracing along with it, we didn't have those swing arm bolts come loose even once in 8+ years.
brant
Posted by: michel richard Mar 14 2006, 08:07 AM
| QUOTE (andys @ Mar 13 2006, 06:54 PM) |
| I think you'd be surprised at the amount of static axial load a 3/8" quality rod end can take; 4,000lbs+. The link (tube) between them needs to be appropriate for the loading you expect. A larger diameter tube with swaged or welded ends would be best. Andys |
The spec on the radial load (which is the load along the shaft, I think - it's radial relative to the eye) is 5,000 pounds for the CM-6, and 8,338 pounds on the CM-8. With the size of the components I am using, it would be the weak link, but could still be strong enough, I agree. Actually, in compression, with the dog-ear trying to move forward, the weak link would probably be the stay itself buckling. I agree that a large diameter on the tube would help.
Just my thoughts.
Posted by: michel richard Mar 15 2006, 07:48 PM
Okay, a couple of changes in the project, since the last update.
1. I have decided that would switch to 1/2 inch rod ends. That will mean a slight modification to the tang assembly that bolts to the bulkhead, but that's no big deal and 2. For a variety of reasons, I'm making a second set reinforcements (but they're not available).
The tangs are pretty much done, so I moved to the stay itself. I was able to visit a metals supply house and get the following: 1) 4 feet of 1 inch od round steel tube. They had a variety with the outside ground to a fine finish, and I took that. 2) 1 foot of 1 inch steel hex bar plus some cold rolled steel for the second set of stays.
I started in the machine shop with the hex bar. I figure I can make two end fittings at a time. I chucked a 3 inch piece, and squared the end:
Attached image(s)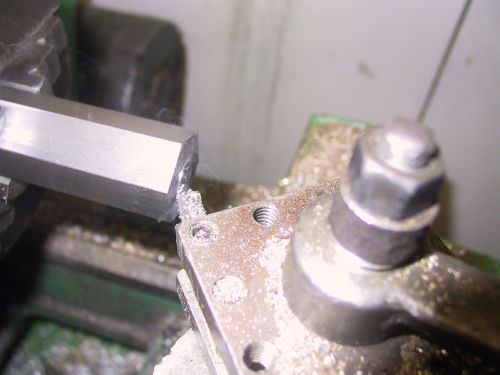
Posted by: michel richard Mar 15 2006, 07:50 PM
I then drilled a bearing in the end of the bar to support it with a center. After that, I turned down a half inch length to fit the inside of the round tube:
Attached image(s)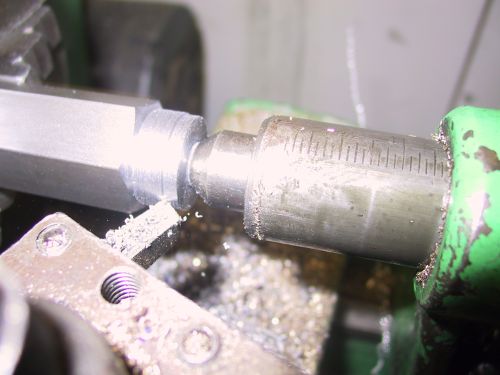
Posted by: michel richard Mar 15 2006, 07:51 PM
Drilled 29 / 64 and cut off one inch: after that, I taped the fitting 1/2-20.
Attached image(s)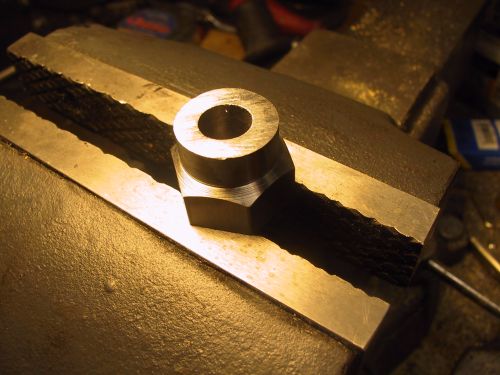
Posted by: michel richard Mar 15 2006, 07:51 PM
this is how it fits: (you can see the three other stays in the background, waiting for their turn)
Attached image(s)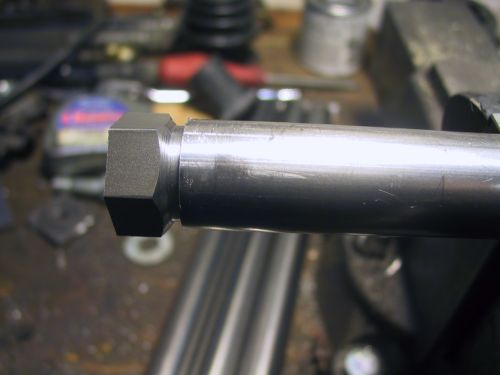
Posted by: michel richard Mar 15 2006, 07:53 PM
One end completed. I now have one stay ready to be welded in the car.
Attached image(s)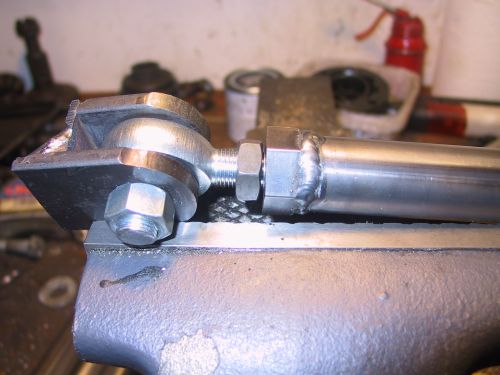
Posted by: michel richard Mar 15 2006, 07:56 PM
I figure my overall length , from the bulkhead to the end of the dog-ear needs to be approximately 18.5 inches. With my setup, this translated into a 12 inch tube.
I now need to finish the other stays, and then weld the things onto the tub.
Posted by: brant Mar 15 2006, 08:20 PM
looking good...
I believe that our bar stock is actually aluminum, and you can save a few pounds that way if you want.
nice work though
brant
Posted by: Brett W Mar 15 2006, 09:46 PM
Looks good. You went a little overkill on the parts. You could have easily used 1/8 plate for all of the mounting ears. The 3/8 rod ends are more than sufficent.
Posted by: michel richard Mar 17 2006, 11:54 AM
Took another vacation day, and spent this morning at the body shop. Owner is still super-nice and lets me work on the car in his shop.
I started by taking some paint off the bulkhead:
Attached image(s)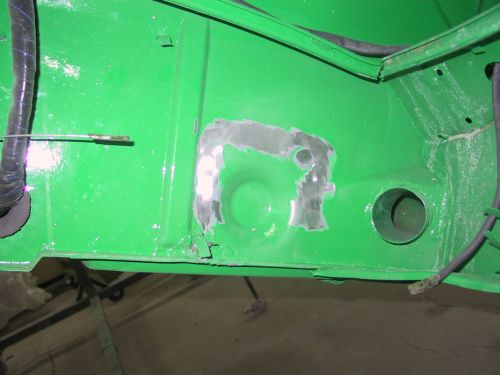
Posted by: michel richard Mar 17 2006, 11:55 AM
Then I started welding, taking care that things were close enough to being lined up:
Attached image(s)
Posted by: michel richard Mar 17 2006, 11:57 AM
Welding the dog-ear end was a bit more involved, but Sylvain, my bodyman, obviously has a good Mig and a good helmet (and less obviously let me use them) so that I was able to weld everything in.
Here's the finished product (actually, I later groud the welds a little):
Attached image(s)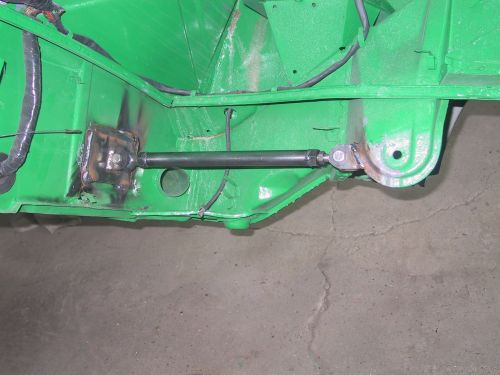
Posted by: michel richard Mar 17 2006, 11:58 AM
And another view:
Attached image(s)
Posted by: michel richard Mar 17 2006, 11:59 AM
This project is done (except for priming the paint that burned off, and painting it again), I'm pretty happy how it turned out.
Posted by: Aaron Cox Mar 17 2006, 12:14 PM
looks great!
Posted by: bondo Mar 17 2006, 12:17 PM
Sweet! Seeing things like this have the potential to keep my 914 from ever getting finished. Somebody please convince me that there's no reason to do this on a street V8 914..
Powered by Invision Power Board (http://www.invisionboard.com)
© Invision Power Services (http://www.invisionpower.com)