|
|

|
Porsche, and the Porsche crest are registered trademarks of Dr. Ing. h.c. F. Porsche AG.
This site is not affiliated with Porsche in any way. Its only purpose is to provide an online forum for car enthusiasts. All other trademarks are property of their respective owners. |
|
|
  |
| r3dplanet |
 Jul 14 2018, 09:02 PM Jul 14 2018, 09:02 PM
Post
#221
|
|
Senior Member    Group: Members Posts: 679 Joined: 3-September 05 From: Portland, Oregon Member No.: 4,741 Region Association: None |
Also finished is the Cover of Many Uses. This was a surprisingly long side project, but if I had more experience I would be less surprised. Experience > surprise.
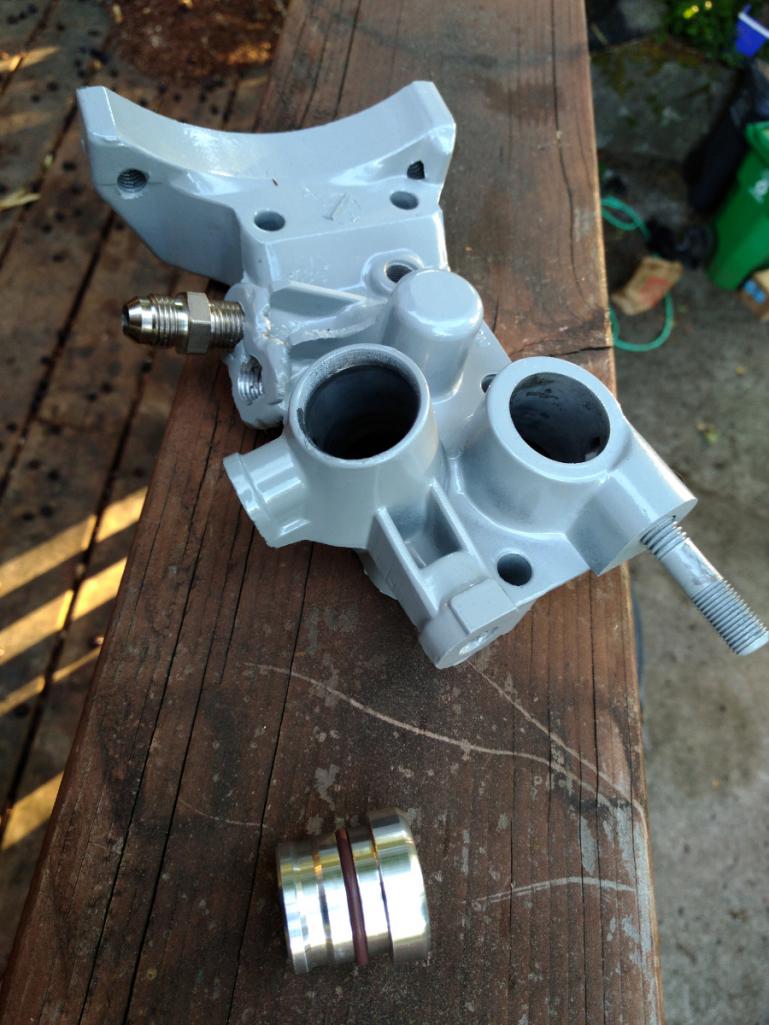
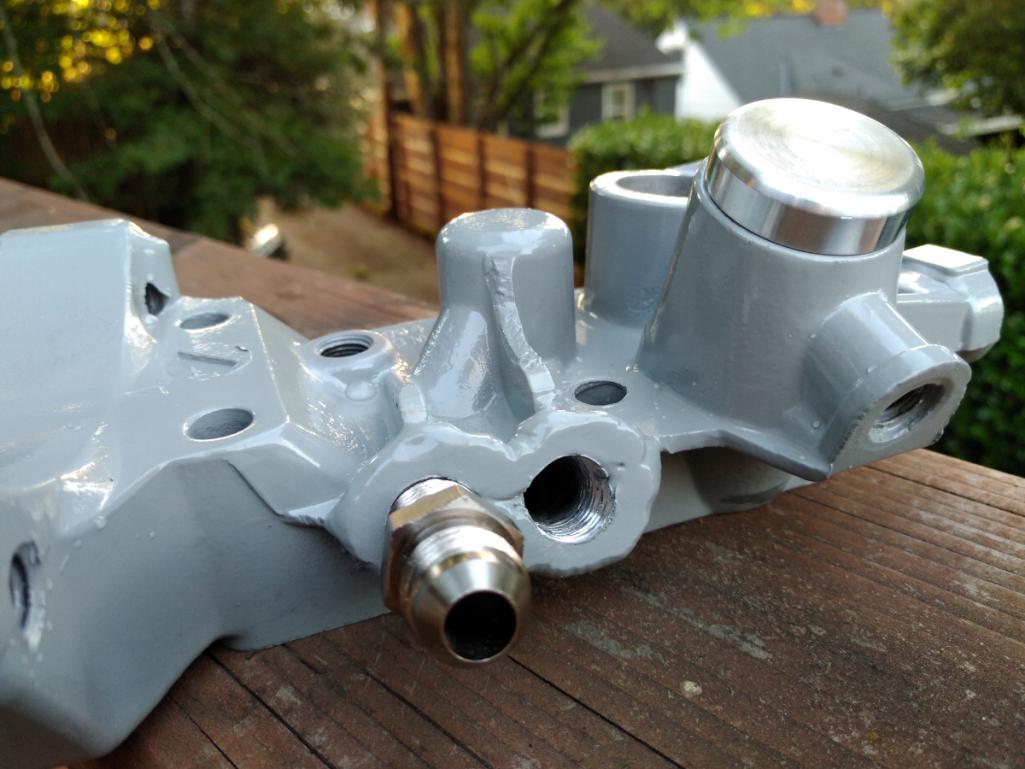
It didn't help that I did all the work out of order. If there was to be a next time, I would do it in this order: First, prep all the mating surfaces by which I mean find any means necessary to make them flat and clean. There are many of these surfaces on the cover. The big one is the rear side of the cover where the the oil channels are and where it mates to the engine case. This photo shows a step during the polishing phase, again using my big glass plate and increasingly finer sandpaper. Because I'm physically weak, this really sucked. 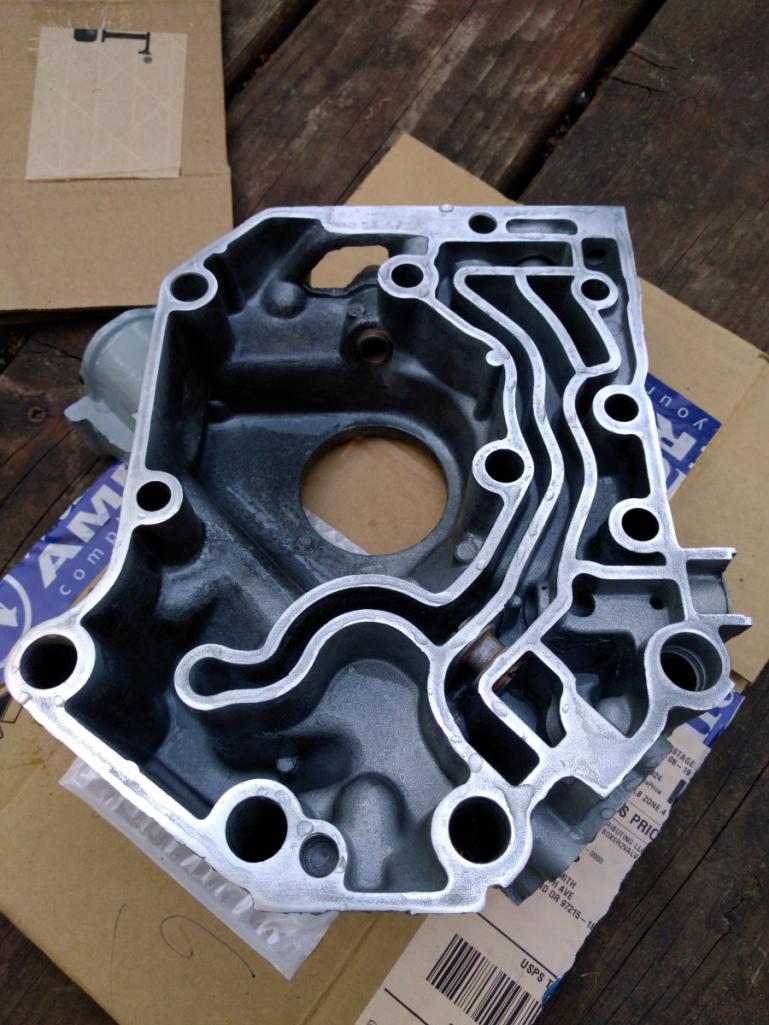 I noticed that the oil pressure valve was a little sticky because the valve itself is a spring loaded tube, but the bore was rough from the original casting. So I made a ghetto polishing tool for which I'm finding ever more uses. It's a screwdriver surrounded by Scotchbrite. Below I'm checking for smooth operation by means of another screwdriver. 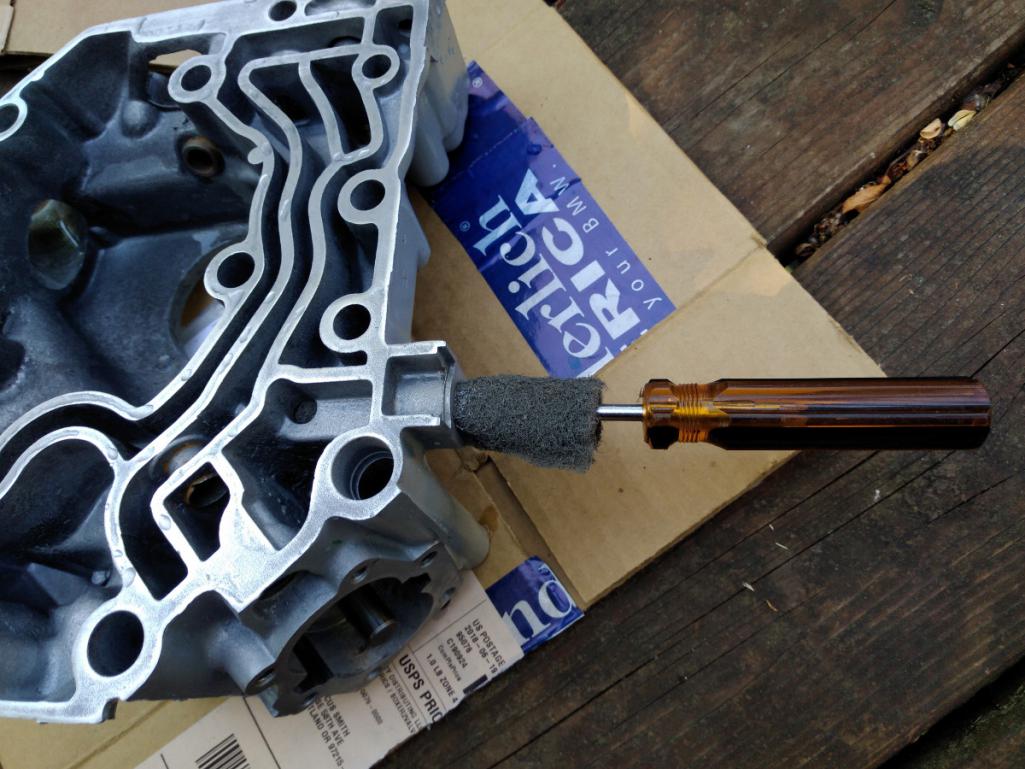 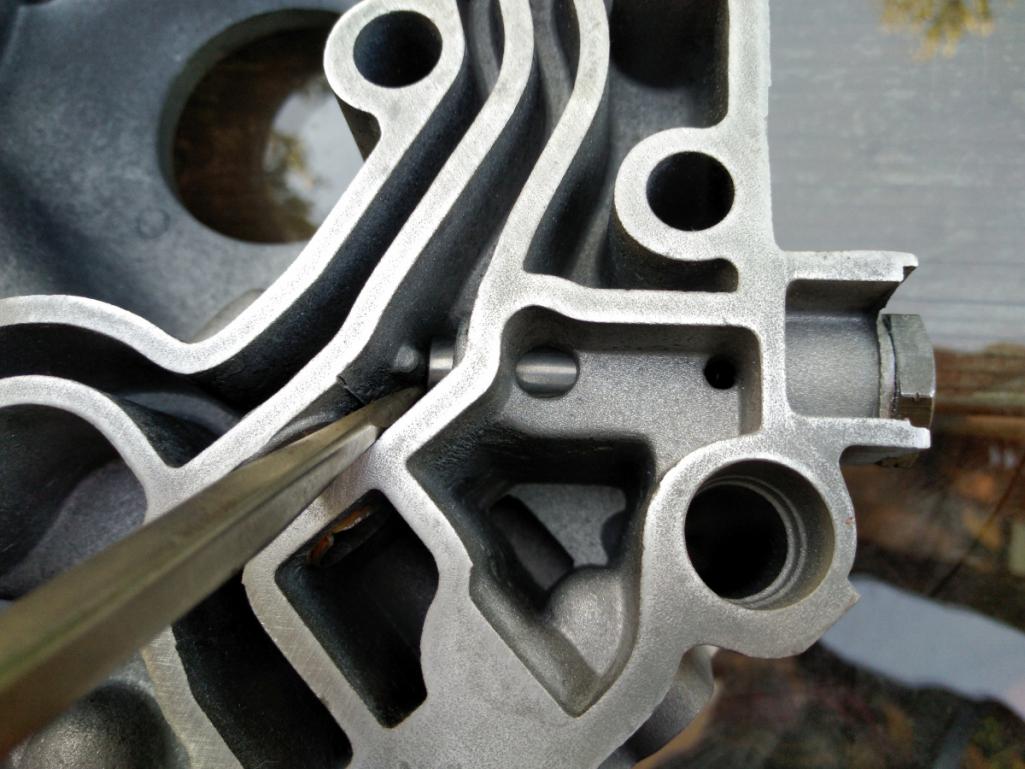 Easier to polish was the front mating surface for the soon-to-be installed seal. 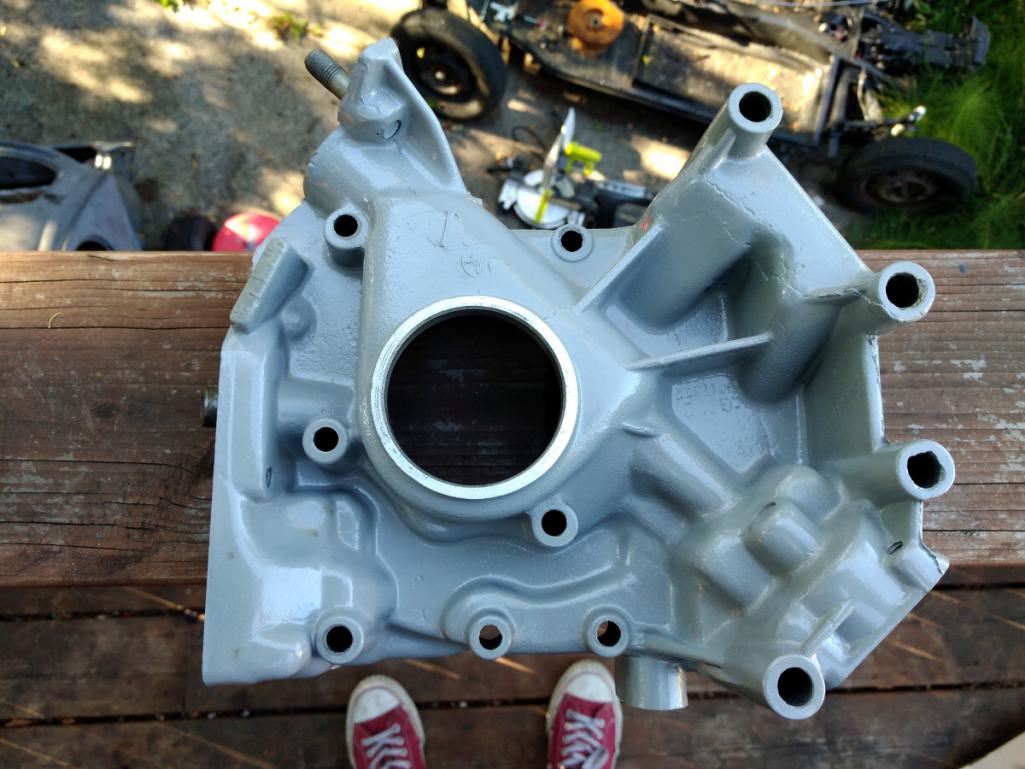 The Cover of Many Uses has two parts, upper and lower. The large lower section makes a home for the distributor, oil pump, fuel pump rod, oil pressure valve, and one of the two oil bypass valves. The smaller upper section is the home for the oil pressure switch, fuel pump, and oil filler tube. On my cover, these two mating surfaces did not match well. There was a .020" rock from one diagonal side to the other. It wouldn't have been so bad to sand them flat except that this steel fuel rod tube is in the way. Sadly, I don't even need it because I'm using an electric fuel pump. I tried to tap it out but it didn't want to budge without heat, and since I already powder coated it torching it was out of the question. I pulled out a blue sharpie and sanded and matched over and over seemingly forever until it finally squared up. 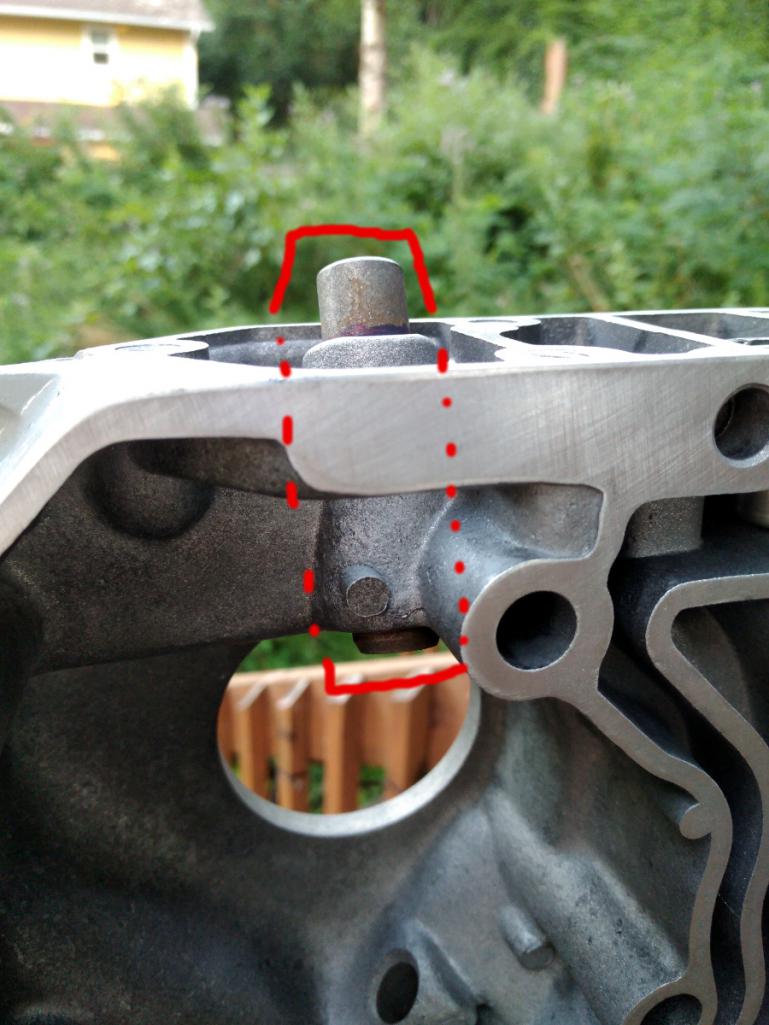 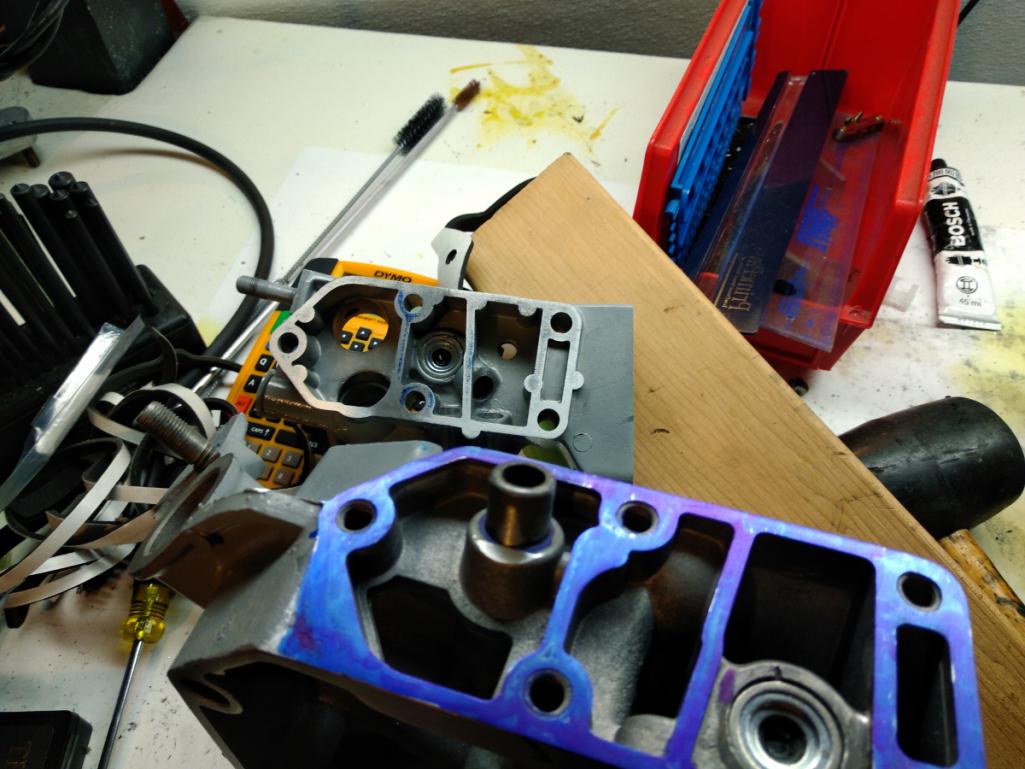 |
| r3dplanet |
 Jul 14 2018, 09:12 PM Jul 14 2018, 09:12 PM
Post
#222
|
|
Senior Member    Group: Members Posts: 679 Joined: 3-September 05 From: Portland, Oregon Member No.: 4,741 Region Association: None |
Next on the list is the installation of the oil bypass valves. There are two of them. They are the same and much better made than the originals. You can see where the old ones were peened into place. But these ones have a much better fit. I just used a socket to drive them into place after cleaning the bores.
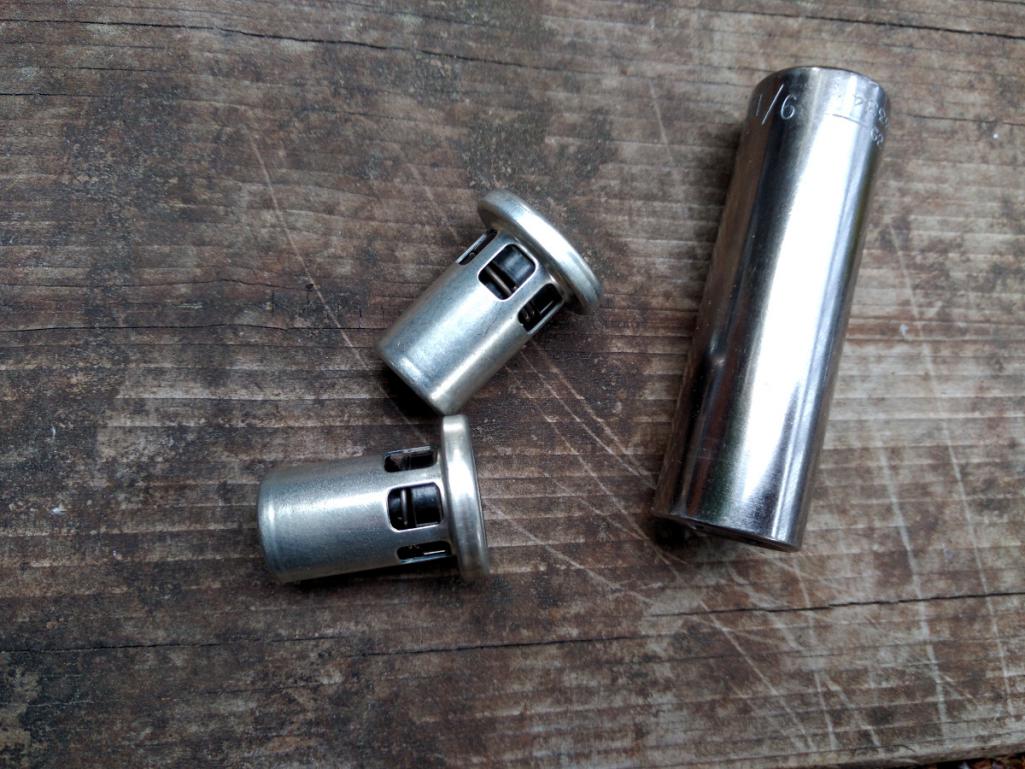 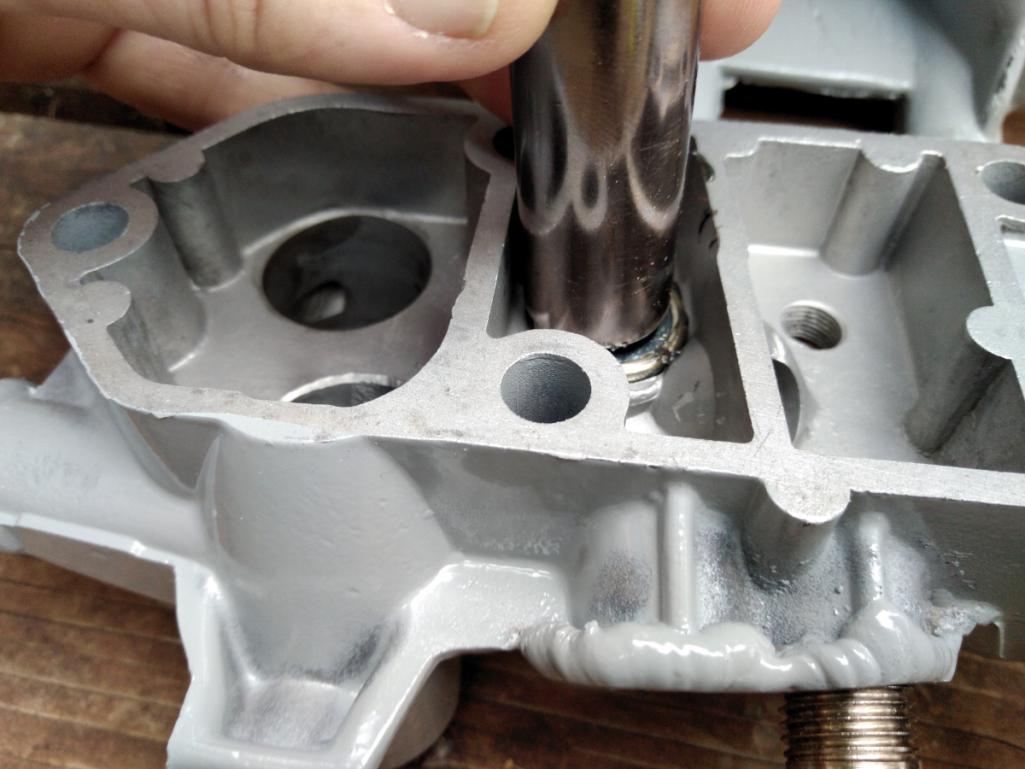 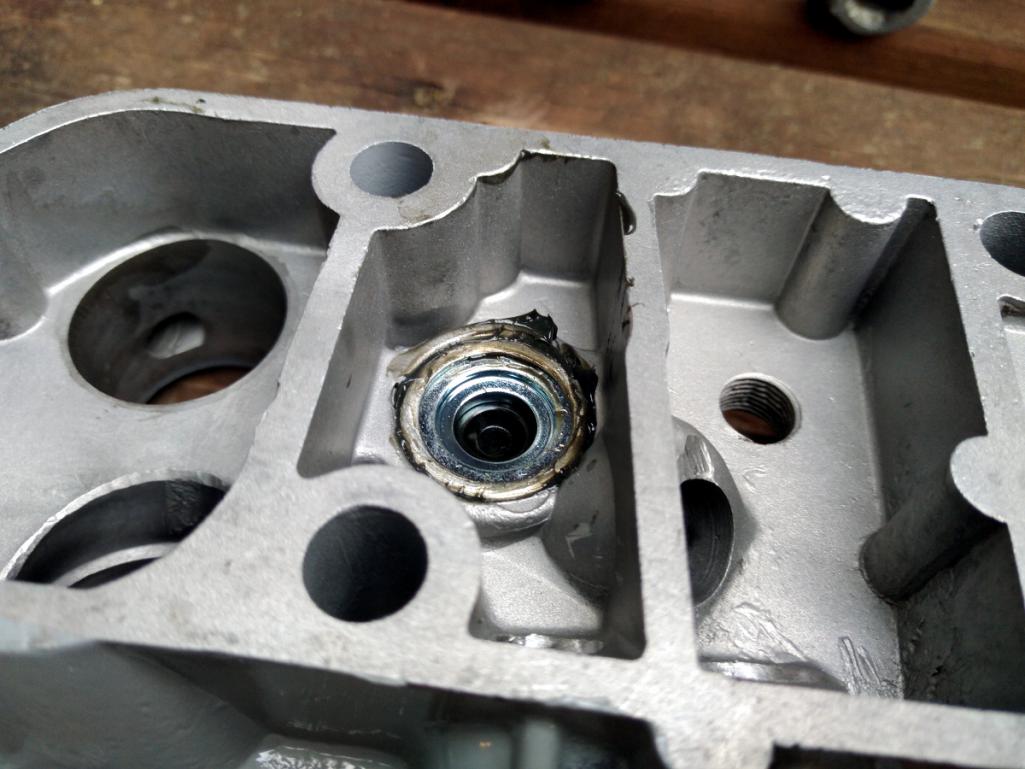 Finally, here are the mating surfaces of the cover nicely matched and polished with the valves installed. Modern oil filters have bypass valves internal to their construction, so apparently this engine gets three bypass valves. If that proves to be a problem, I can always shove that poor nickel right back into place. But I doubt it will be a problem. 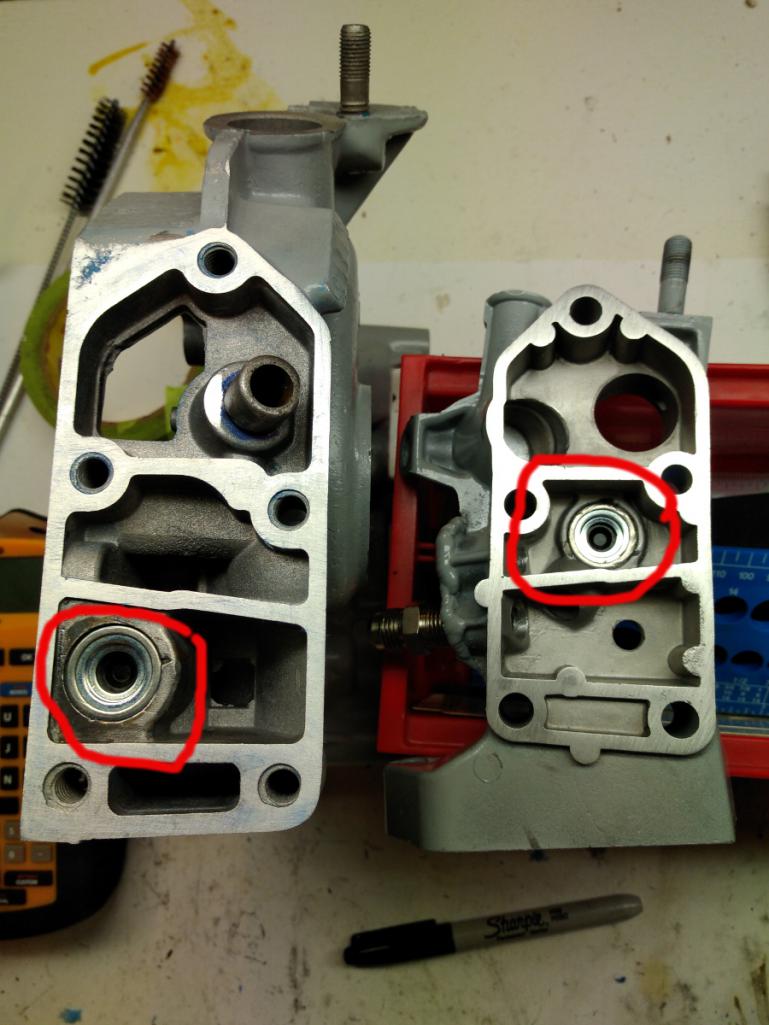 |
| r3dplanet |
 Jul 14 2018, 09:17 PM Jul 14 2018, 09:17 PM
Post
#223
|
|
Senior Member    Group: Members Posts: 679 Joined: 3-September 05 From: Portland, Oregon Member No.: 4,741 Region Association: None |
|
| r3dplanet |
 Jul 14 2018, 09:25 PM Jul 14 2018, 09:25 PM
Post
#224
|
|
Senior Member    Group: Members Posts: 679 Joined: 3-September 05 From: Portland, Oregon Member No.: 4,741 Region Association: None |
Then it's time to install the first of two large seals. This one installs into the cover on the pulley end of the crankshaft, the other one will cover the crankshaft gear on the transmission side.
These come in two varieties in terms of the seal material. It's a flat steel ring with either Viton or another type of black material. I'm not sure which is better but I suppose they both have their benefits. I chose the Viton one but if it leaks I can always swap it out. Once installed it pushes right up against the oil slinger on the crank. Since this is Viton, I'm using Gasgacinch to seal it. If it were the other one, I'd use moly grease like the manual states. Viton is great but I've read it's best used where it doesn't seal a moving part. We shall find out. 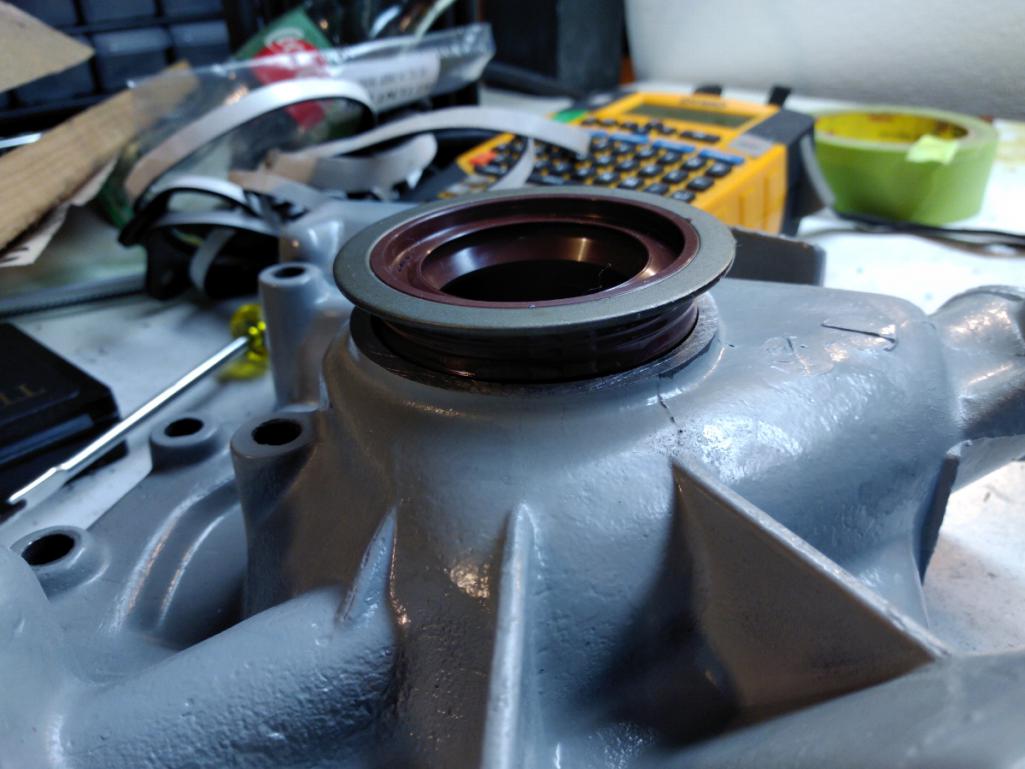 |
| r3dplanet |
 Jul 14 2018, 09:44 PM Jul 14 2018, 09:44 PM
Post
#225
|
|
Senior Member    Group: Members Posts: 679 Joined: 3-September 05 From: Portland, Oregon Member No.: 4,741 Region Association: None |
Then it's finally time to install the cover.
Again I'm coating these gaskets with Permatex High-Tack. In the photo below the first gasket slides over the four bottom studs, but the rest of the cover is held in place by seven bolts. On this subject, nearly all of the bolts on the engine so far are longer than the originals. Most of the time the bolts were threaded in maybe 3/8". Sort of surprising given steel fasteners into aluminum blocks that already have very deep threads. So I'm taking advantage and using longer bolts. The four nuts on the four bottom studs are only temporary. Later, these nuts will be removed and replaced with the front engine mount plate. 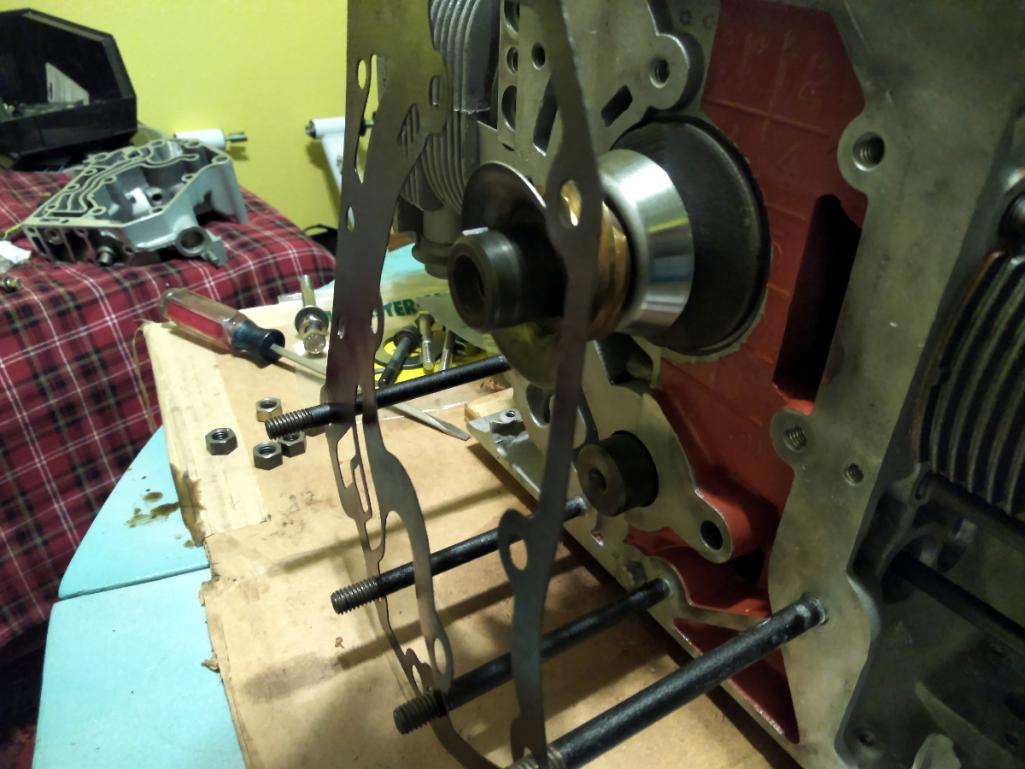 Be very sure to coat the brass distributor gear with grease before proceeding! 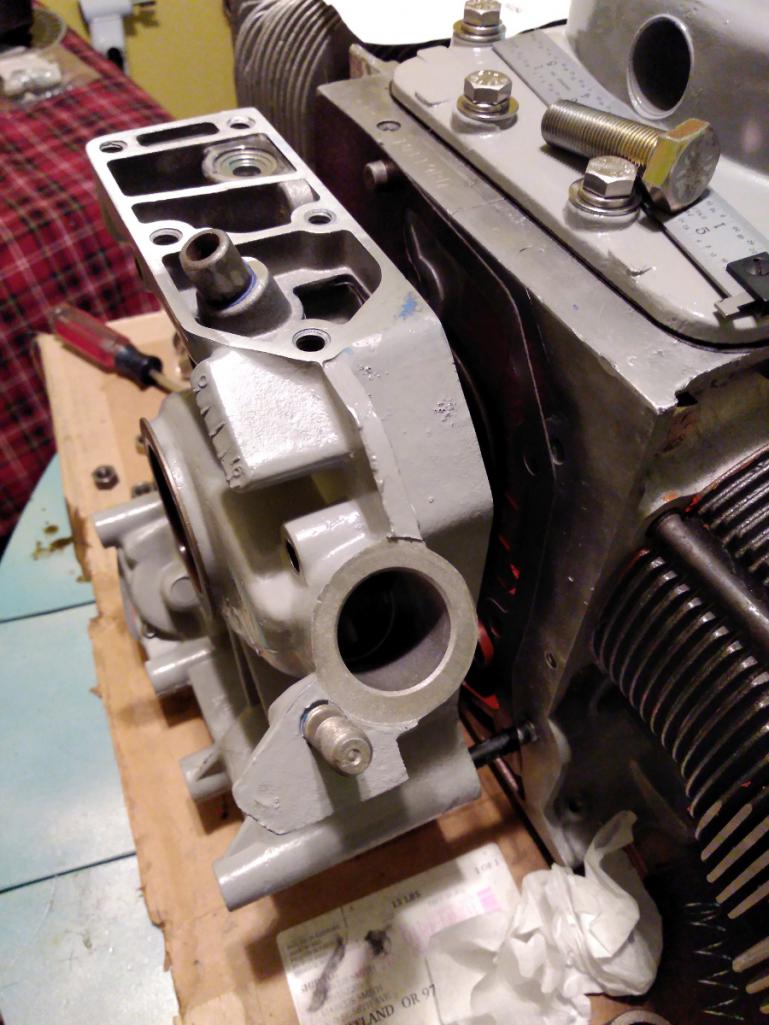 Then pop on the cover and torque down four nuts and seven bolts. Again, I'm using JetLube on the bolts to prevent corrosion and angry fits come disassembly. Then on goes the top gasket and finally the top part of the cover. No idea why I didn't get a photo but the top cover is held down with another five bolts. This engine is a marvel just for the sheer number of fasteners! 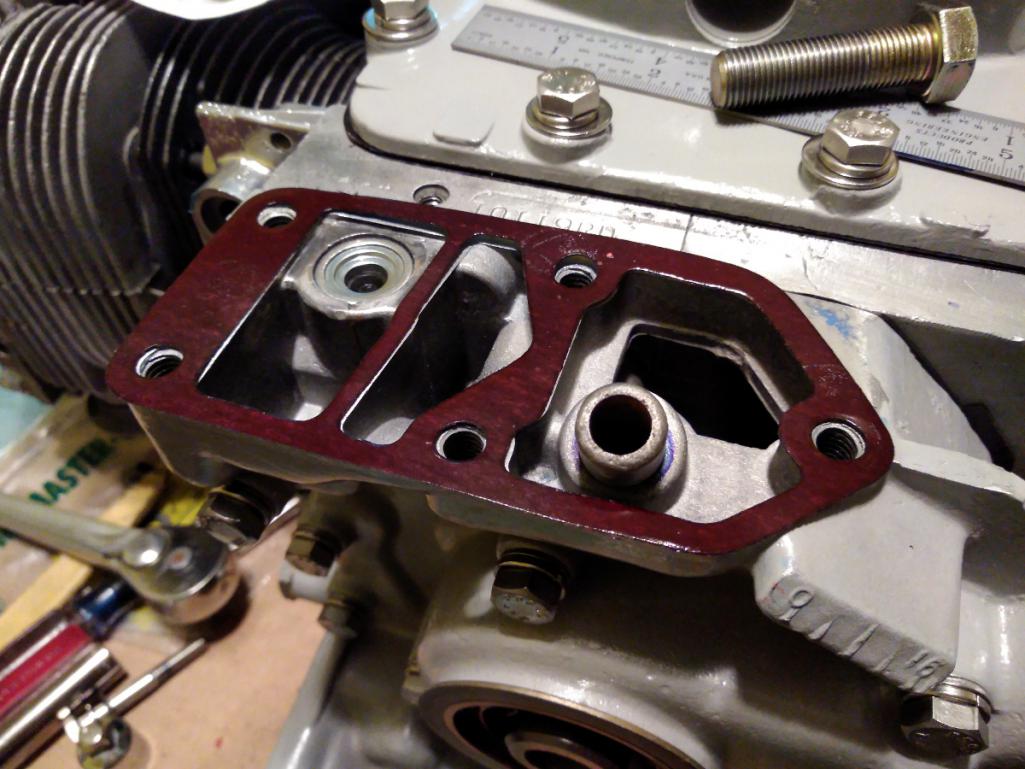 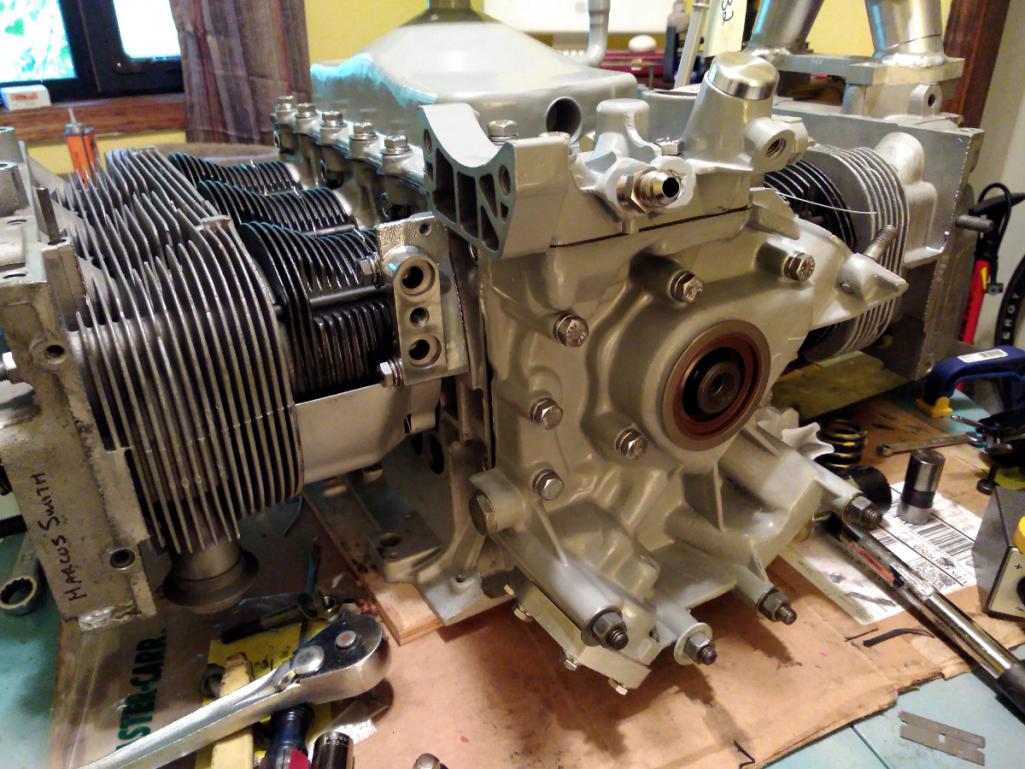 With the Cover of Many Uses now installed, the alternator and belt pulley can be installed. Or they could if I had them. Still tracking them down. Also, the harmonic damper can be installed but I'm waiting to mix up some clear paint for it. |
| r3dplanet |
 Jul 14 2018, 10:01 PM Jul 14 2018, 10:01 PM
Post
#226
|
|
Senior Member    Group: Members Posts: 679 Joined: 3-September 05 From: Portland, Oregon Member No.: 4,741 Region Association: None |
Okay -
The last bit for today is just some notes on the distributor. Here is a lovely HEI unit mated to a long shaft just for the Corvair. You can buy them from Seth Emerson, one the authors of the Performance Corvairs: How to Hotrod the Corvair Engine and Chassis . The website is www.perfvair.com. Originally I wanted to use a stock distributor and throw a Pertronix Ignitor II into it. Or even cooler, a Mallory Unilite. But this distributor has plenty of obvious modern features as well as having a smaller overall outside diameter, so hopefully it will fit easier into the engine bay. I priced out rebuilding an original distributor but when all is said and done it's more expensive. This new HEI unit costs $200, so it's more than a fair price in my little opinion. With either distributor the drive gear needs to be swapped for a reverse drive gear. Clark's sells a kit for this, which includes two thrust washers - one of which has offset keys. If you use the stock distributor you must replace the original thrust washers with these. But on the HEI unit I don't think it's necessary and I know it's not possible. The idea as I understand it is that the thrust of force against the gear and cam is now opposite due to reverse rotation, so the thrust washer needs to be replaced with a mirror image of itself. 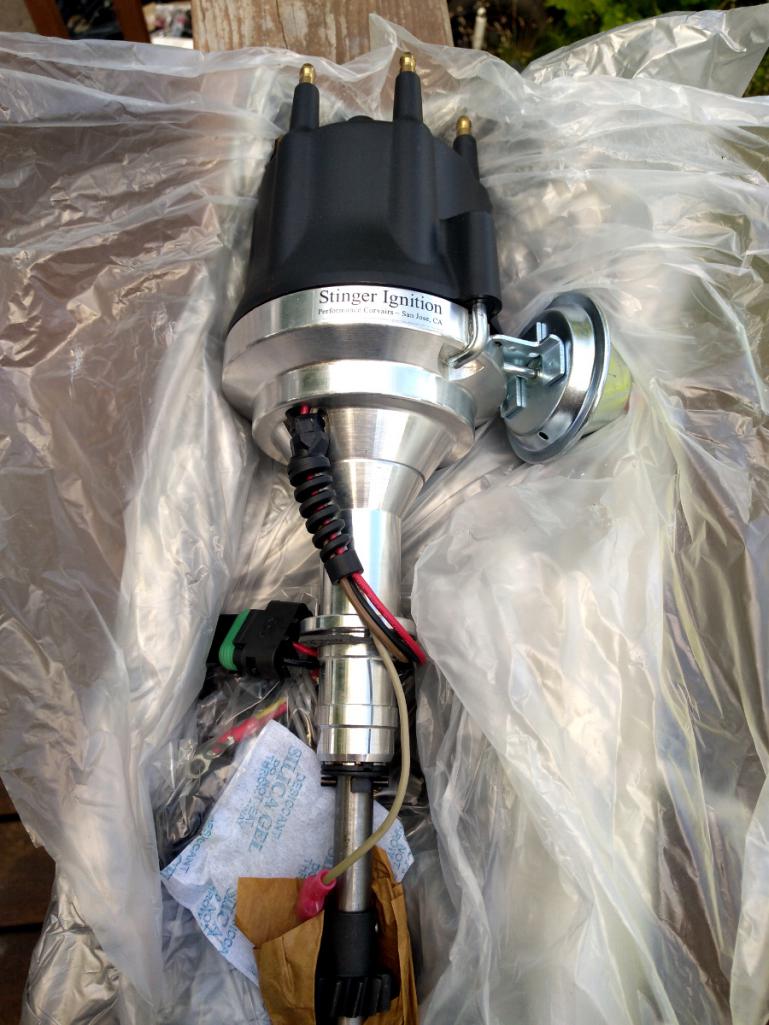 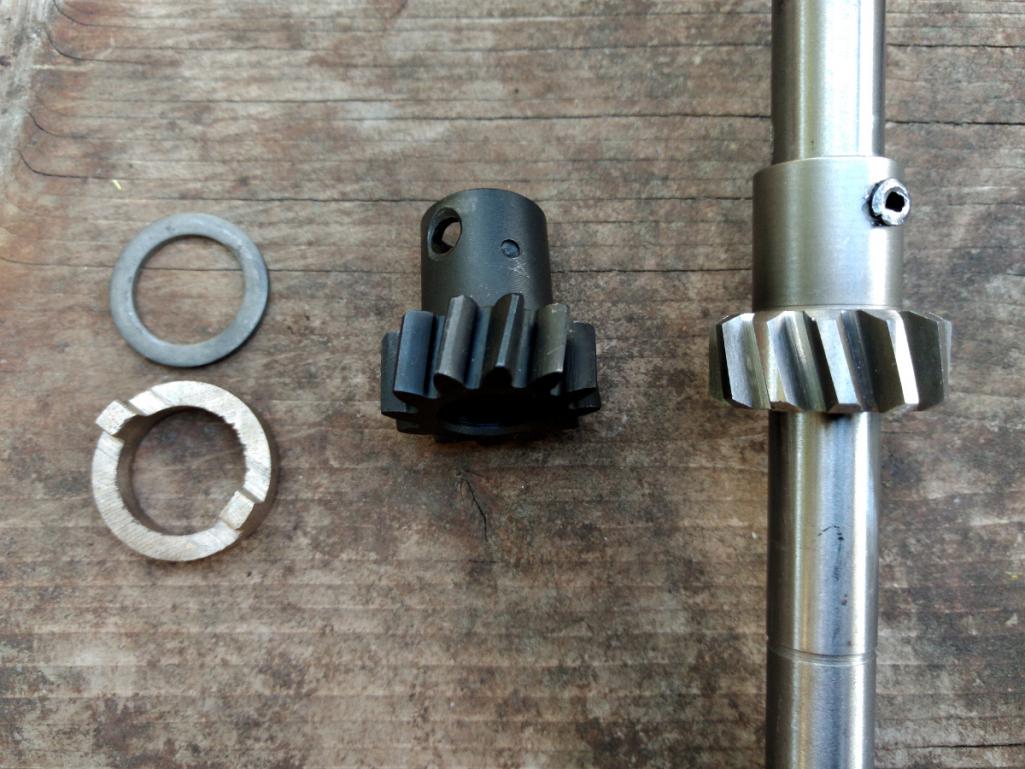 Anyway, here it is as of today in mock-up. 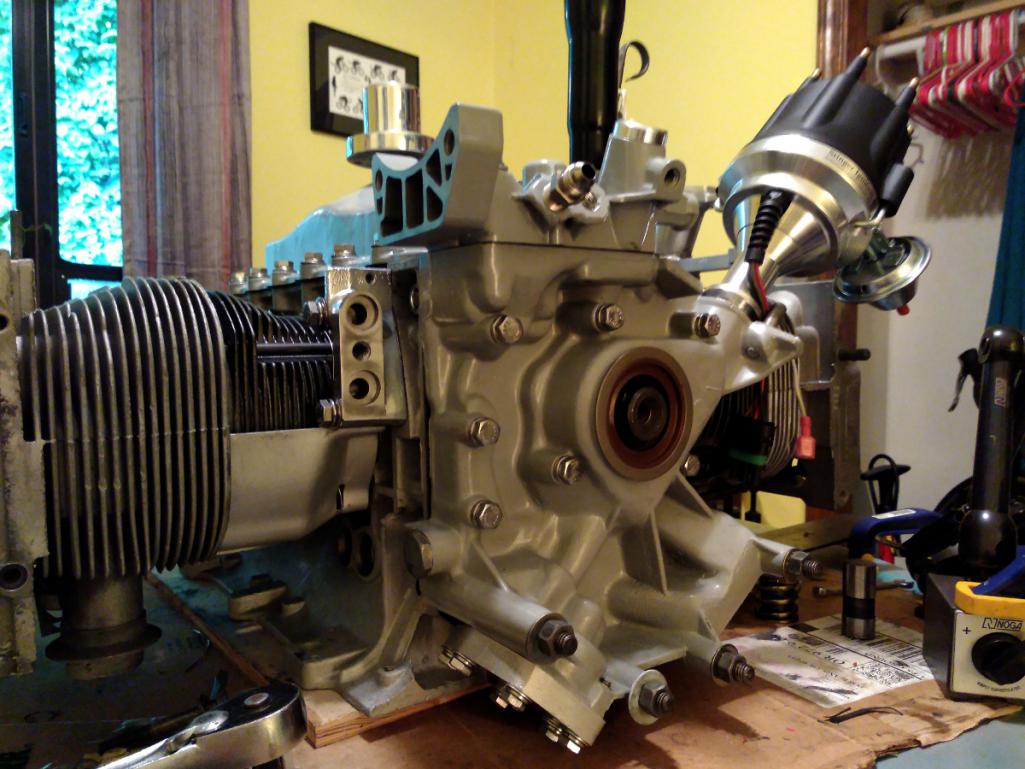 So right now I need to get some missing engine tins, an alternator, a belt pulley, starter, and a few other bits. So it's coming along. But likely nothing further will happen until the oil pan and lifters return. This concludes the broadcasting day. |
| DaveO90s4 |
 Jul 15 2018, 07:39 AM Jul 15 2018, 07:39 AM
Post
#227
|
|
Member   Group: Members Posts: 149 Joined: 26-April 16 From: Australia Member No.: 19,935 Region Association: None |
Hi Marcus. What ring gear will you be using? If 130 tooth then you will probably find that a 911 or 1.4kW VW 9-tooth 25mm diameter pinion will work. The 911 has a 33mm pinion at rest length - which would mean your ring gear would need to be 35mm back from the starter mounting face when fitted to the flywheel I think)
Dave |
| Tbrown4x4 |
 Jul 15 2018, 07:58 AM Jul 15 2018, 07:58 AM
Post
#228
|
|
Senior Member    Group: Members Posts: 706 Joined: 13-May 14 From: Port Orchard, WA Member No.: 17,338 Region Association: None 
|
I'm pretty sure I read somewhere the Corvair engine was the most expensive engine that GM had built at the time.
Not surprising, considering all the aluminum castings. Making great progress! Love the updates. |
| mepstein |
 Jul 15 2018, 08:35 AM Jul 15 2018, 08:35 AM
Post
#229
|
|
914-6 GT in waiting                Group: Members Posts: 19,593 Joined: 19-September 09 From: Landenberg, PA/Wilmington, DE Member No.: 10,825 Region Association: MidAtlantic Region 
|
Okay - The last bit for today is just some notes on the distributor. Here is a lovely HEI unit mated to a long shaft just for the Corvair. You can buy them from Seth Emerson, one the authors of the Performance Corvairs: How to Hotrod the Corvair Engine and Chassis . The website is www.perfvair.com. Originally I wanted to use a stock distributor and throw a Pertronix Ignitor II into it. Or even cooler, a Mallory Unilite. But this distributor has plenty of obvious modern features as well as having a smaller overall outside diameter, so hopefully it will fit easier into the engine bay. I priced out rebuilding an original distributor but when all is said and done it's more expensive. This new HEI unit costs $200, so it's more than a fair price in my little opinion. With either distributor the drive gear needs to be swapped for a reverse drive gear. Clark's sells a kit for this, which includes two thrust washers - one of which has offset keys. If you use the stock distributor you must replace the original thrust washers with these. But on the HEI unit I don't think it's necessary and I know it's not possible. The idea as I understand it is that the thrust of force against the gear and cam is now opposite due to reverse rotation, so the thrust washer needs to be replaced with a mirror image of itself.   Anyway, here it is as of today in mock-up.  So right now I need to get some missing engine tins, an alternator, a belt pulley, starter, and a few other bits. So it's coming along. But likely nothing further will happen until the oil pan and lifters return. This concludes the broadcasting day. That engine would look cool just left on display. |
| r3dplanet |
 Jul 15 2018, 01:53 PM Jul 15 2018, 01:53 PM
Post
#230
|
|
Senior Member    Group: Members Posts: 679 Joined: 3-September 05 From: Portland, Oregon Member No.: 4,741 Region Association: None |
Hello there. Yes, I'm using a 130 tooth ring gear on the flywheel. That's stock for the 914, yes? Thanks for doing this legwork for me. This is such great information - thank you for making all the measurements! Following your advice I'm on the lookout for a 911 starter, or perhaps a modern high torque starter. Maybe something like this?
https://www.amazon.com/STARTER-PORSCHE-1967...3/dp/B079VVN6TN I don't like to buy from Amazon, but it's a good photo. I'll likely buy from Pelican or similar. Hi Marcus. What ring gear will you be using? If 130 tooth then you will probably find that a 911 or 1.4kW VW 9-tooth 25mm diameter pinion will work. The 911 has a 33mm pinion at rest length - which would mean your ring gear would need to be 35mm back from the starter mounting face when fitted to the flywheel I think) Dave |
| euro911 |
 Jul 15 2018, 02:22 PM Jul 15 2018, 02:22 PM
Post
#231
|
|
Retired & living the dream. God help me if I wake up!      Group: Members Posts: 8,858 Joined: 2-December 06 From: So.Cal. & No.AZ (USA) Member No.: 7,300 Region Association: Southern California 
|
We saw a guy driving one of those MANX SRs last week. Hadn't seen one in decades. I knew they used the VW bug pan and typically the bug drive train, but wondered if he stuck a Porsche motor in it because it sounded like a flat 6 when he pulled up next to us at a stop light.
My wife asked him what motor he was running, he said Corvair ... and we noticed a small Chevrolet bowtie emblem on the rear deck after he passed us ... Looked similar to this one 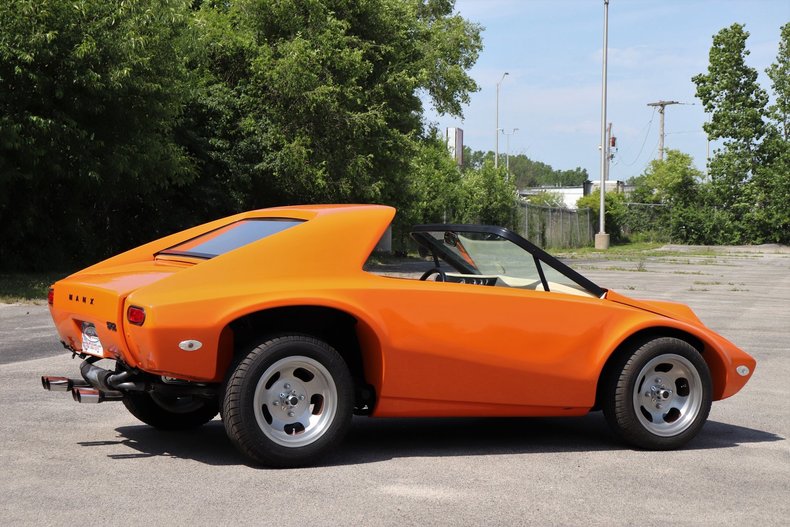 |
| r3dplanet |
 Jul 15 2018, 03:32 PM Jul 15 2018, 03:32 PM
Post
#232
|
|
Senior Member    Group: Members Posts: 679 Joined: 3-September 05 From: Portland, Oregon Member No.: 4,741 Region Association: None |
I'm not surprised. I know way more about Mopar than GM, and I know that costly expense and time were the main problem for engines like the 426 Hemi. Very complicated engines build by specialist hands.
GM was and is an anomaly to me in terms of this engine. They clearly live up to their reputation for not spending any penny they didn't absolutely have to spend. This engine is so cool on so many levels, but there are no shortage of examples on cost cutting. Maybe they cut more costs because the engine was already expensive to build. The aluminum castings certainly come to mind. I keep finding never ending places where I could have cut more aluminum casting flash. Despite all the time I spent with a Dremel, I'll bet there's another cupful of flash I could have removed. Thank you for the goodwill. It helps keep me going. I'm pretty sure I read somewhere the Corvair engine was the most expensive engine that GM had built at the time. Not surprising, considering all the aluminum castings. Making great progress! Love the updates. |
| r3dplanet |
 Jul 15 2018, 03:34 PM Jul 15 2018, 03:34 PM
Post
#233
|
|
Senior Member    Group: Members Posts: 679 Joined: 3-September 05 From: Portland, Oregon Member No.: 4,741 Region Association: None |
You might be more right than you know. If this engine doesn't run perfectly it may very well be a display item for a long time.
QUOTE That engine would look cool just left on display. |
| r3dplanet |
 Jul 15 2018, 03:51 PM Jul 15 2018, 03:51 PM
Post
#234
|
|
Senior Member    Group: Members Posts: 679 Joined: 3-September 05 From: Portland, Oregon Member No.: 4,741 Region Association: None |
Good find! That thing looks like a weekend vehicle from Logan's Run. That is, if they were allowed to leave the domed city.
Ah, the never-ending malleability of the Beetle. I have three Beetle projects in my driveway. My neighbors *love* me. One of the frames is shot in terms of pans and rust. If I were working with a longer time frame I would love to convert it into a Formula Vee car. When I was in Berlin a couple of years back I saw this example at a VW dealership.  I have a real love/hate relationship with the Beetle conversions like the Manx, Baja, etc. and the mmm... vehicle.. in your photo. I love the Beetle and how it's a great platform for so many other cool vehicles. But in modern times my opinion has changed to preserving them instead of cutting them up. Having said that, I really would have loved to build up a Formula Vee, either VW or Corvair powered. A trashed frame like mine is the best starting point. It's the same argument for motorcycles. Breaks my heart to see nice originals cut into cafe racers, but it's okay if the bike was already decrepit. One note about the orange Manx in your photo. The exhaust looks very much like what I want to do. The easy part about a Corvair engine in a 914 is that the exhaust is very easy to access. My plan is to use very simple headers and pipe it right into a 914 exhaust. But not the Monza-style one on the Manx. I'm wondering about a subtle cue for my GM-powered 914, too. Maybe a hatch emblem or something. Anybody want a Beetle project? We saw a guy driving one of those MANX SRs last week. Hadn't seen one in decades. I knew they used the VW bug pan and typically the bug drive train, but wondered if he stuck a Porsche motor in it because it sounded like a flat 6 when he pulled up next to us at a stop light. My wife asked him what motor he was running, he said Corvair ... and we noticed a small Chevrolet bowtie emblem on the rear deck after he passed us ... Looked similar to this one  |
| r3dplanet |
 Jul 20 2018, 11:11 PM Jul 20 2018, 11:11 PM
Post
#235
|
|
Senior Member    Group: Members Posts: 679 Joined: 3-September 05 From: Portland, Oregon Member No.: 4,741 Region Association: None |
Here's a mini how-to on alternator modifications. Huge gratitude to DaveO90s4 for sharing his discovery about the pulley - it will make an important difference for the belt alignment.
From 1960-1963 the Corvair used a generator. From 1964-69 it used an alternator. You can buy very expensive bespoke alternators just for the Corvair (I've seen them on eBay for $600) or even go high dollar and rebuild the generator as an alternator. But my project funds are dwindling and I never wanted to be the guy with alternator bragging rights whilst showing off the engine in a parking lot. So here's the cheap way out. Amazingly, the alternator to be used is the venerable GM internally regulated alternator that you can buy at any any flaps. Three cheers for continuity (heh)! Mine is a 64 amp alternator picked up locally for $58. All that's necessary is to swap the front cover with a period Corvair cover, swap the bearing assembly, and then most importantly swap the alternator fan with a 1964 only fan/pulley one-piece assembly. I bought mine from Clark's for $22. I put out a want-ad on a Corvair forum but they don't separate classified ads from discussion, so it immediately devolved into a discussion about how magnetos work. Ugh. The pulley isn't in the Clark's catalog. I just called and asked. The front cover was cheap also. Here's the FLAPS alternator: 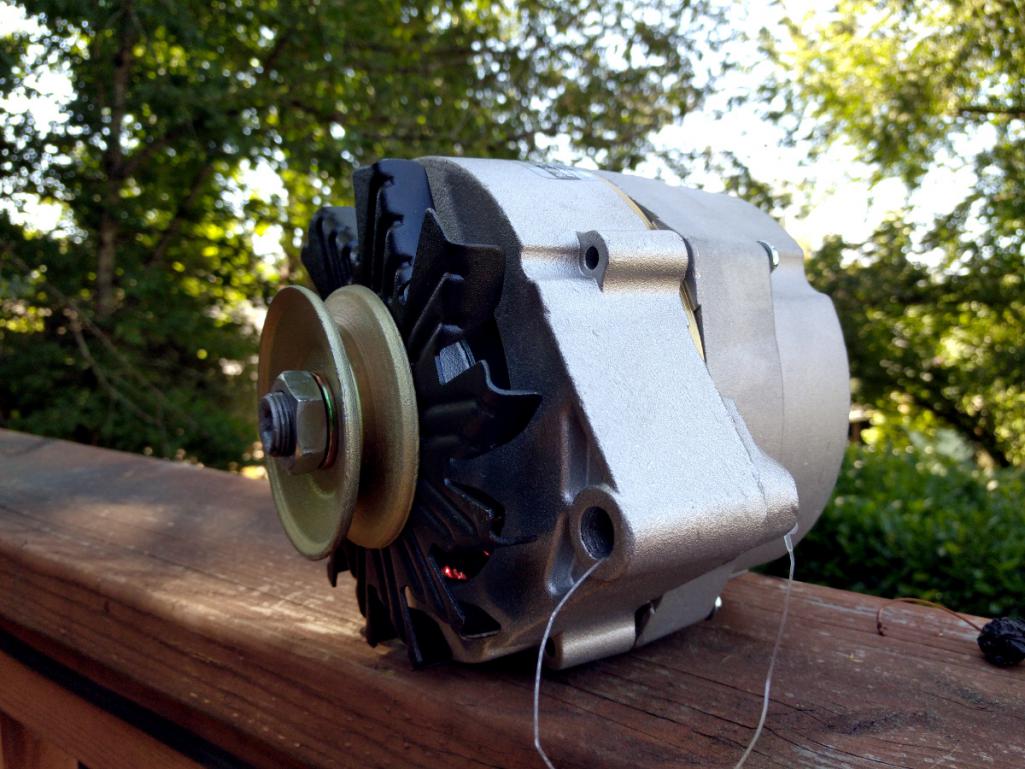 And here is the 1964 only one-piece pulley / fan combo unit: 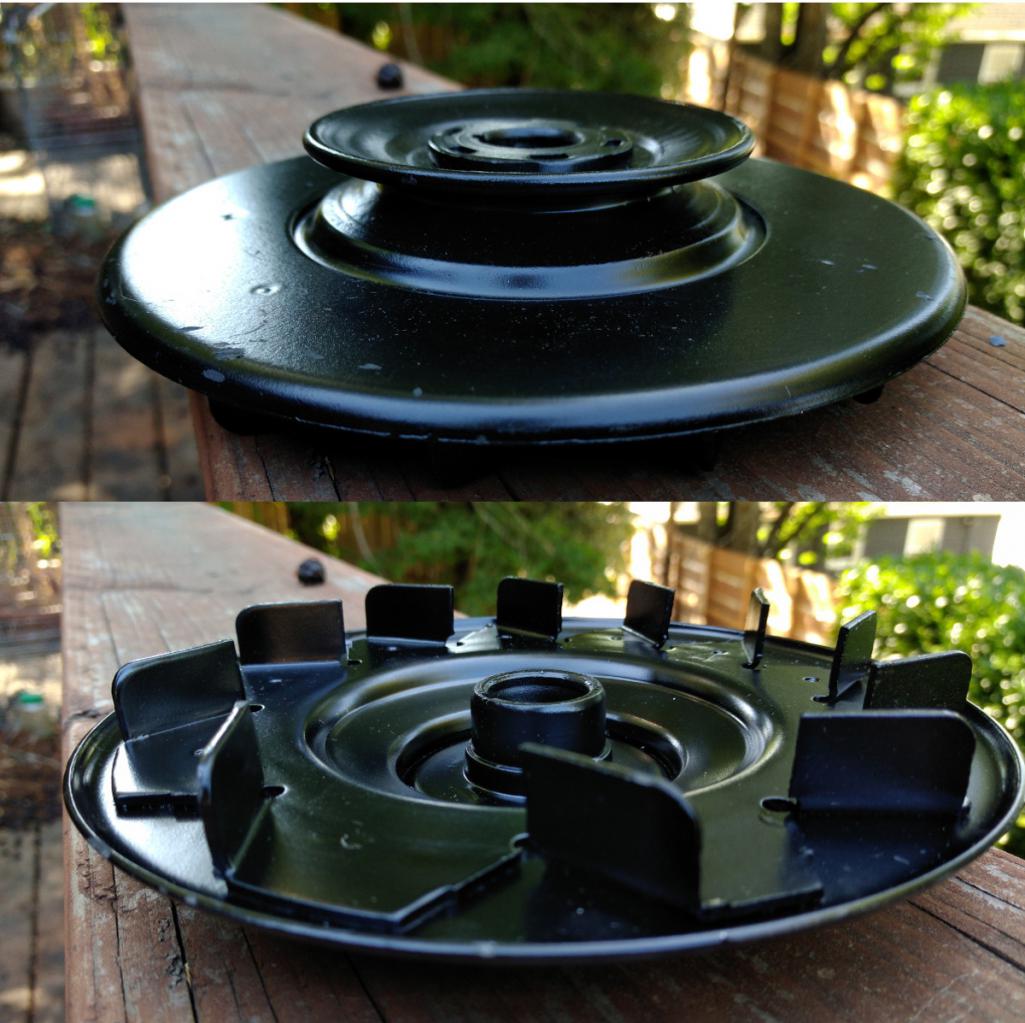 You can see here that the old front cover has it's mounting holes right at the bottom, instead of the more modern cover with its holes 180 degrees apart. 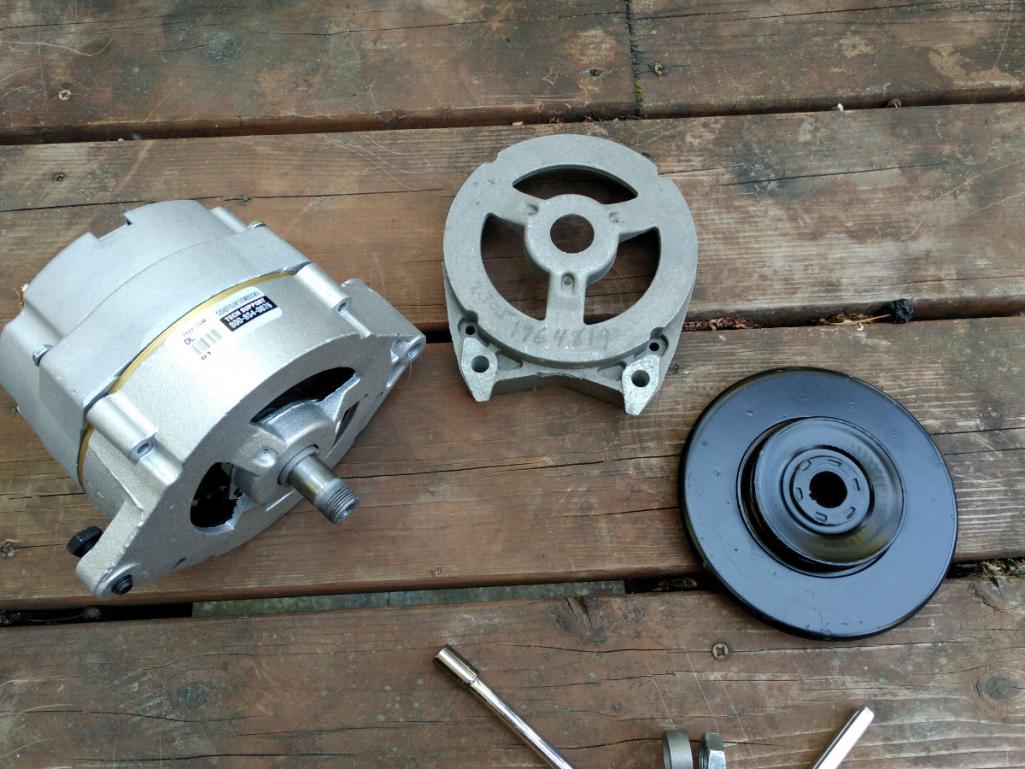 Here is the bearing assembly. It's just three screws, a sealed bearing, and a retainer plate. The bushing is there for looks. But on that subject there is a thick bushing that won't be used. Just use the two smaller ones to get the right clearance. 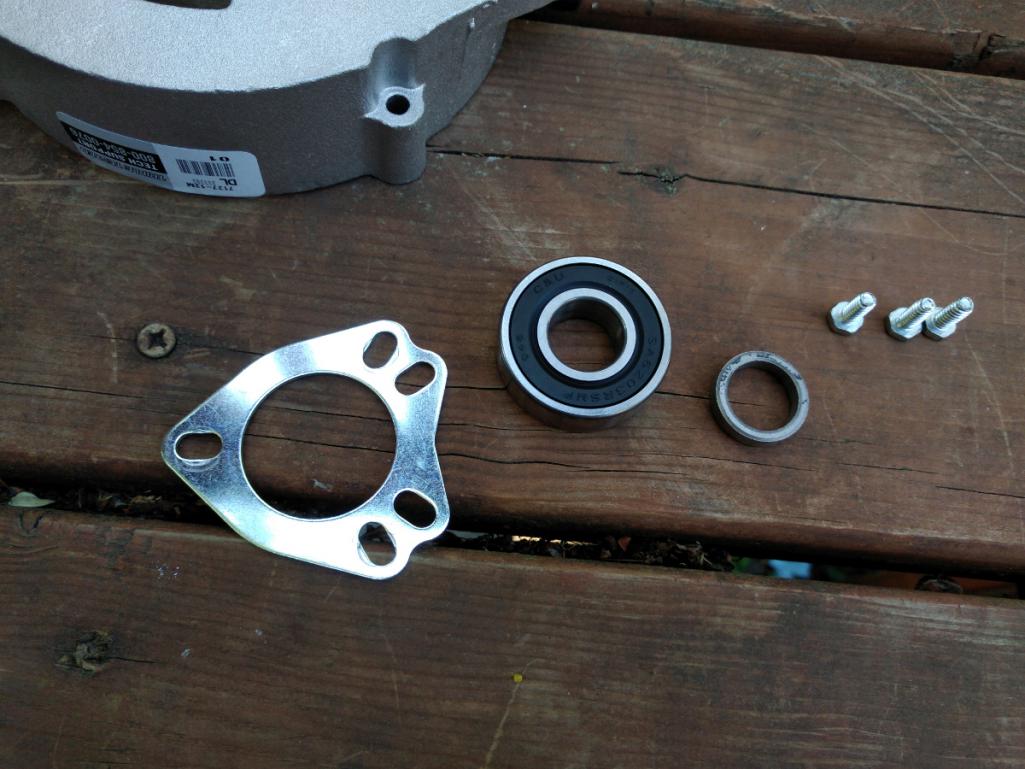 Here is the bearing assembly pressed into the Corvair front cover. Somewhat troubling was that the bearing was easily popped out of the new cover just with my fingers. I used a press to insert the bearing into the Corvair cover. 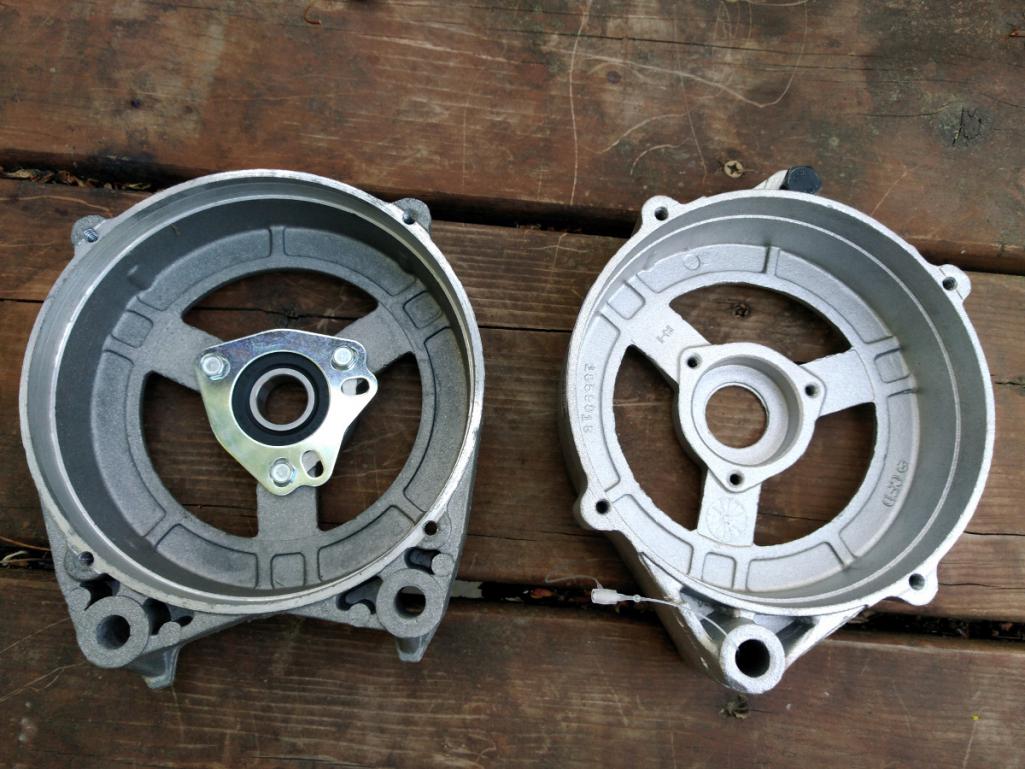 And here it is mostly assembled. Pay no attention the bolt at the bottom. It's inserted the wrong way; it should insert from the other side. All four #10-24 2" bolts match perfectly to the new alternator housing. The fan spins great. 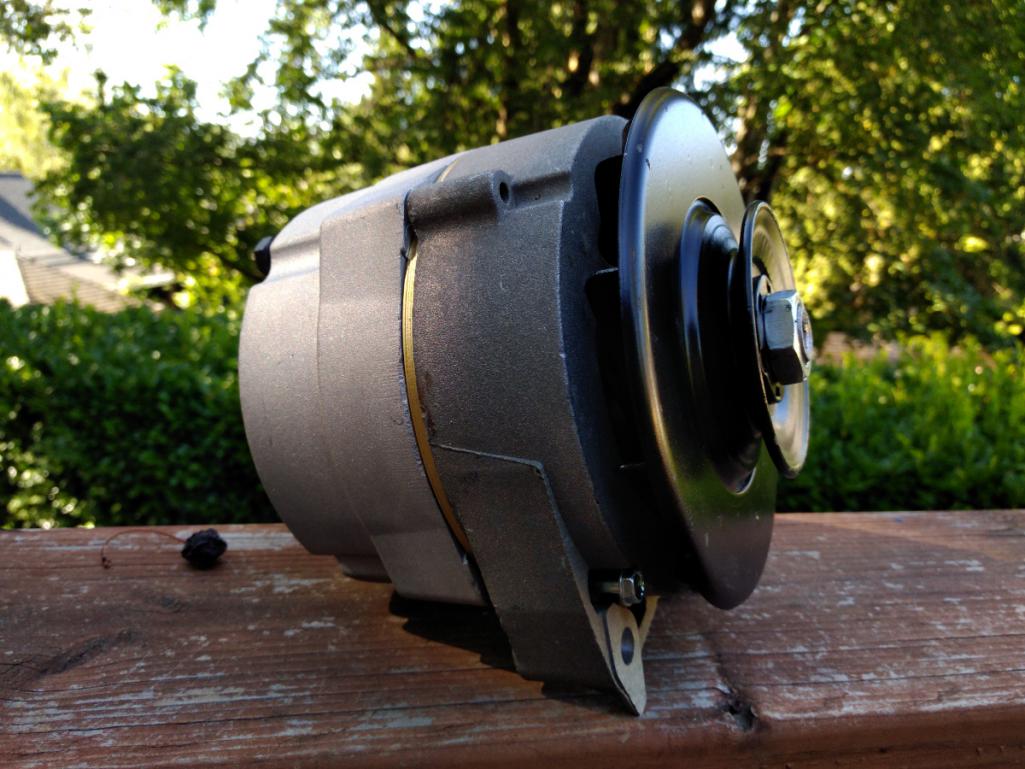 But some info on that fan. Forever and a day the wisdom about reverse rotation engines has been to also utilize a reverse fan on the alternator. Since the alternator doesn't care which way it spins, the fan should blow cooling air in the most efficient way, so while the alternator doesn't care about direction the fan should. Ideally that means the blades should be flipped 180 degrees. On a normal alternator setup without this '64 only pulley/fan assembly a common reverse fan would be installed. But there aren't any reverse '64 only pulleys. Every other pulley after 1964 had a separate fan and pulley, just like the very first photo above. This is where DaveO90s4 did some brain thinking. He found that using the later standard sized pulley dropped the belt in relation to the idler pulley. The belt should run along the both pulleys on the same plane. But the alternator pulley is of a smaller diameter and it had a tendency to throw the belt on his engine. But with this pulley it has that large guard and a larger diameter pulley to equalize the run. I would never have known to do this. Maybe someone out there in fabrication land can manufacture a reverse '64 only pulley, but according to racer lore it should work just fine. I found this helpful table detailing the Corvair generators and pulleys, but the short version is that Part #3848042 is what you need. https://murfy.us/doku.php?id=timtechcorvair...:generatorcodes |
| r3dplanet |
 Jul 20 2018, 11:43 PM Jul 20 2018, 11:43 PM
Post
#236
|
|
Senior Member    Group: Members Posts: 679 Joined: 3-September 05 From: Portland, Oregon Member No.: 4,741 Region Association: None |
Also, a sad note about the Ford roller rocker tips.
Unless I find some way to modify them they won't fit. It took me a bit to figure out some trouble. But the gist of it is that the roller tip rockers are slightly taller from the round base to the top. So if I cinch down the adjuster nut to where the shorter pushrods are correct, it seizes. It seizes because the bottom of the rocker makes contact with the face of the mounting stud. It just can't go in any farther because there's no clearance. The stock rockers still leave maybe .030" of clearance. So it appears that at least in my application the roller tips won't work. If I had the time and money I'd buy the good roller rocker kit from Clark's, but I'm short on both. So stockers it is. It's a bit of a pisser but at least I have a workaround. Stock rocker: 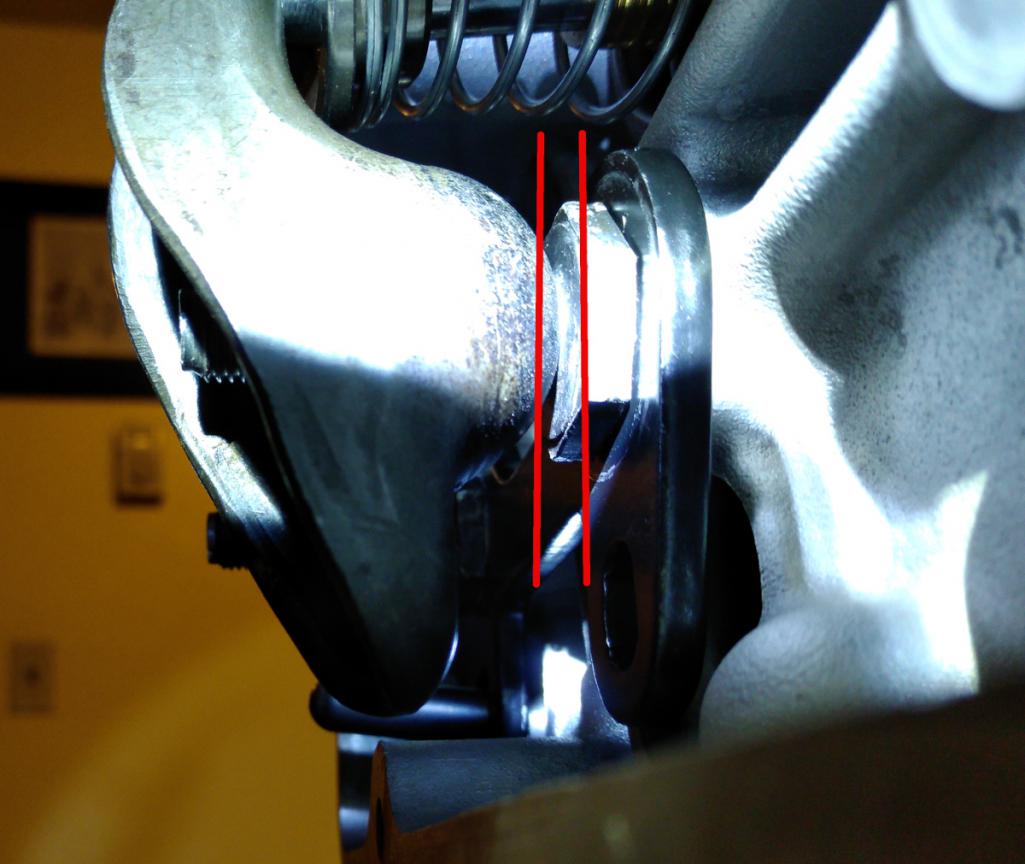 Ford rocker: 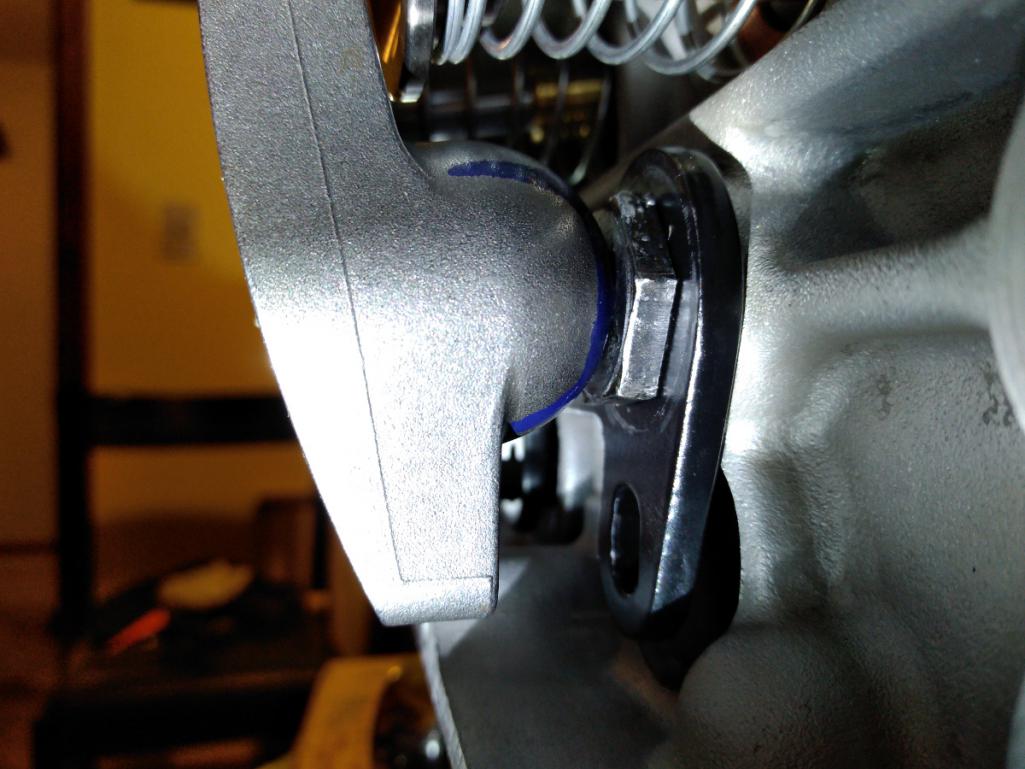 |
| DaveO90s4 |
 Jul 21 2018, 01:20 AM Jul 21 2018, 01:20 AM
Post
#237
|
|
Member   Group: Members Posts: 149 Joined: 26-April 16 From: Australia Member No.: 19,935 Region Association: None |
Pleased to be able to pass on any snippets of info I've gleaned along the way.
Had you inclination you could remove the blades from the '64 pulley (leaving the spot welds in place) to yield a flat-ish rear of the shroud, and then sandwich the later model alternator fan into place. I doubt the thickness of the sandwich would affect belt tracking. Or just leave the '64 pulley as it is. That's what I'm going to do. - so as to give me time to fit the new starter to the 914, fix the electric windows in the 911, replace the water pump in the 944 etc etc.... You did well with that purchase from Clark's. Mine cost more than twice as much, then exchange rates, then shipping. The tyranny of living upside down... But at least mine's fixed and I learnt something I could pass on. Cheers DaveO |
| Dr Evil |
 Jul 23 2018, 09:59 AM Jul 23 2018, 09:59 AM
Post
#238
|
|
Send me your transmission!                Group: Members Posts: 23,032 Joined: 21-November 03 From: Loveland, OH 45140 Member No.: 1,372 Region Association: MidAtlantic Region 
|
Also, a sad note about the Ford roller rocker tips. Unless I find some way to modify them they won't fit. It took me a bit to figure out some trouble. But the gist of it is that the roller tip rockers are slightly taller from the round base to the top. So if I cinch down the adjuster nut to where the shorter pushrods are correct, it seizes. It seizes because the bottom of the rocker makes contact with the face of the mounting stud. It just can't go in any farther because there's no clearance. The stock rockers still leave maybe .030" of clearance. So it appears that at least in my application the roller tips won't work. If I had the time and money I'd buy the good roller rocker kit from Clark's, but I'm short on both. So stockers it is. It's a bit of a pisser but at least I have a workaround. Stock rocker:  Ford rocker:  I had to do the same damn thing. Ended up with stockers. The rollers came with their own special studs, did yours? Man, this build is so right. Mine looks like a tossed it all together comparatively. Things that you did that I would definitely do once I get into this thing again in the future is all the work on the oil pump and the cover of many uses. What a raging bitch those things were to do. Still leak. I was under pressure to get the bus moving under its own power and out of where I was moving from. Now, Im just too bogged down to really mess with it. This will be a classic thread. |
| Dr Evil |
 Jul 23 2018, 10:00 AM Jul 23 2018, 10:00 AM
Post
#239
|
|
Send me your transmission!                Group: Members Posts: 23,032 Joined: 21-November 03 From: Loveland, OH 45140 Member No.: 1,372 Region Association: MidAtlantic Region 
|
Here's a mini how-to on alternator modifications. Huge gratitude to DaveO90s4 for sharing his discovery about the pulley - it will make an important difference for the belt alignment. From 1960-1963 the Corvair used a generator. From 1964-69 it used an alternator. You can buy very expensive bespoke alternators just for the Corvair (I've seen them on eBay for $600) or even go high dollar and rebuild the generator as an alternator. But my project funds are dwindling and I never wanted to be the guy with alternator bragging rights whilst showing off the engine in a parking lot. So here's the cheap way out. Amazingly, the alternator to be used is the venerable GM internally regulated alternator that you can buy at any any flaps. Three cheers for continuity (heh)! Mine is a 64 amp alternator picked up locally for $58. All that's necessary is to swap the front cover with a period Corvair cover, swap the bearing assembly, and then most importantly swap the alternator fan with a 1964 only fan/pulley one-piece assembly. I bought mine from Clark's for $22. I put out a want-ad on a Corvair forum but they don't separate classified ads from discussion, so it immediately devolved into a discussion about how magnetos work. Ugh. The pulley isn't in the Clark's catalog. I just called and asked. The front cover was cheap also. Here's the FLAPS alternator:  And here is the 1964 only one-piece pulley / fan combo unit:  You can see here that the old front cover has it's mounting holes right at the bottom, instead of the more modern cover with its holes 180 degrees apart.  Here is the bearing assembly. It's just three screws, a sealed bearing, and a retainer plate. The bushing is there for looks. But on that subject there is a thick bushing that won't be used. Just use the two smaller ones to get the right clearance.  Here is the bearing assembly pressed into the Corvair front cover. Somewhat troubling was that the bearing was easily popped out of the new cover just with my fingers. I used a press to insert the bearing into the Corvair cover.  And here it is mostly assembled. Pay no attention the bolt at the bottom. It's inserted the wrong way; it should insert from the other side. All four #10-24 2" bolts match perfectly to the new alternator housing. The fan spins great.  But some info on that fan. Forever and a day the wisdom about reverse rotation engines has been to also utilize a reverse fan on the alternator. Since the alternator doesn't care which way it spins, the fan should blow cooling air in the most efficient way, so while the alternator doesn't care about direction the fan should. Ideally that means the blades should be flipped 180 degrees. On a normal alternator setup without this '64 only pulley/fan assembly a common reverse fan would be installed. But there aren't any reverse '64 only pulleys. Every other pulley after 1964 had a separate fan and pulley, just like the very first photo above. This is where DaveO90s4 did some brain thinking. He found that using the later standard sized pulley dropped the belt in relation to the idler pulley. The belt should run along the both pulleys on the same plane. But the alternator pulley is of a smaller diameter and it had a tendency to throw the belt on his engine. But with this pulley it has that large guard and a larger diameter pulley to equalize the run. I would never have known to do this. Maybe someone out there in fabrication land can manufacture a reverse '64 only pulley, but according to racer lore it should work just fine. I found this helpful table detailing the Corvair generators and pulleys, but the short version is that Part #3848042 is what you need. https://murfy.us/doku.php?id=timtechcorvair...:generatorcodes Yup, did this as well. Waaaaay cheaper and available parts. Only special piece is the cover. I kept mine normal corvair rotation since I mated it to a two speed PG. |
| r3dplanet |
 Jul 23 2018, 10:35 AM Jul 23 2018, 10:35 AM
Post
#240
|
|
Senior Member    Group: Members Posts: 679 Joined: 3-September 05 From: Portland, Oregon Member No.: 4,741 Region Association: None |
Right? I spent $90 including the alternator. Otherwise you get to spend $300. It never really hit me that you were using the Powerglide. Intersting..
Current status: * I'm *stilll* waiting on the machinist to finish the oil pan. Can't installl the pushrods, tubes, lifters, rockers, etc untill it returns. * Sorting out starter ideas. * Working on small stuff, like painting the harmonic balancer. * The builder I hired three months ago to rebuild the Type-4 engine hasn't even started yet. Sigh. Yup, did this as well. Waaaaay cheaper and available parts. Only special piece is the cover. I kept mine normal corvair rotation since I mated it to a two speed PG. |
  |
5 User(s) are reading this topic (5 Guests and 0 Anonymous Users)
0 Members:

|
Lo-Fi Version | Time is now: 23rd November 2024 - 03:54 PM |
Invision Power Board
v9.1.4 © 2024 IPS, Inc.


