|
|

|
Porsche, and the Porsche crest are registered trademarks of Dr. Ing. h.c. F. Porsche AG.
This site is not affiliated with Porsche in any way. Its only purpose is to provide an online forum for car enthusiasts. All other trademarks are property of their respective owners. |
|
|
  |
| DBCooper |
 Aug 12 2013, 09:32 AM Aug 12 2013, 09:32 AM
Post
#61
|
|
14's in the 13's with ATTITUDE     Group: Members Posts: 3,079 Joined: 25-August 04 From: Dazed and Confused Member No.: 2,618 Region Association: Northern California |
It wasn't just GM engineers, remember who they were looking to for inspiration. Until the mid-sixties VW engines didn't have cam bearings either, the cam rode in the case. Works fine for a couple of hundred thousand miles and then the wear is enough that you can't maintain oil pressure, need either a new case or the old one machined for bearings. Hundreds of thousands (millions?) of engines. So measure the bores well, in every possible location, and especially for roundness.
Oh, and special attention to the thrust surface. Correct. I have no idea why. Apparently GM engineers didn't think cam bearings were necessary - which seems a bit unsettling. But after finding virtually no wear with the bore gauge, I've come to think that it isn't a huge deal. Apparently, my low wear is near identical to other Corvair engine rebuilds in that the cam journals just don't seem to wear down. One reason I think is that the cam sits so low in the engine that it's constantly flooded with oil. But like you, I certainly raised an eyebrow when I discovered this. Apparently this design decision has been justified over the decades. I don't mean to be obtuse, and I certainly don't know corvair engines but you said the cam runs on the machined aluminum surface of the case without a bearing. did I understand that correctly? |
| gf4c |
 Aug 13 2013, 09:48 AM Aug 13 2013, 09:48 AM
Post
#62
|
|
Newbie  Group: Members Posts: 4 Joined: 11-August 13 From: west coast Member No.: 16,240 Region Association: None |
Thanks for the input, Marty. I appreciate it. Marty .. as in Marty Scarr? If so, I'm honored! Hi Marcus - yes, it's me, didn't know you were such a flatterer (IMG:style_emoticons/default/biggrin.gif) I thought I would come over and see how you're doing on your engine build, since you didn't get much of a welcome at corvaircenter.com Short intro: I am a longtime Corvair guy, been playing with them (and VWs) for over 30 years, have always liked air cooled engines and cars, especially the 914 - but I've never owned one. QUOTE The cleaning of the case halves is a vexing issue. I've heard some say never to bead blast it as you suggest. I've heard other authorities say not to worry about it. My issue is that at this point I just can't get it any cleaner with Simple Green, kerosene, Biokleen, Easy Off, or anything else I've tried. There's a metal dipper in town that uses electrolysis but that's destructive for aluminum (ask me how I know). I'd be open to other suggestions. One method I haven't tried, but produces excellent results is ultrasonic cleaning. I looked into building such a setup, also thought about buying the $30 Harbor Freight unit and putting it's workings into a larger tank. Hasn't happened, too many projects.... Marty |
| r3dplanet |
 Sep 28 2013, 04:17 PM Sep 28 2013, 04:17 PM
Post
#63
|
|
Senior Member    Group: Members Posts: 679 Joined: 3-September 05 From: Portland, Oregon Member No.: 4,741 Region Association: None |
Some more progress on this long term project. I'm still working on case prep. Since the last episode, my machinist tested my crank to make sure it was still good and then had him polish it and make sure it was balanced. I also bought a new crank gear, cam, and cam gear. The cam I'm using is a reverse rotation Otto-20. I've sent these, the newly cleaned up connecting rods, and a few other parts to be cryogenically treated. Gregg Hikimian is doing the work. He's a very interesting chap and has delighted me outstanding service. He also performs all kinds of space age coatings and other treatments. While I'm waiting for all of those parts to return I had my case halves cleaned, and cleaned again. I'm going to perform a head stud test (as seen below), clean off the casting flash from the engines halves with a Dremel, and then hike hike them up to American Metal Cleaners for a trip into a heat-process cleaning specifically for aluminum. Or Aluminium if you are British.
So today I'm showing the head stud test. I found a great procedure here: http://flycorvair.net/2012/01/28/testing-head-studs/ I followed this for the most part with one small modification. But first up I had to clean up the threads on the head studs. I'm actually considering pulling all of them and replacing them with stronger studs, but the Corvair brains I've picked are very split in their opinions. The aircraft guys all seem to do it, but the automotive guys don't tend to unless there's serious problems. I have a call in to American-Pi to see what they recommend. In the meantime, I'm passing the time with important little tasks. [Hey Marty, please feel free to chime in on this issue!] You can see that the ends of the studs (3/8"-24 using the Roman Catholic measuring system) don't look very good. So I'm using both a die and a thread chaser to clean them up. 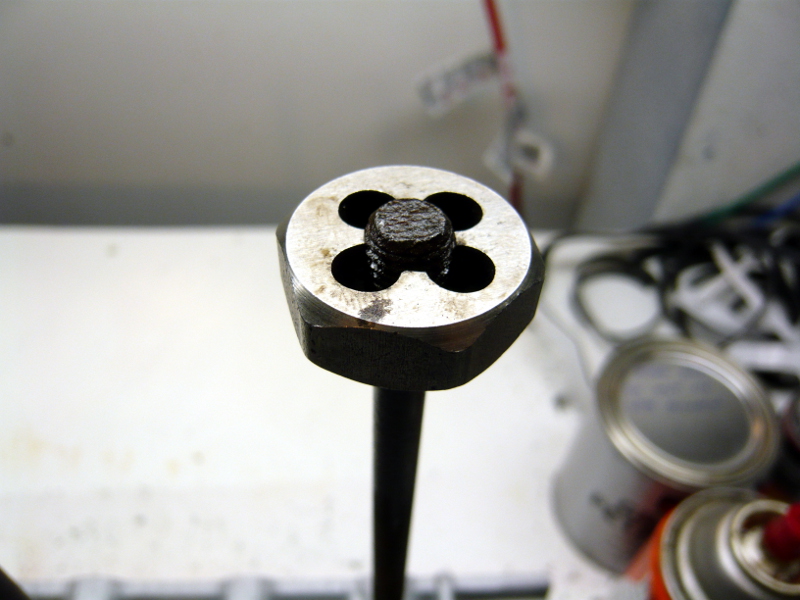 The thing about a six cylinder engine is that there's more studs than usual. The top row is where the damage is. The bottom row is shorter by an inch or so. The bottom studs also hold the rockers in place, and because they're constantly coated in oil these threads are in super condition. 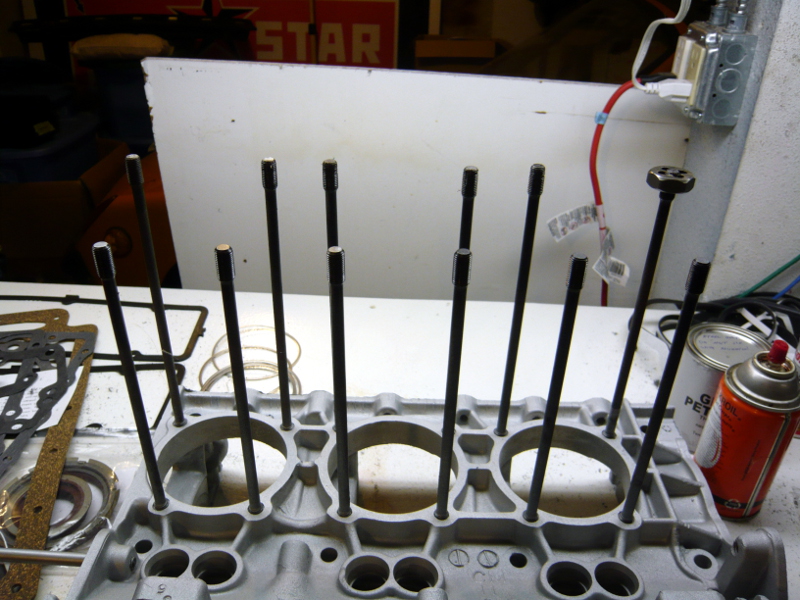 Now it's time to see if the studs can hold 30 pounds of torque. The first idea I had was just to use one of the old cylinders and torque it down with some fasteners, but you can see that there's no way to do that since any little amount of torque would just break the fins. I thought about making a square jig to fit over all four studs and the cylinder to simulate the head, but then I remembered that I don't have any machining capability. 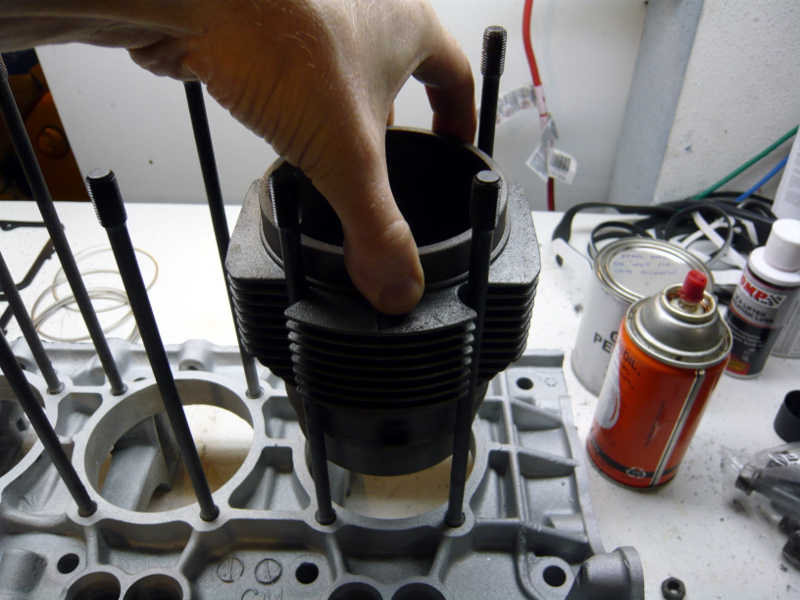 So I went to Plan B and cut some 3/8" steel tubing and used some hardened fasteners instead. This failed because the tubing begins to collapse at less than 20 pounds. 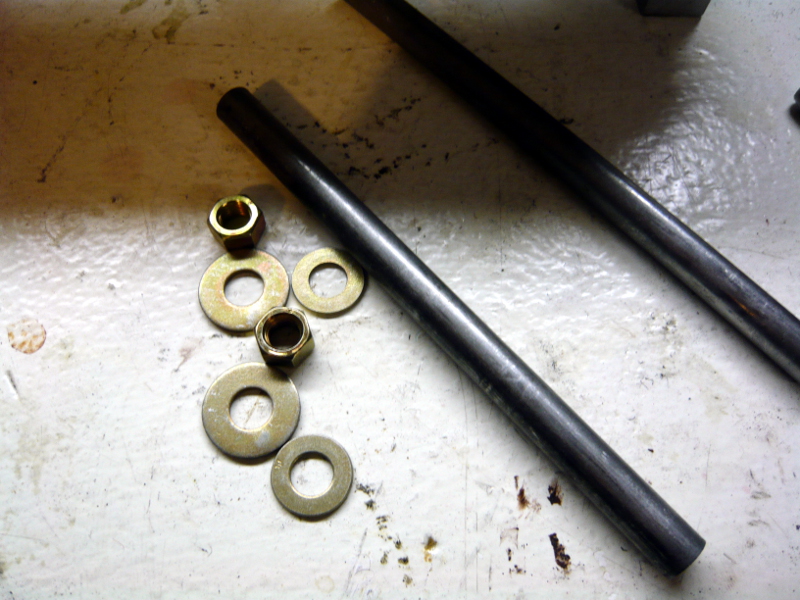 But finally the lights when on and I picked up some steel plumbing nipples of different lengths to match the stud length and still reveal the threads. I spun on a Tee so that I could view into the hole with a small light to see if the head stud would turn as I torqued it down. The tool completely obscures sight of the stud so this little idea worked really well. 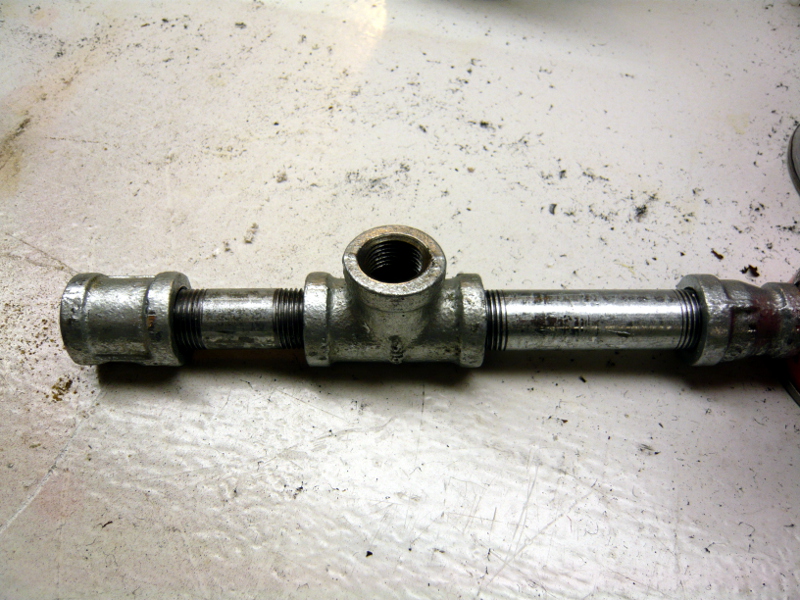 This is the final setup. Using hardened washers to protect the case surface, I torqued down the nut to 15 pounds making note of the position of the wrench handle. Then I torqued again to 20, 25, and then 30 pounds making sure that the handle didn't travel too far to meet each target. 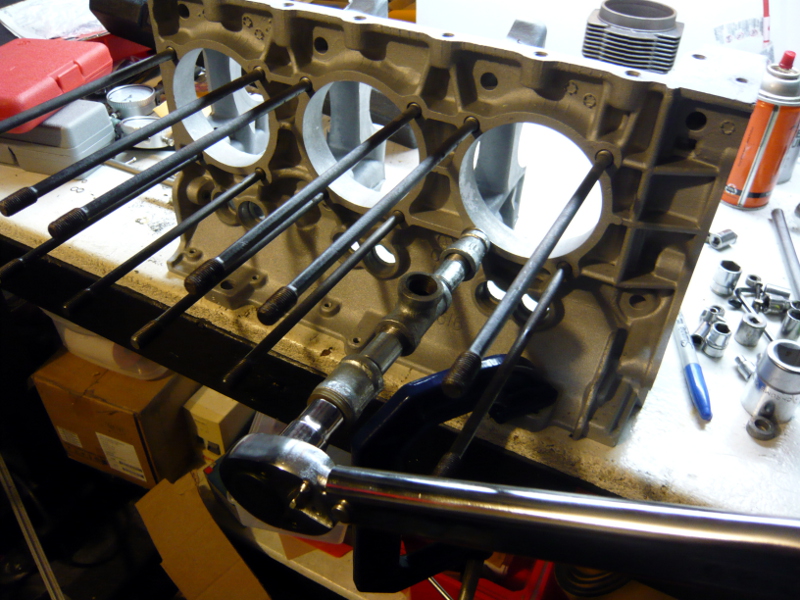 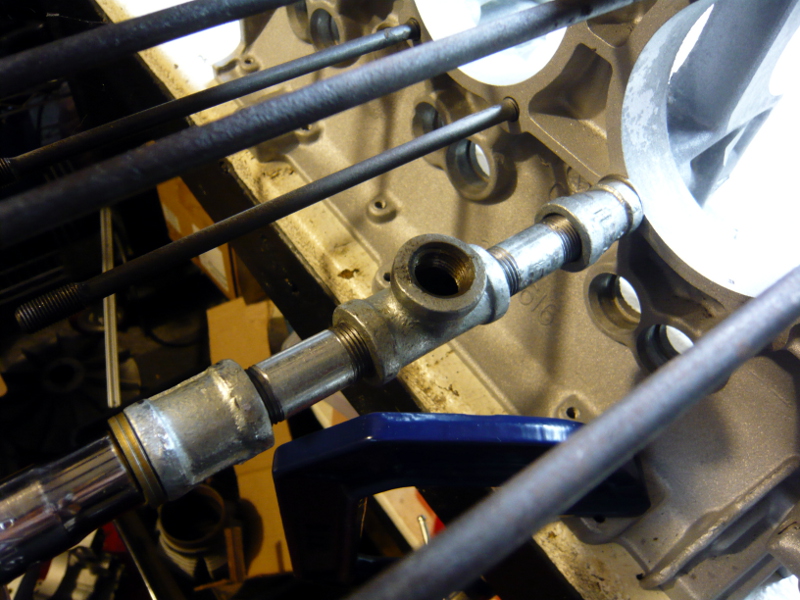 At the end of the exercise I had exactly one loose stud. I'll order a replacement from Clark's that measures .003" thicker on the base stud and Loctite it in unless American-Pi tells me to pull them. If that's the case, then I just wasted a Saturday. But hey, it's pouring down in rain Portland and this is what you do in this crappy weather. |
| McMark |
 Sep 30 2013, 09:38 PM Sep 30 2013, 09:38 PM
Post
#64
|
|
914 Freak!                Group: Retired Admin Posts: 20,179 Joined: 13-March 03 From: Grand Rapids, MI Member No.: 419 Region Association: None |
Porsche did the same thing until the stopped making the cases from aluminum.
It wasn't just GM engineers, remember who they were looking to for inspiration. Until the mid-sixties VW engines didn't have cam bearings either, the cam rode in the case. Works fine for a couple of hundred thousand miles and then the wear is enough that you can't maintain oil pressure, need either a new case or the old one machined for bearings. Hundreds of thousands (millions?) of engines. So measure the bores well, in every possible location, and especially for roundness. Oh, and special attention to the thrust surface. Correct. I have no idea why. Apparently GM engineers didn't think cam bearings were necessary - which seems a bit unsettling. But after finding virtually no wear with the bore gauge, I've come to think that it isn't a huge deal. Apparently, my low wear is near identical to other Corvair engine rebuilds in that the cam journals just don't seem to wear down. One reason I think is that the cam sits so low in the engine that it's constantly flooded with oil. But like you, I certainly raised an eyebrow when I discovered this. Apparently this design decision has been justified over the decades. I don't mean to be obtuse, and I certainly don't know corvair engines but you said the cam runs on the machined aluminum surface of the case without a bearing. did I understand that correctly? |
| gf4c |
 Oct 1 2013, 10:43 AM Oct 1 2013, 10:43 AM
Post
#65
|
|
Newbie  Group: Members Posts: 4 Joined: 11-August 13 From: west coast Member No.: 16,240 Region Association: None |
-snip- I'm actually considering pulling all of them and replacing them with stronger studs, but the Corvair brains I've picked are very split in their opinions. The aircraft guys all seem to do it, but the automotive guys don't tend to unless there's serious problems. I have a call in to American-Pi to see what they recommend. In the meantime, I'm passing the time with important little tasks. [Hey Marty, please feel free to chime in on this issue!] -snip- At the end of the exercise I had exactly one loose stud. I'll order a replacement from Clark's that measures .003" thicker on the base stud and Loctite it in unless American-Pi tells me to pull them. If that's the case, then I just wasted a Saturday. But hey, it's pouring down in rain Portland and this is what you do in this crappy weather. Hi Marcus I don't recommend replacing any studs that pass the torque test when building a stock type engine. They are plenty strong IMO, no need for those expensive 7/16" studs which cost over $300 for replacing all 24 studs. Regarding installing the replacement stud: Factory Manual recommends using anti-seize on the threads when installing into the block. If your threads are good in the block, the .003 will be very snug to install, the anti-seize will help. I use a special installation tool, similar to these: 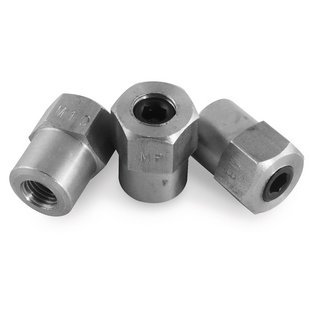 These work much better than the double nut arrangement commonly used. HTH Marty |
| r3dplanet |
 Oct 1 2013, 10:55 AM Oct 1 2013, 10:55 AM
Post
#66
|
|
Senior Member    Group: Members Posts: 679 Joined: 3-September 05 From: Portland, Oregon Member No.: 4,741 Region Association: None |
Hey, those are cool! Where can I find them? Or the exact name of the tool?
The only reason I thought about replacing all of the studs is because of the increased displacement and power of the 3.1 conversion. I know for a stock engine there should be no issue, but with the increased power it gave me pause. Thanks for being here! -marcus QUOTE Hi Marcus I don't recommend replacing any studs that pass the torque test when building a stock type engine. They are plenty strong IMO, no need for those expensive 7/16" studs which cost over $300 for replacing all 24 studs. Regarding installing the replacement stud: Factory Manual recommends using anti-seize on the threads when installing into the block. If your threads are good in the block, the .003 will be very snug to install, the anti-seize will help. I use a special installation tool, similar to these:  These work much better than the double nut arrangement commonly used. HTH Marty |
| 914coop |
 Oct 1 2013, 06:47 PM Oct 1 2013, 06:47 PM
Post
#67
|
|
Member   Group: Members Posts: 214 Joined: 5-September 08 From: Minneapolis Member No.: 9,514 Region Association: Northstar Region |
Hey Marcus, welcome to the madness.
Got good info from Ray and with buding the turbo with both 64 & 66 parts, blow through instead of draw through, and going to a non thrbo 90 hp distributor I do not have any turbo lag. That also added $$$ for a safeguard system. I should update my project thread, you do a much better job at documenting than I did. Hope your mount works better than my trial and error method. Will be interesting to see what you do differently with certain thi.gs like the mount. I am stuck trying to figure out engine lid and if I do a custom rain tray. This would be the reason I would not do the turbo again. Be watching, Irv |
| scotty b |
 Oct 1 2013, 07:55 PM Oct 1 2013, 07:55 PM
Post
#68
|
|
rust free you say ?                Group: Members Posts: 16,375 Joined: 7-January 05 From: richmond, Va. Member No.: 3,419 Region Association: None |
Attached image(s) 
|
| MDG |
 Oct 1 2013, 08:17 PM Oct 1 2013, 08:17 PM
Post
#69
|
|
Wolf in wolf's clothing.      Group: Members Posts: 8,652 Joined: 3-February 09 From: Toronto Member No.: 10,018 Region Association: None |
|
| ben*james |
 Oct 1 2013, 08:18 PM Oct 1 2013, 08:18 PM
Post
#70
|
|
LIFER    Group: Members Posts: 525 Joined: 16-February 09 From: Portland Oregon Member No.: 10,062 Region Association: Pacific Northwest 
|
Marcus, good talking with you today. Good luck with your project here and good teenen. Yeah, that's my word I just made it up. (IMG:style_emoticons/default/smile.gif)
|
| balljoint |
 Oct 1 2013, 08:42 PM Oct 1 2013, 08:42 PM
Post
#71
|
|
914 Wizard           Group: Members Posts: 10,000 Joined: 6-April 04 Member No.: 1,897 Region Association: None |
|
| Dr Evil |
 Oct 1 2013, 08:45 PM Oct 1 2013, 08:45 PM
Post
#72
|
|
Send me your transmission!                Group: Members Posts: 23,032 Joined: 21-November 03 From: Loveland, OH 45140 Member No.: 1,372 Region Association: MidAtlantic Region 
|
1/12 failure. Not bad (IMG:style_emoticons/default/smile.gif) They guy is sending me free parts when he gets back in Oct. |
| scotty b |
 Oct 1 2013, 09:07 PM Oct 1 2013, 09:07 PM
Post
#73
|
|
rust free you say ?                Group: Members Posts: 16,375 Joined: 7-January 05 From: richmond, Va. Member No.: 3,419 Region Association: None |
1/12 failure. Not bad (IMG:style_emoticons/default/smile.gif) They guy is sending me free parts when he gets back in Oct. HOORAY BEER !!! |
| Dr Evil |
 Oct 1 2013, 09:17 PM Oct 1 2013, 09:17 PM
Post
#74
|
|
Send me your transmission!                Group: Members Posts: 23,032 Joined: 21-November 03 From: Loveland, OH 45140 Member No.: 1,372 Region Association: MidAtlantic Region 
|
Indeed. I want to take pics before I update my thread, so stop it.
|
| scotty b |
 Oct 1 2013, 09:18 PM Oct 1 2013, 09:18 PM
Post
#75
|
|
rust free you say ?                Group: Members Posts: 16,375 Joined: 7-January 05 From: richmond, Va. Member No.: 3,419 Region Association: None |
Indeed. I want to take pics before I update my thread, so stop it. no.... can't stop...won't stop (IMG:style_emoticons/default/mellow.gif) |
| Eric_Shea |
 Oct 1 2013, 11:15 PM Oct 1 2013, 11:15 PM
Post
#76
|
|
PMB Performance                Group: Admin Posts: 19,289 Joined: 3-September 03 From: Salt Lake City, UT Member No.: 1,110 Region Association: Rocky Mountains  |
Did someone say "Roller Rockers"?
(IMG:http://www.914world.com/bbs2/uploads_offsite/images.fanpop.com-1110-1380690946.1.gif) |
| gf4c |
 Oct 4 2013, 11:11 AM Oct 4 2013, 11:11 AM
Post
#77
|
|
Newbie  Group: Members Posts: 4 Joined: 11-August 13 From: west coast Member No.: 16,240 Region Association: None |
Hey, those are cool! Where can I find them? Or the exact name of the tool? Those ones are made by Motion Pro but I don't see any in 3/8-24 in their catalog. You might check with some of the motorcycle shops as the Harley guys need them in the 3/8-24 size (also available on ebay). The only reason I thought about replacing all of the studs is because of the increased displacement and power of the 3.1 conversion. I know for a stock engine there should be no issue, but with the increased power it gave me pause. My experience is the studs are not the weak link when making extreme power. (IMG:style_emoticons/default/biggrin.gif) You mention the 3.1 conversion: If you're willing to accept a few less cc by using a 92mm piston/cylinder instead of the 94mm ones (2974cc instead of 3130cc), you can build a stronger engine IMO. The 92mm cylinder is available in a "thick wall" version; it also has a reduced spigot end diameter where it enters the case, resulting in more aluminum around the studs. Many thanks to Jeff Ballard, owner of SC Performance for this tip. Marty |
| tdgray |
 Oct 4 2013, 11:22 AM Oct 4 2013, 11:22 AM
Post
#78
|
|
Thank God Nemo is not here to see this      Group: Members Posts: 9,705 Joined: 5-August 03 From: Akron, OH Member No.: 984 Region Association: None |
Just saw this thread... great stuff there Marcus
|
| veltror |
 Oct 4 2013, 12:22 PM Oct 4 2013, 12:22 PM
Post
#79
|
|
Senior Member    Group: Members Posts: 928 Joined: 27-April 08 From: Potters Bar Herts UK Member No.: 8,978 Region Association: None |
Did someone say "Roller Rockers"? (IMG:http://www.914world.com/bbs2/uploads_offsite/images.fanpop.com-1110-1380690946.1.gif) Bay city rollers !!! |
| Jeff Hail |
 Oct 5 2013, 12:38 PM Oct 5 2013, 12:38 PM
Post
#80
|
|
Senior Member    Group: Members Posts: 1,141 Joined: 3-May 07 From: LA/ CA Member No.: 7,712 |
Fun project. I like your Barracuda also.. Formula S 273 or did you just install the rally wheels?
I built a hot rodded Corvair a long time ago. I always felt Corvairs got a bad rap and that stigma alone is what killed them off. I lived in SoCal so the motor I started with had air injection. As soon as the pump and plumbing went away it ran a lot cooler which enabled the modifications to work well. I opted to go the turbo route which in the early 1980's was an interesting science of trial and experimentation in the aftermarket sector. Small fast spooling scrolls were just not around back then, everything was big snail shells and slow wind up.The electronics were just not up to the hardware at that time. I see a lot of them around the San Fernando Valley still as daily drivers. My friends Chris had a utility truck until recently sold and Kevin has a really nice coupe he's restoring. They still have appeal. These motors are pretty dependable designs. The valve train and rocker layout was taken from the typical V8 overhead valve designs. The block and jugs is a crossbreed of other air cooler designs. I could not help but chuckle about the bearing-less cam quote. Back when I built mine I went to order a load of parts and got that stare when I mentioned to the machine shop "crank bearings, cam bearings..oops". I sold the car off and it changed hands a few times. I saw it about 15 years ago in Hollywood. Same license plate still on it reading " DMONIC". People would see the car, read the plate and say "Dominic nice Corvair". Only the Corvair guys got the joke that it meant Demon - Nimonic hence the turbo parts. Still wish I had that car. If I run into again I would try to buy it back. Good luck with yours. Once it's done I know you will enjoy it. They are fun. |
  |
15 User(s) are reading this topic (15 Guests and 0 Anonymous Users)
0 Members:

|
Lo-Fi Version | Time is now: 23rd November 2024 - 10:53 AM |
Invision Power Board
v9.1.4 © 2024 IPS, Inc.


