|
|

|
Porsche, and the Porsche crest are registered trademarks of Dr. Ing. h.c. F. Porsche AG.
This site is not affiliated with Porsche in any way. Its only purpose is to provide an online forum for car enthusiasts. All other trademarks are property of their respective owners. |
|
|
  |
| Spoke |
 Jul 18 2009, 08:47 AM Jul 18 2009, 08:47 AM
Post
#41
|
|
Jerry      Group: Members Posts: 7,085 Joined: 29-October 04 From: Allentown, PA Member No.: 3,031 Region Association: None 
|
This pic was supposed to show the rust around the heater tube but the fuel pump pigtail got in the way.
The previous fix added extended the "web" that goes between the long and the body by the heater tube. This plate is coming out so I can access the rust around the heater tube. Attached image(s) 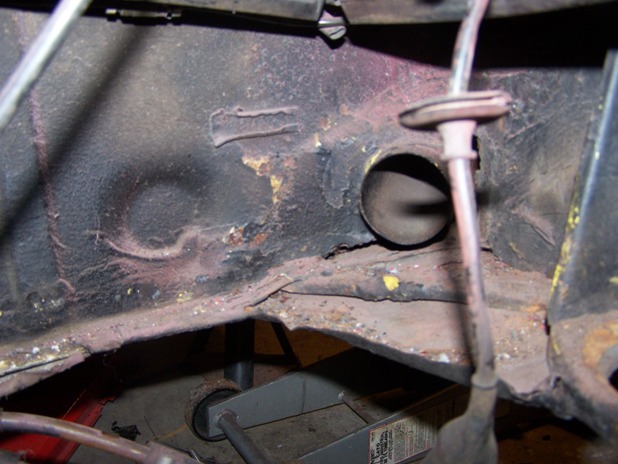
|
| Spoke |
 Jul 18 2009, 08:53 AM Jul 18 2009, 08:53 AM
Post
#42
|
|
Jerry      Group: Members Posts: 7,085 Joined: 29-October 04 From: Allentown, PA Member No.: 3,031 Region Association: None 
|
A while back I repainted the trunk and relocated the battery from the trunk to the original position in the engine compartment. I used an aftermarket battery tray and placed the tray in the original position.
At that time, I had a carbed engine and didn't care about locating the FI ECU between the firewall and the battery tray. Now that I'm FI'ing this engine, I need place the ECU in its original position. If the battery try is too close to the firewall, the ECU won't fit. To check the fit of the ECU, I made a mock ECU out of wood that is the same size and maybe a bit larger than the ECU. As the pic shows, there is room to mount the ECU. Yea! (IMG:style_emoticons/default/piratenanner.gif) Attached image(s) 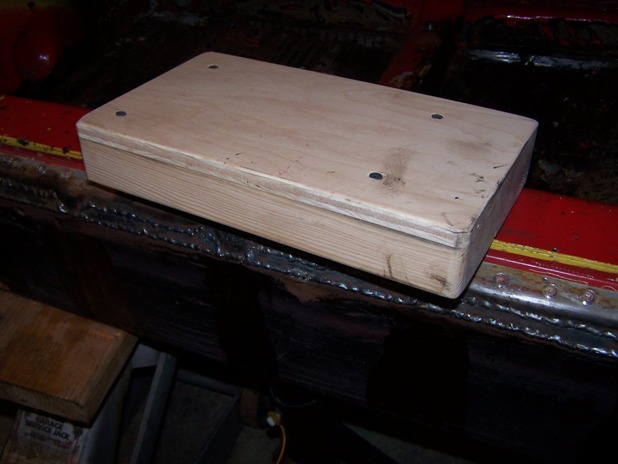 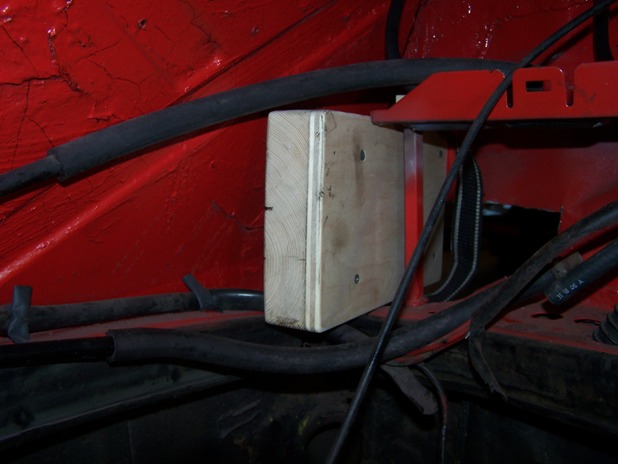
|
| Spoke |
 Jul 18 2009, 10:01 AM Jul 18 2009, 10:01 AM
Post
#43
|
|
Jerry      Group: Members Posts: 7,085 Joined: 29-October 04 From: Allentown, PA Member No.: 3,031 Region Association: None 
|
I ground down the flange for the tailshift boot. I have a flange from a sideshift boot to weld into place.
Attached image(s) 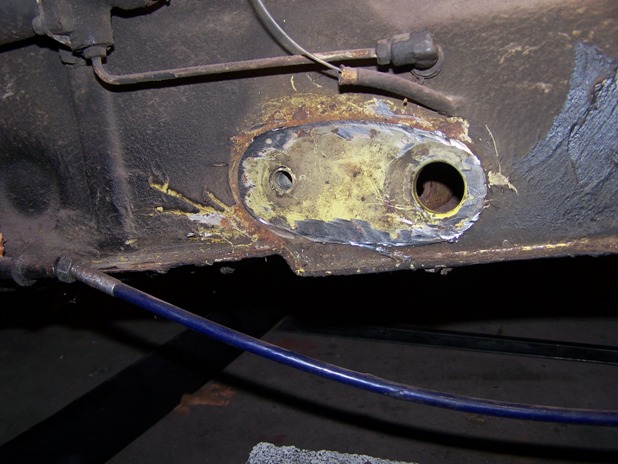
|
| Spoke |
 Jul 18 2009, 10:06 AM Jul 18 2009, 10:06 AM
Post
#44
|
|
Jerry      Group: Members Posts: 7,085 Joined: 29-October 04 From: Allentown, PA Member No.: 3,031 Region Association: None 
|
Ground off the previously added web and original web. The previously added web was covering a bit of rust through.
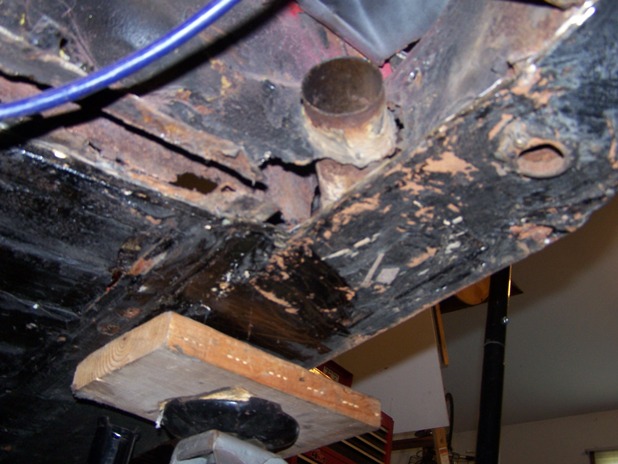 Here's a better shot of the rust around the heater tube. The plate on the bottom runs the entire length of the long and is now the bottom of the long. Between the heater tube and the engine mount, the bottom plate is not attached on the inside to the original vertical section of the long. This will be fixed now. 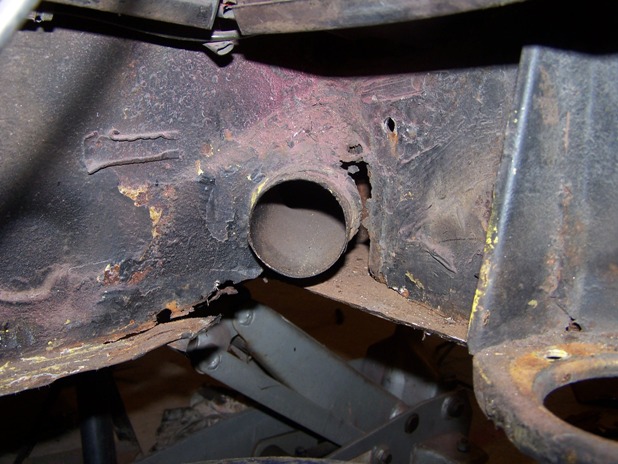 |
| Spoke |
 Jul 20 2009, 10:38 PM Jul 20 2009, 10:38 PM
Post
#45
|
|
Jerry      Group: Members Posts: 7,085 Joined: 29-October 04 From: Allentown, PA Member No.: 3,031 Region Association: None 
|
This patch will join the bottom long plate to the original vertical long. It will go from the engine mount to just inside the cabin on the inside. The little plate will strengthen the long as it passes below the heater tube.
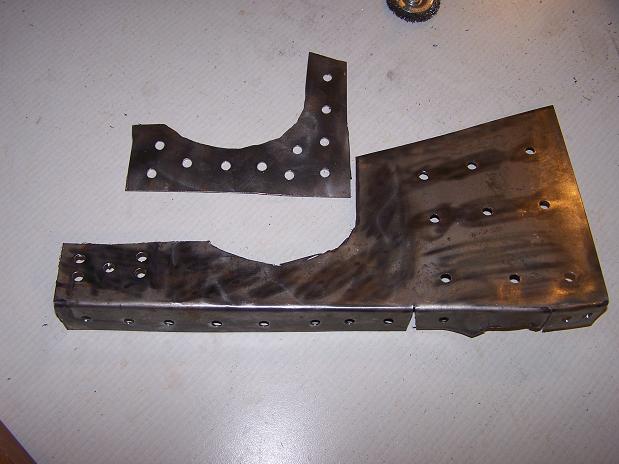 The patch & its stiffener are ready for mounting. 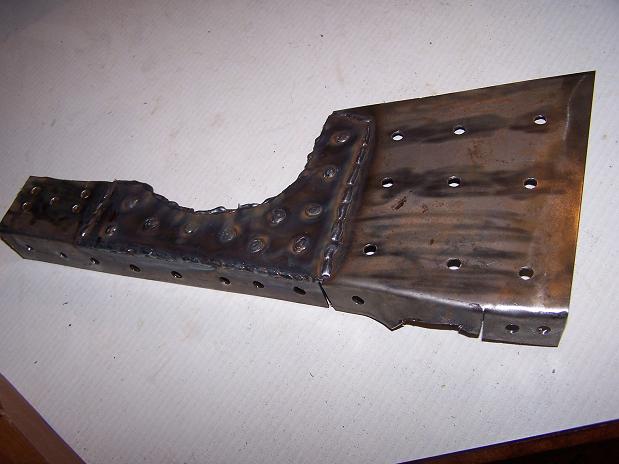 |
| Spoke |
 Jul 20 2009, 10:44 PM Jul 20 2009, 10:44 PM
Post
#46
|
|
Jerry      Group: Members Posts: 7,085 Joined: 29-October 04 From: Allentown, PA Member No.: 3,031 Region Association: None 
|
The patch is now welded in place. Just the front tip is visible from the cabin.
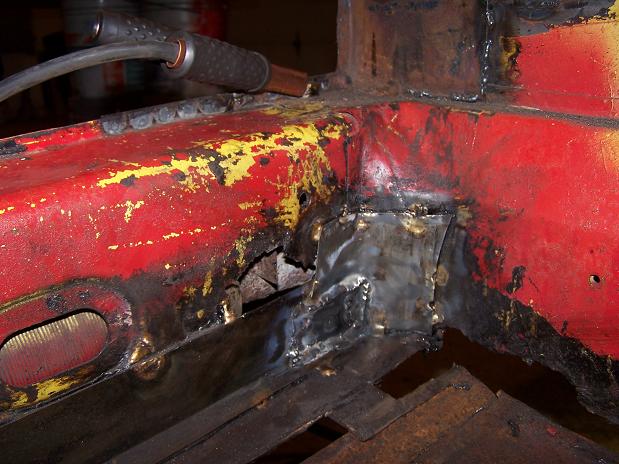 And the bottom view. I had the car on its wheels so the long was stressed as it is normally. I welded a hole on one side, then let the piece cool, then another hole on the other side so not to tweak the patch. 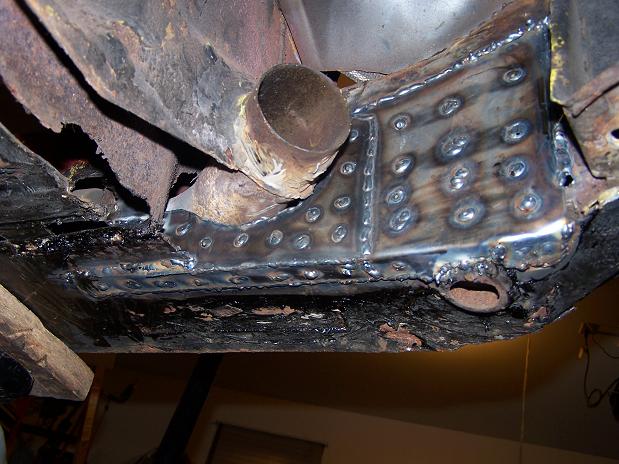 |
| Spoke |
 Jul 20 2009, 10:48 PM Jul 20 2009, 10:48 PM
Post
#47
|
|
Jerry      Group: Members Posts: 7,085 Joined: 29-October 04 From: Allentown, PA Member No.: 3,031 Region Association: None 
|
Also got the sideshift cover flange welded on.
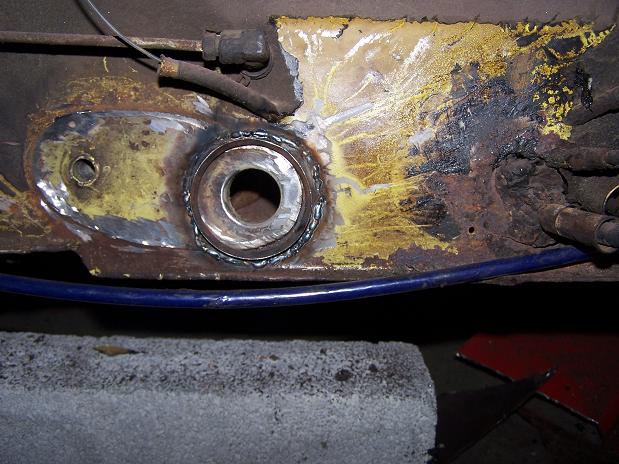 The boot fits fine. 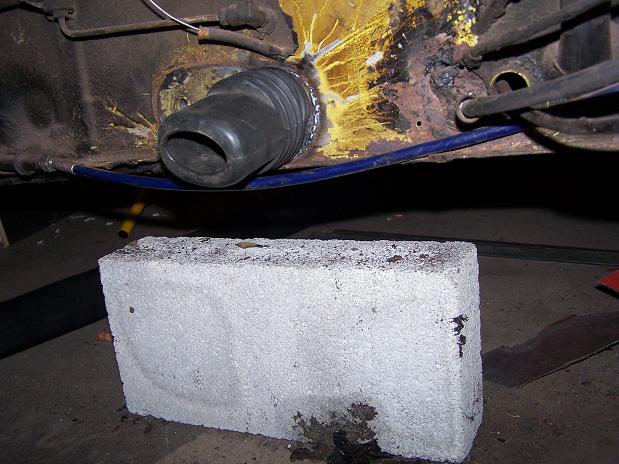 |
| Spoke |
 Jul 22 2009, 11:20 PM Jul 22 2009, 11:20 PM
Post
#48
|
|
Jerry      Group: Members Posts: 7,085 Joined: 29-October 04 From: Allentown, PA Member No.: 3,031 Region Association: None 
|
Got the back of the passenger floor patch done tonight. Welded this one from under the car which is a load of fun. The hardest part of this job is not the rust but all the tar put on the car on the bottom and in the cabin.
Also some of the existing patches were braised on and that stuff seems to explode when hit with the welder. Next up is a patch for the bottom of the firewall. This one will likely be 2 parts: one on the flat part of the firewall and one under and around the heater tube. Attached image(s) 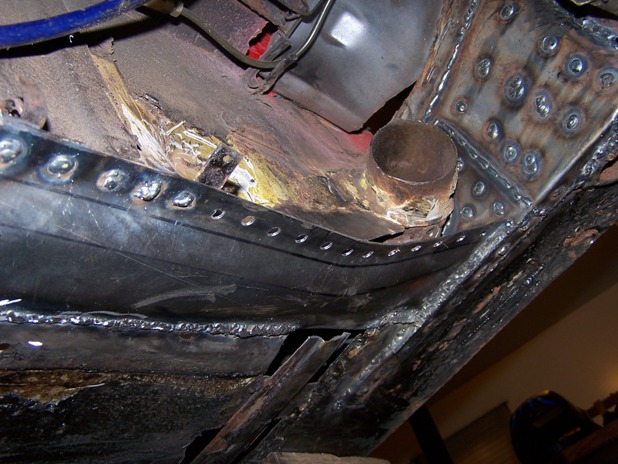 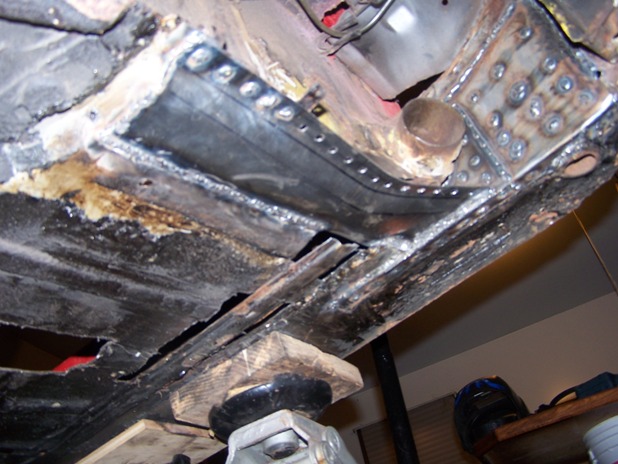 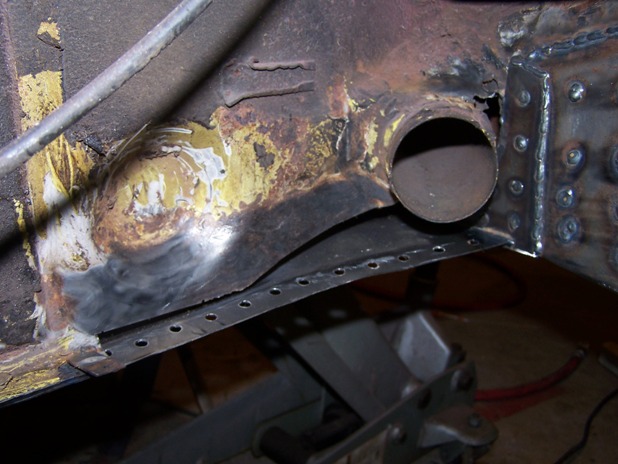
|
| FourBlades |
 Jul 23 2009, 09:48 AM Jul 23 2009, 09:48 AM
Post
#49
|
|
From Wreck to Rockin     Group: Members Posts: 2,056 Joined: 3-December 07 From: Brevard, FL Member No.: 8,414 Region Association: South East States 
|
Those are nice looking repairs. (IMG:style_emoticons/default/piratenanner.gif) Should be nice and strong. Keep the pictures coming... (IMG:style_emoticons/default/biggrin.gif) John |
| Spoke |
 Jul 25 2009, 10:32 AM Jul 25 2009, 10:32 AM
Post
#50
|
|
Jerry      Group: Members Posts: 7,085 Joined: 29-October 04 From: Allentown, PA Member No.: 3,031 Region Association: None 
|
Cleaned up the firewall around the heater tube. I'll use 2 pieces to go around the tube. The first piece has holes for spot welding as well as all edges are seam welded.
My welding still sucks but I am much more confident in my methods. Attached image(s) 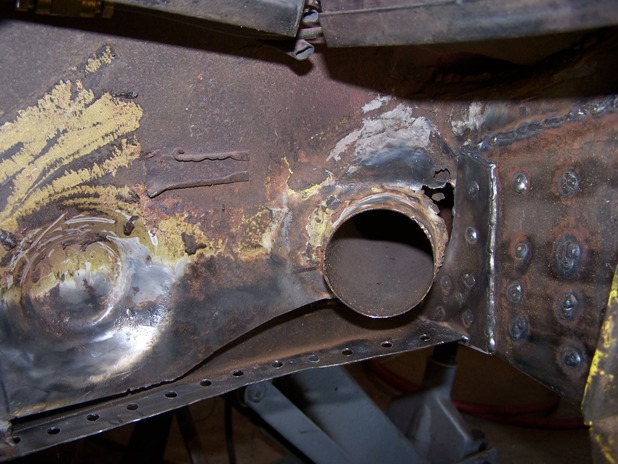 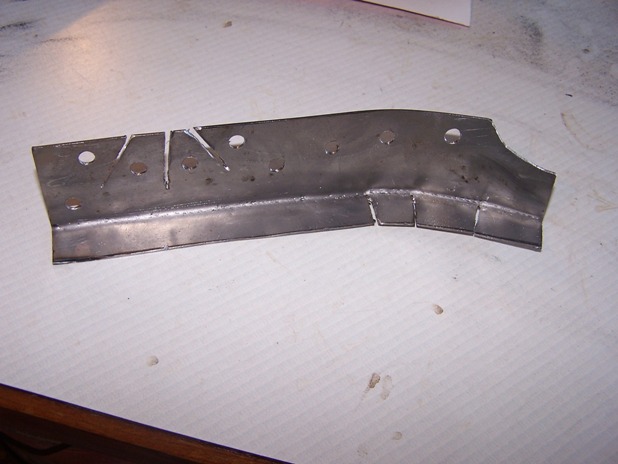 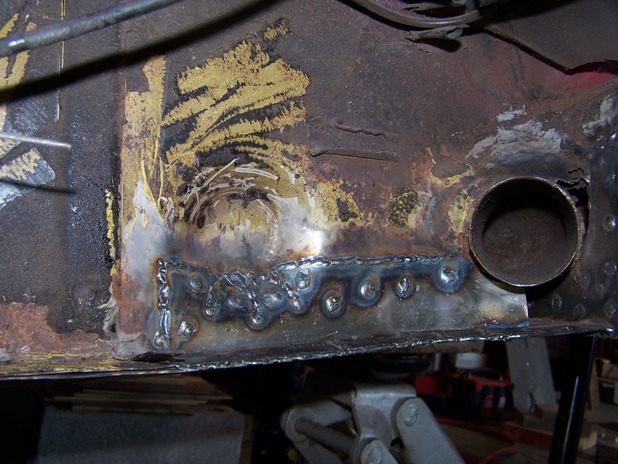
|
| Spoke |
 Jul 25 2009, 10:39 AM Jul 25 2009, 10:39 AM
Post
#51
|
|
Jerry      Group: Members Posts: 7,085 Joined: 29-October 04 From: Allentown, PA Member No.: 3,031 Region Association: None 
|
The 2nd piece around the heater tube is now in. I ground down some of the welds. Now I'm ready for seam sealer and primer to protect the metal.
Attached image(s) 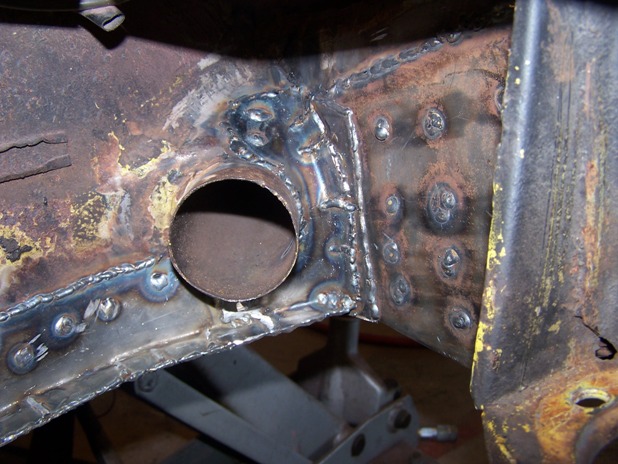 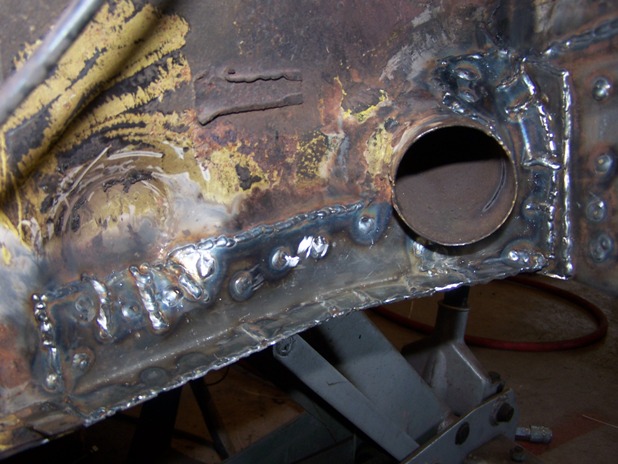 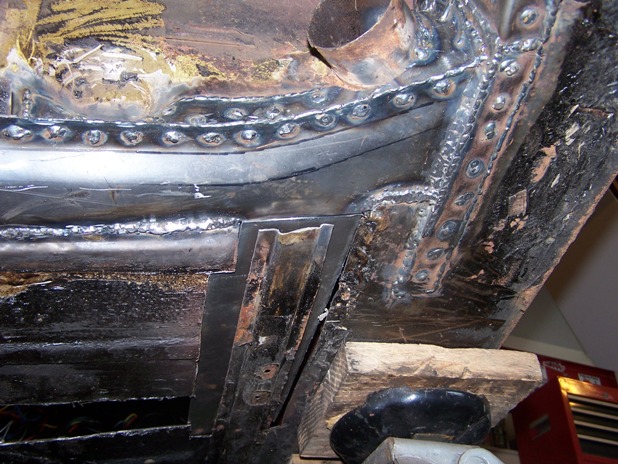
|
| Spoke |
 Jul 25 2009, 07:46 PM Jul 25 2009, 07:46 PM
Post
#52
|
|
Jerry      Group: Members Posts: 7,085 Joined: 29-October 04 From: Allentown, PA Member No.: 3,031 Region Association: None 
|
Patched the holes in the floor, inner firewall, and one on the inner long. Still need to do a rib near the long, make a seat bracket for the stationary passenger seat and patch the passenger crossmember.
Attached image(s) 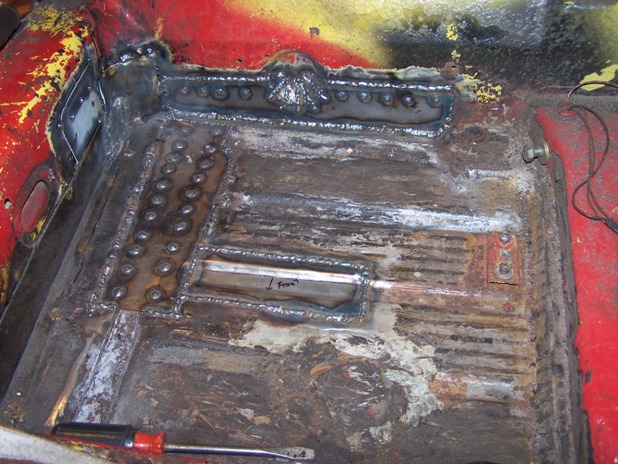
|
| Spoke |
 Jul 26 2009, 04:26 PM Jul 26 2009, 04:26 PM
Post
#53
|
|
Jerry      Group: Members Posts: 7,085 Joined: 29-October 04 From: Allentown, PA Member No.: 3,031 Region Association: None 
|
Last of the patches for the passenger side seat area. After a long time of losing weight via rust, my car is gaining weight.
These 2 pieces are for the crossmember and the right seat brace. 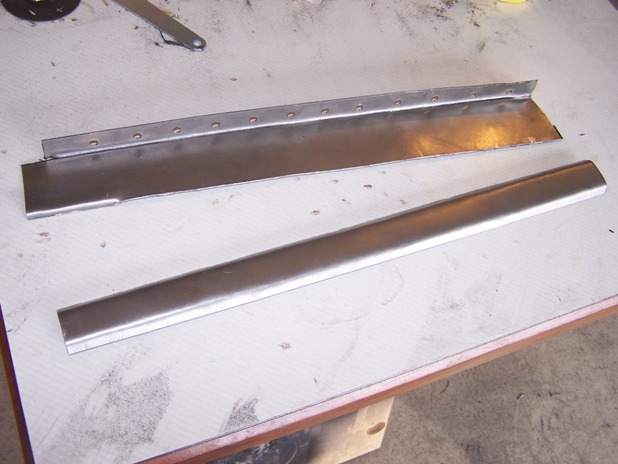 Crossmember is now finished. 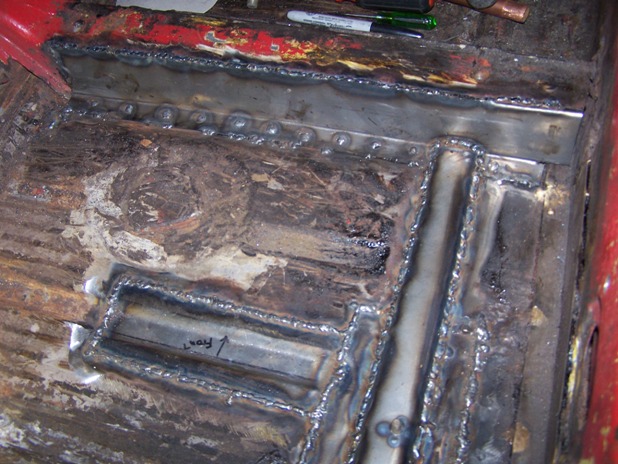 I welded the bolts to hold the stationary passenger seat before welding the seat brace in place. Check out the little patch on the inner long. It is the cut-out for the front heater tube from Engman's inner long kit. No need to cut a piece out when this one fits just right. 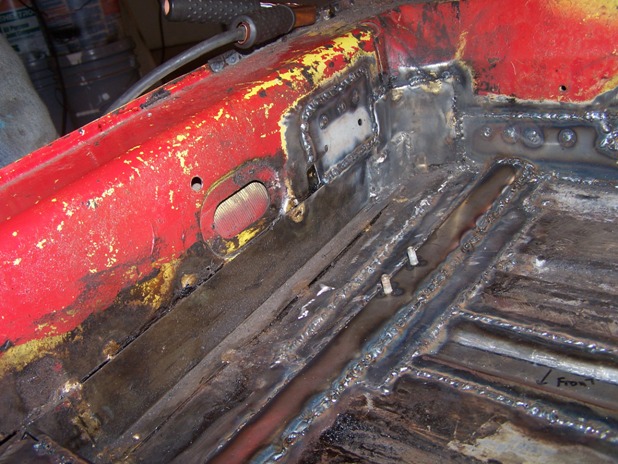 |
| Spoke |
 Sep 11 2009, 07:15 PM Sep 11 2009, 07:15 PM
Post
#54
|
|
Jerry      Group: Members Posts: 7,085 Joined: 29-October 04 From: Allentown, PA Member No.: 3,031 Region Association: None 
|
I'm ready to install new jack posts but it seems that the jack post sticks out quite a bit from the rocker panel. The panel is bowed in about 1/2 inch but another 3/4 inch will still stick out. The long has been repaired and is out further than the original but I wouldn't think the remade long would be over an inch further out than the original long.
Attached image(s) 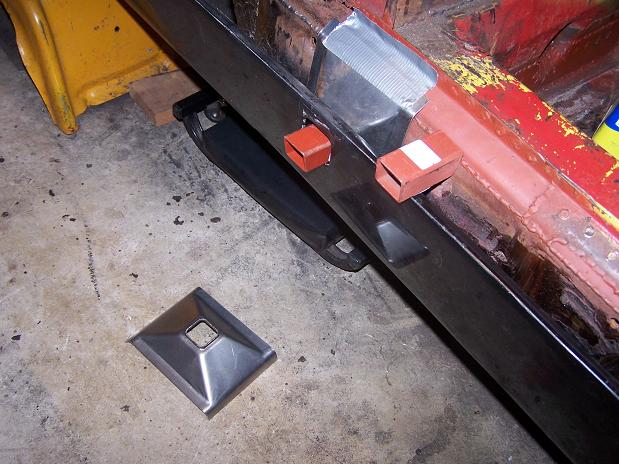 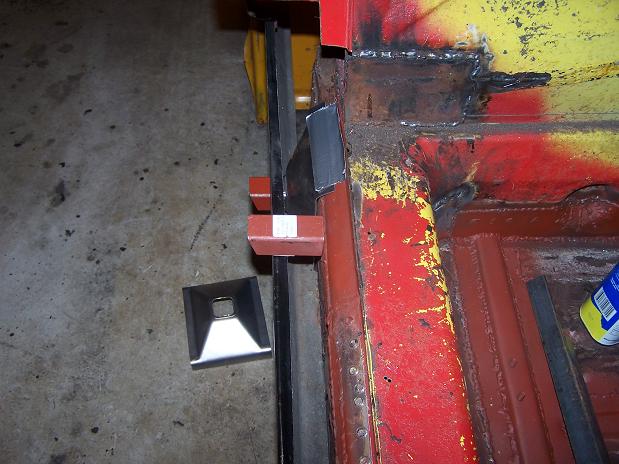
|
| FourBlades |
 Sep 11 2009, 09:09 PM Sep 11 2009, 09:09 PM
Post
#55
|
|
From Wreck to Rockin     Group: Members Posts: 2,056 Joined: 3-December 07 From: Brevard, FL Member No.: 8,414 Region Association: South East States 
|
Your car is really coming along. You jack tube sticks out because of the way your long was repaired. The stock metal is two layers thick where the tube goes through. The innermost layer bows into the long by an inch or more. The next layer is the outer long which is vertical and has a hole in it that the jack tube passes through. You either need to cut a hole in your long and stick the tube in and weld it or shorten the tube and weld it to your repaired long. This may be weaker than stock, if your repaired long is two layers of good metal it may work ok. A little hard to explain in words, if you look at some of the other rusto threads you can see what I mean. John |
| Spoke |
 Sep 11 2009, 09:15 PM Sep 11 2009, 09:15 PM
Post
#56
|
|
Jerry      Group: Members Posts: 7,085 Joined: 29-October 04 From: Allentown, PA Member No.: 3,031 Region Association: None 
|
Here's one of the other things I've been taking care instead of working on the 914 of which also includes:
o Painting and repairing table & chairs for my daughter o Installing tile backsplash in the kitchen o Moving my daughter into her apartment in Pittsburgh. o Moving my younger daughter into her apartment at school. Oh yeah, these are the front rotors from my A6. Note to self: "ALWAYS lubricate the slides on disk calipers when changing rotors/pads". The right side caliper froze on its slides and caused the inside pad to wear to nothing, thus destroying the rotor. Attached image(s) 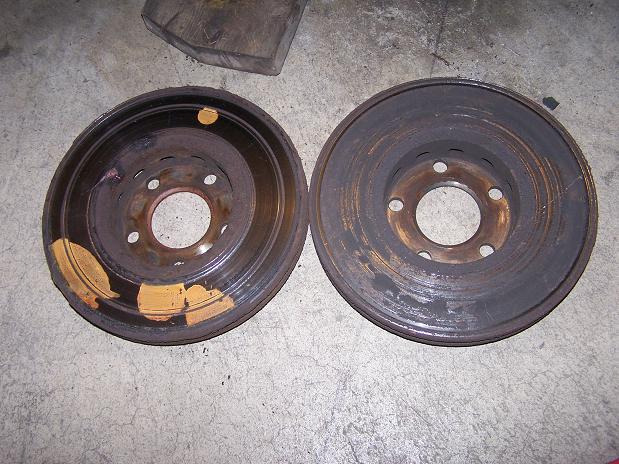
|
| Spoke |
 Sep 11 2009, 09:20 PM Sep 11 2009, 09:20 PM
Post
#57
|
|
Jerry      Group: Members Posts: 7,085 Joined: 29-October 04 From: Allentown, PA Member No.: 3,031 Region Association: None 
|
Your car is really coming along. You jack tube sticks out because of the way your long was repaired. The stock metal is two layers thick where the tube goes through. The innermost layer bows into the long by an inch or more. The next layer is the outer long which is vertical and has a hole in it that the jack tube passes through. You either need to cut a hole in your long and stick the tube in and weld it or shorten the tube and weld it to your repaired long. This may be weaker than stock, if your repaired long is two layers of good metal it may work ok. A little hard to explain in words, if you look at some of the other rusto threads you can see what I mean. John Thanks, I knew the repaired long wasn't that much fatter than stock. I think I will cut a hole then. If I shorten the tube, the jack may not seat all the way and could slip out. In my best Dwight Shrute voice: Question: How far does the tube stick out from the support? If I cut a hole and slide the tube in, then I need to know how far out the tube is from the support. I don't have a stock 914 to look at.......Who put my stapler in Jello? .....MICHAEL!!!! |
| Spoke |
 Sep 12 2009, 01:16 AM Sep 12 2009, 01:16 AM
Post
#58
|
|
Jerry      Group: Members Posts: 7,085 Joined: 29-October 04 From: Allentown, PA Member No.: 3,031 Region Association: None 
|
Mock up of jack tube using Rich Towle's location method of positioning the tube then painting the inside to mark it.
Cut hole and locate jack tube. 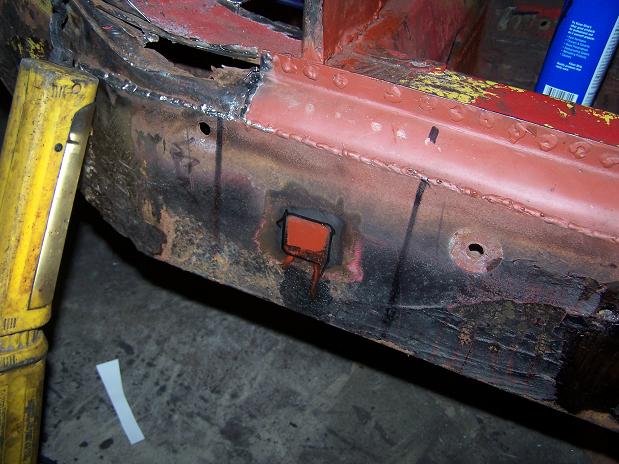 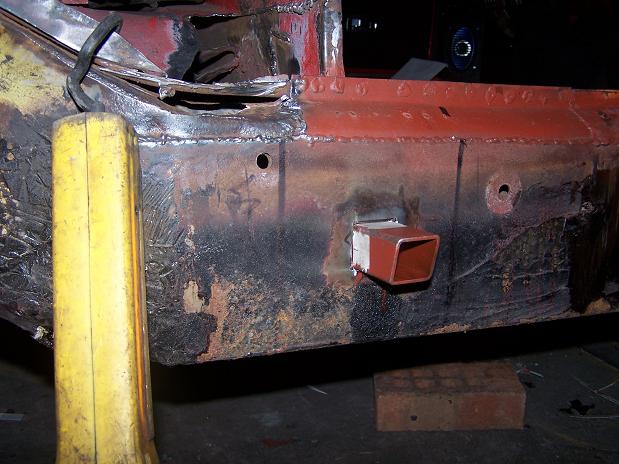 |
| Spoke |
 Sep 12 2009, 01:20 AM Sep 12 2009, 01:20 AM
Post
#59
|
|
Jerry      Group: Members Posts: 7,085 Joined: 29-October 04 From: Allentown, PA Member No.: 3,031 Region Association: None 
|
Jack plate looks good.
Length of jack tube is about right. Jack tube cover from my 911 fits real nice. Time to weld the jack tube. Attached image(s) 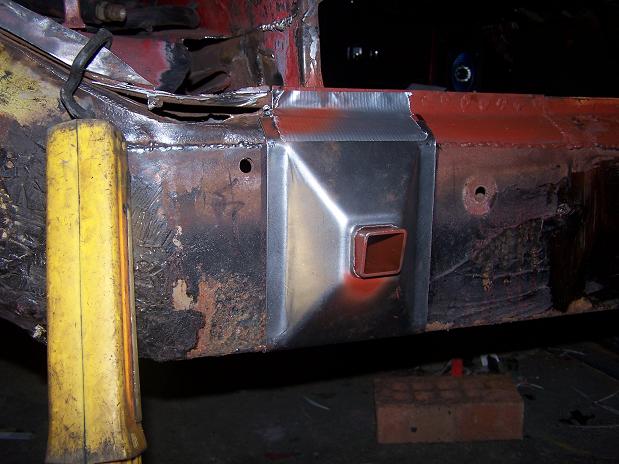 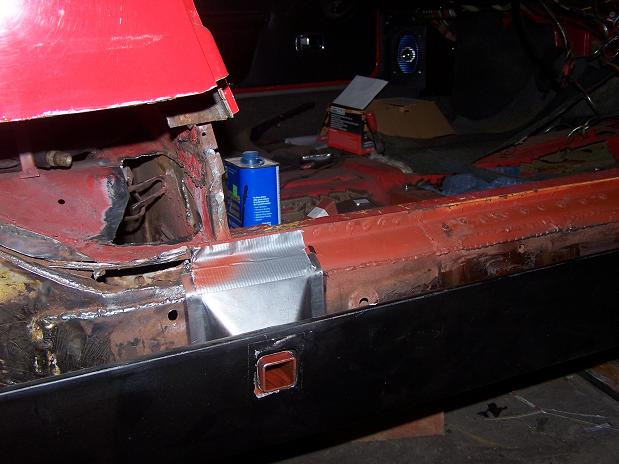 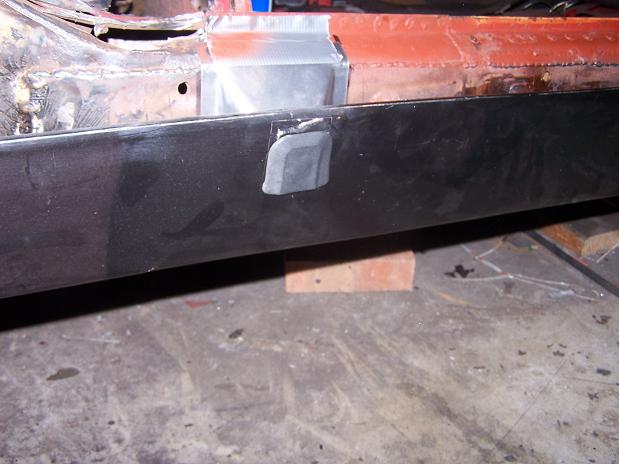
|
| Spoke |
 Sep 12 2009, 05:34 AM Sep 12 2009, 05:34 AM
Post
#60
|
|
Jerry      Group: Members Posts: 7,085 Joined: 29-October 04 From: Allentown, PA Member No.: 3,031 Region Association: None 
|
I used the little piece cut out from the long to seal up the jack tube so no moisture gets inside.
The jack tube is welded to the long. Attached image(s) 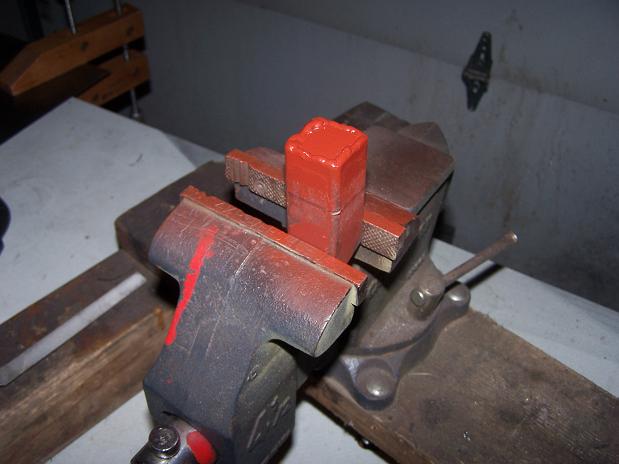 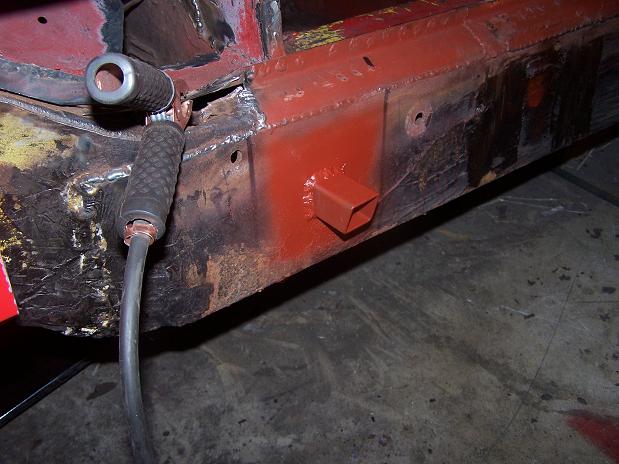
|
  |
2 User(s) are reading this topic (1 Guests and 0 Anonymous Users)
1 Members: arbitrary

|
Lo-Fi Version | Time is now: 23rd November 2024 - 11:31 AM |
Invision Power Board
v9.1.4 © 2024 IPS, Inc.


