|
|
|
Porsche, and the Porsche crest are registered trademarks of Dr. Ing. h.c. F. Porsche AG.
This site is not affiliated with Porsche in any way. Its only purpose is to provide an online forum for car enthusiasts. All other trademarks are property of their respective owners. |
|
|


| 02loftsmoor |
 Oct 27 2011, 06:46 PM Oct 27 2011, 06:46 PM
Post
#1
|
|
Senior Member  Group: Members Posts: 577 Joined: 26-June 11 From: Ft. Worth TX Member No.: 13,243 Region Association: Southwest Region |
Here is something I had forgotten about cleaning rust from Motorcycle fuel tanks with a battery charger. Looked up some information................................
Battery and Washing Soda/Electrolysis Remove rust and amaze your friends with Science! Electrolysis is a technique for returning surface rust to iron. The process actually alters the tank wall on the molecular level removing the oxygen that has oxidized (rusted) the tank. This method has advantages over old standbys like vinegar, Coke, muriatic acid, naval jelly, wire brushing, sand blasting, etc. because those methods all remove material to get rid of rust. These other methods also remove un-rusted material. The electrolytic method removes only the oxygen from the oxidized metal by returning surface rust to metallic iron, rust scale is loosened and can be easily removed. Un-rusted metal is not affected in any way. What do you need to make this work? Not much, really: Your rusted gas tank. A battery charger or other source of 12V DC power. Wires or cables to connect the electrodes together, lLower guage better, less heat. make sure it insulated. Sacrificial electrodes - iron re-bar works great, stainless steel is very bad (and the result is illegal and dangerous). Go to your hardware store get some non coated steel Arm & Hammer LAUNDRY Soda, also known as washing soda. Some chains or steel wire to suspend the part in the solution - copper wire is bad and messy. Water The basics are pretty simple. 1.Look in your tank. Get familiar with the inside of your tank you are going to need to fit the Sacrificial anodes in there and have them not touch the edge, because it will cause you to ground out and not work. 2.Mix 1 Tablespoon of Washing Soda with every gallon of water to create an Electrolyte solution. (Don't go overboard with the washing soda people. It won't help.) 3.Cut your sacrificial anodes to lengths that will fit in the tank. I drilled holes at the top to attach a wire. Now use electrical tape to tape the wired end and the other end thickly so there is no possible way you can ground out on the edge. You can use more then one at a time. 4.Wire all of the electrodes together so they are, electrically speaking, one big electrode. Make sure all connections are on clean metal and sufficiently tight to work. 5.Suspend your part in the solution using the wire/chains so it is not touching the bottom and is not touching any electrodes. 6.Attach the battery charger NEGATIVE lead to the part and the POSITIVE lead to the electrodes. Do not get this backwards! If you do, you'll use metal from your part to de-rust your electrodes instead of the other way around -the positive electrodes are sacrificial and will erode over time. That's how the water becomes iron-rich. THE POLARITY IS CRUCIAL!! The iron or stainless electrode is connected to the positive (red) terminal. The object being cleaned, to the negative(black). Submerge the object, making sure you have good contact, which can be difficult with heavily rusted objects. Get it backwards and your object will be relentlessly eaten away! Make connections on a part of your electrode that protrudes out of the solution, or your clamps will erode rapidly. 7.Double check everything to be sure the right things are touching, the wrong things are not touching, and the cables are hooked up correctly. 8.Turn on the power - plug in the charger and turn it on. Within seconds you should see a large volume of tiny bubbles in the solution - these bubbles are oxygen and hydrogen (very flammable!). The rust and gunk will bubble up to the top and form a gunky layer there. More gunk will form on the electrodes - after some amount of use, they will need to be cleaned and/or replaced - the electrodes give up metal over time. That's why re-bar is such a nice choice - it's cheap and easy to get in pre-cut lengths. The process is self-halting - when there is no more rust to remove, the reaction stops. This is handy because you don't have to monitor it, and because you can do large parts where they are not totally submersed at one time (aka, by rotating them and doing half at a time) without worrying about "lines" in the final part. Once you are done, the part should immediately be final cleaned and painted - the part is very susceptible to surface rust after being removed from the solution. There will be a fine layer of black on the part that can be easily removed, and once it is removed, the part can be primed/painted as needed. Safety Precautions You're playing with serious stuff here, so stay safe. It's not rocket science, but if you're new to this, you might not know all of this - so read up before you do any of this. This process produces highly flammable and explosive hydrogen gas (remember the Hindenburg?), so do it outside, or in some other well ventilated area. Hydrogen is lighter than air (like natural gas), so it will collect near the ceiling - not sink to the floor like some other flammable vapors will (like propane and gasoline). If you have open flames near this (Hint: gas appliances like water heaters and furnaces have pilot lights!) you will most likely severely injure or kill yourself (and others near you) and become a contender for the Darwin Awards in the process. Assuming you used re-bar and steel wire/chain like you were told to, the waste water resulting from this is iron-rich - it's perfectly safe to pour it out onto the grass and your lawn will love it. Beware of ornamental shrubs that don't like iron-rich soil though, unless you like making your wife mad at you. Make sure the battery charger (or whatever source of power you use) stays dry. All of the usual cautions about any electrical device in a wet environment apply here. The solution is electrically "live" - it is a conductor in this system. Turn off the power before making adjustments or sticking your hands into the solution. You can get a mild shock if you stick your hands into the water with the power on. The solution is fairly alkaline and will irritate your skin and eyes. Use gloves and eye protection. Immediately wash off any part of your body the solution comes into contact with with plenty of fresh water. Don't use stainless steel for the electrodes. The results are toxic and illegal to dump out. Don't use copper for the electrodes and anything else in the water - the results are messy. If you are unsure of any of this or unsure about your safety - STOP! Get help before you do something stupid. Use common sense, be smart about what you're doing, and stay safe so you can finish your restoration project and enjoy it. [edit] (IMG:style_emoticons/default/welder.gif) |
   |

 
|
  |
Replies
| rick 918-S |
Dec 2 2011, 09:13 AM
Post
#2
|
|
Hey nice rack! -Celette Group: Members Posts: 20,680 Joined: 30-December 02 From: Now in Superior WI Member No.: 43 Region Association: Northstar Region |
I just did this to Sandy's tank. He's a few things that seemed to work for me. I used a piece of 18 ga. sheet metal. I rolled it into a tube shape and bolted a tab to one end. This gave me more surface area than a strip of metal or a piece of rebar which seems to be the generally used sacrificial piece of steel.
I used the reccomended mix of 1 table spoon to 1 gal of water and filled the tank. Here is my electrode. 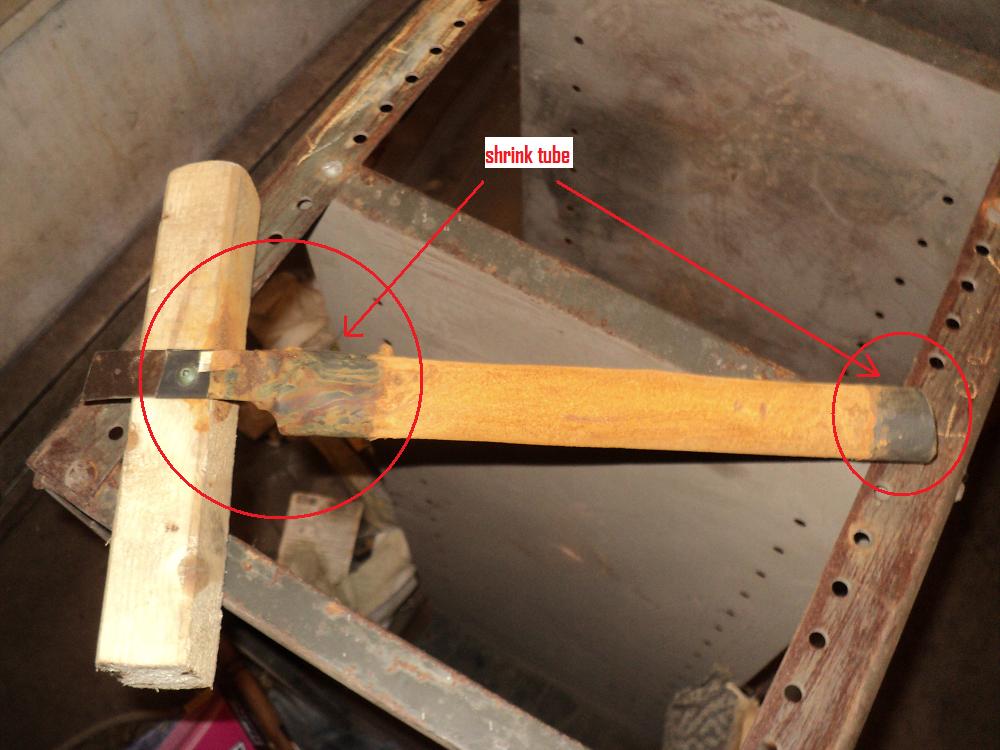 I used shrink wrap over the ends to avoid contact inside the tank or at the opening. I did this for two days. After the first day I poured out the nasty rust water. I could see it was working but not to my satifaction. Here's what it looks like when it's cooking. 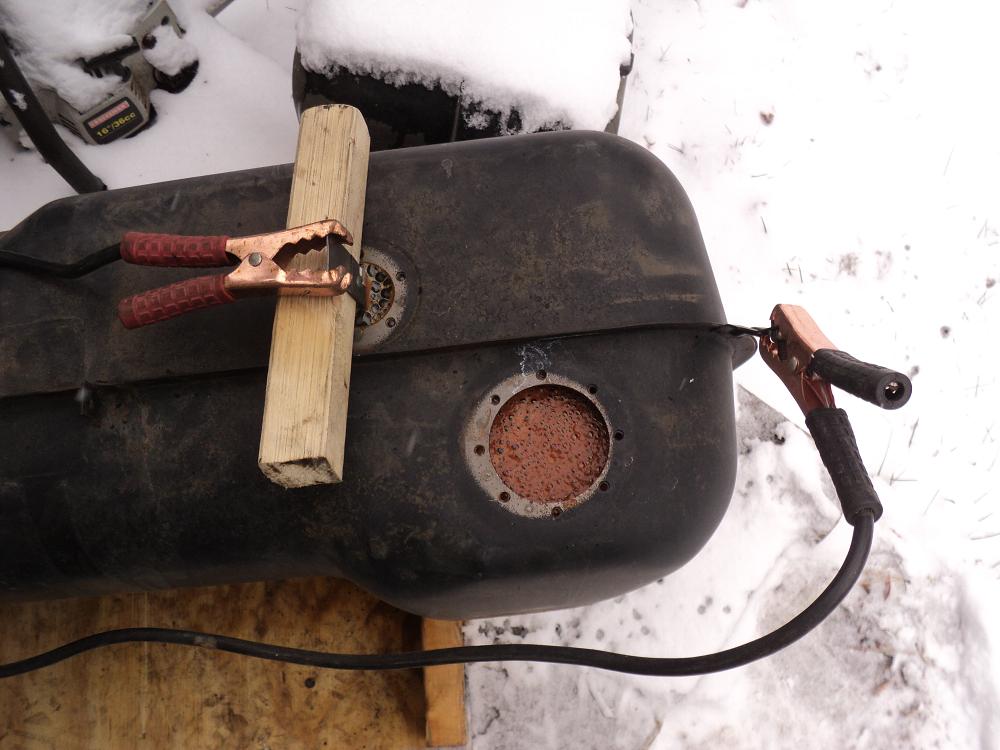 The next day I started fresh. I used a grinder to clean my metal elctrode. What I found was, as the metal started to gather too much rust the gauge on my charger would start to drop. I pulled the electrode and cleaned off again with a grinder and started again. I cleaned off the electrode about every 2-2.5 hours. about the third time I pulled the electrode it was going from orange rust to black. Another thing I did was to take a gallon of the solution and flooded the openings washing out the top of the orange sludge. This seems to work well. Here's what I ended up with, I am rinsing the tank with a 50/50 solution of metal ready and plan on using some WD-40 or marvel or something to clean the flash rust in preperation of new gas.  |
|
|
|
Posts in this topic
 02loftsmoor Rusty Fuel Tanks Oct 27 2011, 06:46 PM
 moparrob
5.Suspend your part in the solution using the ... Oct 27 2011, 09:28 PM
moparrob
5.Suspend your part in the solution using the ... Oct 27 2011, 09:28 PM
 02loftsmoor you suspend the electrodes. sorry of the late get... Oct 29 2011, 10:52 AM Phoenix-MN
[quote name='02loftsmoor' post='1562543' date='Oc... Oct 28 2011, 06:28 AM bulitt When you are done with the electrolysis hit the ta... Oct 28 2011, 06:51 AM DBCooper So with a very large tank, I'm thinking one of... Oct 28 2011, 09:46 AM bulitt
So with a very large tank, I'm thinking one o... Oct 28 2011, 10:02 AM Phoenix-MN
So with a very large tank, I'm thinking one o... Oct 28 2011, 10:09 AM DBCooper So once the car's de-rusted and down to bare m... Oct 28 2011, 12:04 PM bulitt
So once the car's de-rusted and down to bare ... Oct 28 2011, 12:30 PM bulitt http://www.914world.com/bbs2/uploads_offsite/i33.p... Oct 28 2011, 01:06 PM 02loftsmoor you could suspend the tank, but for cleaning the i... Oct 29 2011, 10:54 AM kwales And not only will it outgas a lot, a stream of foa... Oct 29 2011, 11:08 AM Phoenix-MN Here's a couple of shots of my tank in progres... Oct 29 2011, 11:46 AM rick 918-S
Here's a couple of shots of my tank in progre... Oct 29 2011, 01:58 PM jcd914 Seems like something I might try.
How long would o... Oct 29 2011, 12:25 PM Vacca Rabite Huh. I need to do this to the tank on my Jeep. I... Oct 29 2011, 01:30 PM Phoenix-MN
Seems like something I might try.
How long would ... Oct 29 2011, 01:48 PM Phoenix-MN
Here's a couple of shots of my tank in progr... Oct 29 2011, 04:34 PM kwales I've separated a 1/8 thick strip of mild steel... Oct 29 2011, 05:04 PM dlestep ...DO NOT USE CRES (stainless) in this process.... Oct 30 2011, 09:12 PM partwerks Is the electrolysis the same concept used in a HHO... Oct 30 2011, 09:42 PM 914Mike Somebody missed this part from post #1:
"Don... Oct 31 2011, 01:03 AM jaxdream Rick , that looks great :Qarl: . I wonder if temp... Dec 2 2011, 10:04 AM rjames The science is cool, but it seems like a lot of ha... Dec 2 2011, 10:23 AM Drums66
The science is cool, but it seems like a lot of h... Dec 2 2011, 06:17 PM rick 918-S I've done the radiator shop thing. Around here... Dec 2 2011, 10:59 AM Jeffs9146
You could run a hose from the bottom of the hot ... Dec 2 2011, 06:25 PM rick 918-S
You could run a hose from the bottom of the hot... Dec 3 2011, 11:40 AM charliew So why not ss? Dec 3 2011, 12:16 PM windforfun
So why not ss?
??? Dec 3 2011, 05:08 PM kwales Because it makes hexavalent chromium should the st... Dec 4 2011, 01:18 PM
02loftsmoor you suspend the electrodes. sorry of the late get... Oct 29 2011, 10:52 AM Phoenix-MN
[quote name='02loftsmoor' post='1562543' date='Oc... Oct 28 2011, 06:28 AM bulitt When you are done with the electrolysis hit the ta... Oct 28 2011, 06:51 AM DBCooper So with a very large tank, I'm thinking one of... Oct 28 2011, 09:46 AM bulitt
So with a very large tank, I'm thinking one o... Oct 28 2011, 10:02 AM Phoenix-MN
So with a very large tank, I'm thinking one o... Oct 28 2011, 10:09 AM DBCooper So once the car's de-rusted and down to bare m... Oct 28 2011, 12:04 PM bulitt
So once the car's de-rusted and down to bare ... Oct 28 2011, 12:30 PM bulitt http://www.914world.com/bbs2/uploads_offsite/i33.p... Oct 28 2011, 01:06 PM 02loftsmoor you could suspend the tank, but for cleaning the i... Oct 29 2011, 10:54 AM kwales And not only will it outgas a lot, a stream of foa... Oct 29 2011, 11:08 AM Phoenix-MN Here's a couple of shots of my tank in progres... Oct 29 2011, 11:46 AM rick 918-S
Here's a couple of shots of my tank in progre... Oct 29 2011, 01:58 PM jcd914 Seems like something I might try.
How long would o... Oct 29 2011, 12:25 PM Vacca Rabite Huh. I need to do this to the tank on my Jeep. I... Oct 29 2011, 01:30 PM Phoenix-MN
Seems like something I might try.
How long would ... Oct 29 2011, 01:48 PM Phoenix-MN
Here's a couple of shots of my tank in progr... Oct 29 2011, 04:34 PM kwales I've separated a 1/8 thick strip of mild steel... Oct 29 2011, 05:04 PM dlestep ...DO NOT USE CRES (stainless) in this process.... Oct 30 2011, 09:12 PM partwerks Is the electrolysis the same concept used in a HHO... Oct 30 2011, 09:42 PM 914Mike Somebody missed this part from post #1:
"Don... Oct 31 2011, 01:03 AM jaxdream Rick , that looks great :Qarl: . I wonder if temp... Dec 2 2011, 10:04 AM rjames The science is cool, but it seems like a lot of ha... Dec 2 2011, 10:23 AM Drums66
The science is cool, but it seems like a lot of h... Dec 2 2011, 06:17 PM rick 918-S I've done the radiator shop thing. Around here... Dec 2 2011, 10:59 AM Jeffs9146
You could run a hose from the bottom of the hot ... Dec 2 2011, 06:25 PM rick 918-S
You could run a hose from the bottom of the hot... Dec 3 2011, 11:40 AM charliew So why not ss? Dec 3 2011, 12:16 PM windforfun
So why not ss?
??? Dec 3 2011, 05:08 PM kwales Because it makes hexavalent chromium should the st... Dec 4 2011, 01:18 PM |
2 User(s) are reading this topic (2 Guests and 0 Anonymous Users)
0 Members:

|
Lo-Fi Version | Time is now: 27th September 2024 - 01:57 PM |
Invision Power Board
v9.1.4 © 2024 IPS, Inc.