|
|
|
Porsche, and the Porsche crest are registered trademarks of Dr. Ing. h.c. F. Porsche AG.
This site is not affiliated with Porsche in any way. Its only purpose is to provide an online forum for car enthusiasts. All other trademarks are property of their respective owners. |
|
|


| Han Solo |
 Sep 30 2013, 10:40 AM Sep 30 2013, 10:40 AM
Post
#241
|
|
Member  Group: Members Posts: 288 Joined: 30-September 13 From: Middle Tennessee Member No.: 16,456 Region Association: South East States |
New to this forum but I've been around 944s, 924Ss, Boxster and Cayman forums for years.
This one is going to take some time. Purchased for $900, non-running but otherwise complete '73 914 2.0. Certainly just beyond a viable restoration car but probably okay for what I plan to do with it. Here's some highlights of the tear down... On the trailer going to the house. Attached thumbnail(s) 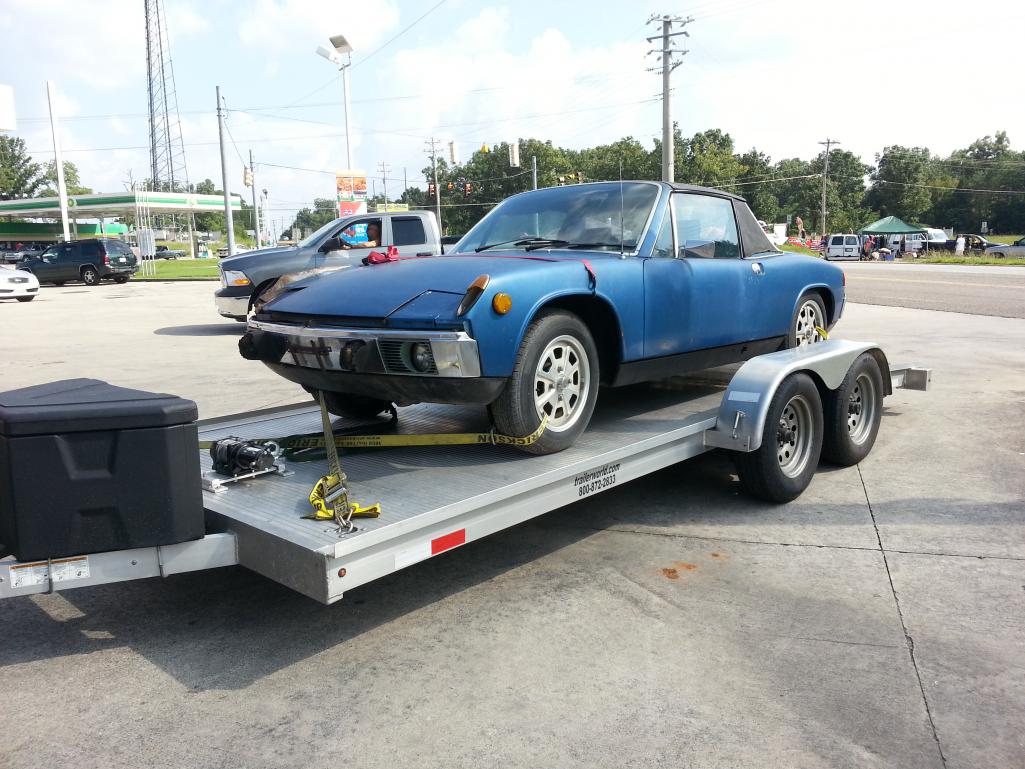
|
   |

 
|
  |
Replies
| Han Solo |
Mar 29 2014, 07:33 PM
Post
#242
|
|
Member Group: Members Posts: 288 Joined: 30-September 13 From: Middle Tennessee Member No.: 16,456 Region Association: South East States |
Blazing ahead. During the week I stripped the donor fender and the original that it was mated to. Then I went ahead and fabed up a quick patch over the turn signal hole (and marked the sheet metal for another). That went on nicely. Today I got down and dirty - stripping the wheel well of gobs of under-coating and rooting out all the seam sealer I could get to. Reaching back towards the rear of the car inside of the fender, heating and scraping was especially brutal. But I got the majority of the paint and sealer removed. Then I worked my way around to the front panel and stripped it. Much easier going there. After cleaning everything with Marine Clean, I treated it all with Metal Prep. I read in the POR 15 instructions that body filler can be applied over POR 15 when tacky. However, other posts indicate you can rough it after it's cured and get good adhesion. That's what I'll do later to dress up the seam in the fender and the rough areas on the front panel. I did try a new application technique with the POR 15. On the large areas I used a small disposable, short napped roller (the one that comes in the disposable trey). That material lays down so well I'm confident that it will look just as good as using a brush. I followed up in the tight areas with a brush. I think next I'll remove all the glass and seals from the car. I'm ready to take a break from wire brushing for a while (at least my sore arm is).
(IMG:http://www.914world.com/bbs2/uploads_offsite/i1336.photobucket.com-16456-1396143208.1.jpg) (IMG:http://www.914world.com/bbs2/uploads_offsite/i1336.photobucket.com-16456-1396143209.2.jpg) (IMG:http://www.914world.com/bbs2/uploads_offsite/i1336.photobucket.com-16456-1396143209.3.jpg) (IMG:http://www.914world.com/bbs2/uploads_offsite/i1336.photobucket.com-16456-1396143209.4.jpg) (IMG:http://www.914world.com/bbs2/uploads_offsite/i1336.photobucket.com-16456-1396143209.5.jpg) (IMG:http://www.914world.com/bbs2/uploads_offsite/i1336.photobucket.com-16456-1396143209.6.jpg) |
|
|
|
Posts in this topic
 Han Solo Rusty bucket into Solo toy Sep 30 2013, 10:40 AM
 Han Solo The front pan is just a tad rusty. Sep 30 2013, 10:42 AM
 Han Solo I've seen worse interiors but there's ants... Sep 30 2013, 10:44 AM Han Solo Floor pans are a little rough too. Sep 30 2013, 10:47 AM Han Solo There's daylight under those peddles. Sep 30 2013, 10:48 AM Han Solo Rear trunk pan is toast also. Sep 30 2013, 10:51 AM Han Solo My hillbilly car lift before dropping the engine a... Sep 30 2013, 10:53 AM Han Solo I got over my fear of spiders while dropping this.... Sep 30 2013, 10:56 AM Han Solo And now it gets really ugly. Seller showed me he c... Sep 30 2013, 10:58 AM Woody
And now it gets really ugly. Seller showed me he ... Sep 30 2013, 11:08 AM 914itis
My hillbilly car lift before dropping the engine ... Dec 5 2013, 12:31 PM Han Solo
My hillbilly car lift before dropping the engine... Dec 5 2013, 01:02 PM 914itis
[quote name='914itis' post='1966570' date='Dec 5 ... Dec 5 2013, 01:13 PM SirAndy I vote for tube-frame ...
:D
:wttc: Oct 1 2013, 11:37 AM Han Solo
I vote for tube-frame ...
:D
:wttc:
It may c... Oct 1 2013, 11:46 AM Han Solo Pulled the fuel tank yesterday. More rust around t... Oct 2 2013, 10:35 AM Han Solo Moving on to rear trunk. Stripped and rust killed ... Oct 10 2013, 01:17 PM Han Solo Continuing the rear trunk pan cut out.
http://www... Oct 21 2013, 07:44 AM Han Solo I finished up the rear trunk pan cut out but was u... Oct 29 2013, 07:46 AM BMXerror Lookin good! And nice trailer! :headbange... Oct 29 2013, 08:31 PM Han Solo Moved back to the rear trunk pan. Welding the cros... Nov 7 2013, 01:10 PM Han Solo Welding completed in rear trunk pan. After grindin... Nov 9 2013, 06:48 PM Han Solo With the rear trunk somewhat completed, I'm wo... Nov 20 2013, 08:32 AM Han Solo Back at it tonight. I revisited the passenger side... Nov 22 2013, 08:52 PM mepstein Door beams, bracing? Nov 22 2013, 09:05 PM Han Solo Although recommended by many, I'm not using br... Nov 24 2013, 08:18 AM Han Solo More welding shots. Getting better at this :)
h... Nov 24 2013, 08:20 AM Han Solo Moving on to the drivers side inner clam shell.
h... Nov 26 2013, 12:29 PM Han Solo Great progress today. I got the drivers side inner... Dec 1 2013, 07:04 AM Han Solo I had a couple hours this evening to move on to th... Dec 5 2013, 09:28 AM Han Solo Another few hours of tunnel fun this afternoon. I ... Dec 5 2013, 09:32 AM Han Solo Despite the extreme cold in the garage, I'm ba... Dec 7 2013, 12:34 PM Han Solo So I'm cutting back towards the firewall from ... Dec 8 2013, 04:00 PM Han Solo A bit more progress last night. That little odd sh... Dec 14 2013, 08:08 PM Han Solo The plan on the drivers side of the tunnel is to l... Dec 14 2013, 08:12 PM Han Solo I started the morning off with marine clean and th... Dec 14 2013, 08:17 PM Han Solo So I'm diving in to this last area of floor pa... Dec 19 2013, 06:47 AM Han Solo And indeed I did change my plan for this troubleso... Dec 22 2013, 05:57 PM ThePaintedMan Looking good so far! One thing I noticed - th... Dec 23 2013, 01:06 PM Han Solo
Looking good so far! One thing I noticed - t... Dec 23 2013, 05:59 PM Han Solo Today I got the upper pad, lower pad, steering whe... Dec 23 2013, 06:22 PM Han Solo A great day off for Christmas eve and I'm craw... Dec 24 2013, 06:49 PM Han Solo The wife ran me out of the house while Christmas d... Dec 26 2013, 08:48 AM Han Solo Another evening of patching fun. Finished up the p... Dec 27 2013, 10:26 AM Han Solo Outstanding progress today! I've got POR 1... Dec 28 2013, 10:08 PM J P Stein Ayup, a race car don't need much in the way of... Dec 29 2013, 12:54 AM Han Solo
Ayup, a race car don't need much in the way o... Dec 29 2013, 08:53 AM Han Solo Well I took a good look at the drivers side long a... Dec 29 2013, 04:48 PM ONTHEGRIND Looking good keep uo the hard work. Dec 29 2013, 06:15 PM Han Solo It seems that the firewall in this car progressive... Jan 2 2014, 08:48 AM IGTARD :bump: :bump: :bump: :bump: Nice :shades2: :sh... Jan 3 2014, 02:43 AM Han Solo Another patch done at the center of the firewall a... Jan 3 2014, 12:20 PM Han Solo Before...
http://www.914world.com/bbs2/uploads_of... Jan 4 2014, 07:40 PM Han Solo Last day of mild weather here so I'm back out ... Jan 5 2014, 06:37 PM Han Solo It finally warmed up enough Thurs. for me to get a... Jan 11 2014, 09:18 PM Han Solo Back at it today and at first I'm focusing on ... Jan 12 2014, 06:30 PM J P Stein My cage builder would be me. I did it twice.
Runni... Jan 13 2014, 08:53 AM J P Stein I did start with a a car as rust free as possible ... Jan 13 2014, 09:01 AM Han Solo Last night's patch was tough. The battery tray... Jan 15 2014, 08:46 PM CptTripps Dude...you're killing it.
It's a lot of H... Jan 16 2014, 08:05 AM f1rocks Where are you in middle Tennessee? Jan 16 2014, 11:54 AM Han Solo
Where are you in middle Tennessee?
Near Lebanon... Jan 18 2014, 09:43 PM f1rocks
Near Lebanon TN. About seven miles from the track... Jan 27 2014, 10:00 AM Han Solo
Near Lebanon TN. About seven miles from the trac... Jan 28 2014, 01:15 PM f1rocks
I haven't made it to the cars and coffee. Tha... Jan 28 2014, 03:54 PM ablesnead This thread is driving me nuts...I mean ...jeez b... Jan 16 2014, 04:07 PM Han Solo
This thread is driving me nuts...I mean ...jeez ... Jan 18 2014, 09:53 PM J P Stein I paid 4500 bucks for that green car back in the l... Jan 17 2014, 09:23 AM Han Solo So today I did the small patch under the long. Thi... Jan 18 2014, 09:57 PM J P Stein Well, if you must.......
You are into an area that... Jan 19 2014, 09:34 AM Han Solo Definitely want your input and advise JP. I can se... Jan 19 2014, 02:22 PM Han Solo This next patch is going to be REALLY tough. It... Jan 19 2014, 02:43 PM J P Stein I removed the 4 banger engine mounts when I put in... Jan 19 2014, 09:49 PM Cupomeat :agree:
I was just thinking that myself, that you... Jan 20 2014, 09:11 AM Han Solo MLK day and I've got four hours to do this mon... Jan 20 2014, 08:19 PM Han Solo I've been thinking about how to make a jig for... Jan 25 2014, 04:11 PM Han Solo Fabulous weather today and I put a few hours into ... Jan 26 2014, 08:29 PM Han Solo Engine compartment mostly done.
Before...
http:/... Feb 1 2014, 11:03 PM Han Solo I've been working for this for a long time. Ge... Feb 2 2014, 08:27 PM Han Solo Installing the front floor pan took about 8 hours.... Feb 8 2014, 09:16 PM Han Solo I'm about 4 hours into the rear pan install an... Feb 13 2014, 12:35 PM Han Solo I never thought I'd get so much gratification ... Feb 16 2014, 08:56 PM Han Solo I had the day off and was able to get the right fr... Feb 17 2014, 07:48 PM nukepipe Keep going dude!!! Love to see it ru... Feb 17 2014, 08:09 PM Han Solo Before I lower the car, strip and treat the gas ta... Feb 22 2014, 07:19 PM Han Solo I got the car re-hung last Sunday and started prep... Feb 27 2014, 12:04 PM J P Stein I just had my new Lincoln welder puke......4 month... Feb 28 2014, 08:15 AM Han Solo
Not trying to be a hard ass, but your welding is... Feb 28 2014, 09:22 AM Alphaogre Having a MIG welder with gas will be a huge help a... Feb 28 2014, 12:41 PM Han Solo Just an update...
Looks like it will be hands off... Mar 5 2014, 08:55 AM Han Solo It was nice to get into the project yesterday and ... Mar 18 2014, 09:04 PM Han Solo Finally got around to that small area under the cl... Mar 20 2014, 08:19 AM Han Solo This evening brings the end of a very productive w... Mar 23 2014, 06:51 PM Han Solo I am sure glad I waited to tackle the right front ... Mar 23 2014, 06:55 PM Han Solo Last couple of evenings I've been working on t... Mar 26 2014, 08:36 PM Han Solo Beside the replacement fender there was a rust thr... Mar 28 2014, 06:23 AM Han Solo Last two evenings I've been pulling the all th... Apr 1 2014, 08:03 PM jaxdream This thread reminds me of Veltor's 914 over in... Apr 2 2014, 09:18 AM Han Solo I am glad to have these front fenders treated. The... Apr 5 2014, 06:49 PM
Han Solo I've seen worse interiors but there's ants... Sep 30 2013, 10:44 AM Han Solo Floor pans are a little rough too. Sep 30 2013, 10:47 AM Han Solo There's daylight under those peddles. Sep 30 2013, 10:48 AM Han Solo Rear trunk pan is toast also. Sep 30 2013, 10:51 AM Han Solo My hillbilly car lift before dropping the engine a... Sep 30 2013, 10:53 AM Han Solo I got over my fear of spiders while dropping this.... Sep 30 2013, 10:56 AM Han Solo And now it gets really ugly. Seller showed me he c... Sep 30 2013, 10:58 AM Woody
And now it gets really ugly. Seller showed me he ... Sep 30 2013, 11:08 AM 914itis
My hillbilly car lift before dropping the engine ... Dec 5 2013, 12:31 PM Han Solo
My hillbilly car lift before dropping the engine... Dec 5 2013, 01:02 PM 914itis
[quote name='914itis' post='1966570' date='Dec 5 ... Dec 5 2013, 01:13 PM SirAndy I vote for tube-frame ...
:D
:wttc: Oct 1 2013, 11:37 AM Han Solo
I vote for tube-frame ...
:D
:wttc:
It may c... Oct 1 2013, 11:46 AM Han Solo Pulled the fuel tank yesterday. More rust around t... Oct 2 2013, 10:35 AM Han Solo Moving on to rear trunk. Stripped and rust killed ... Oct 10 2013, 01:17 PM Han Solo Continuing the rear trunk pan cut out.
http://www... Oct 21 2013, 07:44 AM Han Solo I finished up the rear trunk pan cut out but was u... Oct 29 2013, 07:46 AM BMXerror Lookin good! And nice trailer! :headbange... Oct 29 2013, 08:31 PM Han Solo Moved back to the rear trunk pan. Welding the cros... Nov 7 2013, 01:10 PM Han Solo Welding completed in rear trunk pan. After grindin... Nov 9 2013, 06:48 PM Han Solo With the rear trunk somewhat completed, I'm wo... Nov 20 2013, 08:32 AM Han Solo Back at it tonight. I revisited the passenger side... Nov 22 2013, 08:52 PM mepstein Door beams, bracing? Nov 22 2013, 09:05 PM Han Solo Although recommended by many, I'm not using br... Nov 24 2013, 08:18 AM Han Solo More welding shots. Getting better at this :)
h... Nov 24 2013, 08:20 AM Han Solo Moving on to the drivers side inner clam shell.
h... Nov 26 2013, 12:29 PM Han Solo Great progress today. I got the drivers side inner... Dec 1 2013, 07:04 AM Han Solo I had a couple hours this evening to move on to th... Dec 5 2013, 09:28 AM Han Solo Another few hours of tunnel fun this afternoon. I ... Dec 5 2013, 09:32 AM Han Solo Despite the extreme cold in the garage, I'm ba... Dec 7 2013, 12:34 PM Han Solo So I'm cutting back towards the firewall from ... Dec 8 2013, 04:00 PM Han Solo A bit more progress last night. That little odd sh... Dec 14 2013, 08:08 PM Han Solo The plan on the drivers side of the tunnel is to l... Dec 14 2013, 08:12 PM Han Solo I started the morning off with marine clean and th... Dec 14 2013, 08:17 PM Han Solo So I'm diving in to this last area of floor pa... Dec 19 2013, 06:47 AM Han Solo And indeed I did change my plan for this troubleso... Dec 22 2013, 05:57 PM ThePaintedMan Looking good so far! One thing I noticed - th... Dec 23 2013, 01:06 PM Han Solo
Looking good so far! One thing I noticed - t... Dec 23 2013, 05:59 PM Han Solo Today I got the upper pad, lower pad, steering whe... Dec 23 2013, 06:22 PM Han Solo A great day off for Christmas eve and I'm craw... Dec 24 2013, 06:49 PM Han Solo The wife ran me out of the house while Christmas d... Dec 26 2013, 08:48 AM Han Solo Another evening of patching fun. Finished up the p... Dec 27 2013, 10:26 AM Han Solo Outstanding progress today! I've got POR 1... Dec 28 2013, 10:08 PM J P Stein Ayup, a race car don't need much in the way of... Dec 29 2013, 12:54 AM Han Solo
Ayup, a race car don't need much in the way o... Dec 29 2013, 08:53 AM Han Solo Well I took a good look at the drivers side long a... Dec 29 2013, 04:48 PM ONTHEGRIND Looking good keep uo the hard work. Dec 29 2013, 06:15 PM Han Solo It seems that the firewall in this car progressive... Jan 2 2014, 08:48 AM IGTARD :bump: :bump: :bump: :bump: Nice :shades2: :sh... Jan 3 2014, 02:43 AM Han Solo Another patch done at the center of the firewall a... Jan 3 2014, 12:20 PM Han Solo Before...
http://www.914world.com/bbs2/uploads_of... Jan 4 2014, 07:40 PM Han Solo Last day of mild weather here so I'm back out ... Jan 5 2014, 06:37 PM Han Solo It finally warmed up enough Thurs. for me to get a... Jan 11 2014, 09:18 PM Han Solo Back at it today and at first I'm focusing on ... Jan 12 2014, 06:30 PM J P Stein My cage builder would be me. I did it twice.
Runni... Jan 13 2014, 08:53 AM J P Stein I did start with a a car as rust free as possible ... Jan 13 2014, 09:01 AM Han Solo Last night's patch was tough. The battery tray... Jan 15 2014, 08:46 PM CptTripps Dude...you're killing it.
It's a lot of H... Jan 16 2014, 08:05 AM f1rocks Where are you in middle Tennessee? Jan 16 2014, 11:54 AM Han Solo
Where are you in middle Tennessee?
Near Lebanon... Jan 18 2014, 09:43 PM f1rocks
Near Lebanon TN. About seven miles from the track... Jan 27 2014, 10:00 AM Han Solo
Near Lebanon TN. About seven miles from the trac... Jan 28 2014, 01:15 PM f1rocks
I haven't made it to the cars and coffee. Tha... Jan 28 2014, 03:54 PM ablesnead This thread is driving me nuts...I mean ...jeez b... Jan 16 2014, 04:07 PM Han Solo
This thread is driving me nuts...I mean ...jeez ... Jan 18 2014, 09:53 PM J P Stein I paid 4500 bucks for that green car back in the l... Jan 17 2014, 09:23 AM Han Solo So today I did the small patch under the long. Thi... Jan 18 2014, 09:57 PM J P Stein Well, if you must.......
You are into an area that... Jan 19 2014, 09:34 AM Han Solo Definitely want your input and advise JP. I can se... Jan 19 2014, 02:22 PM Han Solo This next patch is going to be REALLY tough. It... Jan 19 2014, 02:43 PM J P Stein I removed the 4 banger engine mounts when I put in... Jan 19 2014, 09:49 PM Cupomeat :agree:
I was just thinking that myself, that you... Jan 20 2014, 09:11 AM Han Solo MLK day and I've got four hours to do this mon... Jan 20 2014, 08:19 PM Han Solo I've been thinking about how to make a jig for... Jan 25 2014, 04:11 PM Han Solo Fabulous weather today and I put a few hours into ... Jan 26 2014, 08:29 PM Han Solo Engine compartment mostly done.
Before...
http:/... Feb 1 2014, 11:03 PM Han Solo I've been working for this for a long time. Ge... Feb 2 2014, 08:27 PM Han Solo Installing the front floor pan took about 8 hours.... Feb 8 2014, 09:16 PM Han Solo I'm about 4 hours into the rear pan install an... Feb 13 2014, 12:35 PM Han Solo I never thought I'd get so much gratification ... Feb 16 2014, 08:56 PM Han Solo I had the day off and was able to get the right fr... Feb 17 2014, 07:48 PM nukepipe Keep going dude!!! Love to see it ru... Feb 17 2014, 08:09 PM Han Solo Before I lower the car, strip and treat the gas ta... Feb 22 2014, 07:19 PM Han Solo I got the car re-hung last Sunday and started prep... Feb 27 2014, 12:04 PM J P Stein I just had my new Lincoln welder puke......4 month... Feb 28 2014, 08:15 AM Han Solo
Not trying to be a hard ass, but your welding is... Feb 28 2014, 09:22 AM Alphaogre Having a MIG welder with gas will be a huge help a... Feb 28 2014, 12:41 PM Han Solo Just an update...
Looks like it will be hands off... Mar 5 2014, 08:55 AM Han Solo It was nice to get into the project yesterday and ... Mar 18 2014, 09:04 PM Han Solo Finally got around to that small area under the cl... Mar 20 2014, 08:19 AM Han Solo This evening brings the end of a very productive w... Mar 23 2014, 06:51 PM Han Solo I am sure glad I waited to tackle the right front ... Mar 23 2014, 06:55 PM Han Solo Last couple of evenings I've been working on t... Mar 26 2014, 08:36 PM Han Solo Beside the replacement fender there was a rust thr... Mar 28 2014, 06:23 AM Han Solo Last two evenings I've been pulling the all th... Apr 1 2014, 08:03 PM jaxdream This thread reminds me of Veltor's 914 over in... Apr 2 2014, 09:18 AM Han Solo I am glad to have these front fenders treated. The... Apr 5 2014, 06:49 PM |
4 User(s) are reading this topic (4 Guests and 0 Anonymous Users)
0 Members:

|
Lo-Fi Version | Time is now: 27th September 2024 - 08:58 AM |
Invision Power Board
v9.1.4 © 2024 IPS, Inc.