|
|
|
Porsche, and the Porsche crest are registered trademarks of Dr. Ing. h.c. F. Porsche AG.
This site is not affiliated with Porsche in any way. Its only purpose is to provide an online forum for car enthusiasts. All other trademarks are property of their respective owners. |
|
|

  |

| ONTHEGRIND |
 Dec 3 2013, 08:15 PM Dec 3 2013, 08:15 PM
Post
#61
|
|
Member  Group: Members Posts: 286 Joined: 10-November 08 From: California Member No.: 9,738 Region Association: None |
Howdy all Here Is a update In video Form.. I decided to start working on the 914 again I finally got 1 hour into it today.. I work for Jerry Woods Ent. so I spend a lot of time with Porsche's so coming home to work on one hasn't been a high priority plus if anyone has been to the shop knows the level that the cars at the shop are held to and to try to replicate that at home in a one car garage is difficult.. Anyhow here are a few videos of where the car is at and would like some opinions.. I try to not ask the guys at the shop cause they are used to making things flawless and I don't have 6 figures to restore a 914 I just want a nnice cruiser not a concourse car..
http://www.youtube.com/watch?v=cjrNExtjGv8...etQ&index=1 http://www.youtube.com/watch?v=slKaPURf60k...Uv04K8rKi4yGetQ |
   |

 
|
| effutuo101 |
Dec 4 2013, 09:25 AM
Post
#62
|
|
Advanced Member Group: Members Posts: 2,735 Joined: 10-April 05 From: Lemon Grove Member No.: 3,914 Region Association: Southern California |
Steady progress wins! I do the same thing on my lunch hour.
Looking good! |
|
|
|
| ONTHEGRIND |
Dec 7 2013, 11:34 AM
Post
#63
|
|
Member Group: Members Posts: 286 Joined: 10-November 08 From: California Member No.: 9,738 Region Association: None |
Heres Some more video updates ..
http://www.youtube.com/watch?v=Xth2KBYaBkE...etQ&index=2 http://www.youtube.com/watch?v=4mL4hhQy9p0...etQ&index=1 http://www.youtube.com/watch?v=vJtJWJVD-OM...Uv04K8rKi4yGetQ How do I embed videos ? |
|
|
|
| SirAndy |
Dec 7 2013, 11:49 AM
Post
#64
|
|
Resident German Group: Admin Posts: 41,815 Joined: 21-January 03 From: Oakland, Kalifornia Member No.: 179 Region Association: Northern California |
QUOTE(ONTHEGRIND @ Dec 7 2013, 09:34 AM)  How do I embed videos ? http://www.914world.com/bbs2/index.php?showtopic=97052 (IMG:style_emoticons/default/shades.gif) |
 |
|
| ONTHEGRIND |
Dec 7 2013, 12:12 PM
Post
#65
|
|
Member Group: Members Posts: 286 Joined: 10-November 08 From: California Member No.: 9,738 Region Association: None |
Sweet I searched but couldn't find it thanks.. Bummer the weather sucked last nite I wanted to take the ducati to alice and my co worker had his 914 6 ready to roll.. guessing you didn't go either..
|
|
|
|
| SirAndy |
Dec 7 2013, 12:20 PM
Post
#66
|
|
Resident German Group: Admin Posts: 41,815 Joined: 21-January 03 From: Oakland, Kalifornia Member No.: 179 Region Association: Northern California |
QUOTE(ONTHEGRIND @ Dec 7 2013, 10:12 AM) guessing you didn't go either.. Yeah, gotta go to the memorial for a friend who killed himself ... (IMG:style_emoticons/default/sad.gif) |
|
|
|
| gothspeed |
Dec 7 2013, 02:09 PM
Post
#67
|
|
Senior Member Group: Members Posts: 1,539 Joined: 3-February 09 From: SoCal Member No.: 10,019 Region Association: None |
You are doing an amazing job!! (IMG:style_emoticons/default/smash.gif) you are making great progress for only an hour a day (IMG:style_emoticons/default/beerchug.gif)
I widened my rear steel flares a little, mostly to get the upper flat panel of the rear flare closer to the verticalish angle of the front. This was because after i installed them, i noticed the rear outer flat part tilted inboard as the panel went up. Whereas the same flat part on the front flares were near vertical. I widened the rear by cutting along the top of the rears about 5/8" inboard of the top tangent point of the top outer fender bend. Then cut all the way around stopping about 5 -6 inches from the bottom on each side. As i went down the sides i reduced the 5/8" to about 1/2". I then spaced out the outer part of the flare with wood spacers. I used 1/2" thick wood strips and located them about 10 and 2 oclock. After this you wil find the outer 'pushed out' part of the flare no longer matches the seam where it was cut from. I corrected this by making perpendicular cuts, 1" on the outer and 1.5" long on the inner part of the flare, about 5" apart from each other along the length of the first long cut. This allows the inboard part of the flare to be reconciled with the outer. By forming the now independent tabs to match each other across the 1/2" opening. Then i made card stock paper templates of the 1/2" gap, cut them out in steel and butt welded them in. Then hammered and flattened the interface. The overall shape of the rear flares now look like the way they 'should have been'. (IMG:style_emoticons/default/smilie_pokal.gif) I think this method can work well with the 1" that you want to add to the rears. If i were to do this again i would have gone 3/4" to 1" instead of the 1/2" i went with. But it looks far better now than it would have, had I not widened them at all. (IMG:style_emoticons/default/biggrin.gif) If you are interested, i can dig up some pics i took of this process. (IMG:style_emoticons/default/smash.gif) |
|
|
|
| ONTHEGRIND |
Dec 7 2013, 03:29 PM
Post
#68
|
|
Member Group: Members Posts: 286 Joined: 10-November 08 From: California Member No.: 9,738 Region Association: None |
Put in another hour today removed quite a bit of floor pan getting close to trimming it. then I will finish prepping the interior and move on to the firewall I am going to bolt the tub to the cellete at our shop before I start welding.. I was talking to our Fabricator at Jerry Woods and he explained a similar way of doing it Id love to see some photos if you have some... Here is a photo update
(IMG:http://www.914world.com/bbs2/uploads_offsite/img.photobucket.com-9738-1386451791.1.jpg) |
|
|
|
| gothspeed |
Dec 7 2013, 04:25 PM
Post
#69
|
|
Senior Member Group: Members Posts: 1,539 Joined: 3-February 09 From: SoCal Member No.: 10,019 Region Association: None |
Here are some pics of my rear flare 'widen' process (IMG:style_emoticons/default/smile.gif). For some reason I thought I took a lot more pictures of this. I may have to check my other SD card.
But these illustrate the basic idea of what I did. On the third picture, you can see how much better the rear outer shape matches the front, due to the 'widening'. Also in that pic you can see the hand shear I used, to cut the strips that filled the gap I created. I hope this helps (IMG:style_emoticons/default/smash.gif) BTW If anyone could use that rear trunk lid with the spoiler in my pictures below. It is straight and available for pick up in the low to mid two digit range .... (IMG:style_emoticons/default/biggrin.gif) Attached image(s) 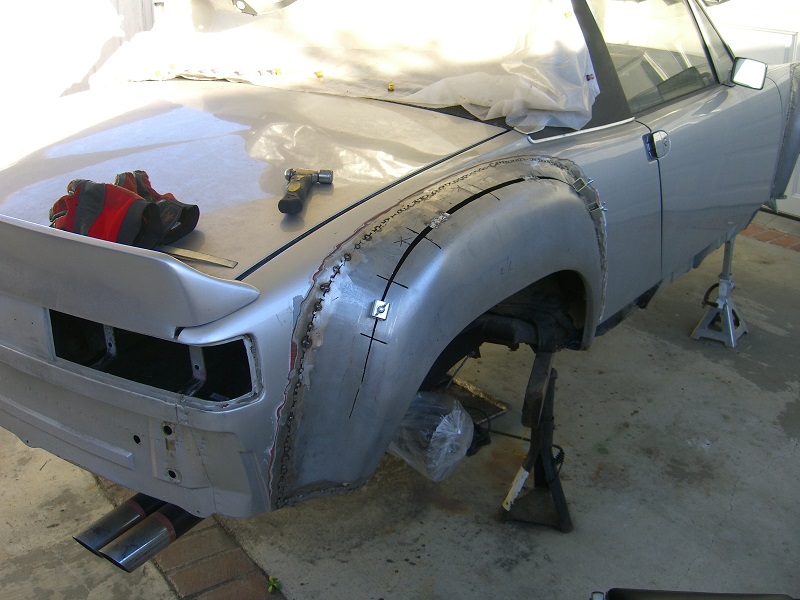 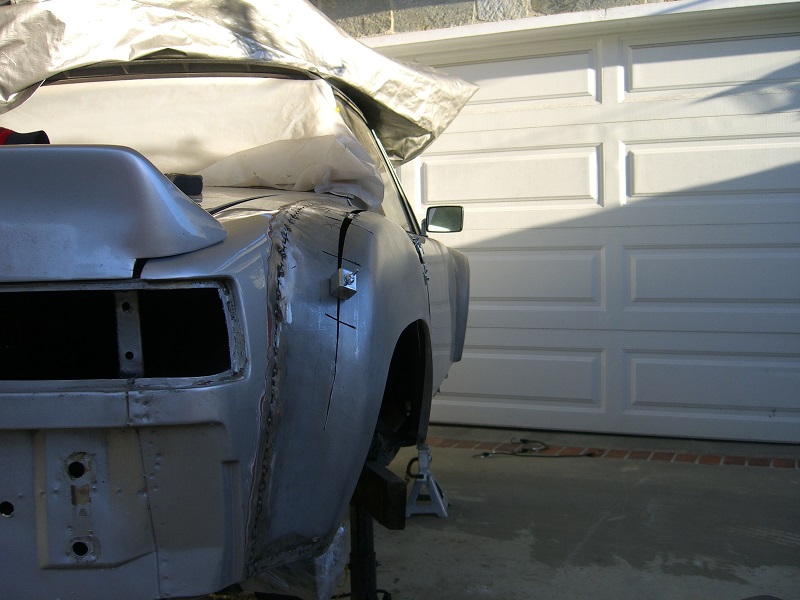 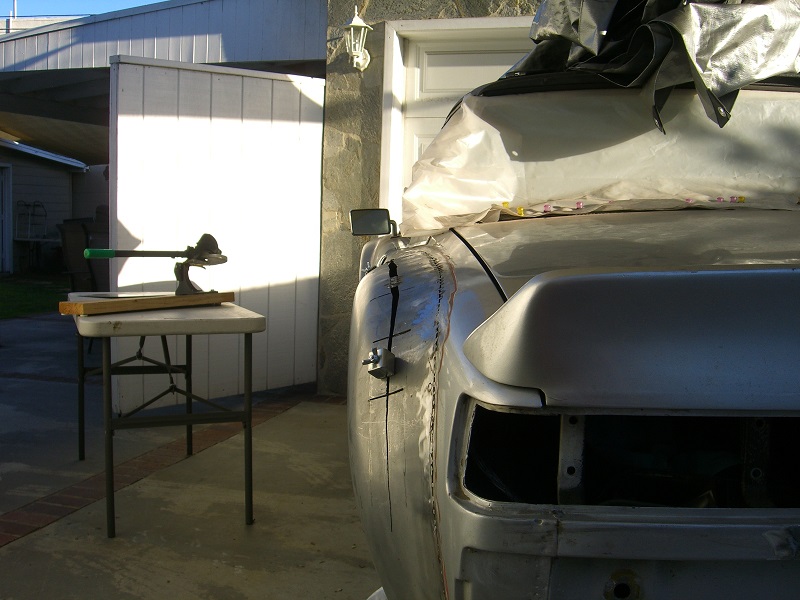
|
|
|
|
| ONTHEGRIND |
Dec 7 2013, 07:03 PM
Post
#70
|
|
Member Group: Members Posts: 286 Joined: 10-November 08 From: California Member No.: 9,738 Region Association: None |
I'd take the deck lid but I'm too far. I love the look of the wider fenders thinking 15x10 with Avons on the back
|
|
|
|
| gothspeed |
Dec 7 2013, 08:33 PM
Post
#71
|
|
Senior Member Group: Members Posts: 1,539 Joined: 3-February 09 From: SoCal Member No.: 10,019 Region Association: None |
Now that the filler and one coat of primer is on, I can barely tell the fenders are 1/2" wider than 'stock flares'. Most people would probably not notice they are wider unless I mentioned it, however overall, it does simply 'look better' than before. (IMG:style_emoticons/default/smile.gif)
That is one of the reasons I only went 1/2", because I did not want it to be 'obvious' the fenders were widened. But now I think I could have done 3/4" with the same subtle effect. 1" would possibly have slid under the radar too, excepting of course the added space for wider wheels (IMG:style_emoticons/default/biggrin.gif) . 15 x 10 should fit right in if you add that 1" (IMG:style_emoticons/default/smile.gif). I will be running 951 8 x 16 fuchs on the rear, spaced out as far as possible of course ... (IMG:style_emoticons/default/sunglasses.gif) Yeah, I am down near the coastal part of Long Beach ...... for someone who would actually use the rear lid, I would deliver 30 or so miles, to meet part ways with it. |
|
|
|
| ONTHEGRIND |
Dec 10 2013, 12:55 AM
Post
#72
|
|
Member Group: Members Posts: 286 Joined: 10-November 08 From: California Member No.: 9,738 Region Association: None |
|
|
|
|
| Blue6 |
Dec 10 2013, 01:31 AM
Post
#73
|
|
Senior Member Group: Members Posts: 1,048 Joined: 3-October 13 From: SoCal Member No.: 16,470 Region Association: Southern California |
Pm sent on decklid..
|
|
|
|
| ONTHEGRIND |
Dec 10 2013, 11:26 PM
Post
#74
|
|
Member Group: Members Posts: 286 Joined: 10-November 08 From: California Member No.: 9,738 Region Association: None |
Few more Updates.. I was helping prep a 997 RSR all day today inside the tub so I figured since I was working in the interior of that I'd come home and try to work on the interior of the 914 ..
Cleaned up the firewall and and started to uncover the drivers side long.. (IMG:http://www.914world.com/bbs2/uploads_offsite/img.photobucket.com-9738-1386739573.1.jpg) (IMG:http://www.914world.com/bbs2/uploads_offsite/img.photobucket.com-9738-1386739573.2.jpg) (IMG:http://www.914world.com/bbs2/uploads_offsite/img.photobucket.com-9738-1386739573.3.jpg) (IMG:http://www.914world.com/bbs2/uploads_offsite/img.photobucket.com-9738-1386739574.4.jpg) (IMG:http://www.914world.com/bbs2/uploads_offsite/img.photobucket.com-9738-1386739574.5.jpg)000094E6320D401_zpsab2a59be.jpg[/IMG][/URL] |
|
|
|
| vw505 |
Dec 11 2013, 10:39 AM
Post
#75
|
|
Member Group: Members Posts: 228 Joined: 17-April 03 From: San Antonio, TX , Navy retired Member No.: 579 Region Association: None |
What products are you using to remove the paint?
|
|
|
|
| ONTHEGRIND |
Dec 11 2013, 10:39 PM
Post
#76
|
|
Member Group: Members Posts: 286 Joined: 10-November 08 From: California Member No.: 9,738 Region Association: None |
Well got into the hell hole area removed the battery tray also along with some more interior work.. I wish I would have studied the hell hole a little better I cut a piece probably bigger then needed. I wasn't aware there were two layers of steel but oh well I will fab up a piece tomarrow at.. as you can see in the photos the only real weak spot is were there was at the single layer of steel.. As for the tools I used today here is a photo Skil Grinder turned into a 1/4 collet by Jerry woods with a speed control and some roloc's you can probably grind threw the golden gate bridge lol..
(IMG:http://www.914world.com/bbs2/uploads_offsite/img.photobucket.com-9738-1386823182.1.jpg) (IMG:http://www.914world.com/bbs2/uploads_offsite/img.photobucket.com-9738-1386823183.2.jpg) (IMG:http://www.914world.com/bbs2/uploads_offsite/img.photobucket.com-9738-1386823183.3.jpg) (IMG:http://www.914world.com/bbs2/uploads_offsite/img.photobucket.com-9738-1386823183.4.jpg) (IMG:http://www.914world.com/bbs2/uploads_offsite/img.photobucket.com-9738-1386823183.5.jpg) (IMG:http://www.914world.com/bbs2/uploads_offsite/img.photobucket.com-9738-1386823184.6.jpg) |
|
|
|
| ONTHEGRIND |
Dec 11 2013, 10:42 PM
Post
#77
|
|
Member Group: Members Posts: 286 Joined: 10-November 08 From: California Member No.: 9,738 Region Association: None |
Here were the tools of the day
(IMG:http://www.914world.com/bbs2/uploads_offsite/img.photobucket.com-9738-1386823375.1.jpg) |
|
|
|
| ONTHEGRIND |
Dec 12 2013, 11:18 PM
Post
#78
|
|
Member Group: Members Posts: 286 Joined: 10-November 08 From: California Member No.: 9,738 Region Association: None |
|
|
|
|
| gothspeed |
Dec 13 2013, 11:38 AM
Post
#79
|
|
Senior Member Group: Members Posts: 1,539 Joined: 3-February 09 From: SoCal Member No.: 10,019 Region Association: None |
Great work!! .... (IMG:style_emoticons/default/beerchug.gif)
|
|
|
|
| ONTHEGRIND |
Dec 14 2013, 12:14 PM
Post
#80
|
|
Member Group: Members Posts: 286 Joined: 10-November 08 From: California Member No.: 9,738 Region Association: None |
What should I spray inside the longs before I weld. ?
(IMG:http://www.914world.com/bbs2/uploads_offsite/img.photobucket.com-9738-1387044882.1.jpg) (IMG:http://www.914world.com/bbs2/uploads_offsite/img.photobucket.com-9738-1387044882.2.jpg) (IMG:http://www.914world.com/bbs2/uploads_offsite/img.photobucket.com-9738-1387044883.3.jpg) |
|
|
|
|
1 User(s) are reading this topic (1 Guests and 0 Anonymous Users)
0 Members:

|
Lo-Fi Version | Time is now: 26th September 2024 - 09:48 PM |
Invision Power Board
v9.1.4 © 2024 IPS, Inc.