|
|

|
Porsche, and the Porsche crest are registered trademarks of Dr. Ing. h.c. F. Porsche AG.
This site is not affiliated with Porsche in any way. Its only purpose is to provide an online forum for car enthusiasts. All other trademarks are property of their respective owners. |
|
|
  |
| 76-914 |
 May 16 2014, 07:31 PM May 16 2014, 07:31 PM
Post
#341
|
|
Repeat Offender & Resident Subaru Antagonist           Group: Members Posts: 13,634 Joined: 23-January 09 From: Temecula, CA Member No.: 9,964 Region Association: Southern California 
|
I think Doug should toss together a meet up and a few of use might be able to run up, or over depending on our locations. Not many can run down, Lake Erie kinda makes that a little hard. He needs a few good hands on that car to get it done. I am booked solid though most of the summer. That would be great but the truth is, Doug is a sharp guy and he can get that support right here. And the reality is it will take many month's should he go it alone. Either way he'll finish it but it would be faster if he got some help. |
| CptTripps |
 May 16 2014, 07:41 PM May 16 2014, 07:41 PM
Post
#342
|
|
:: Punch and Pie ::     Group: Members Posts: 3,584 Joined: 26-December 04 From: Mentor, OH Member No.: 3,342 Region Association: Upper MidWest |
Thanks Stephen and Kent.
MY reality right now is that I'm moving out of the house with the garage, and may not have access to come here all that often. I'm looking for a "garage space" on Craigslist to move everything to that's closer to where I'll be living for the next few months. This was a curve ball for sure. |
| 76-914 |
 May 16 2014, 10:30 PM May 16 2014, 10:30 PM
Post
#343
|
|
Repeat Offender & Resident Subaru Antagonist           Group: Members Posts: 13,634 Joined: 23-January 09 From: Temecula, CA Member No.: 9,964 Region Association: Southern California 
|
(IMG:style_emoticons/default/poke.gif) Doug, you have no excuse for not moving to SoCal now.
And Chris, your a genius! I guess I should slow down a little more. As you can see there are a few dark spots but miles better than stock using stock bulbs. (IMG:style_emoticons/default/piratenanner.gif) I suspect the dark spots are areas where the post interfere and I may just leave it as is. Anyway, thanks for stopping in and pulling my head out of my ass, Chris! (IMG:style_emoticons/default/chair.gif) An Andyesque style but you get the idea. 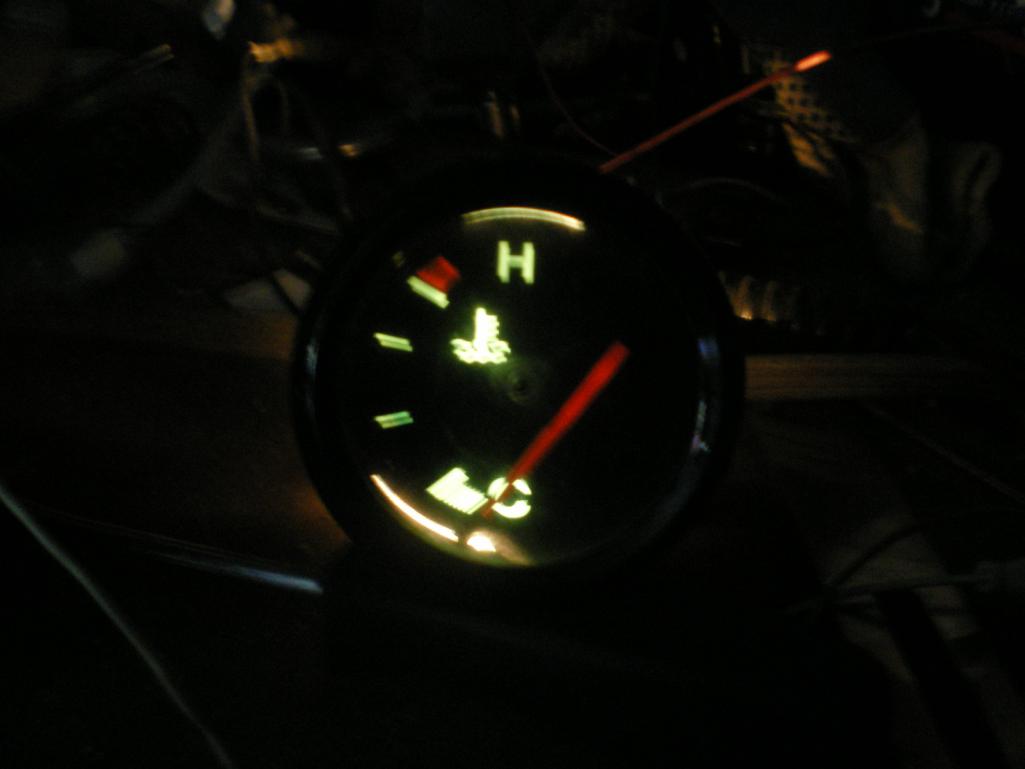 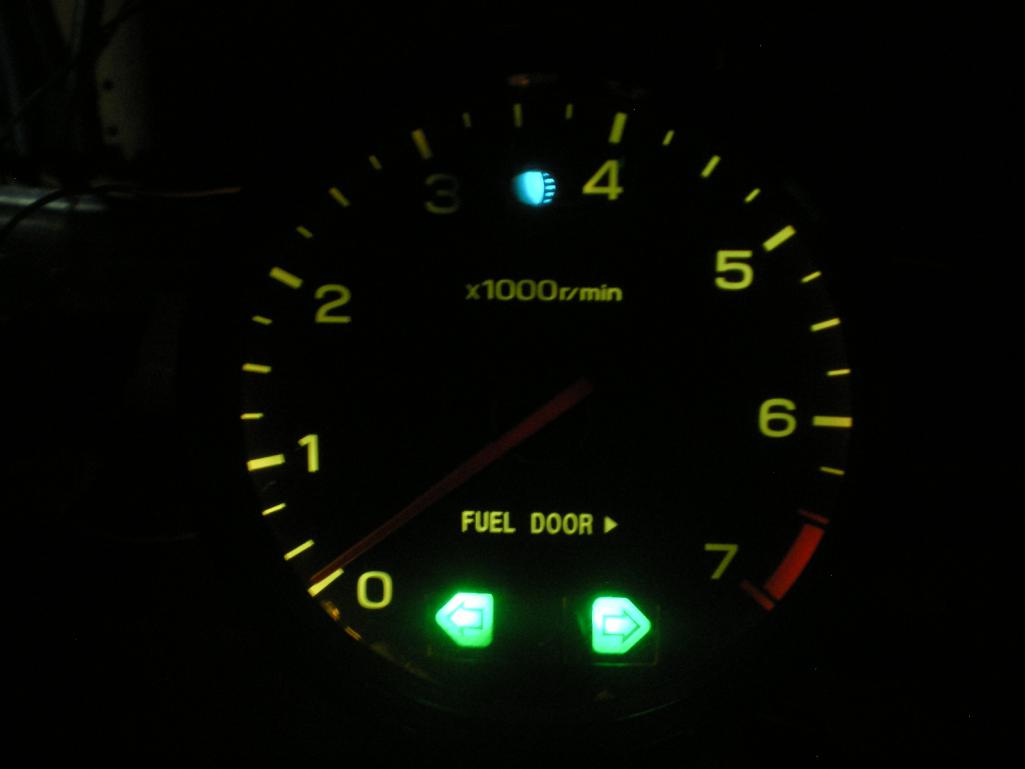 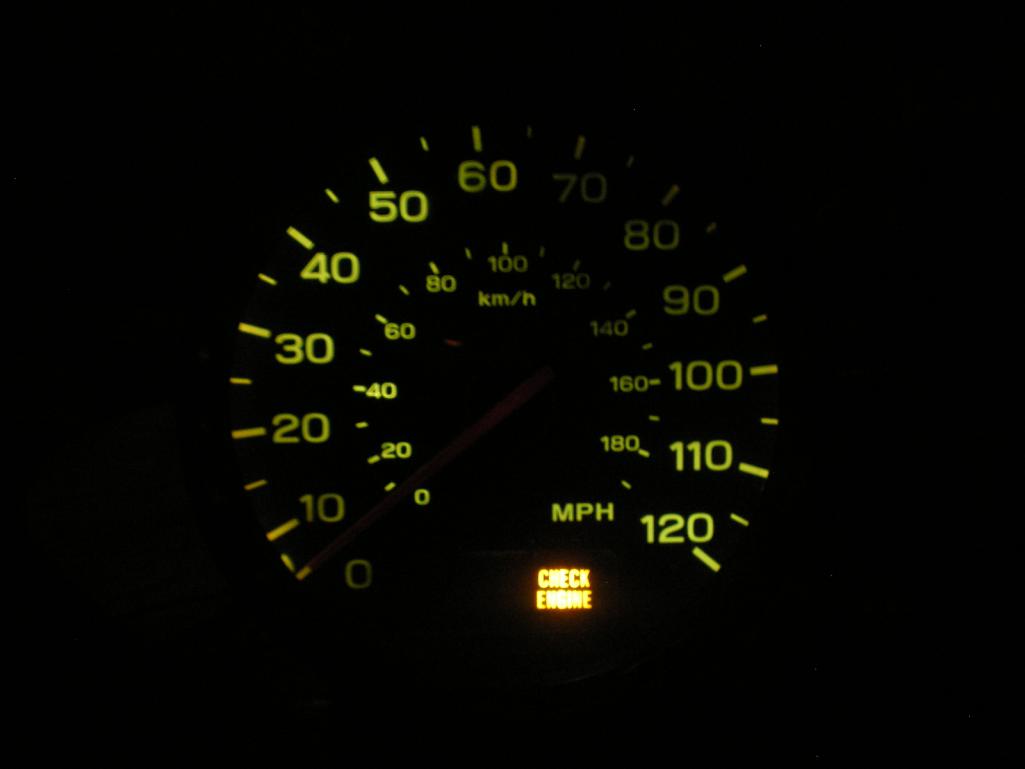 |
| rnellums |
 May 17 2014, 05:10 AM May 17 2014, 05:10 AM
Post
#344
|
|
Professional Enthusiast    Group: Members Posts: 1,646 Joined: 26-November 09 From: Littleton, CO Member No.: 11,072 Region Association: Rocky Mountains |
Well that pretty much does it. I'm keeping subie gauges for sure now.
|
| Mike Bellis |
 May 17 2014, 09:58 AM May 17 2014, 09:58 AM
Post
#345
|
|
Resident Electrician      Group: Members Posts: 8,346 Joined: 22-June 09 From: Midlothian TX Member No.: 10,496 Region Association: None 

|
I really dig this gauge mod. (IMG:style_emoticons/default/first.gif)
|
| Chris H. |
 May 17 2014, 10:19 AM May 17 2014, 10:19 AM
Post
#346
|
|
Senior Member     Group: Members Posts: 4,048 Joined: 2-January 03 From: Chicago 'burbs Member No.: 73 Region Association: Upper MidWest 
|
Whaaaa? Hey you're DOING stuff...I'm just watching. Very easy to do from the arm chair. Hope I didn't come off wrong 'cause I really have no idea how those things are wired. ALMOST took my pod apart last year but it looked so weird inside compared to the old school gauges I decided not to. If the needles light up that will look awesome. The CEL light is a bonus too. If you can't get good light uniformity when you get them all done go for LED in the background and light up the needles with regular lights. I have an SVX and an Impreza gauge pod if you break anything but it looks like you're good. To this point I was planning to go all VDO but I'm calling a major time out now.
BTW I will be ready to ship that Honda OR Yamaha filler neck this weekend. Gonna start the plumbing and it really looks like the Yamaha will win but who knows.... You need any 7/8 hose for the connection down to the tee or do you still have plenty? |
| 76-914 |
 May 17 2014, 06:42 PM May 17 2014, 06:42 PM
Post
#347
|
|
Repeat Offender & Resident Subaru Antagonist           Group: Members Posts: 13,634 Joined: 23-January 09 From: Temecula, CA Member No.: 9,964 Region Association: Southern California 
|
Well that pretty much does it. I'm keeping subie gauges for sure now. Do it. It's free. How much can go wrong at that price? (IMG:style_emoticons/default/biggrin.gif) Thanks Mike, Hope you'll like all my dumb elec questions when I'm trying to start this thing. (IMG:style_emoticons/default/lol-2.gif) Whaaaa? Hey you're DOING stuff...I'm just watching. Very easy to do from the arm chair. Hope I didn't come off wrong 'cause I really have no idea how those things are wired. ALMOST took my pod apart last year but it looked so weird inside compared to the old school gauges I decided not to. If the needles light up that will look awesome. The CEL light is a bonus too. If you can't get good light uniformity when you get them all done go for LED in the background and light up the needles with regular lights. I have an SVX and an Impreza gauge pod if you break anything but it looks like you're good. To this point I was planning to go all VDO but I'm calling a major time out now. BTW I will be ready to ship that Honda OR Yamaha filler neck this weekend. Gonna start the plumbing and it really looks like the Yamaha will win but who knows.... You need any 7/8 hose for the connection down to the tee or do you still have plenty? I was amazed I skipped the obvious and went for the difficult. Thx for pointing it out. I'm good on hose. I did as you did. Bought open boxes on Ebay. Much cheaper. Do You have a good source on fuel hose? OK, I've beat this gage build to death to death but I wanted to show the gages installed in their new panel. Here is what is looked liked before. 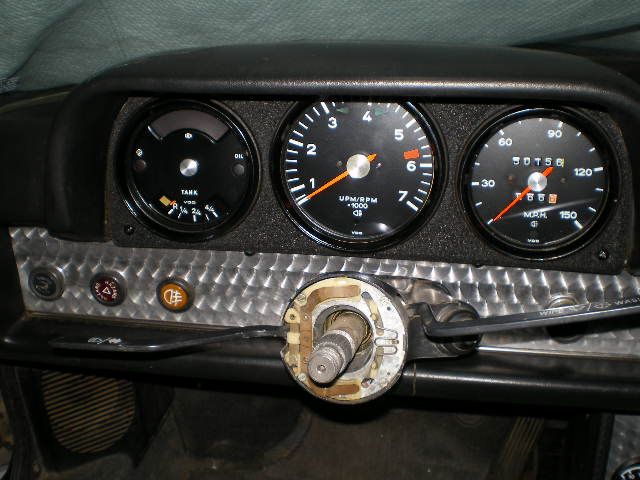 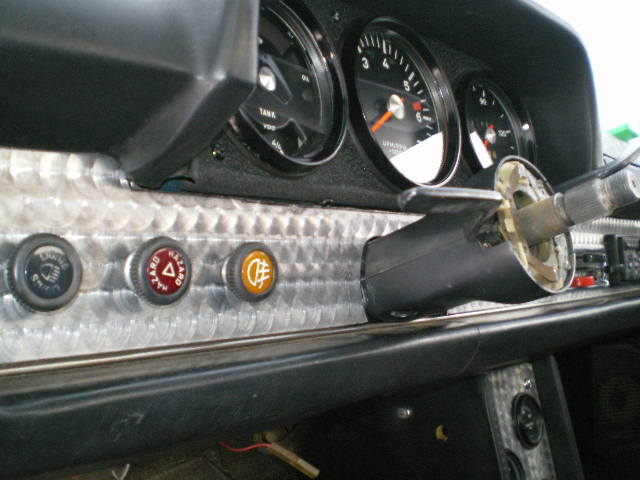 I had wanted to spruce up this panel before but decided not to. I'm glad I had a reason to do this matching panel. (IMG:style_emoticons/default/smile.gif) The only thing I haven't revealed is the way the gages are supported vs. the old rubber gasket in a sleeve stamped during production. My 1st attempt was a miserable failure. I may have it this go around but will hold off till I know that it works. It's so simple I hope it does work. 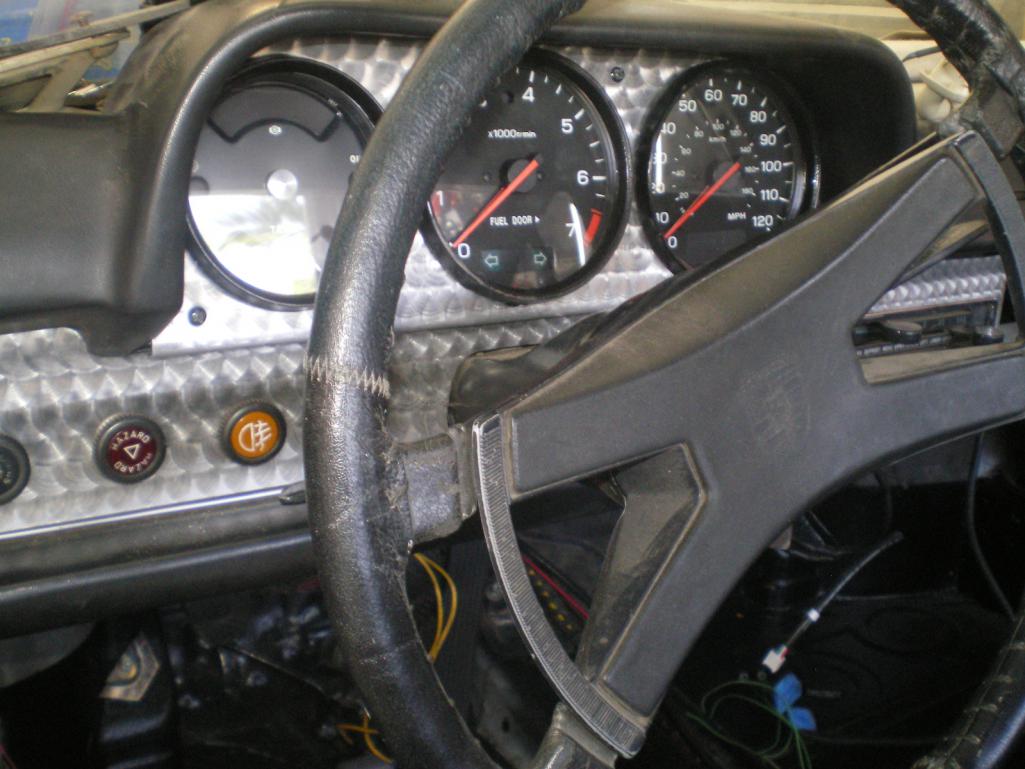 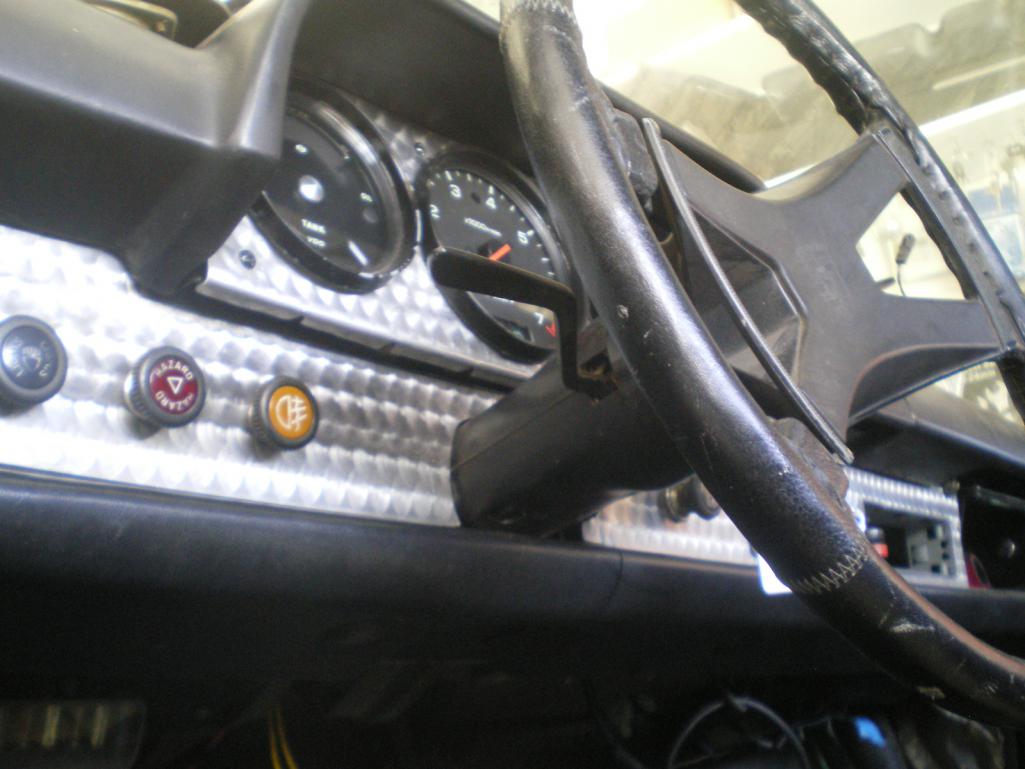 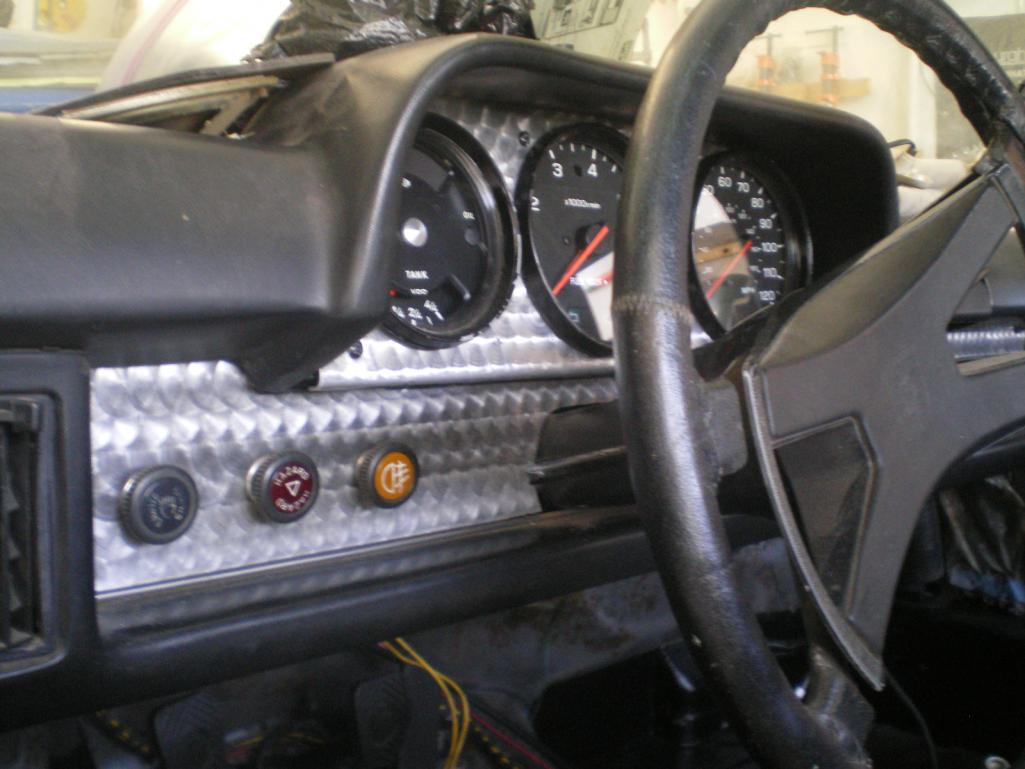 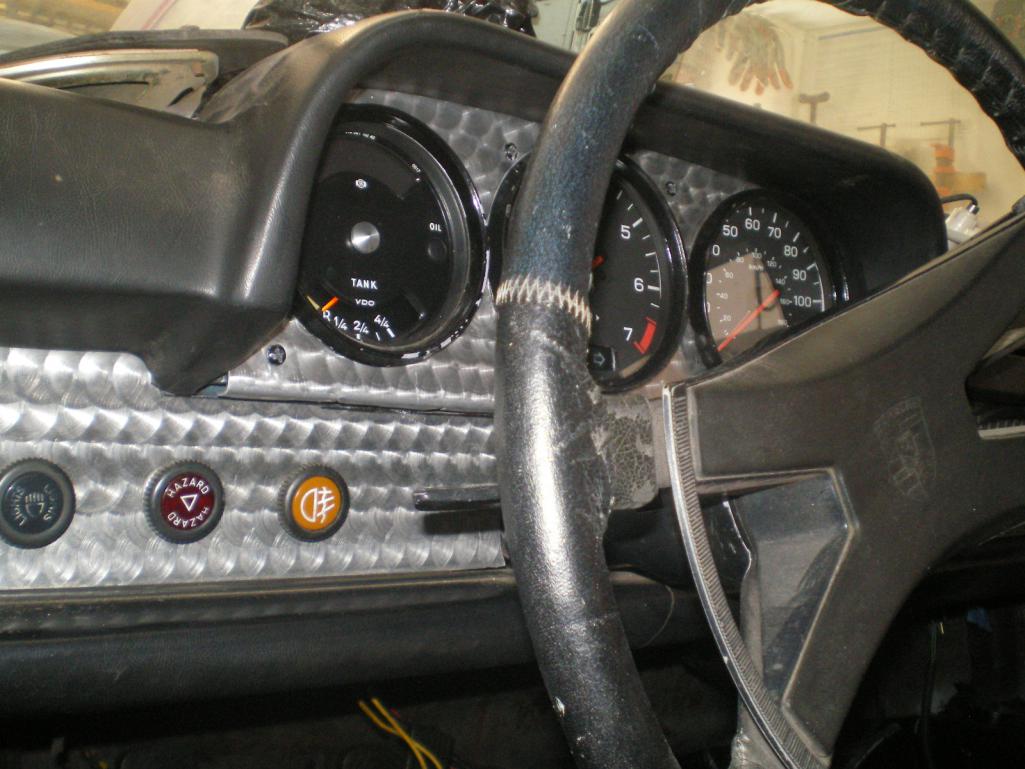 |
| mgp4591 |
 May 17 2014, 06:52 PM May 17 2014, 06:52 PM
Post
#348
|
|
914 Guru      Group: Members Posts: 5,481 Joined: 1-August 12 From: Salt Lake City Ut Member No.: 14,748 Region Association: Intermountain Region 
|
Beat it to death?? Whatever dude! It's info and pics like this that let us drool over the work and gives us all kinds of ideas! And gets us going on to the next project, brings smiles to faces, gives hope to the hopeless... oh well, it's just idol worshipping at this point... (IMG:style_emoticons/default/smilie_pokal.gif)
|
| Chris H. |
 May 17 2014, 07:31 PM May 17 2014, 07:31 PM
Post
#349
|
|
Senior Member     Group: Members Posts: 4,048 Joined: 2-January 03 From: Chicago 'burbs Member No.: 73 Region Association: Upper MidWest 
|
Wow. Those look stock like they belong there. Game changer. Looks like I might need some busted tachs!
Hey Kent I've been thinking about your cooling system. This is just a suggestion, but if you teed that 7/8 return line directly into the larger lines at the engine so they're at the same height, would this be your high point? 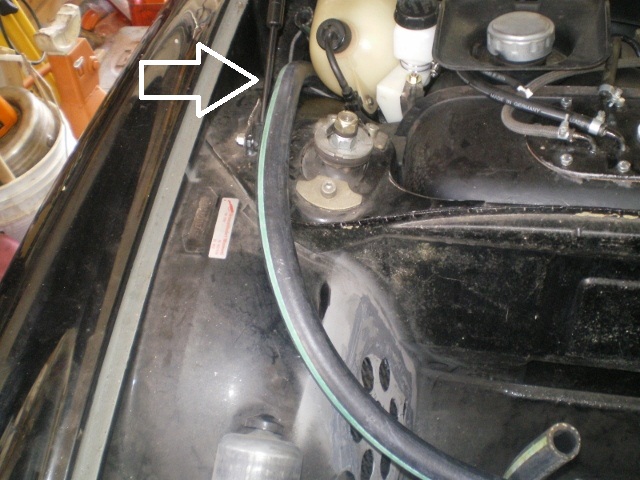 You COULD put the filler neck there if you wanted to whenever you decide to take the copper stuff out. I'm sure you could find a spot for a reservoir or move your washer bottle. Just an idea. Not saying it's a good one. I can't tell if that's actually the highest point or not. |
| 76-914 |
 May 17 2014, 07:48 PM May 17 2014, 07:48 PM
Post
#350
|
|
Repeat Offender & Resident Subaru Antagonist           Group: Members Posts: 13,634 Joined: 23-January 09 From: Temecula, CA Member No.: 9,964 Region Association: Southern California 
|
You read my mind. That is indeed a high spot and the one on the left side is almost as high. I had planned on placing that filler neck a few inches behind that. With a vent tee installed on the left side 3/4" hose. And with the filler neck in the engine compartment, I'll have 3 spots from which to vent/fill. (IMG:style_emoticons/default/piratenanner.gif)
|
| Chris H. |
 May 17 2014, 07:54 PM May 17 2014, 07:54 PM
Post
#351
|
|
Senior Member     Group: Members Posts: 4,048 Joined: 2-January 03 From: Chicago 'burbs Member No.: 73 Region Association: Upper MidWest 
|
Well I better get to work then! Finally have part of a day tomorrow. Those gauges are KILLER man. I'm gonna pull mine out and look at them tonight.
|
| 914forme |
 May 18 2014, 09:30 AM May 18 2014, 09:30 AM
Post
#352
|
|
Times a wastin', get wrenchin'!     Group: Members Posts: 3,896 Joined: 24-July 04 From: Dayton, Ohio Member No.: 2,388 Region Association: None 
|
Did a great job on the gauges. You must be running a center console or some other location.
I missed something though, is that stock Subaru gauge lighting? I am 1/4 awake and blind with out my glasses. Time for me to get wrenching, I am still on the tear down part of my project. Goals today: Finish indexing wheel on rotisserie. Finish cutting up my front tub section, got the sheet metal I needed. Pull the SVX engine and parts Man I need to get off your post and get to work!!!!!!! Kent keep up the great CSOB work, I love it. (IMG:style_emoticons/default/first.gif) |
| 76-914 |
 May 18 2014, 05:15 PM May 18 2014, 05:15 PM
Post
#353
|
|
Repeat Offender & Resident Subaru Antagonist           Group: Members Posts: 13,634 Joined: 23-January 09 From: Temecula, CA Member No.: 9,964 Region Association: Southern California 
|
Thanks for all the praise Guy's but I just fell in a bucket of (IMG:style_emoticons/default/stromberg.gif) and came out smelling like a Rose. (IMG:style_emoticons/default/biggrin.gif) And Stephen, no stock 914 lighting. You use two 914 Tach cans and re-use the stock lighting. All of it + 1 ck eng lite.
I said I would post the results of my 2nd attempt to support the gages if successful. First time I laminated 3 layers of poly carbonate (safety glass) successfully duplicating the curvature of the panel however when cutting the large diameter holes the fly cutter created enough heat to warp the small span areas. A few hours trashed there. Take a look at the next pic to see if you can guess where this is headed. 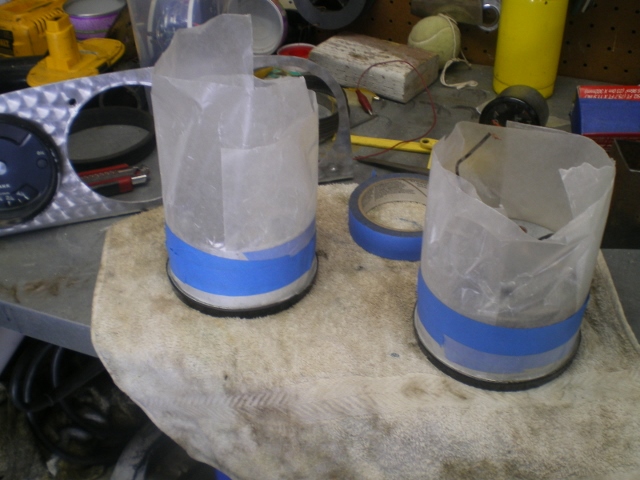 Think you know. I thought about glass to build up the back or even cardboard soaked in resin. But I settled on the $4 method. A can of this stuff. It is semi flexible which served me well as it is easy to manipulate for fitting and doesn't break off when bent. Yet it is sandable. 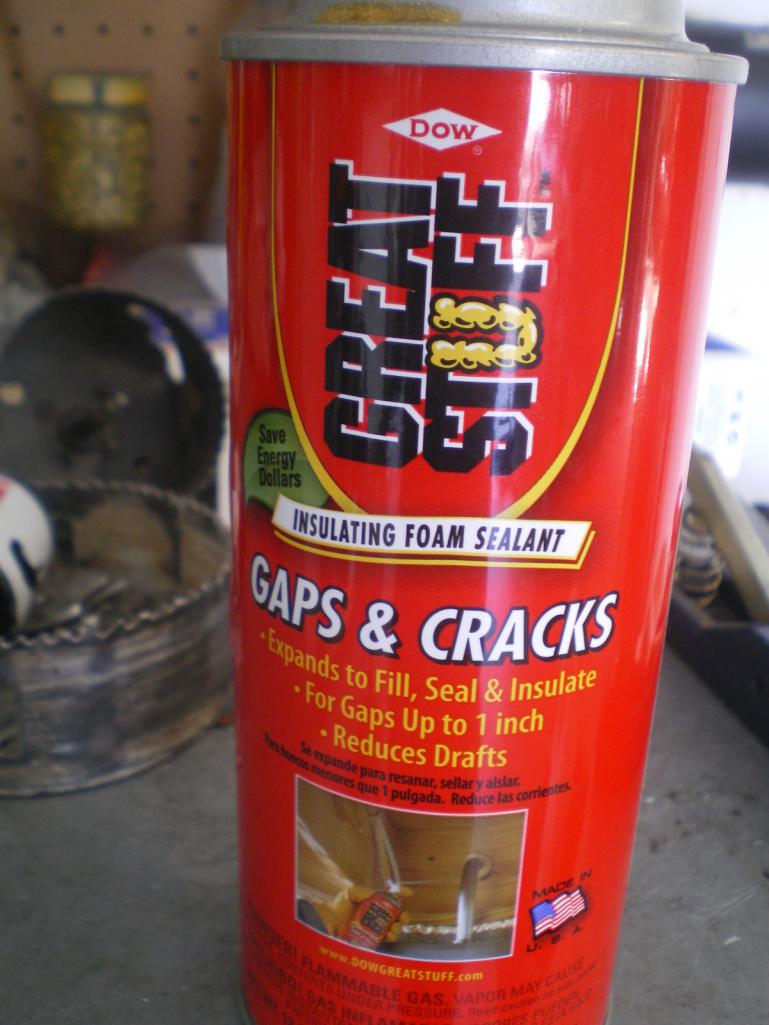 So I squirted out a nice layer around everything and let it dry. 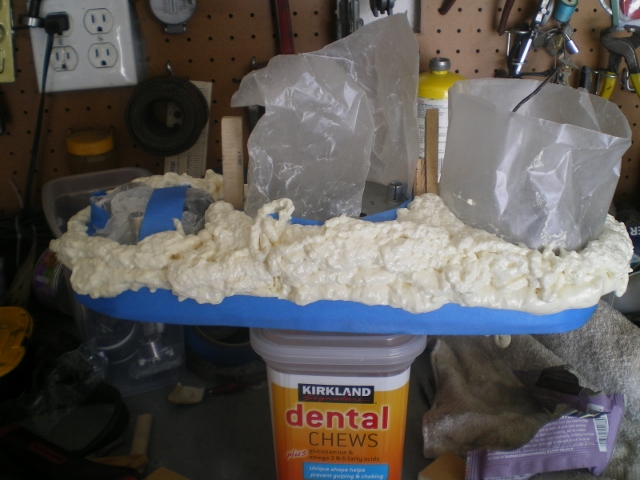 These are the gages being taped firmly against panel prior to rotating for urethane foam. 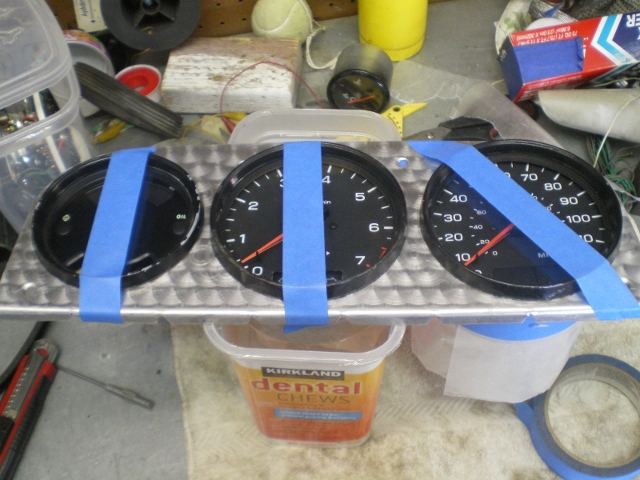 Here it is after curing and first trim. That was done with a hack saw blade held flush with the gage backs. In this pic the first gage has been pushed out and you can see the remnants of tape, wax paper, and even some oozing of foam from the thick area. If you push with your thumbs while reaching around to the front lip with your fingers you can wiggle the gage a few times and it will release from the mold. 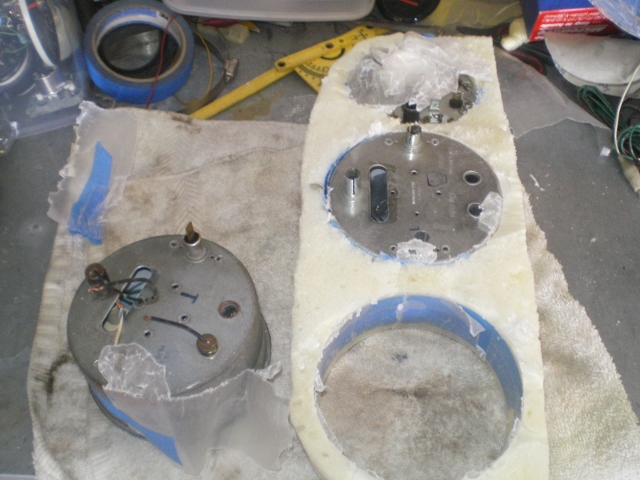 A few more as it is trimmed. 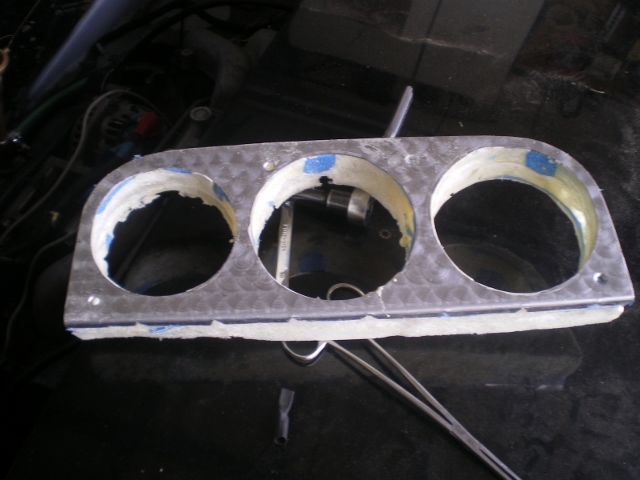 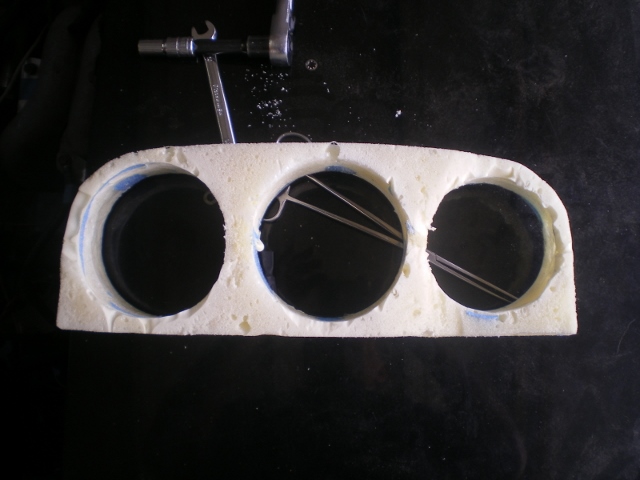 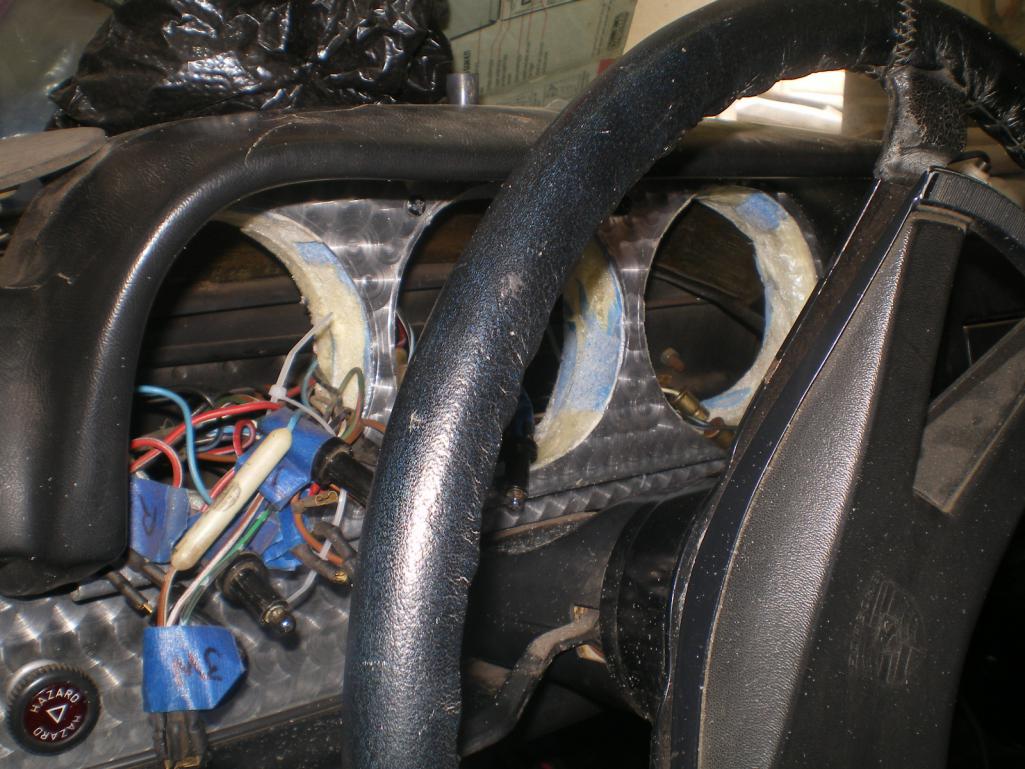 You've already seen what the gages look like installed so I won't bore you with that but if you don't want to go thru all of that you can take the rubber ring's that are tossed and install them from the rear with the lip firmly against the rear of the panel; then tighten the clamp. (IMG:style_emoticons/default/beerchug.gif) . Downside is you would have to install the panel/gages as a modular unit but damnnnnnnnnnnnn it's so easu to install that way. (IMG:style_emoticons/default/biggrin.gif) 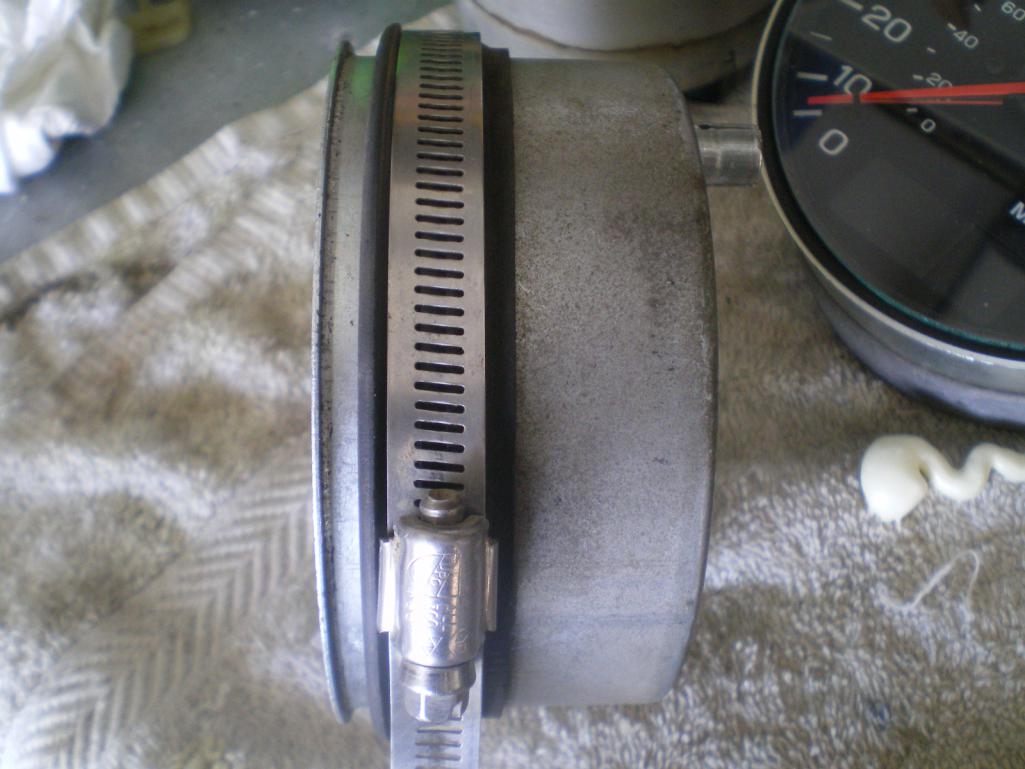 |
| Chris H. |
 May 18 2014, 08:08 PM May 18 2014, 08:08 PM
Post
#354
|
|
Senior Member     Group: Members Posts: 4,048 Joined: 2-January 03 From: Chicago 'burbs Member No.: 73 Region Association: Upper MidWest 
|
I checked out the SVX gauge cluster and realized it was cracked at the base so I took it apart to see what the guts looked like. The problem with the tach and speedo is they aren't round. You could put some warning lights from the strip on the bottom to round it off.
FYI...prior to about 2005ish the backgrounds for the gauges themselves on most models are tinted green. If you don't like that you'd have to put some sort of backing on it. 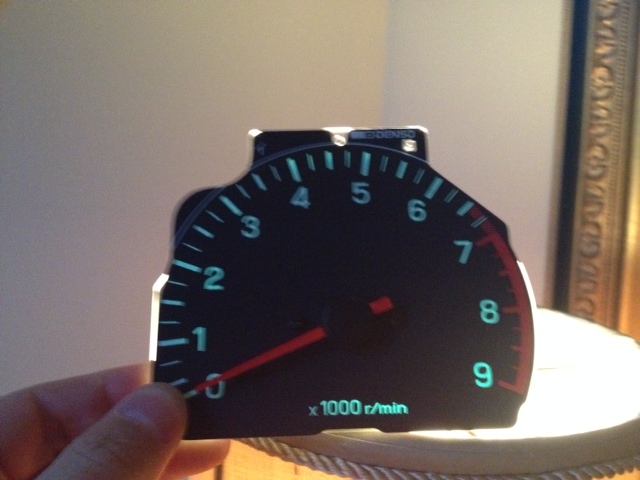 There are no wires at all since the power is run on the back side of the cluster and connected with the screws that secure the gauges 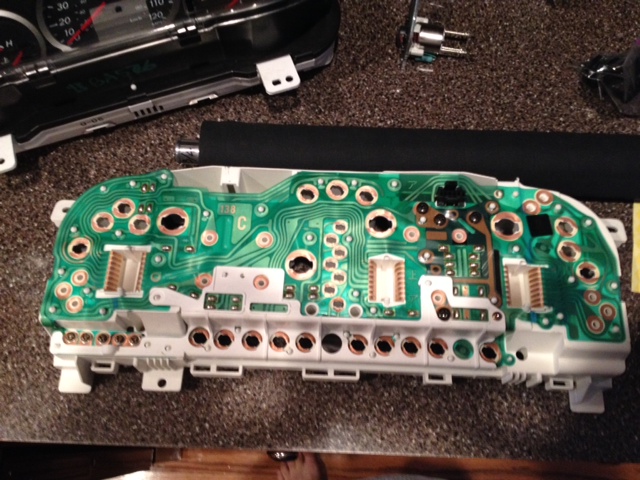 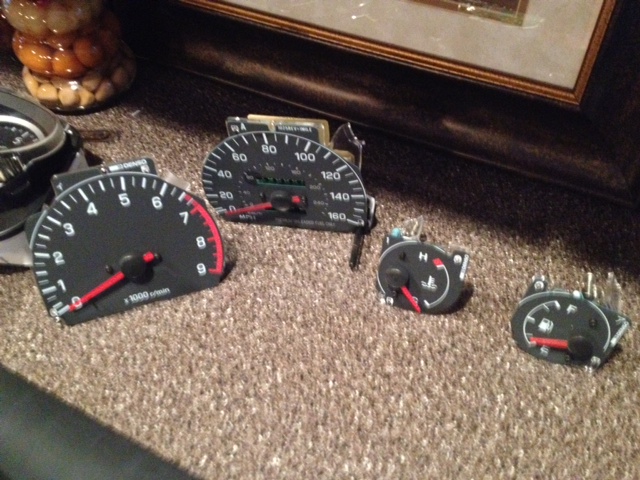 The warning light system is surprisingly simple...just a regular light underneath the corresponding warning symbol. Easy to recreate. 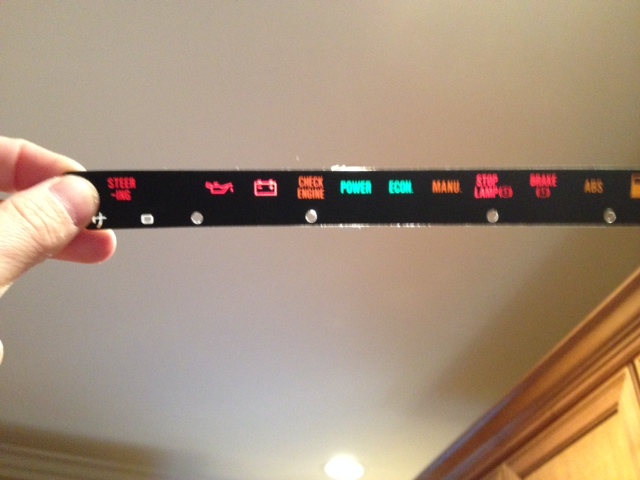 This is the Impreza pod I have... If you like this style go for the WRX one instead with the larger tach in the center instead of the larger speedo. 2006 model (white background) 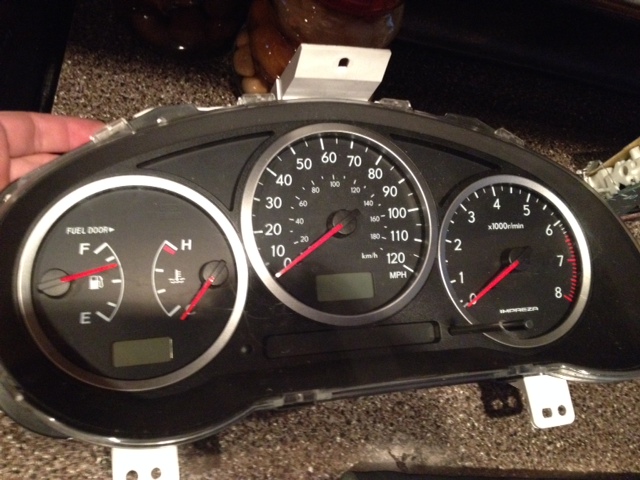 Maybe we should start a gauge thread... (IMG:style_emoticons/default/idea.gif) |
| 76-914 |
 May 18 2014, 10:08 PM May 18 2014, 10:08 PM
Post
#355
|
|
Repeat Offender & Resident Subaru Antagonist           Group: Members Posts: 13,634 Joined: 23-January 09 From: Temecula, CA Member No.: 9,964 Region Association: Southern California 
|
What is the diameter of the SVX gage. And yes you could fill in the flat area. What are the diameters on the Impreza gages. Shoot me a close up of the back of those SVX gages. I want to see where the screws go. Are you talking about posts that slip inside the back of the gage when you say screws. Maybe 4 post per gage? If so you have to pull them from the circuit board with a pair of pliers or side cutters. I don't know if we need to start another thread on gages. It's Suby stuff and there is just a few of us. You can put it in your thread or Dougs thread or even Stephans tread. We could just add our Suby gage info to one if Pat Garvey's threads since he is feeling better. (IMG:style_emoticons/default/av-943.gif) (IMG:style_emoticons/default/lol-2.gif)
|
| ruby914 |
 May 18 2014, 10:30 PM May 18 2014, 10:30 PM
Post
#356
|
|
Senior Member    Group: Members Posts: 720 Joined: 26-April 09 From: Hawthorne, Ca Member No.: 10,305 Region Association: None |
Chris, I did the same thing you did, pulled my extra AT WRX cluster apart.
I wanted to see if the Suby cluster could be cut down, to just the face and circuit board, if it would fit within the 914 form. It is tight but I see possibilities. Kent, you had some dark areas on your gauge faces. Are you utilizing the clear polycarbonate prism looking part that channels the back light to the gauge numbers? That may give you uniform light even if you have to drill holes in it. Here is a photo of the post. Attached image(s) 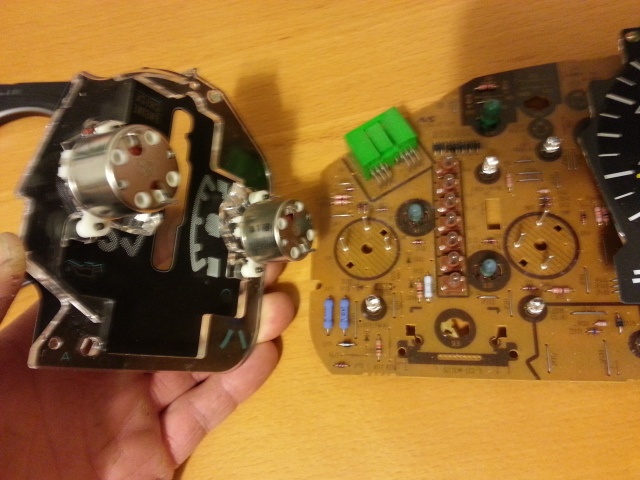
|
| Chris H. |
 May 19 2014, 06:07 AM May 19 2014, 06:07 AM
Post
#357
|
|
Senior Member     Group: Members Posts: 4,048 Joined: 2-January 03 From: Chicago 'burbs Member No.: 73 Region Association: Upper MidWest 
|
Wow weird. On the SVX pod there are no such posts. When you unscrew the gauges this is what you see:
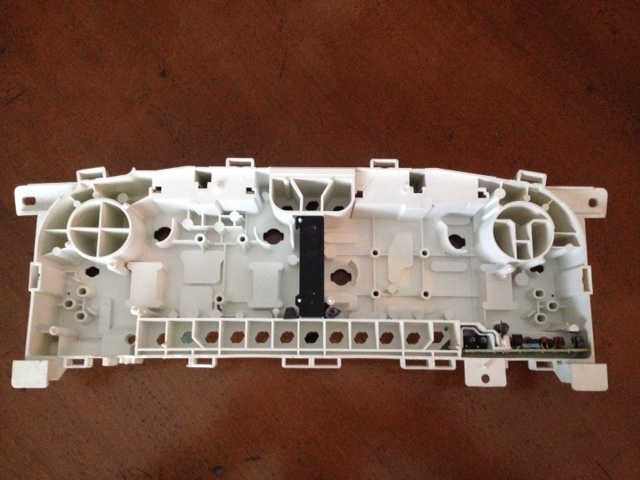 Just plastic. The "wiring" is a flat copper piece that runs on the back of the pod. I guess the screws actually complete the connection because I can't see anything else connected to them. 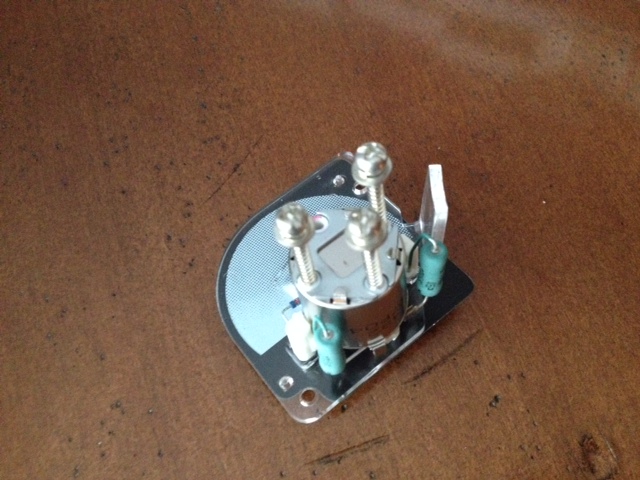 The SVX gauges are pretty big, about 4.5". The Impreza middle gauge circle (either speedo or tach, whichever you get) is about 100MM, just shy of 4". The smaller ones are about 3.6", 91mm-ish. The plastic silver surround is an overlay so you can take that out and cut the circular piece out without having to use that silver part. |
| 76-914 |
 May 19 2014, 08:08 AM May 19 2014, 08:08 AM
Post
#358
|
|
Repeat Offender & Resident Subaru Antagonist           Group: Members Posts: 13,634 Joined: 23-January 09 From: Temecula, CA Member No.: 9,964 Region Association: Southern California 
|
Wow weird. On the SVX pod there are no such posts. When you unscrew the gauges this is what you see:  Just plastic. The "wiring" is a flat copper piece that runs on the back of the pod. I guess the screws actually complete the connection because I can't see anything else connected to them.  The SVX gauges are pretty big, about 4.5". The Impreza middle gauge circle (either speedo or tach, whichever you get) is about 100MM, just shy of 4". The smaller ones are about 3.6", 91mm-ish. The plastic silver surround is an overlay so you can take that out and cut the circular piece out without having to use that silver part. 4.5" is about 114.3 mm which is fine for the large can and the Impreza middle gage is almost perfect. The smaller Impreza gages would need some buildup but easy to do. Those studs would be easy to attach power. If you go the Impreza route just pull those pins out of the circuit board and solder to wire leads. I'm not sure about the compatibility between the Impreza gages and the 6's though. (IMG:style_emoticons/default/poke.gif) I'll be looking for some Suby posts from you and Ross, now. |
| Chris H. |
 May 19 2014, 03:59 PM May 19 2014, 03:59 PM
Post
#359
|
|
Senior Member     Group: Members Posts: 4,048 Joined: 2-January 03 From: Chicago 'burbs Member No.: 73 Region Association: Upper MidWest 
|
And the loser of the filler neck bake off and therefore on the way to Kent's house is.......
The Honda filler!!! I really like the compact size of this one. It was close but the thing that makes this perfect for you and not me is that the "down tube" is angled. It's like it was made for the front trunk. I needed one to go straight down. By the way I was wrong on the inlet sizes, looks like they are 1" on both types but I was able to very easily stretch the 7/8 on to both fillers by setting the end in fairly hot (out of the tap) water for a few minutes. No problem at all, slid right on. 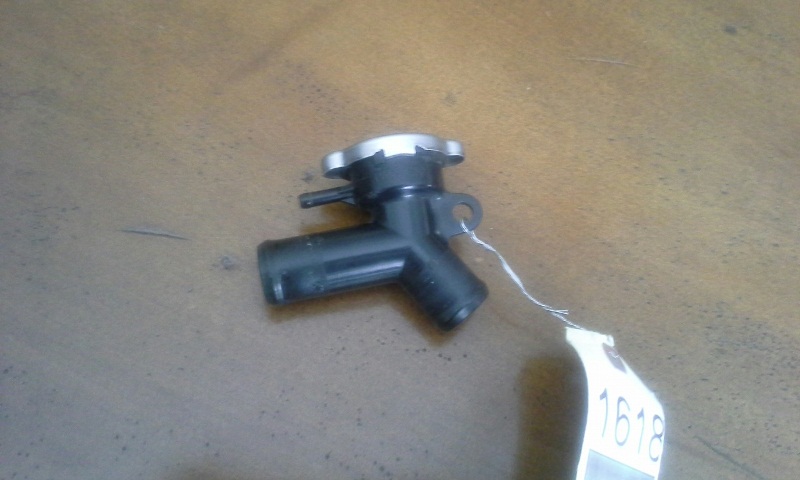 BTW I wish I lived closer. Would have come over and pressed my $@#*ing roll pin out of the pedal cluster. Used a punch and the damn thing snapped off in there. Now I can't seem to find a drill bit that will actually drill the punch since it's such a hard metal. Pain in my arse. I remember installing that thing and thinking it was pretty hard to get in there, but hey I figured it was the last time I'd have to do that! (IMG:style_emoticons/default/headbang.gif) 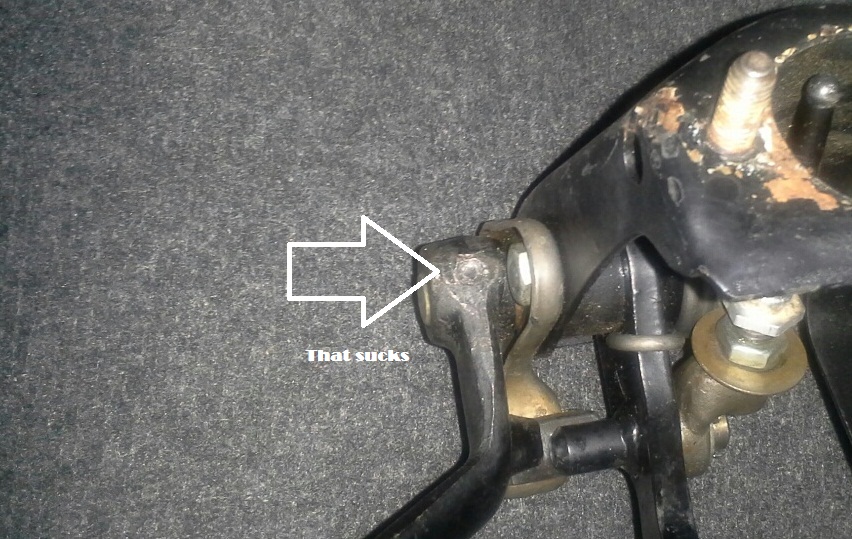 |
| 76-914 |
 May 19 2014, 06:04 PM May 19 2014, 06:04 PM
Post
#360
|
|
Repeat Offender & Resident Subaru Antagonist           Group: Members Posts: 13,634 Joined: 23-January 09 From: Temecula, CA Member No.: 9,964 Region Association: Southern California 
|
You won't believe what a perfect angle that is for my install. Perfect and thanks again, Chris. Be sure your punch is not a nail set. Those are pointed and will flare out the roll pin and cause it to grip even tighter. You can use a 6mm bolt for a drive pin/punch in a squeeze on that size roll pin. Be sure that the piece is on something heavy and solid when you strike it.
|
  |
2 User(s) are reading this topic (2 Guests and 0 Anonymous Users)
0 Members:

|
Lo-Fi Version | Time is now: 23rd November 2024 - 10:07 AM |
Invision Power Board
v9.1.4 © 2024 IPS, Inc.


