|
|
|
Porsche, and the Porsche crest are registered trademarks of Dr. Ing. h.c. F. Porsche AG.
This site is not affiliated with Porsche in any way. Its only purpose is to provide an online forum for car enthusiasts. All other trademarks are property of their respective owners. |
|
|

  |

| RichPugh |
 May 10 2020, 04:29 PM May 10 2020, 04:29 PM
Post
#1
|
|
Member  Group: Members Posts: 121 Joined: 28-October 14 From: Baltimore, MD Member No.: 18,068 Region Association: MidAtlantic Region |
So... the engine is in (I’m using the NaroEscape -6 front mount) and, seeming because of the mount, it sits lower than stock. The Patrick Motorsport -6 shift linkage rod I intended on using, wont work. It interferes with the engine case and doesn’t seem to have a workaround. If the engine were 1/4” - 1/2” higher at the firewall, it looks like it would slip in, but alas, the engine is not going anywhere, lol.
I’m tempted to just bend the PMS bar end upward (maybe a couple inches from where it goes from the narrow shank to the bar rod) to give it the clearance but that would change the angle it goes into the rear bushing and connects to the shift lever... so I figured I’d ask if anyone else had an issue with the bar hitting the engine case and any options I might have. I’m OK with modding the old -4 rod too. Might be worth a shot but figured I’d ask here first. The other threads I found look like the stock rod modded is the move. Thanks Rich 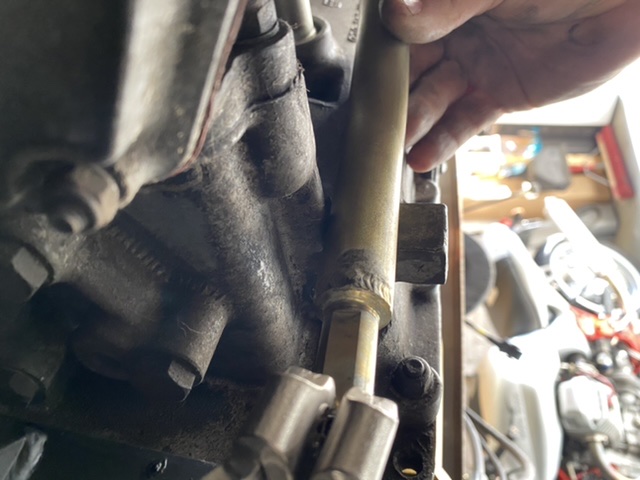 |
   |

 
|
| Coondog |
May 10 2020, 04:49 PM
Post
#2
|
|
Advanced Member Group: Members Posts: 2,089 Joined: 24-September 15 From: Apple Valley Calif Member No.: 19,195 Region Association: Southern California |
I would call James Patrick on Monday. He had to bend my previously installed PMS bar when i had Bens exhaust setup installed.
|
|
|
|
| porschetub |
May 10 2020, 05:37 PM
Post
#3
|
|
Advanced Member Group: Members Posts: 4,696 Joined: 25-July 15 From: New Zealand Member No.: 18,995 Region Association: None |
QUOTE(RichPugh @ May 11 2020, 10:29 AM)  So... the engine is in (I’m using the NaroEscape -6 front mount) and, seeming because of the mount, it sits lower than stock. The Patrick Motorsport -6 shift linkage rod I intended on using, wont work. It interferes with the engine case and doesn’t seem to have a workaround. If the engine were 1/4” - 1/2” higher at the firewall, it looks like it would slip in, but alas, the engine is not going anywhere, lol. I’m tempted to just bend the PMS bar end upward (maybe a couple inches from where it goes from the narrow shank to the bar rod) to give it the clearance but that would change the angle it goes into the rear bushing and connects to the shift lever... so I figured I’d ask if anyone else had an issue with the bar hitting the engine case and any options I might have. I’m OK with modding the old -4 rod too. Might be worth a shot but figured I’d ask here first. The other threads I found look like the stock rod modded is the move. Thanks Rich You will have to bend it in 2 place otherwise you will get binding @ the gearbox connection,are you tail or side shift? ,my engine was the same being too low,it appeared the repop factory bulkhead mount was welded in the right place but something wasn't right with the engine mount so I cut and rewelded it. The whole issue if the engine is perfectly positioned in the enginebay its makes it very hard to remove because of the tinware which is hard to remove (in situ) and is in the way. I don't remember of hand how much I moved it upward but I did found the engine was more horizontal in the opening instead of being nose down if that makes sence,the rear "breast plate tin " fitted better in to the rubber seal also so I knew I was close to correct. I build a custom shifter set up from the crappy rear rod the PO supplied and ditched the factory alloy coupler,now running 2 uni-joints and a double metal bush console. 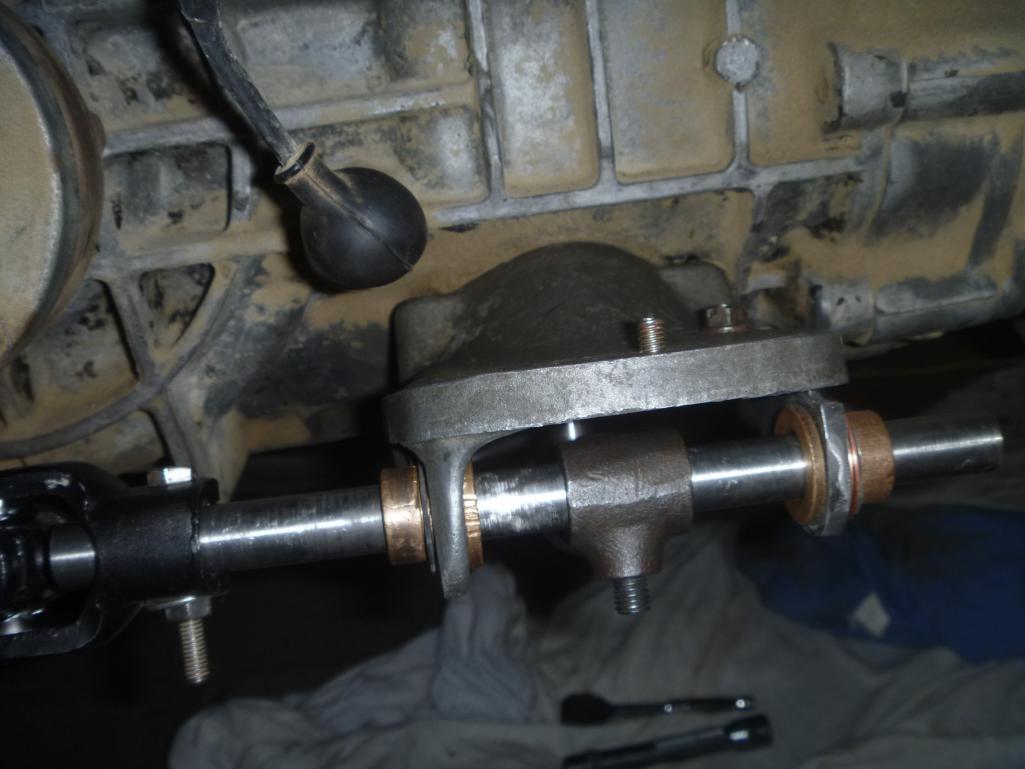 Lots of measuring cutting ,adjusting ,machining and pulling it apart many times (IMG:style_emoticons/default/headbang.gif) but it works very well....huge improvement. Good luck. |
|
|
|
| Mark Henry |
May 11 2020, 05:59 PM
Post
#4
|
|
that's what I do! Group: Members Posts: 20,065 Joined: 27-December 02 From: Port Hope, Ontario Member No.: 26 Region Association: Canada |
Good job I also built my own shift rod, this is the best set-up for the 914 side shiftier.
Chris at tangerine can hook you up with this shift rod set-up. http://www.tangerineracing.com/transmission.htm Rich the rod you have can be modified to work. (IMG:style_emoticons/default/sawzall-smiley.gif) (IMG:style_emoticons/default/smash.gif) (IMG:style_emoticons/default/welder.gif) (IMG:style_emoticons/default/idea.gif) (IMG:style_emoticons/default/smash.gif) (IMG:style_emoticons/default/welder.gif) |
|
|
|
| roblav1 |
May 11 2020, 07:59 PM
Post
#5
|
|
Senior Member Group: Members Posts: 528 Joined: 18-September 12 From: KY Member No.: 14,943 Region Association: MidAtlantic Region |
My conversion side shifter mechanism was a straight shot, no bends. I made it from scratch and used an Apex helicopter joint. Also made my own nylon bushing rear slider in a lathe. Ben's heater boxes were not in the way.
Your mount must be pretty low. |
|
|
|
| Retroracer |
May 11 2020, 10:04 PM
Post
#6
|
|
Senior Member Group: Members Posts: 608 Joined: 7-July 13 From: Bend OR Member No.: 16,100 Region Association: Pacific Northwest |
I purchased the PMS shift rod for my -6 conversion; side shifter and Maddog motor mount. I had a minor clearance issue with it rubbing the engine casing, with the mount welded as per guidance.
I could see from how the engine tin aligned with the apron surround - the rubber seal was not sitting correctly- that the engine was (maybe) 5mm too low in the chassis. It looked as though if I raised the engine slightly then both issues would be helped. I made up some shims to go under the 911 sport mounts from 6mm material; and that did the trick. Not sure if your mount allows the same hack... So - my advice would be to double check the engine is sitting at approx. the right height, before modifying the linkage? - Tony |
 |
|
| sixnotfour |
May 11 2020, 10:24 PM
Post
#7
|
|
914 Wizard Group: Members Posts: 10,406 Joined: 12-September 04 From: Life Elevated..planet UT. Member No.: 2,744 Region Association: Rocky Mountains |
Looks like they are needing some dimensional guidance for proper installed height..
unlike the 911 bulkhead style,,[washers] there is no adjust ability |
|
|
|
| sixnotfour |
May 17 2020, 11:17 AM
Post
#8
|
|
914 Wizard Group: Members Posts: 10,406 Joined: 12-September 04 From: Life Elevated..planet UT. Member No.: 2,744 Region Association: Rocky Mountains |
:blink:Naro needs to post about this..Most want factory engi.height..Pretty simple info sheet would benefit them and customers...
naro how does the engine tin fit ? patrick factory height Attached image(s) 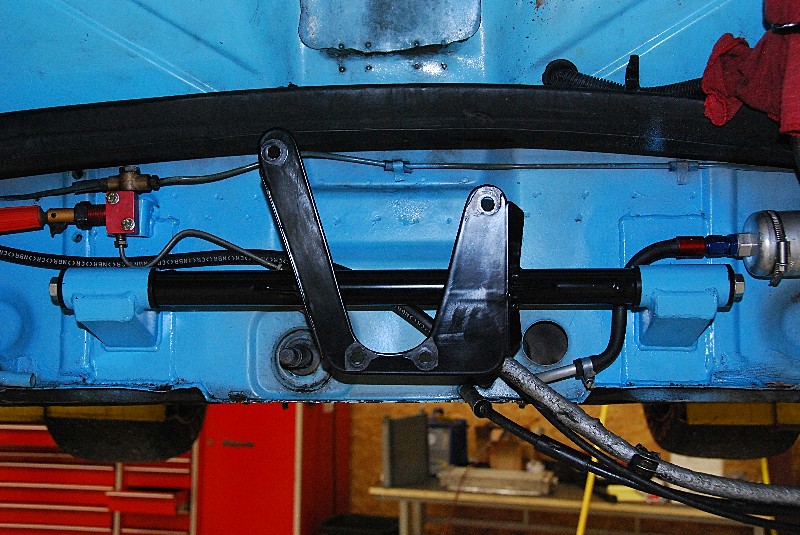 
|
|
|
|
| RichPugh |
Sep 20 2020, 06:43 PM
Post
#9
|
|
Member Group: Members Posts: 121 Joined: 28-October 14 From: Baltimore, MD Member No.: 18,068 Region Association: MidAtlantic Region |
Thanks everyone. Just getting back around to this issue now. Had I known the engine was going to cause shift rod interference sitting as low as it does, I would have asked Translog to weld it in 3/4" higher. I welded it exactly where they say to weld it. It looks exactly like that blue pic above.
The rod only moved back/forth and rotates so I'm not dealing with any side clearance issues with the heat exchanger box... just the bottom of the engine case. I think I can "notch" it where it will go under the case, back up and straight into the side shifter guide without any funky geometry. -Rich  |
|
|
|
| RichPugh |
Sep 20 2020, 06:44 PM
Post
#10
|
|
Member Group: Members Posts: 121 Joined: 28-October 14 From: Baltimore, MD Member No.: 18,068 Region Association: MidAtlantic Region |
Maybe something like this...
  |
|
|
|
| mb911 |
Sep 21 2020, 05:39 AM
Post
#11
|
|
914 Guru Group: Members Posts: 6,801 Joined: 2-January 09 From: Burlington wi Member No.: 9,892 Region Association: Upper MidWest |
I had the same issue with a conversion I did for a customer. I had to cut the bare half way through in 2 spots about 3 inches apart. Then I welded a flat plate in to reinforce. This allowed me to clear the case just enough.
|
|
|
|
| JOEPROPER |
Sep 21 2020, 07:20 AM
Post
#12
|
|
The answer is "no" unless you ask... Group: Members Posts: 1,184 Joined: 21-November 15 From: White Plains New York Member No.: 19,387 Region Association: North East States |
QUOTE(mb911 @ Sep 21 2020, 07:39 AM) I had the same issue with a conversion I did for a customer. I had to cut the bare half way through in 2 spots about 3 inches apart. Then I welded a flat plate in to reinforce. This allowed me to clear the case just enough. This looks to be a pretty straight forward modification to the rod. @mb911 Is welding the mount 3/4" higher and option or will this cause other interference or geometry problems with the driveline, tin, "levelness" angle etc...??? |
|
|
|
| mb911 |
Sep 21 2020, 07:35 AM
Post
#13
|
|
914 Guru Group: Members Posts: 6,801 Joined: 2-January 09 From: Burlington wi Member No.: 9,892 Region Association: Upper MidWest |
I would highly recommend it .. I personally have now gone to suggestions of using either the Rich Johnson mount or the maddog OEM style to eliminate this issue. The heater valves are also an issue that has to be worked around with the Naro mount.
|
|
|
|
| RichPugh |
Sep 21 2020, 08:13 AM
Post
#14
|
|
Member Group: Members Posts: 121 Joined: 28-October 14 From: Baltimore, MD Member No.: 18,068 Region Association: MidAtlantic Region |
QUOTE(mb911 @ Sep 21 2020, 09:35 AM) I would highly recommend it .. I personally have now gone to suggestions of using either the Rich Johnson mount or the maddog OEM style to eliminate this issue. The heater valves are also an issue that has to be worked around with the Naro mount. Yea... I havent even gotten round to the heat valves (IMG:style_emoticons/default/rolleyes.gif) I'm just hoping I get SOME heat to defrost the windshield. Just worked out some fresh air blower motor gremlins yesterday so fingers crossed, LOL. Yea I agree... I'd say if Naro made the bottom of their mount plates like 3/4" taller so it lifted the engine up 3/4" but still lined up the same on the firewall ridges, it would be much better. The engine tins would seal correctly, the shift rod clearance wouldnt be an issue, and the only other issues would be with the line to the rear brake valve and whatever I'm not seeing yet with the heater valves. I dont see the benefit of it sitting as low as it does now. (IMG:style_emoticons/default/confused24.gif) |
|
|
|
| PanelBilly |
Sep 21 2020, 08:47 AM
Post
#15
|
|
914 Guru Group: Members Posts: 5,796 Joined: 23-July 06 From: Kent, Wa Member No.: 6,488 Region Association: Pacific Northwest |
I’m using my oem rod but rotated it so it clears the engine and Ben’s HEs. I had new holes drilled for the pins on both ends. If you’re going that way be sure to drill them correctly. It’s not just a hole, it bevels back so the pin seats properly. A machine shop will have the right drill to do this. The fox hangs down a bit and I plan to cut it and add a straight section one of these days.
|
|
|
|
| live free & drive |
Sep 21 2020, 09:55 AM
Post
#16
|
|
Member Group: Members Posts: 154 Joined: 29-June 16 From: New Hampshire Member No.: 20,159 Region Association: None |
I'm dealing with this same issue right now. I had already welded in the Naro mounts before understanding their issues.
I recently got a hold of a Patrick mount which looks to mount the engine in the proper place according to some measurements taken by another member. The Patrick cross bar can be swapped in, as the spacing is nearly the same. It raises the motor .62" ,which is good, but it also pushes the motor .60" closer to the firewall; which with the Naro mount already being .5" closer puts the engine 1.1" closer to the firewall altogether bringing the axles and trans mounts that much further forward, potentially causing more issues. I have decided to modify the Naro cross-bar by welding on some machined/threaded offset extensions which will push the bar up .75" hopefully placing everything in proper alignment (although still .5" forward). Another note is that neither the Naro nor Patrick mounts were anything close to flat at the engine interface- both being out about .125". I was able to "adjust" the Naro mount to flat by percussion persuasion and light lapping, but due to the design the Patrick mount is non adjustable. There are aspects of each companies engine mount that I think are better than the others solutions, but neither are perfect. |
|
|
|
| mb911 |
Sep 21 2020, 11:58 AM
Post
#17
|
|
914 Guru Group: Members Posts: 6,801 Joined: 2-January 09 From: Burlington wi Member No.: 9,892 Region Association: Upper MidWest |
I do have a fixture to modify the stock rod if you using stock engine height.. Let me know if anyone needs that mod done..
|
|
|
|
| RichPugh |
Sep 21 2020, 08:42 PM
Post
#18
|
|
Member Group: Members Posts: 121 Joined: 28-October 14 From: Baltimore, MD Member No.: 18,068 Region Association: MidAtlantic Region |
|
|
|
|
| RichPugh |
Sep 21 2020, 08:46 PM
Post
#19
|
|
Member Group: Members Posts: 121 Joined: 28-October 14 From: Baltimore, MD Member No.: 18,068 Region Association: MidAtlantic Region |
I thought it was hitting one of the header pipes but its actually tapping the heat exchanger box so with a little luck adjusting it, it MIGHT clear as is... otherwise, modifying the bar even in the clocked repositioned orientation would probably do the trick. We'll see. I'm gonna snug the set screws down a bit and see how far the side to side action actually moves the bar.
https://www.youtube.com/watch?v=62qQqz_GOT4 |
|
|
|
| RichPugh |
Sep 24 2020, 11:27 AM
Post
#20
|
|
Member Group: Members Posts: 121 Joined: 28-October 14 From: Baltimore, MD Member No.: 18,068 Region Association: MidAtlantic Region |
Anyone else using a stock -4 bar just clocked/re-indexed? Does it throw off the shifting due to the geometry of the bar end at the gear selector lever at the side?
|
|
|
|
|
1 User(s) are reading this topic (1 Guests and 0 Anonymous Users)
0 Members:

|
Lo-Fi Version | Time is now: 19th April 2024 - 12:01 PM |
Invision Power Board
v9.1.4 © 2024 IPS, Inc.