|
|
|
Porsche, and the Porsche crest are registered trademarks of Dr. Ing. h.c. F. Porsche AG.
This site is not affiliated with Porsche in any way. Its only purpose is to provide an online forum for car enthusiasts. All other trademarks are property of their respective owners. |
|
|

  |

| Front yard mechanic |
 Jun 14 2021, 09:09 PM Jun 14 2021, 09:09 PM
Post
#41
|
|
Senior Member  Group: Members Posts: 1,205 Joined: 23-July 15 From: New Mexico Member No.: 18,984 Region Association: None |
Try TPC global / auto color library. mfg. code 6406 formula 43477 nice sprayer by the way
|
   |

 
|
| BeatNavy |
Jun 15 2021, 06:56 AM
Post
#42
|
|
Certified Professional Scapegoat Group: Members Posts: 2,933 Joined: 26-February 14 From: Easton, MD Member No.: 17,042 Region Association: MidAtlantic Region |
QUOTE(john77 @ Jun 14 2021, 08:46 PM)  @BeatNavy I've been considering turbines for when I paint my car. From my research Fuji say you want a 4 stage or 5 stage for automotive paint, so it looks like you're on the right track. I follow this painter on youtube and he seemed pretty impressed with the Fuji model above that one: https://www.youtube.com/watch?v=GWcDgILe13k I was about to pull the trigger on a Q5 so I'm really interested to see how this works out for you. Hey @john77 and all. Sorry, I should have posted an update, but I'm really bad about that. I'm also really bad about taking the time to take good pictures to document process and progress. So I ended up buying that Fuji mini mite 4 platinum as shown in the pic. It was super easy to setup, and, when the time came, to clean. I also did pickup some L60E from the place in New Castle, DE. Guy was very friendly and helpful, and I'll go back up there when I need paint to do the whole car. This time I was just respraying/practicing on the roll bar and sail panels, which were going to be covered with new vinyl anyway. My overall thoughts and impressions: I'm very happy with the turbine setup. Again, it's so easy to setup, it's portable, uses 110v, is relatively quiet, there's very little overspray, and I think it can do an excellent job. Cleaning was also very straightforward. I managed to laydown some pretty nice sections of paint, but my lack of experience (both overall and with this system) definitely led to some "opportunities for improvement" as my boss might say. First thing I noticed was that I didn't get the paint thick enough initially. The guy at the store told me to mix it 4 to 1 (paint and reducer), which I did. I also told him I need a slow-drying reducer, which is what is recommended for turbine sprayers. The paint ended up too thin and I ended up with runs on the sail panel. The next time I actually used the Ford #4 cup that comes with the sprayer to test viscosity, and that's when I realized I needed significantly less reducer. Mistake #1. Mistake #2 was initially trying to correct the runs by reducing airflow, which I now understand is the last adjustment that should be used. You want airflow for complete atomization of paint. I should have been a) using correct viscosity/mixture as noted above, and b) using paint flow adjustment before air flow adjustment. You can see some orange peel in the pics below, particularly on sail panel. Mistake #3 (and 4, and 5, and 6, etc., etc.) was simply technique. I practiced on some sheet metal I had. Naturally some of the best paint I laid down is now on that scrap sheet metal (IMG:style_emoticons/default/smile.gif) I found painting the rollbar a challenge as it's hard to reach over and get a consistent angle of attack and motion on something that goes across the whole car. The sail panels were easier, naturally, but then I was dealing with the fact that I bollocksed them up the first time with too thin of paint and had to clean off the runs with solvent. That left a surface that was less than ideal for the second attempt. After a bunch of sanding and attempts at paint correction I was pretty happy with the overall results in the sense that I learned quite a bit, it looks much better than it did, and the new sail panel vinyl looks great and covers up my mistakes anyway (IMG:style_emoticons/default/biggrin.gif) Bottom line: I like this setup a LOT and I'm looking forward to trying again. It just won't happen until I'm ready to tackle the whole enchilada. Here are some random pics of the pain on the car, just for viewing pleasure. Again, not even sure what order these are in from raw paint to post-paint correction attempt. 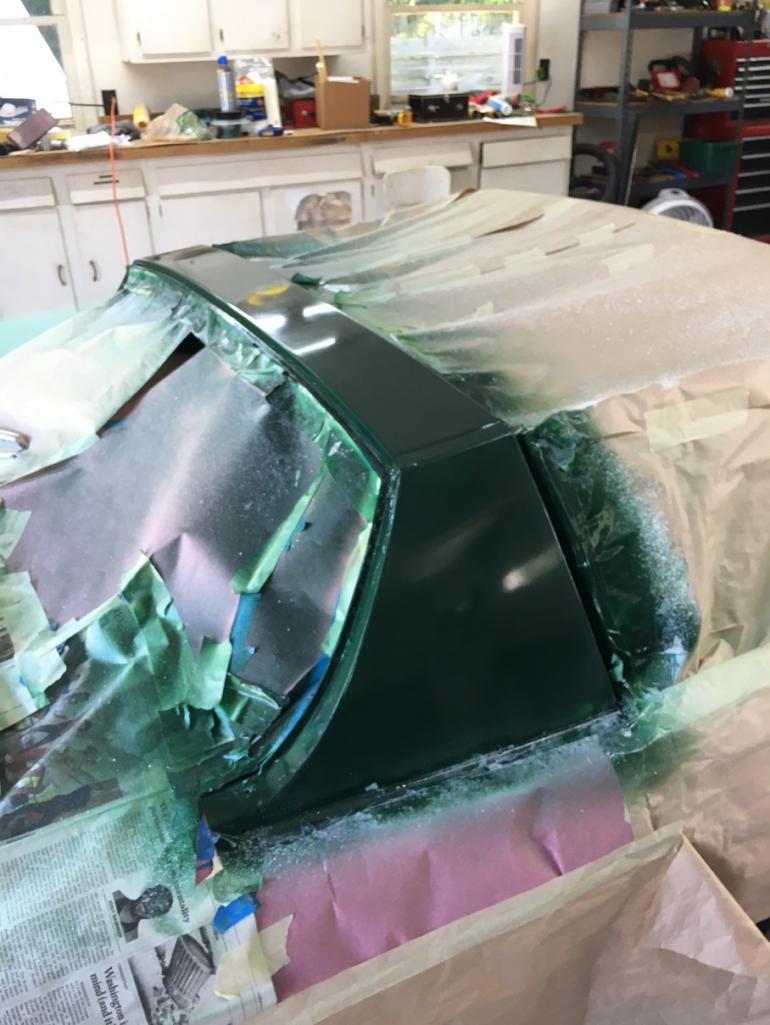 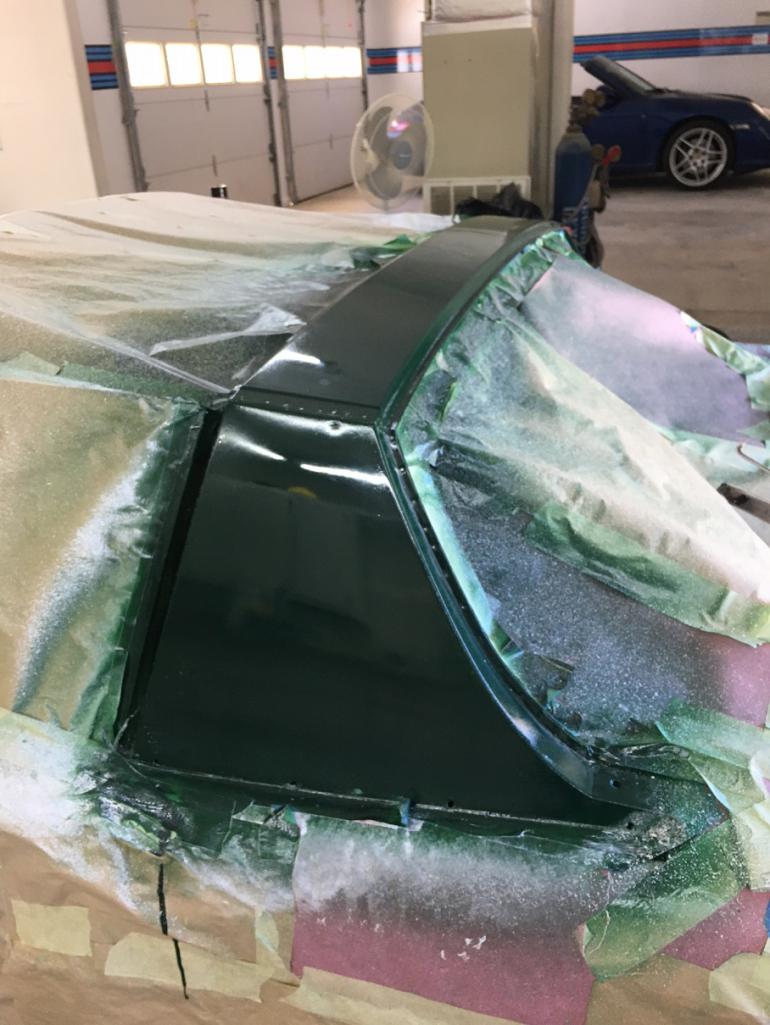 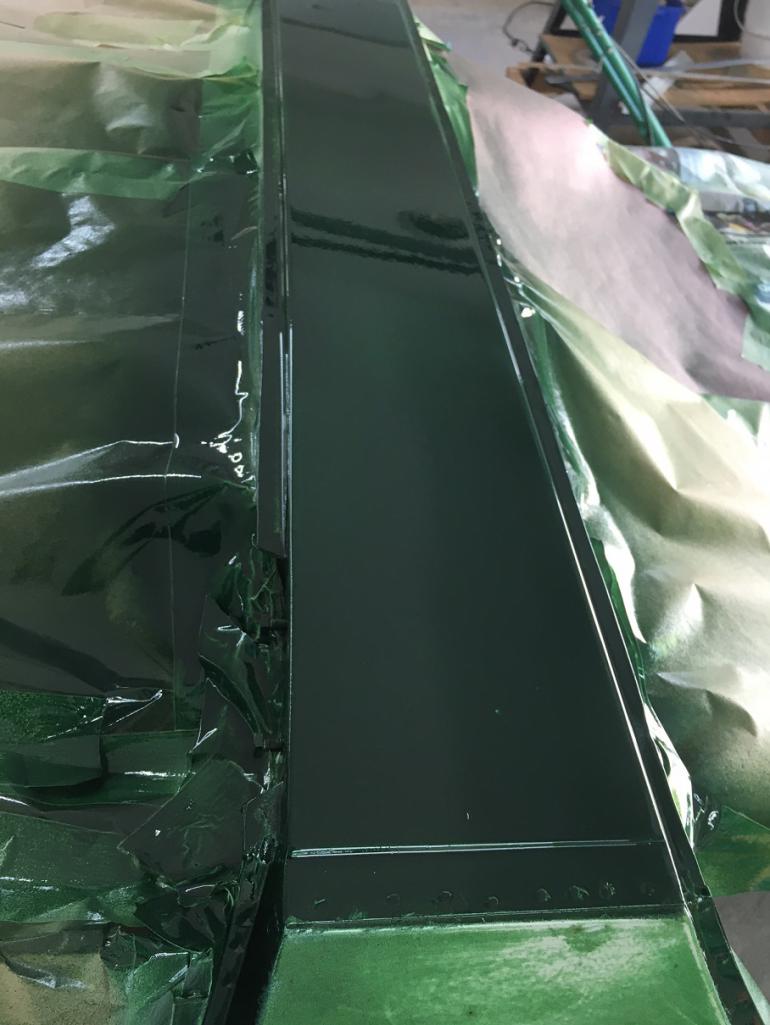 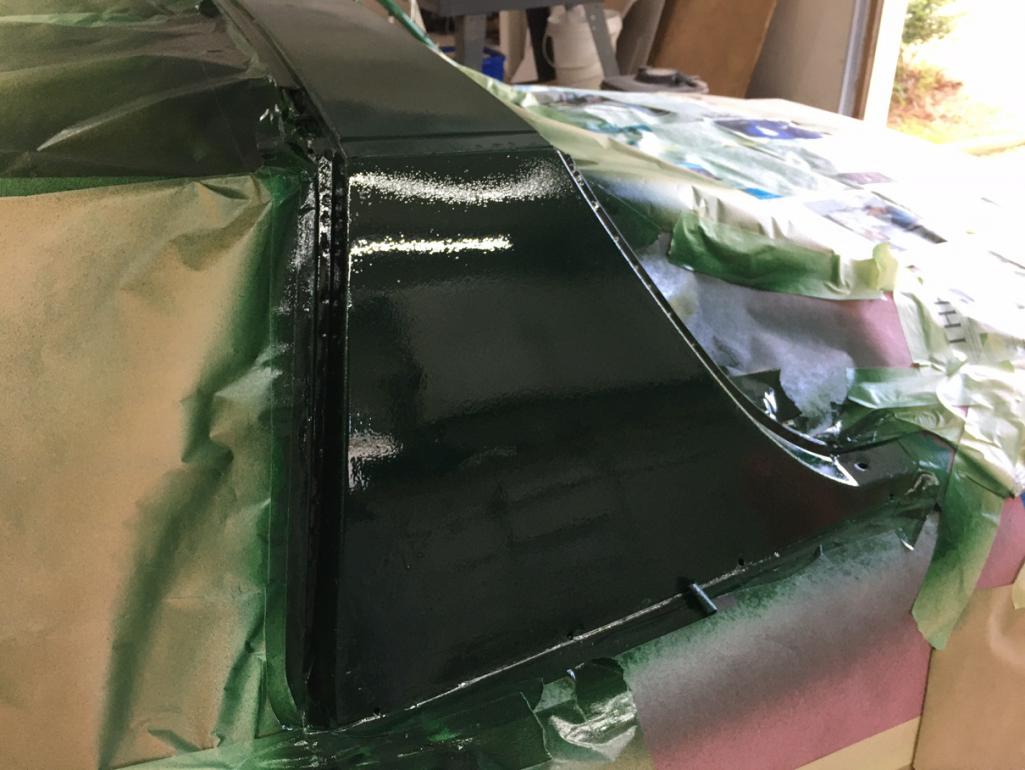 |
 |
|
| john77 |
Jun 15 2021, 01:19 PM
Post
#43
|
|
Senior Member Group: Members Posts: 621 Joined: 21-February 14 From: Los Angeles Member No.: 17,027 Region Association: Southern California |
@BeatNavy Looks great... i mean, you can always sand the orange peel out of the clear anyway, right? (IMG:style_emoticons/default/biggrin.gif)
What size air cap did you use? It seems like they come with a 1.3mm, which is fine for primer, but the 1mm or 0.8 is better for base/clear? QUOTE(BeatNavy @ Jun 15 2021, 05:56 AM) QUOTE(john77 @ Jun 14 2021, 08:46 PM) @BeatNavy I've been considering turbines for when I paint my car. From my research Fuji say you want a 4 stage or 5 stage for automotive paint, so it looks like you're on the right track. I follow this painter on youtube and he seemed pretty impressed with the Fuji model above that one: https://www.youtube.com/watch?v=GWcDgILe13k I was about to pull the trigger on a Q5 so I'm really interested to see how this works out for you. Hey @john77 and all. Sorry, I should have posted an update, but I'm really bad about that. I'm also really bad about taking the time to take good pictures to document process and progress. So I ended up buying that Fuji mini mite 4 platinum as shown in the pic. It was super easy to setup, and, when the time came, to clean. I also did pickup some L60E from the place in New Castle, DE. Guy was very friendly and helpful, and I'll go back up there when I need paint to do the whole car. This time I was just respraying/practicing on the roll bar and sail panels, which were going to be covered with new vinyl anyway. My overall thoughts and impressions: I'm very happy with the turbine setup. Again, it's so easy to setup, it's portable, uses 110v, is relatively quiet, there's very little overspray, and I think it can do an excellent job. Cleaning was also very straightforward. I managed to laydown some pretty nice sections of paint, but my lack of experience (both overall and with this system) definitely led to some "opportunities for improvement" as my boss might say. First thing I noticed was that I didn't get the paint thick enough initially. The guy at the store told me to mix it 4 to 1 (paint and reducer), which I did. I also told him I need a slow-drying reducer, which is what is recommended for turbine sprayers. The paint ended up too thin and I ended up with runs on the sail panel. The next time I actually used the Ford #4 cup that comes with the sprayer to test viscosity, and that's when I realized I needed significantly less reducer. Mistake #1. Mistake #2 was initially trying to correct the runs by reducing airflow, which I now understand is the last adjustment that should be used. You want airflow for complete atomization of paint. I should have been a) using correct viscosity/mixture as noted above, and b) using paint flow adjustment before air flow adjustment. You can see some orange peel in the pics below, particularly on sail panel. Mistake #3 (and 4, and 5, and 6, etc., etc.) was simply technique. I practiced on some sheet metal I had. Naturally some of the best paint I laid down is now on that scrap sheet metal (IMG:style_emoticons/default/smile.gif) I found painting the rollbar a challenge as it's hard to reach over and get a consistent angle of attack and motion on something that goes across the whole car. The sail panels were easier, naturally, but then I was dealing with the fact that I bollocksed them up the first time with too thin of paint and had to clean off the runs with solvent. That left a surface that was less than ideal for the second attempt. After a bunch of sanding and attempts at paint correction I was pretty happy with the overall results in the sense that I learned quite a bit, it looks much better than it did, and the new sail panel vinyl looks great and covers up my mistakes anyway (IMG:style_emoticons/default/biggrin.gif) Bottom line: I like this setup a LOT and I'm looking forward to trying again. It just won't happen until I'm ready to tackle the whole enchilada. Here are some random pics of the pain on the car, just for viewing pleasure. Again, not even sure what order these are in from raw paint to post-paint correction attempt. |
|
|
|
| rjames |
Jun 15 2021, 01:41 PM
Post
#44
|
|
I'm made of metal Group: Members Posts: 4,111 Joined: 24-July 05 From: Shoreline, WA Member No.: 4,467 Region Association: Pacific Northwest |
|
|
|
|
| BeatNavy |
Jun 15 2021, 02:01 PM
Post
#45
|
|
Certified Professional Scapegoat Group: Members Posts: 2,933 Joined: 26-February 14 From: Easton, MD Member No.: 17,042 Region Association: MidAtlantic Region |
QUOTE(john77 @ Jun 15 2021, 03:19 PM) @BeatNavy Looks great... i mean, you can always sand the orange peel out of the clear anyway, right? (IMG:style_emoticons/default/biggrin.gif) Yeah, I mean some of it came out really nice actually. I think I could have laid more paint down on some of it to give myself more chance for polishing / paint correction, but I am pretty happy with this setup's potential (once the operator gains at least a little experience). Another benefit I didn't mention previously: it could be the paint I used, or more likely it's the minimal overspray, but the garage just smelled better. With my old paint / preval sprayers (which are absolutely horrible, don't get me wrong), the whole garage would smell toxic for an hour or more. With this thing I almost felt like I didn't need the respirator - no mistake, I definitely wore it, but there was nowhere near the overpowering smell of chemicals I was used to before. Oh the wasted brain cells.... (IMG:style_emoticons/default/blink.gif) QUOTE(john77 @ Jun 15 2021, 03:19 PM) @BeatNavy What size air cap did you use? It seems like they come with a 1.3mm, which is fine for primer, but the 1mm or 0.8 is better for base/clear? It comes with the 1.3 needle / air cap, but you can definitely buy the others. According to the chart they provide (below), that's right in there for auto base color paint application. For primers, especially epoxy stuff, you need to go larger. As mentioned, one of my mistakes initially was reducing 1 to 4 (as instructed by retailer). I should have gone by the Ford #4 runout cup (supplied) time as in the chart below. 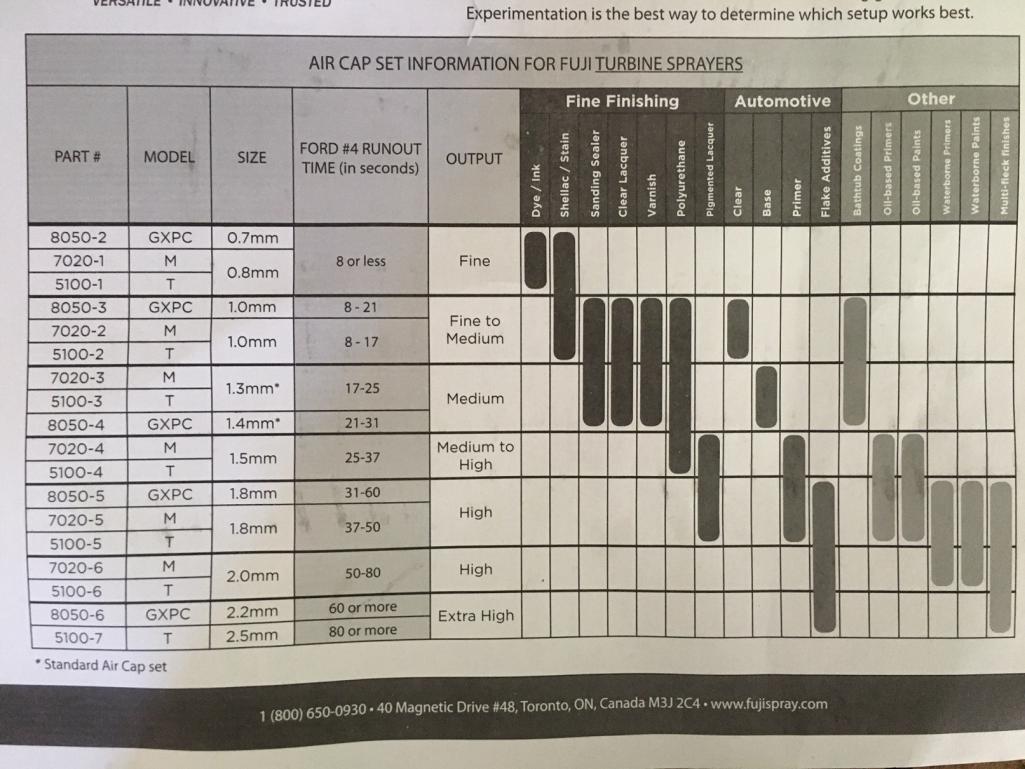 |
|
|
|
| 930cabman |
Jun 15 2021, 04:20 PM
Post
#46
|
|
Advanced Member Group: Members Posts: 3,544 Joined: 12-November 20 From: Buffalo Member No.: 24,877 Region Association: North East States |
Is anyone using single stage? as opposed to base/clear?
|
|
|
|
| crash914 |
Jun 17 2021, 03:12 PM
Post
#47
|
|
its a mystery to me Group: Members Posts: 1,827 Joined: 17-March 03 From: Marriottsville, MD Member No.: 434 Region Association: MidAtlantic Region |
Try Marty's auto paint in Baltimore/Rosedale.
7600 Pulaski Hwy, Baltimore, MD 21237 or FinishMaster at 180 Penrod Ct suite c, Glen Burnie, MD 21061 |
|
|
|
|
1 User(s) are reading this topic (1 Guests and 0 Anonymous Users)
0 Members:

|
Lo-Fi Version | Time is now: 27th September 2024 - 08:23 AM |
Invision Power Board
v9.1.4 © 2024 IPS, Inc.