|
|

|
Porsche, and the Porsche crest are registered trademarks of Dr. Ing. h.c. F. Porsche AG.
This site is not affiliated with Porsche in any way. Its only purpose is to provide an online forum for car enthusiasts. All other trademarks are property of their respective owners. |
|
|
  |
| tygaboy |
 Aug 21 2022, 04:45 PM Aug 21 2022, 04:45 PM
Post
#201
|
|
914 Guru      Group: Members Posts: 5,451 Joined: 6-October 15 From: Petaluma, CA Member No.: 19,241 Region Association: Northern California 
|
Well, sorry to report there will be no more drawings as I've decided to cancel this project.
This piece of crap chassis is rusty and I just don't think I can deal with it... (IMG:style_emoticons/default/av-943.gif) Interesting though and another example of "Every 914 has rust. You just haven't found it yet..." No sign of failure anywhere along the seam sealer but mositure found its way in. Granted, it's right behind the rear tire so I'm sure this area got hammered from underneath, but anyway, there you go. Attached image(s) 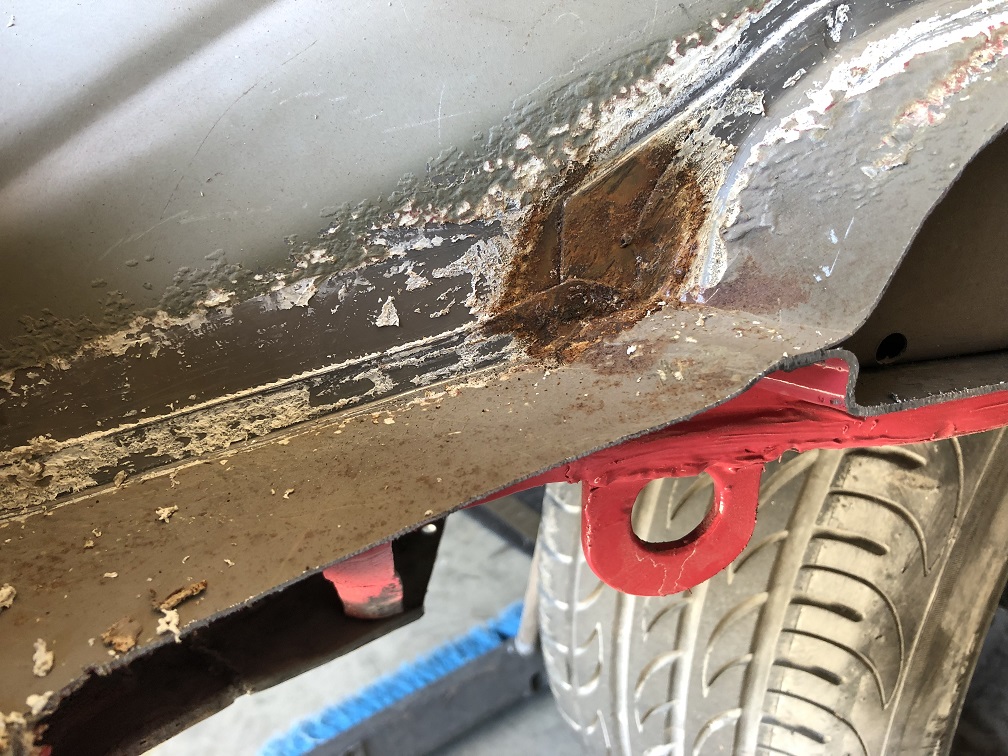 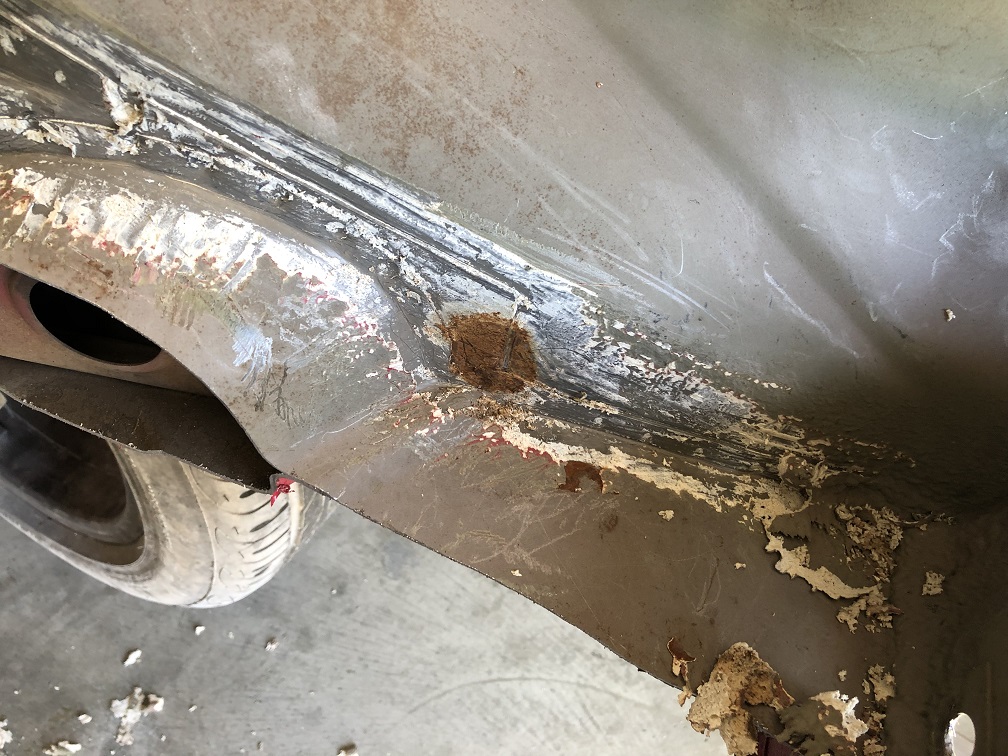
|
| tygaboy |
 Aug 21 2022, 04:52 PM Aug 21 2022, 04:52 PM
Post
#202
|
|
914 Guru      Group: Members Posts: 5,451 Joined: 6-October 15 From: Petaluma, CA Member No.: 19,241 Region Association: Northern California 
|
The rust discovery was part of removing aaaaaaallllll the remnants of the factory trans mount cross bar and trunk floor panel. Messy, messy work. I need to get all this out of the way so I can weld in the spreader plates that will support the Ferrari trans mount cross bars.
You can see the approach was to remove all the unneeded material. That "hole" is where the factory trans mount cross bar used to attach. With the removal complete, I reshaped the open area to accept the spreader plate. Attached thumbnail(s) 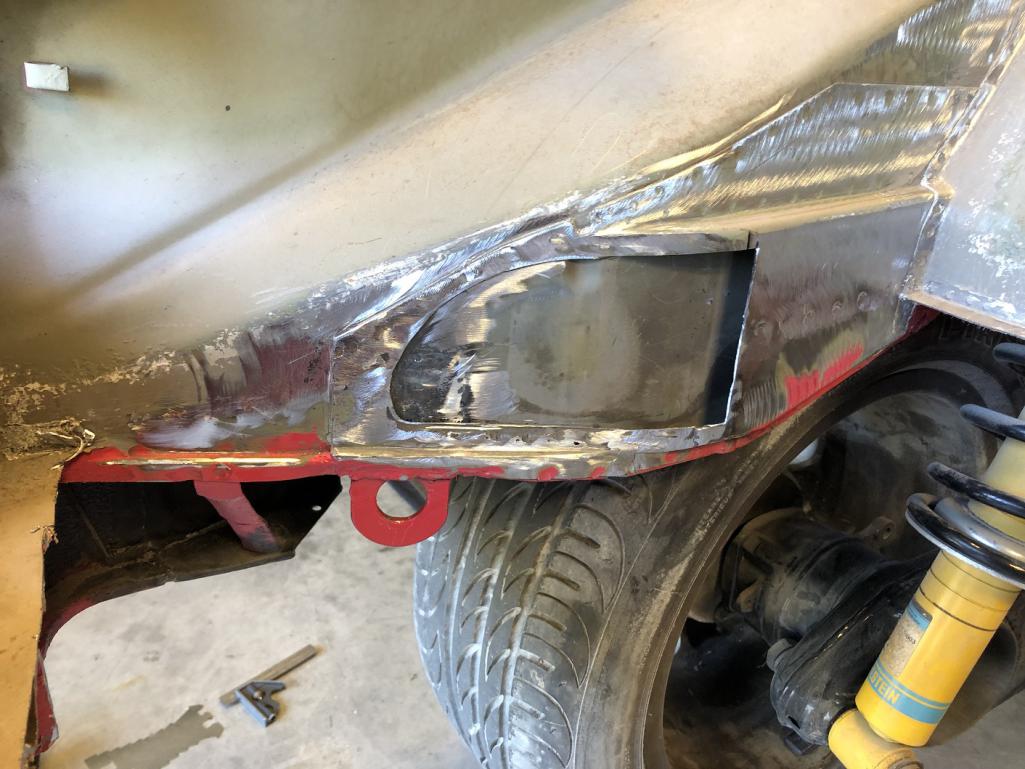
|
| tygaboy |
 Aug 21 2022, 04:59 PM Aug 21 2022, 04:59 PM
Post
#203
|
|
914 Guru      Group: Members Posts: 5,451 Joined: 6-October 15 From: Petaluma, CA Member No.: 19,241 Region Association: Northern California 
|
Then it's the typical fab process: (IMG:style_emoticons/default/sawzall-smiley.gif) (IMG:style_emoticons/default/smash.gif)
- make a cardboard template of the needed shape - transfer it to metal - cut, fit, trim, fit - bend to match the curve of the area to which it'll be welded - fit, trim, bend, rebend, un-bend, fit... You get the picture. You can see how the spreader plate will weld to the inside wall of that opening then turn 90 degrees and get welded to the outer wall of the box section. Attached thumbnail(s) 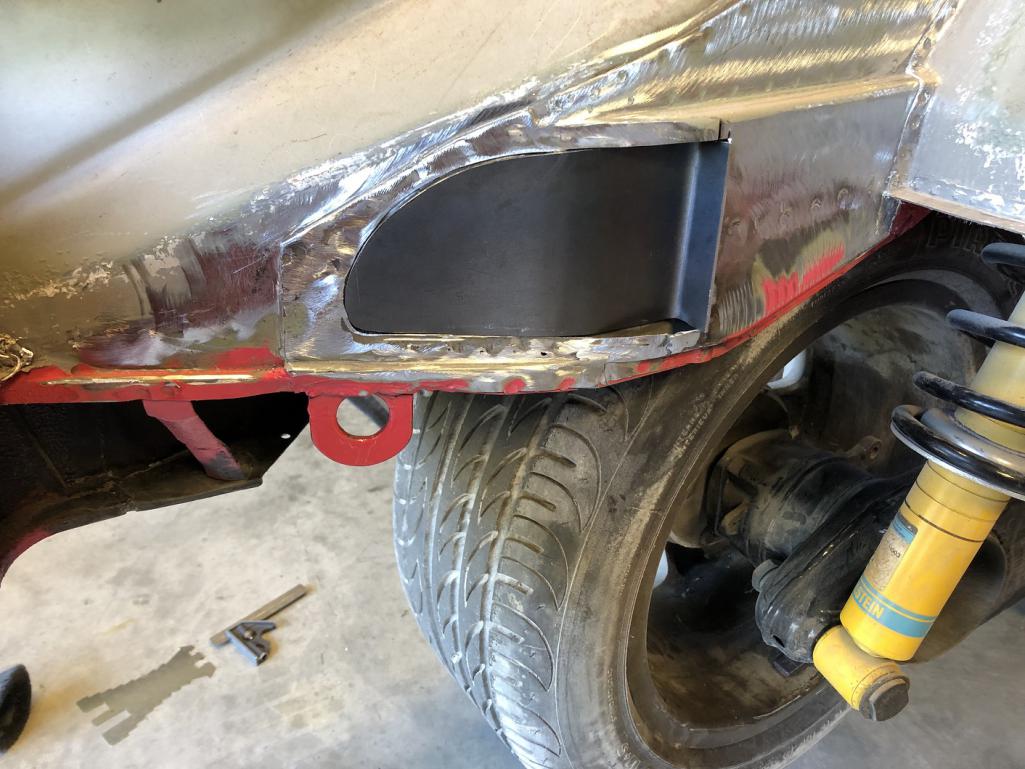
|
| tygaboy |
 Aug 21 2022, 05:08 PM Aug 21 2022, 05:08 PM
Post
#204
|
|
914 Guru      Group: Members Posts: 5,451 Joined: 6-October 15 From: Petaluma, CA Member No.: 19,241 Region Association: Northern California 
|
I'm really happy with the fit I was able to get. And with that done, I drilled for the plug welds. With those complete, the part is clamped in place. A quick check of each hole shows that the spreader plate sits flush against the inner panel, just like it should.
Note that there will be another spreader plate that covers this one and extends to support the upper cross bar. It'll make sense once I get to that piece. Attached thumbnail(s) 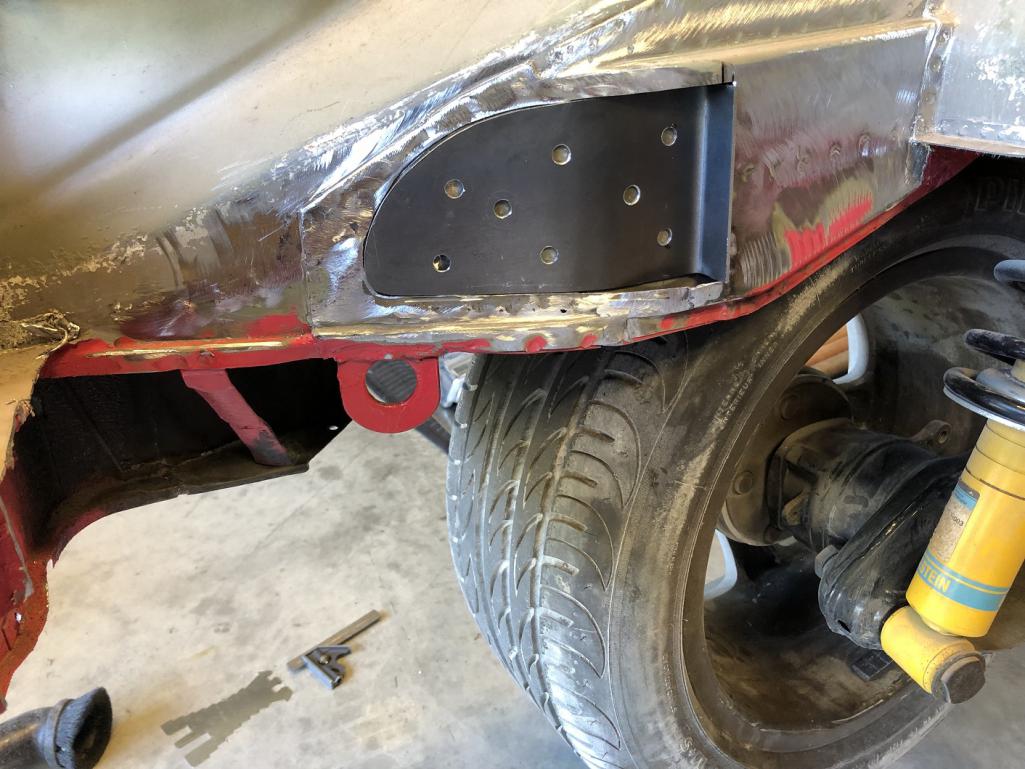 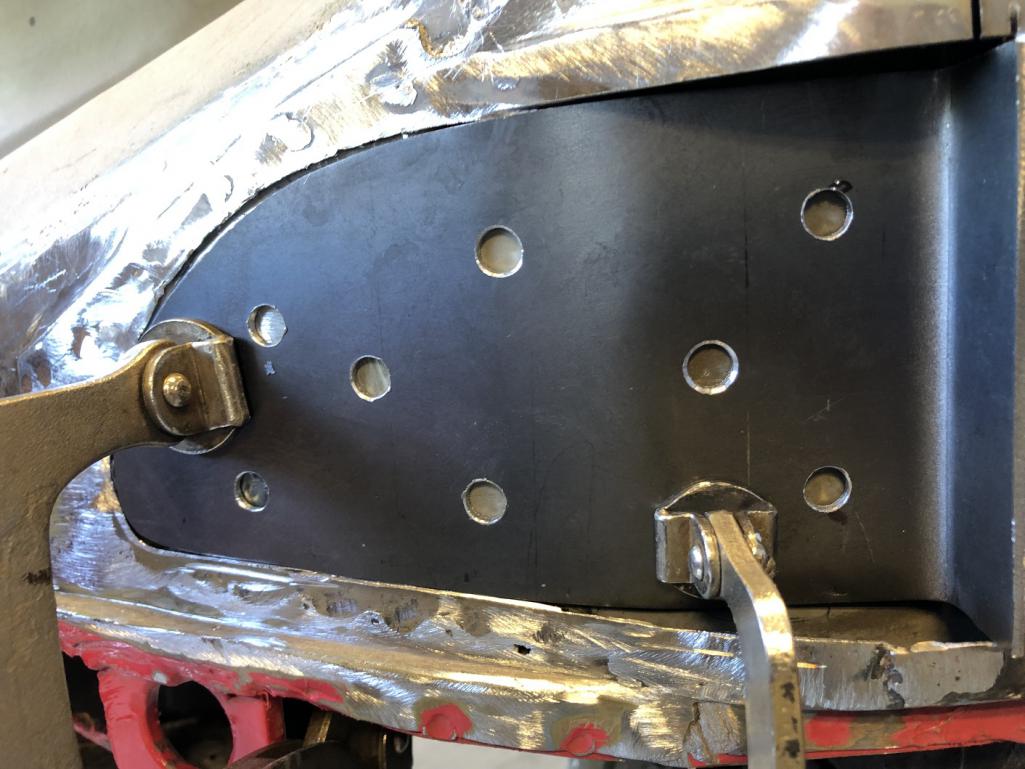
|
| tygaboy |
 Aug 22 2022, 05:09 PM Aug 22 2022, 05:09 PM
Post
#205
|
|
914 Guru      Group: Members Posts: 5,451 Joined: 6-October 15 From: Petaluma, CA Member No.: 19,241 Region Association: Northern California 
|
More messy work grinding all those factory spot welds and removing sheetmetal to prep the passenger side for the lower cross bar's inner spreader plate. But it's all set to go. I got a nice fit here, as well. Tommorrow I'd like to get these welded in and maybe even get the outer spreader plates fab'd, too.
Probably one more messy session and I'll have all the unneeded sheet metal removed from engine bay/trunk area. (IMG:style_emoticons/default/sawzall-smiley.gif) Attached thumbnail(s) 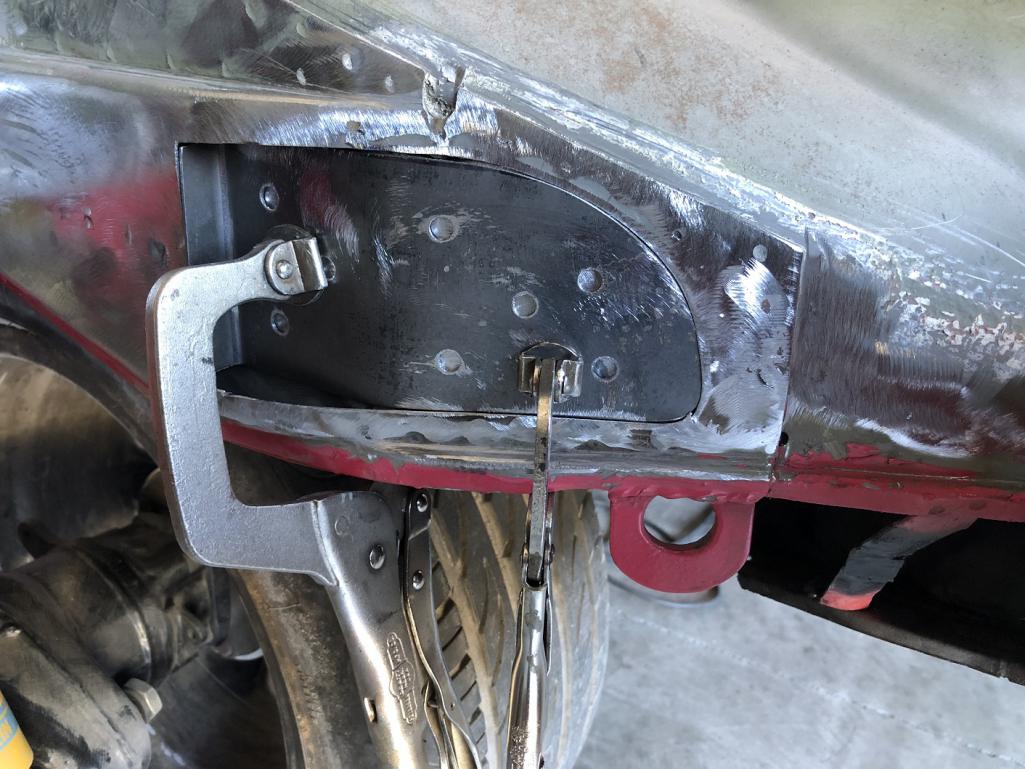
|
| mgarrison |
 Aug 23 2022, 01:15 PM Aug 23 2022, 01:15 PM
Post
#206
|
|
Member   Group: Members Posts: 369 Joined: 14-February 20 From: Chandler, AZ Member No.: 23,922 Region Association: Southwest Region 
|
Such outstanding, uber cool fab work as usual Chris! (IMG:style_emoticons/default/pray.gif)
|
| Cairo94507 |
 Aug 23 2022, 01:24 PM Aug 23 2022, 01:24 PM
Post
#207
|
|
Michael           Group: Members Posts: 10,091 Joined: 1-November 08 From: Auburn, CA Member No.: 9,712 Region Association: Northern California 
|
A master fabricator for sure. (IMG:style_emoticons/default/beerchug.gif)
|
| tygaboy |
 Aug 23 2022, 02:41 PM Aug 23 2022, 02:41 PM
Post
#208
|
|
914 Guru      Group: Members Posts: 5,451 Joined: 6-October 15 From: Petaluma, CA Member No.: 19,241 Region Association: Northern California 
|
Prep'ing the inner spreader plates includes coating the surfaces with weld through primer.
Your PSA for today: Don't weld directly on weld through primer - never weld anything but clean metal. Weld through primer is designed to liquify and galvanize the metal around the weld to help protect from future corrosion. It helps provide permanent rust protection on the inner edges of the welded metal pieces. So, prep the area by spraying on the primer (the stuff I used happens to be black in color) then remove it completely from the area where you'll be welding. I just positioned the spreader plate and scratched where the plug welds would be then came back with a cheap-o Harbor Freight 3/8 belt sander and cleaned each weld location. Attached thumbnail(s) 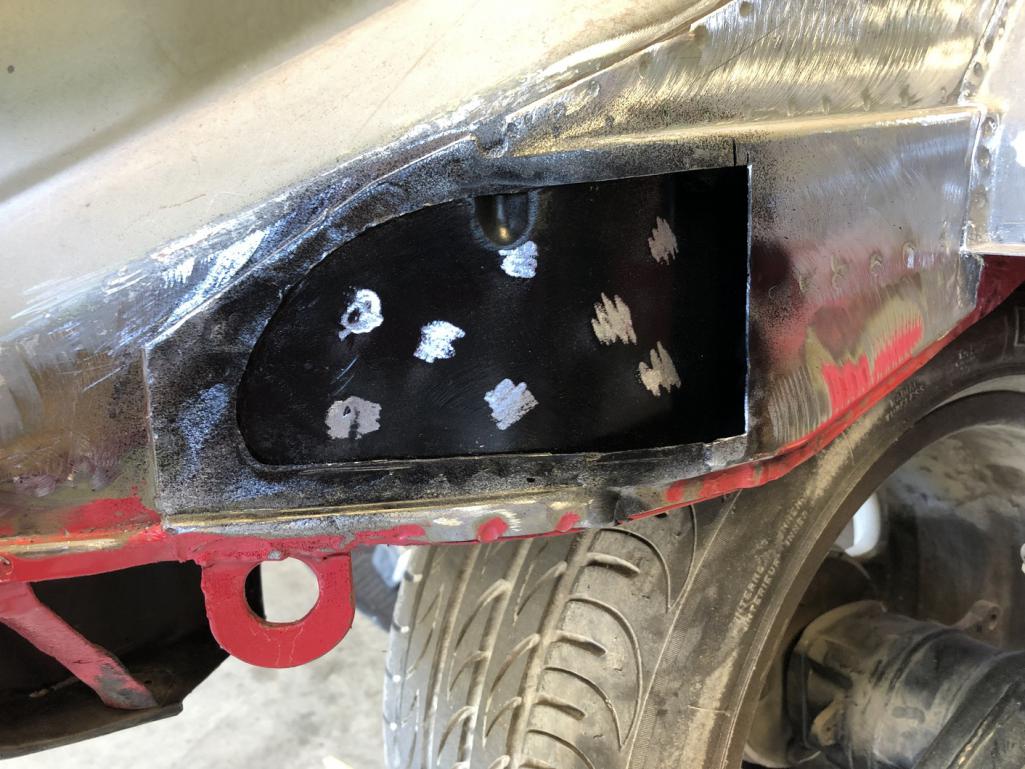
|
| tygaboy |
 Aug 23 2022, 02:43 PM Aug 23 2022, 02:43 PM
Post
#209
|
|
914 Guru      Group: Members Posts: 5,451 Joined: 6-October 15 From: Petaluma, CA Member No.: 19,241 Region Association: Northern California 
|
Plug welded! I use MIG for this as it's faster and easier, at least for me. I get what I think is a really nice result without having to worry about getting all comfortable, like I would need to do if TIGing.
I'll come back and edge weld in a few locations, just to lock the plate in a bit more. Attached thumbnail(s) 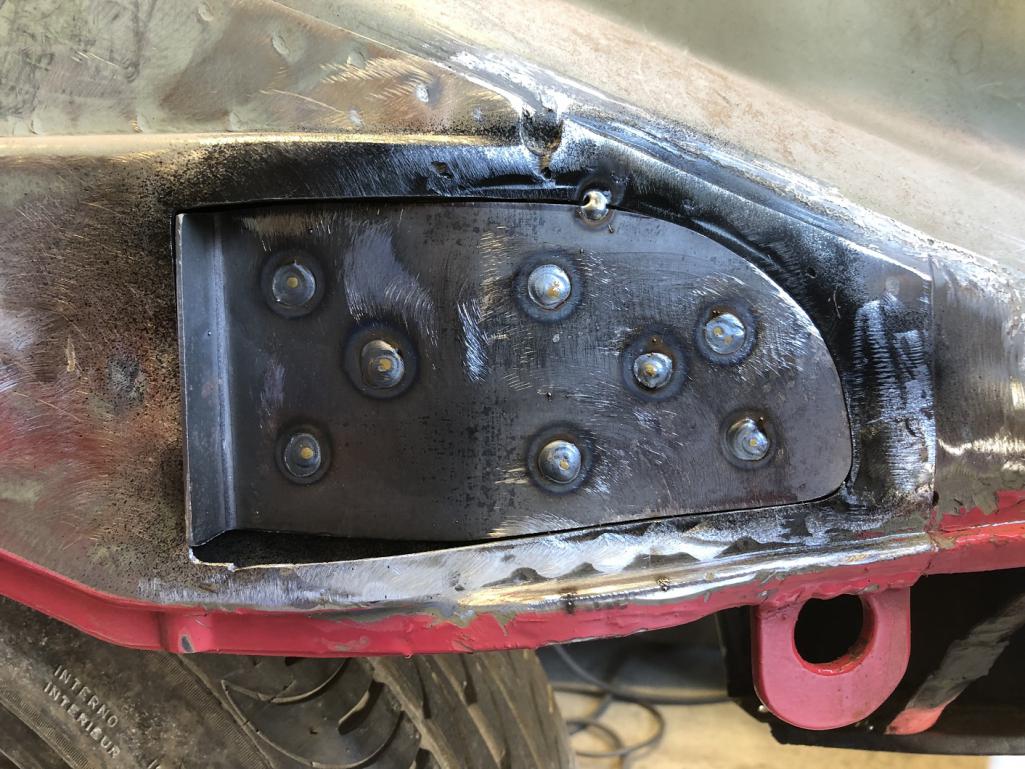
|
| tygaboy |
 Aug 23 2022, 02:46 PM Aug 23 2022, 02:46 PM
Post
#210
|
|
914 Guru      Group: Members Posts: 5,451 Joined: 6-October 15 From: Petaluma, CA Member No.: 19,241 Region Association: Northern California 
|
Next was to final trim the 90 degree return and weld that edge from top to bottom.
A bit of sanding to smooth out all the areas where the outer spreader plate will sit then hit the whole area with weld through primer. Ready for the outer plate fab and installation. Attached thumbnail(s) 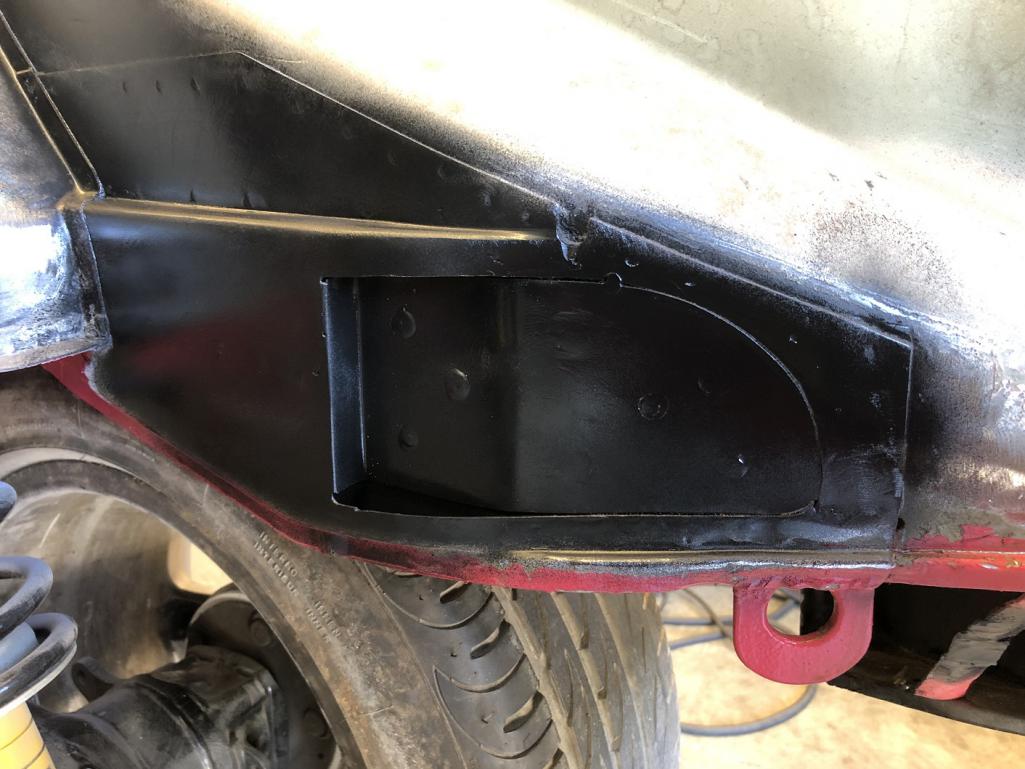
|
| tygaboy |
 Aug 23 2022, 03:03 PM Aug 23 2022, 03:03 PM
Post
#211
|
|
914 Guru      Group: Members Posts: 5,451 Joined: 6-October 15 From: Petaluma, CA Member No.: 19,241 Region Association: Northern California 
|
@mgarrison @Cairo94507 - Thanks for the kind words, gentlemen.
I will say that this build has me really pushing to do the best I possibly can, not that I don't do that all the time, just that this car feels like it could turn out to be something really special. |
| tygaboy |
 Aug 24 2022, 02:31 PM Aug 24 2022, 02:31 PM
Post
#212
|
|
914 Guru      Group: Members Posts: 5,451 Joined: 6-October 15 From: Petaluma, CA Member No.: 19,241 Region Association: Northern California 
|
Today, I grabbed the factory 360 trans mount. This is quite a piece! It's WAY lighter than it looks and a quick rough fit suggests it could be adapted to work in the 914 - but it's quite bulky looking and hides a lot of the cool-factor. Maybe it can be sliced up and that rear hanger section could be used?
The good news is that if this gets used or not, the plating I've done is still required so no lost effort... so far. (IMG:style_emoticons/default/shades.gif) Anyway, multiple options are always good. Much more to do before final decisions are made. Attached thumbnail(s) 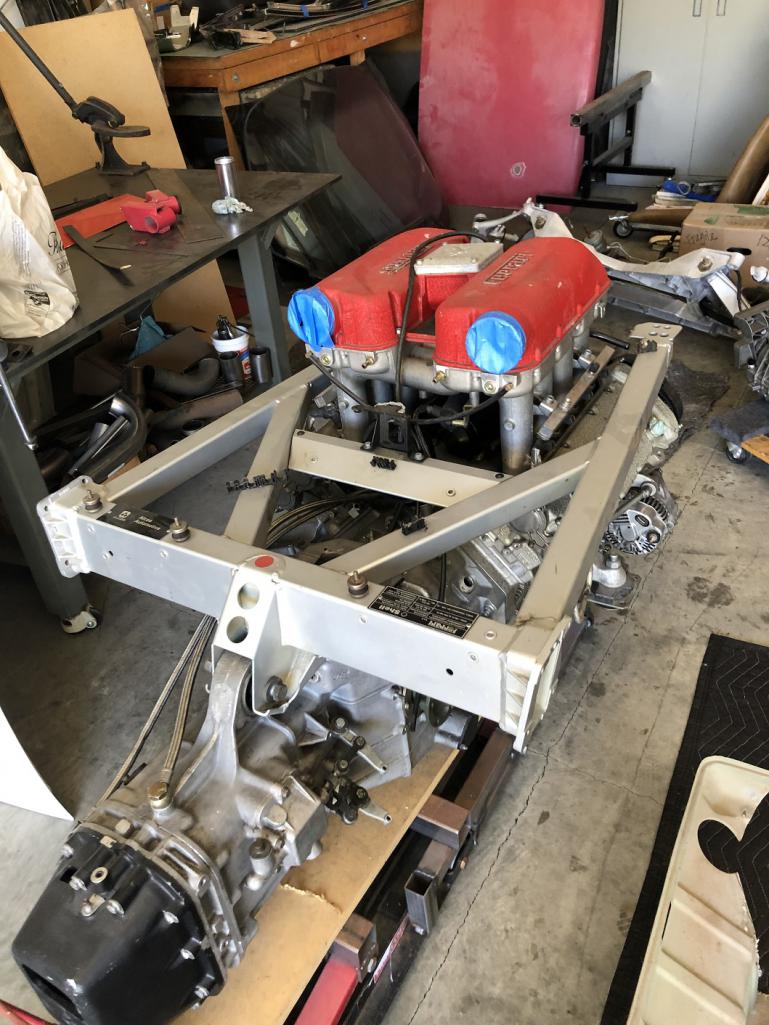
|
| ClayPerrine |
 Aug 24 2022, 02:39 PM Aug 24 2022, 02:39 PM
Post
#213
|
|
Life's been good to me so far.....                Group: Admin Posts: 15,901 Joined: 11-September 03 From: Hurst, TX. Member No.: 1,143 Region Association: NineFourteenerVille 
|
Today, I grabbed the factory 360 trans mount. This is quite a piece! It's WAY lighter than it looks and a quick rough fit suggests it could be adapted to work in the 914 - but it's quite bulky looking and hides a lot of the cool-factor. Maybe it can be sliced up and that rear hanger section could be used? The good news is that if this gets used or not, the plating I've done is still required so no lost effort... so far. (IMG:style_emoticons/default/shades.gif) Anyway, multiple options are always good. Much more to do before final decisions are made. Suggestion... use the rear portion of the factory 360 trans mount in the back. Then take the remains of the mount after you cut the trans crossbar off of it, and put it under the engine to support the motor mounts. Then add risers on the rear to reconnect it it to the trans crossbar. Make it bolt to the trans crossbar so you can remove it to get the engine out of the car. My mental 3d modeling says it should work. But I am not there to examine it in person. Clay |
| tygaboy |
 Aug 24 2022, 05:47 PM Aug 24 2022, 05:47 PM
Post
#214
|
|
914 Guru      Group: Members Posts: 5,451 Joined: 6-October 15 From: Petaluma, CA Member No.: 19,241 Region Association: Northern California 
|
Suggestion... use the rear portion of the factory 360 trans mount in the back. Then take the remains of the mount after you cut the trans crossbar off of it, and put it under the engine to support the motor mounts. Then add risers on the rear to reconnect it it to the trans crossbar. Make it bolt to the trans crossbar so you can remove it to get the engine out of the car. My mental 3d modeling says it should work. But I am not there to examine it in person. Clay @ClayPerrine - Clay - After playing around with that mount (note that it's aluminum), it's just too much not the look I want. Your suggestion about reusing part of it? The wall thickness is way too thin for a support structure. When you put this piece in context with the rest of the 360 chassis, it's pretty clear it's about tying together the right/left sides of the rear section of the Ferrari and providing places to mount a few light weight items. A case of "close, but no cigar". I went to the metal store today and stocked up on 1" x 3" x .095 wall tube. Martin and I worked up some changes to the last design that adds an outrigger from the cradle to the long, just ahead of the suspension console. Give me a few days and I hope to have V1 of the cradle underway. |
| steuspeed |
 Aug 25 2022, 01:13 AM Aug 25 2022, 01:13 AM
Post
#215
|
|
Senior Member    Group: Members Posts: 1,008 Joined: 12-July 11 From: Portland, Oregon Member No.: 13,308 Region Association: Pacific Northwest |
QUOTE (IMG:style_emoticons/default/agree.gif) 100%. (Another massive Rush nerd..... (IMG:style_emoticons/default/aktion035.gif) ) Clay Couple walks by by place last summer. Takes a look at my collection. 2 914s, Alfa Alfetta, Scirocco Mk1. Working Man playing out the garage. He says, all these cars are turning into Red Barchettas. I say, Yes.... yes they are. |
| steuspeed |
 Aug 25 2022, 01:44 AM Aug 25 2022, 01:44 AM
Post
#216
|
|
Senior Member    Group: Members Posts: 1,008 Joined: 12-July 11 From: Portland, Oregon Member No.: 13,308 Region Association: Pacific Northwest |
I would go with the Raspberry, but with those red valve covers it needs to be silver or gunmetal imo. Something like that to show it off. I would be looking at paint chips next to the covers. Porsche Marathon Blue Metallic might be an option?
Ferrari Grigio Ferro https://rossoautomobili.com/blogs/magazine/...-ferrari-silver Trunk mods, excellent! POORARI love it! |
| tygaboy |
 Aug 25 2022, 01:05 PM Aug 25 2022, 01:05 PM
Post
#217
|
|
914 Guru      Group: Members Posts: 5,451 Joined: 6-October 15 From: Petaluma, CA Member No.: 19,241 Region Association: Northern California 
|
Before plating for the upper cross bar, I have to get that whole area to be in the same plane so the spreader plate has no gaps behind it.
A quick trim of some 18 ga and I have that piece ready to weld in. Attached thumbnail(s) 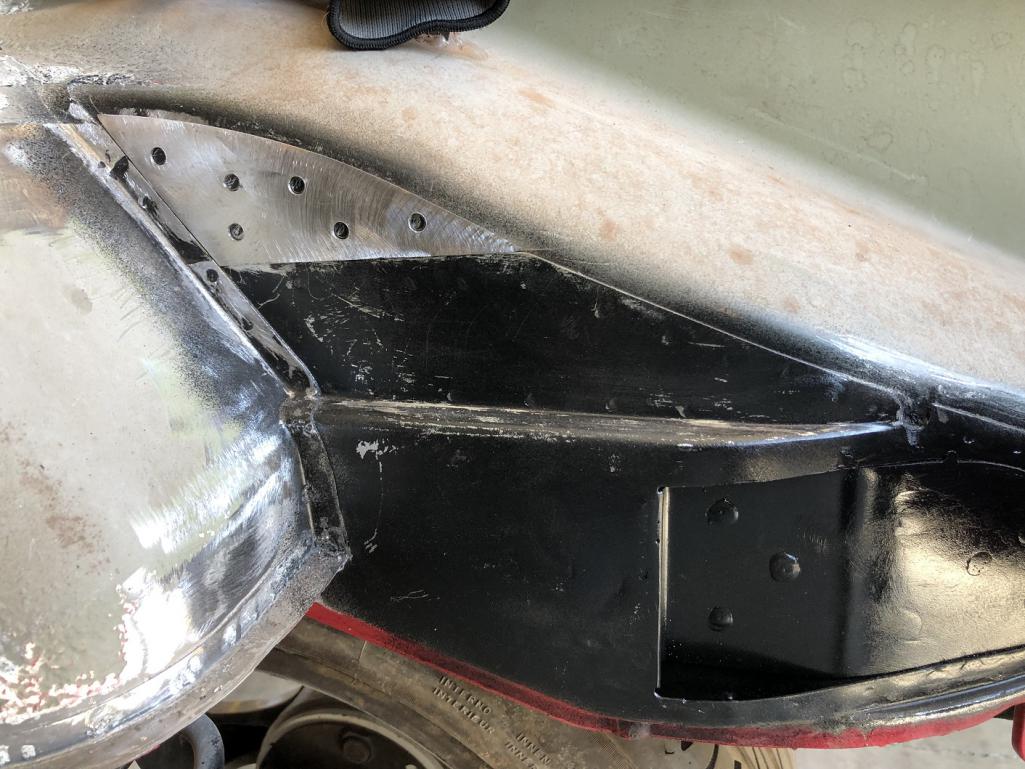
|
| tygaboy |
 Aug 25 2022, 01:06 PM Aug 25 2022, 01:06 PM
Post
#218
|
|
914 Guru      Group: Members Posts: 5,451 Joined: 6-October 15 From: Petaluma, CA Member No.: 19,241 Region Association: Northern California 
|
First rough fit of the 12 ga upper spreader plate. Still some trimming / fitting to do but you get the idea.
Attached thumbnail(s) 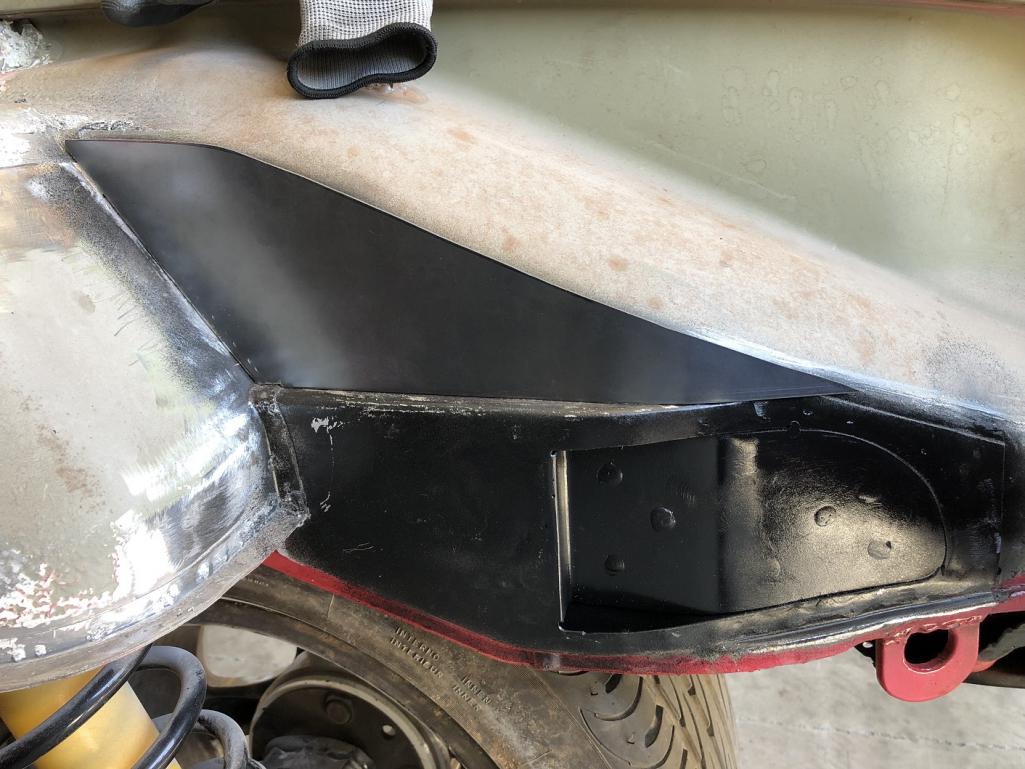
|
| ClayPerrine |
 Aug 26 2022, 06:16 AM Aug 26 2022, 06:16 AM
Post
#219
|
|
Life's been good to me so far.....                Group: Admin Posts: 15,901 Joined: 11-September 03 From: Hurst, TX. Member No.: 1,143 Region Association: NineFourteenerVille 
|
Just a suggestion...
Get Ferrari Modena brakes for it. They are Brembo monoblocks, the exact same as the Boxster brakes, but they have Ferrari on the face of them. So you don't have to engineer anything, just bolt them on. Put them behind Fuchs with the Porsche crest in the center. That would mess with both the Porsche and Ferrari purists big time. (IMG:style_emoticons/default/happy11.gif) Clay |
| tygaboy |
 Aug 26 2022, 09:17 AM Aug 26 2022, 09:17 AM
Post
#220
|
|
914 Guru      Group: Members Posts: 5,451 Joined: 6-October 15 From: Petaluma, CA Member No.: 19,241 Region Association: Northern California 
|
Just a suggestion... Get Ferrari Modena brakes for it. They are Brembo monoblocks, the exact same as the Boxster brakes, but they have Ferrari on the face of them. So you don't have to engineer anything, just bolt them on. Put them behind Fuchs with the Porsche crest in the center. That would mess with both the Porsche and Ferrari purists big time. (IMG:style_emoticons/default/happy11.gif) Clay @ClayPerrine Clay, Well timed, sir! The conversation and initial decison about caliper labeling happened yesterday afternoon! And what is that decision? Well, you'll just have to stay tuned to hear about it and a couple of other big changes in direction... (IMG:style_emoticons/default/happy11.gif) (IMG:style_emoticons/default/shades.gif) |
  |
1 User(s) are reading this topic (1 Guests and 0 Anonymous Users)
0 Members:

|
Lo-Fi Version | Time is now: 23rd November 2024 - 05:04 AM |
Invision Power Board
v9.1.4 © 2024 IPS, Inc.


