To make it a little more clear, current prices for my conversions.
Ready to Install, complete pair of signal housings. $280.00 plus shipping.
Full Version: Euro Turn Signal Conversion $280.00 plus shipping
Installed....
More, I love 914 types.
......
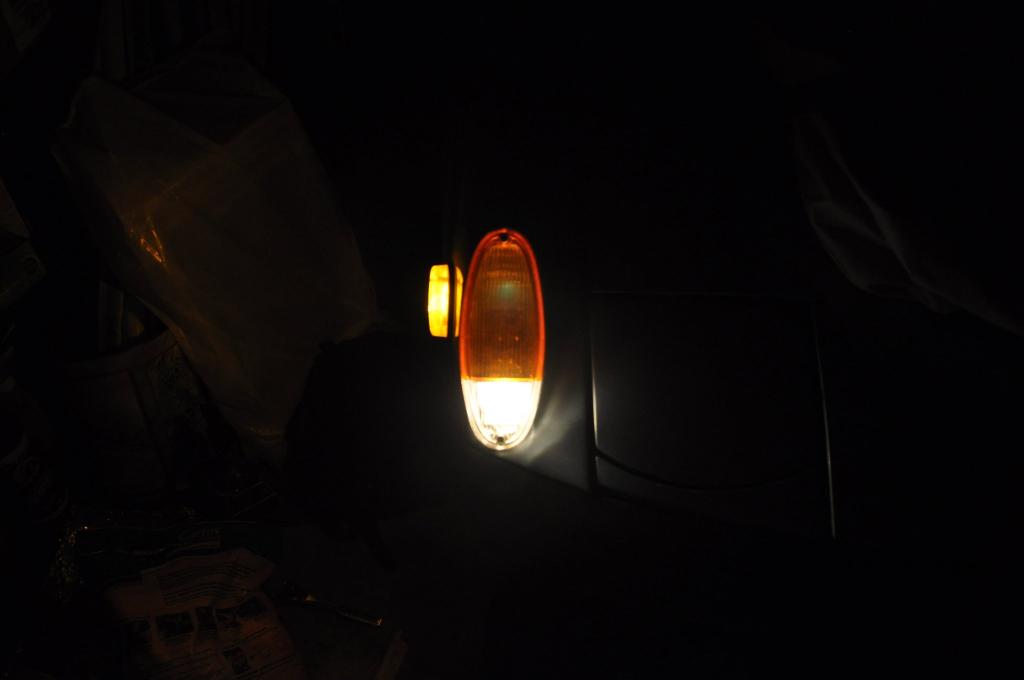
This shot gives a good idea of how much light a 7.5 watt bulb can make. Originally the cars used a 6 watt bulb which will fit this socket, I use a 7.5 as it is the most available bulb, and resonably priced. Original type bulbs can be found in a Salvage Yard, try BMW makes. I found a couple, and are still in my Orange car....they may have been the reverse lights, 3 or 5 Series. Not sure.
Pretty Cool !!!!!
I'll take 1 complete set and 1 DIY if you have them available.
Please let me know.
Thanks Martin.
Mike
Please let me know.
Thanks Martin.
Mike
Mike Thank You! I can make the refractors in an evening. I just came up from the Garage, I do not have two sockets, I need to order some. Normally take a couple of days from the supplier.
Martin
Hey Sixer, Thanks for the kind words!
Martin
Hey Sixer, Thanks for the kind words!
I'll send you a PM, these'll go great with my car.
Hey Martin,
I'd like to do this when I get through the engine conversion, and will probably want to ship my housings to you. Would you be willing to do it that way?
Very cool mod!
Thanks!
pete
I'd like to do this when I get through the engine conversion, and will probably want to ship my housings to you. Would you be willing to do it that way?
Very cool mod!
Thanks!
pete
Very interesting. Does this require a special lense? Will this fit in a Medium USPS box?
Thanks
David
Thanks
David
When I started making these, I would make a set for three pairs in trade, send me three sets, I send you back a restored set, I kept two sets to restore/sell, which worked OK, but many that I recieved were unusable, corroded, bent, missing parts, etc. I still have all the rejects in a box, big box. I have given up on that method, as one persons idea of usable may be very different from someone else's. I can't sell to someone a housing thats been crushed, or so corroded that the terminal cap has no lugs to retain it. One guy sent me six housings, and all six were unusable. So Yes, by ALL means, if you have nice housings and want them done, I will do them, here, and insure you get back what you sent. I have seen a few where the original finish still looks great, and if they do, I do not paint them. Just install a refractor and wire them. I am nearly out of useable housings, so for me, doing yours (Pete, or anyone else!)is a better deal. Before you send, look to see that the contour of the sides of the housing have a unifom shape, the housing is not cracked from someone screwing in the retaining stud to far into the housing. Seen a few of those. Inspect the area where the electrical terminal cap is, to insure the lugs that retain the white terminal cap, can be re-installed and secured.
No special lense, only a normal Euro lense is required. What you see here is an exact copy of what the factory did.
Martin
No special lense, only a normal Euro lense is required. What you see here is an exact copy of what the factory did.
Martin
Thank you to both of the buyers for these two sets, I will start tonight on two more sets, plus a display set for the swap meet. Also, if you bought a set of these from me in the past, and would like to have the refractors polished, its do able. PM me, it would not be that much work. It really makes a difference. FYI, 5 pairs of sockets are on the way.
Martin
Martin
I'm interested if any are still available
Thanks
David
Thanks
David
Begin another pair tonight. I will make one set of those for you if you like.
Martin
Martin
PM sent
QUOTE(jim_hoyland @ May 22 2013, 12:25 PM) 
PM sent
Hello
What is the cost if I send you my usable units ?
Can you post a picture of the unit from the rear outside ? I'm curious about the connectors.
Rory
QUOTE(rgalla9146 @ May 22 2013, 07:44 PM)
QUOTE(jim_hoyland @ May 22 2013, 12:25 PM)
PM sent
Hello
What is the cost if I send you my usable units ?
Can you post a picture of the unit from the rear outside ? I'm curious about the connectors.
Rory
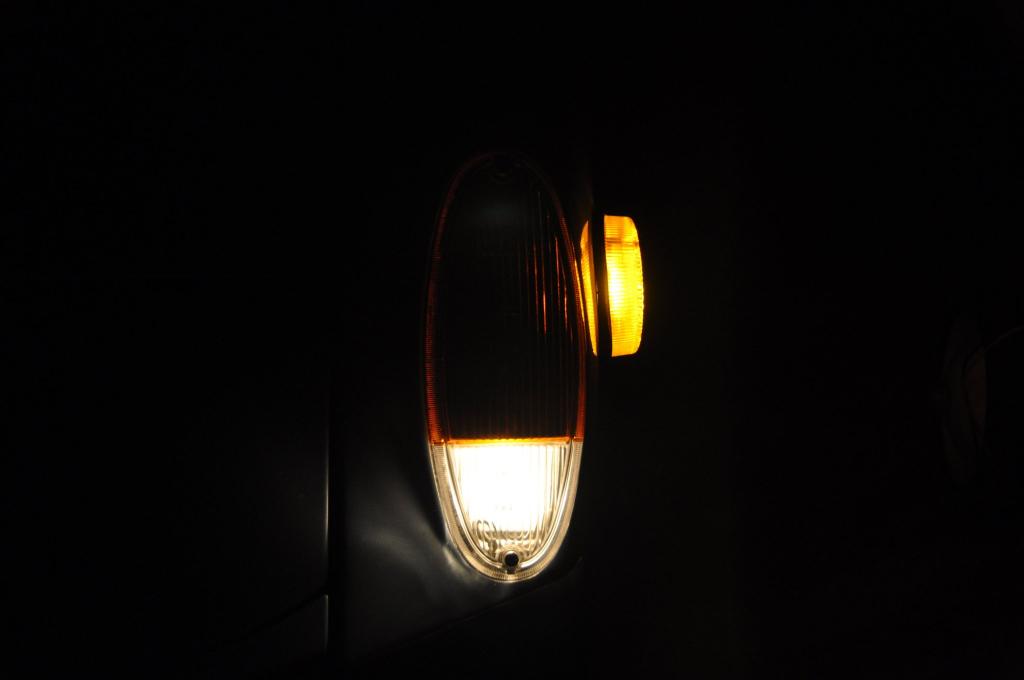
Sure no problem on the photo, its completly original in appearance, as I mentioned earlier. 100% like the original. Plug it in. I duplicated the original as close as possible. What it does is deactivates the park light side of the 1157 bulb, and wires up the 89 bulb internally. An original Euro uses a single filament bulb in both positions.
I have thought a bit about the price of a conversion, so if you ship them to me, and they must be usable, (as I am now out of usable housings) I will do them for $200.00 returned shipped to your location. I think this is fair, and it would be around a week turn around if I have parts on hand. I currently have sockets on order.
Martin
interested in a set. can you PM me your phone # so we can hook up at the swap meet?
i need to check my stash and see if i have any i can trade in.
thanks
Kent
i need to check my stash and see if i have any i can trade in.
thanks
Kent
QUOTE(B2524 @ May 23 2013, 06:49 AM)
interested in a set. can you PM me your phone # so we can hook up at the swap meet?
i need to check my stash and see if i have any i can trade in.
thanks
Kent
Sent requested PM, yes to all who have extras and want a restored set, look for me there at the Swap. I'll be with my SONAUTO replica. We can save you some CASH on shipping to me, and return them back to you quickly.
Martin
Martin Baker,
I ended up doing something like what you have done except not to the extent that you did. I bought a kit from Auto Atlanta which uses the 194 bulb at the time I was doing my Euro lense conversion and I had a friend of mine one night design the upper shield that slid onto the two lips inside the turn signal housings to keep light from going into the turn signal area with a piece of flat stock aluminium with a high polish on one end to redirect the light. If I knew that you had build shields for the bulb I would have come to you. Oh well. Great job on making those by the way.
This is what I did. What do you think?
Before
After
the little shield my friend and I made (fits right into the curvature of the lense)
I ended up doing something like what you have done except not to the extent that you did. I bought a kit from Auto Atlanta which uses the 194 bulb at the time I was doing my Euro lense conversion and I had a friend of mine one night design the upper shield that slid onto the two lips inside the turn signal housings to keep light from going into the turn signal area with a piece of flat stock aluminium with a high polish on one end to redirect the light. If I knew that you had build shields for the bulb I would have come to you. Oh well. Great job on making those by the way.
This is what I did. What do you think?
Before

After

the little shield my friend and I made (fits right into the curvature of the lense)

Looks good, I wanted to stay away from aluminum, and wanted to equal, or exceed the factory part. I silver solder together all the components in the refracter assembly, which will not have a ground issue in the future that aluminum might/will, but its not hard to make these yourself. I have become proficiant in the process, so I do some now and again, and its nice to provide a good part for the car that I love so much, and make some friends along the way. My 914 2.0, 914/6 GT and my 914/6 GT SONAUTO Replica mean very much to me! Not sure what I would do without them! NOW, that is a little twisted!
Martin
Martin
I only used the aluminum for the shield itself. I have the bulb grounded through the lower turn signal lense screw if you look at the after picture, you can see the wire from the bulb kit. I have a 74 1.8L myself, my father is still the original owner, but now I drive, maintain and show the car. Keep up the good work. I will get a picture of my entire set up.
I will have another set of these complete tomorrow. I just have to wire them up.
$200.00 shipped.
Thanks.
MB
(Photo taken in 1974, car was new. Friend, on the right, sent it to me. Gotta LOVE the 70's!)
$200.00 shipped.
Thanks.
MB
(Photo taken in 1974, car was new. Friend, on the right, sent it to me. Gotta LOVE the 70's!)
Pm sent.
Thanks. Replied, and awaiting your usable housing.
Here they are, ready to be shipped. New bulbs included.
Martin's set is top notch and he's a great guy to deal with. Count me as a very satisfied customer.
Pm coming
OK first, THANKS Mike! I will take a pat on the back. I try my best. Every set of these I convert, I would use on my own car, and I want everyone to be satisfied when the install is finished..
Second, these are sold pending payment. Thank you, Dave for that.
I also sold a DIY set, so I will get those finished up tomorrow. Had to order parts.
Again thanks.
MB
Second, these are sold pending payment. Thank you, Dave for that.
I also sold a DIY set, so I will get those finished up tomorrow. Had to order parts.
Again thanks.
MB
If you happen to do another set I would like to have a set please!
QUOTE(Mblizzard @ Dec 30 2015, 05:37 PM)
If you happen to do another set I would like to have a set please!
I would be glad to do a set for you. I am totally out of usable housings, so if you have a set that would be ideal, and save you some money as well. PM me for a shipping address once you have a good pair, and I will get them done for you.
MB
QUOTE(Martin Baker @ Dec 30 2015, 10:05 PM)
QUOTE(Mblizzard @ Dec 30 2015, 05:37 PM)
If you happen to do another set I would like to have a set please!
I would be glad to do a set for you. I am totally out of usable housings, so if you have a set that would be ideal, and save you some money as well. PM me for a shipping address once you have a good pair, and I will get them done for you.
MB
I may have a set. I will look and then PM you.
Martin, if/when you have a DIY kit, I would like to purchase one.
BTW, have the euro lenses only exist as orange tint or are there red ones?
Thanks.
BTW, have the euro lenses only exist as orange tint or are there red ones?
Thanks.
I have never seen red in my life, could be custom,
& I sent you a PM.
& I sent you a PM.
Responded. Thanks.
Here is the photos for the DIY folks, thanks to them. I will start by saying this, don't wire up the socket with the type 89 bulb in the socket. You will need the slack in the wire or it could break under tension.
To start remove the housings wire terminal white cap. Use a long flat object to pop it off, to be 100% honest, I use a large flat file. It works perfect. Be very gentle, this plastic is old. And brittle. Take your time. Work it a little all the way around the circumference, not all at once, or it will break. You can also put a little heat on it with a heat gun to make it a little more pliable. USE COMMON SENSE.
Before the refractor is seated you will need to stretch the insulation on the wire. Do this with the tip of your index and thumb of both hands. It will get hot if you do it right. It needs to be thinner to fit the pins that retain it in the housing. Grab it at the base of the socket and stretch it toward the end. It will fit between the retaining pins much better.
Run the wire through the slot forward of the socket for the 1157 bulb.
Set the refractor in the housing. It should fit tight. If its a little loose in your housing, squeeze it a bit to get a better fit. I have a housing here I use to fit everyone, it is undamaged. They are all a bit different after 40 years.
After the refractor is set in place, with the bulb removed, set the power wire. I use the big end of a valve core tool. You do not want to nick the wire. AVOID sharp tools.
If you damage the wire it will short against the housing. Start at the refractor end, keeping just a bit of tension on the wire, so it stays nice and straight down the run, don't make it like a guitar string.
If you damage the wire it will short against the housing. Start at the refractor end, keeping just a bit of tension on the wire, so it stays nice and straight down the run, don't make it like a guitar string.
So now, your refractor is set, tight, wire is placed in the three set of retainers. Next flip the housing over to trim excess wire. Leave about an inch or a little more. Not much more.
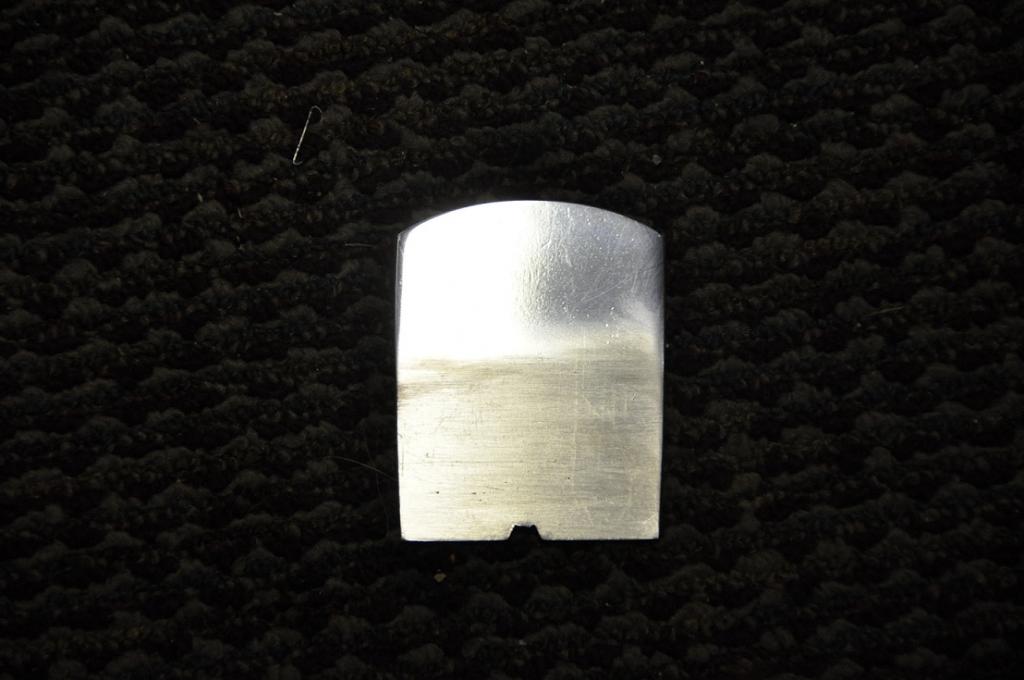
So now this is the important stuff. You will cut terminal 57 on the terminal cap. Of course you will have had to removed that earlier. It will look like this. MAKE SURE YOU CUT THE 57 TERMINAL. The BL terminal is Blinker. 31 is the ground.
The terminal seen here is really bad, hopefully yours are better. You can repair them, but having a spare or two is a good thing.
The terminal seen here is really bad, hopefully yours are better. You can repair them, but having a spare or two is a good thing.
With the 57 terminal cut as shown, and your wire cut and striped back just slightly, use a soldering iron to tin both. Its critical. In the photo here I cut back to much insulation. I redid this but did not re take the photo. You want insulation down right to the solder joint. If you don't, it will cause an internal short.
Next solder up your connection. The direction you come in is critical. Be careful of the plastic on the terminal cap. Don't melt it. Come in from behind the rivet holding the 57 terminal. Use a heat sink, like my extra hands. Once connected, I use a small rubber hammer to tap the terminal back on to the housing. Be gentle, use common sense here as well. Just tap it on, and work your way around. Pay attention to the wire, as it will need to remain clear of the remaining terminal inside for the 1157 bulb. See photo. You will notice the wire is not set in the photo, its because this unit will eventually be sold. I used it for demo only.
I test every unit I build here before I send them out. I use a 12 volt power supply. Hook up to the 31 terminal for ground. The BL will be the 20 watt side of the 1157 bulb. The 57 terminal will be the 7.5 watt 89 bulb in the refractor I built and you just installed. If you have any questions. I will help you.
MB
MB
I honestly didn't know it was that complex to do. Thank you for posting clear instructions. 
I have multiple cores now, (Thanks Al) and will have some of these ready for purchase soon. Al, your two pair are in work, and will be first!
MB
MB
Looking for a set, the PO had installed euro lenses but the buckets remained stock.
Please PM if a set is still available.
Cheers
Please PM if a set is still available.
Cheers
DIY worked out great, thanks for the details, and the product.
Click to view attachment
Click to view attachment
Click to view attachment
Click to view attachment
PM sent
Martin, is this a service you plan to offer for awhile?
Reason I'm asking is that I'm out of the country currently but would like to get you to upgrade my housings that are in excellent shape later this Spring.
I'm doing the LED's on the rear lights for increased visibility, but your treatment looks great for the front.
Thx
Reason I'm asking is that I'm out of the country currently but would like to get you to upgrade my housings that are in excellent shape later this Spring.
I'm doing the LED's on the rear lights for increased visibility, but your treatment looks great for the front.
Thx
QUOTE(raynekat @ Jan 26 2016, 03:00 AM)
Martin, is this a service you plan to offer for awhile?
Reason I'm asking is that I'm out of the country currently but would like to get you to upgrade my housings that are in excellent shape later this Spring.
I'm doing the LED's on the rear lights for increased visibility, but your treatment looks great for the front.
Thx
As long as I am supporting my Vintage Racing gig, I will be making these! Every little bit helps. I just made Vintage Motorsport Magazine, so I will race for some time to come!
I can have a set ready for you when you return home.
Martin
This is a "lo-fi" version of our main content. To view the full version with more information, formatting and images, please click here.