tvdinnerbythepool
Oct 9 2019, 10:55 AM
Back is done, on to the front (later in this thread)
Hey guys,
Starting winter projects: Rear Brakes/Suspension are up first.
-This is a street/daily driver. Just trying to get the sagging ass up and improve the ride quality. -
So far I've got New:
100lb Weltmesiter 914rubber Springs
914rubber upper and lower shock rubber bushings
Plan is to buy:
KYG 9003 Bilstein Struts
Rear control arm bushings (914Rubber)
Rear Caliper Rebuild Kit (If that seems beyond me I will send to PMB)
Discs and Pads will be addressed as needed once I get it all apart. Turn the discs if needed or replace with new pads. We shall see.
Any suggestions on anything else with the rear brakes/suspension??
Thanks all! -Rob
Front Suspension/Brakes will be part 2 of the project. Just trying to keep it manageable and on budget ish
mepstein
Oct 9 2019, 11:01 AM
Just say NO to KYB struts. Spend the money on Bilsteins. You wont be dissapointed.
Always do new brake soft lines if you don't know or cant remember when they were last done.
914_teener
Oct 9 2019, 11:51 AM
Hope your budget is $1800.
Might as well do adjustable perches for the Billy's.
Do the bushings yourself and the alignment. You will learn a lot and it's not that hard.
You should check and repack the CV's while you are there and with all that said may never have to touch the rear suspension ever....at least it depends how old you are and have the car.
Good wrenching.
SirAndy
Oct 9 2019, 12:02 PM
QUOTE(mepstein @ Oct 9 2019, 10:01 AM)

Just say NO to KYB struts

Tbrown4x4
Oct 9 2019, 05:13 PM
PMB is the benchmark for caliper rebuilds, but I had good luck rebuilding my own with caliper paint and parts bought from PMB. Eric can also just plate your caliper halves if you take them apart first. Change out the brake hoses too.
No KYBs! They're cheaper for a reason. My Koni reds (rear shocks) started leaking, so I pulled the nice looking KYB's off my parts car. They had Weltmeister 140lb springs on them and the car rode like it had no suspension at all. I put new Koni adjustable shocks (with 3 clicks from full soft) in the 140 springs and I really like the ride. Firm, but compliant. I put 100 miles a day on I-5, and still have my kidneys. My car doesn't have sway bars.
I only have experience with rubber suspension bushings. I would probably use original type rubber or maybe a little firmer for a daily.
rhodyguy
Oct 9 2019, 05:31 PM
Better off spending more now rather than might being unhappy later. Deduct what ever you spend on KYBs from the upgrade. Koni yellows are nice due to the ex adj feature. Have a look at Paragon's site. Struts and shocks are prob one of the most rewarding tasks on a 914. 2-4 hours and you have a new car. Inspect the bushings on the tie rods.
roblav1
Oct 9 2019, 06:23 PM
As others said, don't use KYB.
914Sixer
Oct 10 2019, 04:22 AM
KYB= Kill Your Back. If you want to feel every pebble on the road, stay a way from KYB.
tvdinnerbythepool
Oct 10 2019, 07:40 AM
Awesome, thanks for the input guys.
Sounds like Koni or Bilstein for the shocks and I'll add new brake soft hoses to the list.
tvdinnerbythepool
Oct 10 2019, 07:41 AM
@Tbrown4x4 did I see you by the Olympia airport a few days ago? Great looking car!
Tbrown4x4
Oct 11 2019, 04:54 AM
I was down that way for a wedding , but we took the Wife's Focus.
Besides, if it was "great looking", it wasn't me.

tvdinnerbythepool
Oct 24 2019, 10:24 PM
Hey guys!
I've seen a few methods online but what is the best way to get these bushings out of the rear control arms?
After much swearing, hammering and torching I finally got everything torn out and disassembled. Going to sandblast the calipers tomorrow and am awaiting parts from Pelican and 914 Rubber.
Discovered much half assed work from PO much to my amusement. Finally figured out why the right wheel had so much camber than the left...no shim! Lol
Click to view attachment
914werke
Oct 25 2019, 12:24 AM
From that pic it looks like you may have more work ahead of you.
Having done a few of these ... the problem youll find is that your pivot shafts are going to be pretty rusty & corroded where the OE vulcanized rubber was attached.
Tbrown4x4
Oct 25 2019, 05:01 AM
I'm reading that you are blasting the calipers, so I assume you're painting them. Make sure no blast media gets into the bleeder hole (or any other caliper passages for that matter). I had to run a wire through mine to clear out some grit. Also, Rustoleum discontinued the silver caliper paint that I used. You're stuck with black or red. VHT, Eastwood and Duplicolor caliper paints are only good for 500-600 degrees, whereas the Rustoleum paints are good for 900. I also used the 2000 deg primer, but the Rustoleum Rep said the caliper paint is direct to metal. I've got over 3000 miles of driving on mine with no discoloration of the silver.
Also clean out any paint overspray where brake fluid will be with solvent.
mepstein
Oct 25 2019, 06:13 AM
QUOTE(tvdinnerbythepool @ Oct 25 2019, 12:24 AM)
Hey guys!
I've seen a few methods online but what is the best way to get these bushings out of the rear control arms?
After much swearing, hammering and torching I finally got everything torn out and disassembled. Going to sandblast the calipers tomorrow and am awaiting parts from Pelican and 914 Rubber.
Discovered much half assed work from PO much to my amusement. Finally figured out why the right wheel had so much camber than the left...no shim! Lol
Click to view attachmentEither heat from a torch or a press. I’ve done both. Torch is the fastest. Heat until you get some smoke and then pry out with a screwdriver. Same with the rubber a arm bushings.
tvdinnerbythepool
Oct 25 2019, 09:59 AM
@914werke for sure! It was a ton of work just to get this far and I'm ready for a rough road ahead!
@mepstein copy the heat/press
@Tbrown4x4 calipers are taped up/holes stuffed etc but will ensure nothing got by and wilco on the paint, still exploring options
Thanks for the input guys!
tvdinnerbythepool
Oct 25 2019, 10:49 AM
1 down! Took about 40 minutes with heat and press.
A little pitting on one end but should lean up nicely
mepstein
Oct 25 2019, 11:17 AM
Mine took 5-10 minutes each side but I really laid in the heat. I was blasting and powder coating after so I didn’t worry about the paint. I was thinking about building up the pits with jb weld and then sanding smooth but I haven’t done it yet. I’m not sure it makes any difference.
914werke
Oct 25 2019, 11:42 AM

Mmmm IDK... I chuck them up in the lathe & take a mil off of them to get down to clean smooth metal before reusing.
TonyA
Oct 25 2019, 01:31 PM
Like that operating room clean look of your shop. .
tvdinnerbythepool
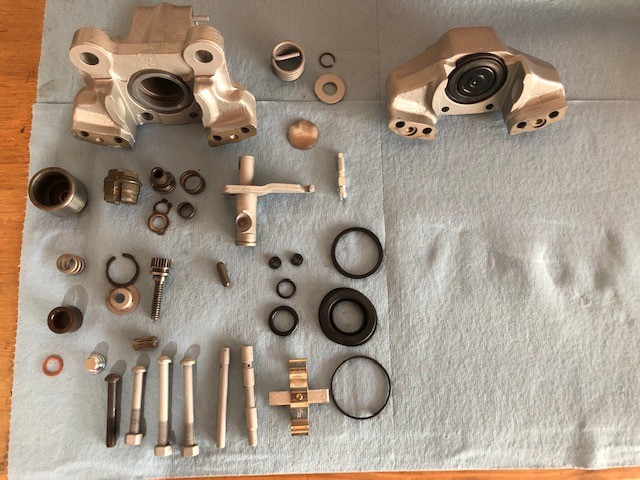
Oct 31 2019, 08:14 AM
Calipers stripped, blasted and painted.
Will report back on long term endurance of VHT gold caliper paint. They sure look good though.
Got several boxes from Pelican with all new pads rotors and rebuild kits for the calipers. Speed bleeders. Stainless hoses. Bearings will be redone also.
Replacing CV pivot shafts due to wear and destroying one of the threads
getting bushings from 914rubber on those and shafts from 914werke
RH side had no shim whatsoever which makes sense as to why that wheel was tipped in so far! Got new 3mm shims to at least get a new base point.
Settled on 914rubber 100lb rear springs and bilsteins.
Fun project so far, sure takes a lot of time and patience but I'm hoping the payoff is worth it!
Tdskip
Oct 31 2019, 10:12 AM
It will be. Like all vintage German cars 914s respond very well to good parts and attention to detail.
tvdinnerbythepool
Oct 31 2019, 10:28 AM
tvdinnerbythepool
Oct 31 2019, 10:29 AM
tvdinnerbythepool
Oct 31 2019, 10:30 AM
DucRS
Oct 31 2019, 11:10 AM
Calipers are looking good!
Please chime in on the difficulty level on reassembly of calipers with the new parts. I'm about to take this brake project on real soon.
mepstein
Oct 31 2019, 11:18 AM
Here’s Eric’s /PMB Performance video for rebuilding rear brake calipers. It does include rebuilding the e-brake lever. Great video !!!
@tvdinnerbythepool https://www.youtube.com/watch?v=dm_DnizKOZM&app=desktop
tvdinnerbythepool
Nov 1 2019, 07:30 AM
@ducrs I followed the pelican disassembly article and took TONS of pictures along the way. The RIBE bolts were a pain in the ass to get out, they hold the 2 half’s together.
I’ll be heading to Tacoma Screw to get new bolts to mate the two half’s. They are M7 bolts and there is a very limited selection at my local ACE. It appears One caliper had been rebuilt prior and had nuts on the other end of the bolts. They must have blown out the treads?
Will be following along with the PMB video to reinstall, thanks
@mepstein
mepstein
Nov 1 2019, 07:34 AM
I’m pretty sure all the calipers had nuts for the ribe bolts and not screwed directly into the caliper. If that’s what I’m getting from your last post. I don’t think there is a source for those bolts other than used. They are pretty unusual.
tvdinnerbythepool
Nov 1 2019, 07:45 AM
QUOTE(mepstein @ Nov 1 2019, 06:34 AM)
I’m pretty sure all the calipers had nuts for the ribe bolts and not screwed directly into the caliper. If that’s what I’m getting from your last post. I don’t think there is a source for those bolts other than used. They are pretty unusual.
@mepstein strange! 1 of the calipers is threaded with no nuts! Maybe the PO tapped the calipers? Hmm. I was thinking of drilling out those threads and doing nuts and bolts both sides. Perhaps one caliper is aftermarket?
tvdinnerbythepool
Nov 1 2019, 07:46 AM
mepstein
Nov 1 2019, 07:55 AM
QUOTE(tvdinnerbythepool @ Nov 1 2019, 09:45 AM)
QUOTE(mepstein @ Nov 1 2019, 06:34 AM)
I’m pretty sure all the calipers had nuts for the ribe bolts and not screwed directly into the caliper. If that’s what I’m getting from your last post. I don’t think there is a source for those bolts other than used. They are pretty unusual.
@mepstein strange! 1 of the calipers is threaded with no nuts! Maybe the PO tapped the calipers? Hmm. I was thinking of drilling out those threads and doing nuts and bolts both sides. Perhaps one caliper is aftermarket?
Before you drill out the caliper, I would call Eric/PMB for advice. I'm always leary about modifying brakes and I always go to Eric with brake questions. I'm sure there was a reason they used nuts over a threaded body.
bbrock
Nov 1 2019, 08:00 AM
QUOTE(mepstein @ Nov 1 2019, 07:34 AM)
I’m pretty sure all the calipers had nuts for the ribe bolts and not screwed directly into the caliper. If that’s what I’m getting from your last post. I don’t think there is a source for those bolts other than used. They are pretty unusual.
My car had a mix of early and late so I got a nice education on the differences.
Early - Ribe star socket through bolts with nuts.
Late - hex head bolts threaded into the caliper housing (no nuts). The hex head bolts may also be stamped "RIBE" on the head, so it can be a little confusing if we just call them ribe bolts. My late hex head bolts were a mix of Ribe and Verbus.
As far as ease of reassembly - the REassembly is super easy. Takes just a few miutes per caliper. It is the DISassembly that can be a bitch. On a scale of 1-10, I'd say the disassembly can be anywhere from 4-9.5 depending on condition of the caliper and reassembly of a cleaned and prepped caliper an easy 2. I'd put the overall rebuild of a caliper that doesn't give you too many fits at around 5. It's a dirty and time consuming process, but not terrible until you encounter something that is seized and doesn't want to come apart.
Oh, it can also be a really PITA if you send the housings to the wong pater and they come back ruined. Ask me how I know.

Send them to Eric for plating.
@tvdinnerbythepool your painted calipers look really nice! Will be curious to see how they hold up. I'm impressed.
mepstein
Nov 1 2019, 08:48 AM
QUOTE(bbrock @ Nov 1 2019, 10:00 AM)
QUOTE(mepstein @ Nov 1 2019, 07:34 AM)
I’m pretty sure all the calipers had nuts for the ribe bolts and not screwed directly into the caliper. If that’s what I’m getting from your last post. I don’t think there is a source for those bolts other than used. They are pretty unusual.
My car had a mix of early and late so I got a nice education on the differences.
Early - Ribe star socket through bolts with nuts.
Late - hex head bolts threaded into the caliper housing (no nuts). The hex head bolts may also be stamped "RIBE" on the head, so it can be a little confusing if we just call them ribe bolts. My late hex head bolts were a mix of Ribe and Verbus.
As far as ease of reassembly - the REassembly is super easy. Takes just a few miutes per caliper. It is the DISassembly that can be a bitch. On a scale of 1-10, I'd say the disassembly can be anywhere from 4-9.5 depending on condition of the caliper and reassembly of a cleaned and prepped caliper an easy 2. I'd put the overall rebuild of a caliper that doesn't give you too many fits at around 5. It's a dirty and time consuming process, but not terrible until you encounter something that is seized and doesn't want to come apart.
Oh, it can also be a really PITA if you send the housings to the wong pater and they come back ruined. Ask me how I know.
Send them to Eric for plating.
@tvdinnerbythepool your painted calipers look really nice! Will be curious to see how they hold up. I'm impressed.
Almost all of my cars have been early so that's why I'm mistaken on the caliper fasteners.

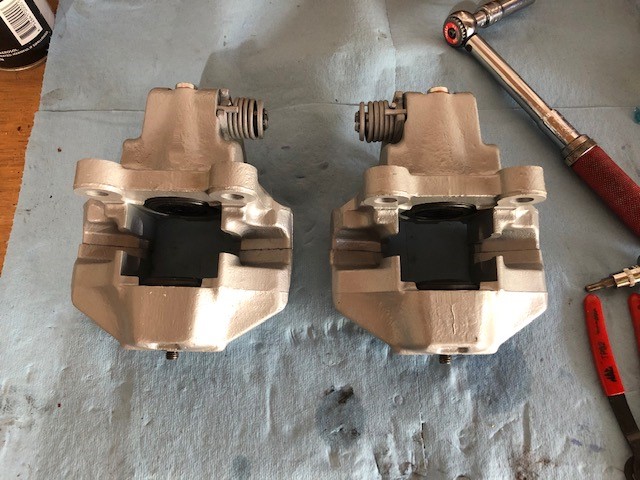
tvdinnerbythepool
Nov 5 2019, 07:46 PM
Drivers side caliper rebuilt!
Still sourcing bolts for the other side
Followed the PMB video for the most part with the occasional improvisation lol
Click to view attachmentClick to view attachment
eatpez
Nov 5 2019, 08:00 PM
QUOTE(tvdinnerbythepool @ Nov 5 2019, 08:46 PM)
Drivers side caliper rebuilt!
Still sourcing bolts for the other side
Followed the PMB video for the most part with the occasional improvisation lol
Click to view attachmentClick to view attachmentLooking really nice. Well done.
Tbrown4x4
Nov 5 2019, 09:34 PM
Yes, those look great!
914werke
Nov 7 2019, 02:14 PM
Shafted!
tvdinnerbythepool
Nov 13 2019, 09:45 AM
Click to view attachment 914Rubber 100lb Springs on Bilsteins
 @mikey914
mepstein
Nov 13 2019, 10:27 AM
QUOTE(tvdinnerbythepool @ Nov 13 2019, 10:45 AM)
Click to view attachment 914Rubber 100lb Springs on Bilsteins
Bils seem to take a couple hundred miles to "break in" and smooth out. Don't be alarmed if they are a little stiff your first ride.
tvdinnerbythepool
Nov 13 2019, 11:29 AM
QUOTE(mepstein @ Nov 13 2019, 08:27 AM)
QUOTE(tvdinnerbythepool @ Nov 13 2019, 10:45 AM)
Click to view attachment 914Rubber 100lb Springs on Bilsteins
Bils seem to take a couple hundred miles to "break in" and smooth out. Don't be alarmed if they are a little stiff your first ride.
Thanks for the heads up
@mepstein
type2man
Nov 13 2019, 06:26 PM
If you already have the rear arms out, I would definitely do the wheel bearings.
tvdinnerbythepool
Nov 14 2019, 11:11 PM
Click to view attachment Bearings are in! Going to make a threaded tool to compress the hubs in evenly like Eric Shea's video shows
Click to view attachment Got these really nice pivot arm shafts/bushings from 914rubber
@mikey914 @914werke hooked me up with a replacement hub (PO destroyed one and reinstalled anyway) and some hard brake lines.
CV joints re-packed and new gaskets. 1 gasket was completely missing and was throwing grease inside the control arm by the hub. Glad I caught that.
Tomorrow will try and get the hubs installed and the stainless lines in and then I think I'm ready to start bolting this thing back together!!
tvdinnerbythepool
Nov 15 2019, 11:55 AM
Maybe a stupid question...how do I know when the hub is installed fully? Will it bottom out? Can I push in too far?
Click to view attachment Is this enough?
tvdinnerbythepool
Nov 15 2019, 11:56 AM
Should the hub shaft be flush with bearing??
Click to view attachment
Tbrown4x4
Nov 15 2019, 01:14 PM
The shoulder on the hub will bottom out on the inner bearing race. The hub doesn't go ALL the way through. The hub and the stub axle traps the inner races when you torque the axle nut. (To the proper torque, of course.)
TargaToy
Nov 15 2019, 02:32 PM
QUOTE(914werke @ Nov 7 2019, 03:14 PM)
Shafted!
I've been curious, since you mentioned it in an earlier post, if milling the shafts like that causes any "slop" in the fitment of the new bushings, presuming they are designed for factory dimension of the pivot shafts.
914werke
Nov 15 2019, 03:35 PM
If you look at the process for installing either the various Delrin / poly or the OE replacement rubber versions it is typically necessary to "clearance" the plastic ones, & use a special tool to draw the tight rubber over the shafts for the fitment.
The .01 removed to clean any corrosion isnt significant enough to adversely effect fitment.
IF you are going Polybronze they (Elephant) provide new shafts with their kit.
TargaToy
Nov 15 2019, 03:59 PM
QUOTE(914werke @ Nov 15 2019, 04:35 PM)
If you look at the process for installing either the various Delrin / poly or the OE replacement rubber version it is typically necessary to "clearance" the plastic ones, & use a special tool to draw the tight rubber over the shafts for the fitment.
The .01 removed to clean any corrosion isnt significant enough to adversely effect fitment.
IF you are going Polybronze they (Elephant) provide new shafts with their kit.
Gotcha. That makes sense.
Mikey914
Nov 15 2019, 06:19 PM
Actually when Elephant made their rods they used a standard size tube that was not metric line the OEM. The bushings they made are to go with their rod, so they don’t work well with the stock rods (and the ones I made).
This is a "lo-fi" version of our main content. To view the full version with more information, formatting and images, please
click here.