|
|

|
Porsche, and the Porsche crest are registered trademarks of Dr. Ing. h.c. F. Porsche AG.
This site is not affiliated with Porsche in any way. Its only purpose is to provide an online forum for car enthusiasts. All other trademarks are property of their respective owners. |
|
|
  |
| horizontally-opposed |
 Feb 14 2008, 02:17 PM Feb 14 2008, 02:17 PM
Post
#41
|
|
Advanced Member     Group: Members Posts: 3,453 Joined: 12-May 04 From: San Francisco Member No.: 2,058 Region Association: None 
|
Thanks very much for posting that!!! I gotta find more pics of Bahia... time to do a search.
But, of course, trying to judge a real red on a computer screen is like... pete |
| Ferg |
 Feb 14 2008, 02:57 PM Feb 14 2008, 02:57 PM
Post
#42
|
|
914 Guru      Group: Members Posts: 5,948 Joined: 8-January 03 From: Boulder CO Member No.: 116 Region Association: None 
|
I've owned both colors (IMG:style_emoticons/default/biggrin.gif) these shots were taken with the same camera, but different years... Both cars were orig paint, 911 "mostly" original/
My Bahia 73.5 T 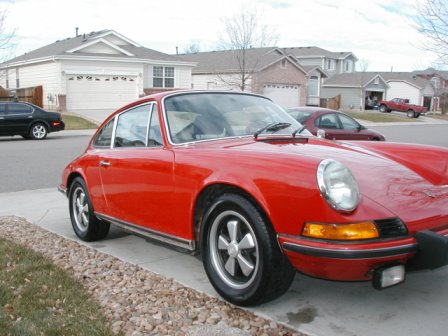 And my Toronado Red GTI 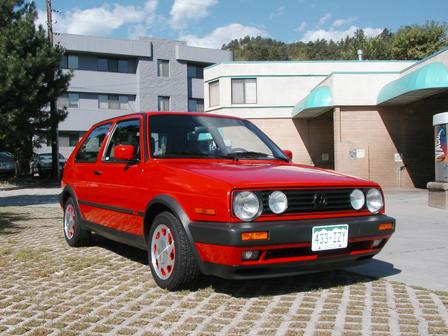 Pete, PM me you email, and I'll send you both gallery's of each car. Ferg (IMG:style_emoticons/default/beerchug.gif) |
| watsonrx13 |
 Feb 15 2008, 07:49 AM Feb 15 2008, 07:49 AM
Post
#43
|
|
Advanced Member     Group: Members Posts: 2,735 Joined: 18-February 03 From: Plant City, FL Member No.: 312 Region Association: South East States |
Another sample of Bahia Red... I had this car painted at a local paint shop last year, using DuPont single stage acrylic-enamel... so my recommendation is original paint.
(IMG:http://www.914world.com/bbs2/uploads_offsite/www.tampabay914.com-312-1291033014.1.jpg) -- Rob |
| horizontally-opposed |
 Mar 6 2008, 12:09 AM Mar 6 2008, 12:09 AM
Post
#44
|
|
Advanced Member     Group: Members Posts: 3,453 Joined: 12-May 04 From: San Francisco Member No.: 2,058 Region Association: None 
|
So some progress has been made...
First up are better pics of the deletion of the rear reflector holes and the antenna hole. pete Attached thumbnail(s) 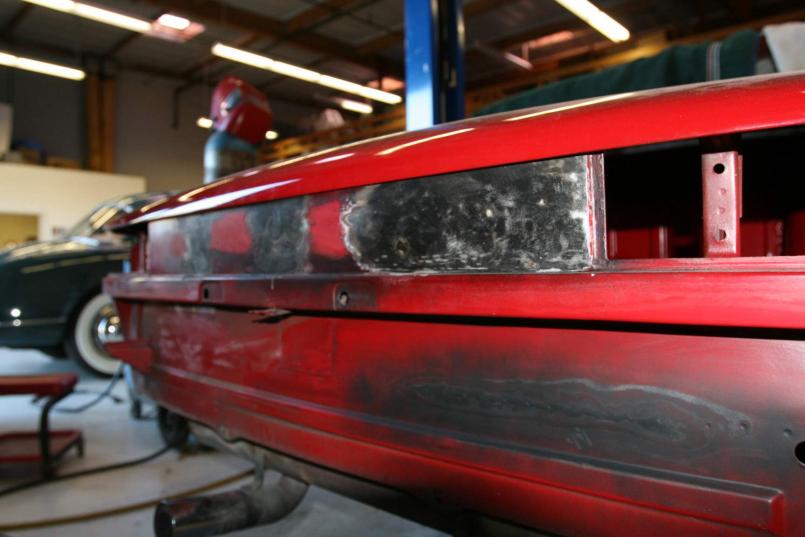 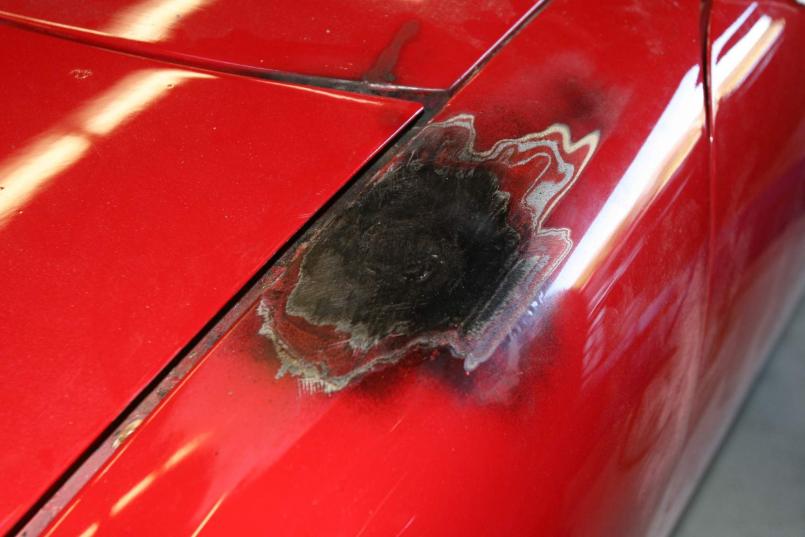
|
| horizontally-opposed |
 Mar 6 2008, 12:11 AM Mar 6 2008, 12:11 AM
Post
#45
|
|
Advanced Member     Group: Members Posts: 3,453 Joined: 12-May 04 From: San Francisco Member No.: 2,058 Region Association: None 
|
Next up... the targa bar and LR fender by the taillight.
Attached thumbnail(s) 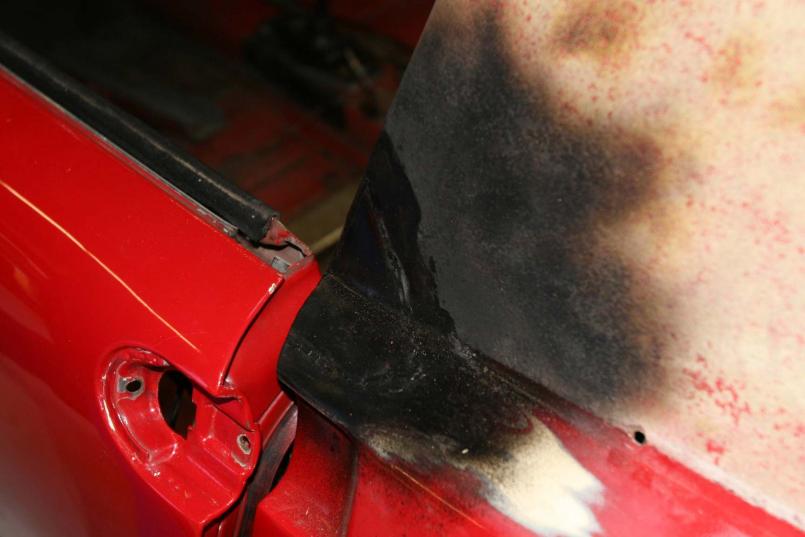 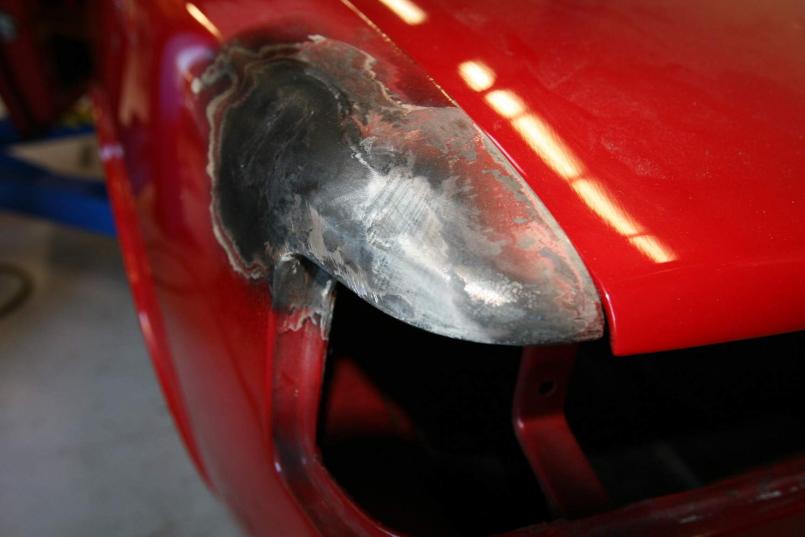
|
| horizontally-opposed |
 Mar 6 2008, 12:20 AM Mar 6 2008, 12:20 AM
Post
#46
|
|
Advanced Member     Group: Members Posts: 3,453 Joined: 12-May 04 From: San Francisco Member No.: 2,058 Region Association: None 
|
Here's where things get interesting.
After scraping all the foam and rubberized sealer out of the LR fender corner as seen above, I can show you the first photo below, as seen from the wheelwell. You can just make out the black rectangular patch in there, as well as the rest of the surface rust hiding out in there, stewing with the foam. (IMG:style_emoticons/default/mad.gif) In the next photo, you can see the same area on the right fender. When I initially poked through the rubber and then the foam, I saw the nice gray metal you see in there, and way angry because I felt that I had broken into a sealed area that wasn't broke. But then I removed the rest of the foam and the rubber and saw HOW the left side failed, and how the right side would have failed. The foam, once dry enough, wicks moisture up the vertical surface of the taillight housing's outer edge, inside, behind the rubber. The left side rust-through was the result of this process, and it had started to do the same on the right side... Please learn from my experience. This is a California car (always), rarely driven in rain the last 10-15 years, and almost always garaged over its life... Clean those corners out, and re-rustproof and seal them!!! It ain't fun, and it took me about 9 hours for both fenders (at the front and the back of each), but that gunk needs to come out... pete Attached thumbnail(s) 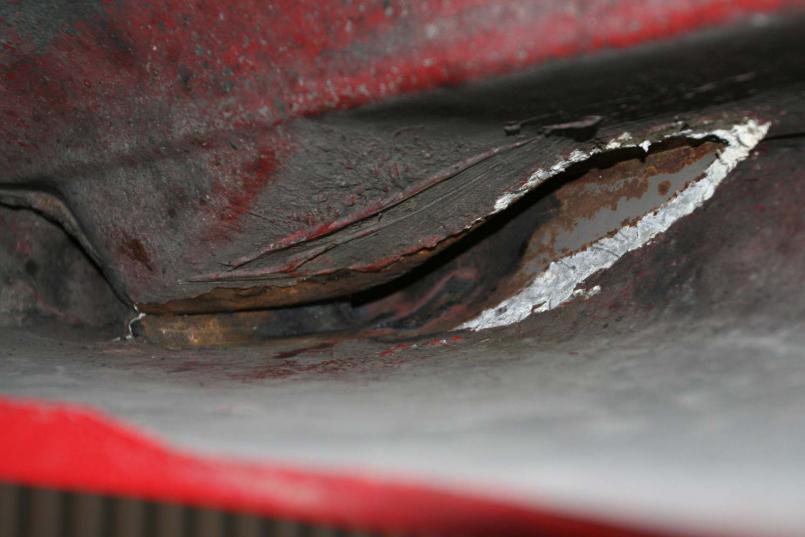 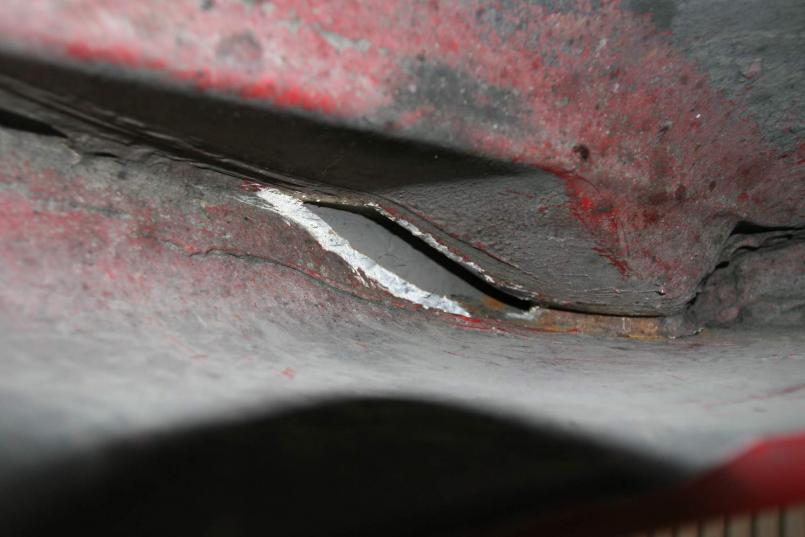
|
| horizontally-opposed |
 Mar 6 2008, 12:21 AM Mar 6 2008, 12:21 AM
Post
#47
|
|
Advanced Member     Group: Members Posts: 3,453 Joined: 12-May 04 From: San Francisco Member No.: 2,058 Region Association: None 
|
The two pinholes in the right front fender filled...
Attached thumbnail(s) 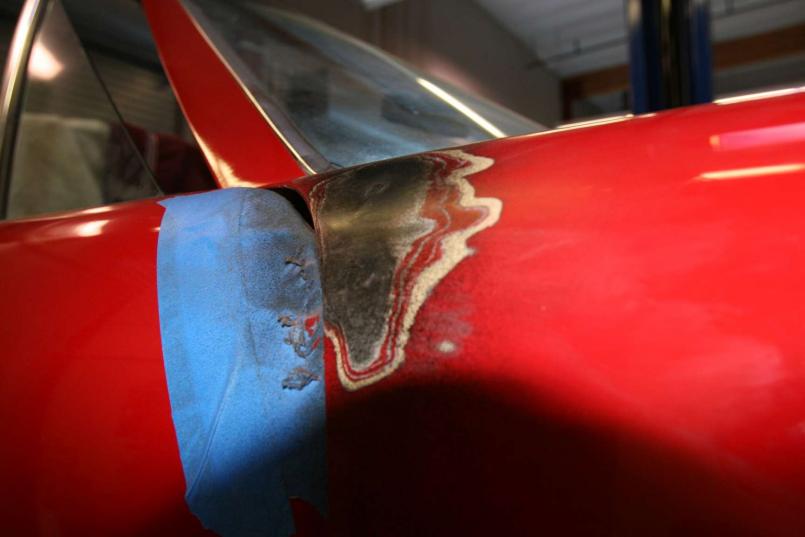
|
| horizontally-opposed |
 Mar 6 2008, 12:24 AM Mar 6 2008, 12:24 AM
Post
#48
|
|
Advanced Member     Group: Members Posts: 3,453 Joined: 12-May 04 From: San Francisco Member No.: 2,058 Region Association: None 
|
BUT, here's where the bummers begin.
Same area, as seen from the doorjamb. Sorry for the crappy angle. It's hard to shoot in there, and it will be even harder to weld in there. Our plan at this poiint is to rid the area of the rust, gain access to the back of the metal that had the pinholes (easy because of the rust!) and then (probably) epoxy over the area once we've converted and encapsulated the rust. It makes me cringe... Attached thumbnail(s) 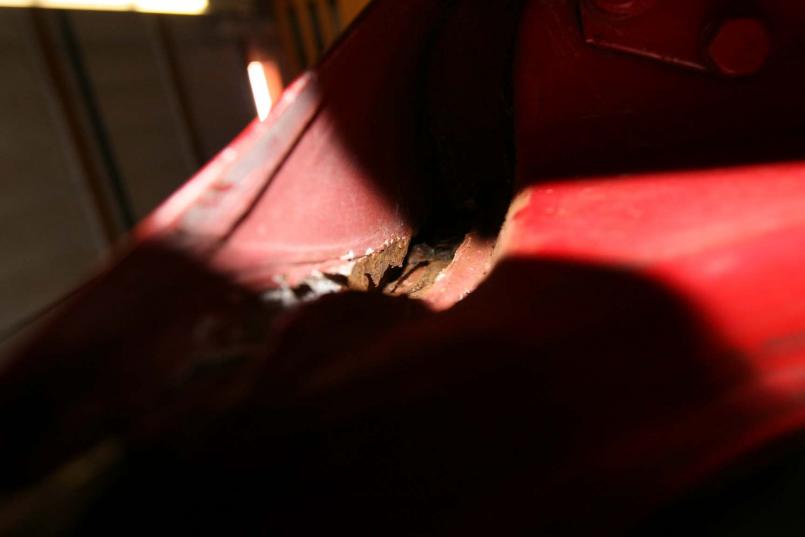 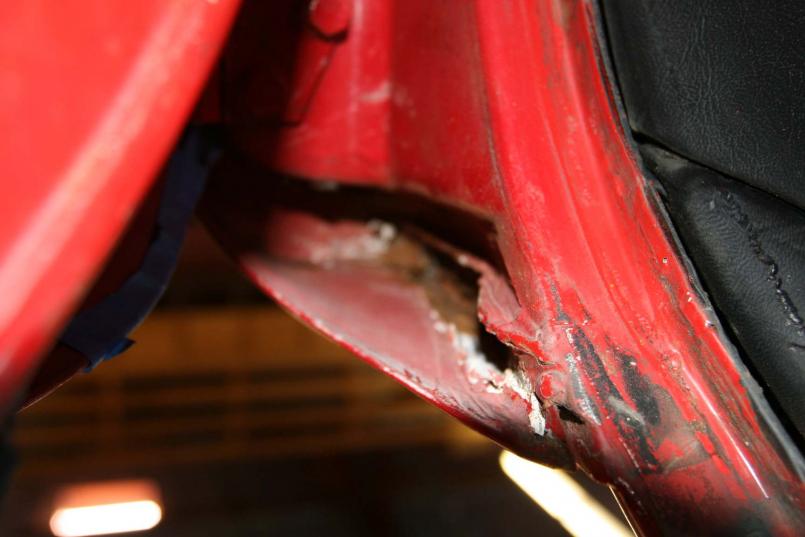
|
| McMark |
 Mar 6 2008, 12:26 AM Mar 6 2008, 12:26 AM
Post
#49
|
|
914 Freak!                Group: Retired Admin Posts: 20,179 Joined: 13-March 03 From: Grand Rapids, MI Member No.: 419 Region Association: None |
Looking good Pete! Glad to see the seam sealer gone. You're right that this is a major PITA and is completely necessary. This is especially important for those people who are media blasting their cars (soda, dry-ice included) because the blasting won't touch that stuff.
I stopped using canned primer/paint over my metal work because I had a few experiences where the rattle can paint didn't interact well with the final paint and caused bubbling. (IMG:style_emoticons/default/sad.gif) Now I figure a little surface rust comes off in two seconds with some 80 grit sandpaper, so why bother painting. (IMG:style_emoticons/default/wink.gif) I agree with the epoxy fix for the door jamb area. Everyone hates on epoxy/body filler/fiberglass and raves about welding, but sometimes it's just NOT worth the hassle when somethine else will work fine. |
| horizontally-opposed |
 Mar 6 2008, 12:39 AM Mar 6 2008, 12:39 AM
Post
#50
|
|
Advanced Member     Group: Members Posts: 3,453 Joined: 12-May 04 From: San Francisco Member No.: 2,058 Region Association: None 
|
While we were in there syndrome set in, so I decided to have John weld in an Engman kit and lower my driver's seat, as he figured, much to my surprise, that we can get 0.75-1.00-inch out of the height. As I have a VERY long torso (most of my 6 feet, 3 inches), this was very appealing to me.
I decided to give the go-ahead. And that's when the real fun with rust began.... Attached thumbnail(s) 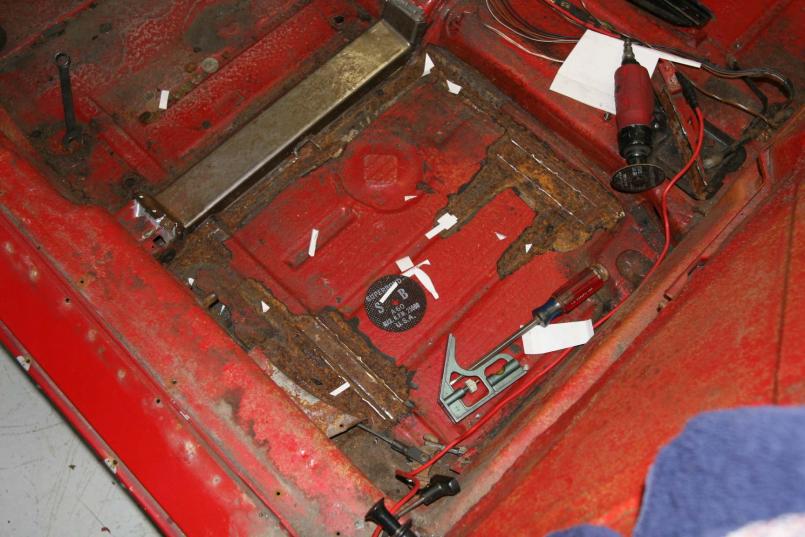
|
| dw914er |
 Mar 6 2008, 12:42 AM Mar 6 2008, 12:42 AM
Post
#51
|
|
Planning Cities     Group: Members Posts: 2,364 Joined: 1-March 08 From: Yucaipa, CA Member No.: 8,763 Region Association: Southern California |
man
that stuff is scary i just had a surface paint job on my car about a year ago, but it wasnt sanded down to metal, and it didnt cover the jams or anything, and now, i feel like i should strip the car and redo it all, to fix any surface rust, or anything worst i know stuff like the longs and stuff are fine, and the battery tray is still there (though there is some rust on it (isaw it when i relaced the battery a month ago) i am not completly satisfied with my paint job, not bad for a grand, and good color, but i had those door ding strips, and you can see where they covered it (the change in the paint at certian angles, and see old dings that werent fixed), and they covered some holes from the old wing i had on it, and one of the holes is beginning to crack, and then some mild surface rust in the trunks (all the jams, and everything on the inside hasnt been touched since it left germany back in august 73 i need to win the lotto, so i can start and redo the paint and fix any potential rust problems i cant see |
| horizontally-opposed |
 Mar 6 2008, 12:43 AM Mar 6 2008, 12:43 AM
Post
#52
|
|
Advanced Member     Group: Members Posts: 3,453 Joined: 12-May 04 From: San Francisco Member No.: 2,058 Region Association: None 
|
As you can see, as soon as the Bahia-painted tar was removed from the floorpan, and what you see was the stuff that came off easy, there was lots o' surface rust.
It makes my stomach turn... Then I removed the vinyl covering the various structural members under the seats and found them to be nice and rusty, too. A screwdriver went right through the forward beam under the driver's seat. Made the decision to "unoriginalize" this piece in the name of getting my seat down REAL easy... (IMG:style_emoticons/default/sad.gif) Second picture shows the beginning of the lowered boxed section. pete Attached thumbnail(s) 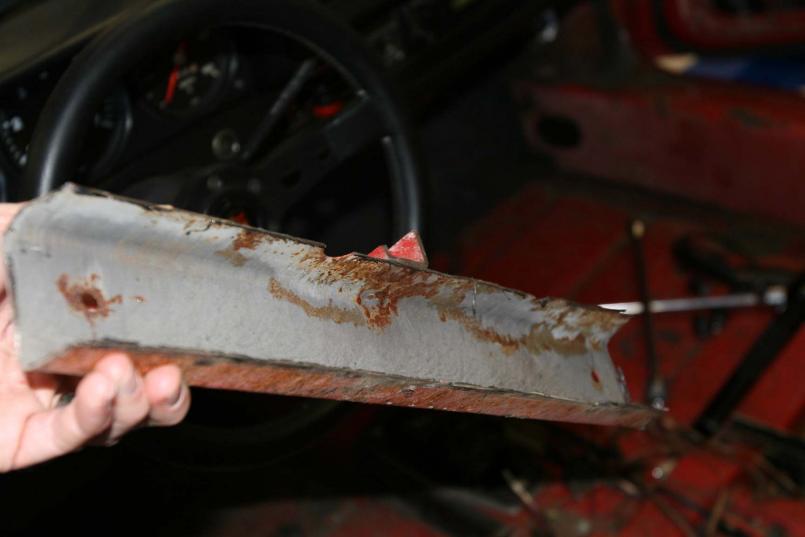 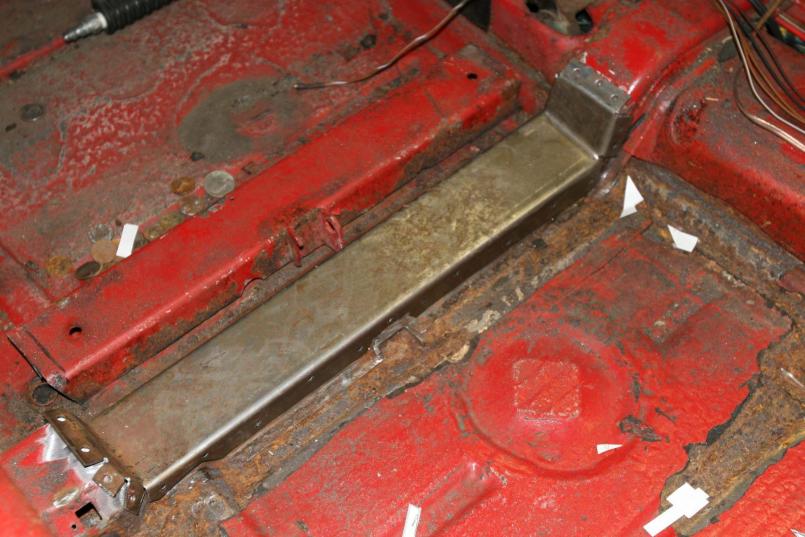
|
| rick 918-S |
 Mar 6 2008, 12:48 AM Mar 6 2008, 12:48 AM
Post
#53
|
|
Hey nice rack! -Celette                Group: Members Posts: 20,826 Joined: 30-December 02 From: Now in Superior WI Member No.: 43 Region Association: Northstar Region 

|
|
| horizontally-opposed |
 Mar 6 2008, 12:49 AM Mar 6 2008, 12:49 AM
Post
#54
|
|
Advanced Member     Group: Members Posts: 3,453 Joined: 12-May 04 From: San Francisco Member No.: 2,058 Region Association: None 
|
Get up close to things, and you can see where the rust is at work under the factory tar. A look down the front floorpan area indicates that only a little surface rust is having its fun along the lower longitudinal seam. We'll have to clear that up, too.
Oh yeah, you can see some of the change we've found here and there (there's been a LOT of it!!!!) and I thought I kept my floors pretty clean. Also found a cuff-link from prom in there.... Attached thumbnail(s) 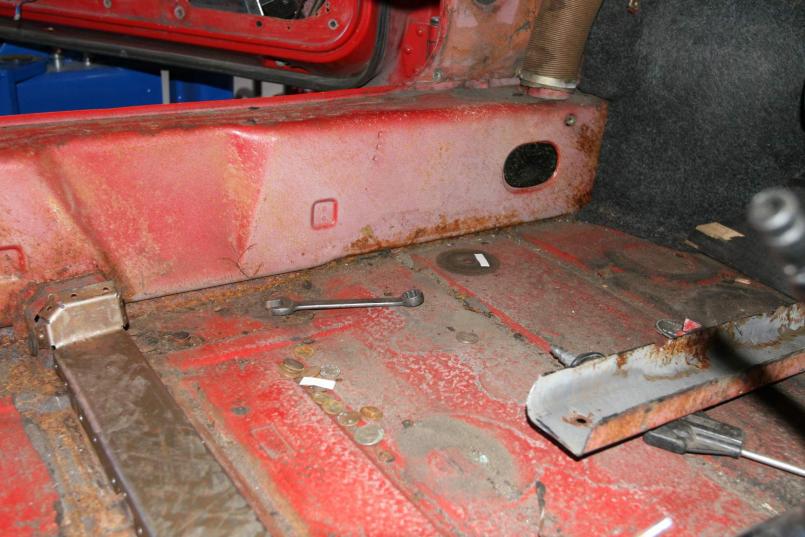
|
| horizontally-opposed |
 Mar 6 2008, 12:52 AM Mar 6 2008, 12:52 AM
Post
#55
|
|
Advanced Member     Group: Members Posts: 3,453 Joined: 12-May 04 From: San Francisco Member No.: 2,058 Region Association: None 
|
The right side beam under the seat, which appears to be much better than the left side (no perforation and seems strong), but will still need attention. Possibly a lot of attention...
So maybe passengers will get treated to a lower seating position, as well... (IMG:style_emoticons/default/wink.gif) Attached thumbnail(s) 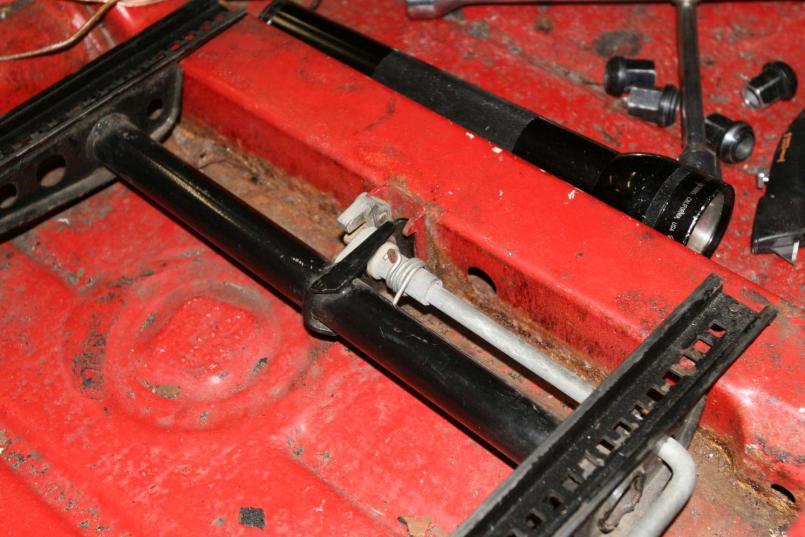
|
| horizontally-opposed |
 Mar 6 2008, 01:02 AM Mar 6 2008, 01:02 AM
Post
#56
|
|
Advanced Member     Group: Members Posts: 3,453 Joined: 12-May 04 From: San Francisco Member No.: 2,058 Region Association: None 
|
Unfortunately, here's where I got more than a little depressed and thought about rolling the car into the bay, or looking for a rust-free chassis...
(IMG:style_emoticons/default/icon8.gif) (IMG:style_emoticons/default/wacko.gif) (IMG:style_emoticons/default/unsure.gif) While the main firewall, hell hole (thank Mick for the Optima back in 1992!!!), and longitudinals appear to be good, this section has succumbed to the tin worm. Damn you thoroughly, brown monster! (IMG:style_emoticons/default/ar15.gif) (IMG:style_emoticons/default/ar15.gif) (IMG:style_emoticons/default/ar15.gif) We poked around in there quite a bit and the only good news is that the real firewall seems VERY strong. The bad news is that this is plain fugly. We'll fix it right, treat the area as best we can (possibily cutting "access" holes for the processs into this "outer" panel, and be thankful the Engman kit will cover this area and add strength. To be honest, and I know there are far braver rust fighters than I, this greatly disheartened me. But then, I have owned this car since high school and another chassis number just wouldn't be the same. Nonetheless, and PLEASE LISTEN TO ME HERE, fix that rear window, whatever it costs. I listened to mine rattle for years, and never took it too seriously. Now I am spending big hours and big bucks to fix the problems it created, years after I had the window fixed right. If you drive your 914 in the rain, this matters. And, if you wash your 914 with running water, this matters... pete Attached thumbnail(s) 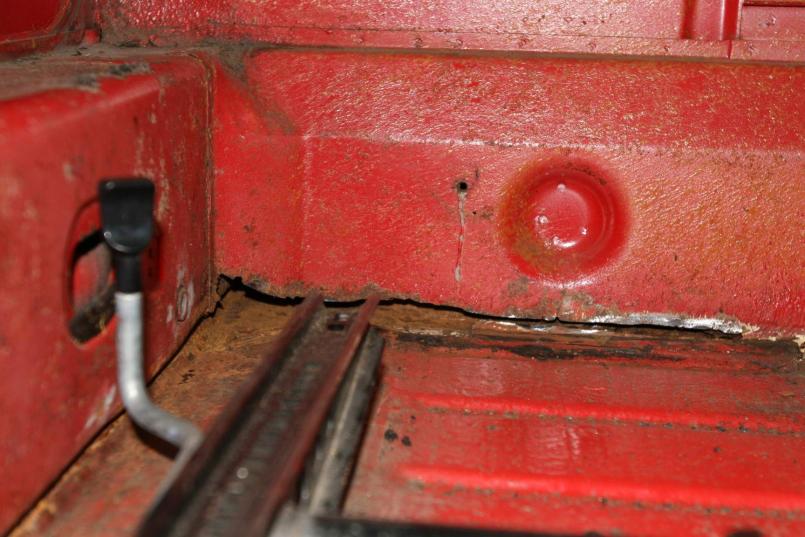
|
| horizontally-opposed |
 Mar 6 2008, 01:31 AM Mar 6 2008, 01:31 AM
Post
#57
|
|
Advanced Member     Group: Members Posts: 3,453 Joined: 12-May 04 From: San Francisco Member No.: 2,058 Region Association: None 
|
I stopped using canned primer/paint over my metal work because I had a few experiences where the rattle can paint didn't interact well with the final paint and caused bubbling. (IMG:style_emoticons/default/sad.gif) Yipes! Well, a little late now. I'll have the painter sand it all off and hope for the best. Or offer to do it myself. The car may come down to metal yet. Thanks for the encouraging words! Me needs them just now. (IMG:style_emoticons/default/sad.gif) pete |
| SirAndy |
 Mar 6 2008, 02:19 AM Mar 6 2008, 02:19 AM
Post
#58
|
|
Resident German                          Group: Admin Posts: 41,945 Joined: 21-January 03 From: Oakland, Kalifornia Member No.: 179 Region Association: Northern California |
If you drive your 914 in the rain, this matters. yieks! (IMG:style_emoticons/default/huh.gif) mine was bad, but not that bad ... (IMG:style_emoticons/default/shades.gif) Andy |
| Richard Casto |
 Mar 6 2008, 08:07 AM Mar 6 2008, 08:07 AM
Post
#59
|
|
Blue Sky Motorsports, LLC    Group: Members Posts: 1,465 Joined: 2-August 05 From: Durham, NC Member No.: 4,523 Region Association: South East States |
Unfortunately, here's where I got more than a little depressed and thought about rolling the car into the bay, or looking for a rust-free chassis... (IMG:style_emoticons/default/icon8.gif) (IMG:style_emoticons/default/wacko.gif) (IMG:style_emoticons/default/unsure.gif) While the main firewall, hell hole (thank Mick for the Optima back in 1992!!!), and longitudinals appear to be good, this section has succumbed to the tin worm. Damn you thoroughly, brown monster! (IMG:style_emoticons/default/ar15.gif) (IMG:style_emoticons/default/ar15.gif) (IMG:style_emoticons/default/ar15.gif) Pete, Don't give up! (IMG:style_emoticons/default/smile.gif) I am working on that same section on my car right now and it should be pretty easy to fix. I am also thinking about cutting in some access holes in that area. Both to treat/paint the inside of that bulkhead as well as monitor for rust over the long haul. I am 6'5" and I like how you lowered the box section/cross member to help lower the seat. I had thought about just cutting it completely out, but the lowered one looks good and keeps some strength in that area. I may have to steal that idea. (IMG:style_emoticons/default/wink.gif) Richard |
| McMark |
 Mar 6 2008, 12:56 PM Mar 6 2008, 12:56 PM
Post
#60
|
|
914 Freak!                Group: Retired Admin Posts: 20,179 Joined: 13-March 03 From: Grand Rapids, MI Member No.: 419 Region Association: None |
BTW, you saw you have The Crack®, right?
Attached thumbnail(s) 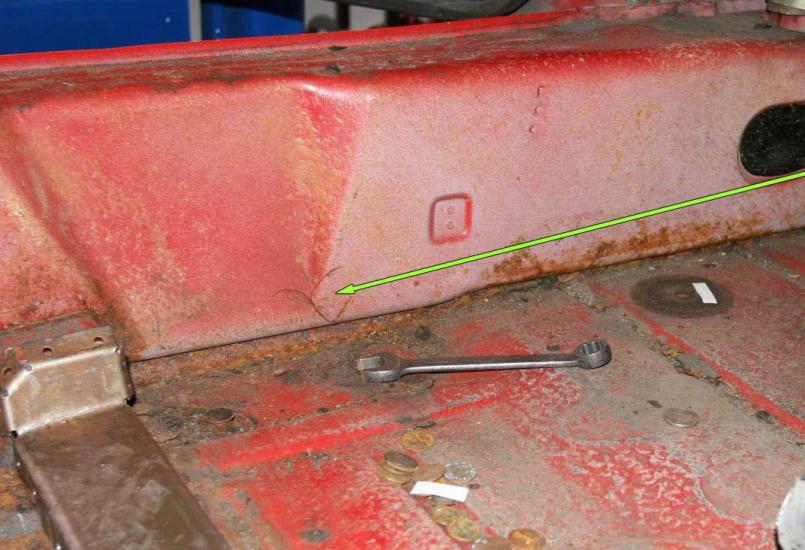
|
  |
1 User(s) are reading this topic (1 Guests and 0 Anonymous Users)
0 Members:

|
Lo-Fi Version | Time is now: 27th December 2024 - 03:20 AM |
Invision Power Board
v9.1.4 © 2024 IPS, Inc.


