|
|
|
Porsche, and the Porsche crest are registered trademarks of Dr. Ing. h.c. F. Porsche AG.
This site is not affiliated with Porsche in any way. Its only purpose is to provide an online forum for car enthusiasts. All other trademarks are property of their respective owners. |
|
|


| dbledsoe |
 Jul 5 2005, 11:03 AM Jul 5 2005, 11:03 AM
Post
#1
|
|
Mutineer  Group: Members Posts: 300 Joined: 13-May 03 From: Boise, ID. Member No.: 687 |
Got the engine & transaxle into the car, bolted up at the back, and ready to fabricate a few minor parts to make the new forward crossmember mate to the body. The forward crossmember was bought from Speedway Motors in Lincoln Nebraska for a grand total of $58 to my door (http://www.speedwaymotors.com/). The crossmember clears the shift linkage just fine. (IMG:http://www.914world.com/bbs2/html/emoticons/mueba.gif)
Attached thumbnail(s) 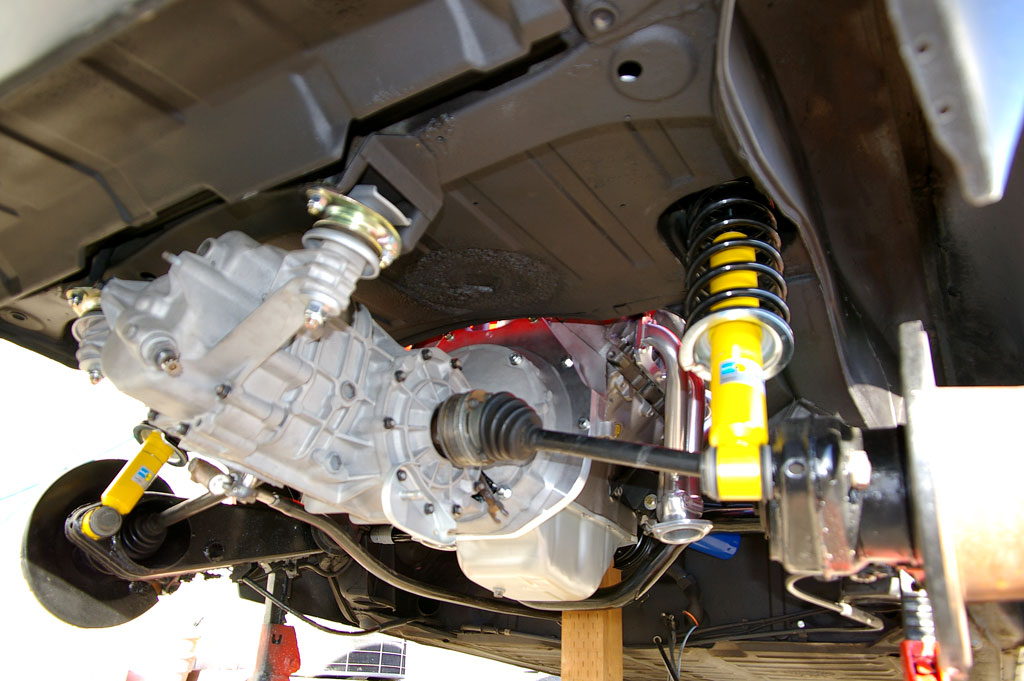
|
   |

 
|
  |
Replies(20 - 39)
| dbledsoe |
Jul 5 2005, 02:19 PM
Post
#21
|
||
|
Mutineer Group: Members Posts: 300 Joined: 13-May 03 From: Boise, ID. Member No.: 687 |
Hello Paul, The cross member came with two 1/4" thick uprights welded to it and a 3/4" tube welded into the upright that that extends about 1" from each side of the upright, fore and aft. The tube is what the rubber engine mount bolts pass through when bolting the engine in place. Luckily the uprights are off set about 1/3" from the centerline of the cross member (as viewed when looking down on the cross member). I cut off 1" of the 3/4" tube on the forward side of the cross member. Between that and the approx 1/3" off set I was able to get the cross member in place when bolted to the rubber engine mounts and slid all the way to the forward end of the rubber mounting blocks. That places the cross member slightly aft of the centerline of the original cross member. I then cut a pair of replacement bars to bolt to the engine cross member body mounting points from 1" wide x 1/4" thick 4140 steel bar stock (they replace the stamped steel pieces that the original cross member bolted to). I now plane to drill the mounting holes in the 4140 bar to match those of the body mounting points and will then drill a hole in the bar stock to mate up with the new cross member centerline. Since my cross member sit on top of the body mounting point, rather than hanging below it, I will have my machinist make a pair of round bar stock spacers to raise/lower the engine to the correct height for proper orientation i.e., level with the car fore and aft. I also cut a pair of 1 1/2" round bar 6" long that slip inside the tubular cross member. Those can be slid in or out to get the correct width to the mounting body points (the cross member as bought from Speedway is too short to span the full width of the centerline to centerline of the original cross member bolting holes so had to have its width extended). It sounds more complex than it is. Once I get all the pieces fabricated I'll snap some photos of it to give you a better idea what I'm talking about. Right now the front of the engine is actually supported by a 4x4 block of wood so I can get the cross member in and out to fabricate the additional pieces to complete the forward mount. I took your advice and cut 1" off the front of the water pump shaft. I did that before trying slip the engine up in there. That is some very hard material they make the shaft from. I started to, or should say attempted, to cut it with a brand new 32 teeth/inch hack saw and blade. Didn't even make a mark on the shaft! So I got out the trusty die grinder and cut-off wheel and went to work on it, and even that took some time. I'm glad you mentioned that in your other message because I would have found out while trying to lift the engine into the body that it would need to come out again to cut 1" of the shaft off. It looks like the best place to mount the alternator will be on the lower left side front of the engine. I suspect I'll need to fabricate a bracket for that. Best regards, Don |
||
|
|
|
||
| xsboost90 |
Jul 5 2005, 02:54 PM
Post
#22
|
|
Senior Member Group: Members Posts: 1,393 Joined: 2-August 04 From: cincinnati Member No.: 2,432 |
awwww. i was looking for a grand national turbo laying on top of that sucker! Super clean install though.
|
|
|
|
| Mueller |
Jul 5 2005, 02:59 PM
Post
#23
|
|
914 Freak! Group: Members Posts: 17,146 Joined: 4-January 03 From: Antioch, CA Member No.: 87 Region Association: None |
wow, super clean....another person I don't like very much, LOL
the V6 looks great in there, I always thought a nice V6 seemed like a better choice than a V8 in a 914 (IMG:http://www.914world.com/bbs2/html/emoticons/smash.gif) |
|
|
|
| dbledsoe |
Jul 5 2005, 03:11 PM
Post
#24
|
||
|
Mutineer Group: Members Posts: 300 Joined: 13-May 03 From: Boise, ID. Member No.: 687 |
Not this one, unfortunately. This is a 3.8L pretty much stock except for the Edlebrock intake, Edlebrock Performer cam, Sanderson headers, and MSD distributor/ignition. This is, for lack of better words, sort of a "proof of concept car." It'll be my daily driver. I've got a 4.1 liter bare block on the engine stand in the garage getting ready to go to the machine shop for hot tanking, line honing, boring to .030" over, and decking the block head surfaces. When that one is built it'll be a bit more radical than the 3.8 and will go in my 76 914 (The 3.8L is in my 75 914). |
||
|
|
|
||
| dbledsoe |
Jul 5 2005, 03:16 PM
Post
#25
|
||
|
Mutineer Group: Members Posts: 300 Joined: 13-May 03 From: Boise, ID. Member No.: 687 |
The V6 is defintiely a much easier conversion than a V8, and as most know a V6 can make a lot of horsepower if one wants it. I did the engine installation into the car (lifting and getting it in place) completely by myself yesterday... well I did use an engine hoist and floor jack. (IMG:http://www.914world.com/bbs2/html/emoticons/smoke.gif) |
||
|
|
|
||
| propricer |
Jul 5 2005, 03:25 PM
Post
#26
|
|
Member Group: Members Posts: 365 Joined: 16-April 04 From: Morgan Hill, CA Member No.: 1,938 |
Wow ... absolutely gorgeous work ... I'm jealous !!!
|
|
|
|
| dbledsoe |
Jul 5 2005, 04:16 PM
Post
#27
|
||
|
Mutineer Group: Members Posts: 300 Joined: 13-May 03 From: Boise, ID. Member No.: 687 |
Thanks Ed! I consider that a a great compliment coming from someone who appears to have been around a lot of conversions. Best regards, Don |
||
|
|
|
||
| dbledsoe |
Jul 5 2005, 04:23 PM
Post
#28
|
|
Mutineer Group: Members Posts: 300 Joined: 13-May 03 From: Boise, ID. Member No.: 687 |
Here's a picture from the Speedway Motors web site showing what the cross member looks like.
Attached image(s) 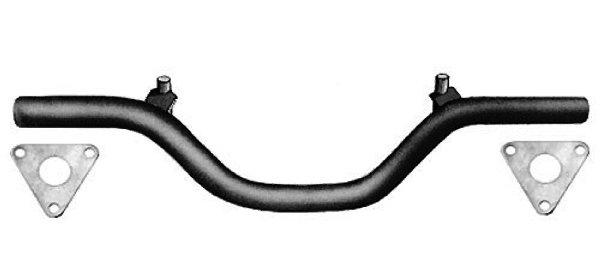
|
|
|
|
| drive-ability |
Jul 5 2005, 07:03 PM
Post
#29
|
|
Senior Member Group: Members Posts: 1,169 Joined: 18-March 05 From: Orange County, California Member No.: 3,782 |
Very clean job, really can't imagine anything cleaner. All due respects however sand blasting a transmission as you did in my opinion is not a good idea. Again its beautiful.
|
|
|
|
| hargray2 |
Jul 5 2005, 07:23 PM
Post
#30
|
|
fuh-q Group: Members Posts: 302 Joined: 12-December 03 From: hardeeville,sc Member No.: 1,432 |
Sounds like a good idea to me.
LOOKS like a good idea too! (IMG:http://www.914world.com/bbs2/html/emoticons/drooley.gif) |
|
|
|
| Brent |
Jul 5 2005, 07:28 PM
Post
#31
|
|
Every month is Oktober Group: Members Posts: 1,360 Joined: 16-December 04 From: North San Jose Member No.: 3,291 Region Association: Northern California |
Don,
The best pics I've seen (clarity) on this site. Thanks for not using a camera phone. What kinda camera? (I'm back in the market after lens failure due to tripod fall). |
|
|
|
| dbledsoe |
Jul 5 2005, 09:17 PM
Post
#32
|
||
|
Mutineer Group: Members Posts: 300 Joined: 13-May 03 From: Boise, ID. Member No.: 687 |
Brent, Thank you for the compliments on the pictures. The camera is a Pentax digital SLR (*ist DS) with their SMC DA 16-45 ED-AL lens. That lens is definitely a far cut above, when compared to the 18-55 lens they supply with the camera if bought in kit form. I've owned Canon digital SLR's and a number of Canon lenses, but prefer the compact size and features of the Pentax, not to mention that it will accept all Pentax lenses dating back to the screwmount lens days. But my favorite cameras and lenses are Leica M and R of the 35mm film generation. Should be no surprise to anyone who likes German autos. I'm by no means a professional, just am enthusiastic hobby photographer, same as with my 914 projects. Best regards, Don. |
||
|
|
|
||
| dbledsoe |
Jul 5 2005, 09:19 PM
Post
#33
|
||
|
Mutineer Group: Members Posts: 300 Joined: 13-May 03 From: Boise, ID. Member No.: 687 |
How come? |
||
|
|
|
||
| Randal |
Jul 5 2005, 11:29 PM
Post
#34
|
|
Advanced Member Group: Members Posts: 4,446 Joined: 29-May 03 From: Los Altos, CA Member No.: 750 |
Maybe I missed it on the posting, but what do you put on that "beautiful" transmission to keep it the same way as it is now?
All in all nice work; looks like a show car. |
|
|
|
| 914GT |
Jul 5 2005, 11:46 PM
Post
#35
|
||||
|
Senior Member Group: Members Posts: 1,100 Joined: 11-October 04 From: Tucson Member No.: 2,923 Region Association: Southwest Region |
There's the good possibility of sand getting into and past the seals. You could have oil leaks or worse, like damaged bearings and races. But you know all that and you protected sand from getting into those areas. The magnesium will look nice for awhile but will eventually turn dark, and dirt/oil/grease will adhere to the etched surface. But it does look great now. Hope you can keep it that way. |
||||
|
|
|
||||
| nine14cats |
Jul 5 2005, 11:55 PM
Post
#36
|
|
Bill Pickering -- 914-6 GT aka....Leeloo Group: Members Posts: 2,618 Joined: 10-February 03 From: Campbell, CA Member No.: 287 Region Association: None |
Wow! I really like the looks of that V6 in there....very pretty! (IMG:http://www.914world.com/bbs2/html/emoticons/smilie_pokal.gif)
Bill P. |
|
|
|
| Brent |
Jul 6 2005, 12:59 AM
Post
#37
|
||
|
Every month is Oktober Group: Members Posts: 1,360 Joined: 16-December 04 From: North San Jose Member No.: 3,291 Region Association: Northern California |
I didn't know Pentax even made those. I thought Cannon was the popula choice, nice to hear some realistic point of view. Keep up the pics though, the more of yours is the better my six will look. I always wondered what my 231 would look like with Edlebrock intake and such. -B |
||
|
|
|
||
| yahthatsright |
Jul 6 2005, 07:41 AM
Post
#38
|
|
Newbie Group: Members Posts: 43 Joined: 10-June 05 From: grand rapids, mi Member No.: 4,246 |
What kind of hp/torque will the six make?
|
|
|
|
| dbledsoe |
Jul 22 2005, 10:33 AM
Post
#39
|
|
Mutineer Group: Members Posts: 300 Joined: 13-May 03 From: Boise, ID. Member No.: 687 |
I finally got around to completing the forward motor mount/cross member (see photos below). Since I couldn't find any already made I came up with my own design using the cross member for a Buick V6 into a street roadster available from Speedway Motors ( http://www.speedwaymotors.com/xq/aspx/disp.../qx/product.htm ) for $50. The photo shows a close up of how I adapted it to fit the 914 chassis. My cross member sits on top of the 914 forward frame/body mounting points rather than hanging below them as do other V6/V8 conversion forward cross member/engine mount set ups. And because mine sit atop there must be a provision in the mount to make it narrower for installation and removal. To accomplish that I used 1.5" steel bar stock to slip inside the cross member allowing the mounting pad to telescope in and out for installation. Once installed they are held in position by a pair of 3/8" bolts running though the cross member and the bar stock tying both together. Total cost was about $80 for the complete motor mount/cross member.
Tonight I'll paint the end pieces and do the final installation in the car. That will complete the engine end of the car and then I can concentrate on the colloing system. Attached thumbnail(s) 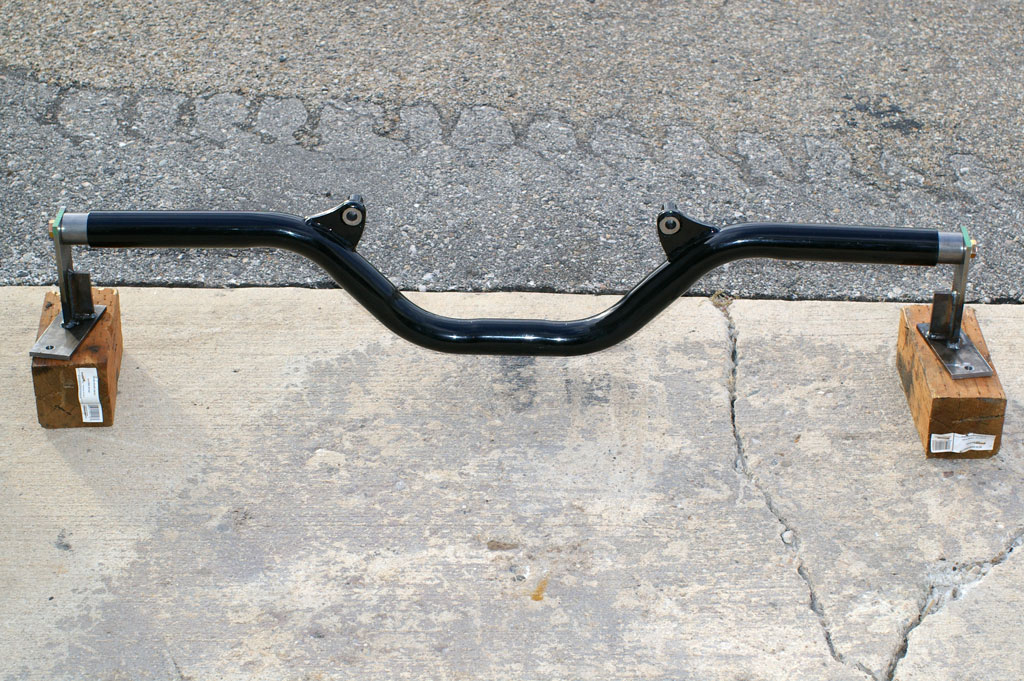
|
|
|
|
| dbledsoe |
Jul 22 2005, 10:34 AM
Post
#40
|
|
Mutineer Group: Members Posts: 300 Joined: 13-May 03 From: Boise, ID. Member No.: 687 |
Close up of end piece.
Attached thumbnail(s) 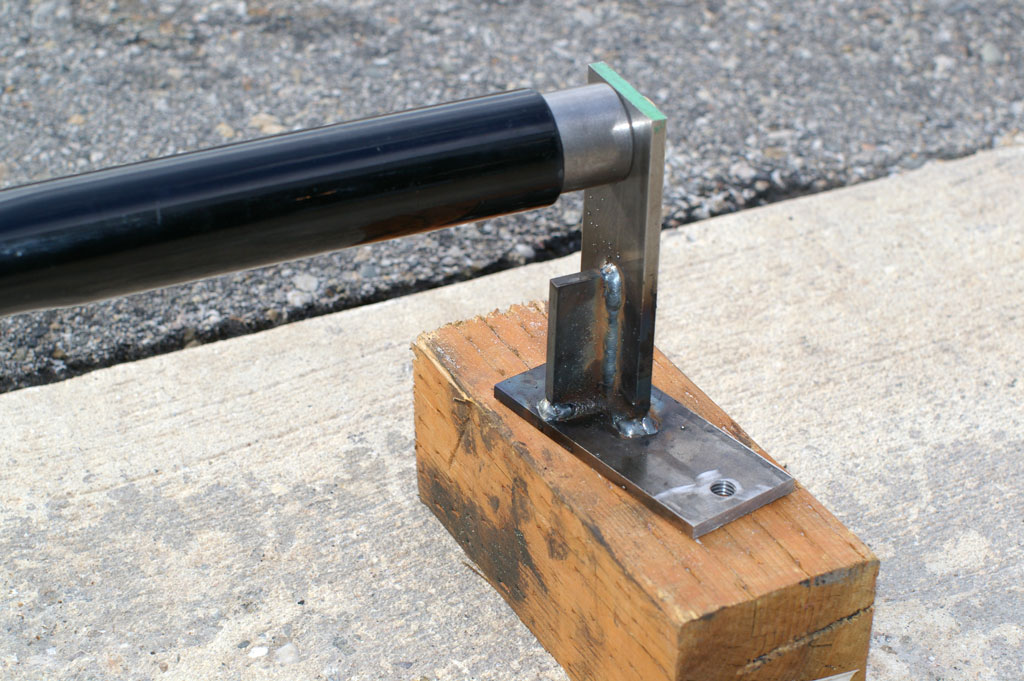
|
|
|
|
|
1 User(s) are reading this topic (1 Guests and 0 Anonymous Users)
0 Members:

|
Lo-Fi Version | Time is now: 26th June 2024 - 12:13 AM |
Invision Power Board
v9.1.4 © 2024 IPS, Inc.