|
|
|
Porsche, and the Porsche crest are registered trademarks of Dr. Ing. h.c. F. Porsche AG.
This site is not affiliated with Porsche in any way. Its only purpose is to provide an online forum for car enthusiasts. All other trademarks are property of their respective owners. |
|
|


| ThePaintedMan |
 Dec 29 2011, 07:02 PM Dec 29 2011, 07:02 PM
Post
#1
|
|
Advanced Member  Group: Members Posts: 3,886 Joined: 6-September 11 From: St. Petersburg, FL Member No.: 13,527 Region Association: South East States |
Hello all,
I'm finally getting around to documenting my restoration after the past several months of work. This may not get updated immediately as I'm trying to get as much done as possible before grad school kicks in again in January. However, I'm going to try and post pics when I can. I purchased this car from a gentleman less than ten minutes from my house named Ray. He apparently is/was a member on the forum as well and was a very cool guy to meet. We talked several times about the car and he was very up-front about its condition (to the best of his own knowledge). He recommended it be used only for the drivetrain, which at this point seems like it was the correct suggestion. However, being 27 and stubborn, I saw it as an opportunity. Most of my experience in the past has been with American and Japanese cars from the the 1980s and newer, and most of that spent doing body work. This car I saw as a chance to learn something (mostly because I figured I couldn't make it any worse than it already was (IMG:style_emoticons/default/biggrin.gif) . So, after seeing the thing run and falling in love, I gave Ray 1,000 for it and convinced my girlfriend to help me tow it home. Unfortunately I do not have pictures of this, but wish I did! The look on her embarased face was something like, "Oh my God, now I've become trailer trash." We towed it five miles clunking the whole way because Ray failed to mention that the CV joints had been disconnected from the wheel. What a ride home. I then set to work on it immediately, replacing a broken clutch fork and cable over the span of a weekend. Drove it around for two weeks to make sure I was still crazy enough to keep it, then began tearing it down. I should mention several things. First of all, this car always had an intention of being raced, which initially was to be in Chumpcar. However, I realized the amount of work needed just to get the thing safe to drive warranted me keeping it for more than just track use. So, at the moment, its going to race Chumpcar next August, and I'm going to PRAY it doesn't get clobbered so that it can be driven afterward. Trust me, I already know I'm (IMG:style_emoticons/default/wacko.gif) . Second, I have made it a point and a promise (to my forever understanding girlfriend) that I'm going to keep the cost to a minimum. That means a minimum of pre-fabbed parts, which also forces me to learn more about metal working as well. This build is certainly not up the past quality work of many of the folks on this board, but like I said, I'm a cheapskate (student loans ain't what they used to be). So, here it goes! I'll try to explain more as I go along. Attached thumbnail(s) 
|
   |

 
|
  |
Replies(140 - 159)
| ThePaintedMan |
Aug 14 2012, 02:28 PM
Post
#141
|
|
Advanced Member Group: Members Posts: 3,886 Joined: 6-September 11 From: St. Petersburg, FL Member No.: 13,527 Region Association: South East States |
QUOTE(JawjaPorsche @ Aug 14 2012, 03:00 PM)  And you did all this while on your back! I am impressed! I guess the PO has enter witness protection to prevent a real ass whupping! Yeah, wait till you see the pics. Its bad. I honestly never knew a car could be so neglected. Scratch that, if all he did was neglect it, I would be fine. Instead, this owner or owners made it worse with redneck engineering. I'm learning a real appreciation for doing things the right way the first time! Out of curiousity, since we don't really have anyone in Florida that I know of who does good machine work, do any of you think it would be reasonable/remotely cost effective to ship heads to one of the many shops you guys have out in California? |
|
|
|
| rnellums |
Aug 14 2012, 02:34 PM
Post
#142
|
|
Professional Enthusiast Group: Members Posts: 1,646 Joined: 26-November 09 From: Littleton, CO Member No.: 11,072 Region Association: Rocky Mountains |
It seems to me like rebuilding those heads would be WAY more trouble than it is worth. I would think that finding some 1.7 heads off a core engine wouldn't be too hard...
|
|
|
|
| URY914 |
Aug 14 2012, 02:35 PM
Post
#143
|
|
I built the lightest 914 in the history of mankind. Group: Members Posts: 122,935 Joined: 3-February 03 From: Jacksonville, FL Member No.: 222 Region Association: None |
I think I have some heads if you need them. I'll look this weekend.
|
|
|
|
| ThePaintedMan |
Aug 14 2012, 04:34 PM
Post
#144
|
|
Advanced Member Group: Members Posts: 3,886 Joined: 6-September 11 From: St. Petersburg, FL Member No.: 13,527 Region Association: South East States |
Paul,
That would be fantastic! Let me know what you're looking to get for them. Either way, it would be nice to finally get over to your place to check out your car, even though it'll stay boxed up till it cools off a little more. Also, I forgot to mention this. Guess how many copper sealing rings were under the manifolds? I pulled out 7 of them. No wonder why it wasn't sealing right and one side of the exhaust was higher than the other. |
|
|
|
| FourBlades |
Aug 14 2012, 05:06 PM
Post
#145
|
|
From Wreck to Rockin Group: Members Posts: 2,056 Joined: 3-December 07 From: Brevard, FL Member No.: 8,414 Region Association: South East States |
Sorry you are having so much trouble with the exhaust. (IMG:style_emoticons/default/sad.gif) A better set of heads and sealed up exhaust will make your engine run much better, maybe fixing some of the carb/ignition problems you were having. John |
|
|
|
| URY914 |
Aug 14 2012, 05:15 PM
Post
#146
|
|
I built the lightest 914 in the history of mankind. Group: Members Posts: 122,935 Joined: 3-February 03 From: Jacksonville, FL Member No.: 222 Region Association: None |
Right now I have nothing schduled for Sat. if you want to come over and play 914's.
|
|
|
|
| Spoke |
Aug 14 2012, 07:29 PM
Post
#147
|
|
Jerry Group: Members Posts: 7,052 Joined: 29-October 04 From: Allentown, PA Member No.: 3,031 Region Association: None |
QUOTE(ThePaintedMan @ Aug 14 2012, 04:28 PM) owner or owners made it worse with redneck engineering. What is it that attracts redneck engineering to finely engineered German vehicles like the 914? |
|
|
|
| Dr Evil |
Aug 17 2012, 02:37 PM
Post
#148
|
|
Send me your transmission! Group: Members Posts: 23,030 Joined: 21-November 03 From: Loveland, OH 45140 Member No.: 1,372 Region Association: MidAtlantic Region |
|
|
|
|
| ThePaintedMan |
Sep 20 2012, 09:47 PM
Post
#149
|
|
Advanced Member Group: Members Posts: 3,886 Joined: 6-September 11 From: St. Petersburg, FL Member No.: 13,527 Region Association: South East States |
Been awhile, but as I cleaned out out my camera/sd card in preparation for my race on Saturday, I figured I'd post some of the madness I've had over the past month and half.
Below are pictures of the broken door hinge debacle. Note: it would have been easy to drive the pin out.... if it hadn't been broken in two different places! Not sure how that is possible, but I finally ended up cutting in in half. Found another half from the parts car at the end of the street and drove in two new pins from PP. Attached thumbnail(s) 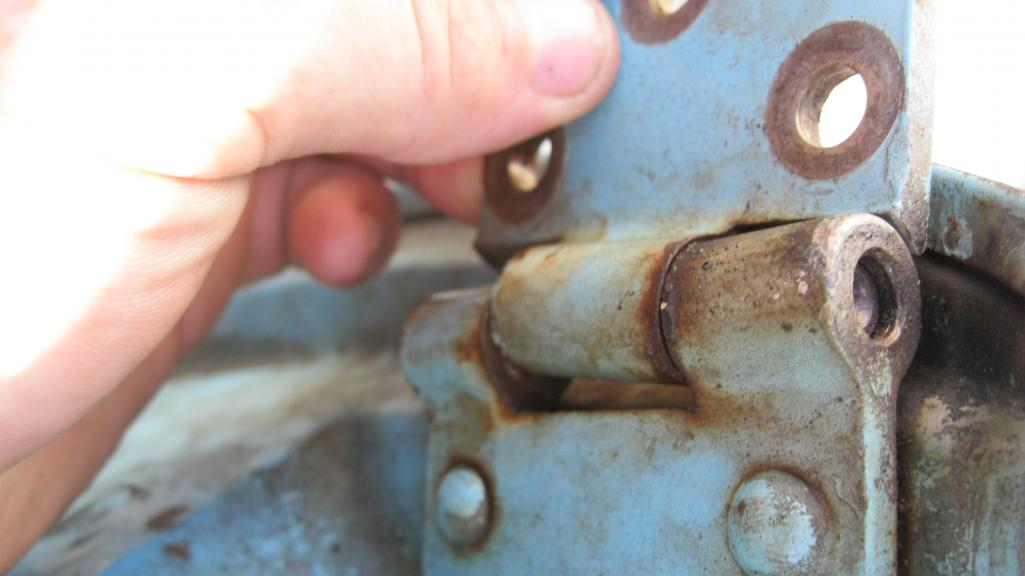 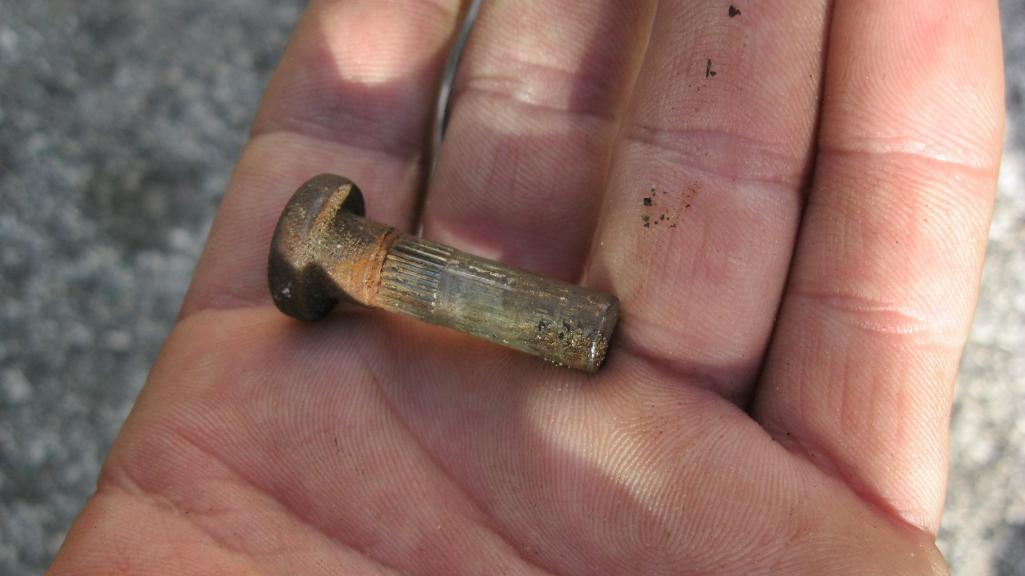 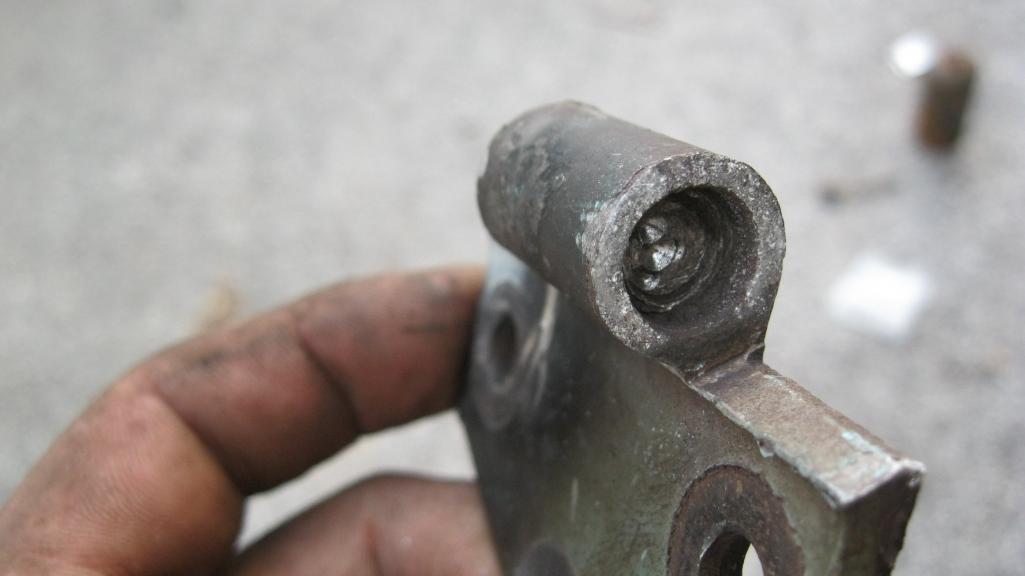
|
|
|
|
| ThePaintedMan |
Sep 20 2012, 09:51 PM
Post
#150
|
|
Advanced Member Group: Members Posts: 3,886 Joined: 6-September 11 From: St. Petersburg, FL Member No.: 13,527 Region Association: South East States |
... Then moved onto the exhaust. Think its pretty obvious how messed up this is, but what you're seeing are the he's welded straight to the muffler, then cut/patched poorly. When I pulled the exhaust off, it cracked right in half.
Attached thumbnail(s) 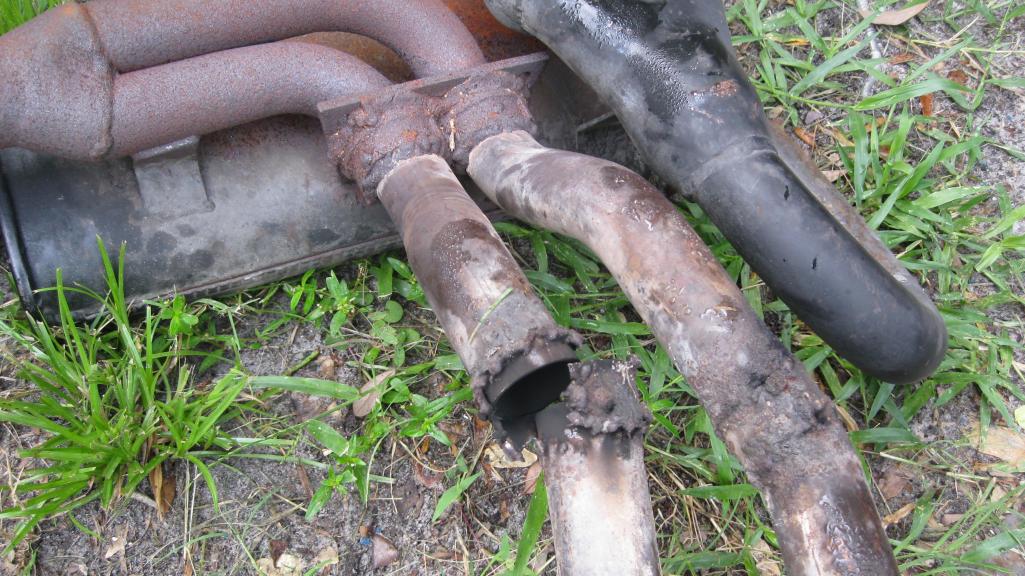
|
|
|
|
| ThePaintedMan |
Sep 20 2012, 10:13 PM
Post
#151
|
|
Advanced Member Group: Members Posts: 3,886 Joined: 6-September 11 From: St. Petersburg, FL Member No.: 13,527 Region Association: South East States |
Of course when the exhaust came off, it brought about another set of problems. Most of the studs were loose or already pulled out, so I ended up installing time serts for the time being. Paul (URY) found a set of heads he had, which I'm looking into getting rebuilt at a local machine shop. Paul, when I found out what condition they're in, we can figure out a price?
In the meantime, I'm stuck with these heads. I'm pretty sure #3 has a burned ex valve. Below is a picture - is there anything obvious from it? 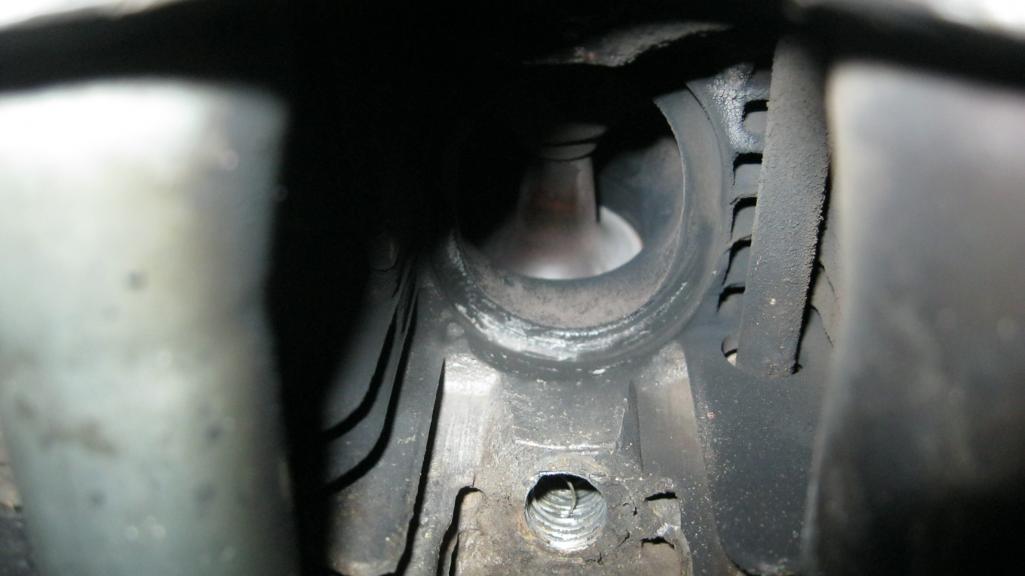 Also, last oil change was pretty curious. At the bottom of the tuna can was a bunch of crusty stuff. I ran a magnet through the sludge, and nothing stuck to it except a few very small slivers. I wonder where all this crap came from then? 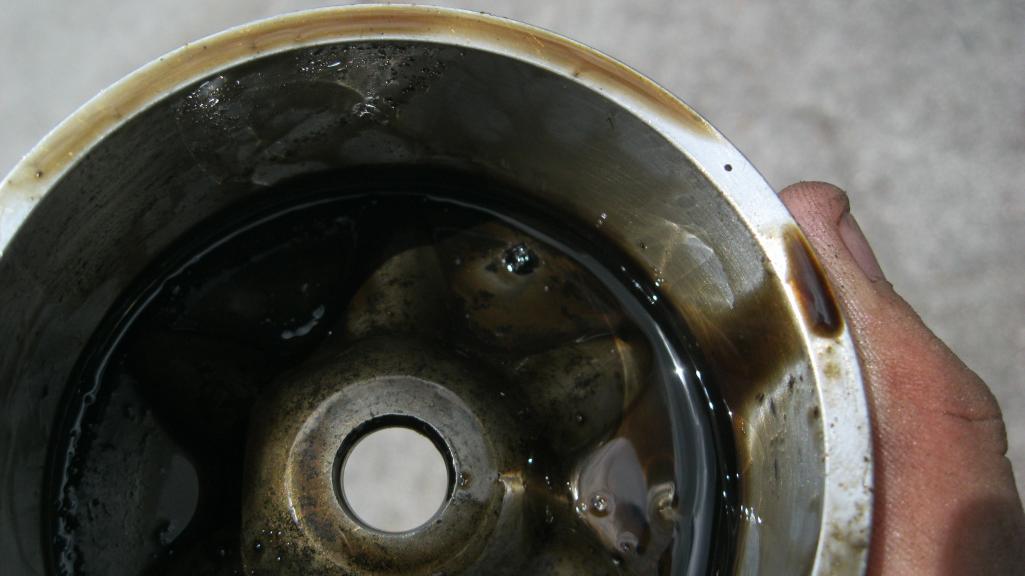 |
|
|
|
| Valy |
Sep 21 2012, 04:07 PM
Post
#152
|
|
Senior Member Group: Members Posts: 1,677 Joined: 6-April 10 From: Sunnyvale, CA Member No.: 11,573 Region Association: Northern California |
QUOTE(ThePaintedMan @ Sep 20 2012, 09:13 PM) Below is a picture - is there anything obvious from it? Seems to me that the plug hole was already fixed once but someone didn't take the time to cut a flat set for the plug. It can be fixed but make sure it's cut it straight this time. |
|
|
|
| ThePaintedMan |
Dec 12 2012, 07:58 PM
Post
#153
|
|
Advanced Member Group: Members Posts: 3,886 Joined: 6-September 11 From: St. Petersburg, FL Member No.: 13,527 Region Association: South East States |
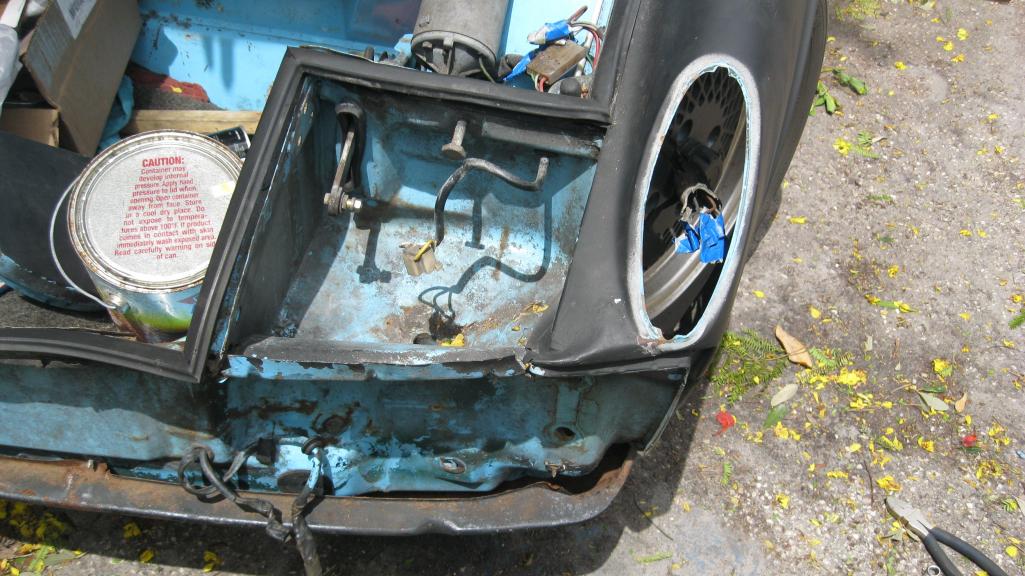
Been quite awhile, and in fact, only a little over a year after I purchased the car, I can't believe how far its come. Dropped a transmission, drove it, dropped the trans/engine, repaired the passenger long, floorboards, put the drivetrain back in and now almost ready for paint in a little over 12 months. So, after the Tropical Ramble, landing a full-time gig and sort of figuring out school and money for the time being, I got a chance to tackle what I consider my specialty (and my favorite hobby, believe it or not) - bodywork. I started with the front and rear trunks.
Attached thumbnail(s) 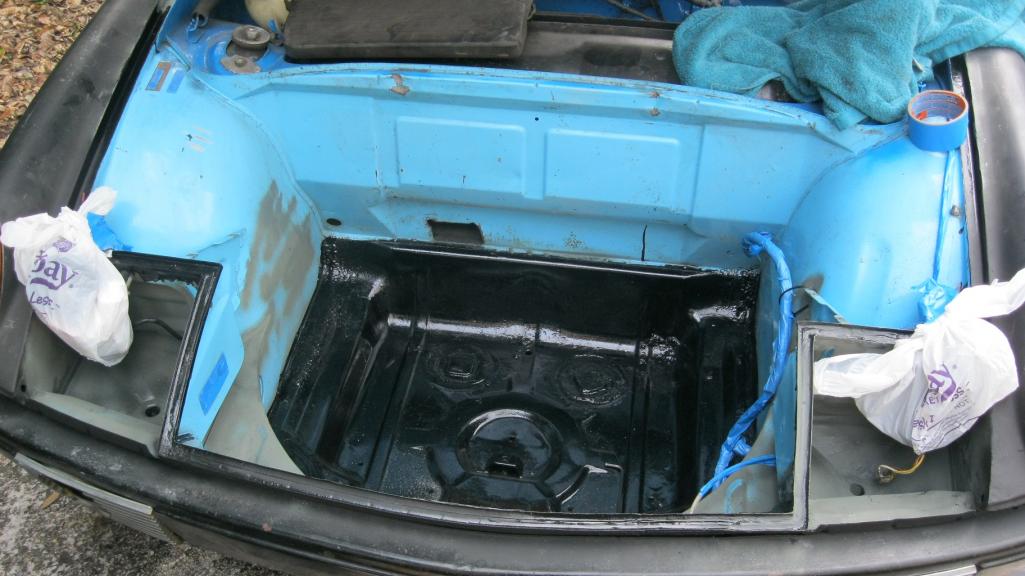
|
|
|
|
| ThePaintedMan |
Dec 12 2012, 08:09 PM
Post
#154
|
|
Advanced Member Group: Members Posts: 3,886 Joined: 6-September 11 From: St. Petersburg, FL Member No.: 13,527 Region Association: South East States |
I guess I don't have a good picture of the front trunk or rear trunk painted. But here is the prep work on the rear. This was probably one of the most difficult tasks I've done on the car. The PO sprayed some kind of rubberized undercoating all over it. The "lie detector", as Scotty B calls it, didn't work very well, neither did a standard wire wheel. The heat gun made progress but it was slow and I was removing a lot of good paint, which I felt was unnecessary, since there wasn't rust in the majority of the trunk. Finally I tried brake cleaner, which is dirty, greasy work, but removes that rubberized stuff like a charm. I wonder if the same would be true for you guys removing the floor tar? The last pic is after filling in pin holes and reapplying seam sealer where necessary, then a coat of POR.
Attached thumbnail(s) 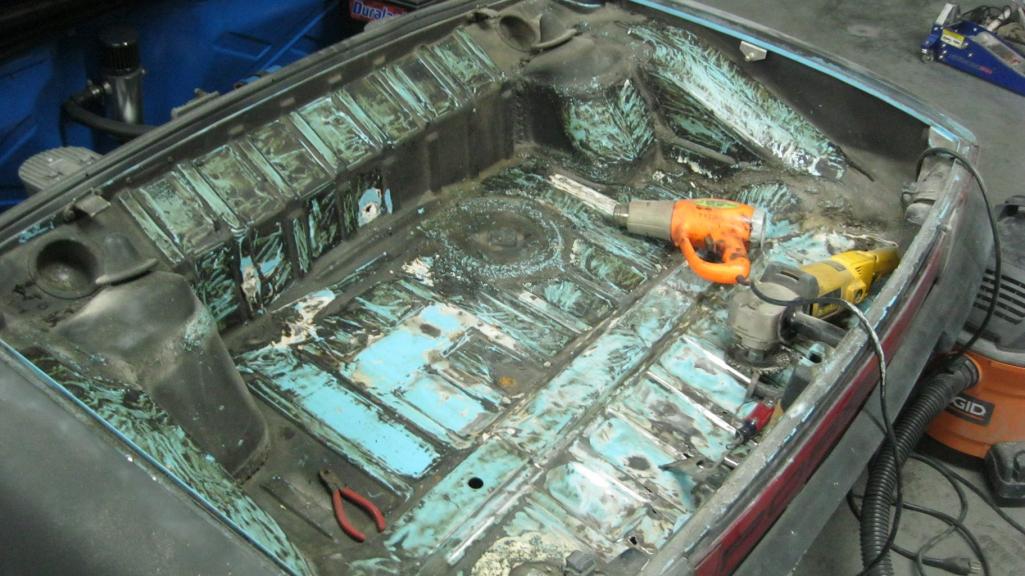 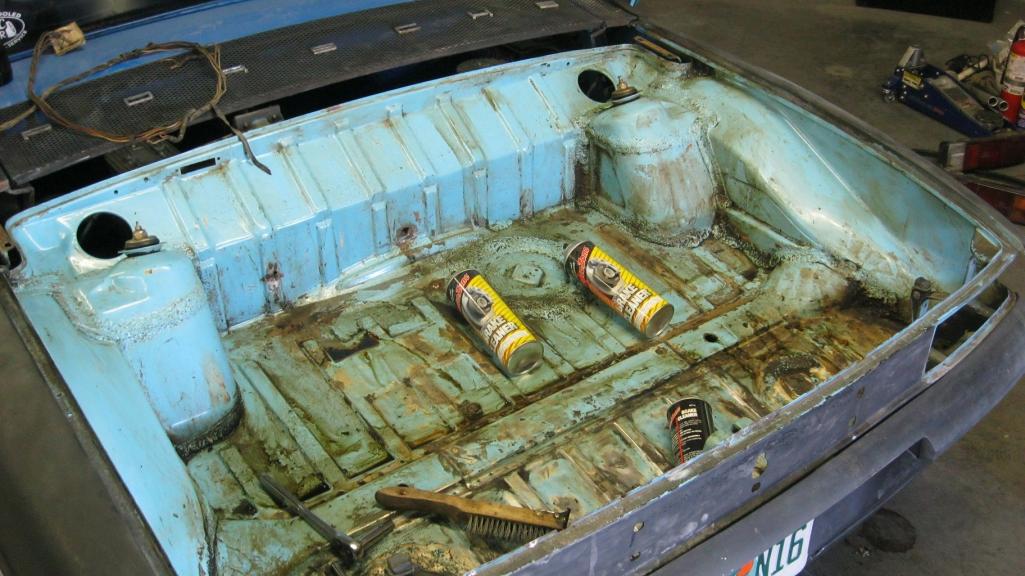 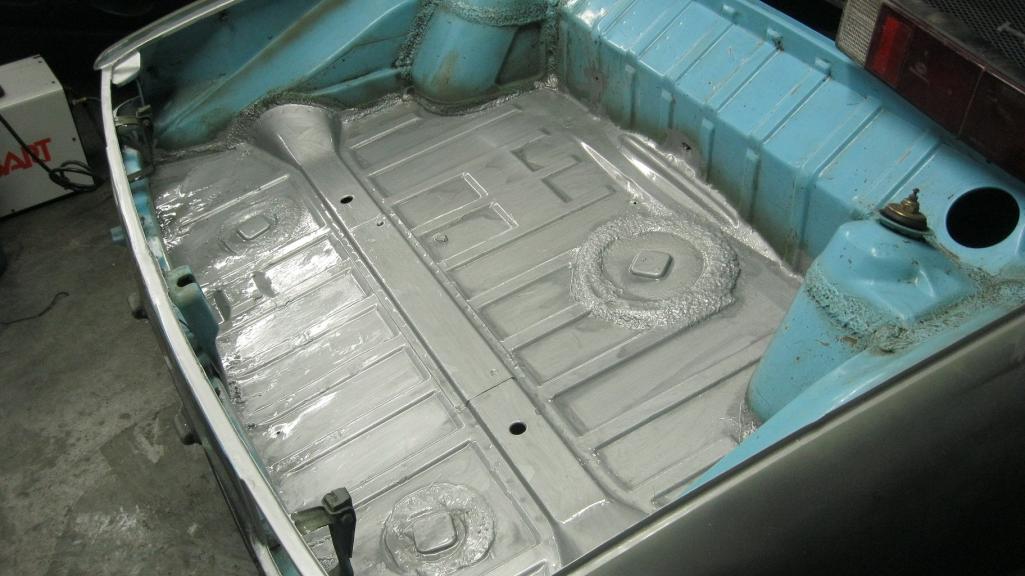
|
|
|
|
| billh1963 |
Dec 12 2012, 08:11 PM
Post
#155
|
|
Car Hoarder! Group: Members Posts: 3,403 Joined: 28-March 11 From: North Carolina Member No.: 12,871 Region Association: South East States |
That's awesome progress compared to many cars on this board that have been on jack stands for years!!!
|
|
|
|
| ThePaintedMan |
Dec 12 2012, 08:17 PM
Post
#156
|
|
Advanced Member Group: Members Posts: 3,886 Joined: 6-September 11 From: St. Petersburg, FL Member No.: 13,527 Region Association: South East States |
I've said from day one that this was to be a "rolling restoration." By that I mean, I wanted to get the car mechanically as sound as I could so I could enjoy it, even if it looks like a turd. The other part is that since I do not have the ability to own a compressor where I live, I have to drive to my previous company's shop (which they graciously allow me to use) in Tampa to do any kind of work that requires one. And, well, I'm tired of working outside. I also happen to work in Tampa, so when I get off at the end of the day I spend a couple hours doing a little bit of body work here and there with filler. Here is the last bit of welding that I had to do before I could start with the filler.
Attached thumbnail(s) 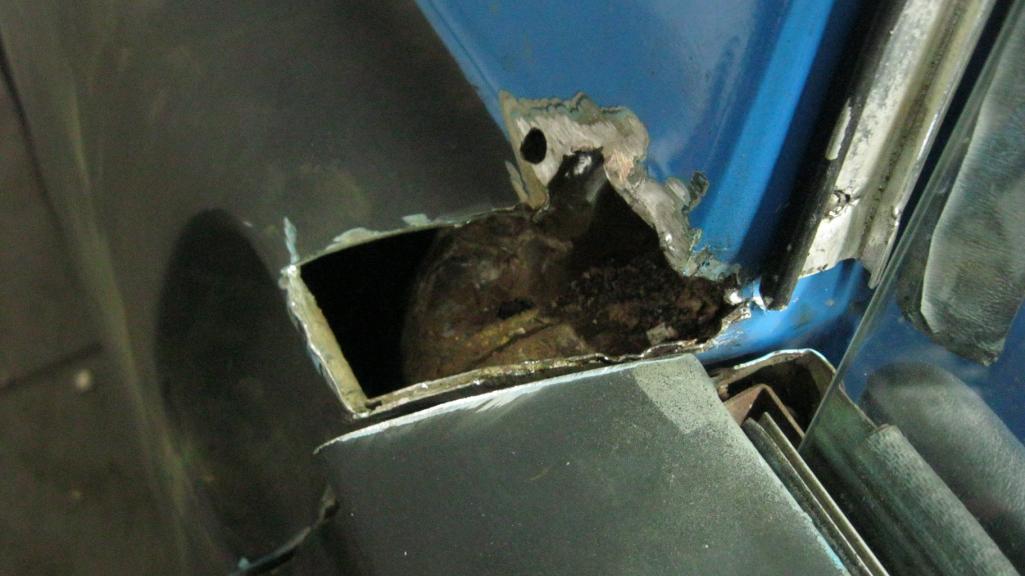
|
|
|
|
| Madswede |
Dec 12 2012, 08:22 PM
Post
#157
|
|
Flat Out Driver Group: Members Posts: 853 Joined: 13-September 06 From: Rio Rancho NM Member No.: 6,831 Region Association: Rocky Mountains |
(IMG:style_emoticons/default/smilie_pokal.gif) Lookin' good man!
|
|
|
|
| ThePaintedMan |
Dec 12 2012, 08:26 PM
Post
#158
|
|
Advanced Member Group: Members Posts: 3,886 Joined: 6-September 11 From: St. Petersburg, FL Member No.: 13,527 Region Association: South East States |
Unfortunately I welded this up with flux-core prior to the Tropical Ramble, where John Faure (Fourblades) so graciously donated his great Hobart mig setup (IMG:style_emoticons/default/headbang.gif) . However, as John said, the proverbial and literal torch has been passed and I plan to put it to good use with the roll cage. Thank you once again John.
On a side note, if any of you are ever going to re-paint your cars or do any work around the door jamb area, make sure to check not only the little round vent for rust, but also the area I cut out. Poke and prod there and more than likely you will find plenty of weak metal. If you didn't have the sail panel trim, you might get lucky. This is a big blunder I think on Karmann's part - below you will see the white epoxy-like chunks I scraped out of this area, which trapped water, most of which came in through the holes in the sail panel. Attached thumbnail(s) 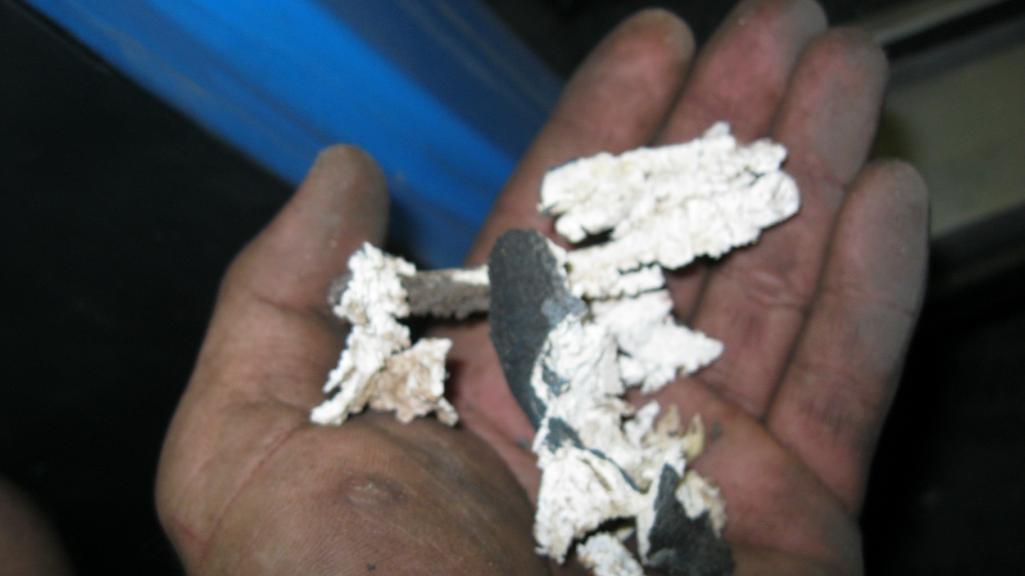
|
|
|
|
| ThePaintedMan |
Dec 12 2012, 08:31 PM
Post
#159
|
|
Advanced Member Group: Members Posts: 3,886 Joined: 6-September 11 From: St. Petersburg, FL Member No.: 13,527 Region Association: South East States |
Here is something interesting. I didn't know till recently looking at all the other cars at the TR that the fenders are not supposed to be flush with the cowl. The PO of my car had at some point filled all this in. So, I ground out the filler to see what was underneath. Sure enough, the fenders are welded to the cowl where there would normally be a seam. Luckily, they did a decent job and there was no rust under the filler, so I re-filled it.
Attached thumbnail(s) 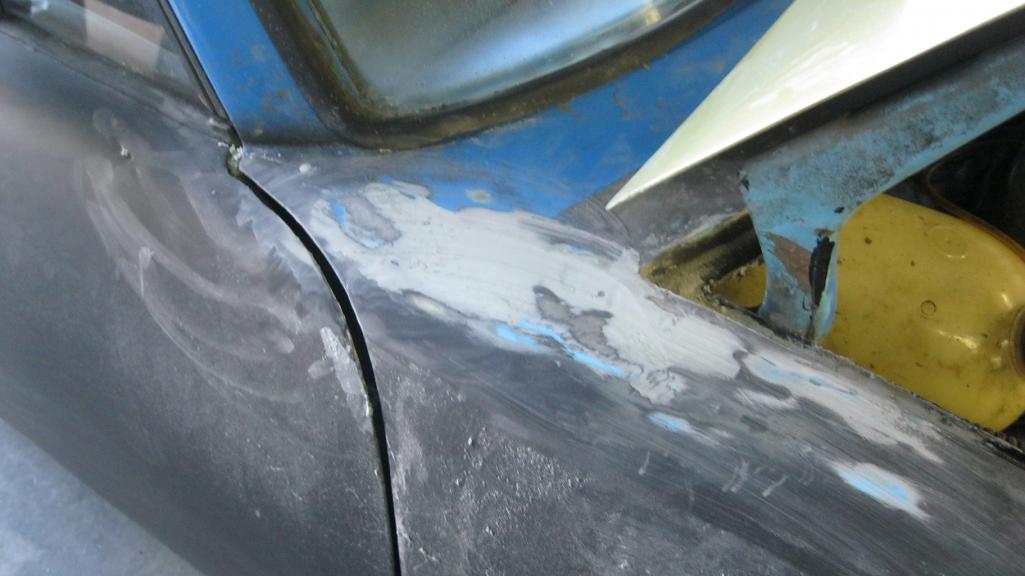
|
|
|
|
| ThePaintedMan |
Dec 12 2012, 08:42 PM
Post
#160
|
|
Advanced Member Group: Members Posts: 3,886 Joined: 6-September 11 From: St. Petersburg, FL Member No.: 13,527 Region Association: South East States |
Almost forgot about this. The front of this car was tagged pretty good at some point, obviously.
 The headlight bucket was pretty buckled. If I were in a different spot financially or this car had been in better shape to begin with, I would have just sourced a replacement piece. 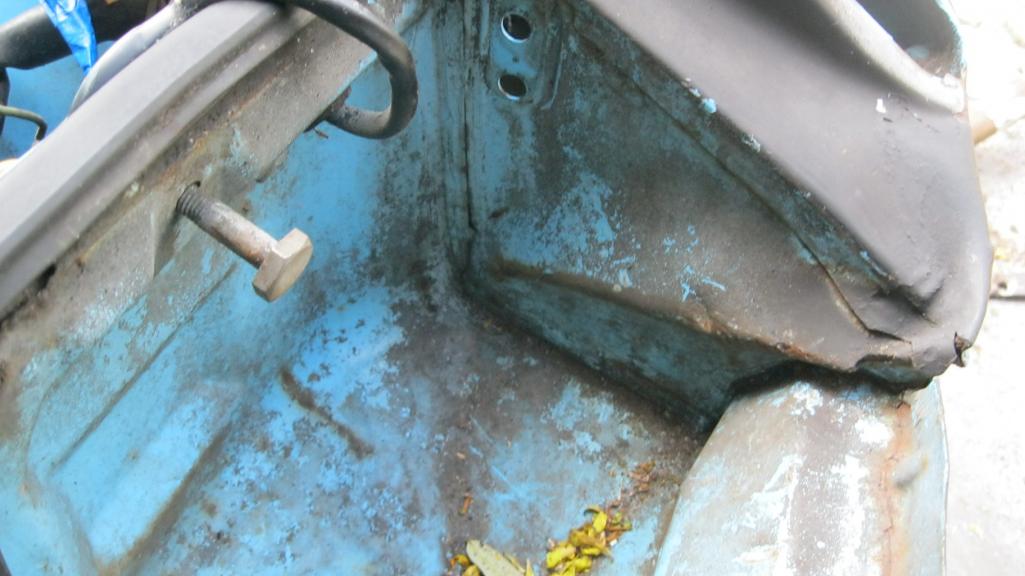 But, as I wanted to learn more about metal and collision work during this process, I thought this would be a good chance. Started by drilling out spot welds (anyone else who has tackled any metal work will know this is usually the first step). 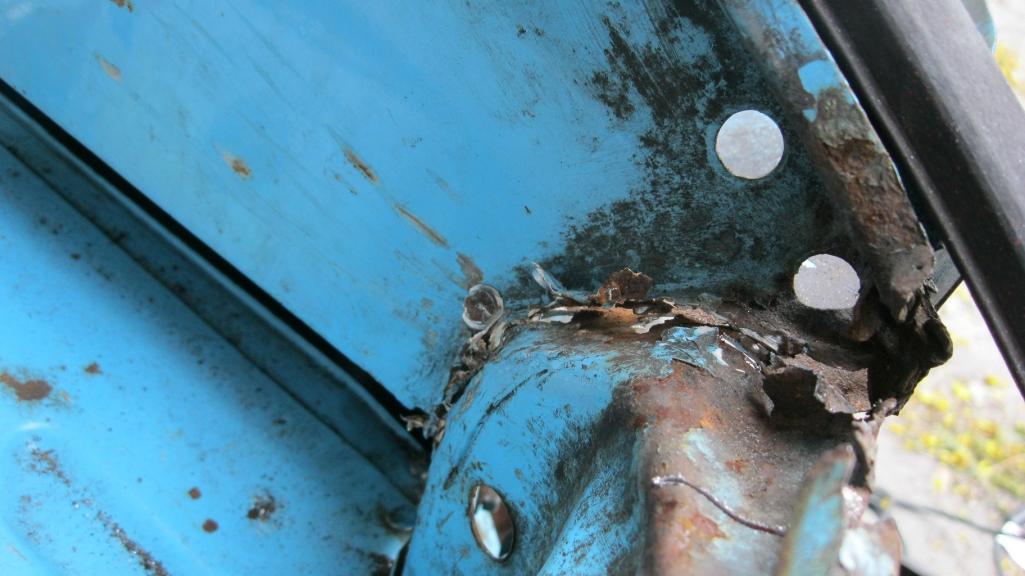 |
|
|
|
|
2 User(s) are reading this topic (2 Guests and 0 Anonymous Users)
0 Members:

|
Lo-Fi Version | Time is now: 21st September 2024 - 06:49 PM |
Invision Power Board
v9.1.4 © 2024 IPS, Inc.