|
|

|
Porsche, and the Porsche crest are registered trademarks of Dr. Ing. h.c. F. Porsche AG.
This site is not affiliated with Porsche in any way. Its only purpose is to provide an online forum for car enthusiasts. All other trademarks are property of their respective owners. |
|
|
  |
| cary |
 Jan 1 2014, 10:10 PM Jan 1 2014, 10:10 PM
Post
#286
|
|
Advanced Member     Group: Members Posts: 3,900 Joined: 26-January 04 From: Sherwood Oregon Member No.: 1,608 Region Association: Pacific Northwest 
|
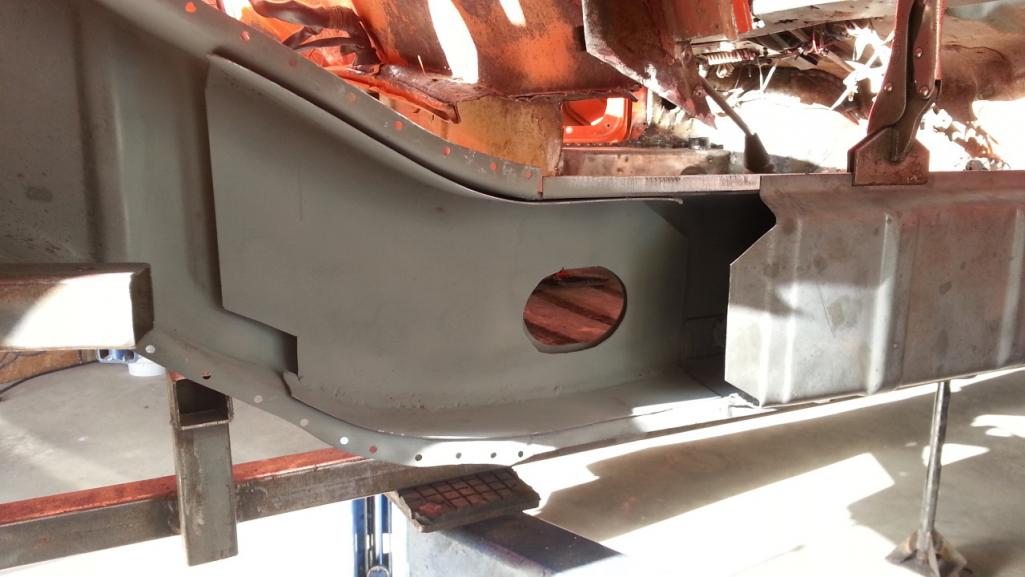
After I finished modifing the front end of the long.
I made the MONEY CUT ................. Only measured about 6 times. 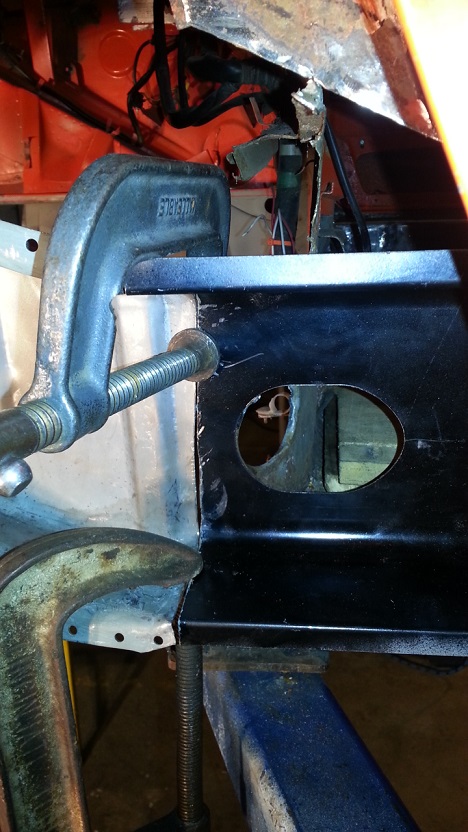 Bad news. It will need more fiddling. The upper long is wider than the lower long. (IMG:style_emoticons/default/mad.gif) And the bottom radius of the upper long doesn't match the back lower radius of the lower long. It will need more fiddling 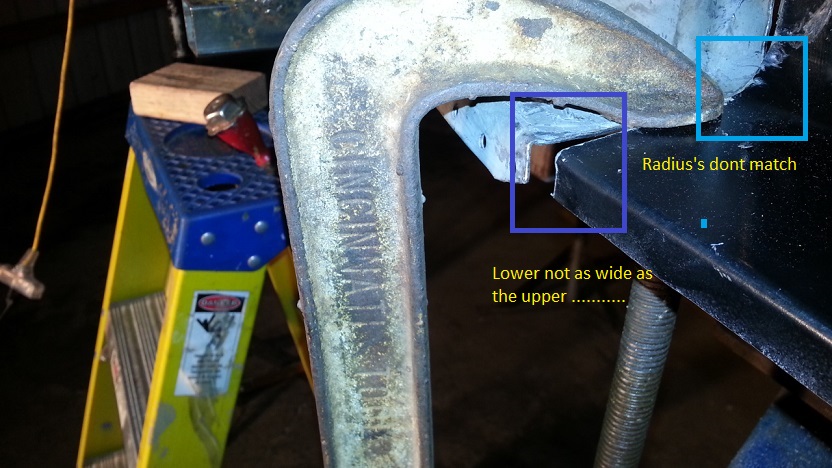 |
| cary |
 Jan 1 2014, 10:58 PM Jan 1 2014, 10:58 PM
Post
#287
|
|
Advanced Member     Group: Members Posts: 3,900 Joined: 26-January 04 From: Sherwood Oregon Member No.: 1,608 Region Association: Pacific Northwest 
|
Ended the day with measuring the door vs. the long on the inside.
Drivers side, long already attached. 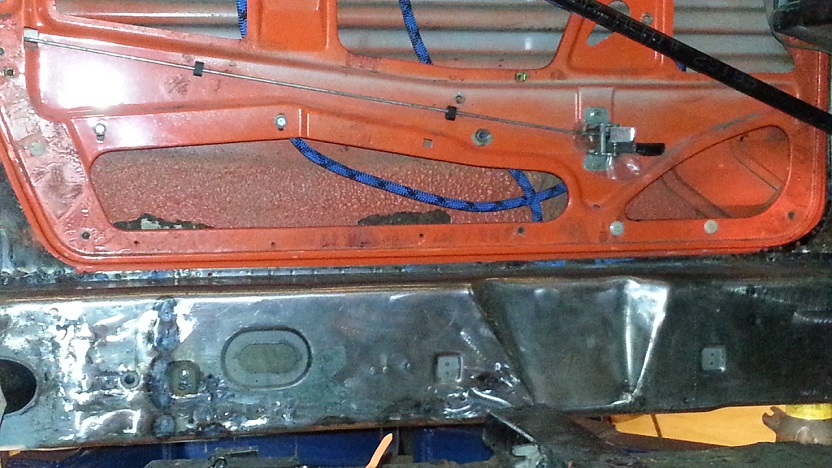 I'm real happy with that ...................... (IMG:style_emoticons/default/smilie_pokal.gif) The right side ............... not so much. Glad its not attached ...................... 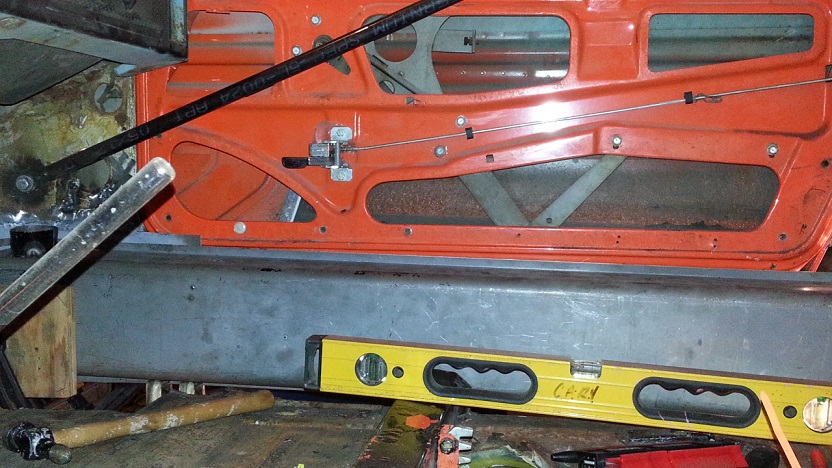 A little more fussing with that front end will lower the front a 1/4 inch. |
| sixnotfour |
 Jan 1 2014, 11:18 PM Jan 1 2014, 11:18 PM
Post
#288
|
|
914 Wizard           Group: Members Posts: 10,706 Joined: 12-September 04 From: Life Elevated..planet UT. Member No.: 2,744 Region Association: Rocky Mountains 

|
that seals the deal for me , I am going to salvage a right inner long for my project...Great Job Cary
|
| cary |
 Jan 1 2014, 11:45 PM Jan 1 2014, 11:45 PM
Post
#289
|
|
Advanced Member     Group: Members Posts: 3,900 Joined: 26-January 04 From: Sherwood Oregon Member No.: 1,608 Region Association: Pacific Northwest 
|
Here's where I struggled today.
This is how the front end of the RD piece comes. 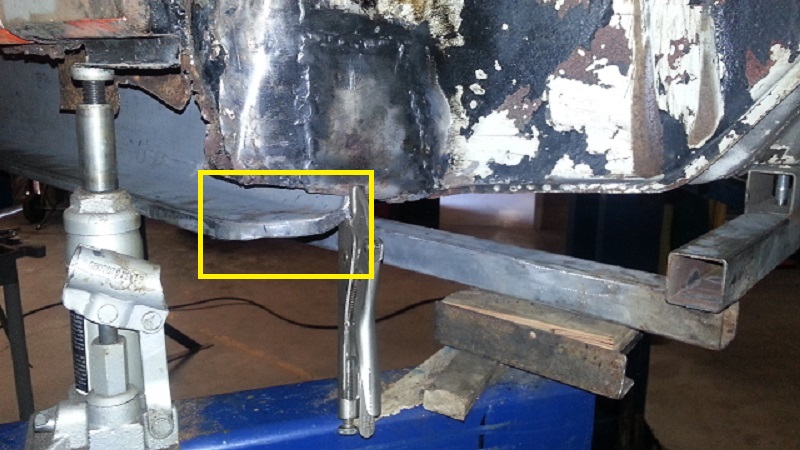 I finally found the picture I was looking for. Here's how it came from the factory. 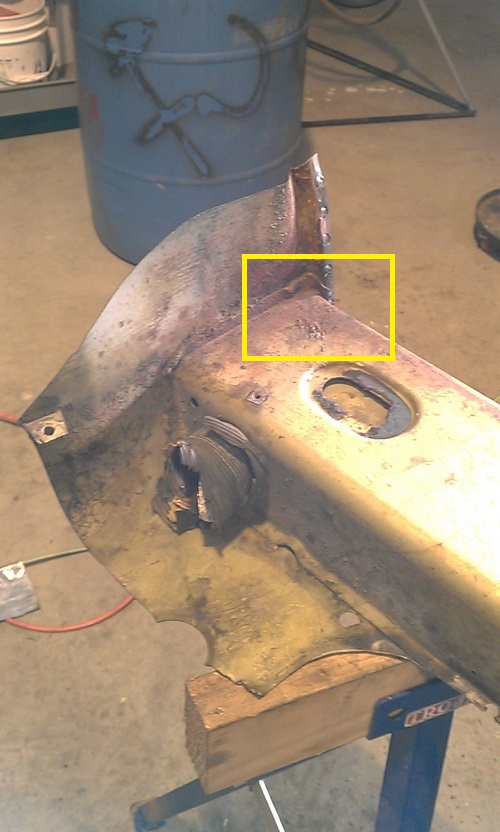 Here's what needs to happen .................. 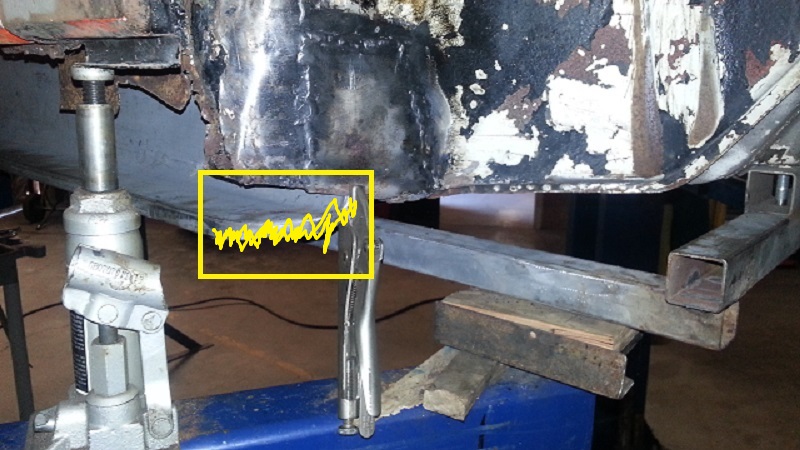 THEN it will slip into the inner fender like it should. Waste of a 1/2 day. No wonder restorations cost $200k. |
| cary |
 Jan 1 2014, 11:53 PM Jan 1 2014, 11:53 PM
Post
#290
|
|
Advanced Member     Group: Members Posts: 3,900 Joined: 26-January 04 From: Sherwood Oregon Member No.: 1,608 Region Association: Pacific Northwest 
|
that seals the deal for me , I am going to salvage a right inner long for my project...Great Job Cary If the front inner fender is in good shape. That's what I'll do next time too. What we need is just the bottom with the inner rocker flange and about a 1 1/2" upright flange. That would take care of most rust damage repairs. |
| maddin |
 Jan 2 2014, 07:59 PM Jan 2 2014, 07:59 PM
Post
#291
|
|
Member   Group: Members Posts: 168 Joined: 22-December 13 From: Australia Member No.: 16,789 Region Association: Australia and New Zealand |
...what an incredible display of craftsmanship! :-)
|
| cary |
 Jan 2 2014, 10:23 PM Jan 2 2014, 10:23 PM
Post
#292
|
|
Advanced Member     Group: Members Posts: 3,900 Joined: 26-January 04 From: Sherwood Oregon Member No.: 1,608 Region Association: Pacific Northwest 
|
Here's the trimming I needed on the front end of the long.
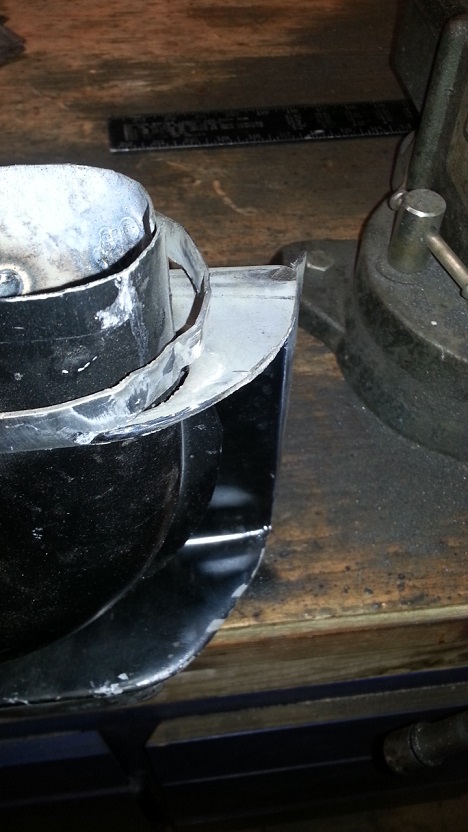 Upper Trimmed I needed to modify the curve to match the inner fender radius 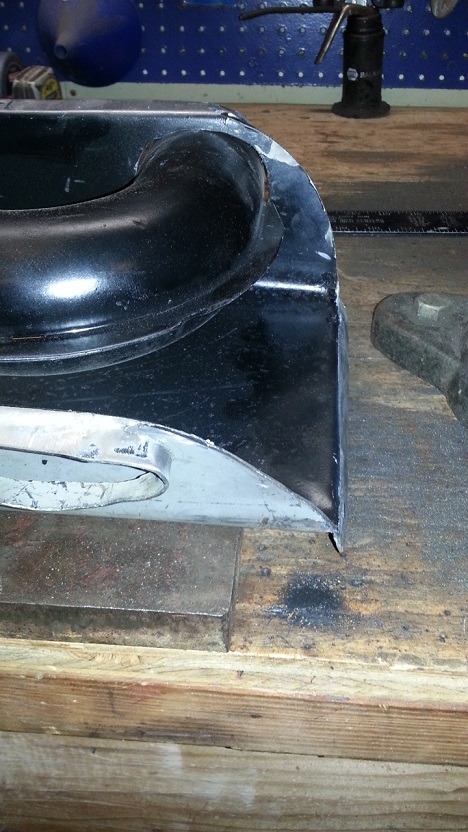 Lower Trimmed 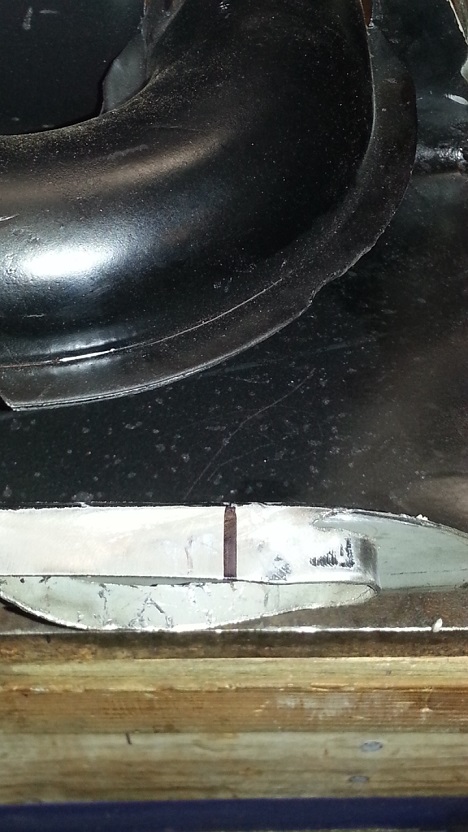 The Sharpie mark is where I finally cut off the lip too. |
| cary |
 Jan 2 2014, 10:25 PM Jan 2 2014, 10:25 PM
Post
#293
|
|
Advanced Member     Group: Members Posts: 3,900 Joined: 26-January 04 From: Sherwood Oregon Member No.: 1,608 Region Association: Pacific Northwest 
|
Double Post (IMG:style_emoticons/default/headbang.gif)
|
| cary |
 Jan 2 2014, 10:40 PM Jan 2 2014, 10:40 PM
Post
#294
|
|
Advanced Member     Group: Members Posts: 3,900 Joined: 26-January 04 From: Sherwood Oregon Member No.: 1,608 Region Association: Pacific Northwest 
|
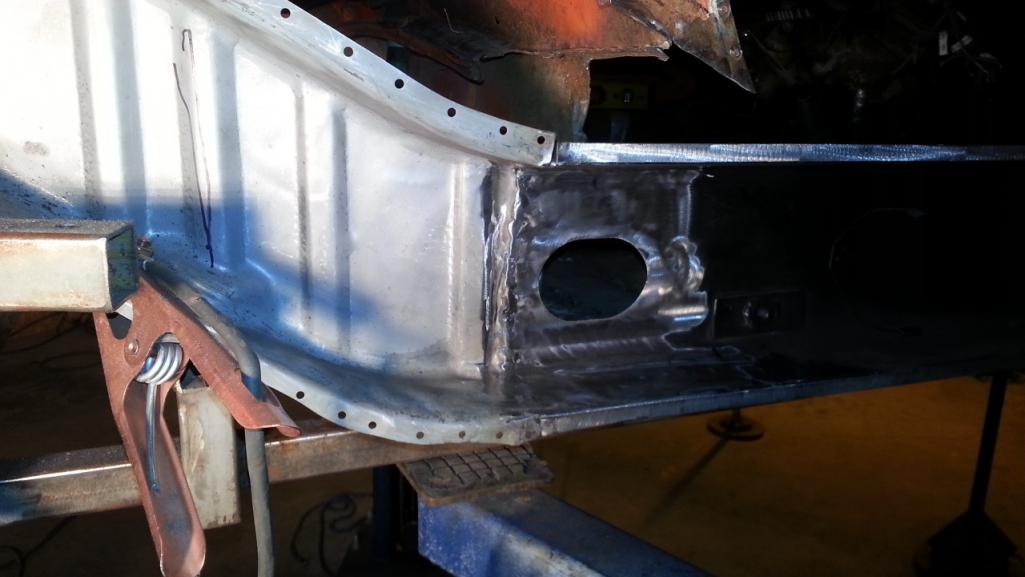
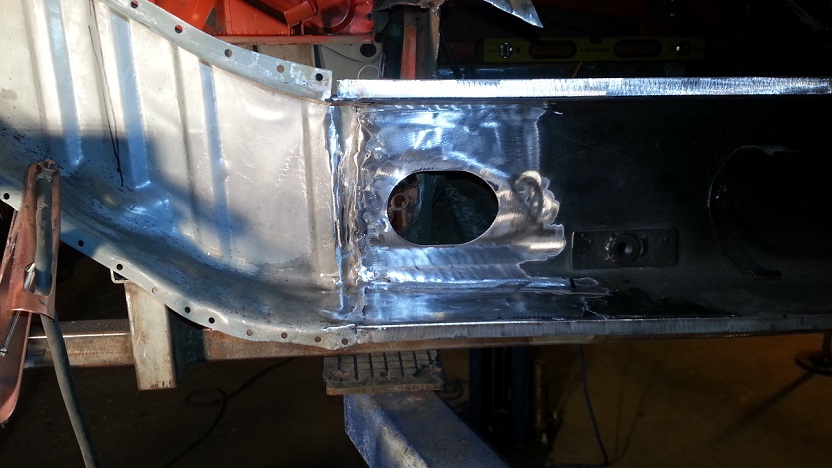
Finally, the right long installed ............ (IMG:style_emoticons/default/smilie_pokal.gif) (IMG:style_emoticons/default/smilie_pokal.gif) (IMG:style_emoticons/default/smilie_pokal.gif)
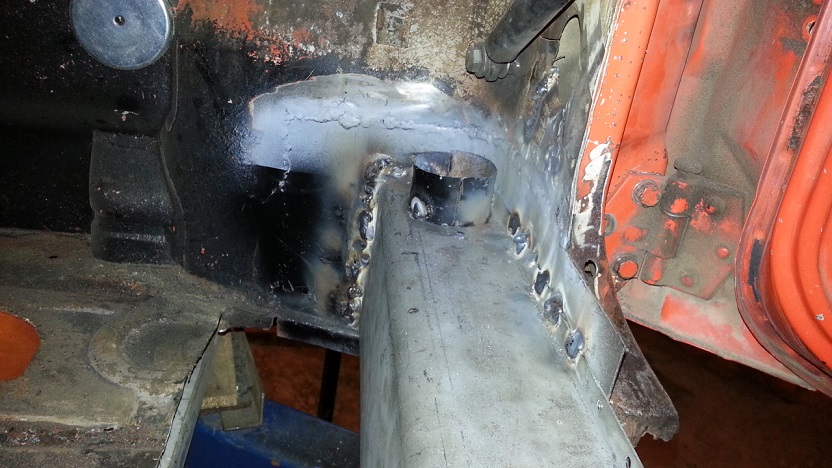 Tough welding, under the car. Arm stuck up throw a hole. Helmet all jammed up and twisted. Over did the weld ............... (IMG:style_emoticons/default/mad.gif) (IMG:style_emoticons/default/mad.gif) 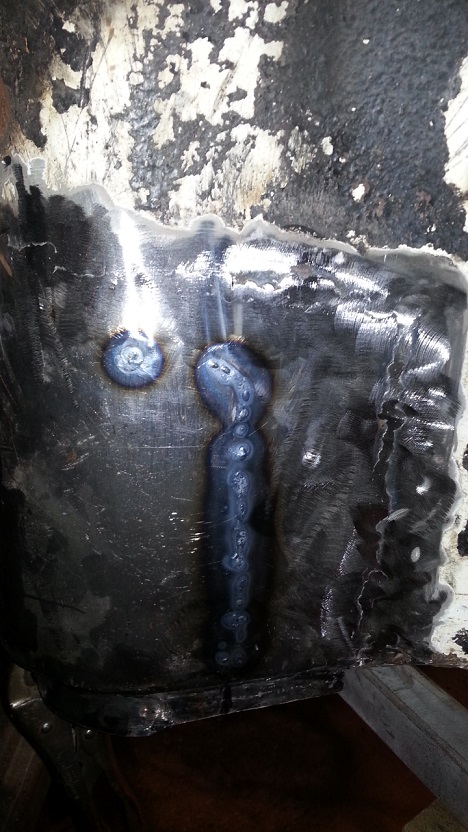 Happy with the penetration though ............. I'll wait to tidy up the welding till after I remove the floor. (IMG:style_emoticons/default/welder.gif) Plus I'd like one more behind the heater tube. |
| cary |
 Jan 2 2014, 10:46 PM Jan 2 2014, 10:46 PM
Post
#295
|
|
Advanced Member     Group: Members Posts: 3,900 Joined: 26-January 04 From: Sherwood Oregon Member No.: 1,608 Region Association: Pacific Northwest 
|
|
| cary |
 Jan 2 2014, 10:48 PM Jan 2 2014, 10:48 PM
Post
#296
|
|
Advanced Member     Group: Members Posts: 3,900 Joined: 26-January 04 From: Sherwood Oregon Member No.: 1,608 Region Association: Pacific Northwest 
|
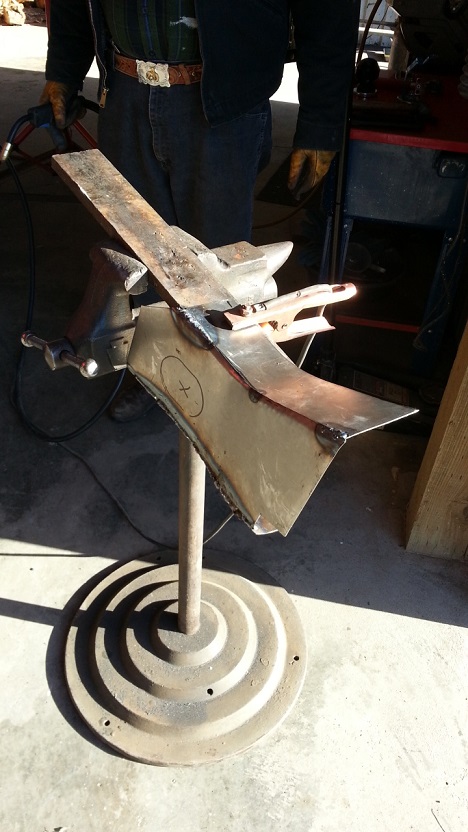
Might want to build one of these clamps to squeeze the long into the right size.
Mine came a bit splayed open. 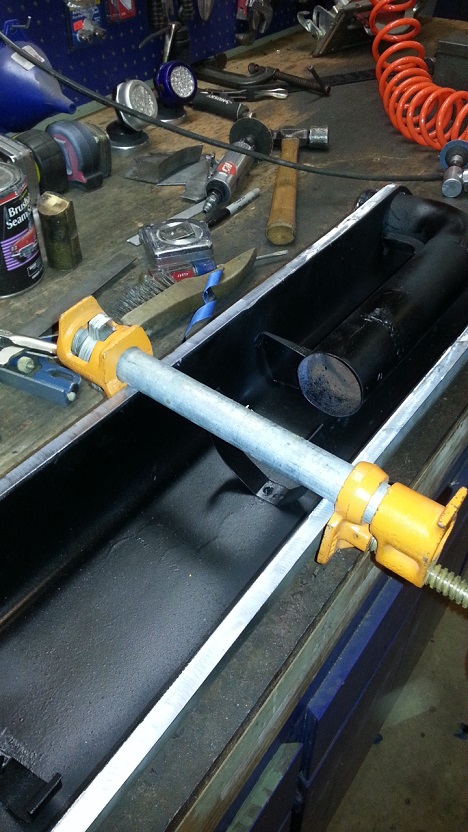 |
| cary |
 Jan 2 2014, 10:49 PM Jan 2 2014, 10:49 PM
Post
#297
|
|
Advanced Member     Group: Members Posts: 3,900 Joined: 26-January 04 From: Sherwood Oregon Member No.: 1,608 Region Association: Pacific Northwest 
|
Another Double Post .......... (IMG:style_emoticons/default/hissyfit.gif)
|
| cary |
 Jan 2 2014, 10:56 PM Jan 2 2014, 10:56 PM
Post
#298
|
|
Advanced Member     Group: Members Posts: 3,900 Joined: 26-January 04 From: Sherwood Oregon Member No.: 1,608 Region Association: Pacific Northwest 
|
Ended the night with Super In Law building inner box.
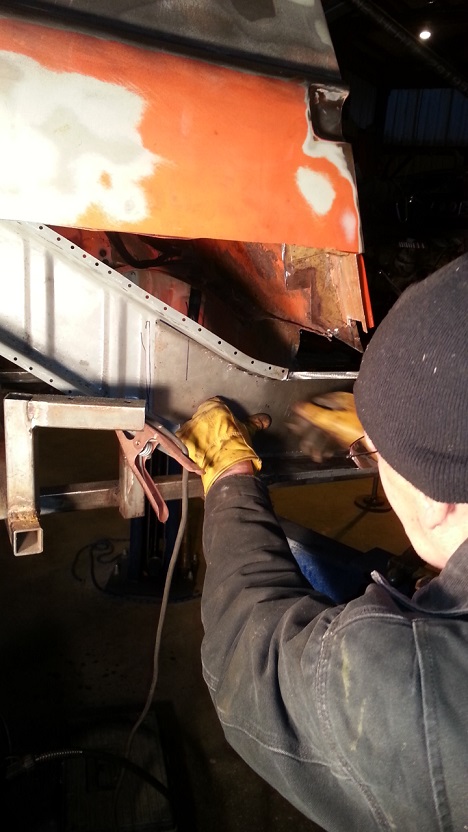 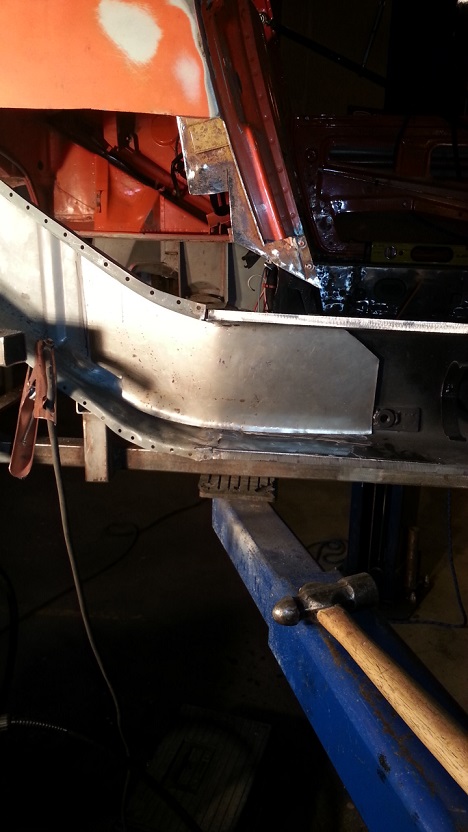 We'll cut and add the upper and lower flanges in the am. Needs a little trimming in that picture ........... |
| cary |
 Jan 3 2014, 11:58 PM Jan 3 2014, 11:58 PM
Post
#299
|
|
Advanced Member     Group: Members Posts: 3,900 Joined: 26-January 04 From: Sherwood Oregon Member No.: 1,608 Region Association: Pacific Northwest 
|
|
| cary |
 Jan 4 2014, 12:00 AM Jan 4 2014, 12:00 AM
Post
#300
|
|
Advanced Member     Group: Members Posts: 3,900 Joined: 26-January 04 From: Sherwood Oregon Member No.: 1,608 Region Association: Pacific Northwest 
|
I'm thinking I might not use the stiffeners.
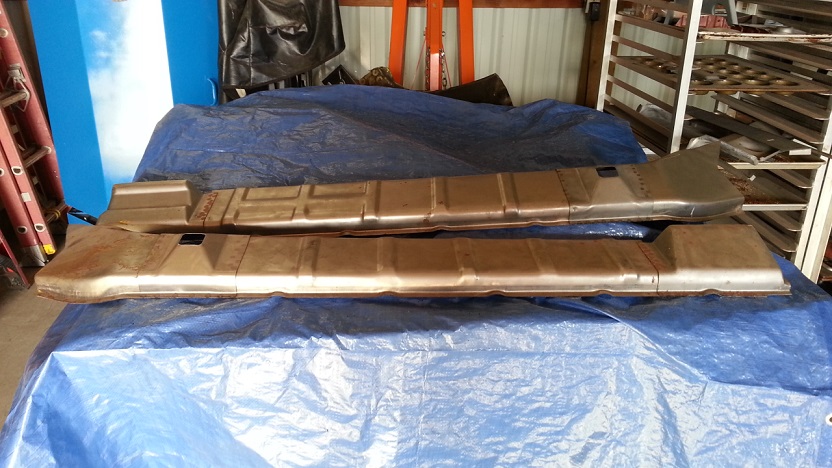 Coat them with WD 40 and shrink wrap them up. |
| cary |
 Jan 4 2014, 12:08 AM Jan 4 2014, 12:08 AM
Post
#301
|
|
Advanced Member     Group: Members Posts: 3,900 Joined: 26-January 04 From: Sherwood Oregon Member No.: 1,608 Region Association: Pacific Northwest 
|
It's finally coming back together ................
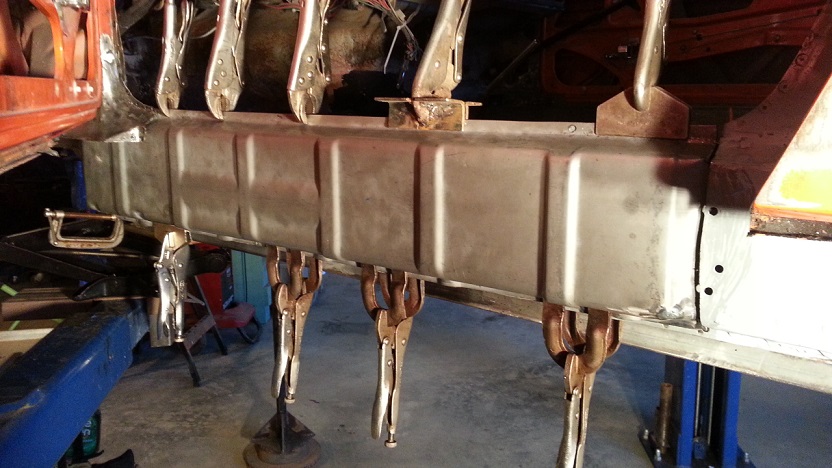 It's been a long road ............... But this puts a (IMG:style_emoticons/default/biggrin.gif) on my place. Door alignment is holding perfect. |
| cary |
 Jan 4 2014, 10:58 PM Jan 4 2014, 10:58 PM
Post
#302
|
|
Advanced Member     Group: Members Posts: 3,900 Joined: 26-January 04 From: Sherwood Oregon Member No.: 1,608 Region Association: Pacific Northwest 
|
Finished welding in the left rocker.
Nice ..................... Then moved on to installing the right long inner box. Pre-drilled the holes. Sprayed with weld thru primer, again. 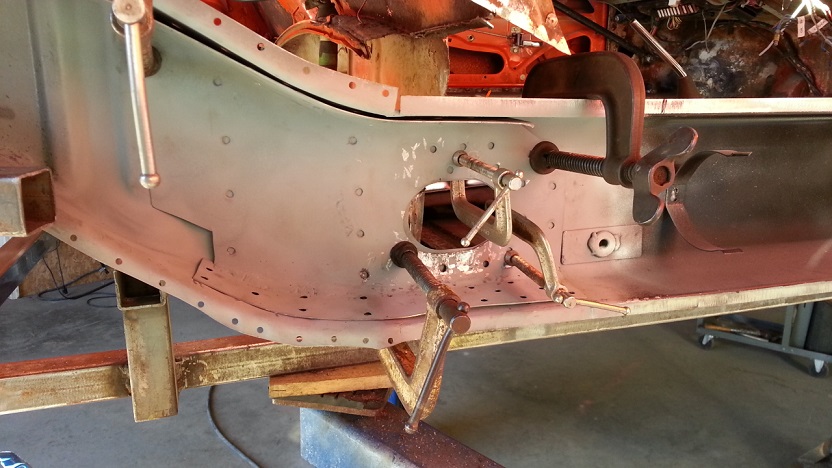 Stayed away from the long seam weld. Rosette welds only. No seam welds. Finished the night with seam sealing over all the welds and the two edges laying on the bottom of the longs. Today's lesson. Don't spray on TOO much weld thru primer. Spitter, sputter ............. Today was the last shop day of vacation. Didn't meet my goal of getting the car off the lift. But I'm close. |
| saigon71 |
 Jan 5 2014, 10:01 AM Jan 5 2014, 10:01 AM
Post
#303
|
|
Advanced Member     Group: Members Posts: 2,007 Joined: 1-June 09 From: Dillsburg, PA Member No.: 10,428 Region Association: MidAtlantic Region 

|
Looking good! (IMG:style_emoticons/default/beerchug.gif)
I had to learn the same lesson on weld-thru primer during my restoration. Two light coats and go. Which weld-thru primer are you using? I had problems with the Eastwood Copper, the can kept clogging. |
| cary |
 Jan 5 2014, 10:10 AM Jan 5 2014, 10:10 AM
Post
#304
|
|
Advanced Member     Group: Members Posts: 3,900 Joined: 26-January 04 From: Sherwood Oregon Member No.: 1,608 Region Association: Pacific Northwest 
|
I had been using U-Pol. Which I liked. Their labeling on the spray cans isn't real user friendly. You need to know the product # to what know the product is.
Went to using a can of NAPA zinc enhanced that I'd bought. I'll need to rework my spraying technique. I put it on too thick. Lesson learned .... |
| cary |
 Jan 5 2014, 10:13 AM Jan 5 2014, 10:13 AM
Post
#305
|
|
Advanced Member     Group: Members Posts: 3,900 Joined: 26-January 04 From: Sherwood Oregon Member No.: 1,608 Region Association: Pacific Northwest 
|
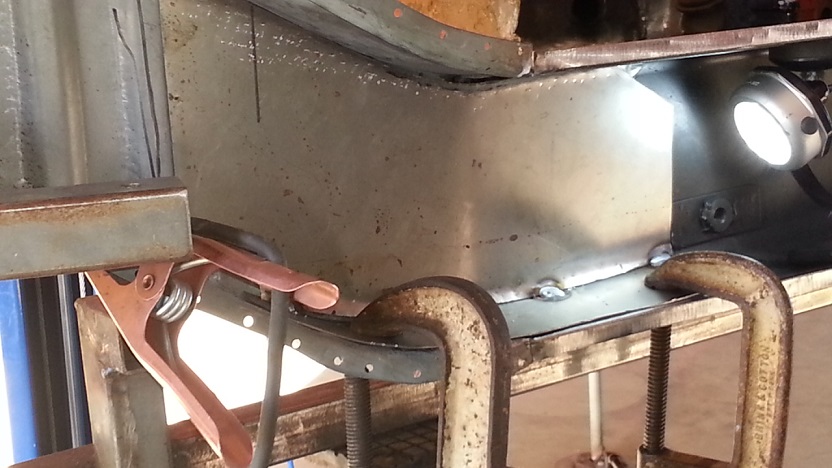
I'll add a couple notes :
The upper long did end up coming together fine. Had to do a little reshaping on the upper to get it to align with the lower. 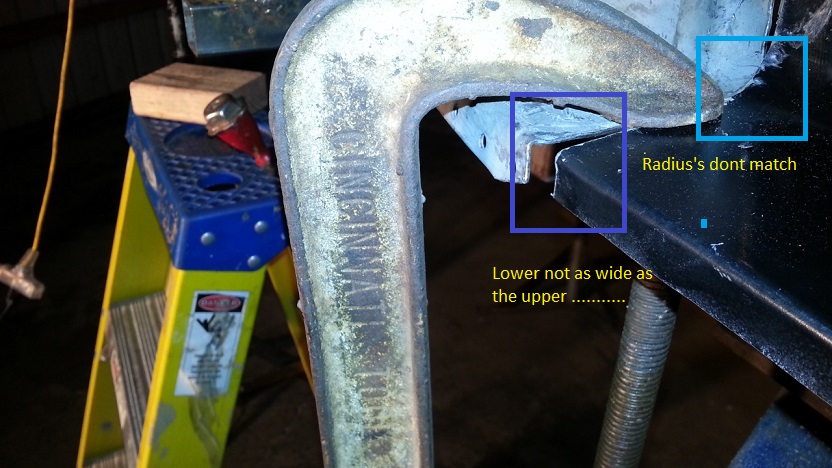 Final result ............... 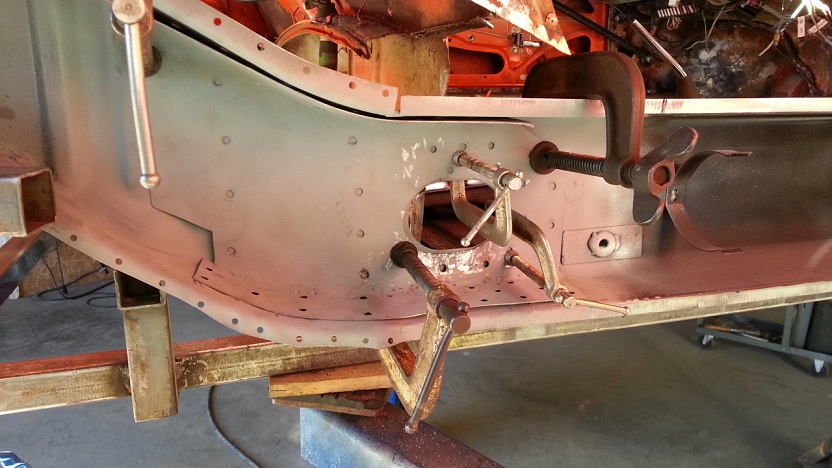 |
  |
61 User(s) are reading this topic (61 Guests and 0 Anonymous Users)
0 Members:

|
Lo-Fi Version | Time is now: 16th January 2025 - 01:07 PM |
Invision Power Board
v9.1.4 © 2025 IPS, Inc.


