|
|

|
Porsche, and the Porsche crest are registered trademarks of Dr. Ing. h.c. F. Porsche AG.
This site is not affiliated with Porsche in any way. Its only purpose is to provide an online forum for car enthusiasts. All other trademarks are property of their respective owners. |
|
|
  |
| 914_7T3 |
 May 19 2019, 10:41 AM May 19 2019, 10:41 AM
Post
#121
|
|
Please forgive me, I'm new to all of this!    Group: Members Posts: 1,862 Joined: 3-April 17 From: Los Angeles, CA Member No.: 20,991 Region Association: Southern California 
|
I did a little more "clean" work yesterday to take a look at my oil pump and sifting though FI parts. The camshaft I took out of the engine does show witness marks from the shaft contacting the cam gear bolt heads. I've also been picking my way though D-Jet parts trying to ensure I have usable components. The injector points need a bit of help. I'll fix these with a bit of new copper braid and some solder. Why didn't you say so, I have an extra trigger plate that is lightly used. Picked it up as a spare, but then found a NOS one (IMG:style_emoticons/default/rolleyes.gif) Let me know if you want it and I can email you pics and we can work something out. |
| Superhawk996 |
 May 19 2019, 11:14 AM May 19 2019, 11:14 AM
Post
#122
|
|
914 Guru      Group: Members Posts: 6,502 Joined: 25-August 18 From: Woods of N. Idaho Member No.: 22,428 Region Association: Galt's Gulch 
|
Why didn't you say so, I have an extra trigger plate that is lightly used. Picked it up as a spare, but then found a NOS one (IMG:style_emoticons/default/rolleyes.gif) Let me know if you want it and I can email you pics and we can work something out. @914_7T3 You're the best. If I wrote down a list of everything I "need" you'd have to send me your car! (IMG:style_emoticons/default/av-943.gif) Points already fixed. 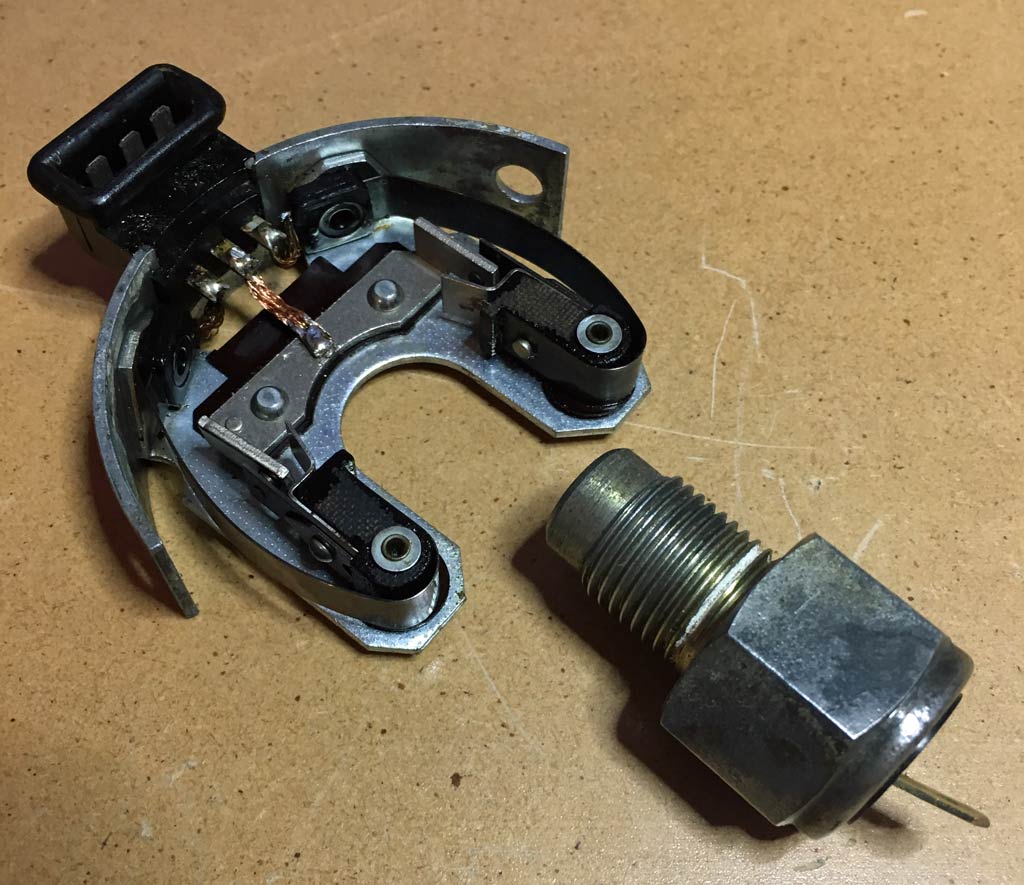 If only everything were that simple. I will be looking for an Ambient Temp Sensor (in photo) and posting it at some point on WTB classifieds. Just in case you happen to have one sitting around. |
| Superhawk996 |
 Jun 4 2019, 06:40 PM Jun 4 2019, 06:40 PM
Post
#123
|
|
914 Guru      Group: Members Posts: 6,502 Joined: 25-August 18 From: Woods of N. Idaho Member No.: 22,428 Region Association: Galt's Gulch 
|
Finally got a call from the machine shop that was cleaning my case and seeing if they could polish out the crank that was already 0.010" undersize.
The case turned out nice but will still need lots of love. This engine had massive rust in the sump. All galley plugs will need to be pulled so that the ends of the galleys can be cleaned to ensure there isn't a nice little pile of rust at the dead end just waiting to come out inside a freshly rebuilt engine. There will also be machine work to deck the piston seats lightly, and the oil pressure sensor hole is stripped and will need to be re-tapped. 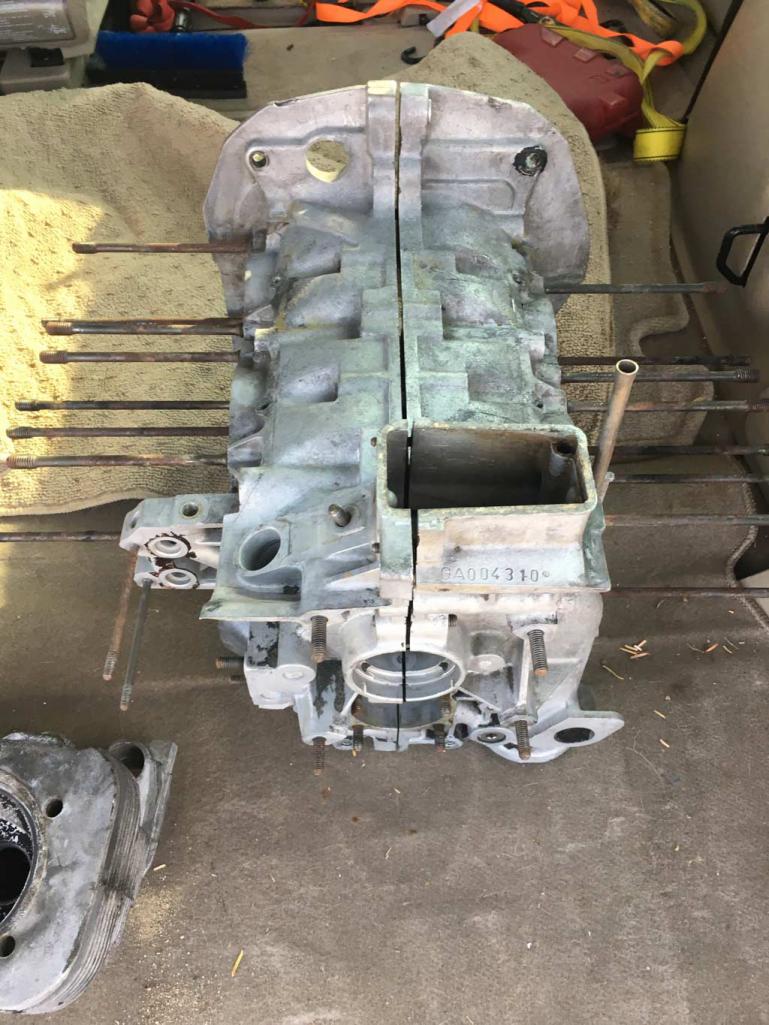 Now for the bad news. One cylinder is cracked at the boss for the valve guide. Likely a result of prior poor workmanship. I can see evidence of the valve guide having been replaced previously. (IMG:style_emoticons/default/headbang.gif) I'm undecided on next steps for this head. I hate to toss a 2.0L head. May weld it but that will be down the road since it will involve lots of work to weld it and then to re-machine the valve guide boss properly. I will probably bead blast it just to see if there are other cracks in the combustion chamber to help seal the deal. 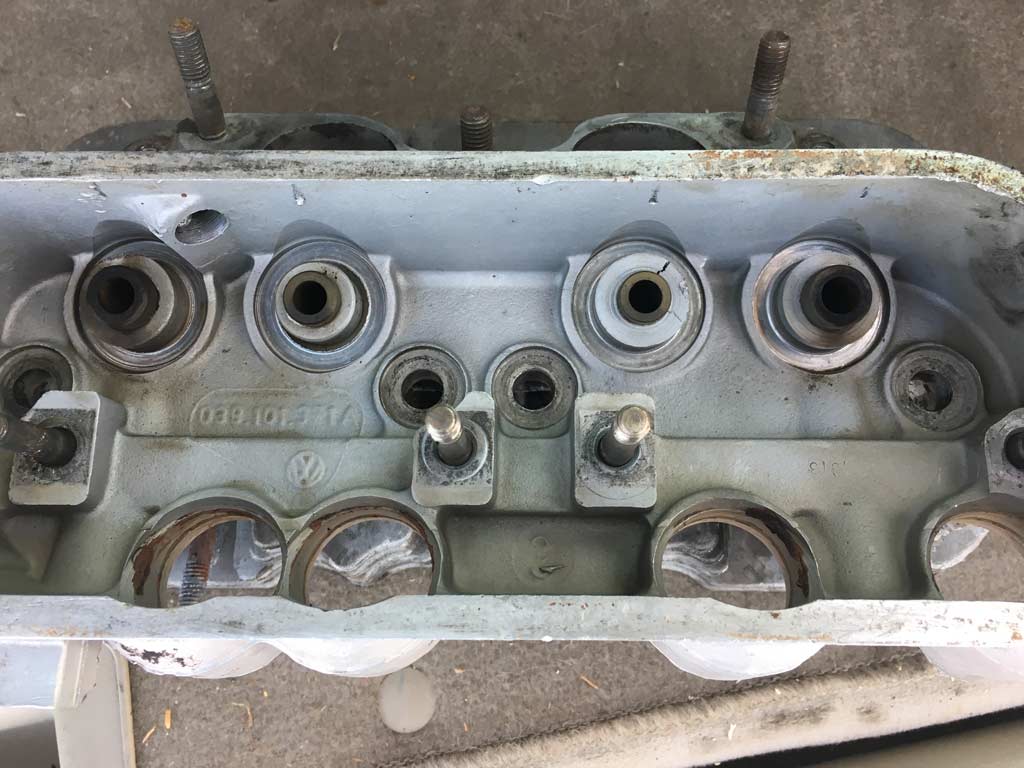 Ah . . . the joy of restoring 40+ year old cars. (IMG:style_emoticons/default/icon8.gif) |
| Superhawk996 |
 Jun 4 2019, 06:46 PM Jun 4 2019, 06:46 PM
Post
#124
|
|
914 Guru      Group: Members Posts: 6,502 Joined: 25-August 18 From: Woods of N. Idaho Member No.: 22,428 Region Association: Galt's Gulch 
|
The crank actually did polish out pretty well but I need to measure it for myself to see where it is at. However, there is a bit of rust pitting just below where the Cam gear sits. This surface doesn't get bearing wear but it is a defect that I couldn't see with the cam gear in place.
I ended up getting another used standard size crank that is in good condition from Kevin W that will go into this engine. If anyone is in desperate need of a 2.0L crank 0.010" under on both the mains and the rods. I will send this one to you for the cost of shipping (~$45) based on what I paid to get mine from Kevin. Otherwise, it is probably headed toward becoming a lamp, a door stop, or something like that. |
| bbrock |
 Jun 4 2019, 06:54 PM Jun 4 2019, 06:54 PM
Post
#125
|
|
914 Guru      Group: Members Posts: 5,269 Joined: 17-February 17 From: Montana Member No.: 20,845 Region Association: Rocky Mountains 
|
Finally got a call from the machine shop that was cleaning my case and seeing if they could polish out the crank that was already 0.010" undersize. The case turned out nice but will still need lots of love. This engine had massive rust in the sump. All galley plugs will need to be pulled so that the ends of the galleys can be cleaned to ensure there isn't a nice little pile of rust at the dead end just waiting to come out inside a freshly rebuilt engine. Is the plan to put the guts of the engine you just picked up into this case? Is this one numbers matching? Just curious. |
| Superhawk996 |
 Jun 4 2019, 07:12 PM Jun 4 2019, 07:12 PM
Post
#126
|
|
914 Guru      Group: Members Posts: 6,502 Joined: 25-August 18 From: Woods of N. Idaho Member No.: 22,428 Region Association: Galt's Gulch 
|
Is the plan to put the guts of the engine you just picked up into this case? Is this one numbers matching? Just curious. That is a question I pondered for 14 hours while driving to/from Wisconsin. I started this project with the mindset of saving a scrap car and not feeling bad that I'd eventually like to put a six into it after running the stock 2.0 Type 4 for a year or two. To answer the question would take a COA. I don't feel good about sending those fools money given other members experiences with them. Likely out come will be I'll cherry pick the best parts from each (both are 73' engines) and build one prime engine for me. The other engine (if truly low miles) may just get pistons cleaned, cylinders honed, and put back together with fresh bearings etc. as a basic runner for sale later set up with my Dell's to someone in need? That is a very optimistic scenario. Worst case, I'll part out what's left. |
| Superhawk996 |
 Jun 4 2019, 07:16 PM Jun 4 2019, 07:16 PM
Post
#127
|
|
914 Guru      Group: Members Posts: 6,502 Joined: 25-August 18 From: Woods of N. Idaho Member No.: 22,428 Region Association: Galt's Gulch 
|
Also as a point of note, KevinW donated a 017 CHT sensor to me before I bought engine GA000099.
I intend to fully document the resistance vs. temp behavior of both sensors for a sample size of two. I'll post the results since 017 CHT sensors seem to be a mystery. May be a bit before I get to this. I have a few irons in the fire. (IMG:style_emoticons/default/av-943.gif) When done, I'll pay it forward by donating the extra sensor for cost of shipping to next user in need like Kevin did for me not knowing I'd end up buying another complete motor. |
| Superhawk996 |
 Jun 9 2019, 11:29 AM Jun 9 2019, 11:29 AM
Post
#128
|
|
914 Guru      Group: Members Posts: 6,502 Joined: 25-August 18 From: Woods of N. Idaho Member No.: 22,428 Region Association: Galt's Gulch 
|
Tool Of The Day Post.
I've been working to get my original case ready for some machine work. Needed to pull the cylinder head studs. I love these stud installers & extractors from Snap-On. I know this can be done by jamming nuts together and hoping for the best. I did that for a lot of years when I was broke. These collet type extractors make the job a pleasure rather than a pain. No risk of galling threads. Work the first time, every time. 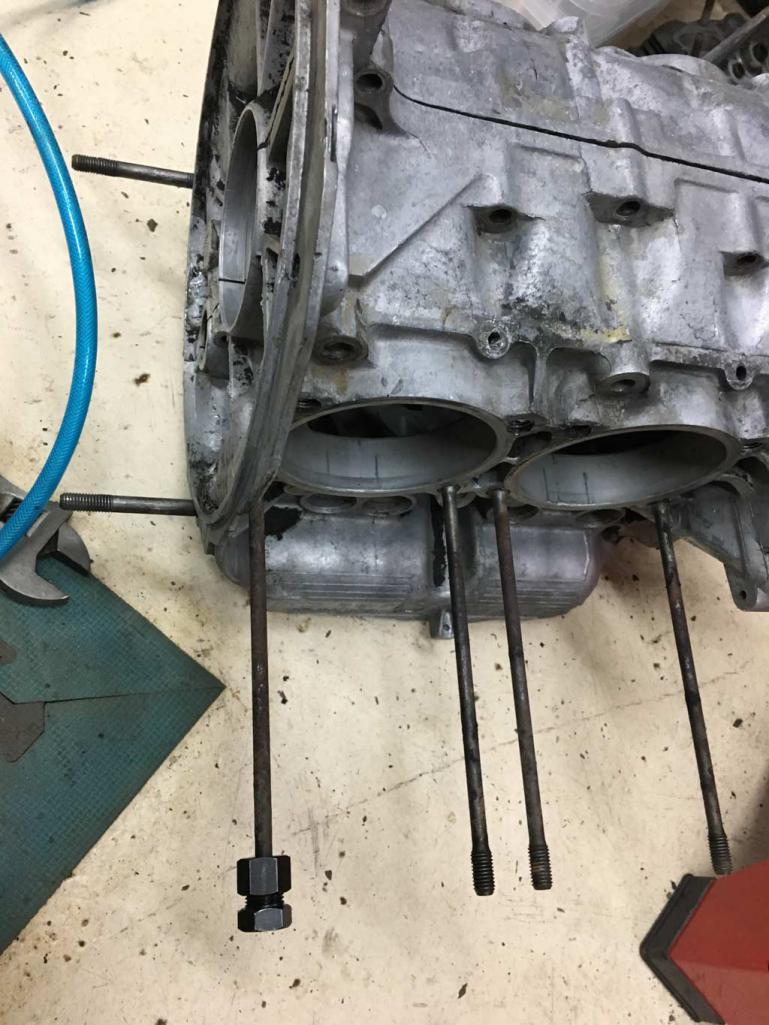 |
| Superhawk996 |
 Aug 28 2019, 06:27 PM Aug 28 2019, 06:27 PM
Post
#129
|
|
914 Guru      Group: Members Posts: 6,502 Joined: 25-August 18 From: Woods of N. Idaho Member No.: 22,428 Region Association: Galt's Gulch 
|
Well it's been a while since I posted to this thread. Chassis work is on hold due to the Melanoma surgery stuff, but I'm still plugging away at the small stuff I can do without stressing my shoulder.
The engine that came out of this vehicle is GA004310. Whoever had this engine had a knack for screwing things up. (IMG:style_emoticons/default/mad.gif) The flaps were removed from this car and the engine tin is sort of mangled on the passenger side tin at the corner where the flap rod passes through. In anticipation of having tin sent out for media blast and power coat, I've been fixing tin cracks, stuck cheese head screws, and trying to straighten this tin back to original shape. Luckily I have decent tin from GA000099 to see what it should look like. It's actually so bad, I'm sort of wondering if it was just a bad stamping. Otherwise, someone really worked to screw it up. Here is the starting point. 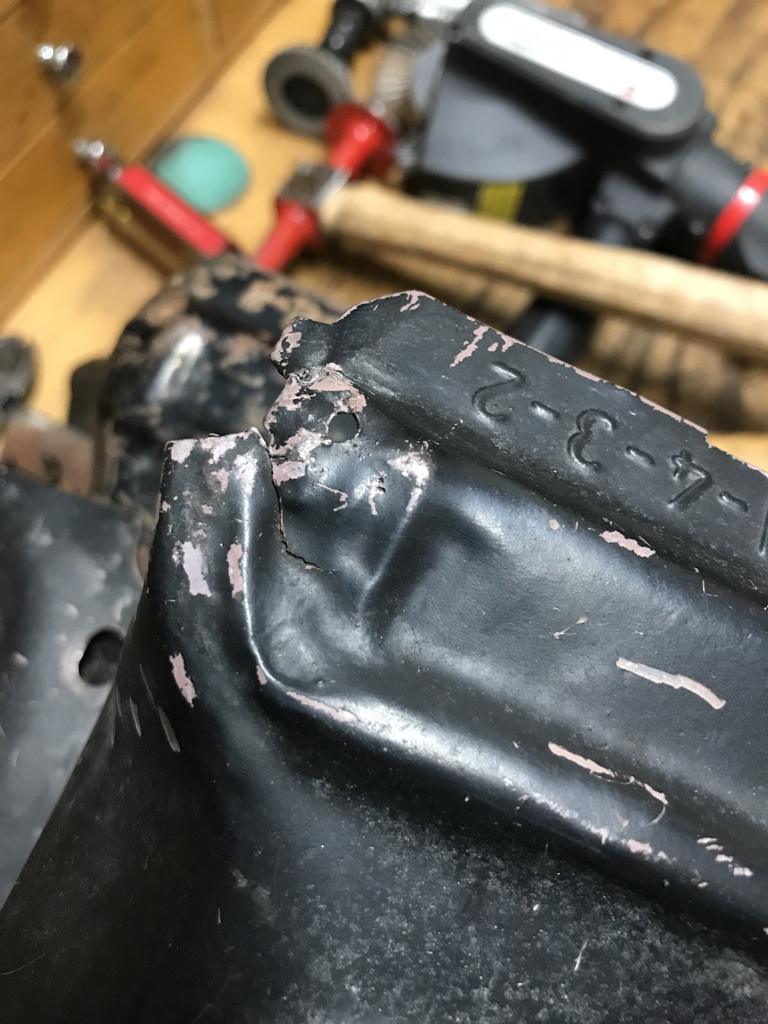 Just basic hammer and dolly work but the tight radius and the raised semi-circular formations are making it a tough slog. The photo below is getting closer but still needs a crack welded and some more shaping. 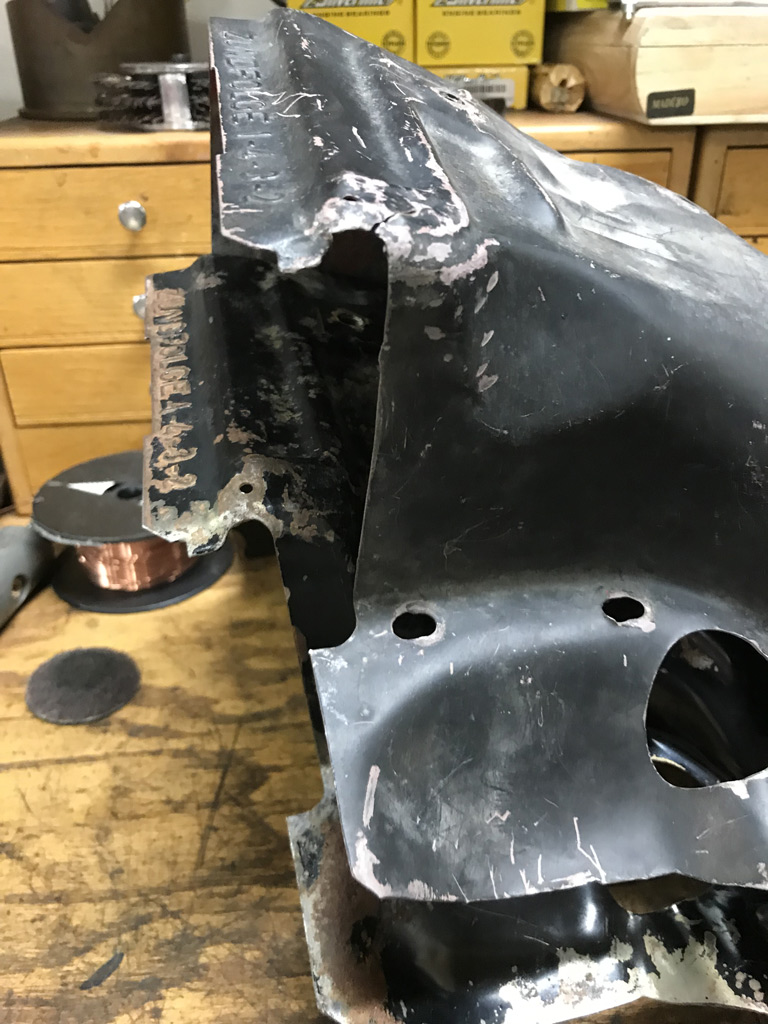 Getting a little closer to the right shape but I think a few of these creases are going to get locked in as the material work hardens. 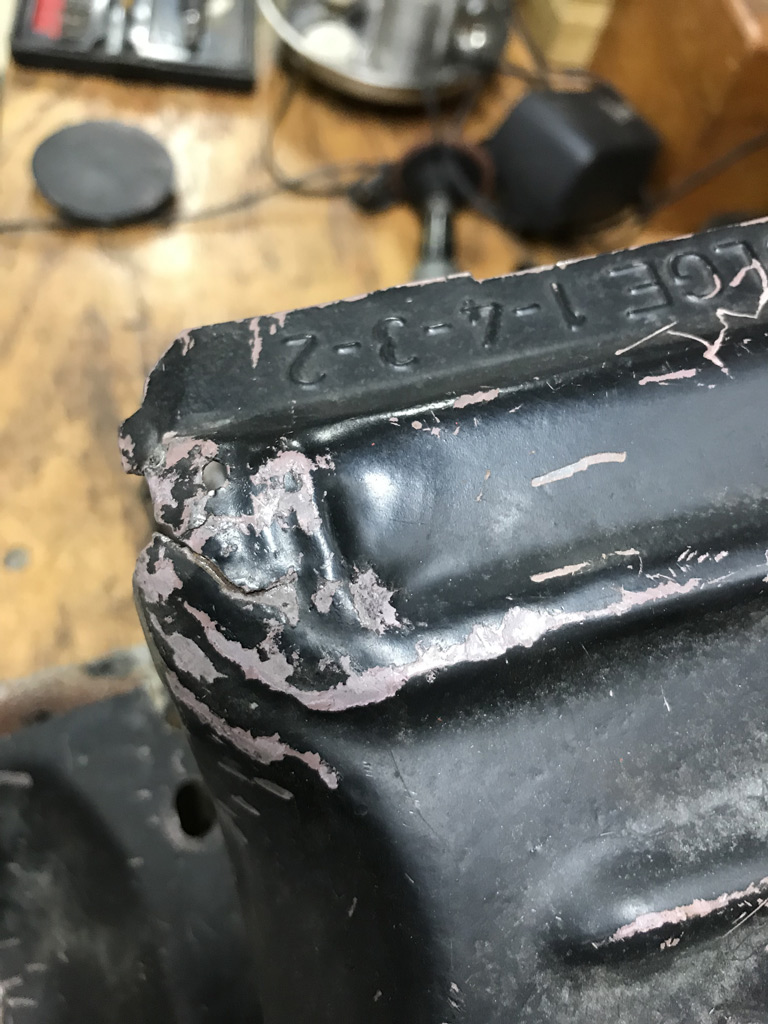 It also appears that the rear tin had two extra holes drilled for some reason. Will need to fill these. (IMG:style_emoticons/default/chair.gif) 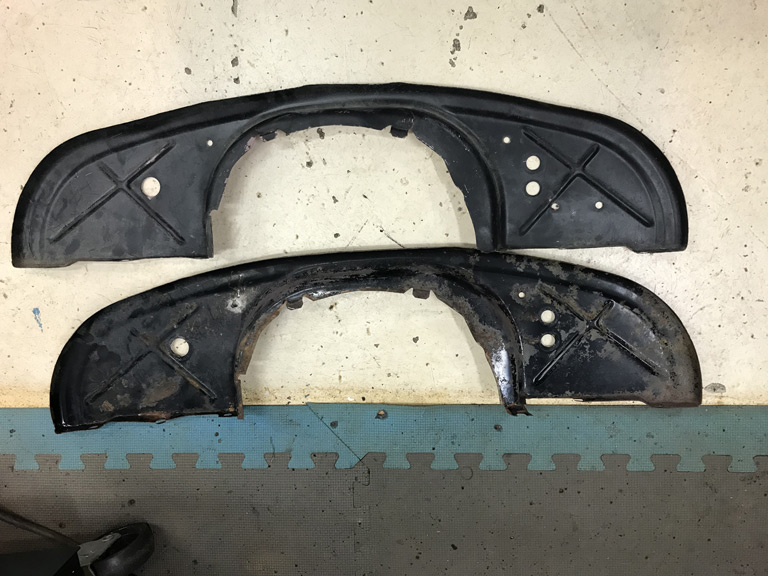 Now in the process of comparing tin between the two engines I noticed the tin from GA000099 had the 621 and I.0. markings that Brent has so carefully reproduced. However, I did note that the I.O. mark is in a different location. Hopefully this doesn't mean he has to start all over again. (IMG:style_emoticons/default/huh.gif) @bbrock 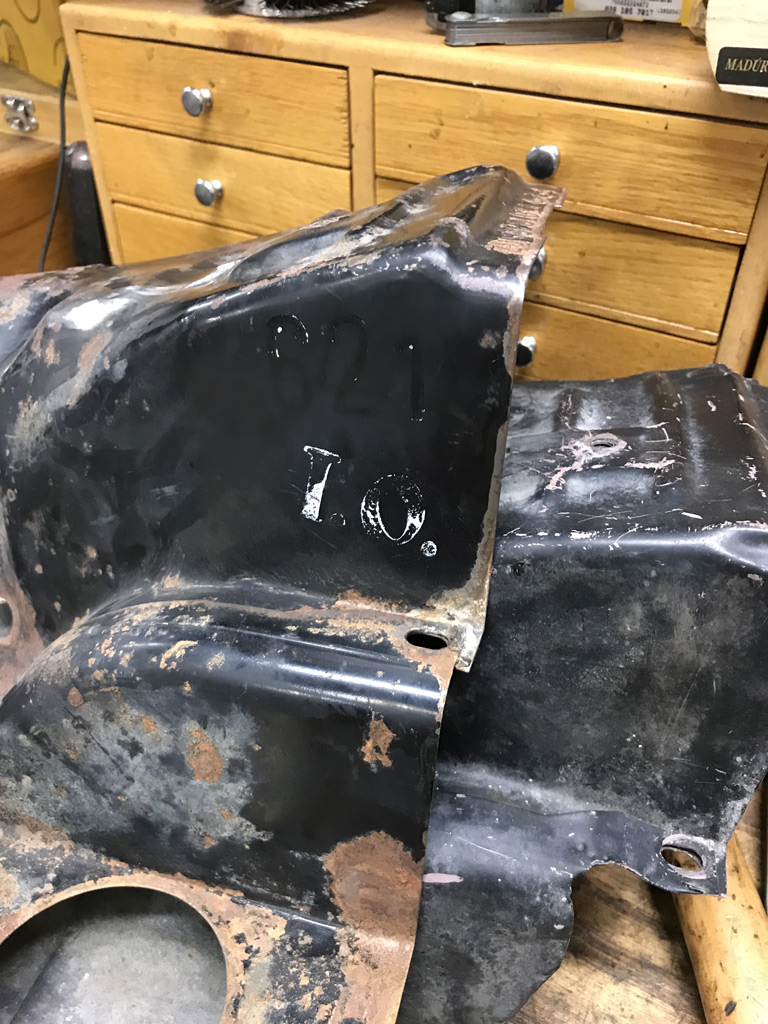 |
| bbrock |
 Aug 28 2019, 07:57 PM Aug 28 2019, 07:57 PM
Post
#130
|
|
914 Guru      Group: Members Posts: 5,269 Joined: 17-February 17 From: Montana Member No.: 20,845 Region Association: Rocky Mountains 
|
Now in the process of comparing tin between the two engines I noticed the tin from GA000099 had the 621 and I.0. markings that Brent has so carefully reproduced. However, I did note that the I.O. mark is in a different location. Hopefully this doesn't mean he has to start all over again. (IMG:style_emoticons/default/huh.gif) @bbrock  Ha! (IMG:style_emoticons/default/laugh.gif) Jeff Bowlsby has two pics of the I.O. stamp on his site. Neither show it where yours or mine were located. Seems they allowed creative license on that one as long as it was in the general neighborhood. Let me know if you want to borrow the stamps, or just pass them along to the next person who needs them. I can't imagine how tragic it would be to be driving around in a car with an engine that wasn't certified "in order." (IMG:style_emoticons/default/lol-2.gif) |
| Superhawk996 |
 Aug 29 2019, 05:04 AM Aug 29 2019, 05:04 AM
Post
#131
|
|
914 Guru      Group: Members Posts: 6,502 Joined: 25-August 18 From: Woods of N. Idaho Member No.: 22,428 Region Association: Galt's Gulch 
|
Let me know if you want to borrow the stamps, or just pass them along to the next person who needs them. I can't imagine how tragic it would be to be driving around in a car with an engine that wasn't certified "in order." (IMG:style_emoticons/default/lol-2.gif) @bbrock I think I just might take you up on that and continue the trend you've started. (IMG:style_emoticons/default/happy11.gif) I'm still a few weeks from having this tin stripped and powder coated. I had hopped to drop off a massive batch of tin before the holiday weekend but I still have several pieces with cracks to weld up, one that needs fab work to repair A/C damage, another that needs a fuel pressure regulator bracket fabricated and those rear tin holes to fill. But when that is done, the tin could get stamped quickly and then continue to the tradition of passing the stamps along if anyone else is crazy enough! |
| Superhawk996 |
 Sep 2 2019, 09:18 AM Sep 2 2019, 09:18 AM
Post
#132
|
|
914 Guru      Group: Members Posts: 6,502 Joined: 25-August 18 From: Woods of N. Idaho Member No.: 22,428 Region Association: Galt's Gulch 
|
More tin work in progress.
Tin on GA004310 was hacked up for dealer installed AC. Time to fix. 1st fabricated a new fuel pressure regulator bracket, the original had been cut off as part of the carb conversion and someone taking this engine apart and rebuilding with the deep dish bus pistons. (IMG:style_emoticons/default/headbang.gif) This piece bracket is made out of 0.057" and has a stamping dart in it for added stiffness. I was able to approximate the stamping dart with a small bench brake. 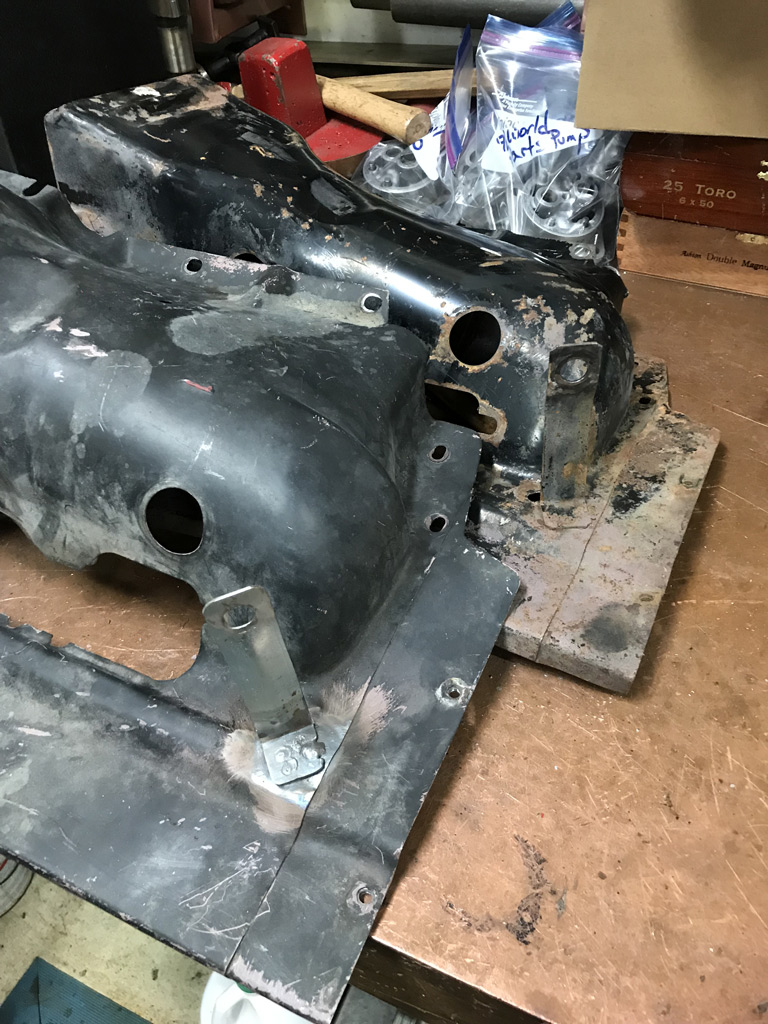 Started fabrication work to address the missing sheet metal section that was cut out of the cylinder 3/4 side tin to accommodate the York compressor. Here is the start of it. 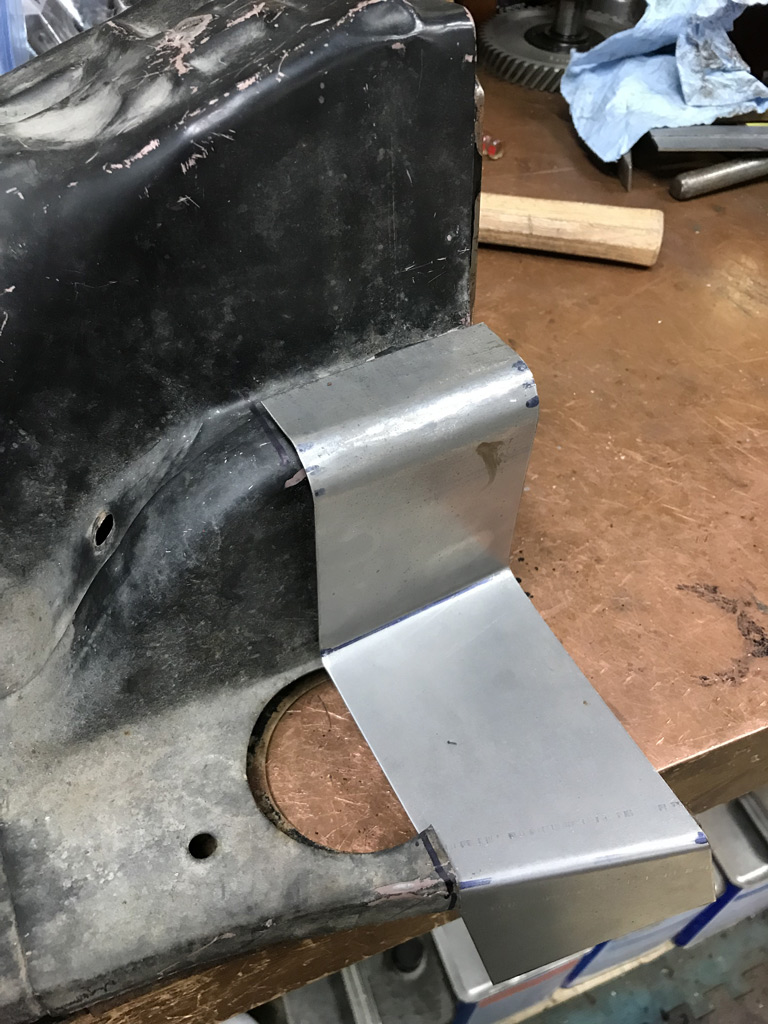 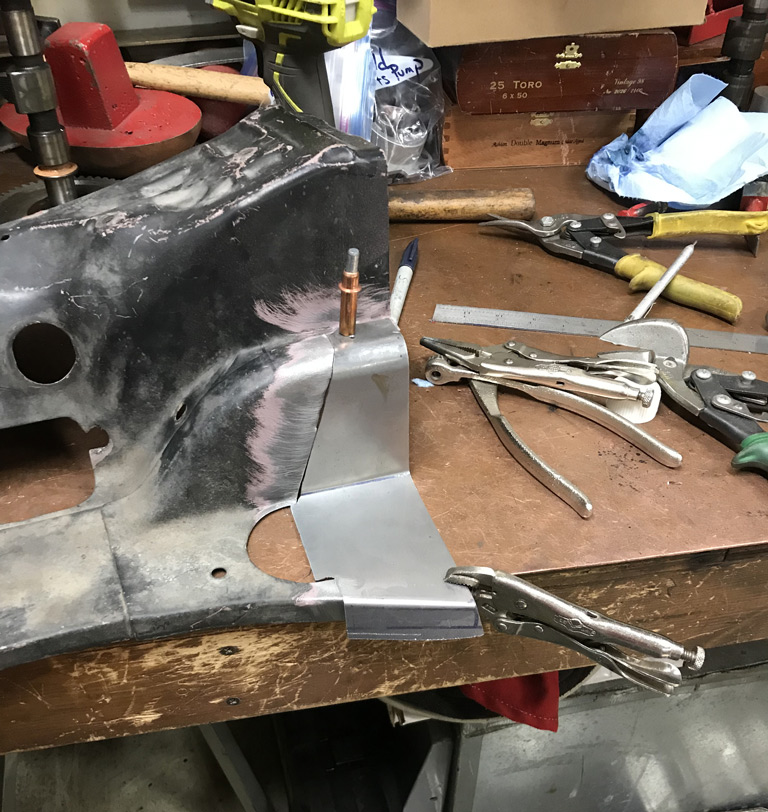 Will finish this up today. |
| Superhawk996 |
 Sep 18 2019, 02:45 AM Sep 18 2019, 02:45 AM
Post
#133
|
|
914 Guru      Group: Members Posts: 6,502 Joined: 25-August 18 From: Woods of N. Idaho Member No.: 22,428 Region Association: Galt's Gulch 
|
Well, 9/17 was my final skin graft surgery so I'll use the downtime to post up some work that I was able to get accomplished prior.
Engine Tin repair was completed. I did use a little bit of silicon bronze TIG rod to help fill in low spots and/or minor porosity to help with quality of final powder coating. 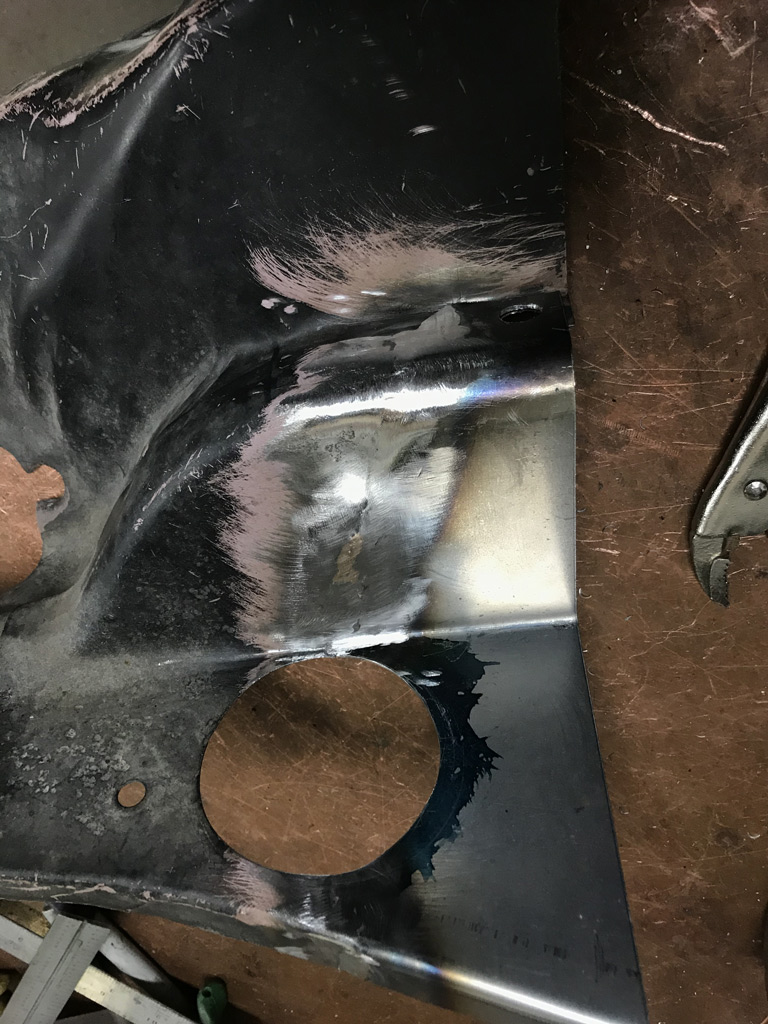 Mocked up to fan tin to determine where hole needed to be. 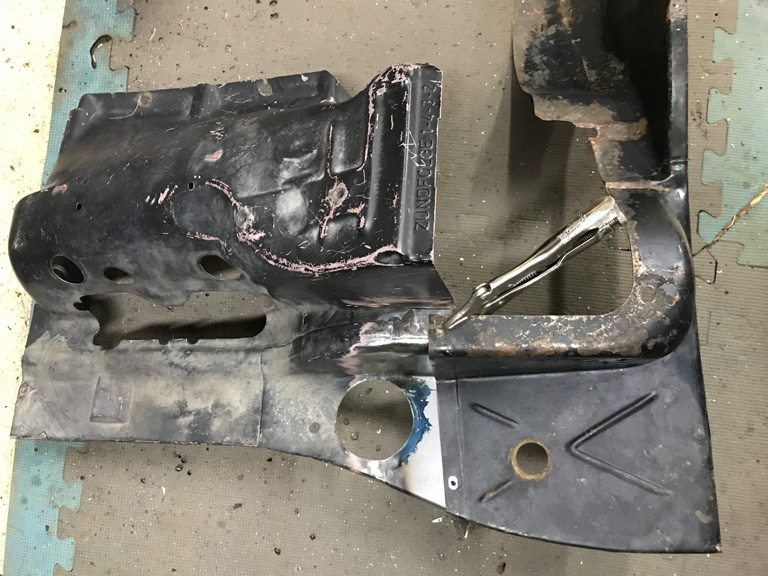 and there you have it A/C butchery repaired. Would have been way easier to buy tin, but, it made more sense to fix this and not break up a full set. 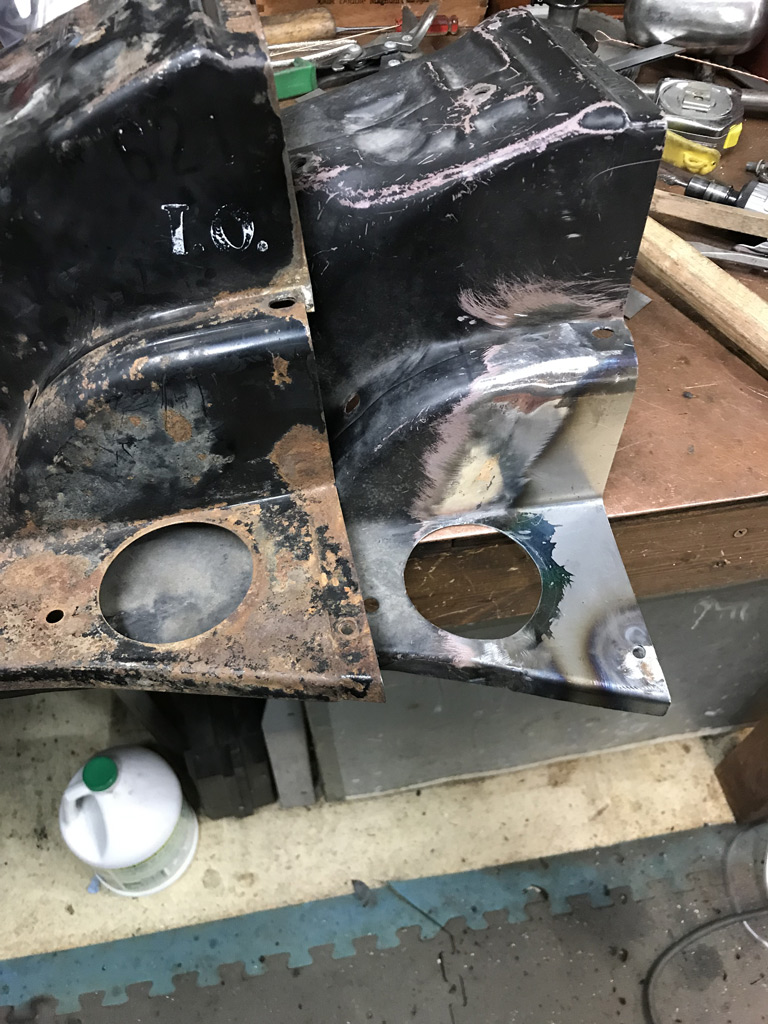 |
| Superhawk996 |
 Sep 18 2019, 03:02 AM Sep 18 2019, 03:02 AM
Post
#134
|
|
914 Guru      Group: Members Posts: 6,502 Joined: 25-August 18 From: Woods of N. Idaho Member No.: 22,428 Region Association: Galt's Gulch 
|
Not having enough to do with two 2.0L engines already torn down and and various stages of rebuild, I decided to pull the trigger on the 2.4L six that was floating around over on the Classifieds forum.
You know, cause I really need more to do. (IMG:style_emoticons/default/dry.gif) But at some point, I have always wanted a 914 with a six. 914/6 prices are in the Stratosphere so a conversion is my best bet to have a six in my lifetime. The plan: 1) Tear this engine down 2) Figure out what I have 3) Try to recoup some cost by selling off the 1973.5 CIS components to a needy 911 owner 4) Cash flowing the rebuild over time as finances permit 5)Offset this engine cost by selling GA004310 (engine from my car) 1st after it has been rebuilt 6) Selling GA000099 after a year or two when I have this engine rebuilt and the funds for the conversion parts (Need a set of Ben's awesome SS heat exchangers and a nice SS muffler, a DIY oil tank kit, and other hoses, engine mounts, etc.) These costs stack up pretty quickly and will be done over time to ease negative cash flow. 7) Determine induction -- PMO carbs would be nice but I'm contemplating modern MegaSquirt based FI with PMO ITB. Has to have a ITB's or Carbs for that look and oh so sweet induction noise. 8) Question my sanity again! I want to post up front that this engine was bought as a core, at core price with no assumption that this would be a running motor. Engine was purchased from a terrific guy with no warranty expressed or implied! Thank you for selling this to me. @Rolinkhaus Upon arrival in my garage and finally up on the engine stand after a long drive, and lots of mid-west style sweating. 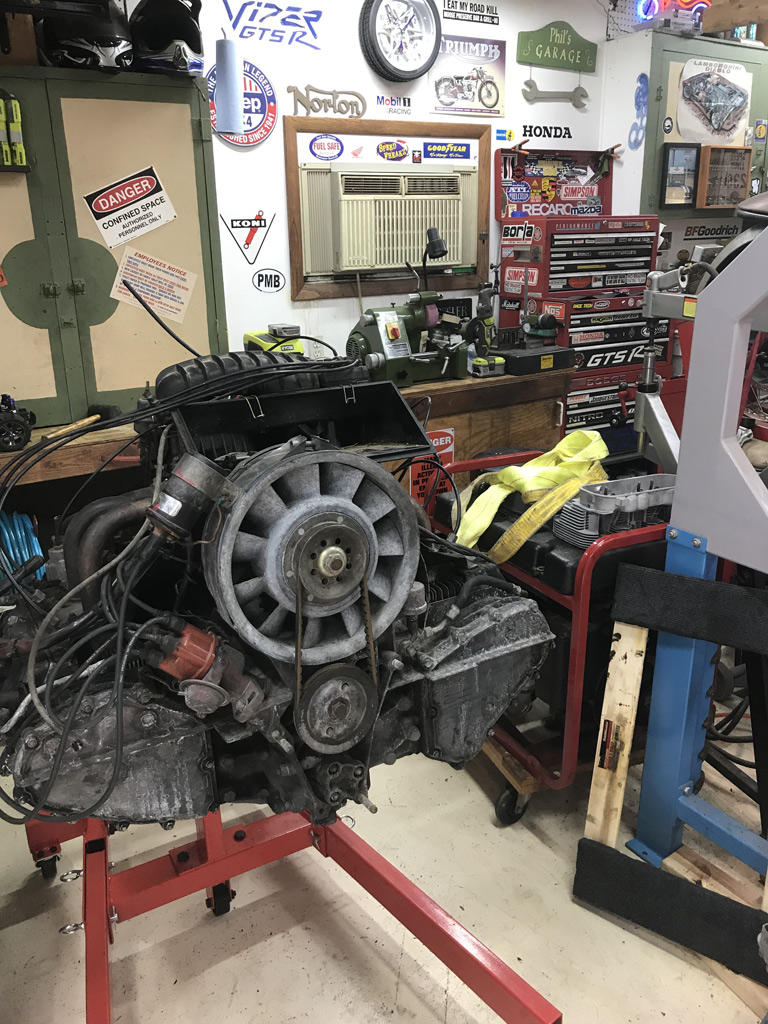 Also right up front I want to reinforce with you guys buying cars and then having overheating problems. Don't assume that the mice haven't set up home while your car and/or engine was in storage. Here is the standard oil gunk, pollen or cottonwood fluff crap that clogs up oil coolers plus some deposits from Mickey Mouse. 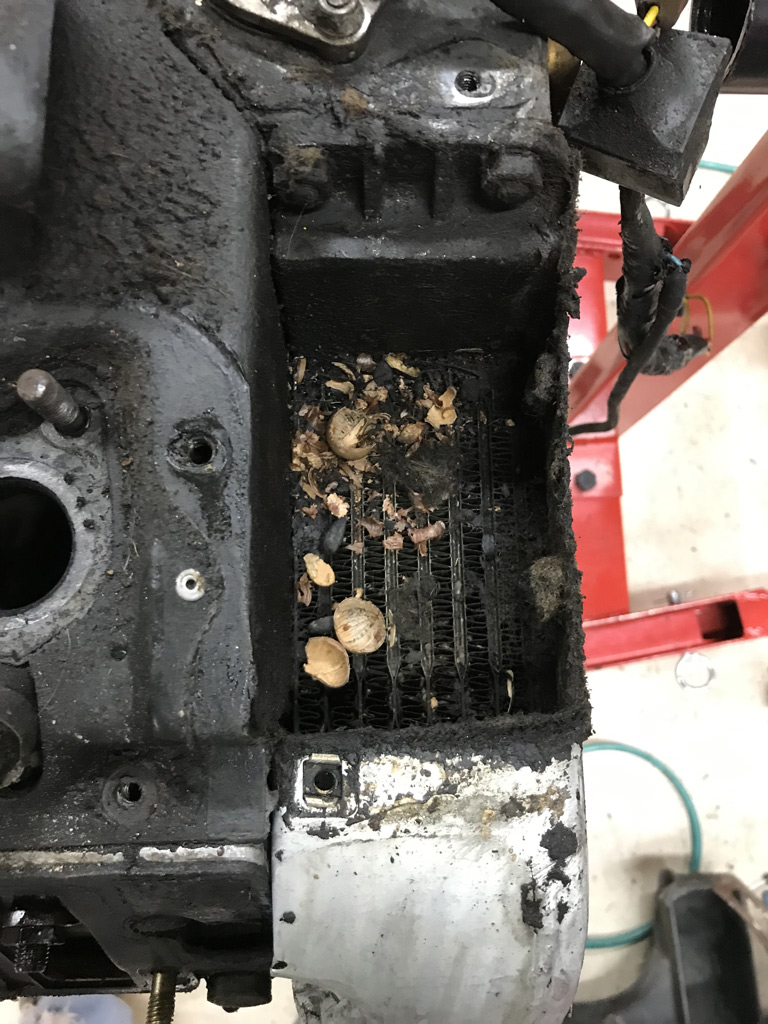 |
| defianty |
 Sep 18 2019, 03:02 AM Sep 18 2019, 03:02 AM
Post
#135
|
|
Senior Member    Group: Members Posts: 659 Joined: 9-August 06 From: Essex, UK Member No.: 6,621 Region Association: None  |
Nice work.
|
| Superhawk996 |
 Sep 18 2019, 03:36 AM Sep 18 2019, 03:36 AM
Post
#136
|
|
914 Guru      Group: Members Posts: 6,502 Joined: 25-August 18 From: Woods of N. Idaho Member No.: 22,428 Region Association: Galt's Gulch 
|
As I mentioned over in the buid thread for GA000099 I absolutely love tearing down old engines.
It is sort of like Christmas. You never know what is in the box. Sometimes its good, sometimes, it's sheer terror. I purchased it in part because it is a 1973.5 7R motor. My car is a 73'. Seems like a good match to me. (IMG:style_emoticons/default/biggrin.gif) Case shows signs of having been disassembled before as witnessed by RTV sealing the case and timing chain covers + heavily loaded in around the oil return tubes. I'm really hoping that someone didn't cut the cylinder spigots. Cylinders are cast iron so I have high hopes they are 2.4L originals. Early plan of action: 1) Do leakdown just to see if I got lucky. 2) Teardown completely and assess what I have. This engine purchase was a bit of a risk due to it being a 1973.5 2.4L and that only being a 1/2 year engine with CIS. The heads are different, CIS parts for 1973.5 are hard to find because, well you know Porsche. They were so hot to do CIS in 1973.5 that they turned around and changed a bunch of stuff for 1974! Hopefully some of this works to my advantage in trying to unload the CIS as a cost offset. Another risk is that the air box has a ton of dirt in it. This could be debris from storage, engine shipping to Rolinkhaus, or it could be somebody was doing a track day and ingested this crap during an off course shunt. 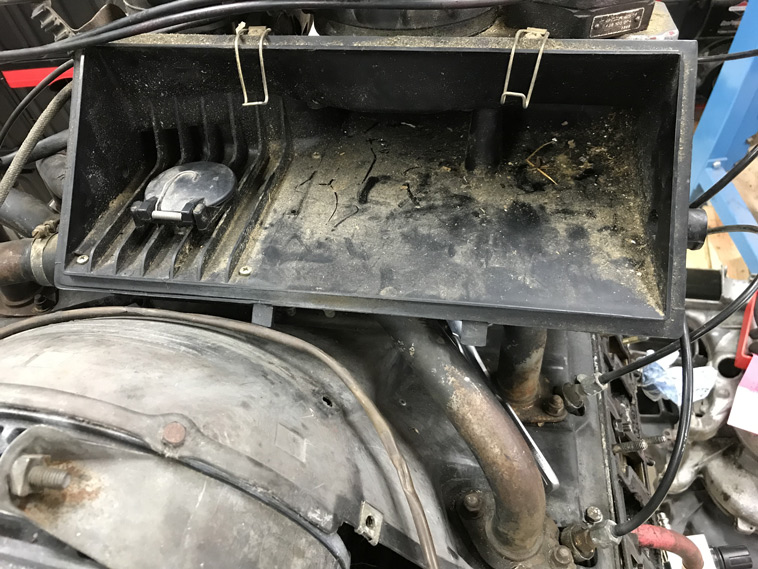 When I pulled the CIS boot, at least the throttle body and the CIS valve look to be clean. Not a guarantee a bunch of dirt / dust didn't come through though. 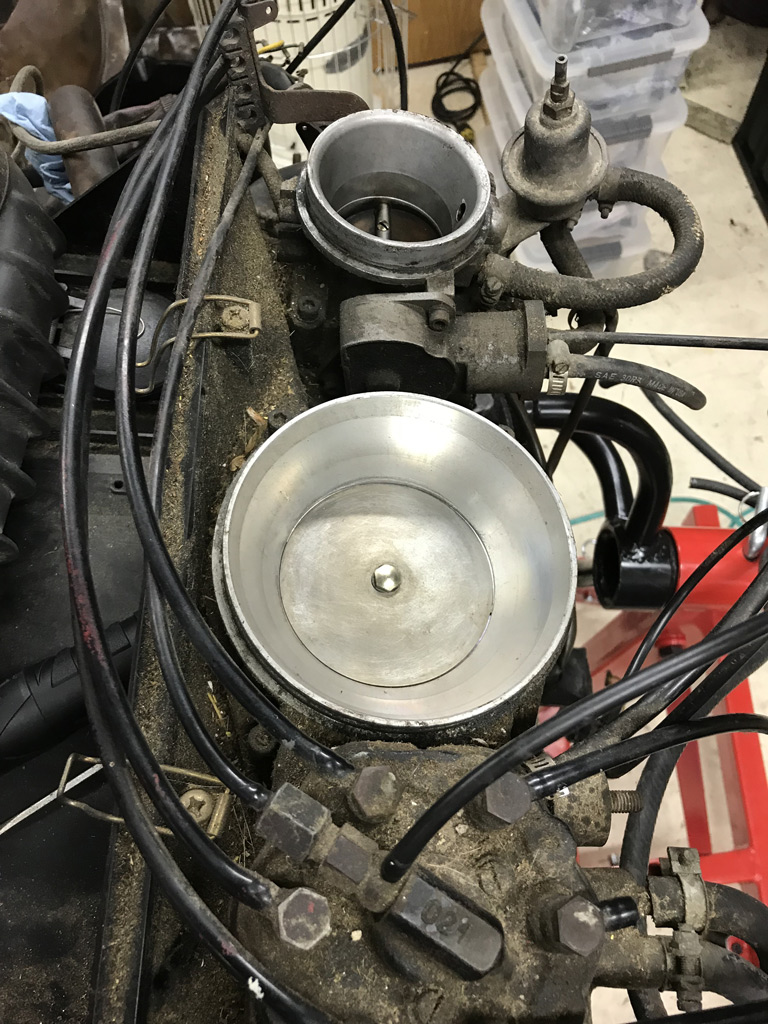 Opening up the rocker boxes to get a look at the valve gear, cams, and to be able to see them in preparation for leakdown checks. 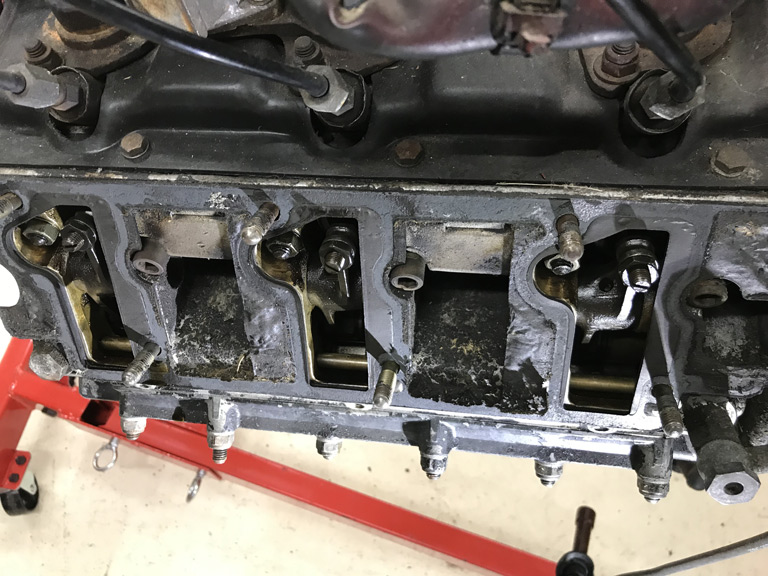 Not pristine but engine was supposedly 90K so not outlandish either. Between the fact that the CIS internals and the fact that the side of the rocker boxes exposed air aren't covered in dust matching the air box, I'm going to say the airbox dirt probably came during shipping or storage. |
| Superhawk996 |
 Sep 18 2019, 03:47 AM Sep 18 2019, 03:47 AM
Post
#137
|
|
914 Guru      Group: Members Posts: 6,502 Joined: 25-August 18 From: Woods of N. Idaho Member No.: 22,428 Region Association: Galt's Gulch 
|
After pulling all rocker covers, I did a leakdown.
Not so encouraging. Bank 1-3 is 16% to 30%. Definitely rebuild time. Bank 4-6 is more concerning. Basically, complete blow though with 70-90% leakage. Leaking into the case partially and hard out the exhaust valves. No compression feel when air is applied via the leak down gauge and starting before TDC and cycling up though and past TDC. Nothing . . . Nada. (IMG:style_emoticons/default/sad.gif) 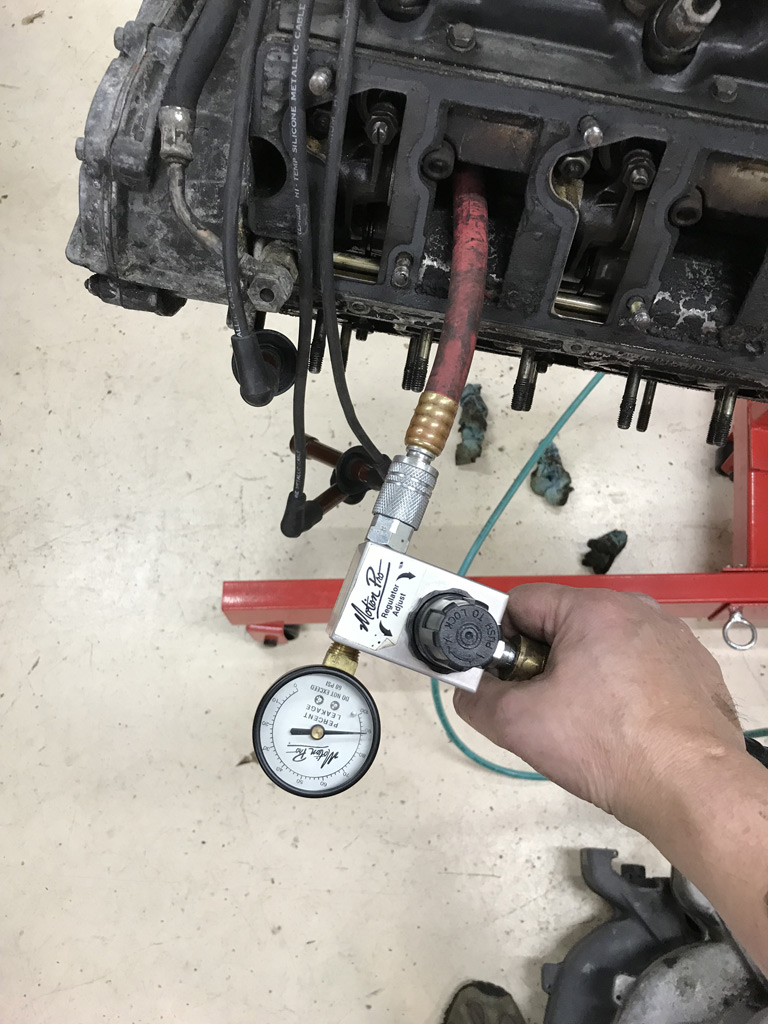 There is a lot going on in my head at this point. This is the sheer terror part! (IMG:style_emoticons/default/stromberg.gif) Valves seem to have clearance to rockers on the compression stroke so we really shouldn't have this much valve leakage. Might be burned valves. I did pop a borescope into a couple of the cylinders before I purchased and didn't see any holes or valve heads in there and the engine turns freely. (IMG:style_emoticons/default/confused24.gif) likewise, I can see all valve heads are attached. Whew! I may go back and back off the exhaust valve adjusters just to be sure but honestly, it doesn't matter since a complete tear down is going to occur. |
| Superhawk996 |
 Sep 18 2019, 03:50 AM Sep 18 2019, 03:50 AM
Post
#138
|
|
914 Guru      Group: Members Posts: 6,502 Joined: 25-August 18 From: Woods of N. Idaho Member No.: 22,428 Region Association: Galt's Gulch 
|
Next order of business is to get the shroud pulled.
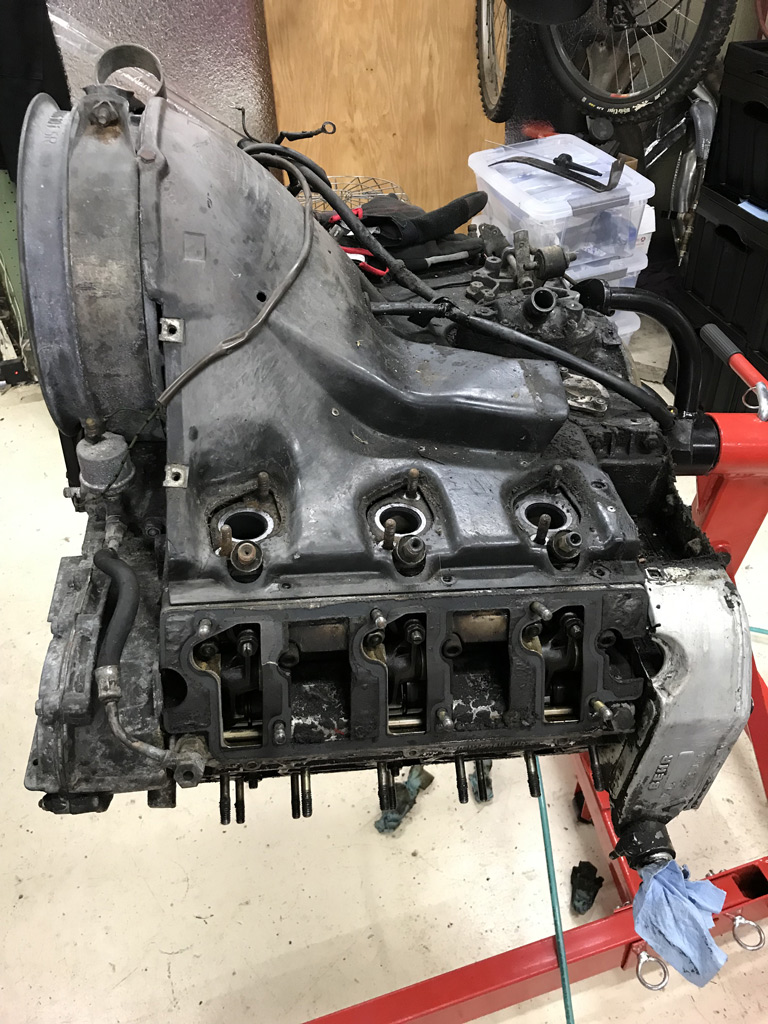 Easier said than done. CIS had to come off which is easy enough but the CIS injectors proved to be a challenge. I've read all the Pelican forums about how hard these are to pull. I honestly can't imagine trying to do this in car. I ended up using a slide hammer. I made an adapter to thread onto the CIS injector body and then to get a nice hard straight line pull out. They still didn't come easy. |
| Superhawk996 |
 Sep 18 2019, 04:13 AM Sep 18 2019, 04:13 AM
Post
#139
|
|
914 Guru      Group: Members Posts: 6,502 Joined: 25-August 18 From: Woods of N. Idaho Member No.: 22,428 Region Association: Galt's Gulch 
|
Removal of the shroud came with a few unpleasant surprises. Like all machinery of this age, it has been abused at some point in it's life.
This one appears to be no exception. I found the fan housing to be cracked and a slight chip out of the backside of one of the fan blades. Most likely from an inept mechanic trying to wedge a screwdriver or pry bar between the fan and the housing to loosen the fan belt nut rather than using the proper holding tool. You would think Porsche 911's might get a touch better attention than the 914's. . . but nope! Not if you happened to be in Iowa in 1974 and needed a fan belt replaced. Sorry - not trying to pick on Iowa . . . . just an analogy. Could have happened as easily in Detroit back in the day! (IMG:style_emoticons/default/happy11.gif) 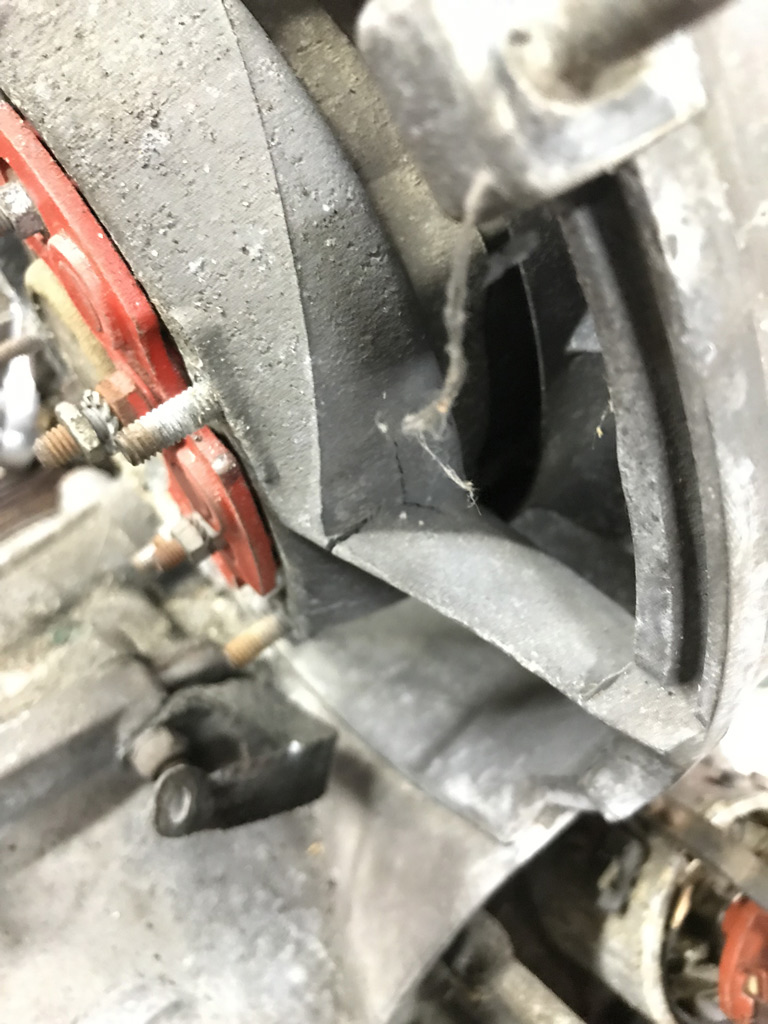 I've got to say, I'm continually confounded by American mechanics that never seemed to really grasp things like Magnesium. 1) It isn't as strong as cast iron and deserves a little more respect. 2) The legend that it can't be welded without starting on fire. I also found this cracking on the case. (IMG:style_emoticons/default/stromberg.gif) The case is the desirable 7R case and is the bulk of the reason I chose to purchase this core. I think this is just casting shrink at the casting gate where molten metal flows into the mold. The gate intentionally provides a place for metal to shrink from when the casting cools. The fact that there is no oil residue here likely means this doesn't penetrate the case. We'll see when I get the case split. I'll keep my fingers crossed that it is indeed gate shrinkage. Or worst case, it is repairable by Otto's or the like. 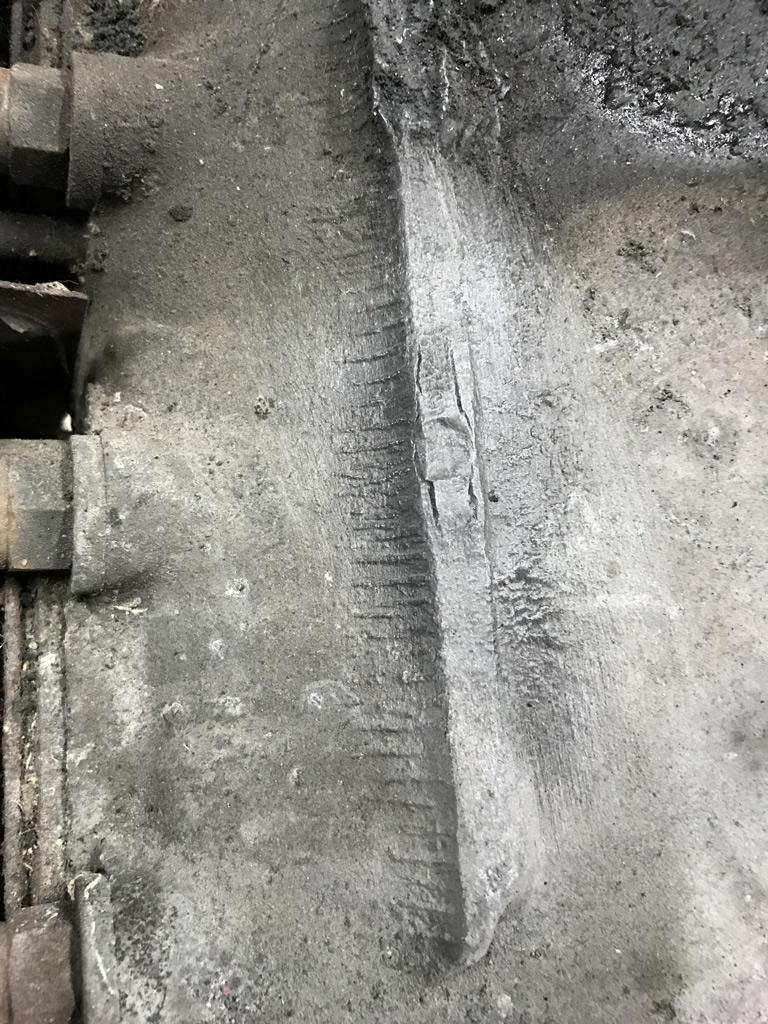 |
| Superhawk996 |
 Sep 18 2019, 04:19 AM Sep 18 2019, 04:19 AM
Post
#140
|
|
914 Guru      Group: Members Posts: 6,502 Joined: 25-August 18 From: Woods of N. Idaho Member No.: 22,428 Region Association: Galt's Gulch 
|
So finally after much cursing and a little more disassembly, I finally got it down to a long block.
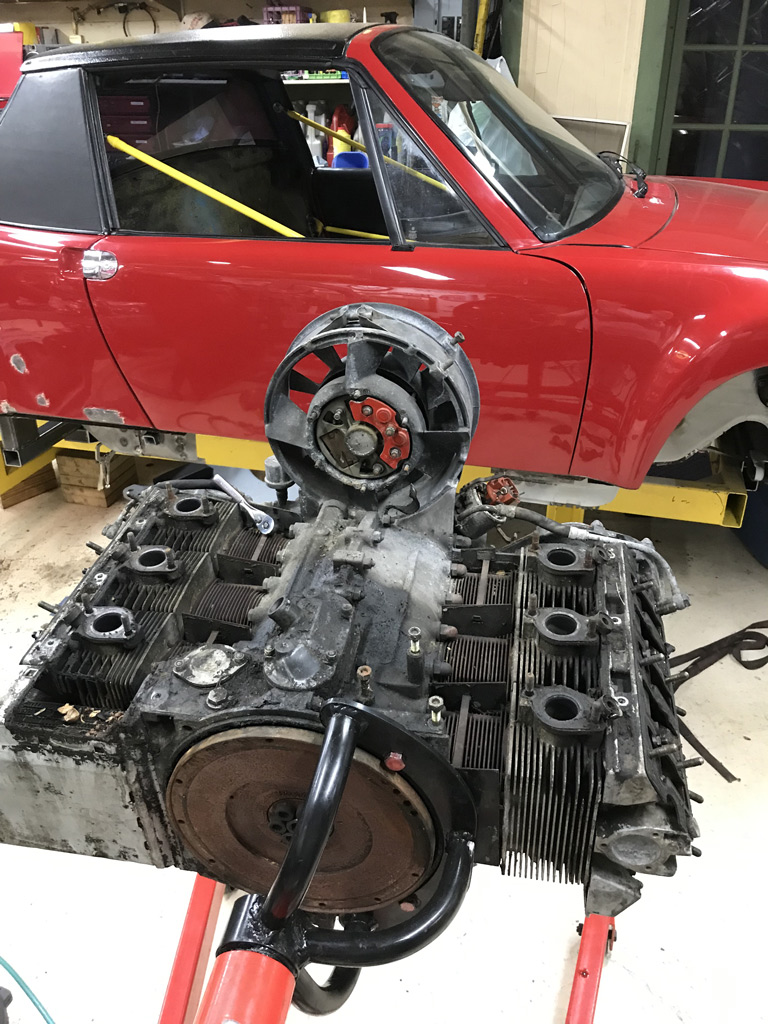 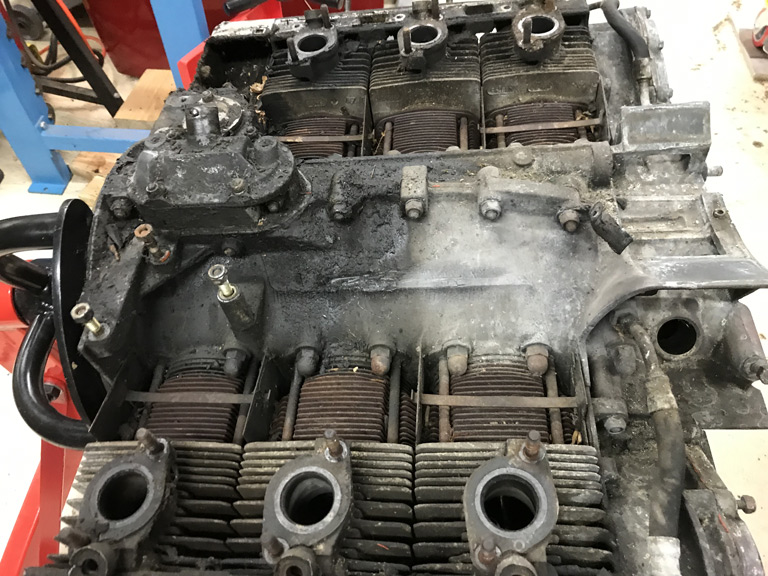 This is the current state of affairs. Once I'm past this 2nd day of post surgery pain, I'll get back out into the garage and start working toward a complete teardown and determination of what's going on over on the bank 4-6 side of the engine. |
  |
1 User(s) are reading this topic (1 Guests and 0 Anonymous Users)
0 Members:

|
Lo-Fi Version | Time is now: 31st October 2024 - 11:26 PM |
Invision Power Board
v9.1.4 © 2024 IPS, Inc.


