|
|

|
Porsche, and the Porsche crest are registered trademarks of Dr. Ing. h.c. F. Porsche AG.
This site is not affiliated with Porsche in any way. Its only purpose is to provide an online forum for car enthusiasts. All other trademarks are property of their respective owners. |
|
|
  |
| Superhawk996 |
 Feb 27 2022, 06:15 PM Feb 27 2022, 06:15 PM
Post
#501
|
|
914 Guru      Group: Members Posts: 6,507 Joined: 25-August 18 From: Woods of N. Idaho Member No.: 22,428 Region Association: Galt's Gulch 
|
Used the old welding rod post trick to get the little hole filler pieces sized and in position for tack welding.
The post allows you to hold the part, keeping it from dropping back in the hole while getting tack welds in place. 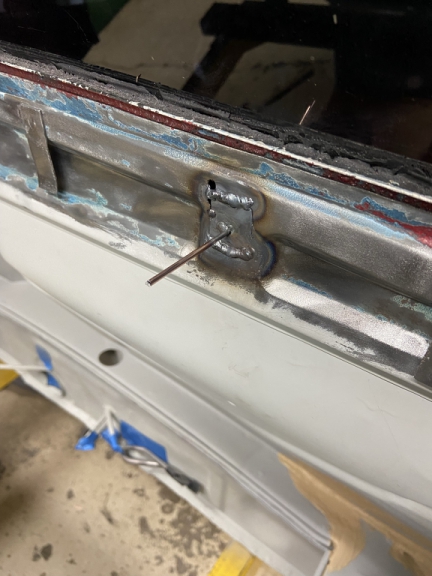 Here's the holes fixed - Driver side 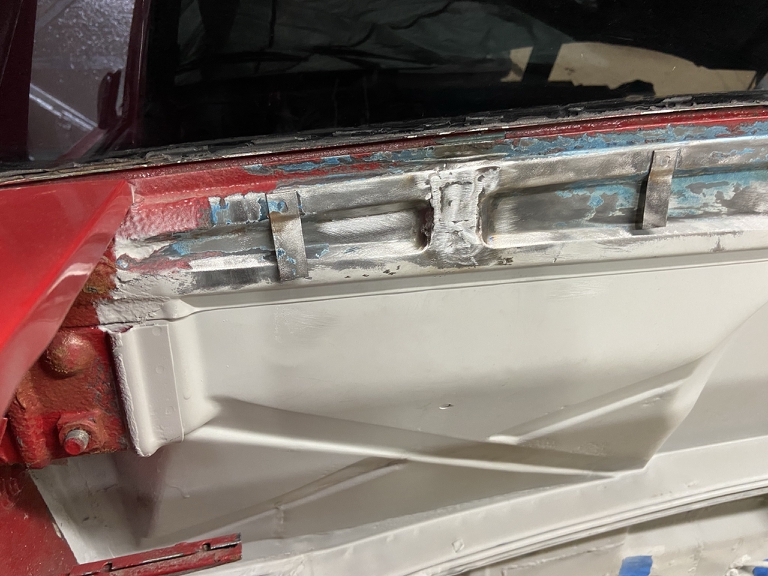 Passenger Side 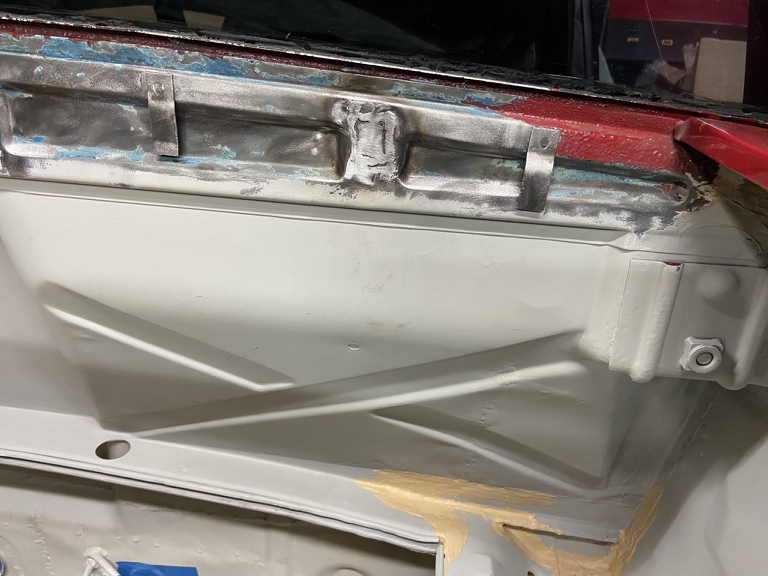 I think I'm going to add a small doubler over these patches. It will move the hinges 1mm further back in space but I think there is enough adjustability in the hinge to accommodate the 1mm of rearward movement. A little extra stiffness in this area wouldn't hurt. Need to mock up to be sure before I go for it. |
| Superhawk996 |
 Feb 27 2022, 06:29 PM Feb 27 2022, 06:29 PM
Post
#502
|
|
914 Guru      Group: Members Posts: 6,507 Joined: 25-August 18 From: Woods of N. Idaho Member No.: 22,428 Region Association: Galt's Gulch 
|
Side Project Of The Day
Had to make a new set of bushings for a buddy's F2000 Anti Roll Bar (ARB). Thought some folks might be interested in this style of anti-roll bar and how it works. The actual deflection occurs mostly in the tapered segments. As shown in the photo below the ARB would be at its softest. The closer the links are to vertical the more deflection will occur in the very shot tube between them. The assembly rides in pillow block bearings supported by the two hex bolts on the ends. 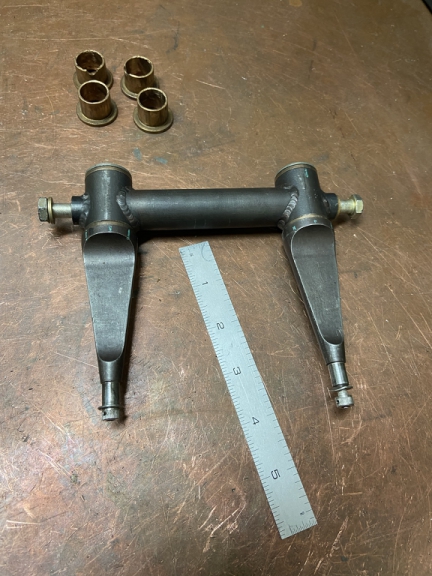 The links can be rotated so that the orientation of the links are either vertical (stiffer) or horizontal (more flexible). or somewhere between as shown below. 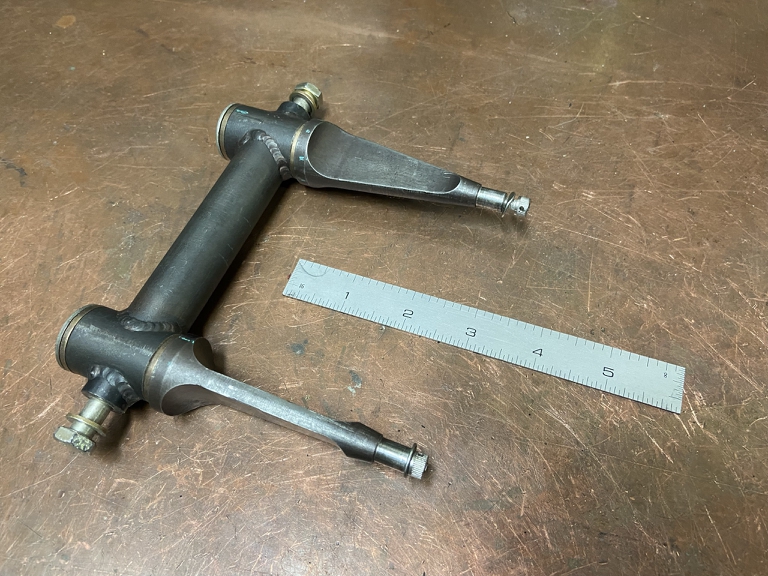 The orientation of the links can be controlled from the cockpit to allow for changes to the ARB rate during the race. It's very small and compact to fit up in the front area of the chassis where there really isn't much package space. Pretty cool (IMG:style_emoticons/default/shades.gif) but not quite applicable to a 914. |
| Superhawk996 |
 Mar 7 2022, 09:47 AM Mar 7 2022, 09:47 AM
Post
#503
|
|
914 Guru      Group: Members Posts: 6,507 Joined: 25-August 18 From: Woods of N. Idaho Member No.: 22,428 Region Association: Galt's Gulch 
|
This past Saturday was Autorama in Detroit. Finally! it was cancelled last two years and is the only thing to look forward to in March.
I always get a chuckle out of the awards for the rat rods. Here's this years survivor award. 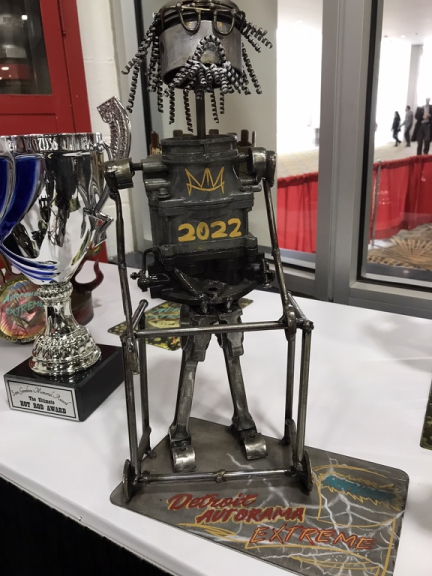 On Sunday I was able to get back to welding and finalized the truck and engine lid hinges. On the engine lid, I did add a doubler over the original hinge location to reinforce it a bit since this area is prone to stress cracking. 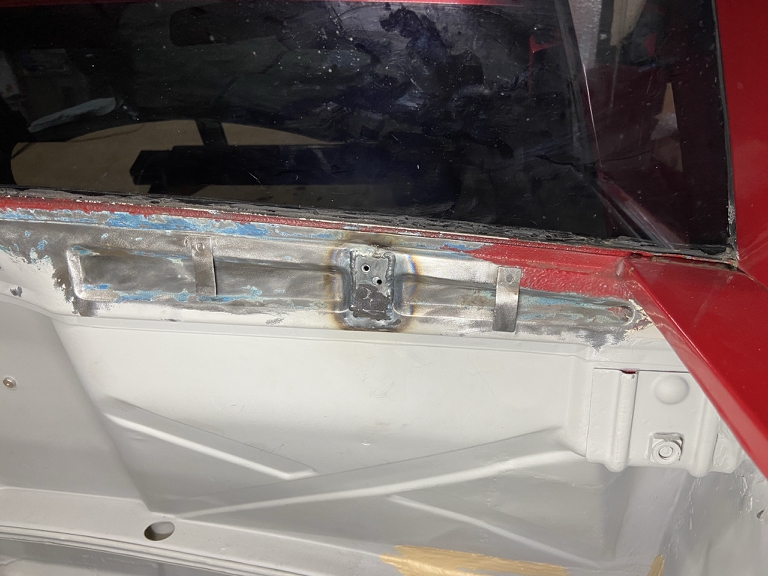 the extra 1mm of thickness caused absolutely no issues. I'm pretty happy with the gaps given I'm dealing with 1970's quality fit & finish. I moved things around a lot and this is the best I could get. To take gaps & fits to the next level, would involve taking sheetmetal to bare metal and doing weld & grind work along the panel edges. 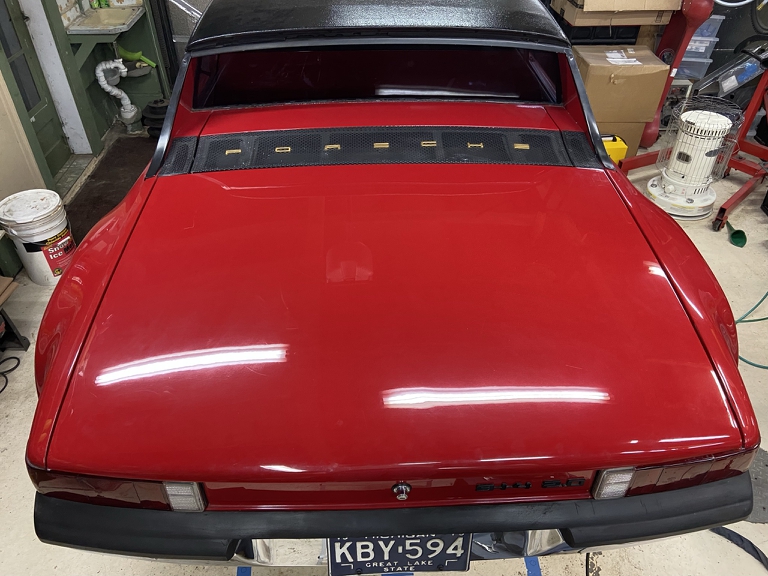 |
| rfinegan |
 Mar 7 2022, 10:15 AM Mar 7 2022, 10:15 AM
Post
#504
|
|
Senior Member    Group: Members Posts: 1,023 Joined: 8-February 13 From: NC Member No.: 15,499 Region Association: MidAtlantic Region 
|
WOW+++ impressive work going on here
|
| Shivers |
 Mar 7 2022, 10:27 AM Mar 7 2022, 10:27 AM
Post
#505
|
|
Senior Member     Group: Members Posts: 2,758 Joined: 19-October 20 From: La Quinta, CA Member No.: 24,781 Region Association: Southern California |
Used the old welding rod post trick to get the little hole filler pieces sized and in position for tack welding. The post allows you to hold the part, keeping it from dropping back in the hole while getting tack welds in place.  Good idea. I use a magnet and seam to hit it every time with the welder |
| Superhawk996 |
 Apr 11 2022, 03:08 PM Apr 11 2022, 03:08 PM
Post
#506
|
|
914 Guru      Group: Members Posts: 6,507 Joined: 25-August 18 From: Woods of N. Idaho Member No.: 22,428 Region Association: Galt's Gulch 
|
School of Hard Knocks - Lesson #7461
There hasn't been a lot of exciting stuff to post. Mostly just paint work. Here's a hard learned lesson during the install of the passenger side door sill. The rear door gap was being controlled by the loose leading edge of the door jamb panel. Sorry no photo. Depending on where the door jamb was placed, it would deflect the gap either tighter or looser. All though my build I had counted on this flexibility to set the rear door gap. Well, I had it all set, and had it successfully tack welded in place. All looked great. Again sorry no photos since I wasn't expecting things to go awry at that point. So as I'm looking at the trough between the sill stamping and the door jamb transition, I thought to myself . . . . . self . . . . you should just use Braze instead of more tack welds. That would minimize the amount of body filler needed to fill and smooth that trough. Smart huh? (IMG:style_emoticons/default/biggrin.gif) 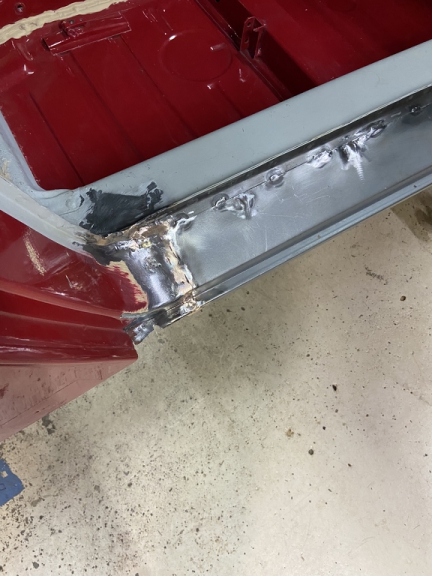 Uh . . . No. Reinstall door only to find the gap had closed up (IMG:style_emoticons/default/headbang.gif) All sorts of profanity that I hope the neighbors didn't hear. (IMG:style_emoticons/default/icon8.gif) (IMG:style_emoticons/default/WTF.gif) 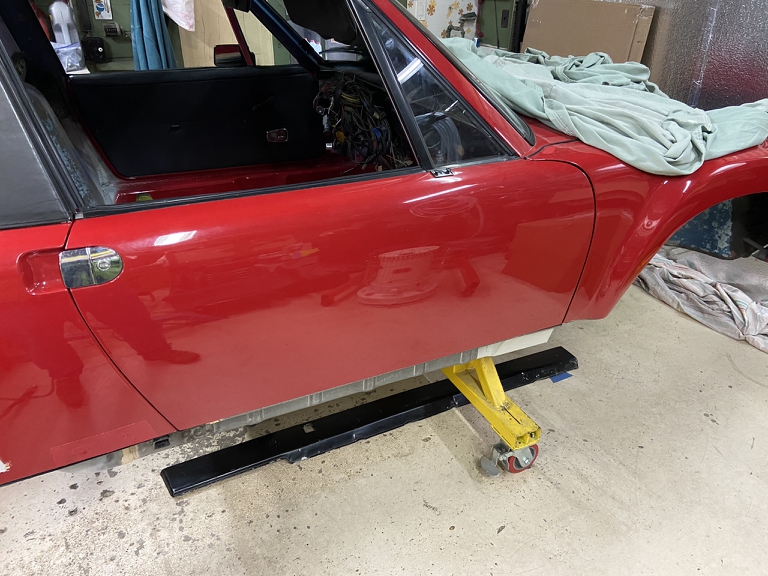 Rear gap closed up. (IMG:style_emoticons/default/headbang.gif) So what happened? In order to set the gap, the rear quarter panel was essentially pushed rearward and was under compressive force being held by the tack welds. During the process of brazing, I tried to do too much, too quickly and it softened the steel, allowing the compressive force to buckle the soft steel back to where the panel wanted to be without the internal stress. This closed the gap. I would have been far better to place a couple more tack welds and to have used the plastic filler that I was trying to minimize. UGH! (IMG:style_emoticons/default/sheeplove.gif) So Now What to Do? I could have fixed this by simply cutting the door jamb, pushing it back to reset the door gap and then re-welding it slowly and carefully. Problem is that I'm now under pressure to get this chassis ready for a cross country trip on the back of a trailer. I am going to be moving soon and this needs to be able to go on a trailer for transport. Yes, it's a lame excuse for not doing it right. My rationale is that I was eventually going to put steel flares on this car and to return the paint to Alaska Blue since I really do hate red cars. I know how to fix, it. I just need to keep forging ahead due to my move timeline. So after multiple days of fighting with myself along the lines of "Just fix it right". "No, just get it done". "Yeah, but it would only take a day or two to fix it right". "No! I don't have the time." I finally yielded to the just get it done voice. (IMG:style_emoticons/default/sad.gif) |
| Superhawk996 |
 Apr 11 2022, 03:18 PM Apr 11 2022, 03:18 PM
Post
#507
|
|
914 Guru      Group: Members Posts: 6,507 Joined: 25-August 18 From: Woods of N. Idaho Member No.: 22,428 Region Association: Galt's Gulch 
|
Paint Progress.
So I've been struggling with paint match. Here are some photos. Original paint code is BMW #138. When I did the interior, I determined that that code is close but it seems to be a bit darker, deeper red than the exterior and even of the trunk interior which really shouldn't be faded due to UV and the elements. I painted the upper engine compartment in the same color since I had more of that color on hand. I then painted the lower engine compartment in Honda R90 which is what PPG recommended as the best color match to a scan we did of the front headlamp cover. I was hoping to get a slightly lighter red. Nope. 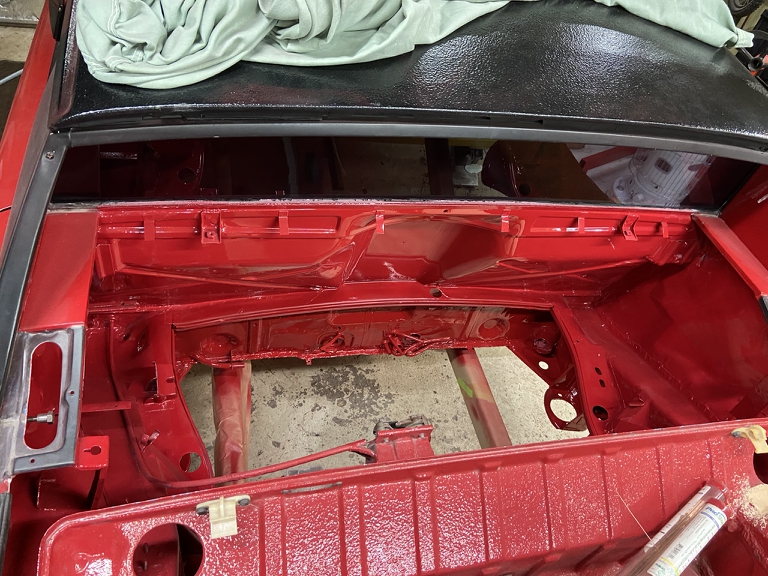 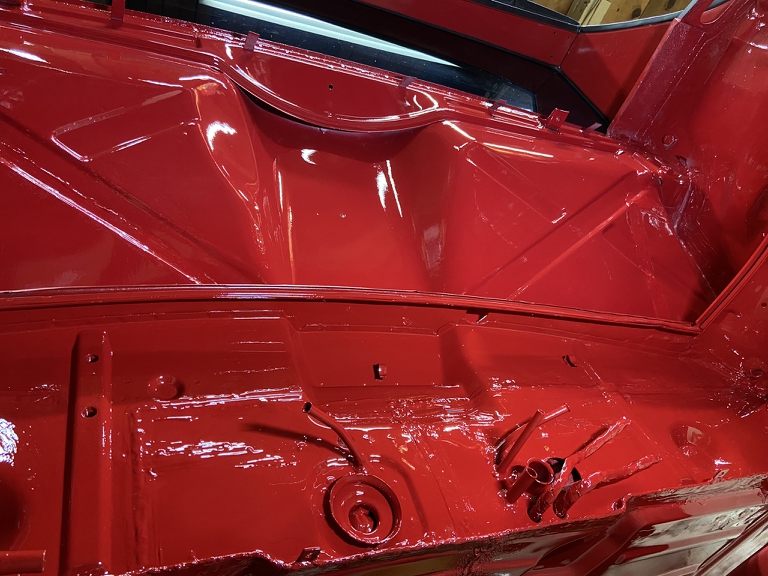 I'm not sure I can even tell the difference. Then shot the bottom of the floor pan & under the sill. 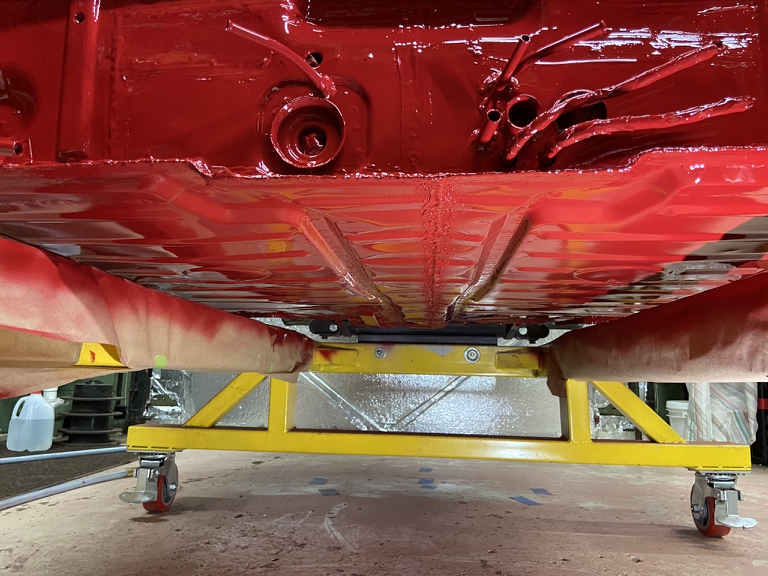 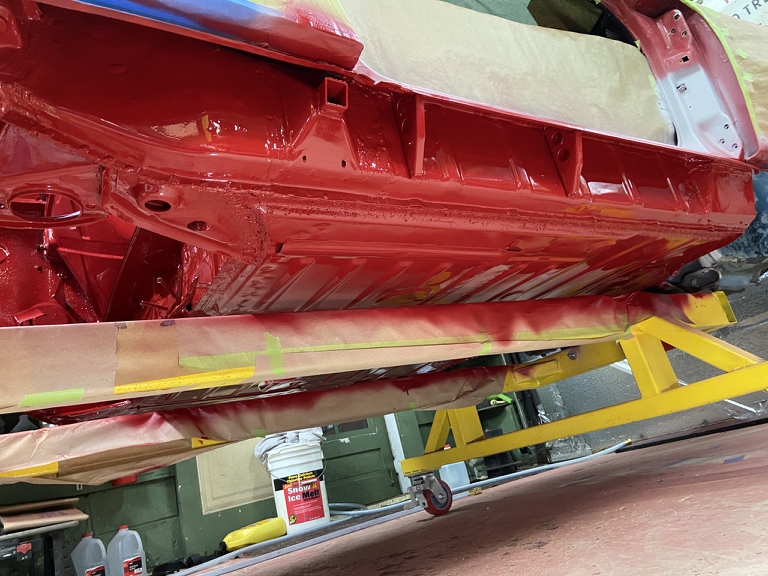 Not having had satisfaction on the engine compartment, I decided to try beige primer on the door jamb and went back to BMW#138 I don't know . . . . I think it's slightly closer but not much - might just be the difference in lighting. 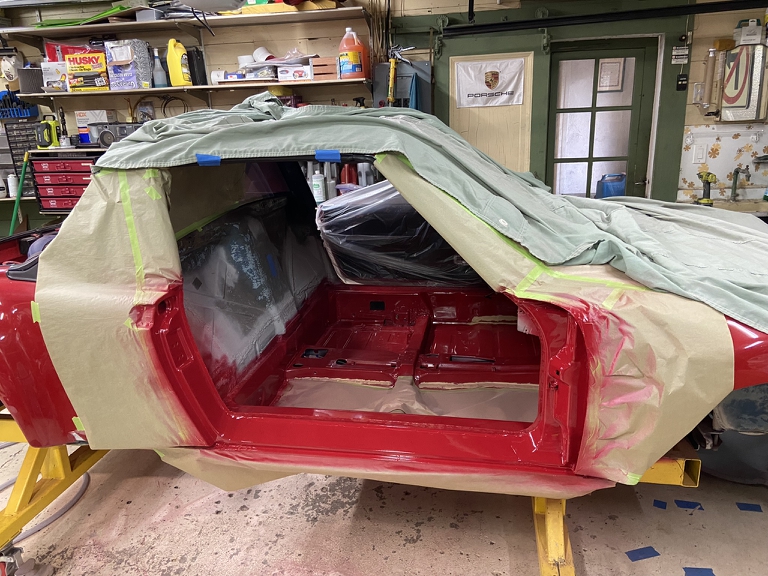 All this leads me to believe I'm going to have a very hard time blending the repairs that need to be made on the passenger side rear quarter later on. Yup . . . Alaska Blue looking better all the time. (IMG:style_emoticons/default/laugh.gif) |
| 930cabman |
 Apr 12 2022, 04:22 AM Apr 12 2022, 04:22 AM
Post
#508
|
|
Advanced Member     Group: Members Posts: 3,643 Joined: 12-November 20 From: Buffalo Member No.: 24,877 Region Association: North East States 
|
Great progress, but having a cross country move in the program can easily throw a large wrench into things. Good thing she looks like she can be a roller in short time. Also, nice fix with the engine hinge mountings.
|
| Superhawk996 |
 Jun 6 2022, 11:11 AM Jun 6 2022, 11:11 AM
Post
#509
|
|
914 Guru      Group: Members Posts: 6,507 Joined: 25-August 18 From: Woods of N. Idaho Member No.: 22,428 Region Association: Galt's Gulch 
|
 Per previous posts - still in the midst of putting house on market and getting ready for a big move that will put this project on hold for a while. Right now the focus is on buttoning up the large holes in the car that would let rain into the car during a cross country open air haul. |
| Superhawk996 |
 Jun 6 2022, 11:21 AM Jun 6 2022, 11:21 AM
Post
#510
|
|
914 Guru      Group: Members Posts: 6,507 Joined: 25-August 18 From: Woods of N. Idaho Member No.: 22,428 Region Association: Galt's Gulch 
|
First order of business has been packing up lots of (IMG:style_emoticons/default/stromberg.gif) to get the house in presentable shape for showings.
Apparently potential home buyers have no appreciation for a man cave filled with 914 parts sitting around on the floor. Part of the packing entails putting the 2.4L 911 engine away for the move. (IMG:style_emoticons/default/sad.gif) 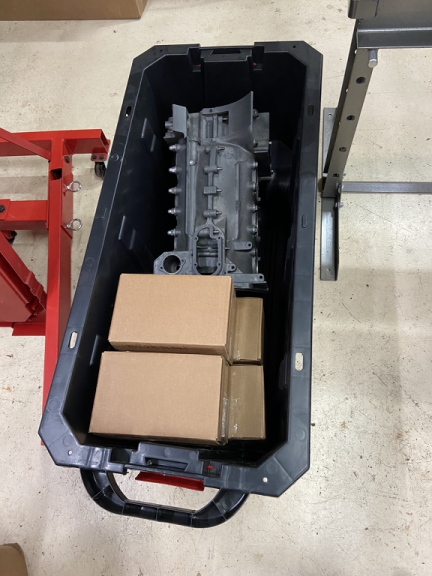 The other task lingering was to seal up the hole in the driver side long where the corroded jacking triangle had been. Although the driver side long is very sound the jacking point had the usual corrosion that took out the 1st layer of metal that the jack tube welds to. Here is the finished result - proving that you definitely can replace the jack point tube and pyramid without resorting to cutting the rear quarter panel. 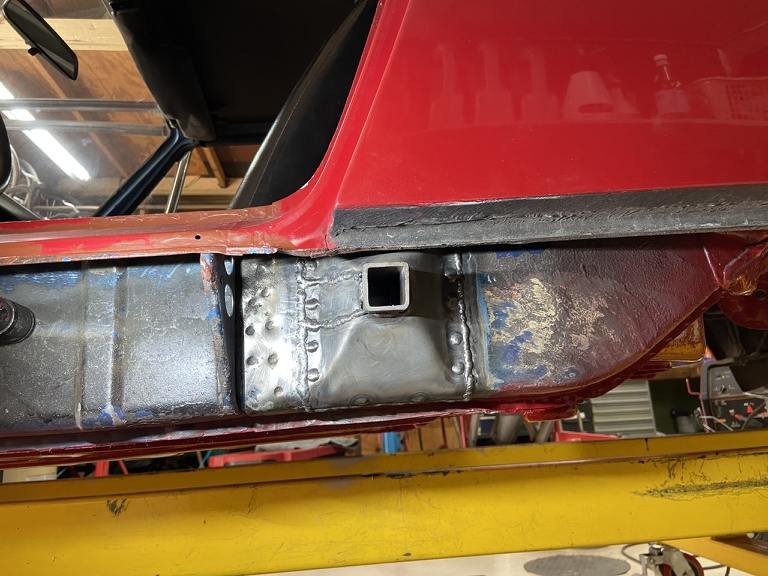 Starts with the usual fabrication of a shallow inverted pyramid arrangement that sort of sinks into the long to mimic the OEM form. 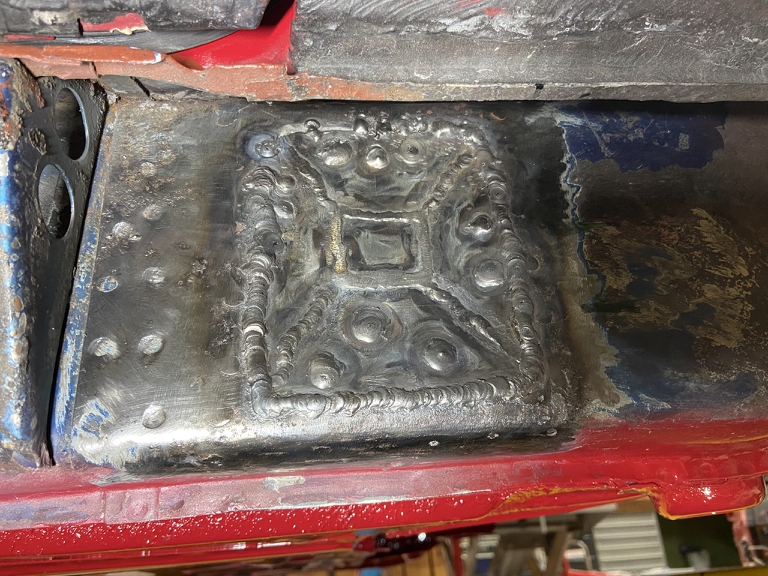 Then location of the tube and welding it to the long. 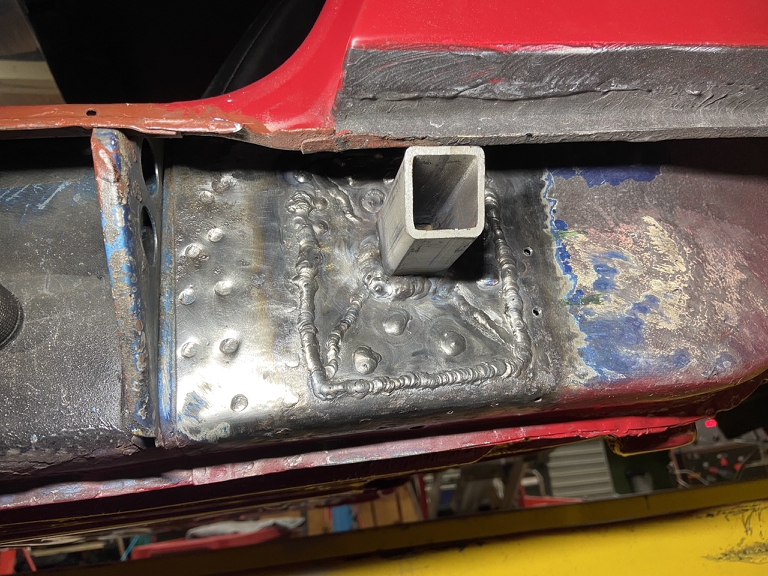 Then the super secret step. How to get the triangle over the post since the rear quarter panel is in the way? 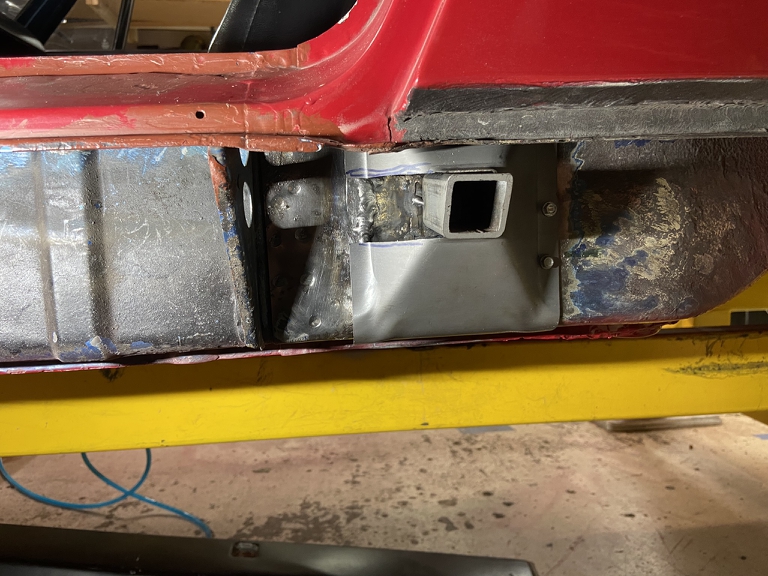 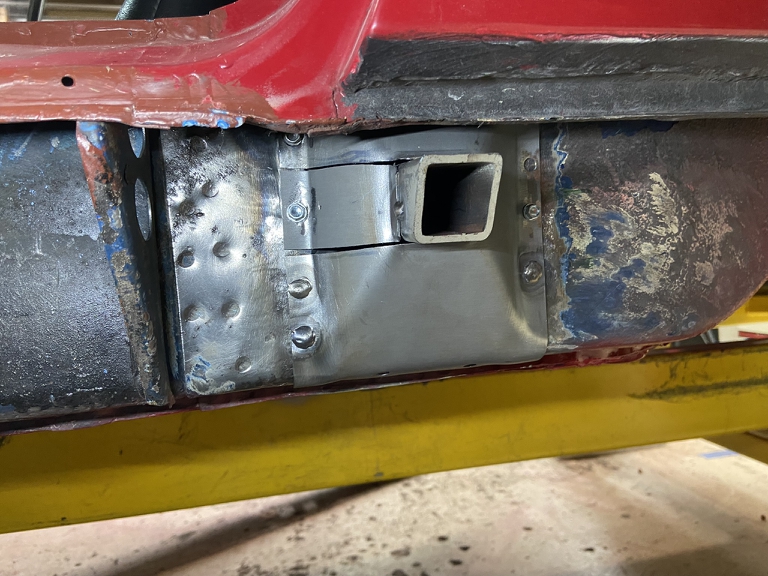 And of course, after that, it's simply a matter of welding it up! Ta da! Now in all honesty, I was only able to get one lonely spot weld on the top of the triangle up between the inner and outer wheelhouse. But, the jack point basically operates in double shear with a inward bending load at the top of the jack pyramid. So the attachment at the top of the long really isn't doing anything structural. I would have loved a couple more spot welds up there but it wasn't going to happen. Final step was seam sealer around the entire triangle perimeter to seal it up and help keep water out. Note: I still need to drill a couple drain holes on the bottom of the pyramid that isn't in the photos! After those holes are drilled, I'll flood the inside of the pyramid with Eastwood frame coating for future corrosion protection. |
| Superhawk996 |
 Jun 6 2022, 11:54 AM Jun 6 2022, 11:54 AM
Post
#511
|
|
914 Guru      Group: Members Posts: 6,507 Joined: 25-August 18 From: Woods of N. Idaho Member No.: 22,428 Region Association: Galt's Gulch 
|
Now -- time to do my own DAPO workmanship.
What to do about those massive holes created by the AC butchery? 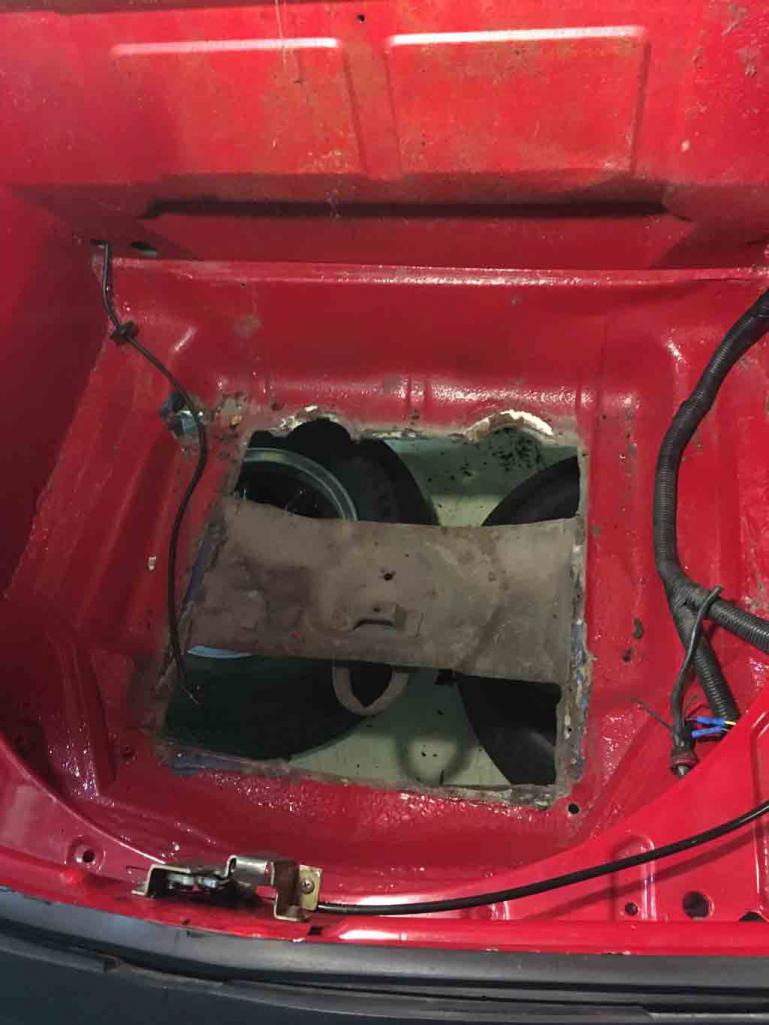 The first thing I have to say about this is for all you guys cutting holes like this for AC and/or water pumper radiator venting is that you don't have enough appreciation for how a unibody structure gets its stiffness. Cutting holes this large in the Frunk floor pan seriously compromises the structural integrity - especially between the front LCA attachment points that are bearing lateral load. In the following photos you can see sheet metal that is cracking at the corners that was not part of the the original butchery. This is occurring because the structure is flexing! 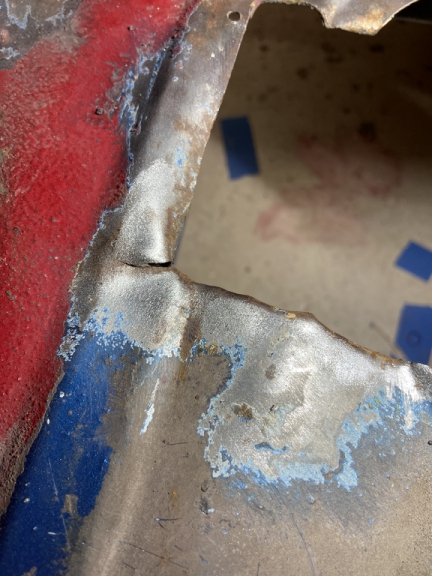 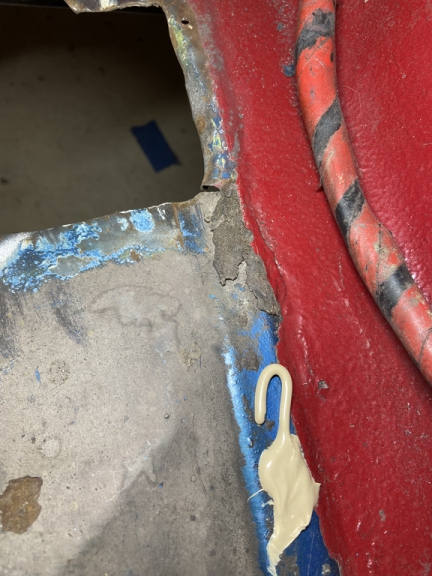 Now let it be said that I have a complete RD front trunk pan that I intend to install at some future point in time. I just don't have time to do it now with the pending move. This means time for DAPO workmanship just to seal it up. The short term solution was basically to cut some flat stock, roughly (IMG:style_emoticons/default/smash.gif) it to shape and then lap weld it in and seal it with seam sealer for the trip - only purpose being to keep water out. This is my final result (rubber plugs and drain tubes on order for the 4 remaining OEM holes): 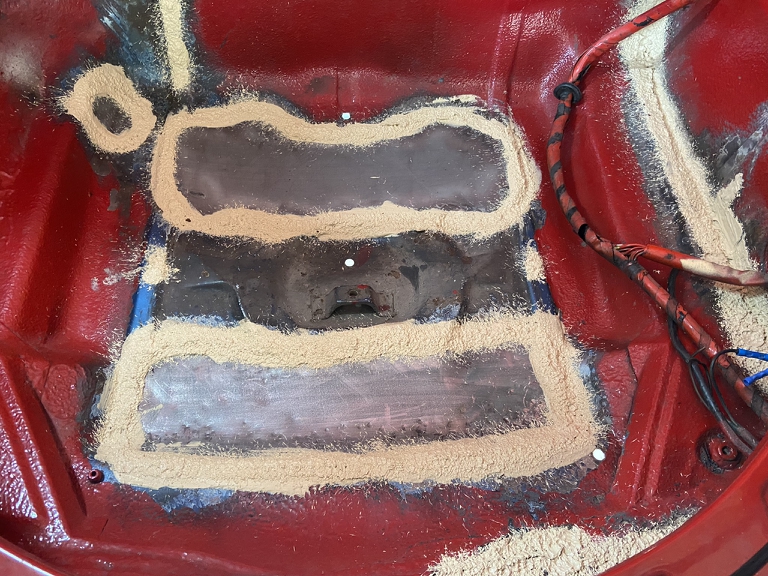 It's hard to convey how much stiffer the structure got after just welding in the first panel. Along the way, I've had to squat in the Frunk while working on the fuel tank area. I could feel the structure flex unless I stood on the very sides, on top of the reinforcing gussets above the front LCA's. I was very careful to always do this because I could feel the flex. After welding in these two crude patch panels, I can now stand in the frunk and I don't feel even a hint of flex. Bottom line, if you're opening up holes like this for conversion cooling, you better be thinking about how you're going to reinforce the structure to gain back the structural rigidity that has been lost. |
| bbrock |
 Jun 6 2022, 09:23 PM Jun 6 2022, 09:23 PM
Post
#512
|
|
914 Guru      Group: Members Posts: 5,269 Joined: 17-February 17 From: Montana Member No.: 20,845 Region Association: Rocky Mountains 
|
Well you know what? That patch is not half bad. Maybe too good. That's the kind of patch that is so good you can put the "proper" patch off indefinitely.
I would imagine you are quite relieved to have proper stiffness returned. (IMG:style_emoticons/default/happy11.gif) |
| autopro |
 Jun 7 2022, 09:11 AM Jun 7 2022, 09:11 AM
Post
#513
|
|
Member   Group: Members Posts: 306 Joined: 14-January 18 From: San Diego / Tijuana Member No.: 21,797 Region Association: Southern California |
I vote Alaska Blue (IMG:style_emoticons/default/beer.gif)
Great job on getting the chassis strength back up, it always amazes me how some people just think they can start cutting up a car and it will remain as strong as it originally was. Oh and I've had to move with two project cars not finished, it was a total pain in the rear but we got it done. It was actually good because I found parts I had forgot that I had (IMG:style_emoticons/default/huh.gif) |
| 930cabman |
 Jun 7 2022, 06:06 PM Jun 7 2022, 06:06 PM
Post
#514
|
|
Advanced Member     Group: Members Posts: 3,643 Joined: 12-November 20 From: Buffalo Member No.: 24,877 Region Association: North East States 
|
Great progress, when will she be moving under her own power, after the move I'm sure.
Let me know I have a Carver and Sony maybe we can make a deal |
| Superhawk996 |
 Jun 9 2022, 06:29 AM Jun 9 2022, 06:29 AM
Post
#515
|
|
914 Guru      Group: Members Posts: 6,507 Joined: 25-August 18 From: Woods of N. Idaho Member No.: 22,428 Region Association: Galt's Gulch 
|
Great progress, when will she be moving under her own power, after the move I'm sure. Unfortunately it won't be for a couple years. First order of business after the move is to put up a shop to work out of -- expect that will take me the better part of a year. After that I'll need to get all my tools set back up (Mill, lathe, welder, parts storage, etc.). Don't worry, I'll still continue to be a troll on the World though. (IMG:style_emoticons/default/laugh.gif) |
| Superhawk996 |
 Jun 9 2022, 06:49 AM Jun 9 2022, 06:49 AM
Post
#516
|
|
914 Guru      Group: Members Posts: 6,507 Joined: 25-August 18 From: Woods of N. Idaho Member No.: 22,428 Region Association: Galt's Gulch 
|
I'm growing a little uncomfortable at how easily I've adapted to a low standard of workmanship. (IMG:style_emoticons/default/happy11.gif)
Quick paint prep yesterday to get something on work that can't be left exposed to the elements during the move. I've got to say this looks much more convincing in color. 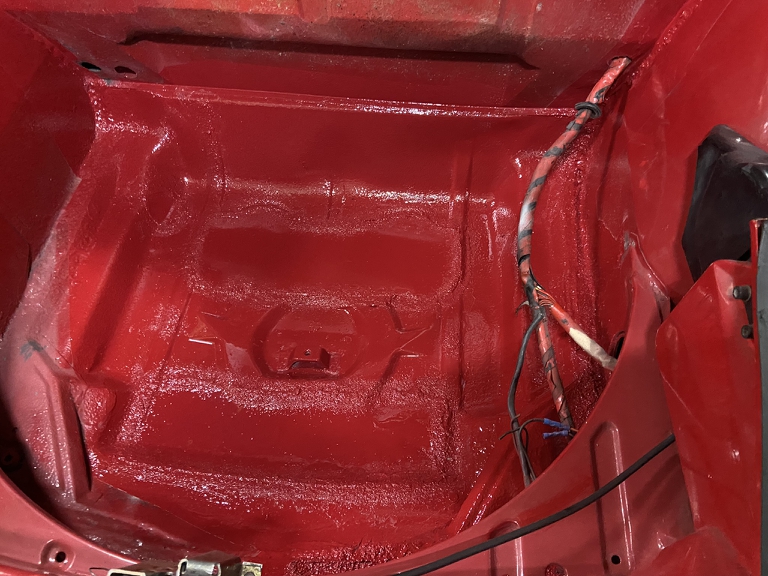 The bottom side got paint to protect the metal but will get undercoated too so that it sort of matches the area under the trunk and the rest of the front that I didn't fully strip. 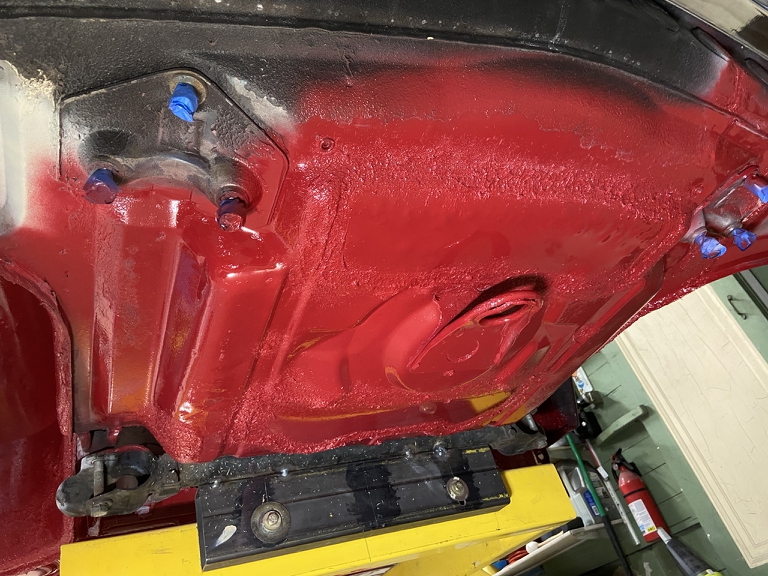 Someday, all this will need to be stripped to bare metal anyway in order to get back to Alaska Blue and to install steel flares. Here is a quick shot of the driver side front wheelhouse to document that the front was poorly clipped (before me). Someday, this will get redone properly with proper fitting butt welds rather than lap welds as some collision shop did back in the day. 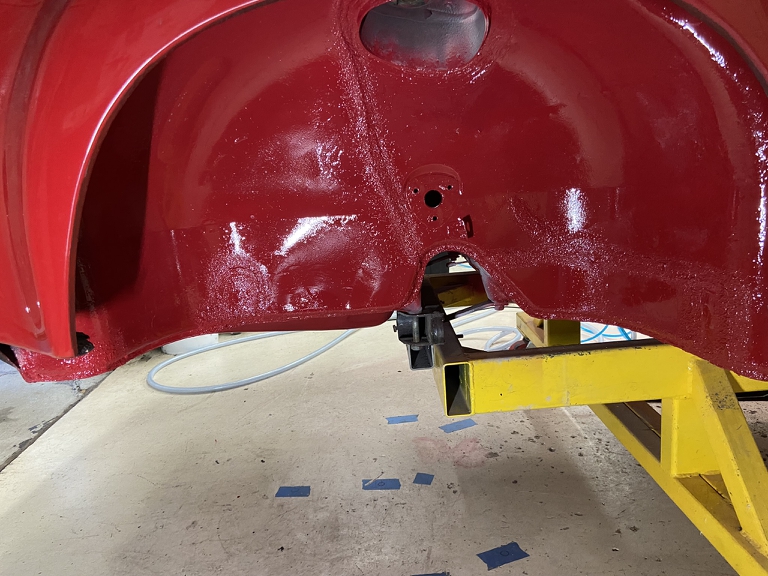 Passenger side 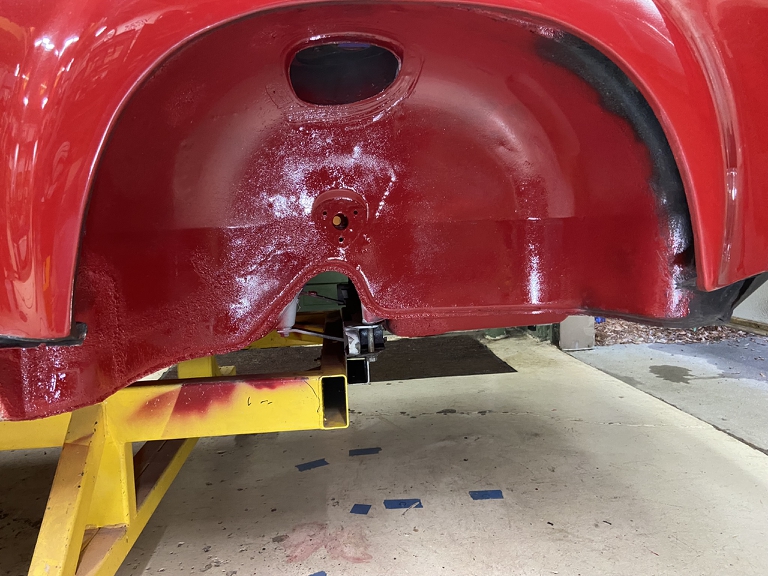 I ordered the whole body seal kit from 914Rubber so I've also been replacing seals to get the interior water tight for the trip. Front targa seals done and a little bit of a view of the dash panel that was recovered in the proper basket weave vinyl instead of the wanna be MG / Jaguar wood dash that it had when I started. 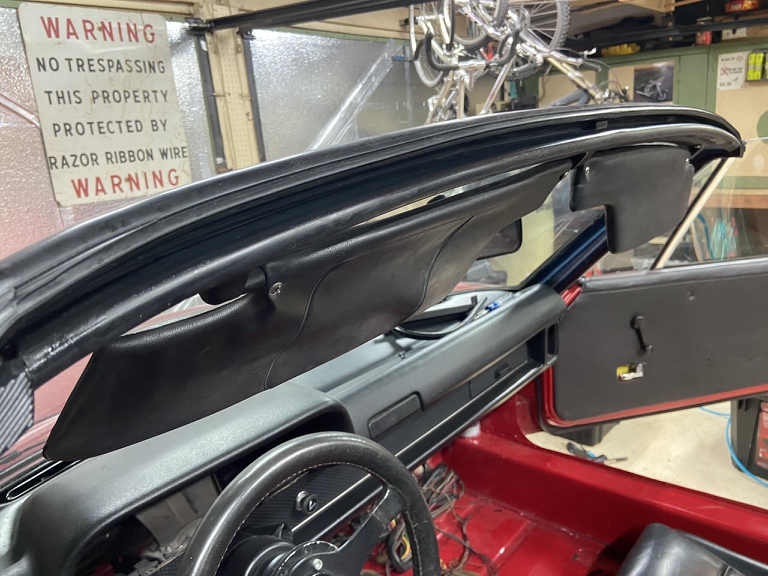 And finally, a really (IMG:style_emoticons/default/stromberg.gif) job of putting a little paint on the rear quarter panel damage that I did years ago. It already had dabs of primer but I really wanted to compare the new PPG color match (Honda R90) vs. the other area that I did with BMW #138. I think the R90 is a better match. Obviously this will all need to be sanded, re-filled, etc., and blended for a proper repair. Right now it just needs to keep moisture and rust out. Unofficial poll: Which do you think is the better color match? The diagonal swath, or the one on the lower right? 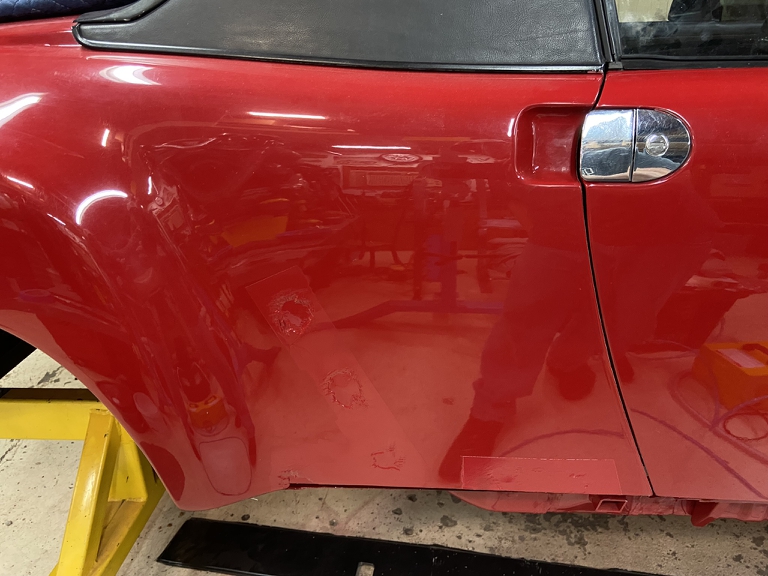 Hoping to have this back on it's suspension and sitting on the ground by the end of the weekend but a Friday graduation party for my buddy's triplets will lay waste to Friday as a full work day. |
| Superhawk996 |
 Jun 9 2022, 06:55 AM Jun 9 2022, 06:55 AM
Post
#517
|
|
914 Guru      Group: Members Posts: 6,507 Joined: 25-August 18 From: Woods of N. Idaho Member No.: 22,428 Region Association: Galt's Gulch 
|
Oh,
And one more photo hoping to convince people to stop cutting holes in these cars that compromises the structure! (IMG:style_emoticons/default/headbang.gif) Found another stress crack down by the front LCA attachment. When I was laying primer. The contrast between the primer made it stand right out. I had failed to notice this when it was dark paint and/or undercoating under here. 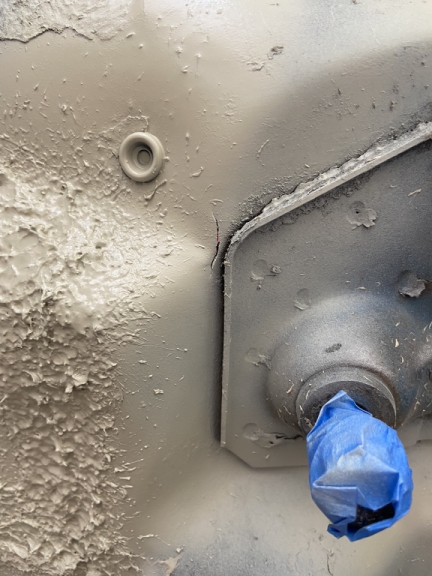 |
| 930cabman |
 Jun 9 2022, 05:33 PM Jun 9 2022, 05:33 PM
Post
#518
|
|
Advanced Member     Group: Members Posts: 3,643 Joined: 12-November 20 From: Buffalo Member No.: 24,877 Region Association: North East States 
|
Is this possibly caused due to the missing floor?
|
| Superhawk996 |
 Jun 10 2022, 07:24 AM Jun 10 2022, 07:24 AM
Post
#519
|
|
914 Guru      Group: Members Posts: 6,507 Joined: 25-August 18 From: Woods of N. Idaho Member No.: 22,428 Region Association: Galt's Gulch 
|
Is this possibly caused due to the missing floor? @930cabman Yes, this is a result of the GIANT holes that were cut in the floor of the Frunk for the air conditioning condenser. Unibody structures like the 914, are able to use thin sheet metal (~0.040") to handle high loads that would otherwise be transmitted into a thick steel frame in body on frame (BOF) construction. BOF construction was pretty much the norm right up though the early 80's for most domestic OEM's. In BOF construction, the body doesn't really bear any structural loads of the chassis. BOF construction is HEAVY! Since the frame bears the bulk of the chassis loads, you can cut lots of holes in a BOF body and have little effect. Not so with unibody construction. Case in point, my buddy cut the roof of one of our typical 1970's domestic iron BOF winter beater cars when spring came. "Let's make it a convertible". (IMG:style_emoticons/default/laugh.gif) Sure it flexed a little bit more than it did when it had a roof but due to the thick steel frame underneath, it had very little effect. Don't try that with a unibody! The way a unibody like the 914 gets away with using such thin metal is due to the stiffness that can be created when the sheet metal is formed into geometric shapes like c-channels, box sections (like out longs), or just deep draw formations that stiffen sheet metal panels. The Frunk has a lot of form pressed into the floor panel to create that stiffness. When the AC holes are cut an enormous amount of that stiffness is lost. The result is that loads are now concentrated, localized and ultimately those loads exceed the limits of the thin sheet metal. That is what leads to this type of cracking. |
| Superhawk996 |
 Jun 10 2022, 10:17 AM Jun 10 2022, 10:17 AM
Post
#520
|
|
914 Guru      Group: Members Posts: 6,507 Joined: 25-August 18 From: Woods of N. Idaho Member No.: 22,428 Region Association: Galt's Gulch 
|
Finishing up paint and undercoating
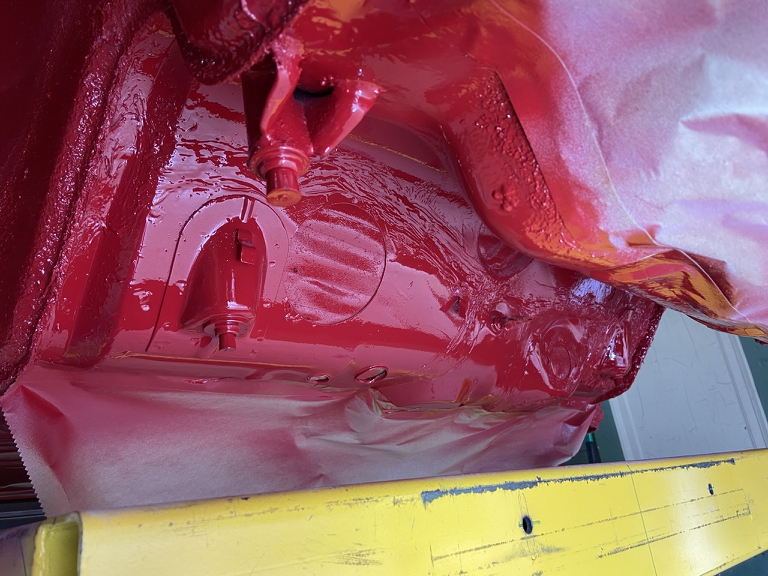 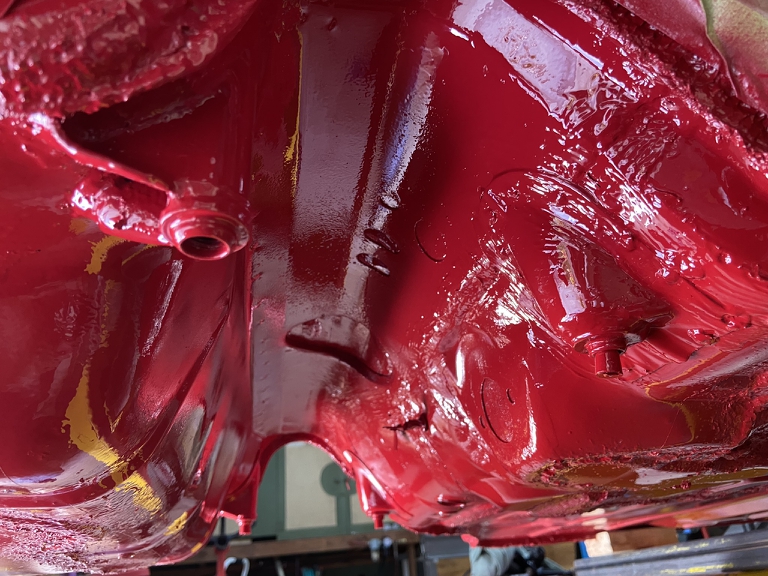 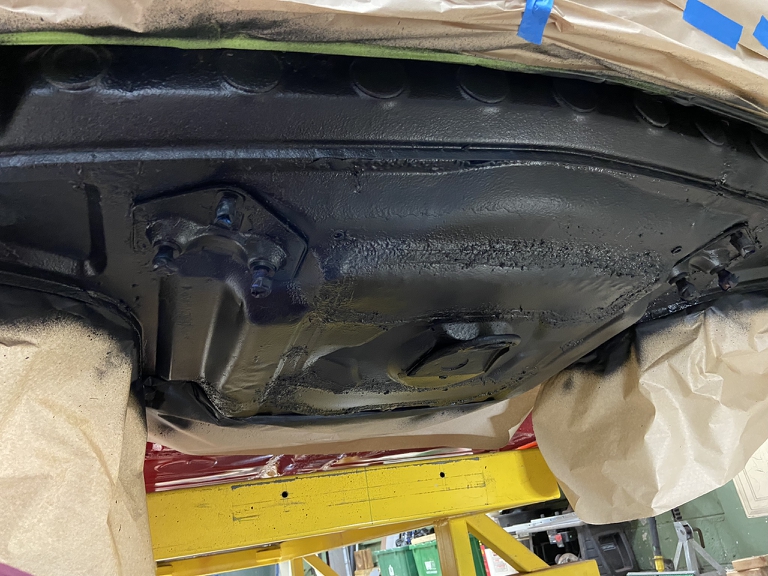 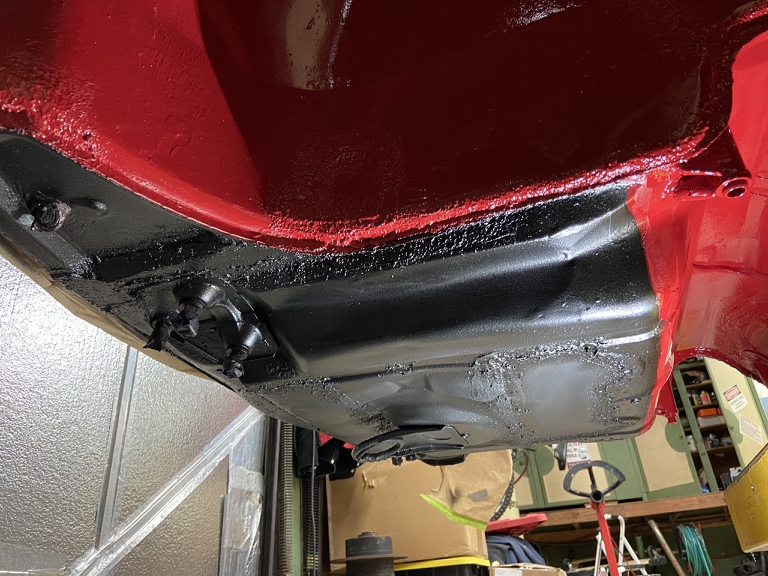 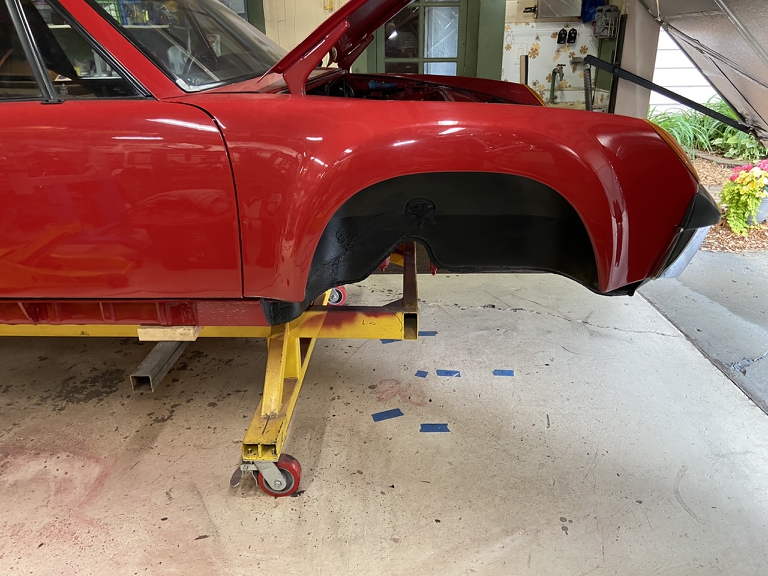 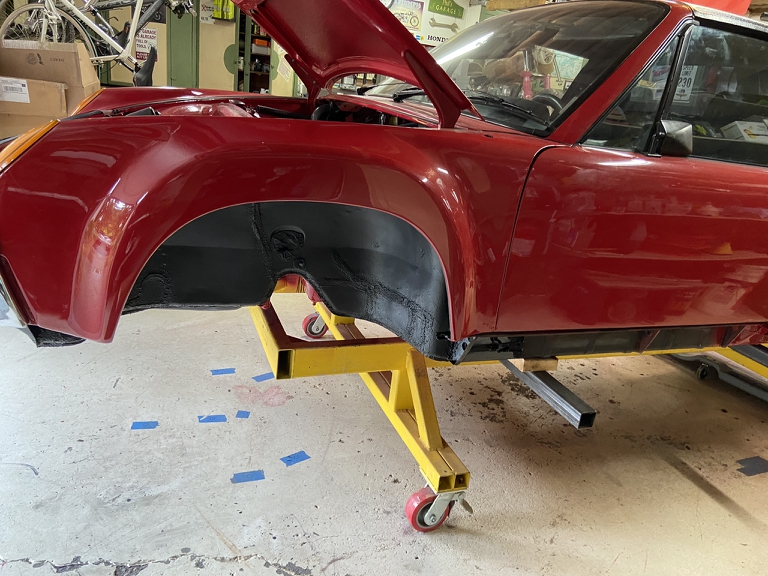 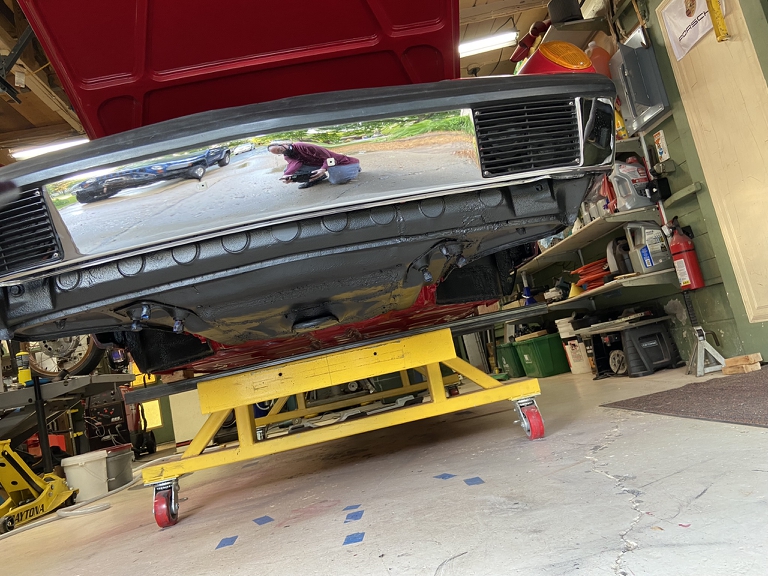 Suspension going on tomorrow. |
  |
1 User(s) are reading this topic (1 Guests and 0 Anonymous Users)
0 Members:

|
Lo-Fi Version | Time is now: 1st November 2024 - 07:20 PM |
Invision Power Board
v9.1.4 © 2024 IPS, Inc.


