|
|

|
Porsche, and the Porsche crest are registered trademarks of Dr. Ing. h.c. F. Porsche AG.
This site is not affiliated with Porsche in any way. Its only purpose is to provide an online forum for car enthusiasts. All other trademarks are property of their respective owners. |
|
|
  |
| FourBlades |
 Nov 3 2008, 07:53 PM Nov 3 2008, 07:53 PM
Post
#141
|
|
From Wreck to Rockin     Group: Members Posts: 2,056 Joined: 3-December 07 From: Brevard, FL Member No.: 8,414 Region Association: South East States 
|
Mig Welding Where Angels Fear to Tread - The First Day
Started working on fixing the driver side cowl and front fender joint. This seems like a complex part of the car where a bunch of different panels come together. 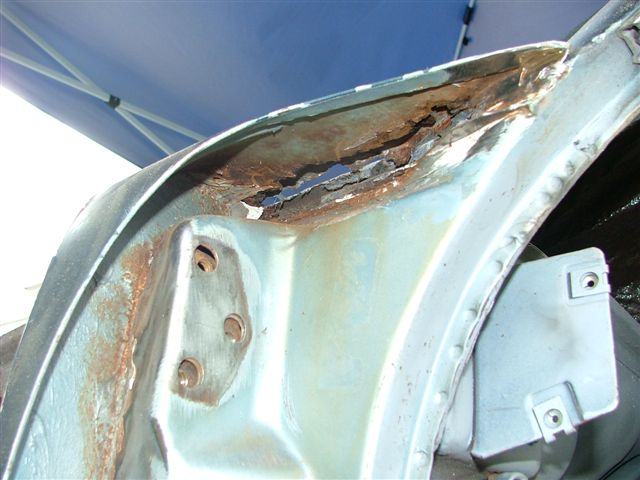 Bottom of the door pillar is also rusted out. 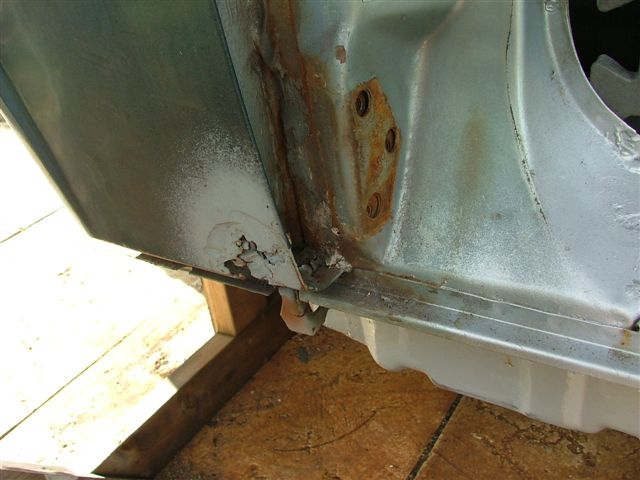 Cut off most of the fender to see what was going on. 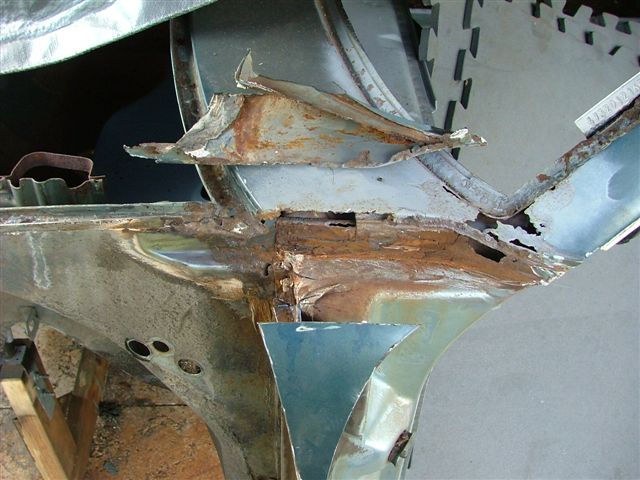 Clean it up and cut away the bad parts. Hit it with some metal ready. 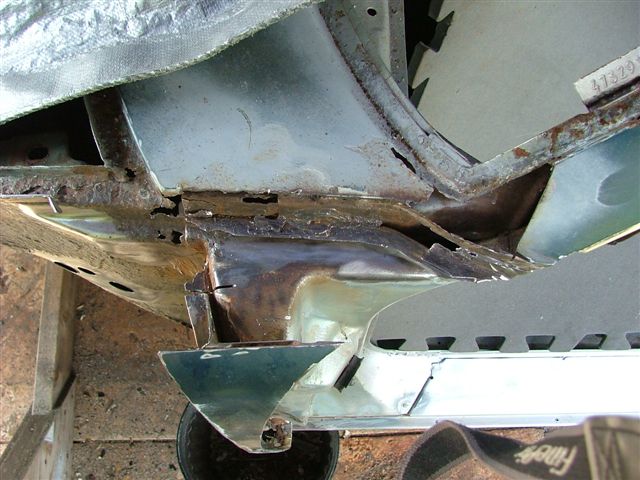 Rebuild the area from the inside out. I am not completely sure how these panels went together. I was really torn between retaining the drain (rust) channel between the fender and the cowl and just welding it all up solid. Some people say you car will crack there if you weld it solid. First patch going on. 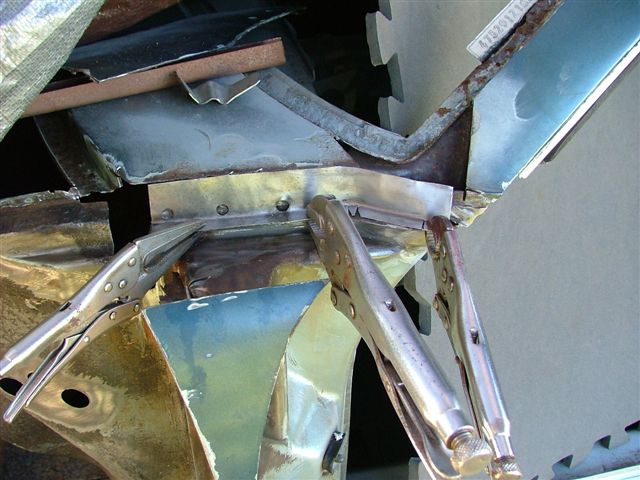 |
| FourBlades |
 Nov 3 2008, 08:00 PM Nov 3 2008, 08:00 PM
Post
#142
|
|
From Wreck to Rockin     Group: Members Posts: 2,056 Joined: 3-December 07 From: Brevard, FL Member No.: 8,414 Region Association: South East States 
|
First two patches welded on.
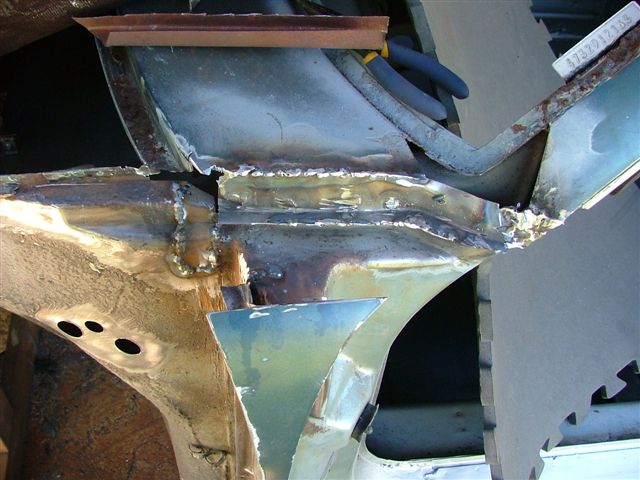 A patch made from a windshield surround a board member used to protect a windshield they shipped to me. The irony is the windshield metal from the cut up donor car is far better than the rust bucket I am rebuilding. 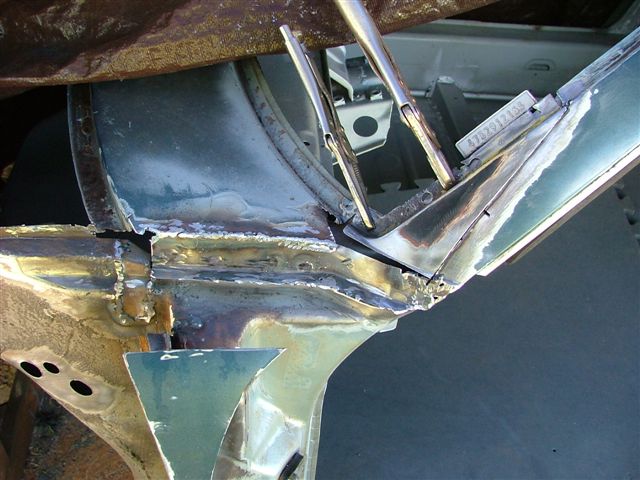 More patches for the windshield surround. 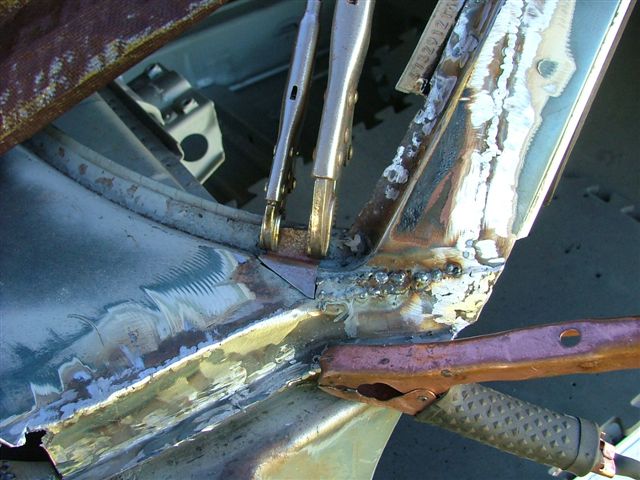 Still more patches to the rain gutter and front corner of the cowl. 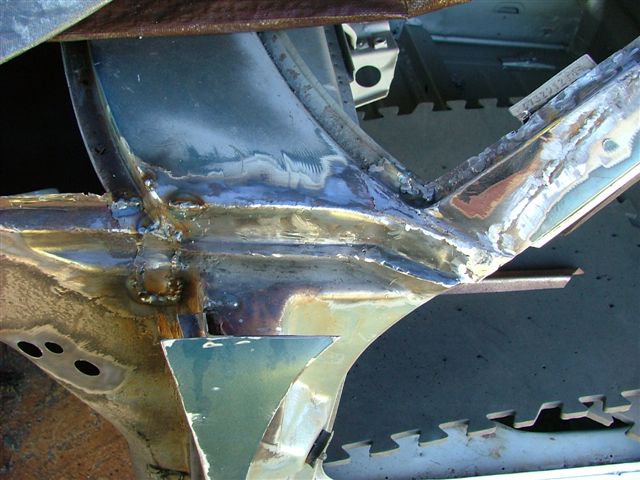 |
| FourBlades |
 Nov 3 2008, 08:11 PM Nov 3 2008, 08:11 PM
Post
#143
|
|
From Wreck to Rockin     Group: Members Posts: 2,056 Joined: 3-December 07 From: Brevard, FL Member No.: 8,414 Region Association: South East States 
|
Rebuilding the rain gutter had me really stumped for a while. There was nothing
left of the original metal on my car to look at as a pattern. I decided to weld on some pieces to form the gutter and then weld the fender to them. I don't see how Porsche ever spot welded this area together because I can't see how they accessed both sides??? 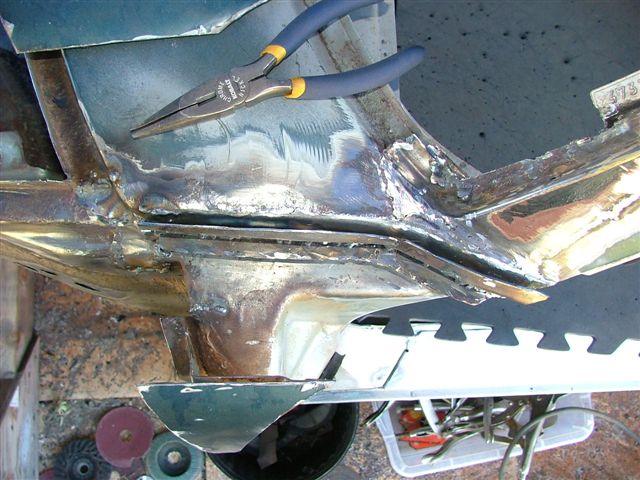 Here is how the fender will sit. It will be seam welded to the top of the gutter pieces. I need to make sure the body lines from the hood to the fender and cowl are all correct. 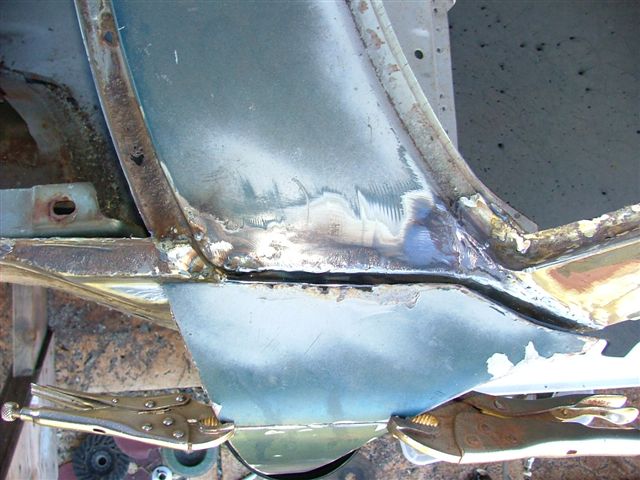 This far took me about six hours. At least an hour was just trying to figure out how to proceed. I think this repair might end up being a tenth of a point deduction in a concours. I may have to give up my dream of a Pebble Beach Best of Show Trophy... John |
| jonferns |
 Nov 3 2008, 08:33 PM Nov 3 2008, 08:33 PM
Post
#144
|
|
Advanced Member     Group: Members Posts: 2,081 Joined: 29-March 07 From: New Jersey Member No.: 7,631 Region Association: North East States 
|
QUOTE I may have to give up my dream of a Pebble Beach Best of Show Trophy... (IMG:style_emoticons/default/av-943.gif) |
| FourBlades |
 Nov 24 2008, 08:37 PM Nov 24 2008, 08:37 PM
Post
#145
|
|
From Wreck to Rockin     Group: Members Posts: 2,056 Joined: 3-December 07 From: Brevard, FL Member No.: 8,414 Region Association: South East States 
|
Fixing the cowl and fender - The Second Day
While I was in there with the fender cut off, I made a reinforcing plate for the anti-roll bar mount, rewelded the brake line clip, and seam sealed it. 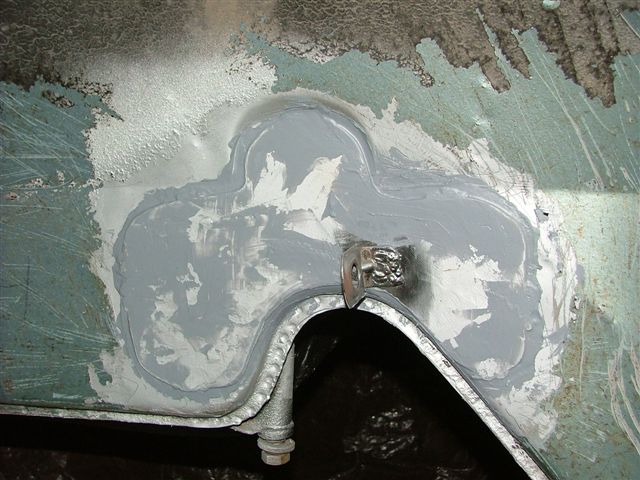 Made up some replacement hood channels. 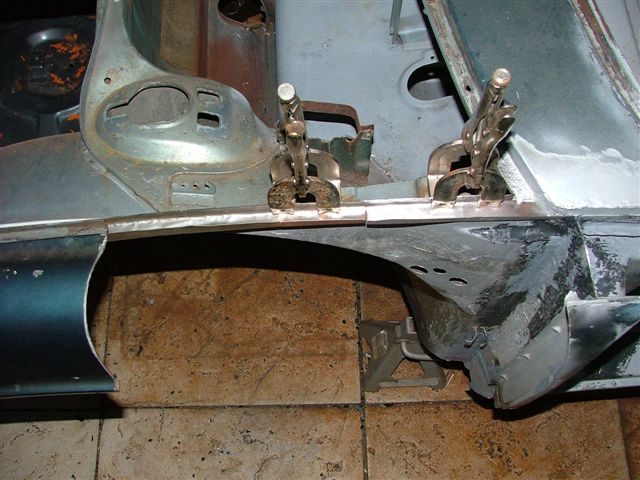 Welded them on. 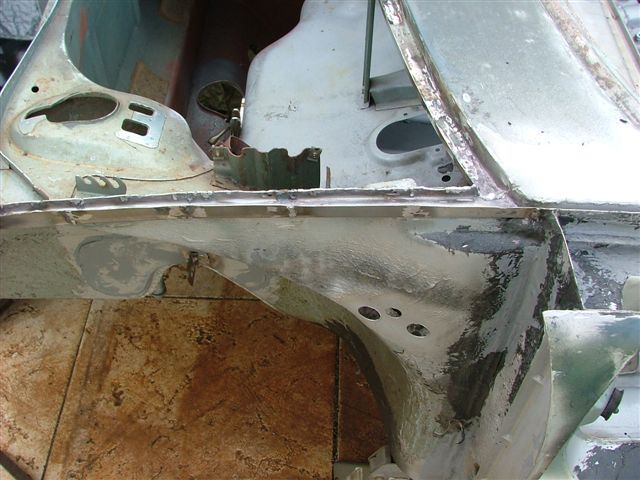 Tacked the fender pieces back in place. 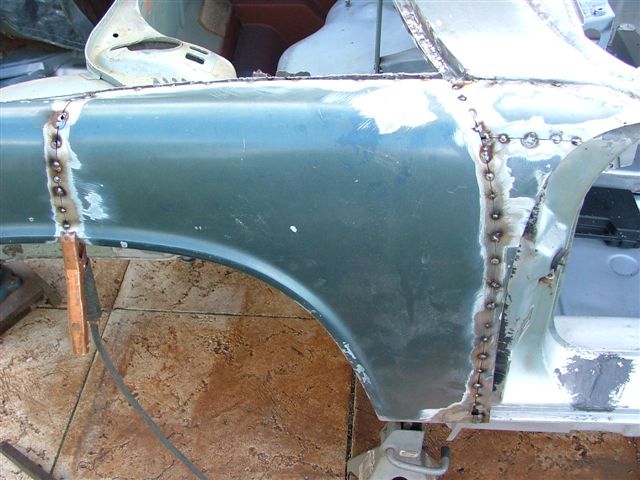 Added tacks little by little until they were solidly welded, then ground it down. 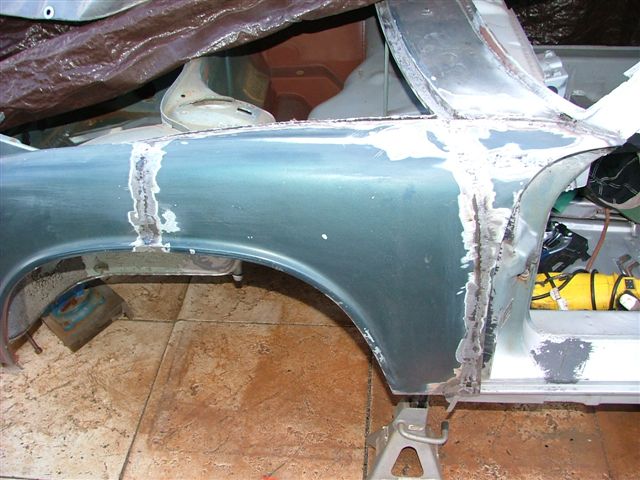 After I put on 40 coats of hand rubbed bondo it will be a 10 footer. (IMG:style_emoticons/default/rolleyes.gif) The whole cowl and fender repair took about 20 hours spread over multiple days. John |
| rick 918-S |
 Nov 24 2008, 08:41 PM Nov 24 2008, 08:41 PM
Post
#146
|
|
Hey nice rack! -Celette                Group: Members Posts: 20,838 Joined: 30-December 02 From: Now in Superior WI Member No.: 43 Region Association: Northstar Region 

|
Keep em comin! (IMG:style_emoticons/default/popcorn[1].gif)
|
| jc914 |
 Nov 24 2008, 08:46 PM Nov 24 2008, 08:46 PM
Post
#147
|
|
Member   Group: Members Posts: 289 Joined: 15-September 08 From: Miami, Florida Member No.: 9,548 Region Association: South East States |
|
| FourBlades |
 Nov 24 2008, 08:57 PM Nov 24 2008, 08:57 PM
Post
#148
|
|
From Wreck to Rockin     Group: Members Posts: 2,056 Joined: 3-December 07 From: Brevard, FL Member No.: 8,414 Region Association: South East States 
|
Fixing the driver's sail panel. This hole provides a little too much ventilation. (IMG:style_emoticons/default/smile.gif)
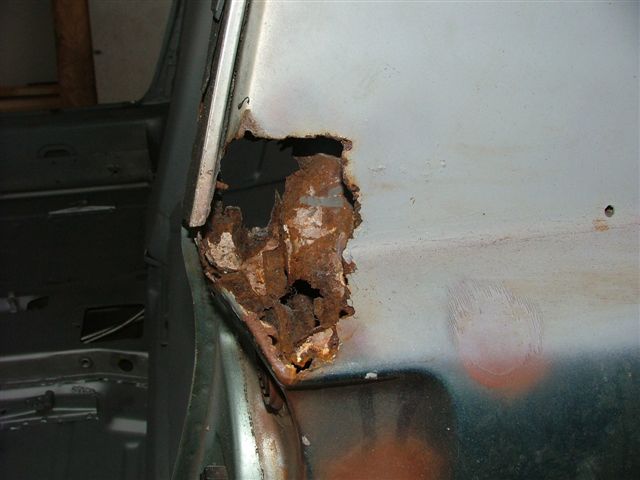 Cut away all the rusty stuff. Unfortunately the metal tube connecting the door vent to the interior vent was rusted to nothing. I decided to weld up the driver side interior vent and lose what was left of the tube. I will keep the door vent but seal it up just to keep a little more stock look. You can see two patches I made and welded to the interior. 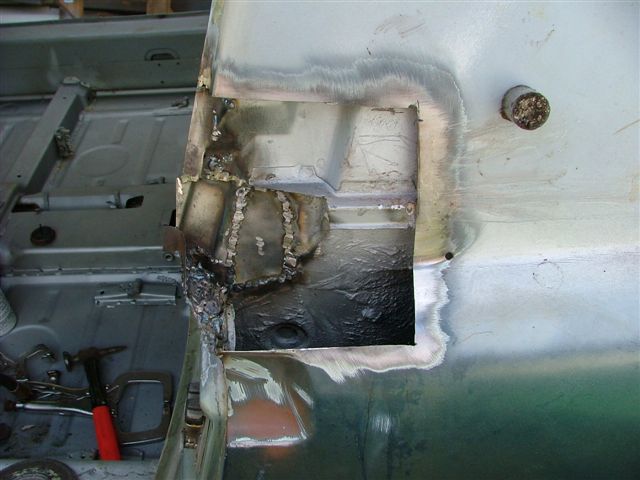 Fitting a piece of the AA sail panel. This is a tricky area to get to fit right. Somehow I screwed up on fitting this patch and left a big gap. 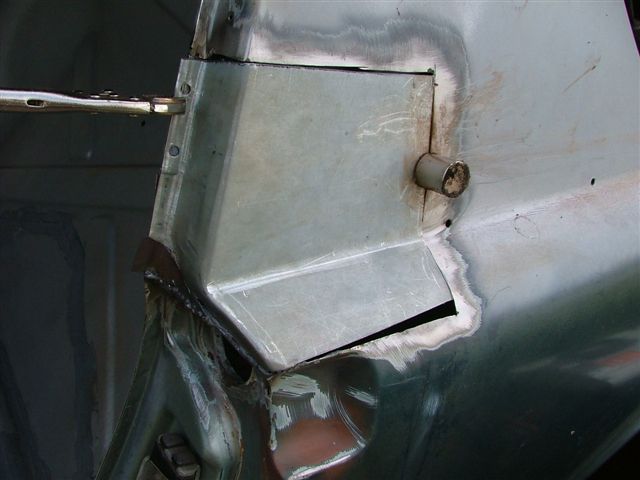 Welded up and ground down. Still needs some more smoothing. I also welded up all the trim (rust) holes. I plan to glue on any trim to avoid these leaks. 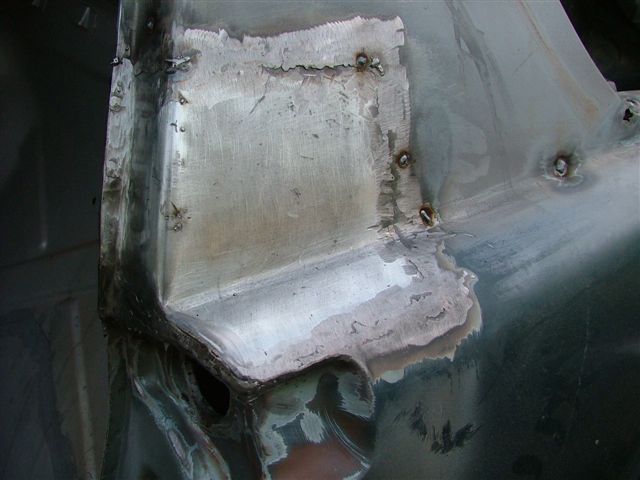 The area above the door vent was pretty thin. I built it up from the top using weld beads. I backed it up from the outside with pieces of copper sheet. This is going to need more work to look decent. 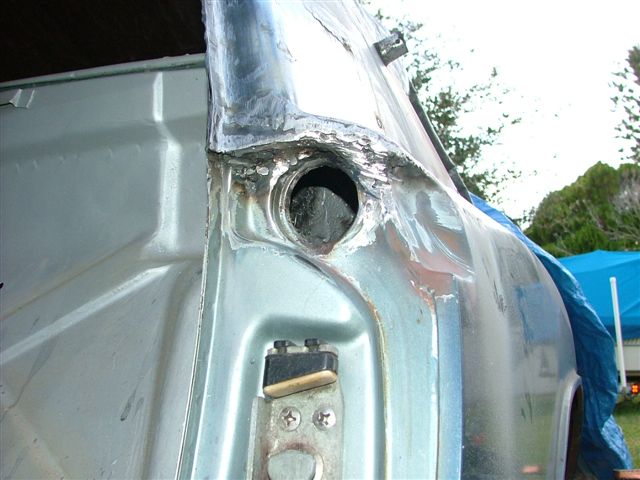 Making these weird shaped, little patches is very time consuming. I'd much rather weld up a hell hole or plug weld an inner long replacement. John |
| RiqueMar |
 Nov 25 2008, 02:44 PM Nov 25 2008, 02:44 PM
Post
#149
|
|
Enrique Allen Mar     Group: Members Posts: 2,185 Joined: 28-August 08 From: San Diego, CA Member No.: 9,478 Region Association: Southern California 
|
I assume it's not gonna be a GT then
|
| FourBlades |
 Nov 25 2008, 09:32 PM Nov 25 2008, 09:32 PM
Post
#150
|
|
From Wreck to Rockin     Group: Members Posts: 2,056 Joined: 3-December 07 From: Brevard, FL Member No.: 8,414 Region Association: South East States 
|
That is right. I was debating joining the group buy for flares but I want to get it on the road, and I am ready to move on from bodywork. Maybe later. I have 6x16 fuchs and was thinking of 205/50s to be sure they will fit. I have a pair of 7x16 fuchs I could use on the rear. Gonna order tires this week so I need to decide what brand and size to buy. John |
| FourBlades |
 Nov 29 2008, 07:56 PM Nov 29 2008, 07:56 PM
Post
#151
|
|
From Wreck to Rockin     Group: Members Posts: 2,056 Joined: 3-December 07 From: Brevard, FL Member No.: 8,414 Region Association: South East States 
|
These pictures are from the one year anniversery of this restoration!!!
(IMG:style_emoticons/default/smilie_pokal.gif) (IMG:style_emoticons/default/piratenanner.gif) (IMG:style_emoticons/default/beerchug.gif) I estimate it has taken me 250 hours to fix all the bodywork issues so far. I think I have about 15 hours left!! I guess half the time was spent with brake cleaner, wire wheels, torch, scrapers, and paint remover on cleaning out rust, seam sealer, undercoating, dirt and oil. Next car I plan to soda blast or dip to reduce the sheer grunt work required. Also used up my second 10 pound roll of mig wire. Fixing the passenger side cowl and fender. Cleaned it up and cut out the rusted metal. When I got the car I sprayed the rusty areas with rustoleum rusty metal primer. No cleaning or anything first. It did a good job of preventing the rust from getting any worse over the last year. 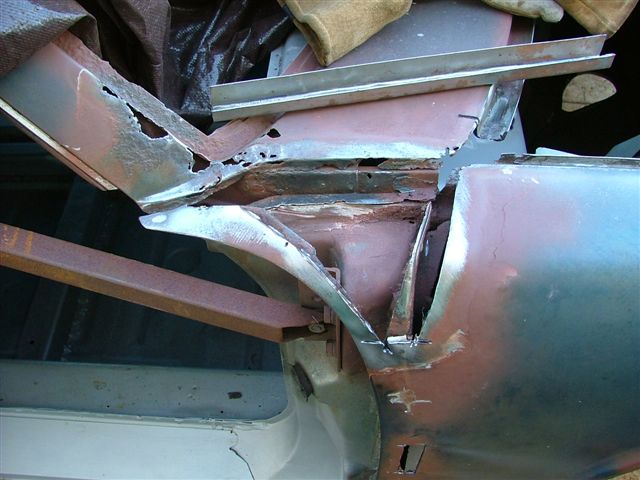 Patched up the hood channels. 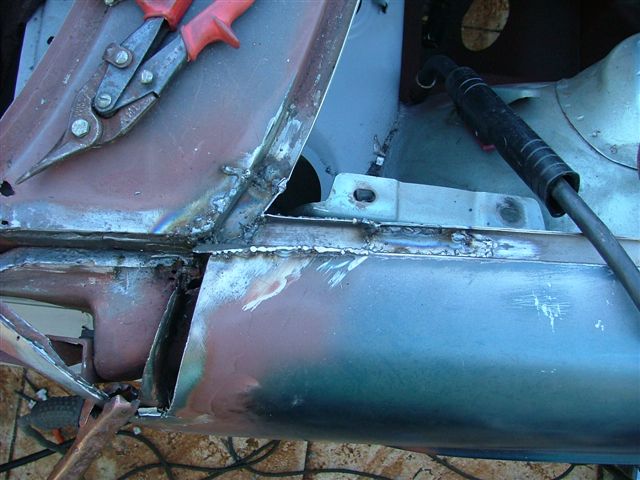 Patched the side of the cowl. 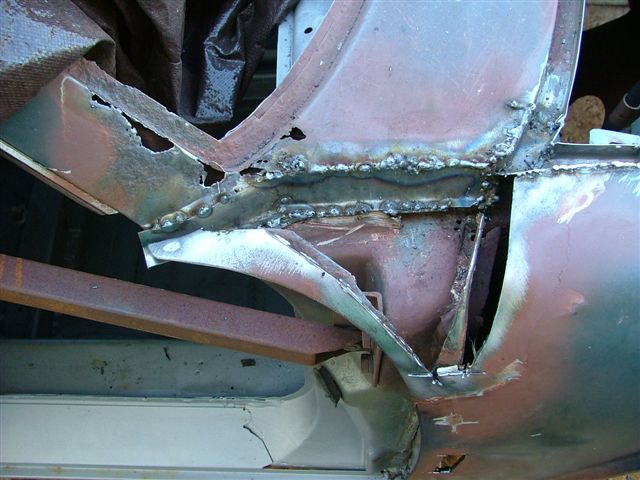 Patched the windshield surround and ground it all up. 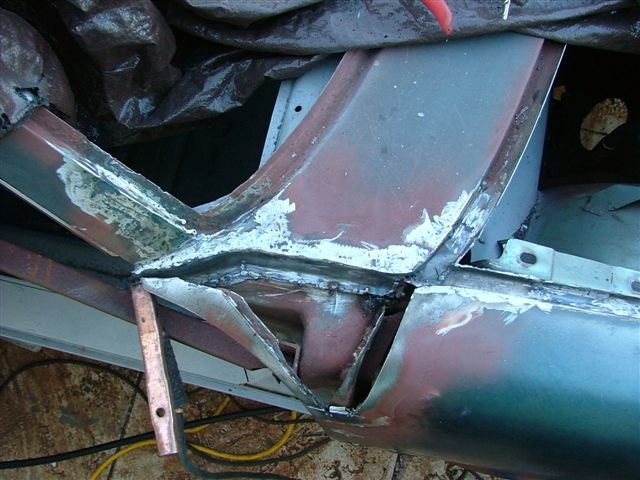 Started making a patch for the fender and ran out of gas for the day. 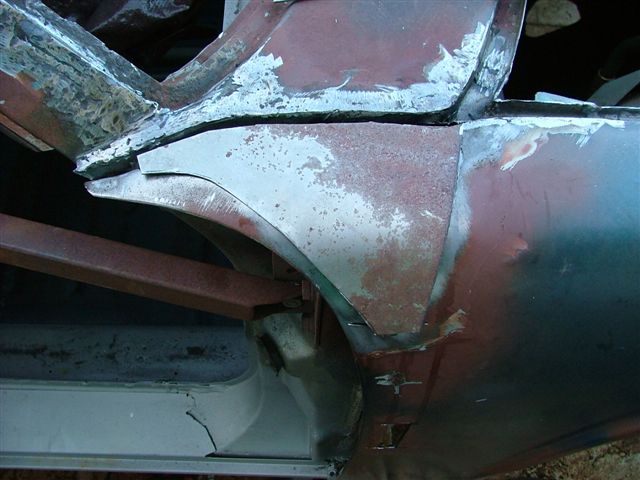 I know there is a right way to attach a fender to a 914 and I am pretty sure that this is not it... John |
| FourBlades |
 Nov 30 2008, 06:26 PM Nov 30 2008, 06:26 PM
Post
#152
|
|
From Wreck to Rockin     Group: Members Posts: 2,056 Joined: 3-December 07 From: Brevard, FL Member No.: 8,414 Region Association: South East States 
|
Cleaning up a few last areas. Welded on the last bits of the tunnel.
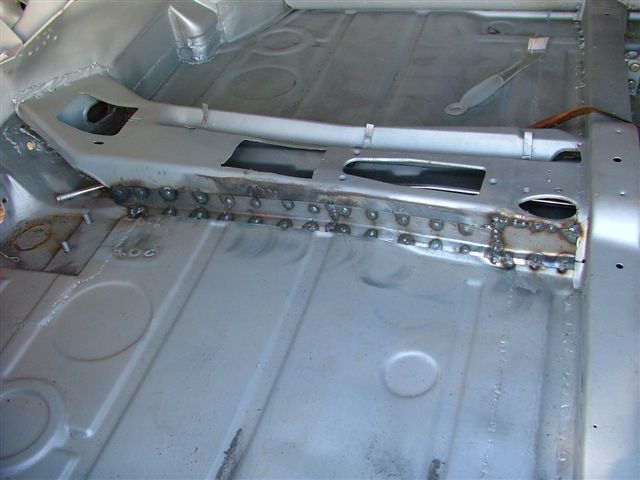 Cut the rust out of the passenger headlight bucket. 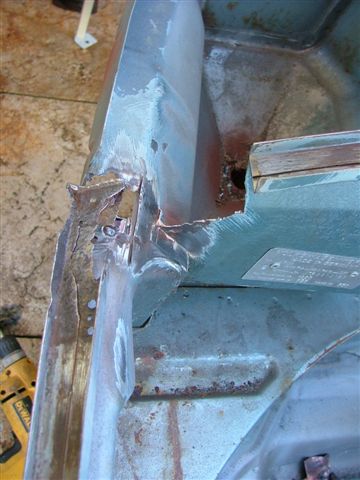 Pass me another f-ing clamp. 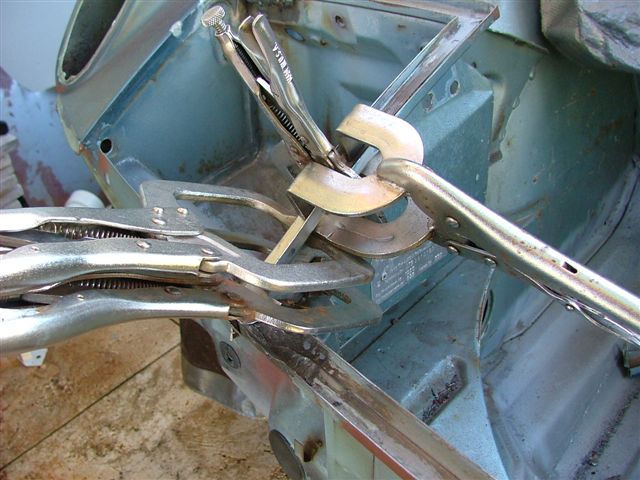 Weld up the rain gutter using a piece of copper backing behind it. 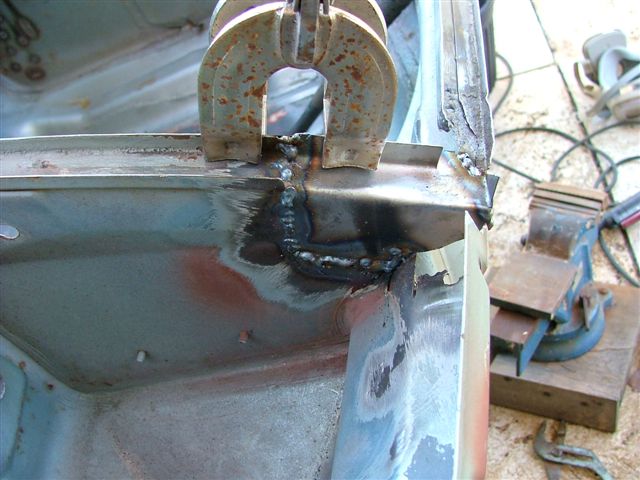 Grind the welds so far. 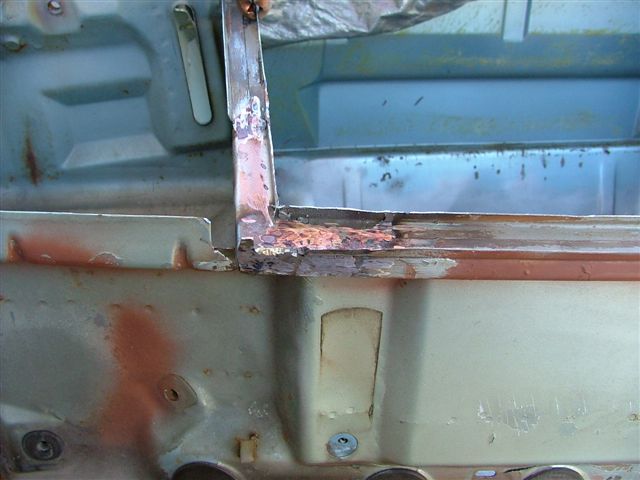 Weld on a patch on the bottom of the hole. 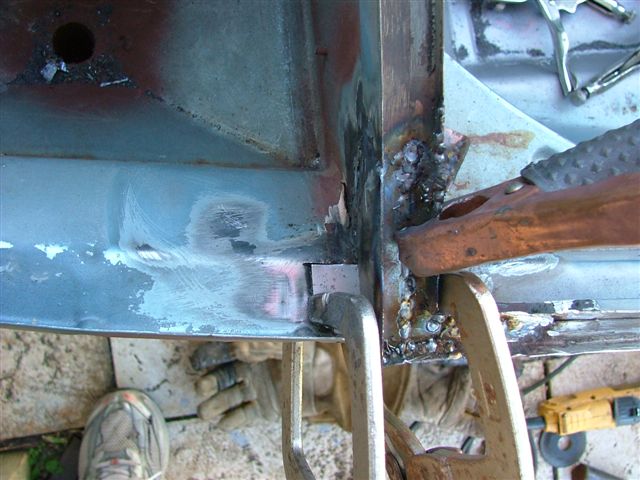 Grind it kinda smooth. 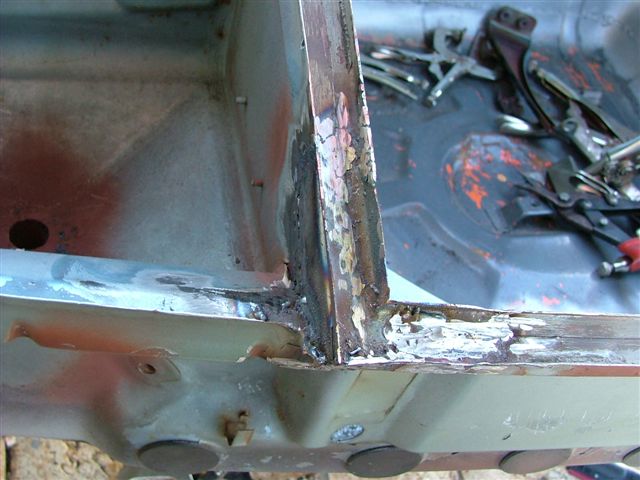 Almost time to get out the wagner power painter and a gallon of exterior latex... John |
| FourBlades |
 Dec 25 2008, 06:53 AM Dec 25 2008, 06:53 AM
Post
#153
|
|
From Wreck to Rockin     Group: Members Posts: 2,056 Joined: 3-December 07 From: Brevard, FL Member No.: 8,414 Region Association: South East States 
|
Merry Christmas to all!!!
I've been working on adding an Engman kit to my car. Still some grinding and painting left to go. I also added the e-brake parts. This car is heading more in the direction of a street and occasional AX car due to some new developments. 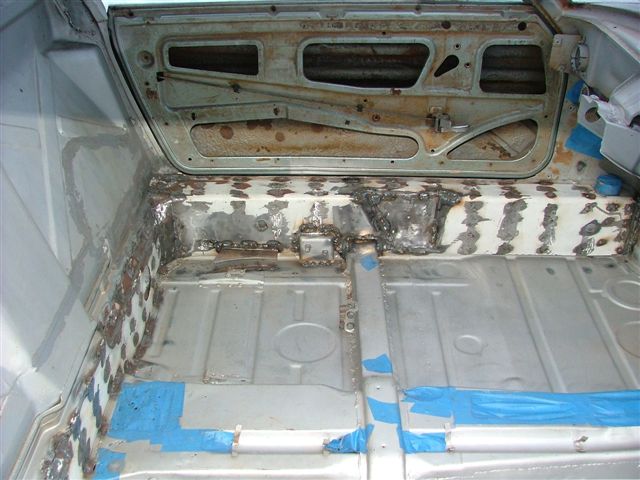 It looks like I am getting a major 914 related present this year courtesy of T.C. 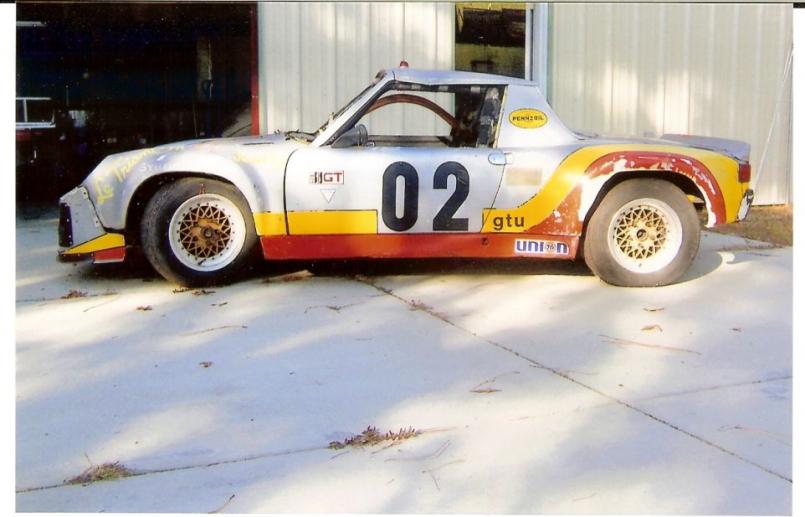 Stay tuned for the build thread. John |
| rick 918-S |
 Dec 25 2008, 07:57 AM Dec 25 2008, 07:57 AM
Post
#154
|
|
Hey nice rack! -Celette                Group: Members Posts: 20,838 Joined: 30-December 02 From: Now in Superior WI Member No.: 43 Region Association: Northstar Region 

|
I was wondering who bought that car. (IMG:style_emoticons/default/popcorn[1].gif)
|
| degreeoff |
 Dec 25 2008, 09:04 AM Dec 25 2008, 09:04 AM
Post
#155
|
|
I like big butts and I can not lie!    Group: Members Posts: 1,622 Joined: 9-February 03 From: Booowieeee MD (near DC) Member No.: 275 Region Association: MidAtlantic Region |
John, you really had you work CUT out for you.......I am amazed that you went through the effort? BUT merry Christmas and you have done a hell of a job!
Josh |
| FourBlades |
 Dec 25 2008, 10:06 AM Dec 25 2008, 10:06 AM
Post
#156
|
|
From Wreck to Rockin     Group: Members Posts: 2,056 Joined: 3-December 07 From: Brevard, FL Member No.: 8,414 Region Association: South East States 
|
Hey thanks Josh. I guess I really did not know quite the extent of work that would be required, but I wanted to do it to learn how to restore a car. The longer I have been involved in the 914 madness the more I realized these cars are worth saving. The encouragement from 914 world has been key to keeping motivated. This new project is exactly what I dreamed of doing in terms of restoration, so all the work on my first project will pay off. I plan to finish my first car before really digging into the new one, but I doubt I can resist doing some fiddling around with it. I plan to do a series of detailed pictures once the car is here. I am going to need lots of advice from board members on what to do and will really document the whole process. John |
| jimkelly |
 Dec 29 2008, 08:41 AM Dec 29 2008, 08:41 AM
Post
#157
|
|
Delaware USA     Group: Members Posts: 4,969 Joined: 5-August 04 From: Delaware, USA Member No.: 2,460 Region Association: MidAtlantic Region |
is this NOT a classic thread ??
jim |
| FourBlades |
 Jan 11 2009, 01:07 PM Jan 11 2009, 01:07 PM
Post
#158
|
|
From Wreck to Rockin     Group: Members Posts: 2,056 Joined: 3-December 07 From: Brevard, FL Member No.: 8,414 Region Association: South East States 
|
Finishing the passenger side fender today. Welded on a patch.
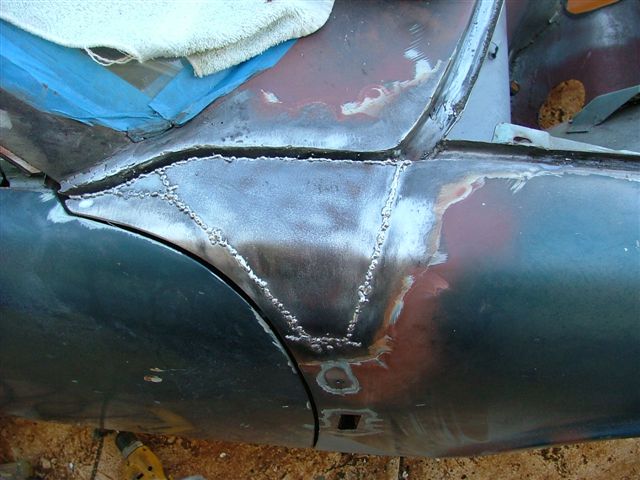 Ground it down. 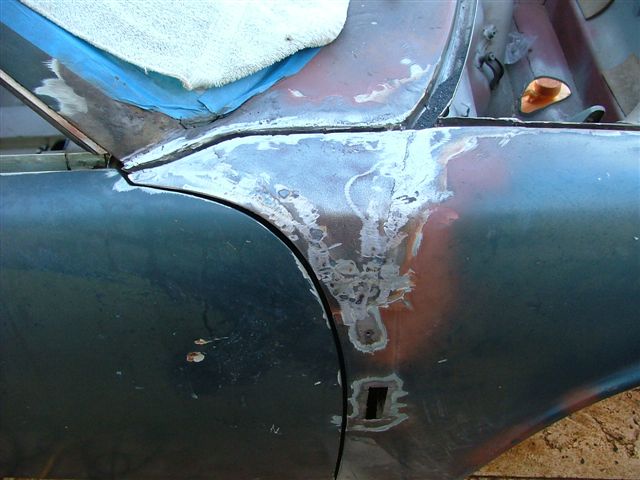 Just some little stuff left... John |
| pktzygt |
 Jan 11 2009, 01:23 PM Jan 11 2009, 01:23 PM
Post
#159
|
|
Member   Group: Members Posts: 328 Joined: 20-March 07 From: Chesapeake, VA Member No.: 7,611 Region Association: MidAtlantic Region |
Very impressive. Just this morning I was getting welder buying advice from a welder in the shipyard I am stationed at. I think I'll start with the rear trunk floor. I hope someday not to be afraid of doing work like the stuff you are doing.
|
| FourBlades |
 Jan 11 2009, 08:02 PM Jan 11 2009, 08:02 PM
Post
#160
|
|
From Wreck to Rockin     Group: Members Posts: 2,056 Joined: 3-December 07 From: Brevard, FL Member No.: 8,414 Region Association: South East States 
|
I started welding up the holes for the sail panel trim. Wire wheeling revealed
some rust issues once the paint came off. Doesn't look too bad from the outside, just a few little holes: 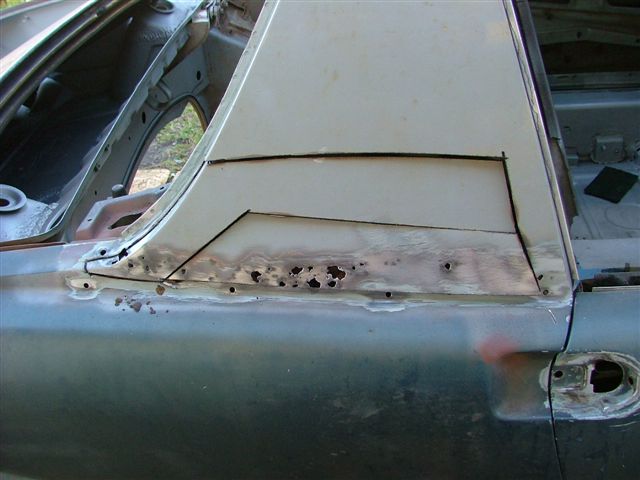 Open it up and see why people say 914s rust from the inside out. 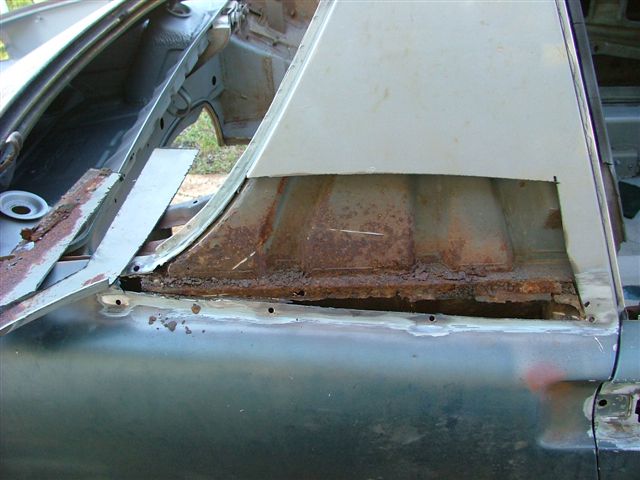 Cleaned it up, not too bad. I'll have to fix this another day. This area seems designed to trap dirt and water thrown up by the rear wheels and cause rust. Porsche could have designed a better way to seal up this area. The foam they sprayed in here was where the rust was the worst. 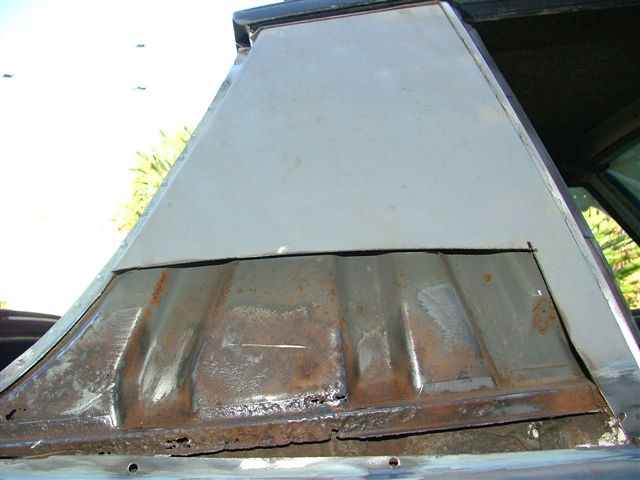 There always seems to be just one more rust hole... John |
  |
2 User(s) are reading this topic (2 Guests and 0 Anonymous Users)
0 Members:

|
Lo-Fi Version | Time is now: 7th January 2025 - 10:55 PM |
Invision Power Board
v9.1.4 © 2025 IPS, Inc.


