|
|

|
Porsche, and the Porsche crest are registered trademarks of Dr. Ing. h.c. F. Porsche AG.
This site is not affiliated with Porsche in any way. Its only purpose is to provide an online forum for car enthusiasts. All other trademarks are property of their respective owners. |
|
|
  |
| 76-914 |
 Aug 8 2014, 08:03 AM Aug 8 2014, 08:03 AM
Post
#301
|
|
Repeat Offender & Resident Subaru Antagonist           Group: Members Posts: 13,634 Joined: 23-January 09 From: Temecula, CA Member No.: 9,964 Region Association: Southern California 
|
BTW I will be re-taping the joints on the rad...had to remove the aluminum tape when I took the radiator out to seal up the threaded hole. Should be pretty air-tight. The one odd issue I am having is that it seems like the thermostat is acting weird. I tapped the return line for the reservoir at the lowest point right at the water pump. Should be drawing a nice vacuum there. The temp sensor is on the return line side and doesn't register at all for a long time, then shoots up pretty high all at once. The return line gets VERY HOT and the pump doesn't seem to run until the engine is pretty hot. The lines under the car are cold for quite a while. Might be air in the system...any thoughts? According to Bob, that is an air pocket that gives the rapid rise in temp, Steam pockets. I called him before I got to that pointe and asked how would I be able to determine if I had an air pocket and he said I'd see what you just described! And no, I haven't connected my fans to the ECU yet. I will after I get my new cable. They sent the wrong one. I was running wired in low speed. My plan is to run it a few miles to get it up to temp then connect to the ECU. Hopefully they will fire right up, at high speed, confirming that the ECU connection is working. Then I will disconnect them, one at a time to determine which is hi/lo. |
| Chris H. |
 Aug 8 2014, 08:29 AM Aug 8 2014, 08:29 AM
Post
#302
|
|
Senior Member     Group: Members Posts: 4,048 Joined: 2-January 03 From: Chicago 'burbs Member No.: 73 Region Association: Upper MidWest 
|
Well sheeeeit then...that's what it is I guess. Nothing, nothing, nothing....then it shoots up suddenly. I thought the gauge wasn't working, that's how long it was taking. Probably just have to run it a few times. I could run an overflow tank up front too, but would prefer not to.
Notice most of us had air pockets but we're all surprised we have them? Now that's funny. (IMG:style_emoticons/default/lol-2.gif) Hey Doug, you're farther along than you think. Get the turbo plumbing sorted and it'll fly from there. I still have a lot to do. - cable shifter - clutch reinstall - fans install - rear brakes re-do - figure out how I'm gonna exit the radiator exhaust air - install throttle cable And a few other things I forgot I'm sure. |
| Jon H. |
 Aug 9 2014, 06:12 AM Aug 9 2014, 06:12 AM
Post
#303
|
|
Member   Group: Members Posts: 237 Joined: 1-July 11 From: Ottawa, Canada Member No.: 13,264 Region Association: Canada |
If you have a coolant system pressure tester you can use that to pressurize your system and get the air out. Thats how I bled my SVX/Vanagon swap, worked great.
Jon H. |
| rnellums |
 Aug 9 2014, 07:40 AM Aug 9 2014, 07:40 AM
Post
#304
|
|
Professional Enthusiast    Group: Members Posts: 1,646 Joined: 26-November 09 From: Littleton, CO Member No.: 11,072 Region Association: Rocky Mountains |
Harbor freight has a tool that uses compressed air and the Bernoulli effect to suck all the air out. Then you open a ball valve and the vacuum in the system pulls coolant in. I have also heard that backfilling the engine from the outlet is essential. It took me two weeks to get mine bled right.
|
| BIGKAT_83 |
 Aug 9 2014, 11:53 AM Aug 9 2014, 11:53 AM
Post
#305
|
|
Senior Member    Group: Members Posts: 1,798 Joined: 25-January 03 From: Way down south Bogart,GA Member No.: 194 Region Association: South East States 

|
No problem with bleeding the air fom the system if you plumb it up like the picture. I have removed the small pin in the thermostat and drilled the hole out to 1/8th inch.
Fill it with the expansion tank. Make sure the recovery tank is about half full. If the radiator has a air bleed at the top open until water starts to flow out. If not remove the top hose at the radiator(high pressure hose from the pump)reinstall hose or close bleed.Start the engine up and run it through a couple of heat cycles and add water if necessary. I have 8k miles on my EZ30 conversion now and have not added water or done anything to it since start up. Runs at the thermosat all the time 180 degrees. 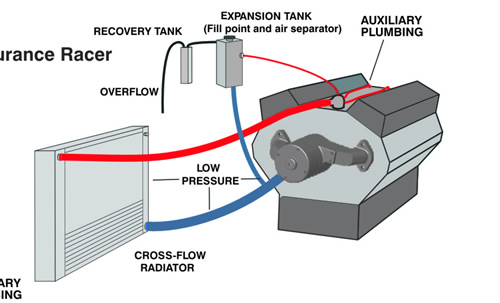 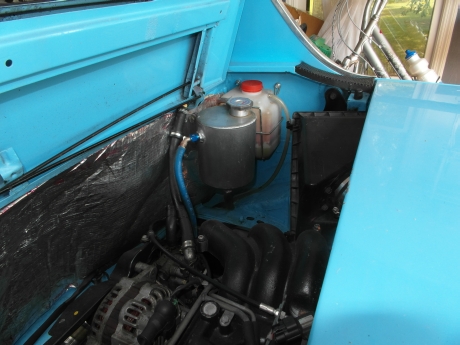 |
| mgp4591 |
 Aug 9 2014, 02:21 PM Aug 9 2014, 02:21 PM
Post
#306
|
|
914 Guru      Group: Members Posts: 5,482 Joined: 1-August 12 From: Salt Lake City Ut Member No.: 14,748 Region Association: Intermountain Region 
|
And if you have or get a thermostat with the pinhole in it, make sure the t-stat is installed with that pinhole at the 12 o'clock position!
|
| Chris H. |
 Aug 9 2014, 04:18 PM Aug 9 2014, 04:18 PM
Post
#307
|
|
Senior Member     Group: Members Posts: 4,048 Joined: 2-January 03 From: Chicago 'burbs Member No.: 73 Region Association: Upper MidWest 
|
Bob,
Well, I do have the system set up that way for the most part. My only concern is that in some cases I'm pulling from the hot side instead of the cool side and vice-versa. Here's the situation... Radiator is the Celica...no upper hose but there is an overflow outlet. I was wondering if I should install a bleeder there. I capped it off for now. Do I need one? 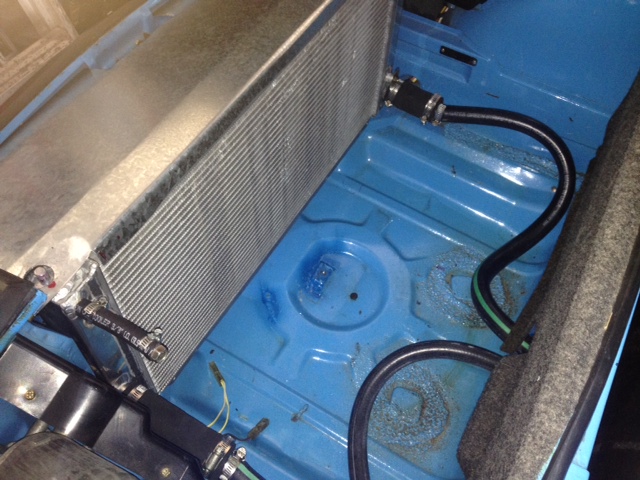 I have an overflow tank which is the water fill point. 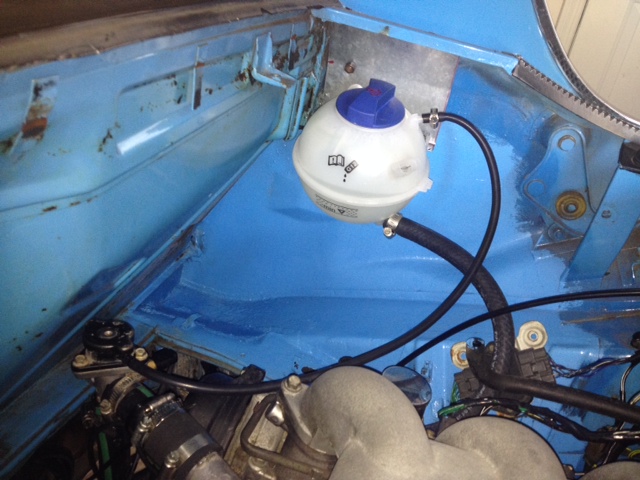 I have topped it up several times after it cools down a bit so that tells me something is happening. The small line connected to the fitting coming off of the engine which is the high point. 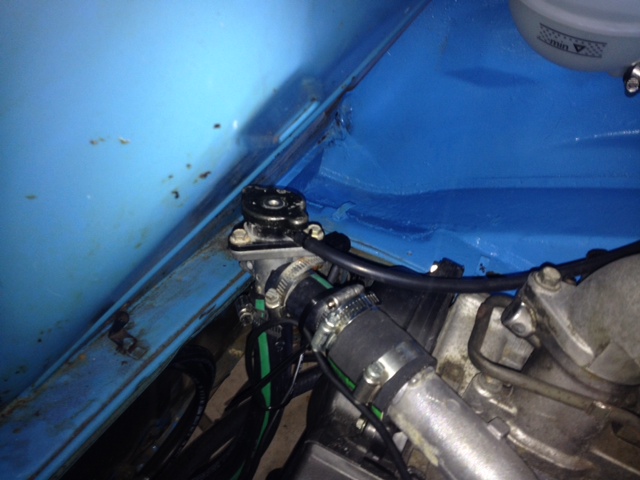 I think that's similar to how you had it on your SVX engine, except I think you just tapped the water pipe on the engine itself. The only contradiction here is that this is the COOL SIDE when the diagram says it should be the hot side, but it's practically connected to the engine and it is the highest point which from my understanding is the most important part. I guess I could run one off that port on the radiator.... (IMG:style_emoticons/default/idea.gif) The larger hose on the overflow tank tees into a hose that connects to the water pump. 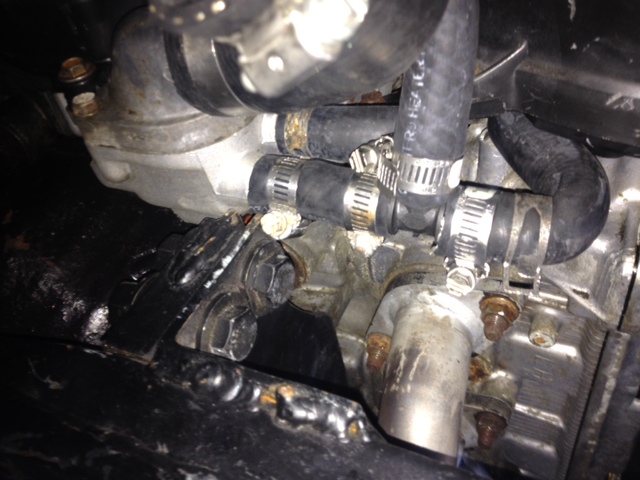 That's the lowest point in the system and also the best vacuum I'll get from the pump. Only concern here is that this is the HOT SIDE. According to the diagram the return line should be on the cool side, but again, I think the lowest point in the system is the most important thing. I think this is where you teed in to your EG33 also, so if it worked for you then I should be good. I did notice this line gets HOT pretty quick. See anything I should change? I'll probably drill the thermostat as well. Seems like a good idea. (And make sure it's at 12:00!) |
| BIGKAT_83 |
 Aug 9 2014, 06:36 PM Aug 9 2014, 06:36 PM
Post
#308
|
|
Senior Member    Group: Members Posts: 1,798 Joined: 25-January 03 From: Way down south Bogart,GA Member No.: 194 Region Association: South East States 

|
This is your problem. You have the small hose connected to the pressure release of the radiator cap.. You need to get this out of the system. What ever that is its not needed. Move the small hose to a high point on the line and you will have a constant flow of water.
Is the blue cap on the header tank a high pressure cap? 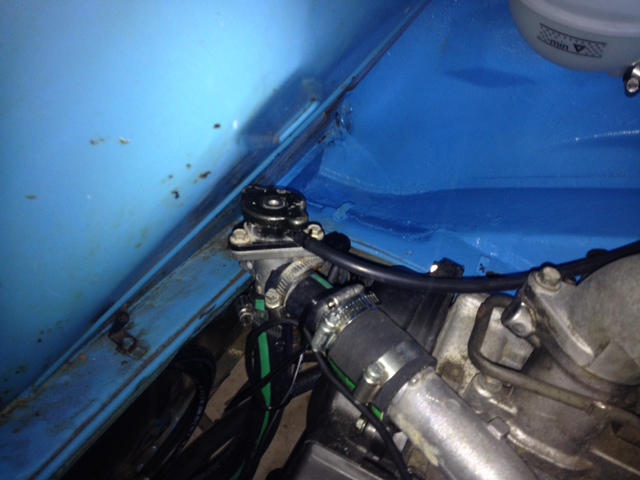 |
| 76-914 |
 Aug 9 2014, 07:02 PM Aug 9 2014, 07:02 PM
Post
#309
|
|
Repeat Offender & Resident Subaru Antagonist           Group: Members Posts: 13,634 Joined: 23-January 09 From: Temecula, CA Member No.: 9,964 Region Association: Southern California 
|
|
| Chris H. |
 Aug 9 2014, 07:53 PM Aug 9 2014, 07:53 PM
Post
#310
|
|
Senior Member     Group: Members Posts: 4,048 Joined: 2-January 03 From: Chicago 'burbs Member No.: 73 Region Association: Upper MidWest 
|
This is your problem. You have the small hose connected to the pressure release of the radiator cap.. You need to get this out of the system. What ever that is its not needed. Move the small hose to a high point on the line and you will have a constant flow of water. Is the blue cap on the header tank a high pressure cap?  Aha! Got it. Thanks Bob. That explains a lot. So either run a long line from the radiator or tap in to the water pipe intake like you did. The blue cap is pressurized. |
| Chris H. |
 Aug 9 2014, 11:31 PM Aug 9 2014, 11:31 PM
Post
#311
|
|
Senior Member     Group: Members Posts: 4,048 Joined: 2-January 03 From: Chicago 'burbs Member No.: 73 Region Association: Upper MidWest 
|
Bob, one more question....I just went out and looked and it seems like the radiator vent outlet that I capped off and the high spot on the engine where I thought I was venting before are very close to the same height. So technically I could probably use the radiator vent...
So the question is: If I run a line from the radiator back to the overflow tank from the front it would obviously have to be routed down and then back up again. I'd probably run it down through the heater channel, through the long and out right under the overflow tank. Is that OK since the line diameter is so small (1/4" probably) or do you think I'd get some air trapped at the high point in the line? Seems like with a line that small the water pressure would push the air out pretty well. For less than $10 worth of hose I guess I can give it a shot and see what happens unless you really hate the idea. Let me know what you think. Thanks again. |
| Chris914n6 |
 Aug 11 2014, 06:56 PM Aug 11 2014, 06:56 PM
Post
#312
|
|
Jackstands are my life.     Group: Members Posts: 3,413 Joined: 14-March 03 From: Las Vegas, NV Member No.: 431 Region Association: Southwest Region |
You want a bleeder at the top of the rad. No reason to do the whole return hose thing. If you can make a place for the air to collect.
I used one of these. rad air bleeder (IMG:http://www.914world.com/bbs2/uploads_offsite/www.homedepot.com-431-1407804972.1.jpg) |
| Chris H. |
 Aug 11 2014, 07:55 PM Aug 11 2014, 07:55 PM
Post
#313
|
|
Senior Member     Group: Members Posts: 4,048 Joined: 2-January 03 From: Chicago 'burbs Member No.: 73 Region Association: Upper MidWest 
|
Caught up with Bob. In order to be sure the system is continuously bled you need the return line. It will be high pressure, so I don't think the air in the line will be an issue. If it is I'll move it to the back and do a bleeder in front. The line is only 5/16.
In other good news, my rear calipers are completely functional. I thought they would be stuck or messed up in some way for sure. Just need to install new piston seals and muster up the energy to get DIRTY getting the brake dust off of them. Now it's mostly hurry up and wait for all the parts I ordered today and yesterday! Got the throttle cable installed, so that's done, and I reinstalled the gauge pod. I moved the e- brake warning light to where the "CAT" warning light was. About 20 seconds with some nail polish remover and the CAT and EGR symbols rub right off. Pics tomorrow...battery is charging. Waiting for a strap wrench to reinstall the alternator. EDIT....waiting for a strap wrench to tighten the crank pulley to 116 lbs, THEN reinstall the alternator so it will charge the battery itself (IMG:style_emoticons/default/biggrin.gif) . Yeah..that makes more sense. |
| 904svo |
 Aug 11 2014, 08:01 PM Aug 11 2014, 08:01 PM
Post
#314
|
|
904SVO    Group: Members Posts: 1,124 Joined: 17-November 05 From: Woodstock,Georgia Member No.: 5,146 |
|
| JRust |
 Aug 11 2014, 08:14 PM Aug 11 2014, 08:14 PM
Post
#315
|
|
914 Guru      Group: Members Posts: 6,310 Joined: 10-January 03 From: Corvallis Oregon Member No.: 129 Region Association: Pacific Northwest 
|
Burping is an art with these. With my v8 it was a bit of a chore to learn how to get all the air out of the system. I found making the high loin really high helped. I would jack up my ass end. Let it run & then shut it off. Crack the bleeder from the top in front. Took a little while to get it all out but I did. Running the extra return line Bob suggest is probably the most efficient way. Much less work to burp the system. Bob knows this stuff & you'll save time doing what he says over some dipshits (Myself (IMG:style_emoticons/default/shades.gif) )
|
| Chris H. |
 Aug 17 2014, 12:35 PM Aug 17 2014, 12:35 PM
Post
#316
|
|
Senior Member     Group: Members Posts: 4,048 Joined: 2-January 03 From: Chicago 'burbs Member No.: 73 Region Association: Upper MidWest 
|
TBM= The Bob Method for cooling water cooled 914s Use it.
So I could tell right away that the system was working better even before I started the car. Although my garage is pitched unfavorably to this so that the front end is higher than the back, I could hear the water moving through the system as I filled it up, which I could not hear as well before. https://www.youtube.com/watch?v=pOmJoViuj9A I removed the Yamaha filler cap and added a temp sender fitting. 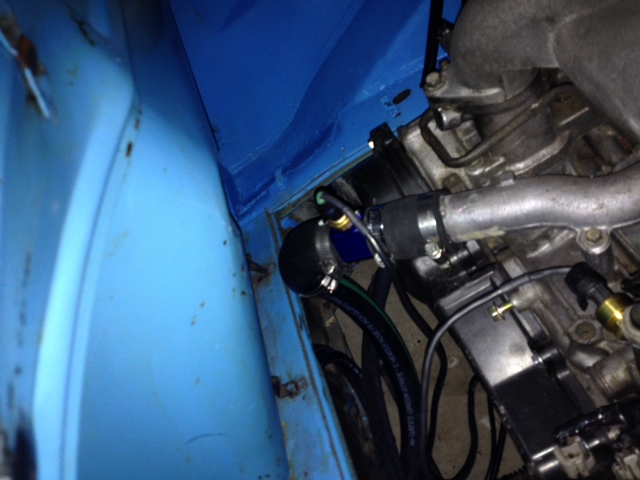 And ran the 5/16 hose front to back. 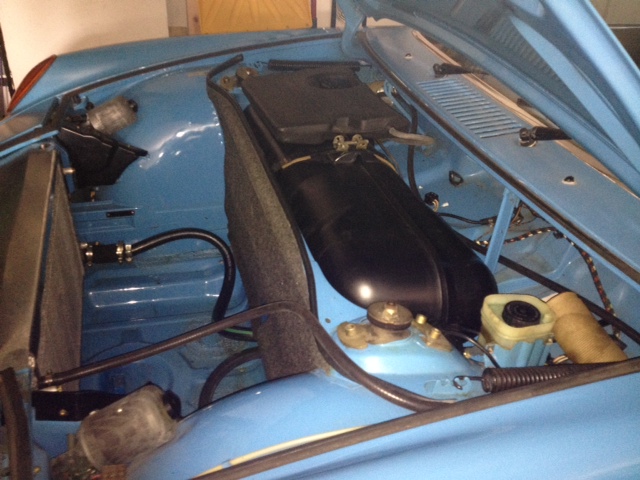 I also removed the pin from the thermostat and drilled it to 1/8" (which was barely more than before). When I started it it was clearly running differently, not nearly as hot. Before there was a lot of heat coming from the engine bay, now hardly any. Next week we (and by "we" I mean Kent, who is doing all the work) should have the clutch setup done and be able to take it out. I'm not waiting on him, he is waiting on my MC to show up from e-bay. Still need to do the rear brakes and cable shifter as well. Should be done just about the same time I get the stuff. |
| Chris H. |
 Aug 17 2014, 12:49 PM Aug 17 2014, 12:49 PM
Post
#317
|
|
Senior Member     Group: Members Posts: 4,048 Joined: 2-January 03 From: Chicago 'burbs Member No.: 73 Region Association: Upper MidWest 
|
Just a little FYI if you have EGR and CAT lights...you can use one to relocate the e-brake warning light. The white lettering rubs off in about 20 seconds with any kind of thinner (I used nail polish remover). Probably use the other one for the CEL. I have a '95 so it's OBD 1. Uses a morse code type system apparently.
https://www.youtube.com/watch?v=aEwgdcRYfO0 |
| JRust |
 Aug 17 2014, 12:50 PM Aug 17 2014, 12:50 PM
Post
#318
|
|
914 Guru      Group: Members Posts: 6,310 Joined: 10-January 03 From: Corvallis Oregon Member No.: 129 Region Association: Pacific Northwest 
|
TBM= The Bob Method for cooling water cooled 914s Use it. (IMG:style_emoticons/default/evilgrin.gif) I like it TBM (IMG:style_emoticons/default/agree.gif) |
| Mike Bellis |
 Aug 17 2014, 02:44 PM Aug 17 2014, 02:44 PM
Post
#319
|
|
Resident Electrician      Group: Members Posts: 8,346 Joined: 22-June 09 From: Midlothian TX Member No.: 10,496 Region Association: None 

|
Just a little FYI if you have EGR and CAT lights...you can use one to relocate the e-brake warning light. The white lettering rubs off in about 20 seconds with any kind of thinner (I used nail polish remover). Probably use the other one for the CEL. I have a '95 so it's OBD 1. Uses a morse code type system apparently. https://www.youtube.com/watch?v=aEwgdcRYfO0 Why do you post a video that is private and can't be seen? (IMG:style_emoticons/default/confused24.gif) |
| Chris H. |
 Aug 17 2014, 02:48 PM Aug 17 2014, 02:48 PM
Post
#320
|
|
Senior Member     Group: Members Posts: 4,048 Joined: 2-January 03 From: Chicago 'burbs Member No.: 73 Region Association: Upper MidWest 
|
Oh you can't see it? It should be able to be seen by anyone who I share the link with, which should be everyone since I posted it. That's how all of mine are usually done. No one can see it? I'll change it if so.
|
  |
3 User(s) are reading this topic (3 Guests and 0 Anonymous Users)
0 Members:

|
Lo-Fi Version | Time is now: 24th November 2024 - 06:28 AM |
Invision Power Board
v9.1.4 © 2024 IPS, Inc.


