|
|

|
Porsche, and the Porsche crest are registered trademarks of Dr. Ing. h.c. F. Porsche AG.
This site is not affiliated with Porsche in any way. Its only purpose is to provide an online forum for car enthusiasts. All other trademarks are property of their respective owners. |
|
|
  |
| lapuwali |
 Nov 2 2005, 06:01 PM Nov 2 2005, 06:01 PM
Post
#181
|
|
Not another one!     Group: Benefactors Posts: 4,526 Joined: 1-March 04 From: San Mateo, CA Member No.: 1,743  |
The hardest part about a dry sump is the tank, and you can buy those. The rest is simply a matter of adding a second oil pump (can be a belt-driven external unit) that pulls oil out of the much-shortened "sump" and pumps it into the tank. The drain for the tank then feeds into the pressure pump. There are external pump assemblies available that supply both the scavenge and pressure pumps in one housing, and you simply remove the stock oil pump.
|
| TonyAKAVW |
 Nov 4 2005, 01:45 AM Nov 4 2005, 01:45 AM
Post
#182
|
|
That's my ride.     Group: Members Posts: 2,151 Joined: 17-January 03 From: Redondo Beach, CA Member No.: 166 Region Association: None |
I decided to use the messed up radiator for making measurements and building a frame.
Attached image(s) 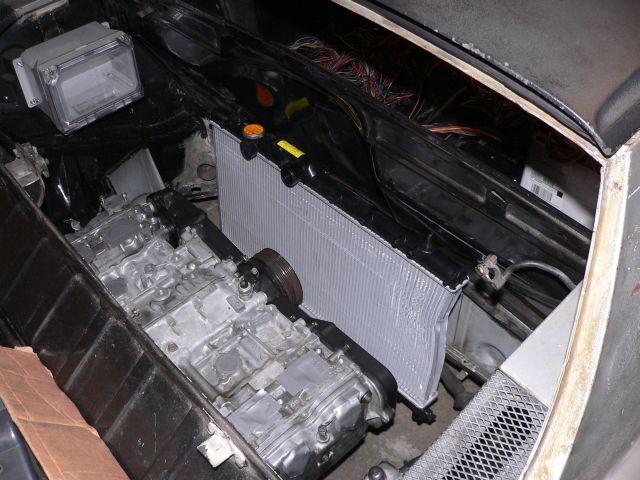
|
| TonyAKAVW |
 Nov 4 2005, 01:47 AM Nov 4 2005, 01:47 AM
Post
#183
|
|
That's my ride.     Group: Members Posts: 2,151 Joined: 17-January 03 From: Redondo Beach, CA Member No.: 166 Region Association: None |
Here's the frame. Its made from 1 inch wide angle stock, held together for now with screws. Eventually it will be welded together.
Attached image(s) 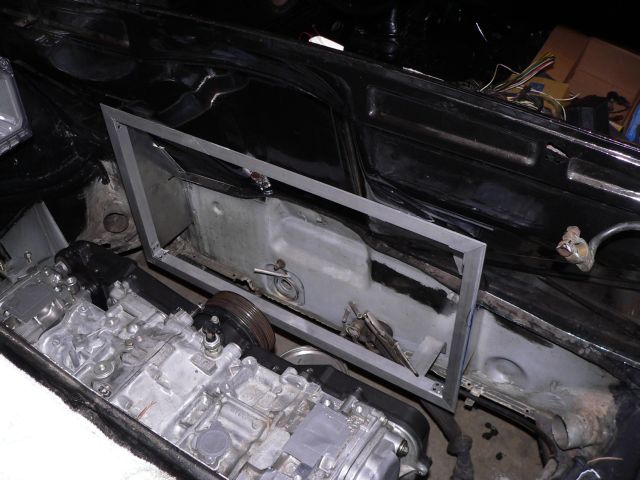
|
| TonyAKAVW |
 Nov 4 2005, 01:53 AM Nov 4 2005, 01:53 AM
Post
#184
|
|
That's my ride.     Group: Members Posts: 2,151 Joined: 17-January 03 From: Redondo Beach, CA Member No.: 166 Region Association: None |
Here are the side pieces taped into place for fitting. The top piece is a much more challenging part and I still need to figure out a way to cut it to the correct shape.
Attached image(s) 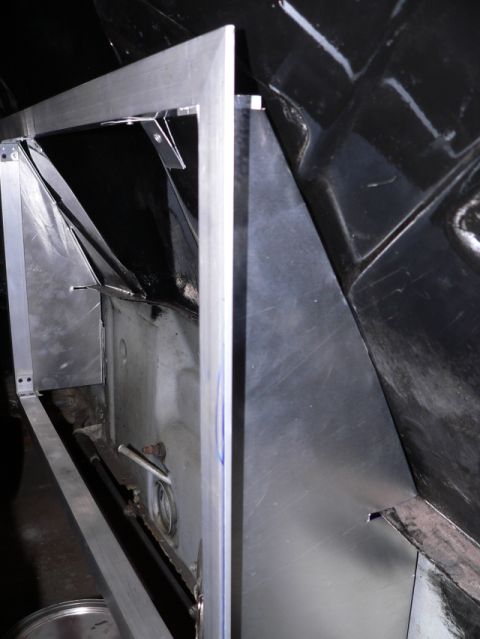
|
| jsteele22 |
 Nov 4 2005, 11:22 AM Nov 4 2005, 11:22 AM
Post
#185
|
||
|
Senior Member    Group: Members Posts: 727 Joined: 24-August 05 From: Colorado Springs, CO Member No.: 4,653 |
Wow, great shot. I nominate you for the 914club Annie Liebowitz prize. I had been trying to picture what that area looked like, and I was sure that something would protrude down into the sump (besides the pickup tube.) Tony, is that windage tray you show a stock part of the Suby engine ? (If a little piece of stamped sheet metal makes that big a difference, WTH doesn't every car come with one ?) So, I know its crazy, but Mike's other thread has gotten me all worked up about a dry sump system. Sort of a hypochondriac's version of DWD. |
||
| TonyAKAVW |
 Nov 4 2005, 12:39 PM Nov 4 2005, 12:39 PM
Post
#186
|
||
|
That's my ride.     Group: Members Posts: 2,151 Joined: 17-January 03 From: Redondo Beach, CA Member No.: 166 Region Association: None |
Thanks! Yes, the windage tray is part of the stock Subaru engine. The type IV has a similar plate, so I don't know which engines have them and don't. Seems like a pretty inexpensive item. And yes, that dry sump idea sounds really cool. I'm definitely interested in that, but I think for the time being I will go with a modified oil pan. If I start taking on new projects like that I'm never going to get this car on the road. Something interesting I found out when placing the radiator is that if you mount the radiator to one side of the engine bay, there would be plenty of room on the other side for one of those large oil sump tanks! -Tony |
||
| Goge |
 Nov 4 2005, 01:04 PM Nov 4 2005, 01:04 PM
Post
#187
|
|
Member   Group: Members Posts: 53 Joined: 3-September 05 From: Portland, OR Member No.: 4,746 |
Hey Tony-
I decided I'd quit lurking and finally post something... Would that rad fit in there if the lower sheet metal weren't cut away? It doesn't really look like it but I can't quite tell. Just curious. I'd like to do this dance eventually myself, but would like to keep cutting to a min... I don't think I could carve up my car very much and still sleep at night. But if i could get away with a few mounting holes for the motor mount and the rad, I might be able to catch a few winks without too much guilt. Thanks for answering a couple questions via e-mail the other day, too!! Keep up the good work there, I'm living vicariously through you! (IMG:http://www.914world.com/bbs2/html/emoticons/drooley.gif) -Todd |
| airsix |
 Nov 4 2005, 05:06 PM Nov 4 2005, 05:06 PM
Post
#188
|
||
|
I have bees in my epiglotis     Group: Members Posts: 2,196 Joined: 7-February 03 From: Kennewick Man (E. WA State) Member No.: 266 |
Todd, I used to feel that way too, but you get numb to it eventually. I can dive in with an air-chisel or other instrument of mass destruction now without even giving it a second thought. (IMG:http://www.914world.com/bbs2/html/emoticons/happy11.gif) -Ben M. |
||
| Goge |
 Nov 5 2005, 12:35 AM Nov 5 2005, 12:35 AM
Post
#189
|
|
Member   Group: Members Posts: 53 Joined: 3-September 05 From: Portland, OR Member No.: 4,746 |
Ben-
You're certainly correct. I could maintain my (unperfect, underpowered) '72 in all it's debatably stock glory, and get hit by a Hyundai next week. Or, I could do a little choppin' and multiply horses by about 2 (holy crap!!!!) and work on putting in a Soob motor. And I think that would be more fun to drive (even if the Hyundai still mowed me down later on, at least I'd have had the fun). I had better quit posting, because I'm at least a year away from undertaking this... and it's Tony's thread. But I'm taking baby steps, fixing rusty areas over the winter. I was pleasantly surprised when I finally took off the outer rocker after owning this thing for 10 years! Not bad! This was taken just after I took it off, only a little surface rust. And a lotta dirt. And a hazelnut fell out, too (a 'filbert' if you live around here....) Have at it, Tony. We're watching... Attached image(s) 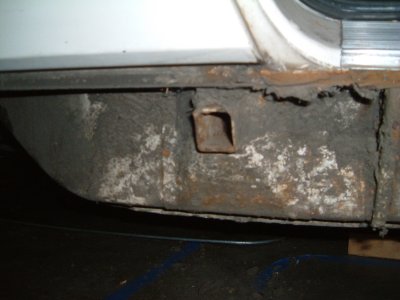
|
| CptTripps |
 Nov 6 2005, 07:57 AM Nov 6 2005, 07:57 AM
Post
#190
|
|
:: Punch and Pie ::     Group: Members Posts: 3,584 Joined: 26-December 04 From: Mentor, OH Member No.: 3,342 Region Association: Upper MidWest |
I've got a Vespa to do this winter, but I'm thinking *NEXT* year I'm going to drop a Soob in mine too...
Something about 200hp, and getting to keep both trunks. (IMG:http://www.914world.com/bbs2/html/emoticons/biggrin.gif) |
| TonyAKAVW |
 Nov 6 2005, 10:41 PM Nov 6 2005, 10:41 PM
Post
#191
|
|
That's my ride.     Group: Members Posts: 2,151 Joined: 17-January 03 From: Redondo Beach, CA Member No.: 166 Region Association: None |
Made a little progress this weekend... My main project this weekend was replacing the front pads and rotors, as well as an oil change on my wife's TT.
The remaining piece of radiator shroud was cut today and installed. All that is left now for the radiator frame is some bracketry for suspending the radiator itself. This too will be made from angle-stock. Once this is all complete I should have measurements and drawings up for others to duplicate. Another bit of good news, is that the infamous alternator bracket I made is out for reproduction, so hopefully there will be some even slicker custom alternator brackets coming out soon. -Tony Attached image(s) 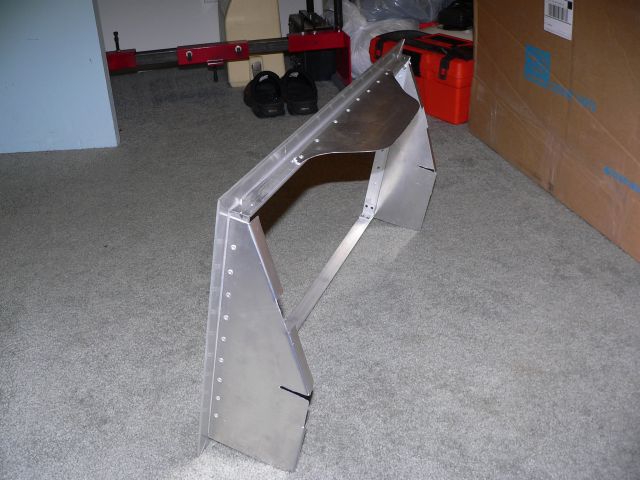
|
| Aaron Cox |
 Nov 6 2005, 10:43 PM Nov 6 2005, 10:43 PM
Post
#192
|
|
Professional Lawn Dart                Group: Retired Admin Posts: 24,541 Joined: 1-February 03 From: OC Member No.: 219 Region Association: Southern California |
tony. your sheet metal work rocks!
can i pay you to make an oil cooler shroud for me? (IMG:http://www.914world.com/bbs2/html/emoticons/drooley.gif) |
| TonyAKAVW |
 Nov 6 2005, 10:45 PM Nov 6 2005, 10:45 PM
Post
#193
|
|
That's my ride.     Group: Members Posts: 2,151 Joined: 17-January 03 From: Redondo Beach, CA Member No.: 166 Region Association: None |
The top piece was made in an interesting way...I needed the shape of the tin to conform to the indent on the firewall between the two seats. I put the radiator frame in place and then applied masking tape to the wall and then sprayed some expanding foam into the gap. This provided a pretty good template for tracing out the top piece. Unfortunately it wasn't perfect and I had a bit of filing to do to get it right. Its pretty decent but there are some small gaps still.
This picture is of the foam block (ecased in masking tape) ready to trace out onto the aluminum sheet. -Tonyi Attached image(s) 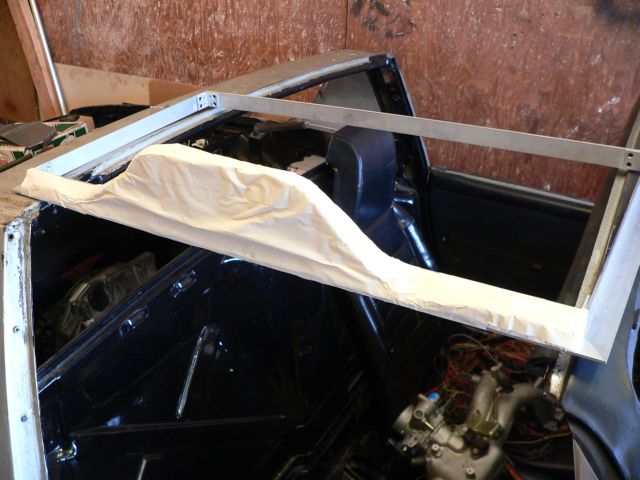
|
| TonyAKAVW |
 Nov 6 2005, 10:49 PM Nov 6 2005, 10:49 PM
Post
#194
|
||
|
That's my ride.     Group: Members Posts: 2,151 Joined: 17-January 03 From: Redondo Beach, CA Member No.: 166 Region Association: None |
My sheetmetal work is only awesome in the 640 by 480 resolution (IMG:http://www.914world.com/bbs2/html/emoticons/smile.gif) I did this with a $12 nibbling tool from Radio Shack, a pair of tin snips, and a fairly small bench vice. If you want a shroud, bring your car by some weekend and we can make one. Should be pretty easy. -Tony |
||
| Aaron Cox |
 Nov 6 2005, 10:59 PM Nov 6 2005, 10:59 PM
Post
#195
|
||||
|
Professional Lawn Dart                Group: Retired Admin Posts: 24,541 Joined: 1-February 03 From: OC Member No.: 219 Region Association: Southern California |
you got it man. (IMG:http://www.914world.com/bbs2/html/emoticons/smilie_pokal.gif) |
||||
| phantom914 |
 Nov 6 2005, 11:01 PM Nov 6 2005, 11:01 PM
Post
#196
|
||||||
|
non-914-owner non-club member    Group: Benefactors Posts: 1,013 Joined: 24-February 04 From: Covina,CA(North ofWest Covina) Member No.: 1,708  |
Tony accepts only frozen pizzas as payment. (IMG:http://www.914world.com/bbs2/html/emoticons/wink.gif) Andrew |
||||||
| Aaron Cox |
 Nov 6 2005, 11:06 PM Nov 6 2005, 11:06 PM
Post
#197
|
|
Professional Lawn Dart                Group: Retired Admin Posts: 24,541 Joined: 1-February 03 From: OC Member No.: 219 Region Association: Southern California |
i thought you had to have a 914 to post here (IMG:http://www.914world.com/bbs2/html/emoticons/laugh.gif)
hey andrew (IMG:http://www.914world.com/bbs2/html/emoticons/wavey.gif) |
| bondo |
 Nov 6 2005, 11:44 PM Nov 6 2005, 11:44 PM
Post
#198
|
||
|
Practicing my perpendicular parking     Group: Members Posts: 4,277 Joined: 19-April 03 From: Los Osos, CA Member No.: 587 Region Association: Central California |
Hahahaha! (IMG:http://www.914world.com/bbs2/html/emoticons/lol2.gif) (IMG:http://www.914world.com/bbs2/html/emoticons/chairfall.gif) |
||
| TonyAKAVW |
 Nov 14 2005, 01:26 AM Nov 14 2005, 01:26 AM
Post
#199
|
|
That's my ride.     Group: Members Posts: 2,151 Joined: 17-January 03 From: Redondo Beach, CA Member No.: 166 Region Association: None |
Okay, some progress on the radiator shroud. Lots of minor improvements and little tricks to this...
Here's what it looks like now. On the sides are adjustable angle pieces that keep the air from shooting out to the side of the radiator. They are adjustable so that I can tighten them to whatever radiator goes in (the replacement for my crappy ne may be very slightly different) and I can account for any skew as well... There are also mounts now for the top and bottom of the radiator to hold it in place. More details below... -Tony Attached image(s) 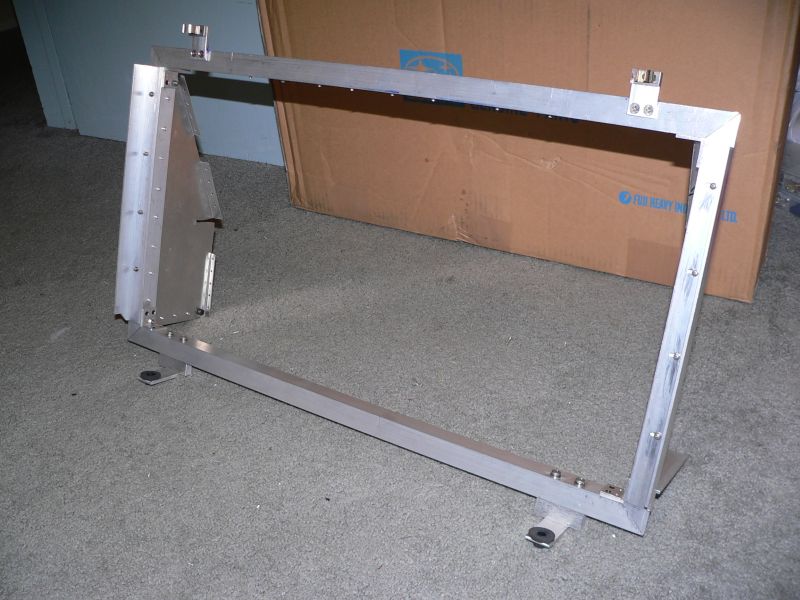
|
| TonyAKAVW |
 Nov 14 2005, 01:29 AM Nov 14 2005, 01:29 AM
Post
#200
|
|
That's my ride.     Group: Members Posts: 2,151 Joined: 17-January 03 From: Redondo Beach, CA Member No.: 166 Region Association: None |
At the bottom of the frame are two legs that stick out, and they have holes drilled in them to accept the peg that sticks out from the bottom of the radiator. I bought some rubber grommets and some foam rubber gaskets at Industrial Liquidators for isolation dampening.
Attached image(s) 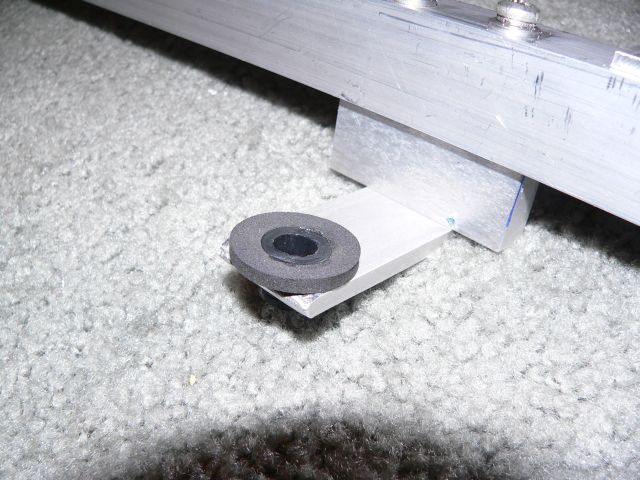
|
  |
1 User(s) are reading this topic (1 Guests and 0 Anonymous Users)
0 Members:

|
Lo-Fi Version | Time is now: 8th January 2025 - 12:15 PM |
Invision Power Board
v9.1.4 © 2025 IPS, Inc.


