|
|

|
Porsche, and the Porsche crest are registered trademarks of Dr. Ing. h.c. F. Porsche AG.
This site is not affiliated with Porsche in any way. Its only purpose is to provide an online forum for car enthusiasts. All other trademarks are property of their respective owners. |
|
|
  |
| Amenson |
 Jun 27 2015, 07:40 AM Jun 27 2015, 07:40 AM
Post
#501
|
|
That's opposite lock!!    Group: Members Posts: 645 Joined: 27-May 05 From: Dublin, OH Member No.: 4,154 Region Association: None 
|
Finally took the time to grab the photos from the last couple of weeks of work before HRPT.
One project that turned out to be a much larger PITA than expected was installing the ProVent recirculating crank case air oil separator. Looks pretty straight forward... 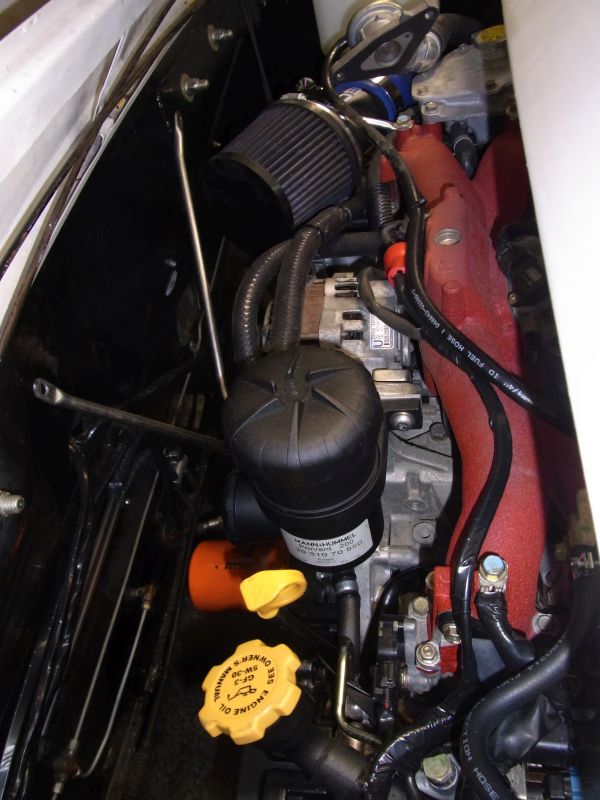 Look at the bend I had to make to avoid the alternator. 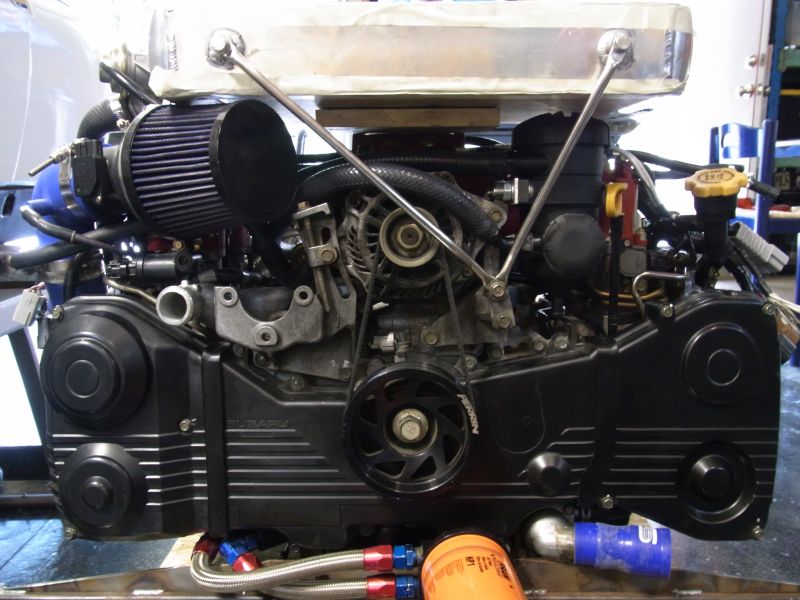 Do you think that anybody in the world makes a fitting that will fit there? Nope, had to cut apart two different fittings and weld them together to get what I needed. 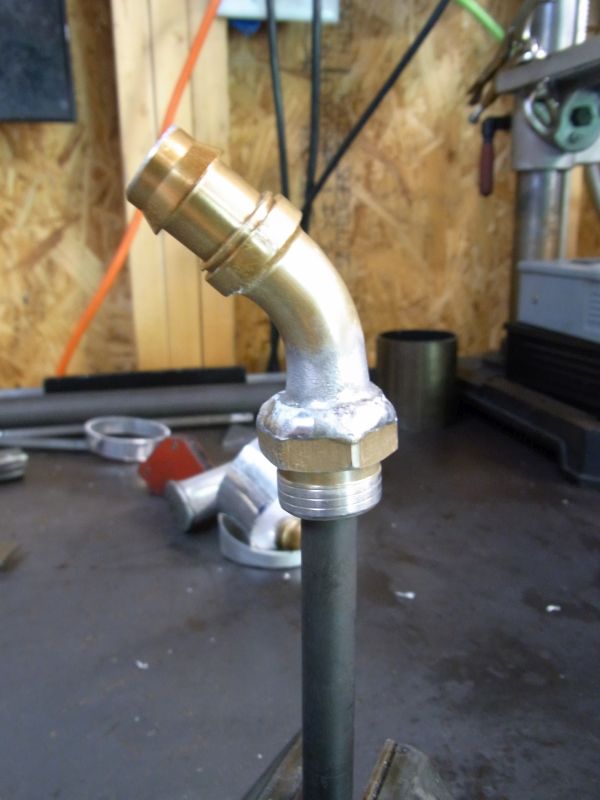 This is a poor attempt to show the plumbing from the block. A tube connects the center block vent to the valve cover vent on each side of the engine and to the bottom of the ProVent. 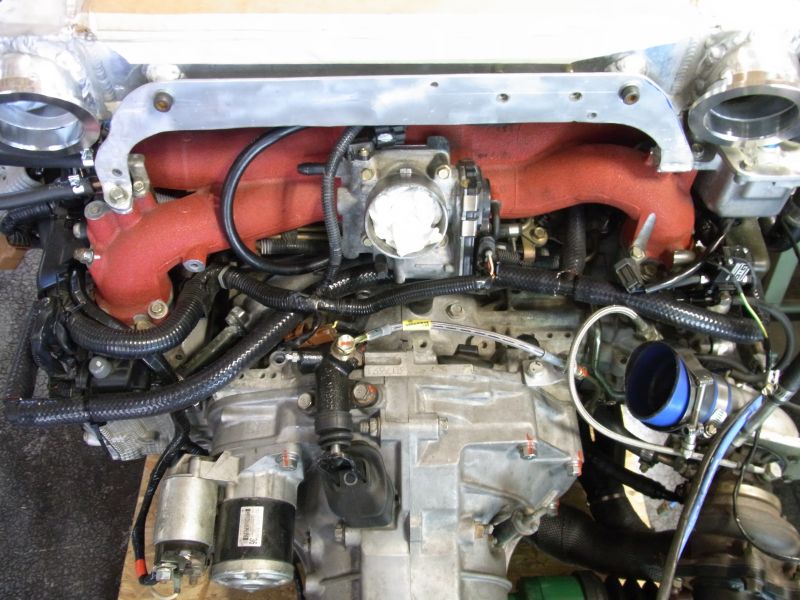 After the ProVent does its job I dump the oil back to the pan through the dipstick tube. 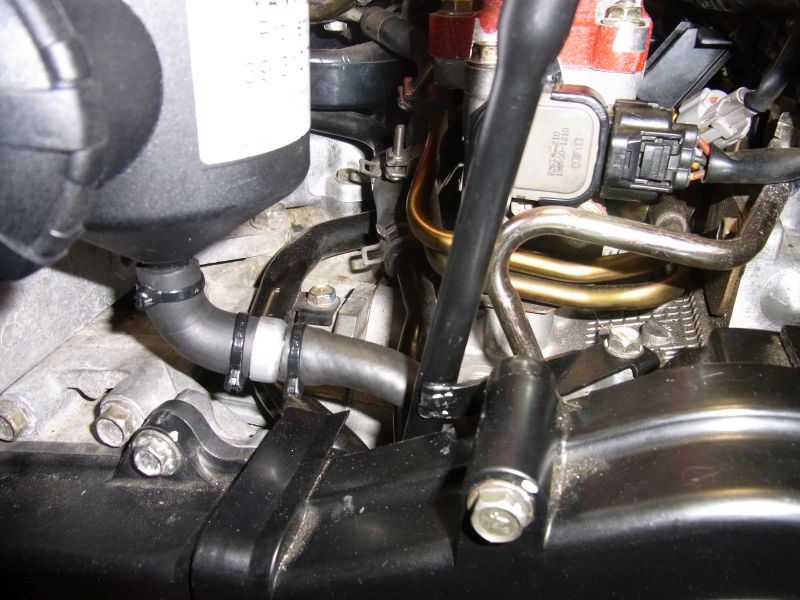 I probably have the most custom Subaru Dipstick tube in the entire world. 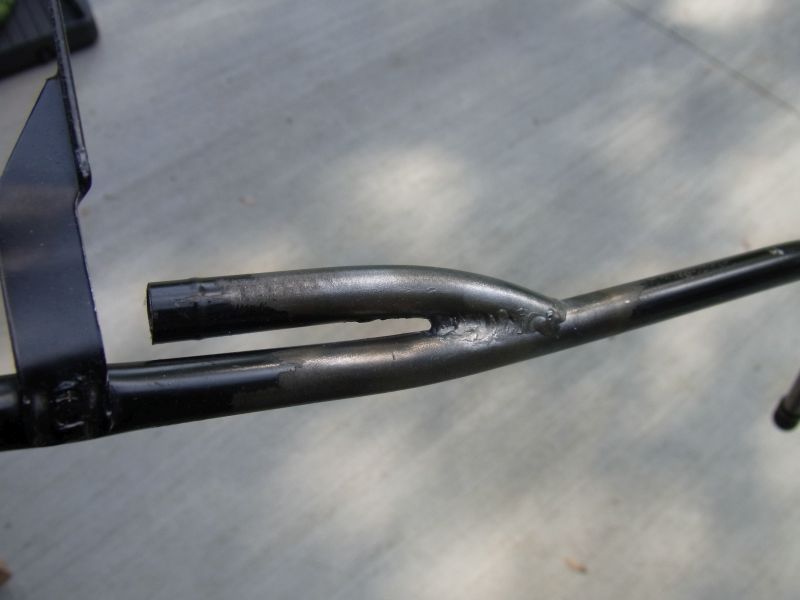 I also extended the bottom of the tube because I shortened the inlet to the oil pan so that I could remove it with the front engine mount in place. Smallest weld bead on the car! 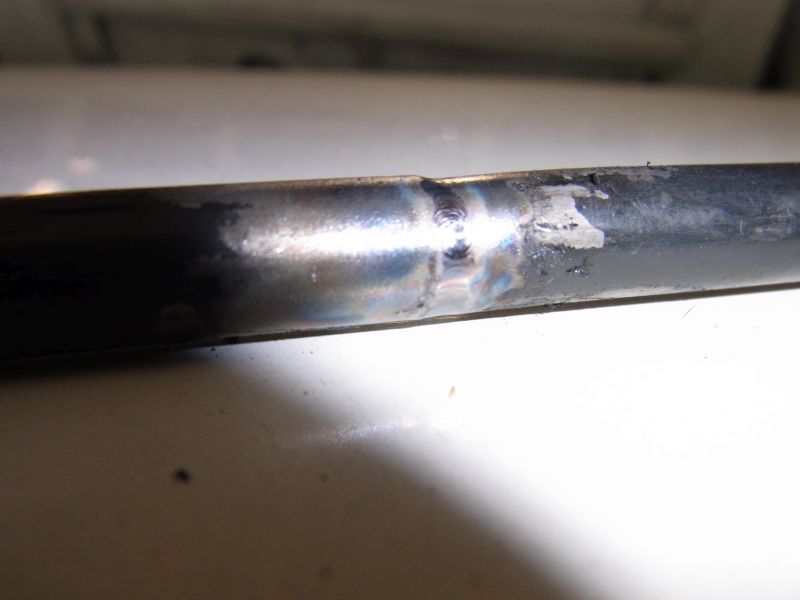 Also learned how to Tig Braze in order to reinstall the shortened oil pan tube. 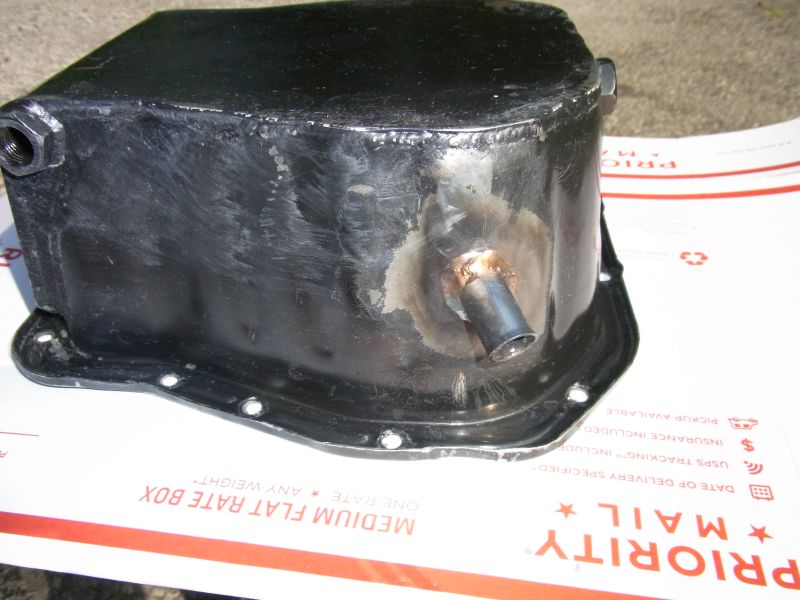 While I had the pan off I installed a Killer B windage tray 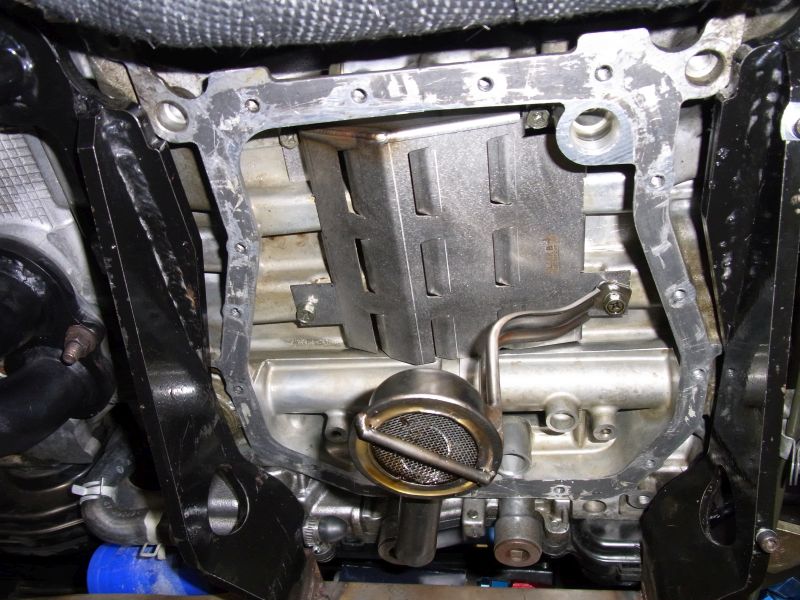 Phew...that was a project and a half. Cheers, Scott |
| 914forme |
 Jun 27 2015, 07:50 AM Jun 27 2015, 07:50 AM
Post
#502
|
|
Times a wastin', get wrenchin'!     Group: Members Posts: 3,896 Joined: 24-July 04 From: Dayton, Ohio Member No.: 2,388 Region Association: None 
|
I used to run the Pro-Vents on my TDIs, never got them to work as well as I wood have liked. But they certainly reduced the oil in the intercooler that plagued the A4 TDIs.
Haven't even looked at my new TDI to see if it has the same issue (IMG:style_emoticons/default/dry.gif) You know Scott your pictures make it look so easy, we never feel the pain of all the hard work you put into that car. As always you do top notch work. |
| Amenson |
 Jun 27 2015, 08:08 AM Jun 27 2015, 08:08 AM
Post
#503
|
|
That's opposite lock!!    Group: Members Posts: 645 Joined: 27-May 05 From: Dublin, OH Member No.: 4,154 Region Association: None 
|
I also decided that I needed to rework the shift linkage. I am sure that it works completely fine the way it was but...
This is a picture of CaptTripps install. Notice the small ends on the rotation link. 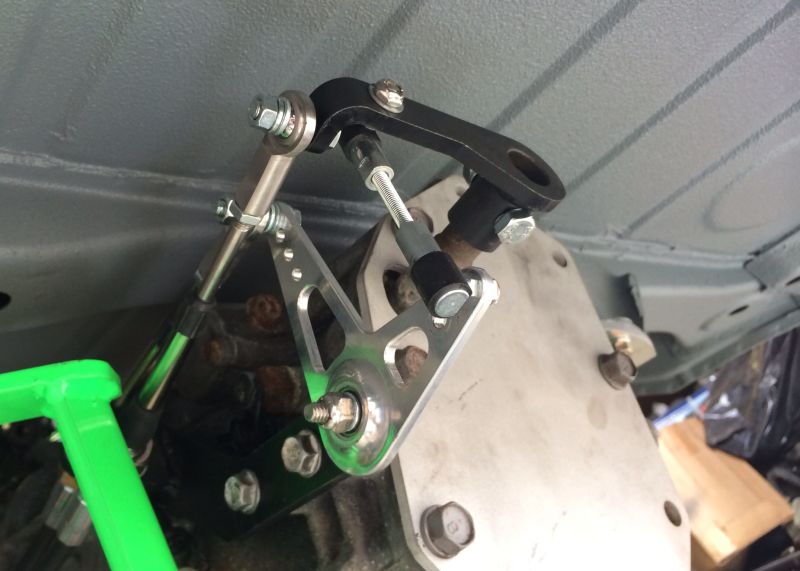 My kit came with normal sized ends and a spacer mount stud thingy. When I mounted it on the inside the angle was less than 90deg. 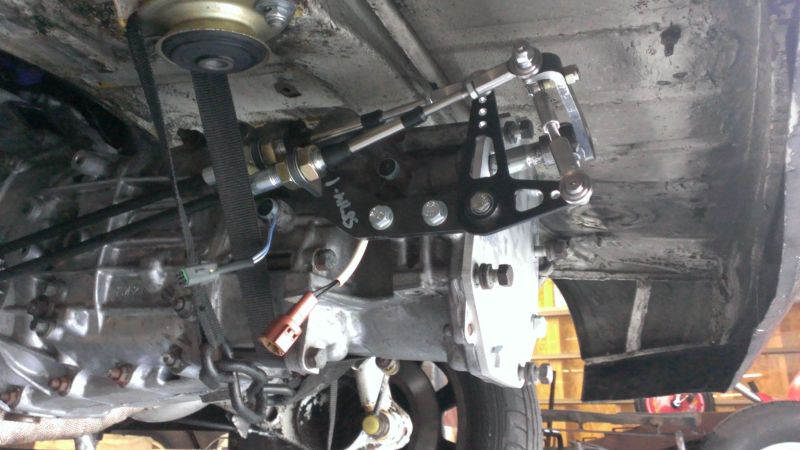 When I mounted it on the outside the angle was larger than 90deg. Also notice the in/out cable is almost at the extreme operating angle to the top and outside of the vehicle. It seemed to slightly bind when at the retracted position. 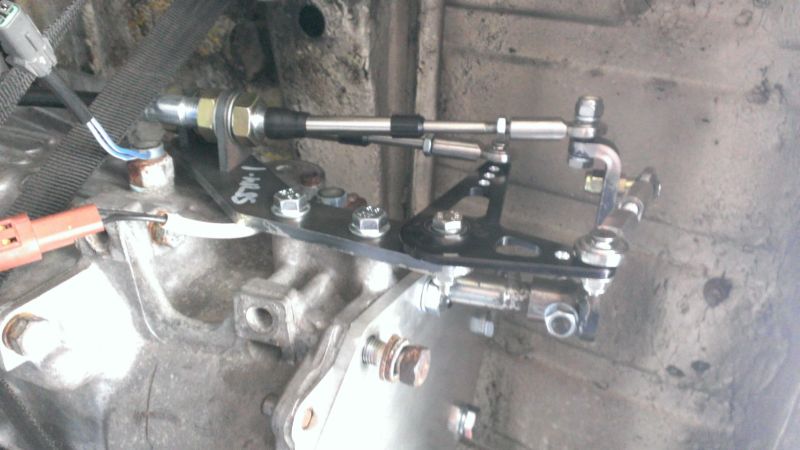 What I did was shorten the arm by 4-5mm and added an extension so that I can run it upside down to the above pictures. 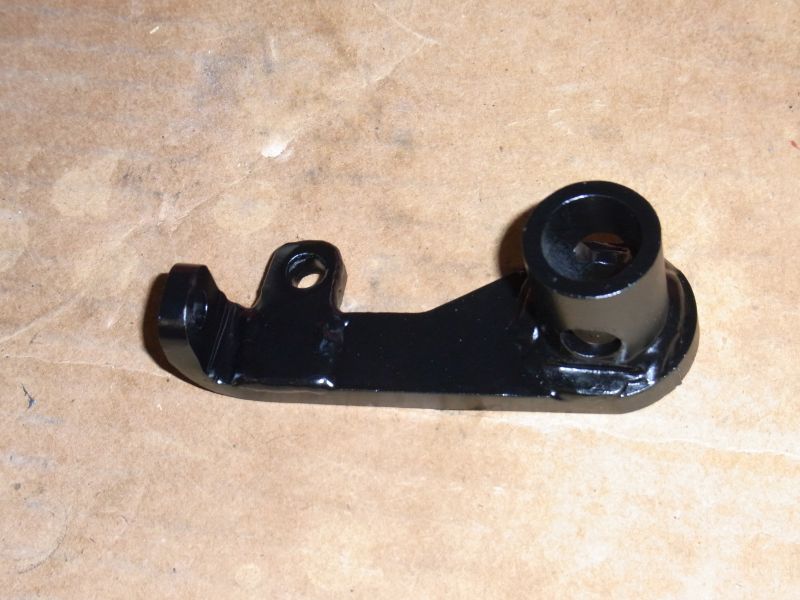 This is what it looks like installed. 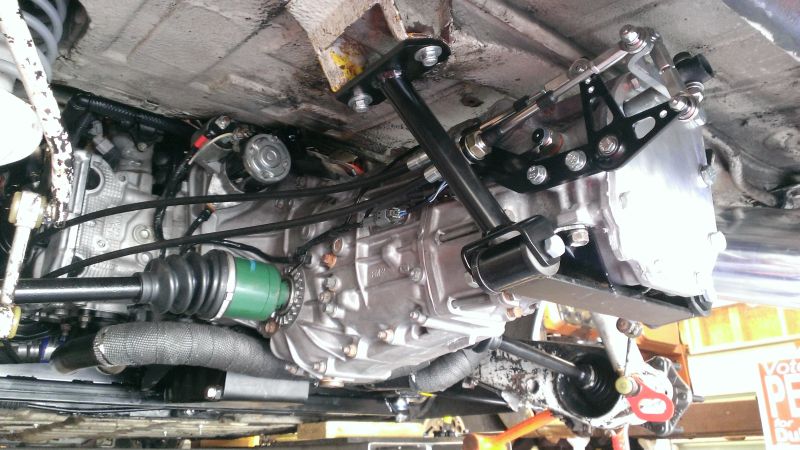 The hours of fiddling were so worth it (IMG:style_emoticons/default/confused24.gif) Probably not but it makes me feel much better. Cheers, Scott |
| Amenson |
 Jun 27 2015, 09:30 AM Jun 27 2015, 09:30 AM
Post
#504
|
|
That's opposite lock!!    Group: Members Posts: 645 Joined: 27-May 05 From: Dublin, OH Member No.: 4,154 Region Association: None 
|
I used to run the Pro-Vents on my TDIs, never got them to work as well as I wood have liked. But they certainly reduced the oil in the intercooler that plagued the A4 TDIs. Haven't even looked at my new TDI to see if it has the same issue (IMG:style_emoticons/default/dry.gif) You know Scott your pictures make it look so easy, we never feel the pain of all the hard work you put into that car. As always you do top notch work. So far it seems to be working great. I had the IC tubes off after 1600 miles and everything was dry. Previously there was so much oil it was pooling a bit in the intake. The engine has not used any oil yet either. I am quite satisfied. The pictures I post make it look easy because I neglect to take pictures of all of the failures. (IMG:style_emoticons/default/biggrin.gif) Cheers, Scott |
| 914forme |
 Jun 27 2015, 10:21 AM Jun 27 2015, 10:21 AM
Post
#505
|
|
Times a wastin', get wrenchin'!     Group: Members Posts: 3,896 Joined: 24-July 04 From: Dayton, Ohio Member No.: 2,388 Region Association: None 
|
Not failure learning how not to do something invaluable to knowledge building.
|
| zipedadoo |
 Jun 27 2015, 06:56 PM Jun 27 2015, 06:56 PM
Post
#506
|
|
Member   Group: Members Posts: 135 Joined: 23-January 14 From: Arizona Member No.: 16,921 Region Association: None |
Wondering if you could give me some advise with my linkage. Obviously its a homemade version based on the one you're using.
It shifts ok but, when shifting from first to second the gear shift lever wants to move to the right a little so its not a straight pull back. Kind of feels like you're going to go into fourth gear. I guessing my geometry is off on the "L" bracket. Why did you rework yours? did you have the same issue? Thanks for any advise you might have. 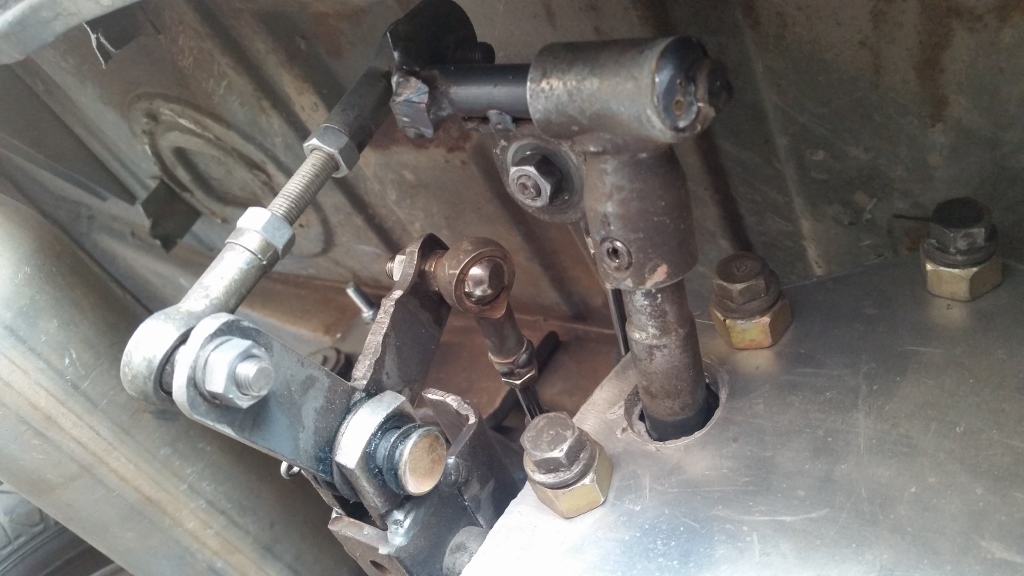 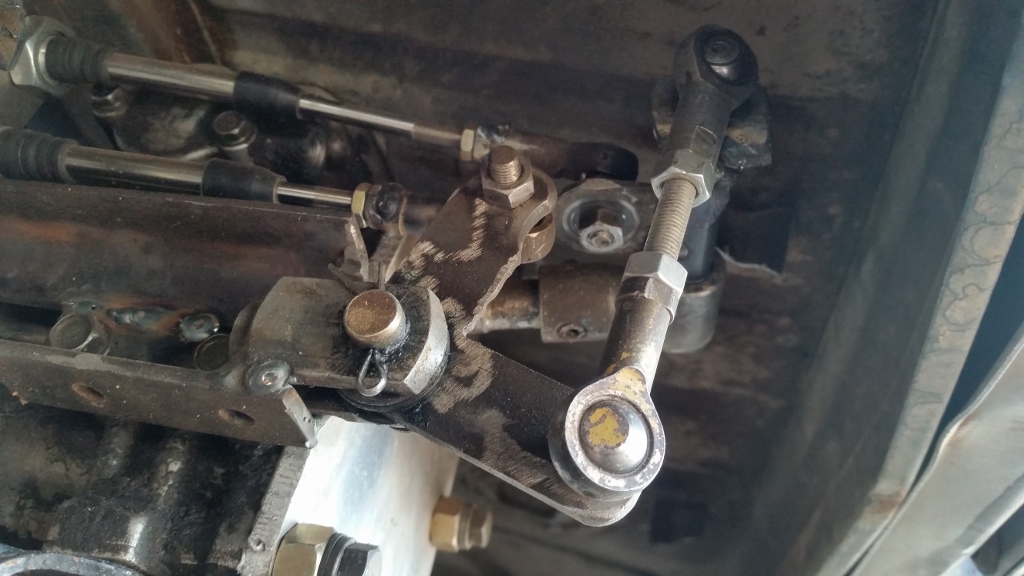 |
| Amenson |
 Jul 1 2015, 11:13 AM Jul 1 2015, 11:13 AM
Post
#507
|
|
That's opposite lock!!    Group: Members Posts: 645 Joined: 27-May 05 From: Dublin, OH Member No.: 4,154 Region Association: None 
|
Wondering if you could give me some advise with my linkage. Obviously its a homemade version based on the one you're using. It shifts ok but, when shifting from first to second the gear shift lever wants to move to the right a little so its not a straight pull back. Kind of feels like you're going to go into fourth gear. I guessing my geometry is off on the "L" bracket. Why did you rework yours? did you have the same issue? Thanks for any advise you might have. I reworked mine before even installing the shifter so I am not sure if what I did made a difference or not. In principal what I wanted to achieve was to keep the linkage components parallel and perpendicular when in neutral. This would make any linear displacement due to the rotational movement symmetrical and as small as possible. I made an illustration to show the point. The bottom of the "L" is parallel to the input shaft, both shown with red lines. The linkage between the two (blue line) should be perpendicular to both. 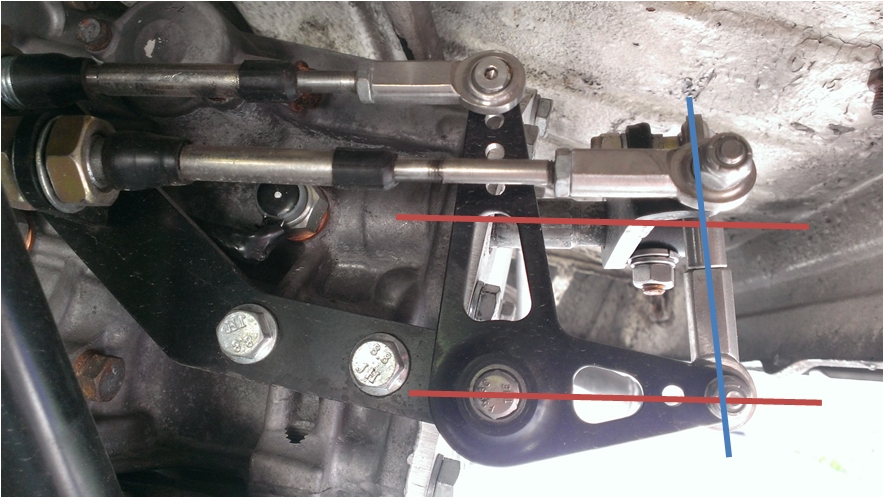 I currently have a very small amount of side to side motion when shifting between 1st and 2nd. Not measurable but I can feel it. Would be nice if I could not (IMG:style_emoticons/default/rolleyes.gif) Looking at it in this picture it seems like I have an adjustment to make, or maybe it is the angle of the picture. Keep tweaking until it is perfect! Cheers, Scott |
| zipedadoo |
 Jul 1 2015, 11:44 AM Jul 1 2015, 11:44 AM
Post
#508
|
|
Member   Group: Members Posts: 135 Joined: 23-January 14 From: Arizona Member No.: 16,921 Region Association: None |
Thanks for the reply. I'll make some adjustments and see what happens.
|
| ruby914 |
 Jul 30 2015, 11:28 PM Jul 30 2015, 11:28 PM
Post
#509
|
|
Senior Member    Group: Members Posts: 720 Joined: 26-April 09 From: Hawthorne, Ca Member No.: 10,305 Region Association: None |
Wondering if you could give me some advise with my linkage. Obviously its a homemade version based on the one you're using. It shifts ok but, when shifting from first to second the gear shift lever wants to move to the right a little so its not a straight pull back. Kind of feels like you're going to go into fourth gear. I guessing my geometry is off on the "L" bracket. Why did you rework yours? did you have the same issue? Thanks for any advise you might have. I reworked mine before even installing the shifter so I am not sure if what I did made a difference or not. In principal what I wanted to achieve was to keep the linkage components parallel and perpendicular when in neutral. This would make any linear displacement due to the rotational movement symmetrical and as small as possible. I made an illustration to show the point. The bottom of the "L" is parallel to the input shaft, both shown with red lines. The linkage between the two (blue line) should be perpendicular to both.  I currently have a very small amount of side to side motion when shifting between 1st and 2nd. Not measurable but I can feel it. Would be nice if I could not (IMG:style_emoticons/default/rolleyes.gif) Looking at it in this picture it seems like I have an adjustment to make, or maybe it is the angle of the picture. Keep tweaking until it is perfect! Cheers, Scott Scott and Zipedadoo, I did my own linkage. At first, I didn't feel a big improvement from the 901. (bad) I never had a problem with the lever moving from side to side as I moved from 1st to 2nd. The way I did my linkage the pusher is aligned as close to the trans shaft as possible so it has little influence on the rotating linkage and visa-verse. Yours is different. My rotating linkage is farther out from the shaft. The drop link limits what you would feel from the push pull influencing movement on the bell crank. My problem was in the side to side shifter movement maxing out, not moving the rear linkage enough to clearly get into gear. The way I fixed that was to move the cable end pivot point on the vertical (long leg) of the bell crank down. New location not shown in this photo. This gave me more leverage and it feels much better. I have moved my pivot point up and down the shift lever so yours will be different. You have some extra holes in the bell crank, give them a try. I also made an adjustable gate for the shifter so I don't push or pull too far in order to find 1st, 2nd, 5th & R. It works great now. Attached image(s) 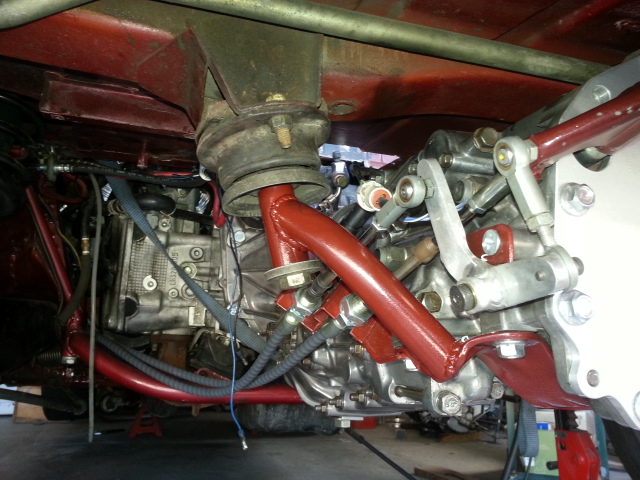
|
| Amenson |
 Feb 6 2016, 12:11 PM Feb 6 2016, 12:11 PM
Post
#510
|
|
That's opposite lock!!    Group: Members Posts: 645 Joined: 27-May 05 From: Dublin, OH Member No.: 4,154 Region Association: None 
|
I had a request to update the thread and I am just sitting in the Phoenix airport waiting for my connection to Reno on my way to Squaw Valley so why not.
Porsti spent the summer on daily driver duty. Only problem was a the rear IC mount kept cracking. 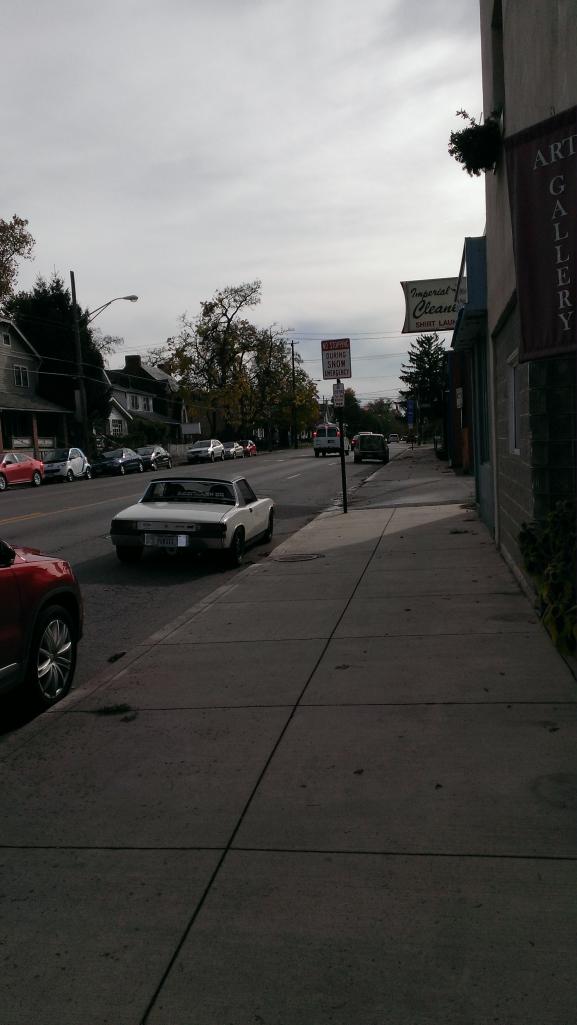 It is currently resting through the winter sharing the garage with its half sister that made it's way back after being in storage in WI for 13 years. 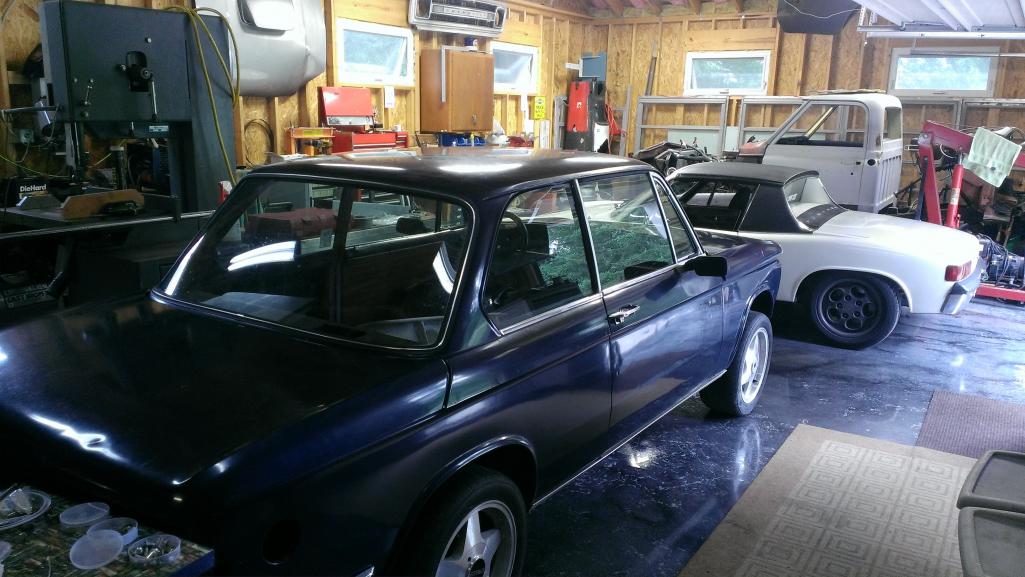 I have a list of to-dos that I will start in a few weeks. Cheers Scott |
| Amenson |
 Mar 19 2016, 09:11 PM Mar 19 2016, 09:11 PM
Post
#511
|
|
That's opposite lock!!    Group: Members Posts: 645 Joined: 27-May 05 From: Dublin, OH Member No.: 4,154 Region Association: None 
|
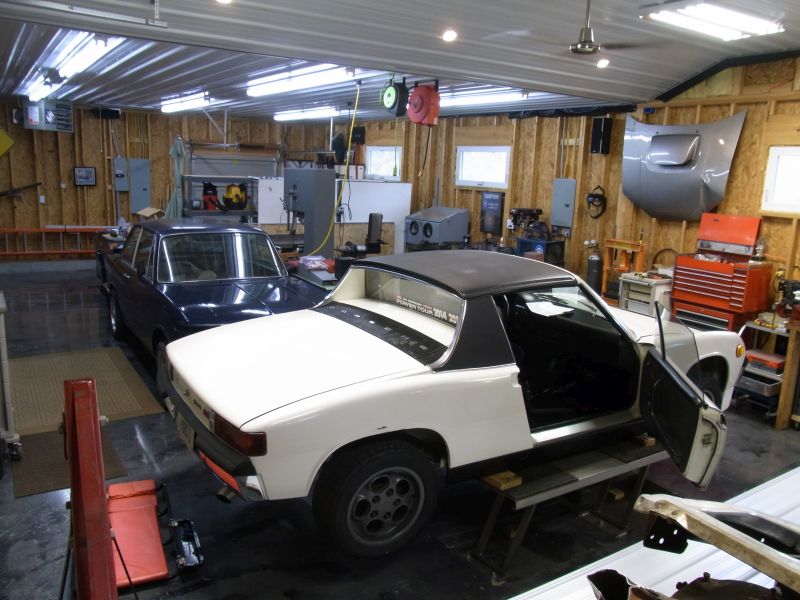
After spending most of the winter wiring, plumbing, insulating, vapor barriering, and metal ceilinging it is time to actually work on the car. It is so nice to have a garage that can be heated to high 50's with the heater only running sporadically.
 Part of the push to finish the ceiling was my 40th birthday party. We normally have a Chili Cook-off party around my birthday but with this year being a bit special my wife organized some birthday activities also. We had almost 50 people at the house! Super awesome cake. 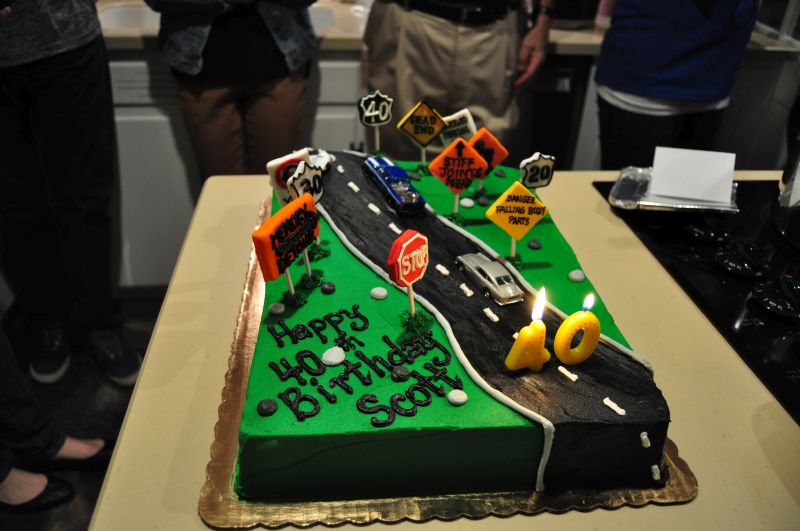 One thing lead to another and a birthday burnout happened. 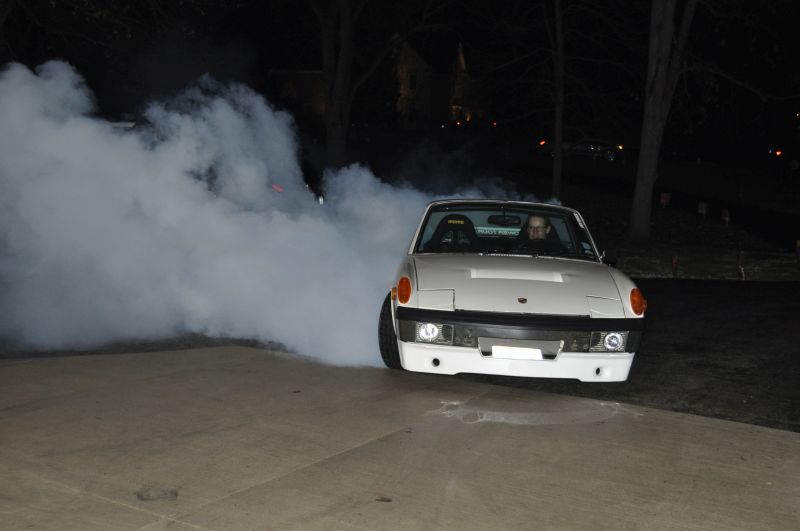 On with progress. Finding the ideal routing of the wiring harness has been a ongoing irritation. I had run the rear part of the harness through a hole between the seats and it always bothered me. I figured out a way that I could reroute the wires through the center tunnel. There was also a bundle of wires going to the engine that were too long but I could never find the correct terminals to the ecu plugs to shorten them. 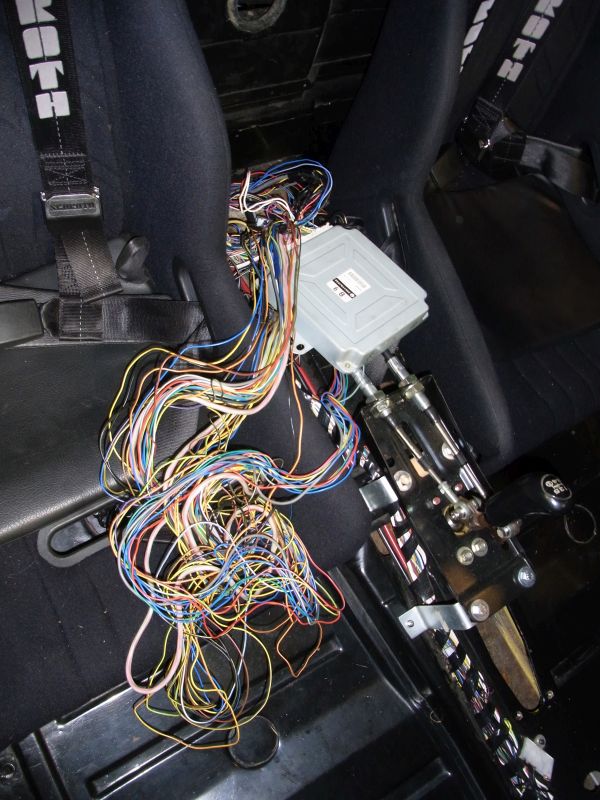 I found them. After about 5 hours sitting in the passenger foot-well the hernia of wires is gone. 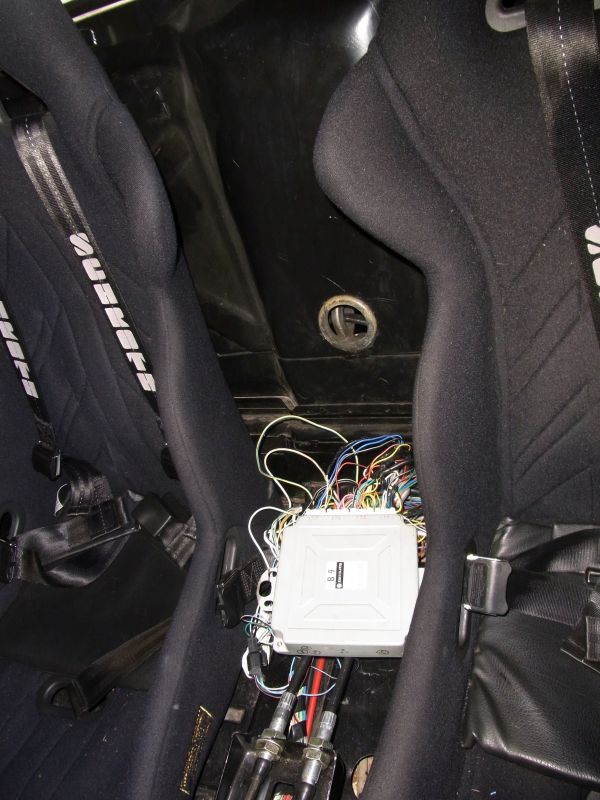 Extras...and it still runs! 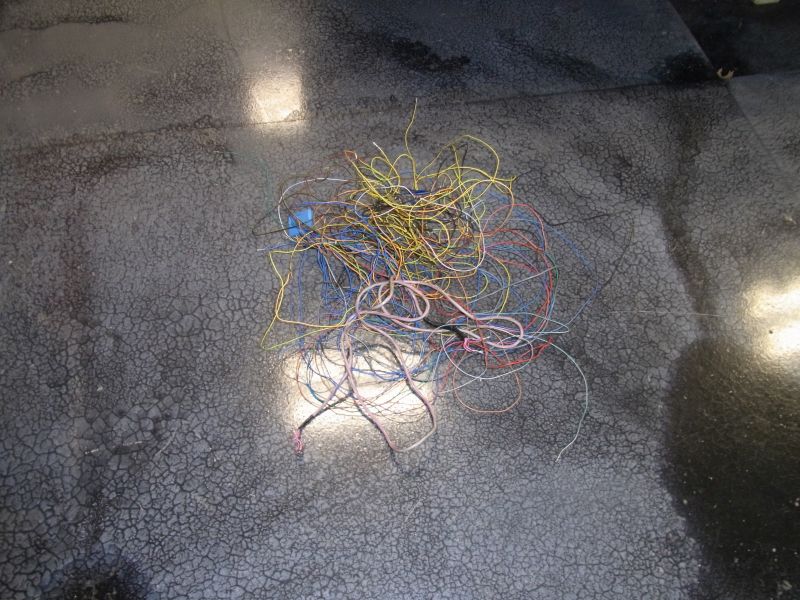 Tomorrow I need to re-wrap the entire back half of the harness. Cheers, Scott |
| 914forme |
 Mar 20 2016, 06:15 AM Mar 20 2016, 06:15 AM
Post
#512
|
|
Times a wastin', get wrenchin'!     Group: Members Posts: 3,896 Joined: 24-July 04 From: Dayton, Ohio Member No.: 2,388 Region Association: None 
|
(IMG:style_emoticons/default/sad.gif) Sorry I missed the epic burnout, seriously bummed.
Garage looks great, being semi warm makes a huge difference. |
| 914forme |
 Apr 24 2016, 11:34 AM Apr 24 2016, 11:34 AM
Post
#513
|
|
Times a wastin', get wrenchin'!     Group: Members Posts: 3,896 Joined: 24-July 04 From: Dayton, Ohio Member No.: 2,388 Region Association: None 
|
Stopped by Scott's place on my way to Hersey. I had a decent time at Hersey, I had a great time with Scott. We have a 2014 Subaru STI in our stables. That car is fast, Scott's PORSTI is faster if he can keep it hooked up. Amazing what a difference a couple thousand pounds and no AWD makes to a car. (IMG:style_emoticons/default/happy11.gif) This car is driven, it is raw, and a blast, and the workmanship is so nice.
Thank you for the ride, hope you enjoy the refreshments. Maybe next year at Hersey we both can be in attendance with some serious Subaru powered 914s. |
| Amenson |
 May 11 2016, 08:45 PM May 11 2016, 08:45 PM
Post
#514
|
|
That's opposite lock!!    Group: Members Posts: 645 Joined: 27-May 05 From: Dublin, OH Member No.: 4,154 Region Association: None 
|
I have had a nagging leak from the fabricated top of the coolant expansion tank. The weld neck just did not seem to work well with the stock cap. I cut it off and installed a standard size neck and cap. I managed to leave a pinhole when installing the new neck. No problem, pull off the cover and fix the weld. After coming apart so many times the big o-ring in the stock expansion tank tore. A quick trip to the Subaru dealership revealed that the seal is no longer available.
Time for another solution. I searched online and found two fabricated expansion tanks. The Mishimoto looked like the cap might just be in the correct location so I ordered one. 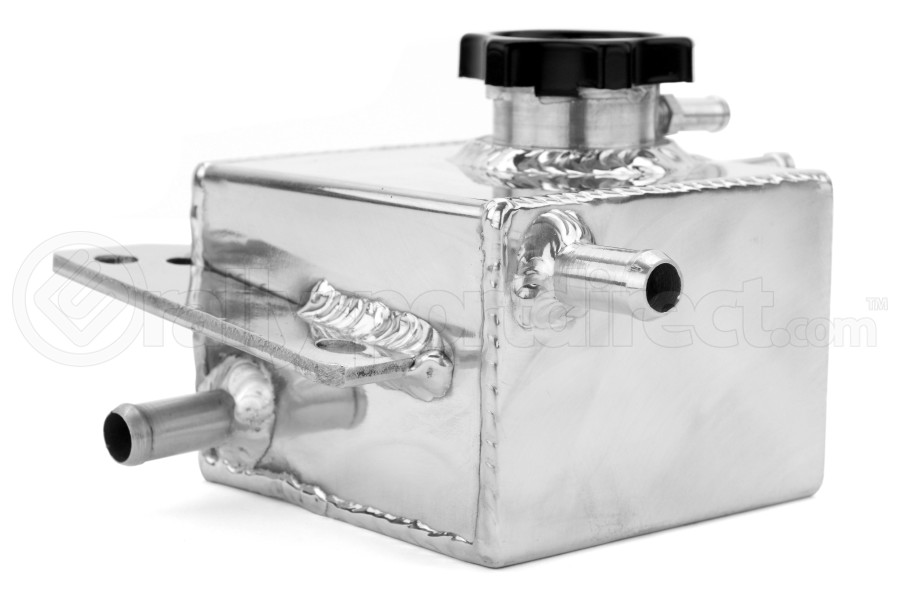 Nope filler neck was in the way. Surgically removed the filler neck and extra barb and installed another standard size neck. Oh, and added a bottom mount like the stock tank. No idea why Mishimoto decided that it was not necessary. Much more solid with it. 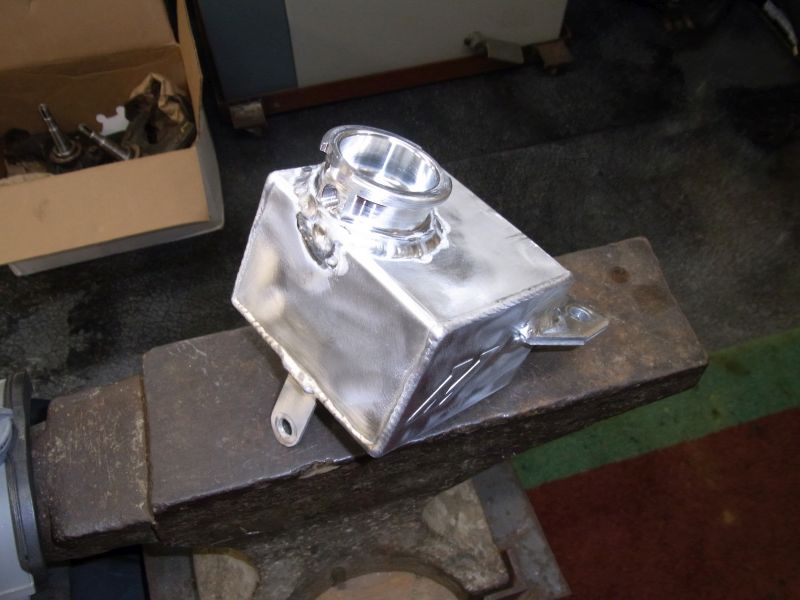 It fits and is leak free! 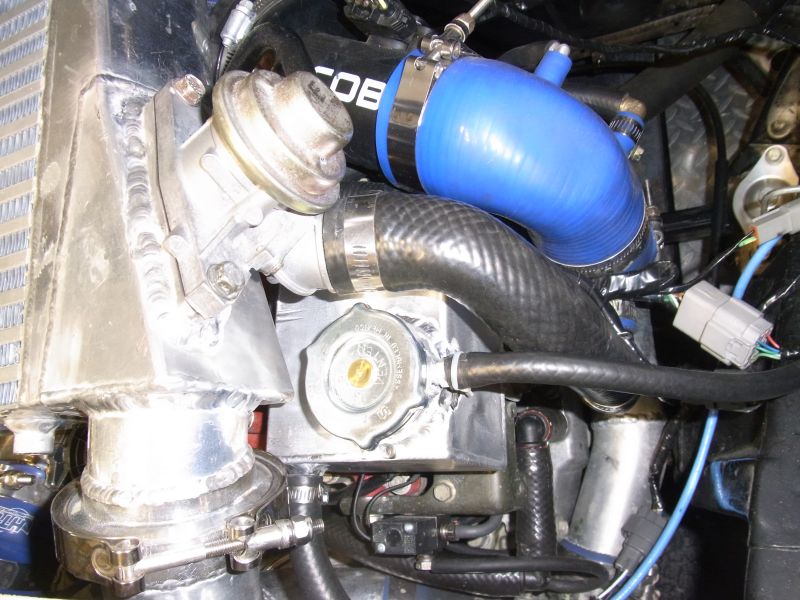 Next project is to make a new rear IC mount. Then pull the passenger trailing arm to confirm that it is bent. Anybody have a spare trailing arm that they want out of the garage? Cheers, Scott |
| 914forme |
 May 14 2016, 04:59 PM May 14 2016, 04:59 PM
Post
#515
|
|
Times a wastin', get wrenchin'!     Group: Members Posts: 3,896 Joined: 24-July 04 From: Dayton, Ohio Member No.: 2,388 Region Association: None 
|
Maybe, I have an e-mail out for you
|
| Amenson |
 Jun 27 2016, 08:20 PM Jun 27 2016, 08:20 PM
Post
#516
|
|
That's opposite lock!!    Group: Members Posts: 645 Joined: 27-May 05 From: Dublin, OH Member No.: 4,154 Region Association: None 
|
Getting ready to post about converting to 911 park brake and new rear calipers when I realized that I never posted one of my favorite parts on the car.
I probably complained several times about my IC mount cracking. I have fixed it 3-4 times and finally got fed up. Time to make a proper tubular mount. I purchased a really nice tube notcher for when I build a cage and figured that it would make quick work of all of the tube for the IC mount...nope, tube is too small. Had to resort to the band saw and hand file. Good welding starts with good fitup (IMG:style_emoticons/default/sawzall-smiley.gif) Many hours later and it is finished. Out with the old... 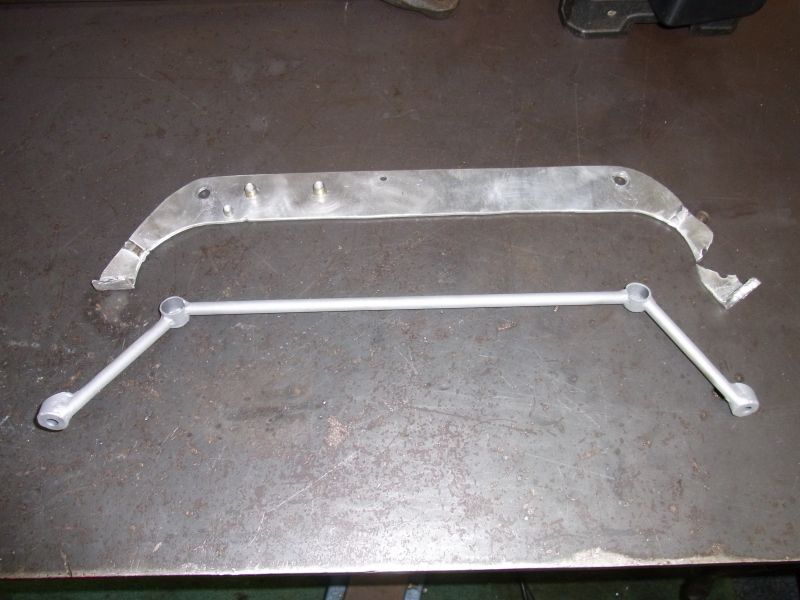 Purty 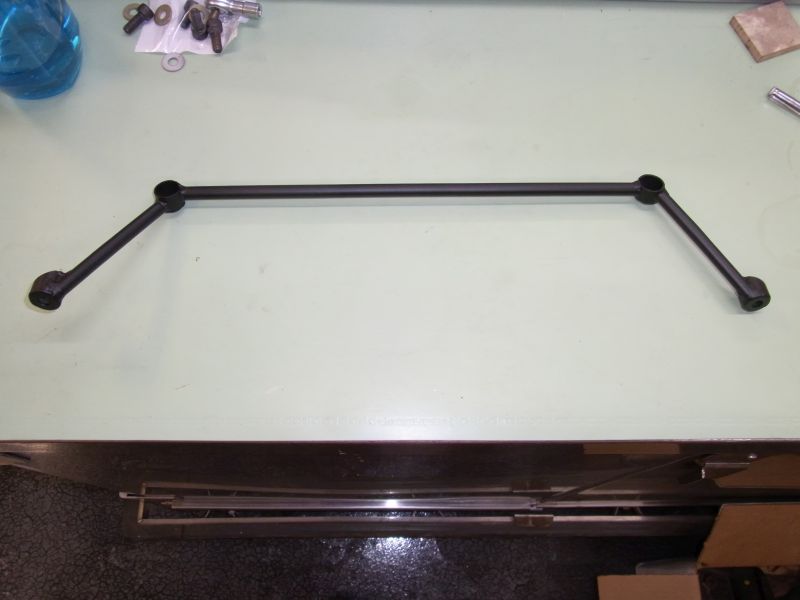 I was very careful tacking it before welding to avoid pulling it out of position and it worked. The thing drops right into place and all 4 bolts go in with out even needing a wiggle. 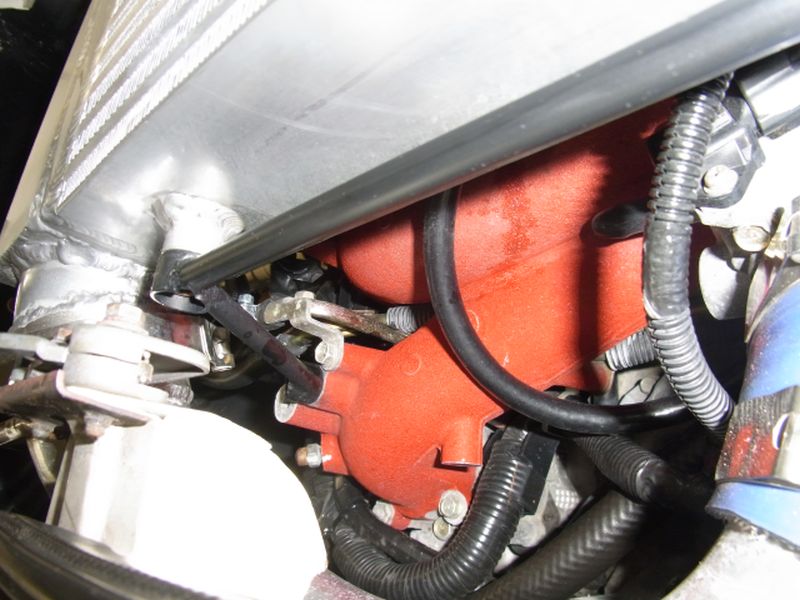 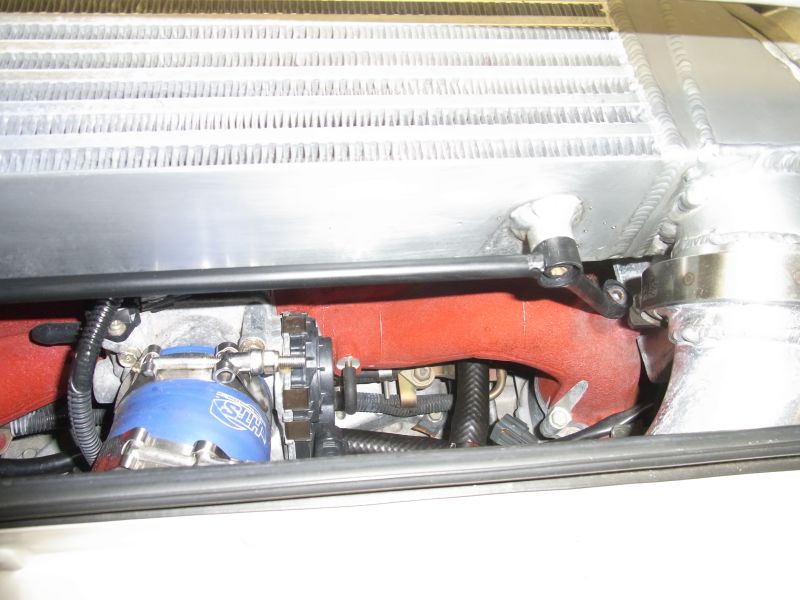 Took hours to make but man am I pleased with it. On with the current project... |
| Amenson |
 Jun 27 2016, 08:36 PM Jun 27 2016, 08:36 PM
Post
#517
|
|
That's opposite lock!!    Group: Members Posts: 645 Joined: 27-May 05 From: Dublin, OH Member No.: 4,154 Region Association: None 
|
Stephen ended up hooking me up with his old trailing arms, calipers and rotors..including the Elephant Bushings (IMG:style_emoticons/default/beerchug.gif) . I picked up an "early 70's" 911 drum brake setup and Tangerine conversion cable. Time to starting grinding and welding.
I have always been a little slow when laying down tig welds in odd positions which result in solid but slightly hot welds that grey a bit when cooling. Made a conscious effort to keep up the pace this time and the welds are nice and shiny. If I was better with the camera a little bit of color in the welds would show...boo-ya. 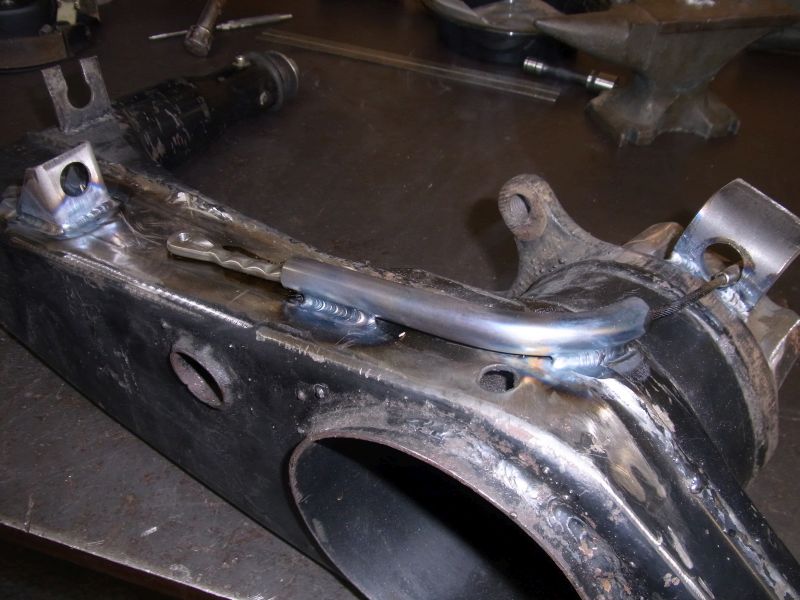 The park brake setup is not quite early enough so it is the big bearing setup that requires slotting the holes to make it fit. I also noticed when I put the rotor in place the pads are not completely up in the rotor. I noticed in pictures using the proper park brake parts there is a decent size gap between the caliper ear and the park brake. Not so much here. 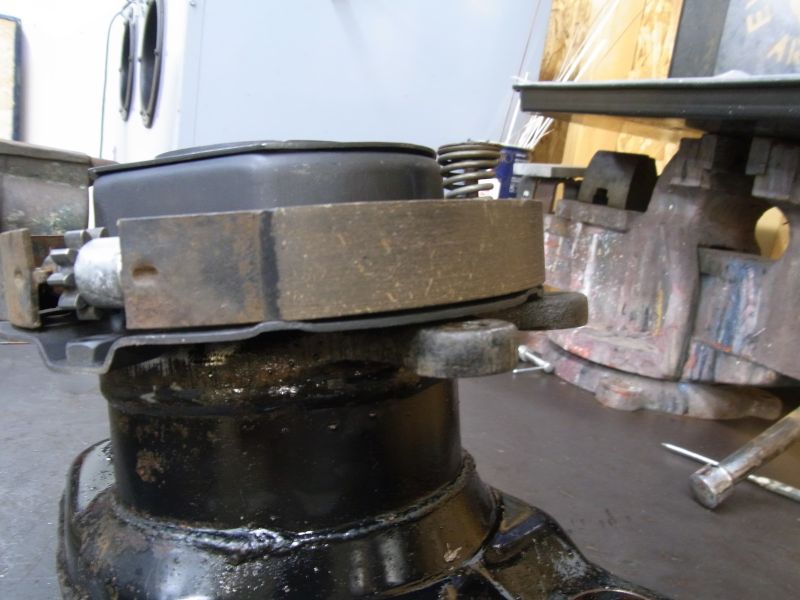 I know it probably does not matter but I am thinking about spacing the park brake to get it deeper into the rotor. I have tangerine bearing retainers that are 3/16" thick...almost perfect thickness if I fit it under the park brake. Has anybody tried this? I could not figure out how to support the parts for painting, much too heavy to hold and spray. While thinking about the quickest way to fab up a rack I noticed the engine hoist hiding in the corner. Perfect!! 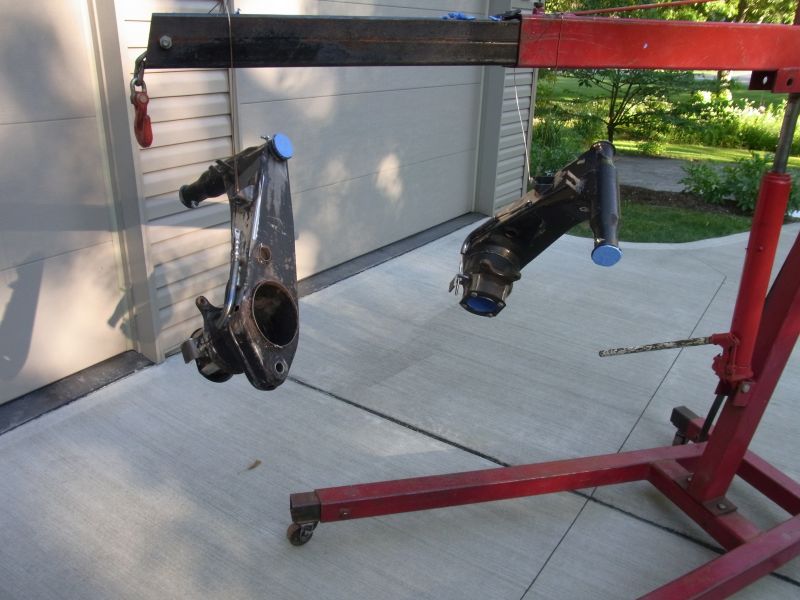 I was in too much of a hurry to get over to the neighbors house for a beer so i forgot to take a post painting picture but man does a fresh coat of matte black make everything look better. Should have them installed later this week. Cheers, Scott |
| 914forme |
 Jun 28 2016, 10:49 AM Jun 28 2016, 10:49 AM
Post
#518
|
|
Times a wastin', get wrenchin'!     Group: Members Posts: 3,896 Joined: 24-July 04 From: Dayton, Ohio Member No.: 2,388 Region Association: None 
|
Sounds like a plan to me. It should work. The other idea I ha was mount it up at a 90 and section it and weld it back together. More practice for your TIG skills.
I puled the trigger on a TIG this weekend, as I think it will help out with body mods, keeping the heat down should allow me to not have to grind so much. I can also use EZ grind wire, and make it easier to hammer weld. My MIG does not like to feed the EZgrind well. Balls up in the feed, right infant of the rollers. Looking good as usual. Enjoy the (IMG:style_emoticons/default/beer3.gif) |
| charliew |
 Jun 29 2016, 10:45 AM Jun 29 2016, 10:45 AM
Post
#519
|
|
Advanced Member     Group: Members Posts: 2,363 Joined: 31-July 07 From: Crawford, TX. Member No.: 7,958 |
Scott as you know I've been following you from the start. I really like the power tour parts as I have always wanted to take a project on one but it will never happen for me. Life has caught up with me.
Once I had a good grasp of the 911 park brake set up as that was my intended setup. I have all the parts but that was as far as I got. There are several good 911/914 parking brake threads from a few years ago. If you don't like the way yours works try to find the thread here or on narp that uses 944 angle adjusters and I think I remember a 90* pivoting arm with a short straight rod connecting link to the 914 cable. My memory is not as good as the threads if you can find them. I wonder if the ic shrinking and growing is not what breaks the mount? 914forme, have you put the little oilwick on the wire infront of the feedwheels on your welder? I have always used one but have not tried the soft wire as the local places don't stock it but if I ever get back on this I will order some as that always was my iintention to put the flares on if my tigging was not up to snuff. Scott you are becoming very good on your welding I think. I do wonder if your short dipstick tube will not leak at the oring as it looks like it is close to the oil level in the pan. My son has had the mann provent for several years on his sti. We found that the original oring will grow a huge amount and will not go back in if you take it apart to clean it. It as you know is a diesel part and the oring needs to be a different one for some reason, they can be found as thats what we did, don't take it apart till you get one. That has been discussed a lot I think on nasioc. I know the provent does work very good but the longer the hoses are and the higher the provent is the better it works on the suby. Also we put the return below the oil level to try and keep the pressure in the return lower if I remember right. I'm 71 now so things get lost a little. Also If you check your sti you will see the motor is up in the front but that may not be a big deal but might affect the oil supply in the pan. I think you have done a very good job and the street testing have been very valuable. I really like the cable diagnosis on the motion and the changes to the arms for your Ian stuff and the discussion from both you and ruby914 in one place on this thread. A 5 spd fiero has a simple mech but it is backwards for the mid engine application I think, I remember. |
| Amenson |
 Jul 4 2016, 08:14 AM Jul 4 2016, 08:14 AM
Post
#520
|
|
That's opposite lock!!    Group: Members Posts: 645 Joined: 27-May 05 From: Dublin, OH Member No.: 4,154 Region Association: None 
|
The upgrade is finished and while it took much longer than anticipated everyting about it is a resounding success. 911 Park Brake works perfectly and even has a shorter pull than stock so it clears my seat better. Pedal feel with the larger rear piston area is really nice. The Elephant bushings are actually noticable as the rear end sets much earlier during transition.
The post would not be complete without pic's so here we go... Stephen provided his modified trailing arm brackets with the arms but I could not bring myself to use them because I did not make them, but I did basically copy them. I didn't relocate the pivot shaft hole and now after getting it back together wish that I had. 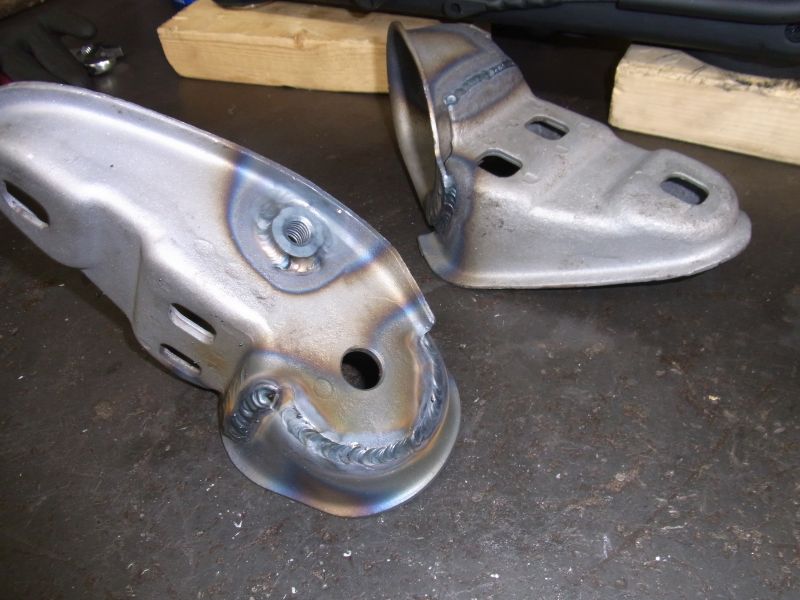 I ended up installing the Tangerine bearing retainers under the park brake assembly. 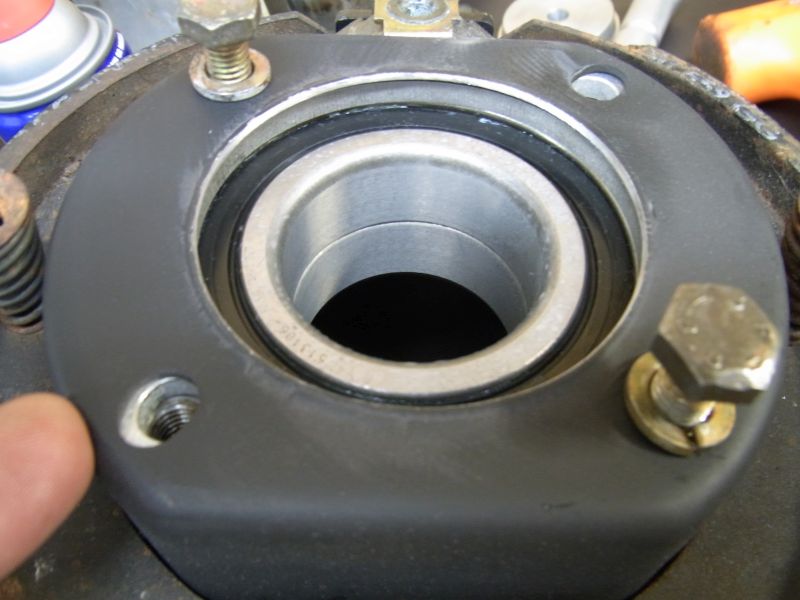 The lip needed to be ground off of the park brake to avoid hitting the Boxster hub. 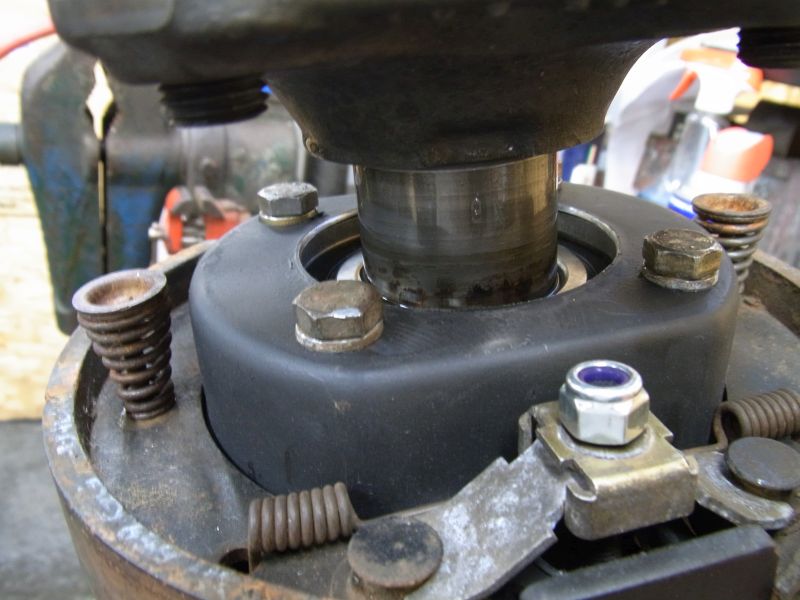 Everything together and no interference! 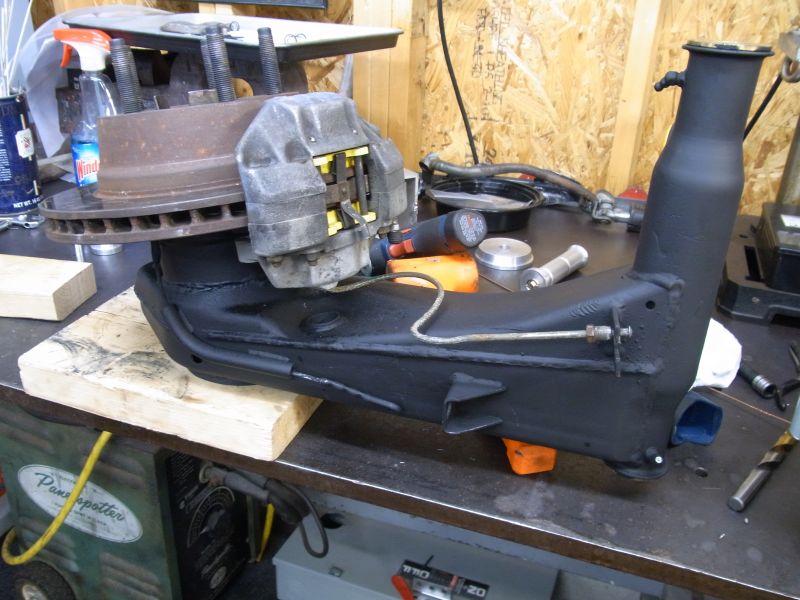 I think that it goes in here. 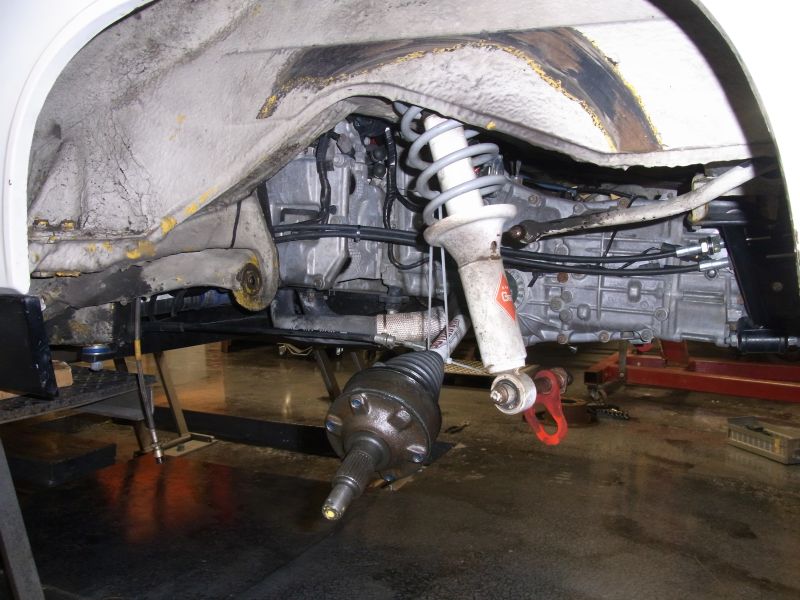 Every time I have the car on the lift I can not help but take a picture like this. 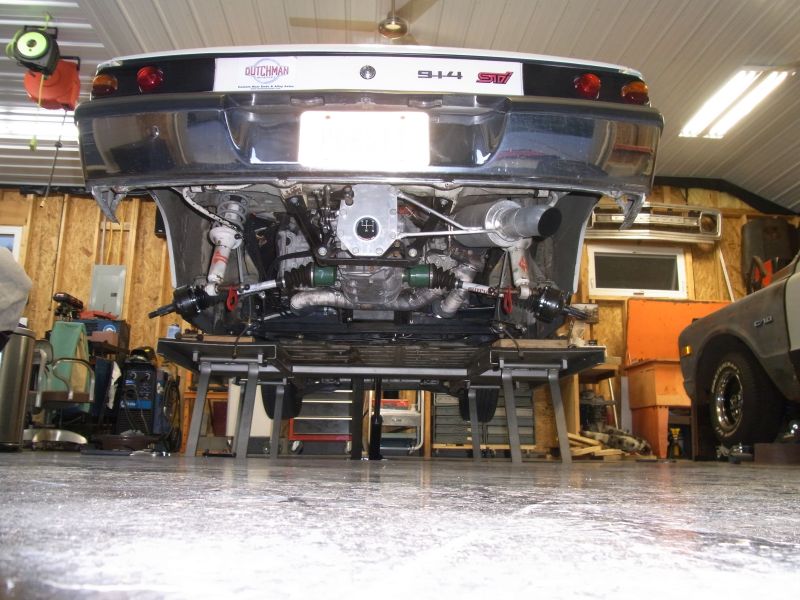 Installed! 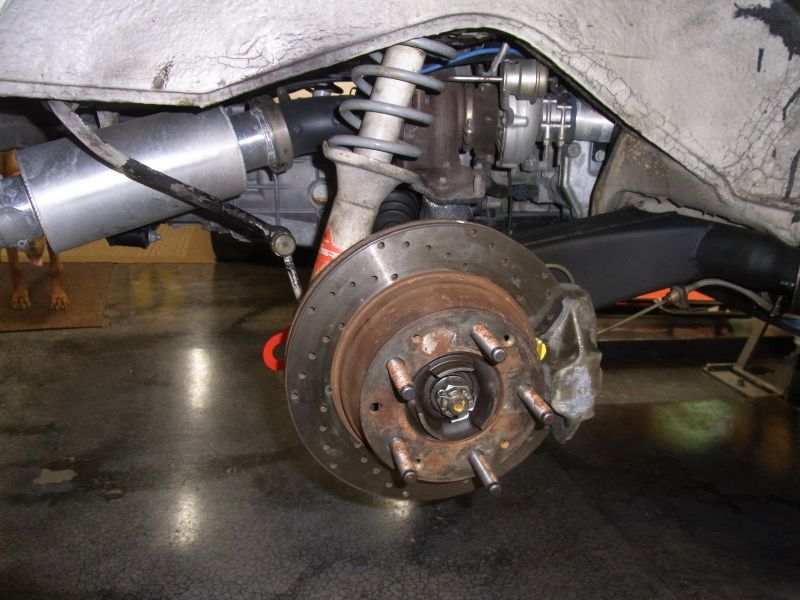 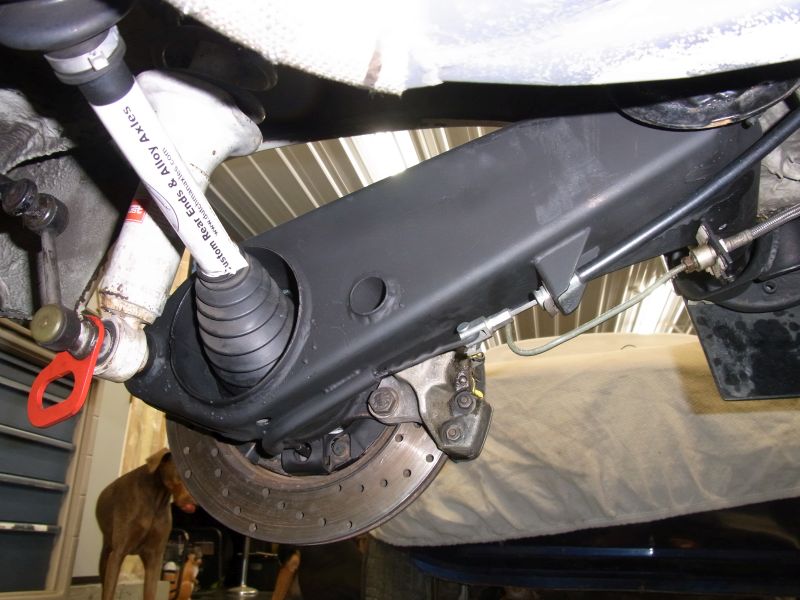 You can see in this picture that the shoes are flush with the back side of the drum. 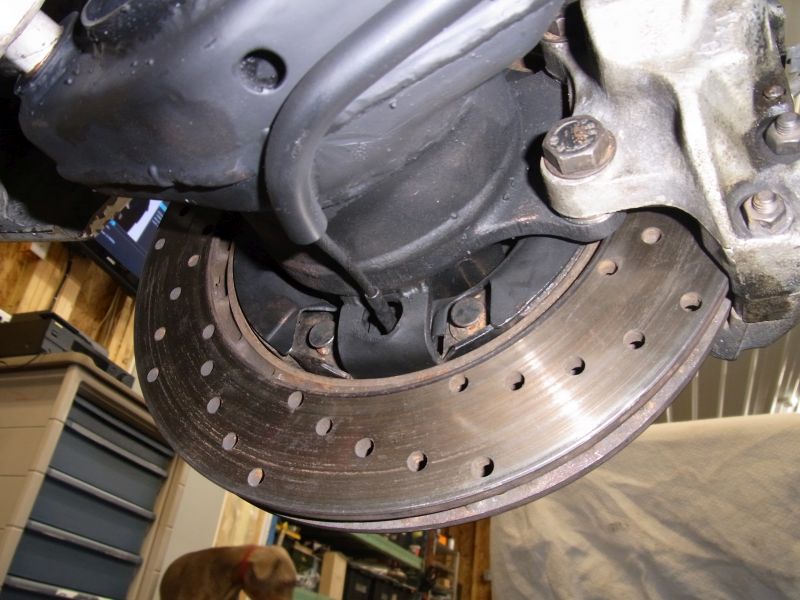 Cheers, Scott |
  |
1 User(s) are reading this topic (1 Guests and 0 Anonymous Users)
0 Members:

|
Lo-Fi Version | Time is now: 24th November 2024 - 11:30 AM |
Invision Power Board
v9.1.4 © 2024 IPS, Inc.


