|
|

|
Porsche, and the Porsche crest are registered trademarks of Dr. Ing. h.c. F. Porsche AG.
This site is not affiliated with Porsche in any way. Its only purpose is to provide an online forum for car enthusiasts. All other trademarks are property of their respective owners. |
|
|
| strawman |
 Apr 18 2008, 12:19 AM Apr 18 2008, 12:19 AM
Post
#1
|
|
Senior Member    Group: Members Posts: 888 Joined: 25-January 08 From: Los Osos, CA Member No.: 8,624 Region Association: Central California 
|
Hi All --
This is my second post, but I've been lurking on this fine website for a while now. I've wanted a 914 since I was in high school, but always seemed to stumble upon other projects... until recently. My neighbor gave me this 1973 Porsche 914 about a month ago. He told me he blew a head gasket and parked it in his parents' driveway in 1992. When his parents finally told him to move it or they were calling a local junkyard, he offered it to me since he knows I'm a gearhead. In for a penny, in for a pound... I hauled it home, knowing that it has some rust issues in the battery area and rear trunk. But it appears to have never been in a wreck and it is complete. It turns out that an exhaust stud pulled, so he coulda fixed it for a couple hundred and probably kept another 914 from languishing but I guess all things happen for a reason (namely, so I would undertake this project!). I sold the engine to a local Craigslister for use in his Meyers Manx dune buggy, and bought a wrecked but running 1993 Subaru Legacy turbo wagon. This is the closed-deck 2.2 liter engine, and 250 hp is easy with boost control and an open exhaust. I've already done a Subaru into a VW Vanagon and my daily driver is a 1992 Suby Legacy, so this won't be too much of a stretch for me. I plan to use the Suby 5-speed transmission (out of a 1998 Suby Forester) with the Aussie-sourced RWD elimination coupler and custom-mated 914/Suby axles. I've got a suburban home with a crowded two-car garage (my 125 shifter kart and my daughter's FJA kart will likely get lonely!), a MIG welder, and a wide assortment of air/power/hand tools -- so the adventure begins! This project will likely take a year to finish, so please be patient. I've attached some pics of the car as found in the driveway, some rust areas and the rear trunk repairs I've started. I'll chronicle the build as I go, so feel free to chime in! Geoff Attached image(s) 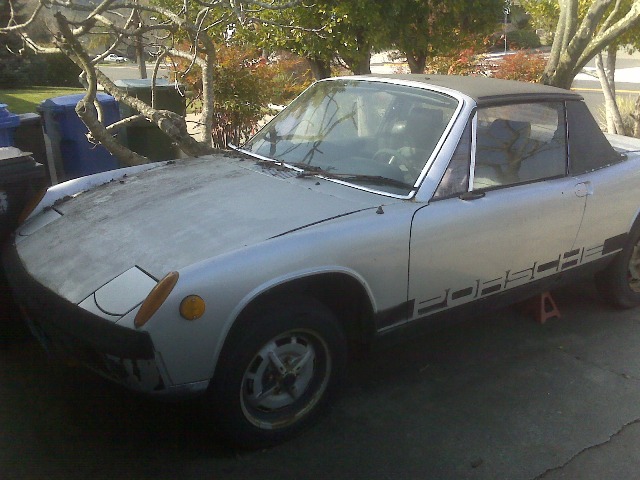 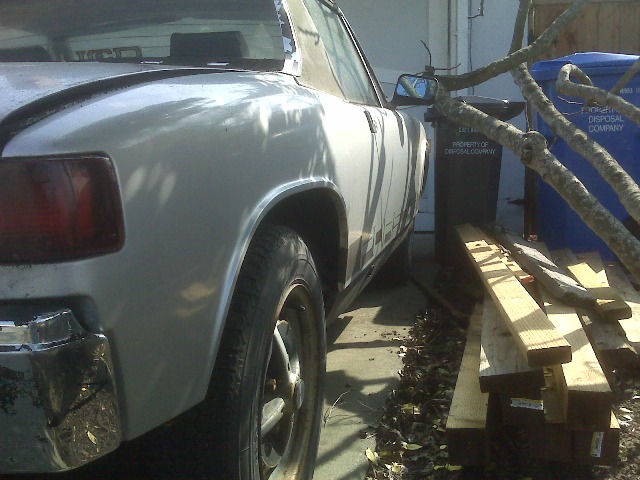 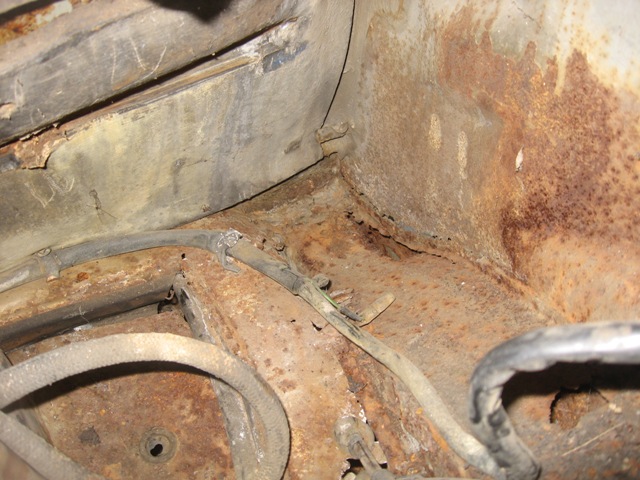
|
  |
Replies(100 - 119)
| strawman |
 Nov 1 2009, 11:33 PM Nov 1 2009, 11:33 PM
Post
#101
|
|
Senior Member    Group: Members Posts: 888 Joined: 25-January 08 From: Los Osos, CA Member No.: 8,624 Region Association: Central California 
|
I finished up the epoxy primer and painting of the rear suspension parts, pedal assembly and various other parts. I also rebuilt the pedal assembly, using bronze bushings. That gave me the opportunity to start mocking up the Subaru clutch master cylinder. Below are some pics of that effort.
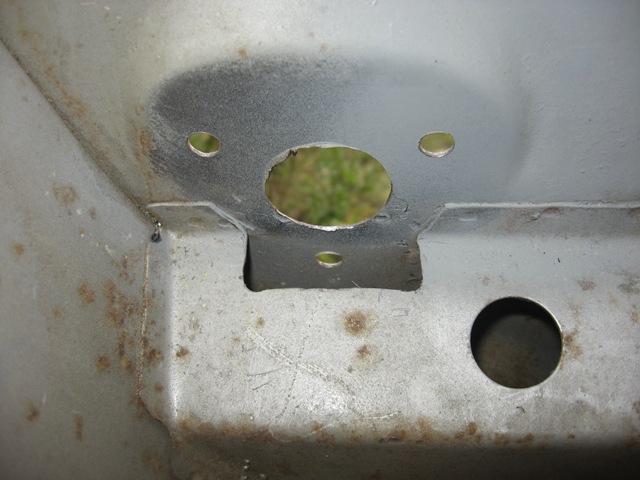
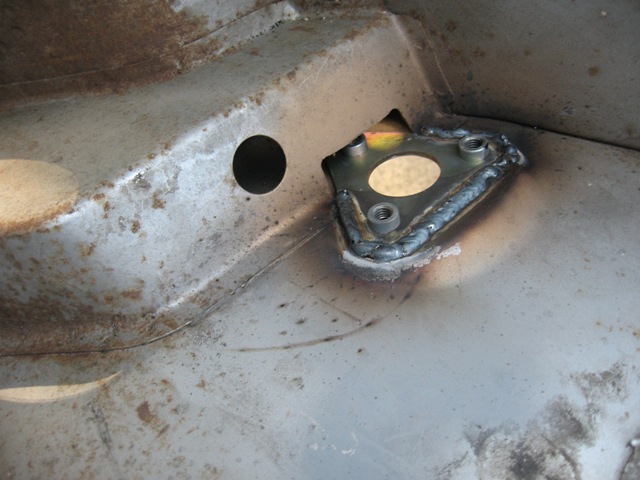
I ended up cutting the "face" of the mount from 1/4" steel and the "box" out of 1.5" by 0.090" wall box tubing. I still have to finalize the extended Subaru clutch master cylinder push rod, which will work using the stock 914 clutch cable "ear" -- only it will push toward the front of the car instead of pulling the cable from the rear... hard to explain, but I'll post some pics later after I finalize everything. Of particular note is that anyone considering this mod -- either for a Suby conversion or as a mod to their 901-equipped car -- is the need to provide space for the hydraulic brake line entrance into the tunnel. Note the hole right next to & above the mount. You'll also have to offset the clutch master cylinder push rod slightly toward the passenger side of the car to avoid the throttle bell-crank. 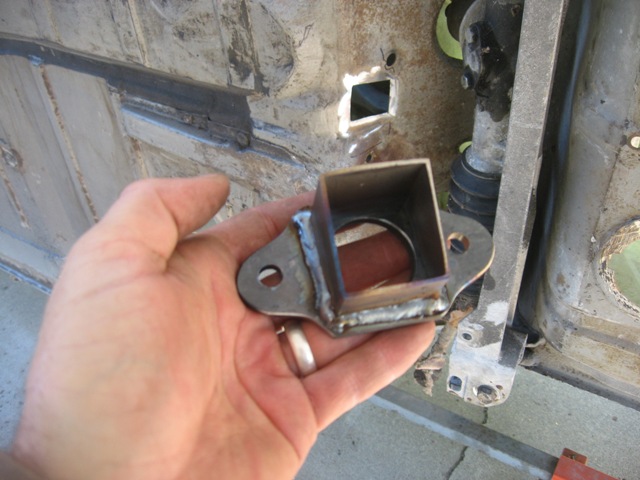 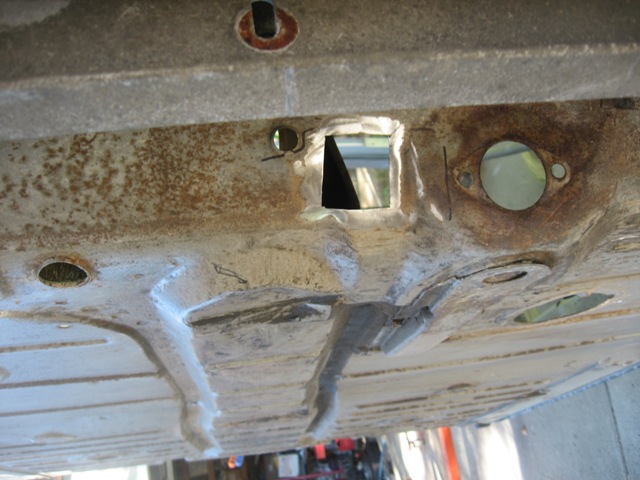 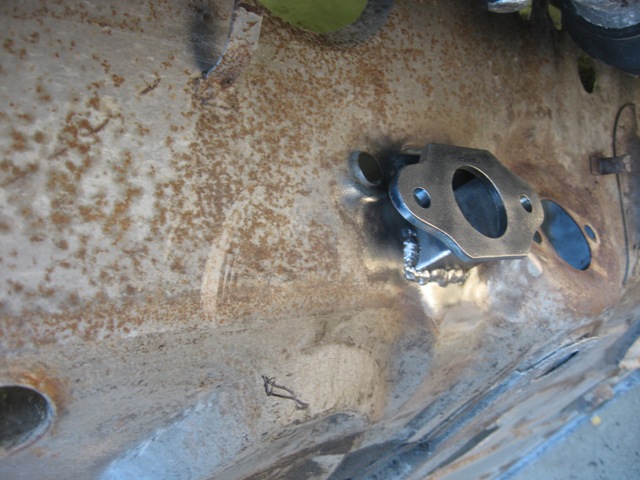 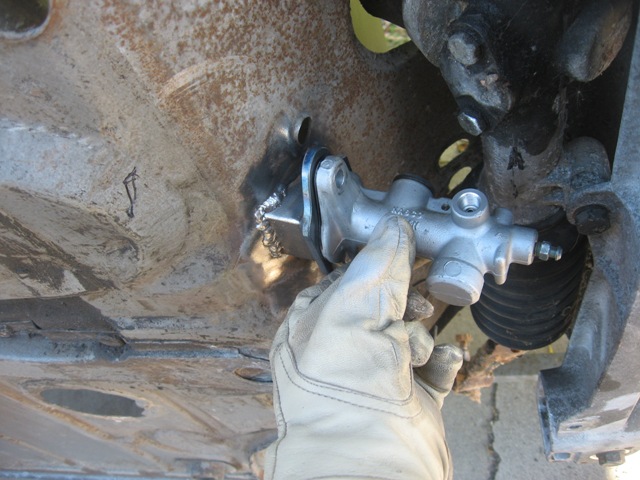 Since I need to cut the rear firewall for clearance of the turbo/downpipe, clutch slave cylinder and starter solenoid, I decided to install a 1"x2"x0.090" wall tube brace between the two rear shock towers. I plan to box in the cross-brace down to the rear trunk floor and forward to the rear firewall using 18 gauge sheetmetal to cover the above-mentioned components. Below is a pic of the passenger side gusset that I was able to start tonight before it got too dark. I'll post pics as get a chance to finish up that work. 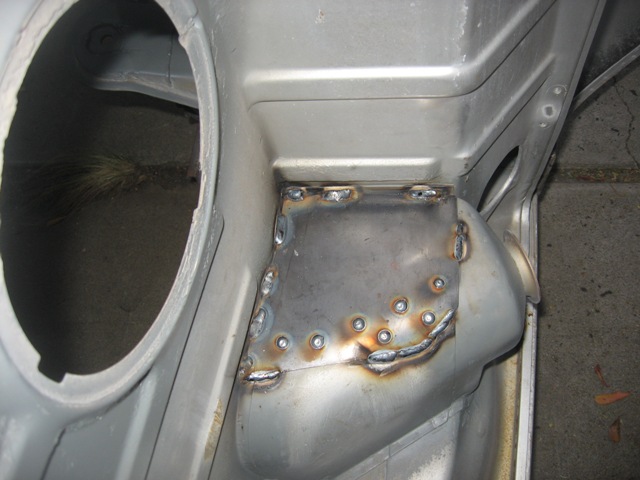 Got a really nice visit from Al and Harvey Weidman yesterday. These guys are the real deal -- extremely friendly, very knowledgeable and willing to share their experience. Al's 1975 914 is a peach, and Harvey's 1973 911 is uber-cool. I was also able to unload a trunkful of early 911 and some unneeded 914 parts, which freed up some valuable space is my disaster of a garage! Geoff |
| strawman |
 Nov 8 2009, 10:33 PM Nov 8 2009, 10:33 PM
Post
#102
|
|
Senior Member    Group: Members Posts: 888 Joined: 25-January 08 From: Los Osos, CA Member No.: 8,624 Region Association: Central California 
|
Just finished welding in a 1"x2" tube between the two rear shock wells, cut out the area needed for turbo/starter/clutch slave cylinder, made a box and welded it in. Of course, those are Cliff's Notes, as this effort took about 10 hours of shop time... (IMG:style_emoticons/default/sawzall-smiley.gif) (IMG:style_emoticons/default/welder.gif)
The rectangular tube is 0.90" wall, which -- along with the gusset plates -- should help shore up the rear end of car. I had the engine/trans up in the car twice this weekend to make sure I made a "clearance box" big enough to clear all components, and I had to be very careful with the cuts to the vertical double-wall section of the rear firewall lined up with the bottom of the horizontal rectangular tube. In short, I ate/breathed/snorted a lot of grinding and body-saw dust these past two weekends! (IMG:style_emoticons/default/barf.gif) The first two pics are of the cut-out area. Before welding everything up, I ground off the paint, cleaned everything with acetone, Metal Ready-ed everything (shown in the third pic), dried everything with air and/or heat gun, used Sem Weld-Thru Primer on all mating surfaces, and test-fit everything countless times. 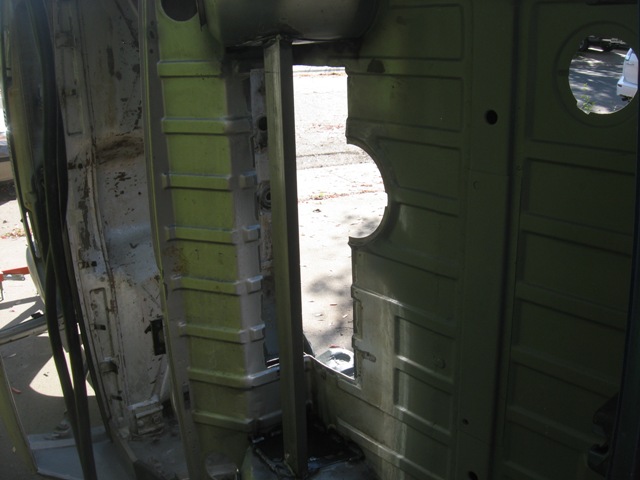 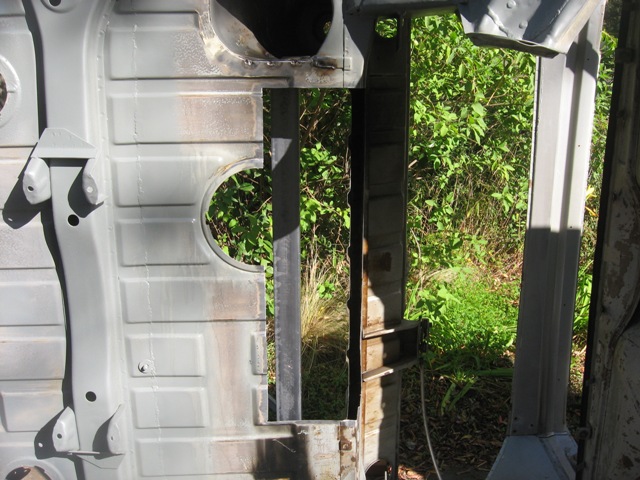 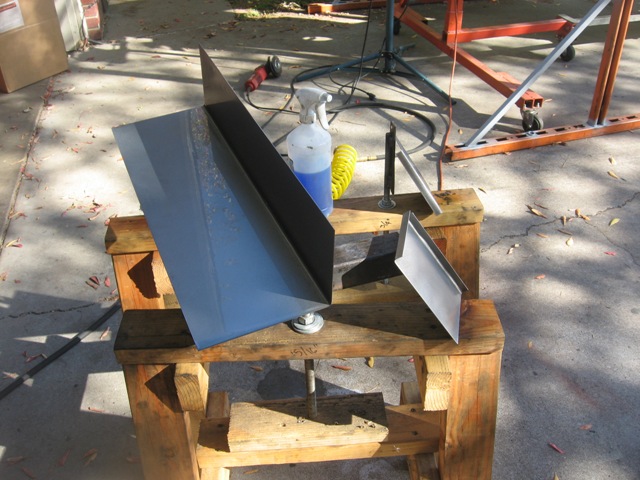 I cut the 18 gauge sheetmetal on a friend's shear, and bent all three pieces on his sheetmetal brake. Niiiiice! I then used his spot welder to mate the end caps to the main piece. I drilled out holes to rosette weld it to the underside of the horizontal tube. I didn't take any pictures of the box before welding it in, but below are two shots of the box from below and above. 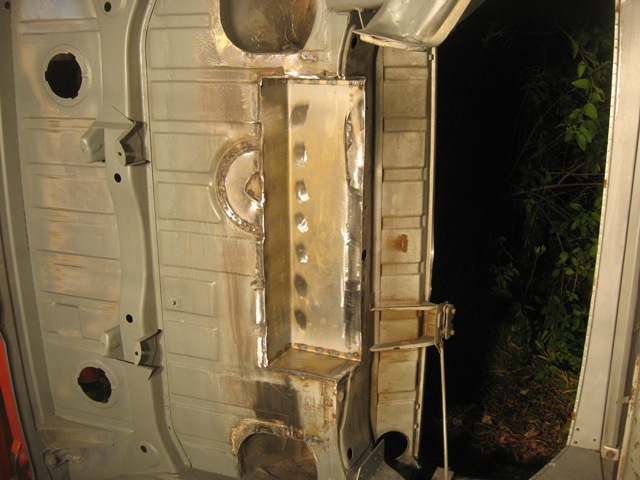 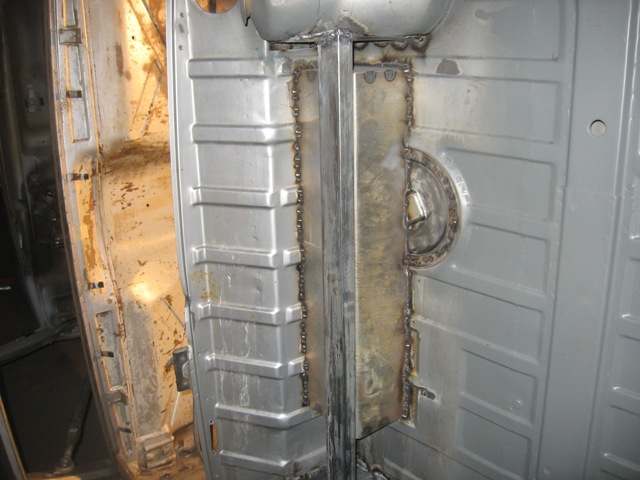 I've got Veteran's Day off, so I hope to finish cleaning up the welds on the top side, and seam weld the whole rear of the car. Then I'll weld in support bars from the horizontal bar to the top of the trans mount crossmember. Time permitting, I'll epoxy primer everything, although the forecast is for rain. (IMG:style_emoticons/default/mad.gif) Geoff |
| charliew |
 Nov 9 2009, 08:58 AM Nov 9 2009, 08:58 AM
Post
#103
|
|
Advanced Member     Group: Members Posts: 2,363 Joined: 31-July 07 From: Crawford, TX. Member No.: 7,958 |
Nice work. I really appreciate your work it is way better than just talking about it which is what I've been doing for quite awhile. You will be through and on another project before I even start probably.
My idea will be to use two tubes like the one you installed except one will be under the rear firewall and the other at the floor. Then two lips extending off of the towers with a small lip for strength following the shape of the pieces you put on the towers. Then a removable panel with nutzerts in the floor and it might be made from the parts I cut out to resemble the original floor. The bend would be where your tube is. I like the idea of being able to get to the turbo and stuff above the tranny and motor area. Also I might be able to also use the motor support (dog bone) that goes to the top of the tranny like the stock suby uses except I will use a short adjustable one. I was hoping that if I cut the firewall at the right spot and cut the spotwelds out of the motor side of the firewall and just remove it completely, that maybe I won't need to weld the spotweld holes up if I use a carbide burr instead of the spotweld cutter. The trick will be to have a nice transition that comes across and down that looks factory between the towers. Also in the process is the fixing of the joint on the towers that the inner firewall covers where the spot welds come loose at the longitudional on the sides. |
| strawman |
 Nov 9 2009, 06:56 PM Nov 9 2009, 06:56 PM
Post
#104
|
|
Senior Member    Group: Members Posts: 888 Joined: 25-January 08 From: Los Osos, CA Member No.: 8,624 Region Association: Central California 
|
... I like the idea of being able to get to the turbo and stuff above the tranny and motor area. ... Also in the process is the fixing of the joint on the towers that the inner firewall covers where the spot welds come loose at the longitudional on the sides. Hi Charlie -- Thanks for the words of encouragement. There really is a lot of space to work on the turbo with my setup -- so much so that I scrapped the idea of a removable panel. Honestly, I believe it is more important to shore up the ass-end of the teener than to provide easy access. I thought about cutting into & welding the joint near the towers/longs, but instead decided to tie the towers together with the horizontal bar, triangulate it to the trans x-member, and use the motor mount gusset plates to tie the longs to the rear firewall. Hopefully, my assumption is okay and I won't see separation later. I'll look into your idea about the top dog-bone engine mount. That would allow me to easily remove the trans with the engine in the car. Now get out into your garage and get going on your Suby-Teener project!!! Geoff |
| charliew |
 Nov 10 2009, 08:09 AM Nov 10 2009, 08:09 AM
Post
#105
|
|
Advanced Member     Group: Members Posts: 2,363 Joined: 31-July 07 From: Crawford, TX. Member No.: 7,958 |
Geoff you are right about the structural strength being better. With a removeable panel the diagonal side to side support between the towers will be less especially with the rear firewall moved so much higher between the towers. The dogbone mounts to the tranny, so to remove the motor it would hold the tranny up but not hold the motor up while removing the tranny. Course you can always support the front of the motor while the motor mounts hold the motor in place to remove the tranny. I have bought a tubing bender with several dies to make the mounts but I really wanted to build it all out of aluminum as one friend has a machine shop and the other fabs a lot of aluminum and between them they have a lot of drops or left over material. The machine shop guy has two 4x4x4 baskets of aluminum scrap from his machine shop setting out at his farm waiting for scrap prices to go up. The only problem is my tig is only a 175 amp machine and to tig 1/2 aluminum it takes more amps than that or it will be a really slow process to stay in the duty cycle of my machine. I didn't really buy it expecting to be welding heads or heavy stuff. I have tripped my machine tigging 1/4x1 aluminum strap mainly from not waiting between welds. My fab shop buddy has two 350 millers so it's no problem for him but I really want to do it myself. He probably would let me use one of his welders if I wamted to impose on him though. He's older than me and only a one man shop, I used to be his helper at times over the last 30 years.
I can't get on my 914 for working on my house, my sons house, my sons sti and my other sons 72 super beetle it seems. Course now huntings getting started heavy. |
| strawman |
 Nov 11 2009, 11:38 PM Nov 11 2009, 11:38 PM
Post
#106
|
|
Senior Member    Group: Members Posts: 888 Joined: 25-January 08 From: Los Osos, CA Member No.: 8,624 Region Association: Central California 
|
Today I finished up the rear trunk bracing, and completed some of the seam welding on the ass end of the car. I used 1"x0.065" wall round tubing, which I tied to the horizontal bar I installed last weekend and to the factory crossmember topside cover.
Below is a pic of the jig I built to cut the angles on the braces for each side, using two short pieces of scrap tubing, a piece of angle iron and two Vise-Grips to align things correctly for each side separately. The piece of white posterboard is used to trace the very acute angle onto the lower end of each brace. Does that make sense? 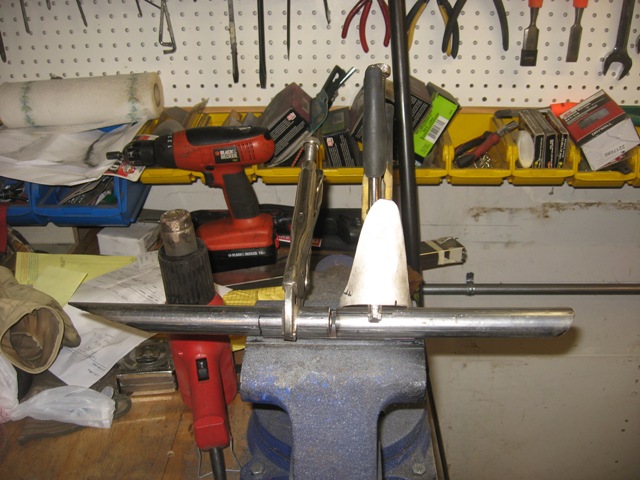 The next pic is of the two braces welded in; you can also see the seam welding to bolster the rear shock towers. I decided against welding in gussets on the topside crossmember cover after seeing how the factory doubled-up this area. 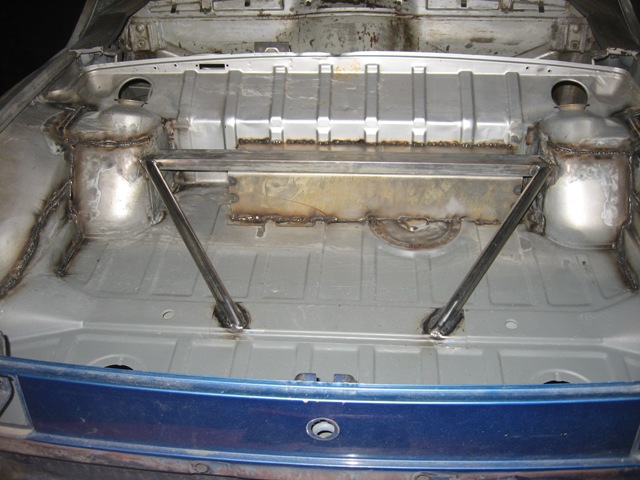 I gotta say, it is frustrating trying the weld the pinch seams along the bottom of the longs -- you just can't get the impurities out of these areas, and it is tough to get a nice weld without popping/holes. I found it best to wirewheel the seams as best as possible, use an awl to try to dig out any paint/rust/crap, and then bzzt-bzzt-bzzt small sections at a time. I'm glad I am using a rotisserie; doing it whilst laying on your back would be treacherous. 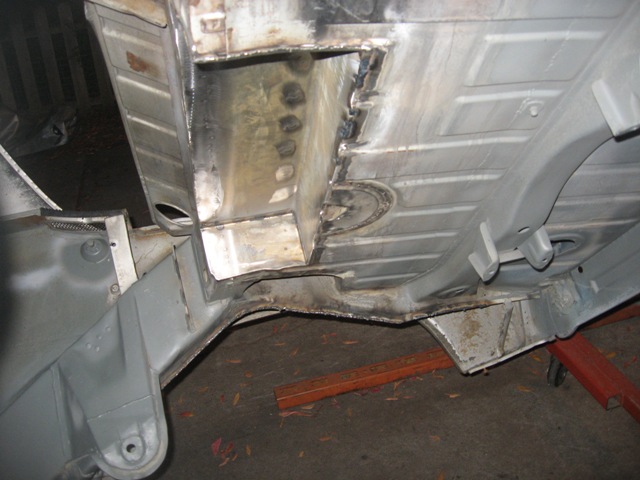 I'm gonna do some searching on the 'world tonite to see to what extent folks are seam welding the car. I gotta say I'm ready to call it good after seam-welding the area aft of the engine/cabin firewall. I wonder if it is necessary to do the car forward of that firewall, since I've already welded in the Engman long kit... anyone? anyone? Beuhler? Unfortunately, I wasn't able to epoxy primer it, since the temps started to drop and the rain is a-comin'. I hope to do that this weekend. |
| Numbchux |
 Nov 12 2009, 12:54 AM Nov 12 2009, 12:54 AM
Post
#107
|
|
Newbie  Group: Members Posts: 33 Joined: 3-September 09 From: Duluth, MN Member No.: 10,758 Region Association: Upper MidWest |
wow. very nice fabrication!
(IMG:http://www.914world.com/bbs2/uploads/post-8624-1258003109.jpg) love the bracing there! should tighten things up very well. I'm watching this build very closely, as my own suby swap is still in the planning stages. good to see what other people are doing. would you say you'd need that extra clearance just for the starter and such? I plan to use a suby transmisson, but no turbo, so wouldn't need the space for that. |
| strawman |
 Nov 12 2009, 10:42 AM Nov 12 2009, 10:42 AM
Post
#108
|
|
Senior Member    Group: Members Posts: 888 Joined: 25-January 08 From: Los Osos, CA Member No.: 8,624 Region Association: Central California 
|
... would you say you'd need that extra clearance just for the starter and such? I plan to use a suby transmisson, but no turbo, so wouldn't need the space for that. In order to line up the trans outputs with the hubs on the trailing arms (fore/aft), you need to make some clearance in the engine/trunk firewall for the starter and clutch slave cylinder / throw-out bearing arm; the turbo requires even more room. I suppose you could just move the engine forward and/or lower to provide clearance. But just moving it forward -- about 4" just for the starter solenoid -- could wreak havoc on your CV joints; lowering the engine too much and you'll risk scraping the oil pan and exhaust manifolds as they'll hang pretty low. Maybe there is an aftermarket starter that would permit you to "clock" it counterclockwise so the solenoid won't be in the way, but I couldn't find it in my 'net searches. There is probably also an aftermarket hydraulically controlled throw-out bearing setup that would permit you to get rid of the top-mounted slave cylinder & T/O arm. Finally, there are pre-made headers for sand buggies that exit the exhaust and mount the turbo in front of the engine. However, all of those options would require $$$, time and fabrication (especially for oil flow to the turbo if mounted up front). Since I'm a CSOB, I opted to cut out the trunk floor... Good luck with your project! (IMG:style_emoticons/default/beerchug.gif) |
| Numbchux |
 Nov 12 2009, 12:08 PM Nov 12 2009, 12:08 PM
Post
#109
|
|
Newbie  Group: Members Posts: 33 Joined: 3-September 09 From: Duluth, MN Member No.: 10,758 Region Association: Upper MidWest |
Thanks for the info! I'm a CSOB too....but I have very little welding experience, and no equipment. so something like what you've got there would be fabrication $$$ for me...
but, sounds like it'll be necessary. I plan to run a cable-clutch trans, so I'll have a little more room there, but not much. I'll have to play it by ear a bit. Thanks again, and keep up the awesome work (IMG:style_emoticons/default/shades.gif) |
| charliew |
 Nov 12 2009, 09:13 PM Nov 12 2009, 09:13 PM
Post
#110
|
|
Advanced Member     Group: Members Posts: 2,363 Joined: 31-July 07 From: Crawford, TX. Member No.: 7,958 |
I had a ss header that my son took off his sti when he changed to a perrin header and I shortened it to be the 4 5/8 distance down that matched the depth of the 8 qt pan I built. I do kinda like putting the turbo inbetween the motor and the firewall but that will add more heat to the area that a ic will need to be over. Also the exhaust pipe will be a bigger hassle with the front mount turbo. I want to use 2.5 or 3.0 id exhaust pipe.
In my opinion the turbo suby is the only way to do this conversion and it will take a person with good fab skills to make it look factory and clean. The reason I think it should only be the turbo version is that the power of the turbo suby is the only reason to do a swap. the na suby will need too much hotrodding to get it up to 200hp and that cost will need to be added to the equation. When the motor gets to 200hp the clutch will be too weak and that will need a upgrade it just keeps going on and on. Once you get used to 160hp you will want more. |
| strawman |
 Feb 10 2010, 12:16 AM Feb 10 2010, 12:16 AM
Post
#111
|
|
Senior Member    Group: Members Posts: 888 Joined: 25-January 08 From: Los Osos, CA Member No.: 8,624 Region Association: Central California 
|
It has been a while since my last post, but I've been busy. My camera memory card took a dump, so I couldn't take any pics of the epoxy paint work on the rear half of the car - including both sides of the firewall (engine bay and passenger compartment), the rear trunk area, and the whole rear underside of the tub. I'll try to snap some pics this weekend now that I've got a new memory card.
Since my last post, I bought a Harbor Freight powdercoat gun and picked up a free electric oven on Craigslist. The biggest pain was wiring a 30 amp 220v fusebox for the oven, but it works great. I'm using a "Wet Black" finish from Columbia Coatings. Now that I have this setup, I ended up media blasting the suspension arms that I painted a few months ago (that epoxy was tough!) and powder coating them, as well as a bunch of smaller parts. Yes, you can BARELY fit front A-arms and rear trailing arms in a standard oven. Below are some pics: 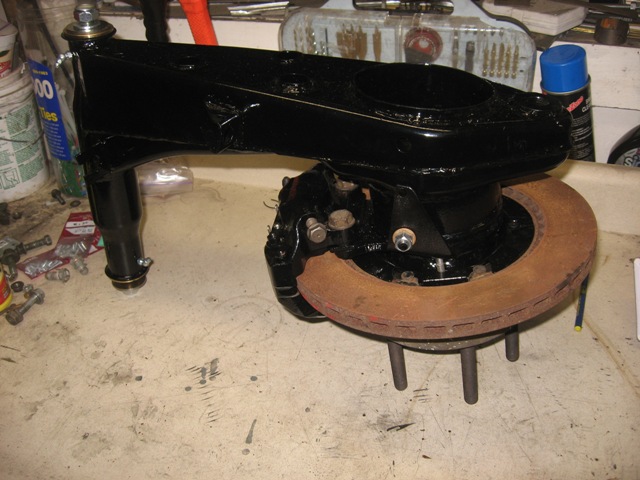 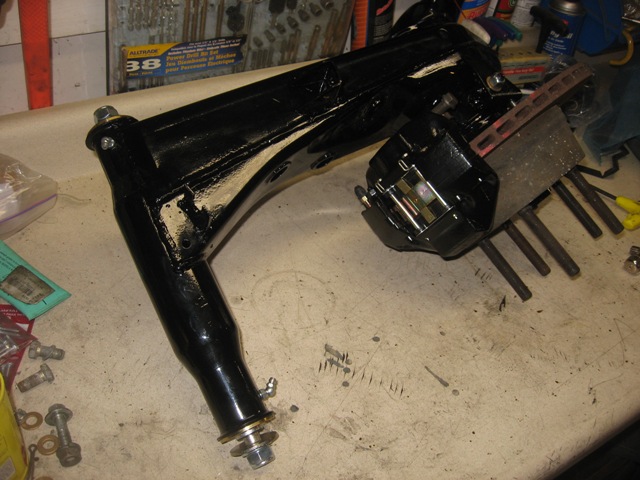 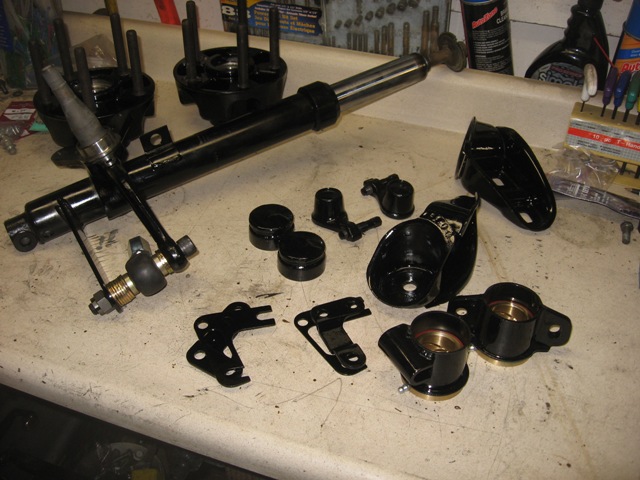 You can see the 911 e-brake setup on the trailing arm, based on Paul Seyegh's article in Excellence magazine. I'll put some new brake rotors on before I get the car rolling, since those in the pics are right at the wear limit and they're quite rusty. You can also see the Elephant Racing Products polybronze bushings front and rear. The chintzy 5mm grease fittings broke off during assembly, so I took Eric Shea's advise and replaced them with 6mm fittings. I talked to Chuck at ERP about this, and he says he's also making the switch -- if you're considering it, be sure to ask for the larger fittings upfront. I ended up using a Dremel to cut the depth of the 6mm threaded end; otherwise, they stick up kinda high. You can also see the bump-steer setup that I've developed after raising the spindles. I'll use a bunch of stacked washers during setup, and then make up some nice powdercoated spacers once dialed-in. It took about 60 minutes in the oven to bake out the remaining grease in the strut housings; you don't want to attempt powdercoating an item with grease/oil on it -- the smoke can ruin the powdercoat finish while its curing. In fact, the oven is a great way to remove any residual grease & oil from any parts that don't have rubber/vinyl gaskets. I bought caliper rebuild kits from Eric Shea, so I disassembled the M rear calipers before powdercoating the components, and then powdercoated 'em. They look nice, eh? The front aluminum S calipers were recently rebuilt by the PO (with stainless pistons, no less!), but I replaced the seals anyway. I won't be powdercoating those aluminum beauties, though. I'll be running Pagid Blacks up front and PBR Metal Masters in rear to start; I may go for something more aggressive after I sort the car. |
| strawman |
 Feb 10 2010, 12:22 AM Feb 10 2010, 12:22 AM
Post
#112
|
|
Senior Member    Group: Members Posts: 888 Joined: 25-January 08 From: Los Osos, CA Member No.: 8,624 Region Association: Central California 
|
I also cut the radiator inlet hole in the front of the car, and devised the radiator mounting setup. I am using a Griffin 25241 radiator (27.5' wide x 15.5" high x 3.0" thick). Details can be found at http://www.summitracing.com/parts/GRI-1-25241-X/.
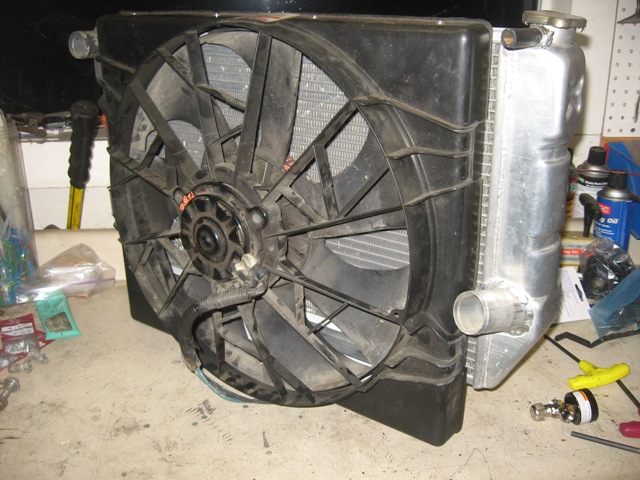 I am also using a Lincoln Mark VIII radiator fan that I got at a local Pick-n-Pull for $35. This two-speed brute pulls 4500cfm on the highest speed, and is used by a lot of the rockcrawling Jeep crowd. 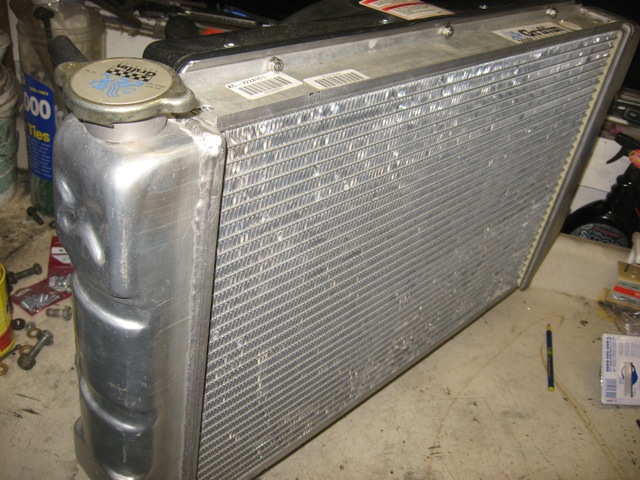 I took some camera phone pics of the shrouding I constructed out of aluminum sheet to force all the air through the radiator, since the fan is so much bigger than the radiator core -- but not surprisingly those pictures are so low quality that they are not worth posting. Suffice it to say that ALL of the air has to pass through the radiator core. |
| FourBlades |
 Feb 10 2010, 02:16 AM Feb 10 2010, 02:16 AM
Post
#113
|
|
From Wreck to Rockin     Group: Members Posts: 2,056 Joined: 3-December 07 From: Brevard, FL Member No.: 8,414 Region Association: South East States 
|
Nice progress! (IMG:style_emoticons/default/piratenanner.gif) (IMG:style_emoticons/default/piratenanner.gif) (IMG:style_emoticons/default/piratenanner.gif) This is a great build, looking forward to more pictures. John |
| strawman |
 Feb 10 2010, 03:58 PM Feb 10 2010, 03:58 PM
Post
#114
|
|
Senior Member    Group: Members Posts: 888 Joined: 25-January 08 From: Los Osos, CA Member No.: 8,624 Region Association: Central California 
|
I thought I'd post the crappy camera photos anyway, since they'll help me remember how everything went together (getting old sux!).
First up is a pic of the fan mount/shroud. I used 16 ga. aluminum scrap sheeting, as well as some aluminum angle to give it some extra oomph. 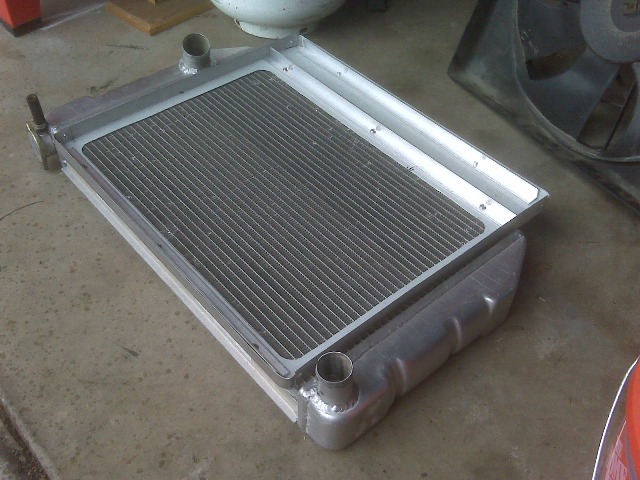 Next up are two pics of the comparative weights of a fully-loaded aluminum 911S front caliper vs. a fully-loaded rear cast steel 911 M caliper. I thought the 911S caliper would be considerably lighter, but then realized the front calipers are much larger than the rears. Note the homebrewer's grain scale -- not too accurate, but it has helped me brew many gallons of all-grain beer! 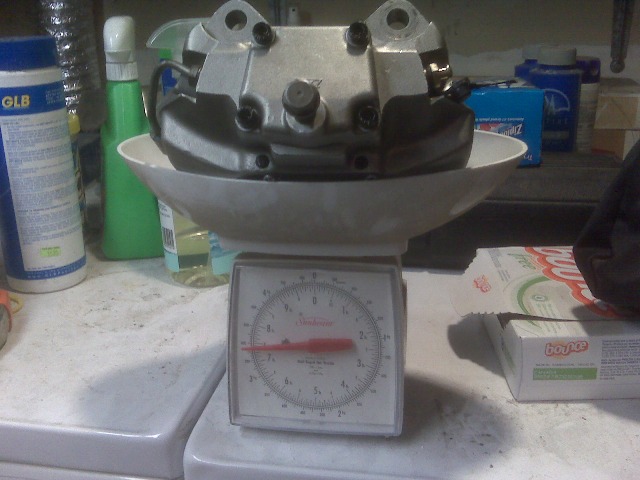 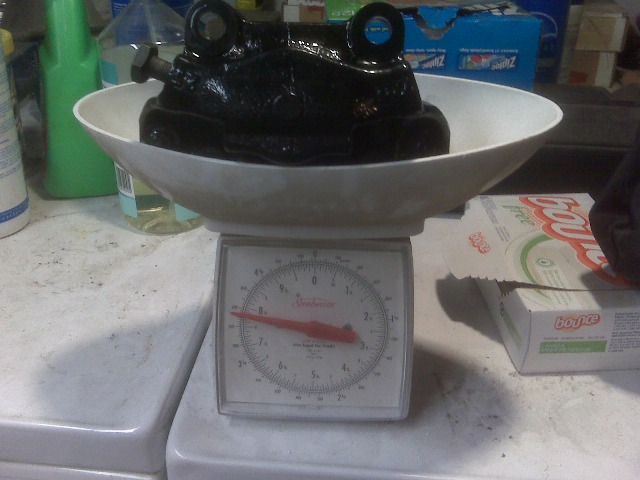 Finally, I mocked up the rear trailing arm with a 21mm spacer and stuck on a 16x9 BBS rim with a junk tire. Definitely need the flares! 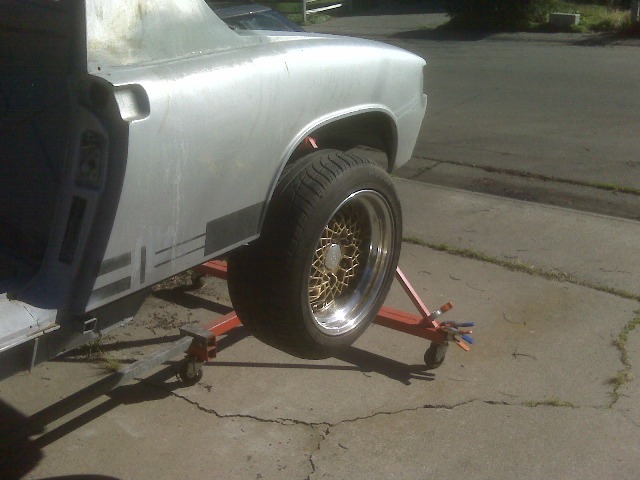 |
| strawman |
 Mar 30 2010, 10:06 PM Mar 30 2010, 10:06 PM
Post
#115
|
|
Senior Member    Group: Members Posts: 888 Joined: 25-January 08 From: Los Osos, CA Member No.: 8,624 Region Association: Central California 
|
I've made some pretty good progress over the past six weeks (just been too lazy to post any pics here).
I have finally nailed down my shifting mechanism, based on a early Toyota MR2 shifter, and 9' and 11' Teleflex TFXtreme push-pull cables (I originally bought two 12-footers to help me mock things up). I didn't get a chance to take pics of the entire thing all bolted together, but below is a pic of the shifter mount (swiss-cheesed to reduce weight), which bolts to the factory holes in the 914 floor. I've also included a photo of the combination trans mount and cable mount. I powder-coated both of these mounts and will powder-coat the various pieces of the shifter mechanism later this week. I'll also take some more pics soon of everything in situ. 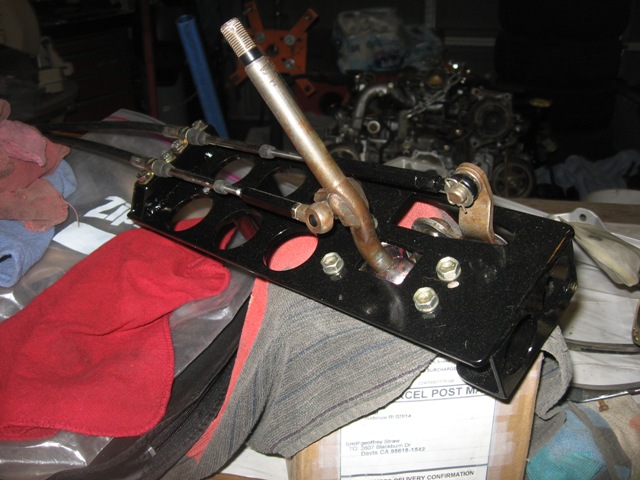 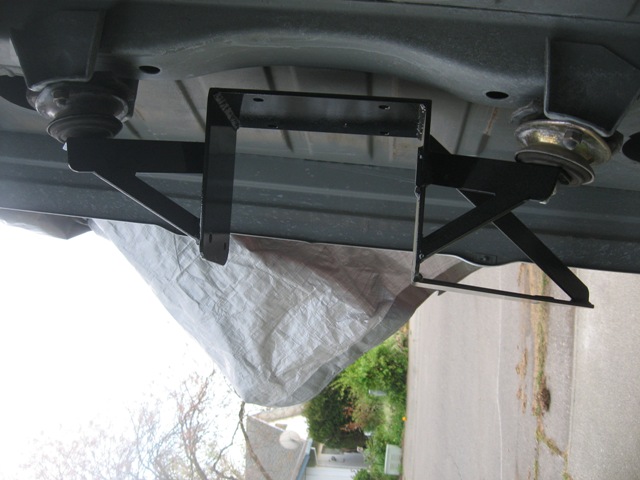 I've also welded in a reinforcement tube that ties together the front A-arm mounts, as well as the lower radiator mount and upper mount/crossbar. The lower "rail" of the radiator sits on top of the square rubber feet, and I'll weld on brackets that will hold rubber mounts for the "rail" at the top of radiator. You can also see the rough-cut holes for the radiator air intake. 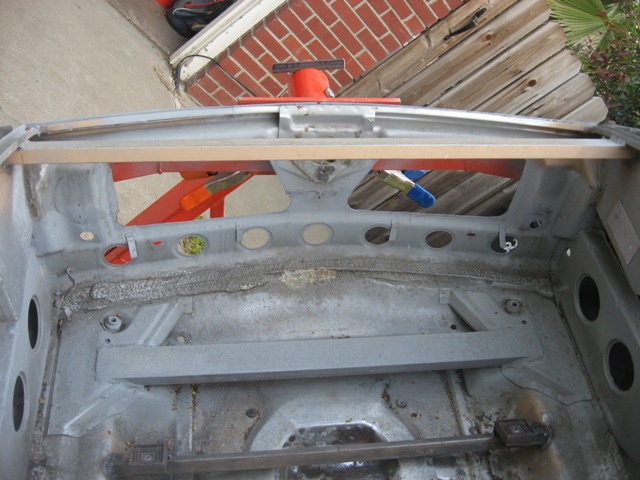 |
| strawman |
 Mar 30 2010, 10:18 PM Mar 30 2010, 10:18 PM
Post
#116
|
|
Senior Member    Group: Members Posts: 888 Joined: 25-January 08 From: Los Osos, CA Member No.: 8,624 Region Association: Central California 
|
Due to furloughs at the campus at which I work, I was able to spend a full day working on something I've been avoiding -- dealing with the rust damage in the area between the cowl and driver side fender. I first dug out the seam sealer in the area, and media blasted what I could get to. Here is a pic of the planned cut-out area.
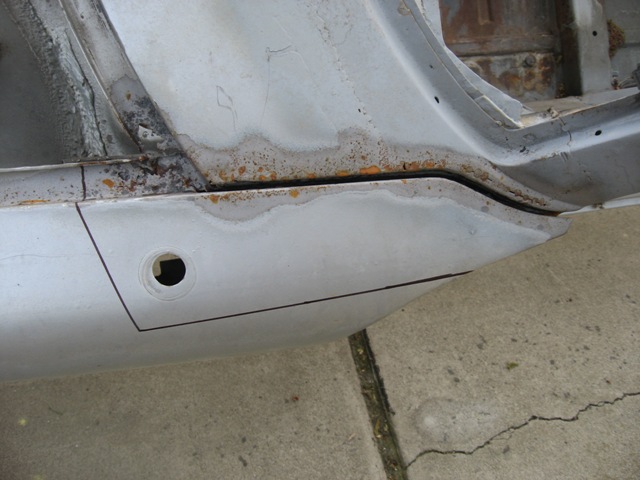 Next is a picture of the rust and nasty-ass seam sealer from the inside of the door jamb. Ugh! 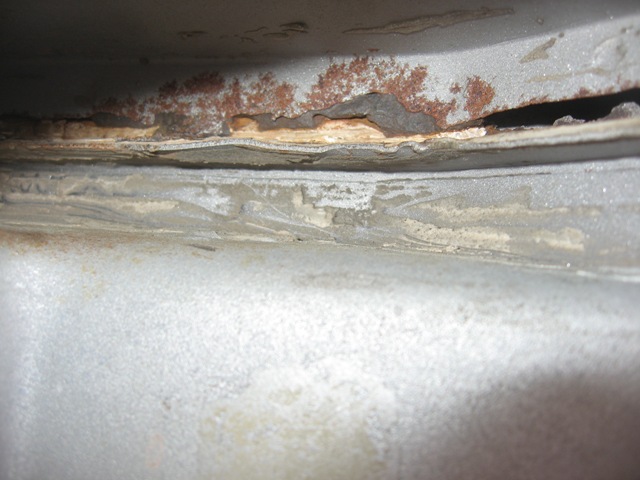 Here is a pic of the fender top cut out. Look at all the tinworm work around the remaining seam sealer... 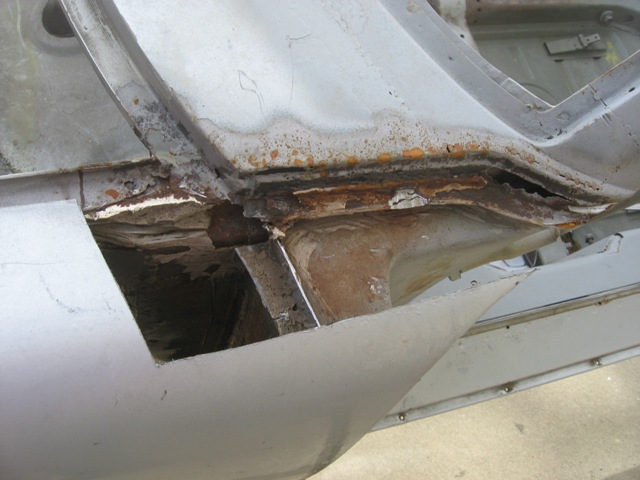 Check out the area after further cleaning, grinding and media blasting. 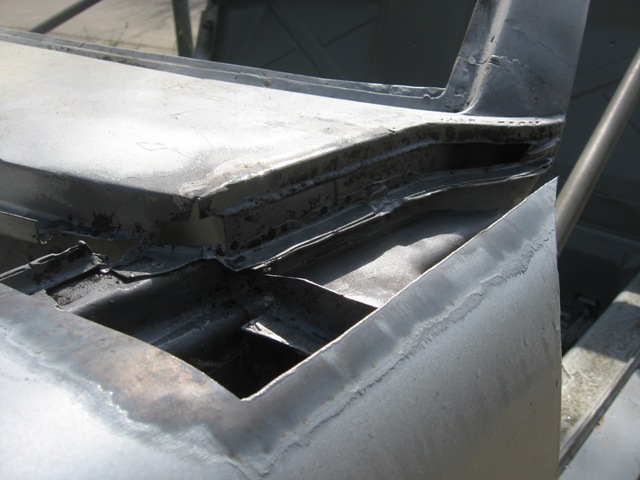 Here is a shot of the repair pieces welded in, but not yet smoothed. 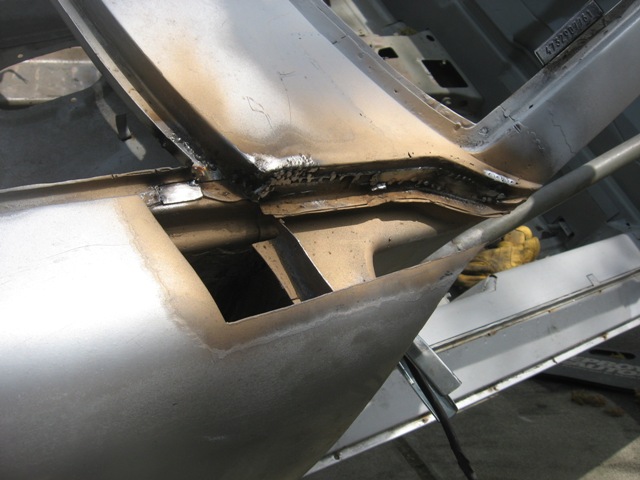 |
| strawman |
 Mar 30 2010, 10:31 PM Mar 30 2010, 10:31 PM
Post
#117
|
|
Senior Member    Group: Members Posts: 888 Joined: 25-January 08 From: Los Osos, CA Member No.: 8,624 Region Association: Central California 
|
Finally, here is shot of the fender top cut-out being welded back in. Unfortunately, my camera batteries died and I didn't get a shot of the area all smoothed out...
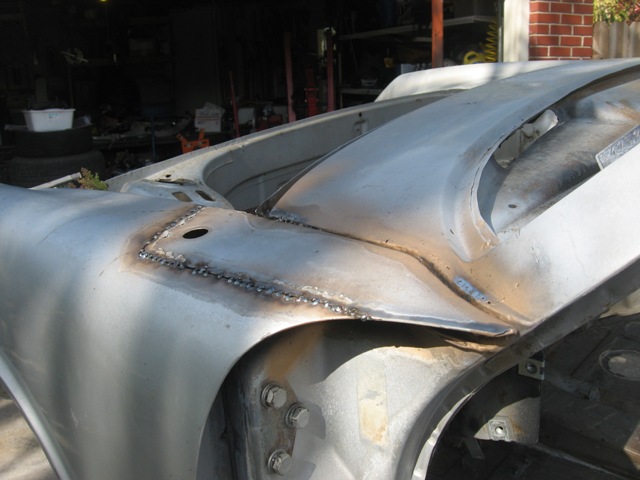 The hood seal channel was pretty nasty, too. Here are some pics of the before, during and after for most of the repairs. 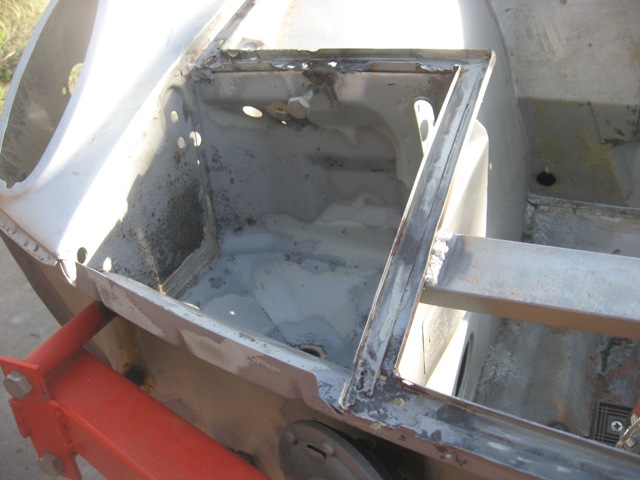 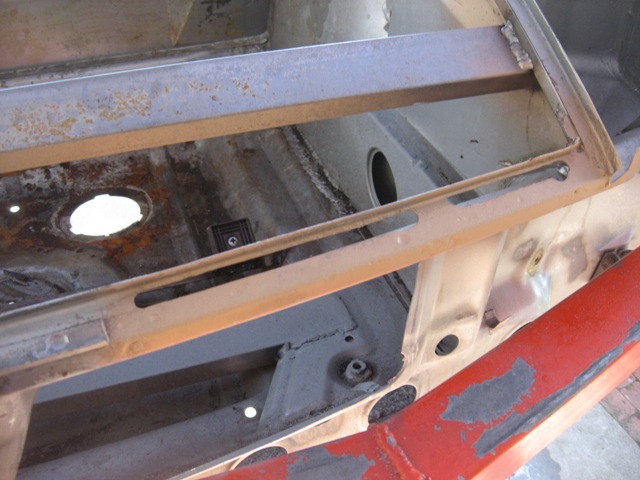 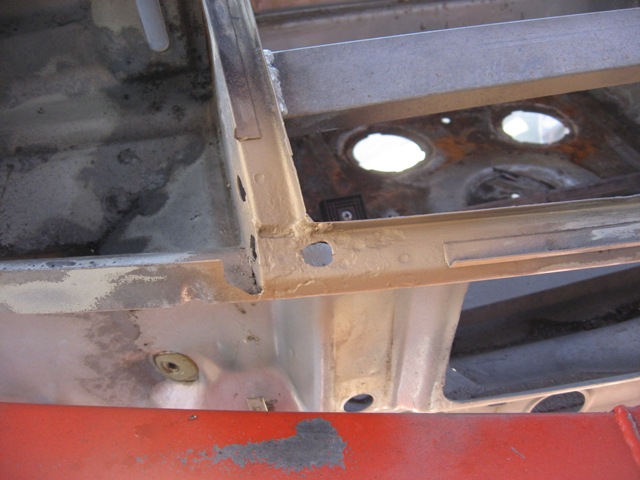 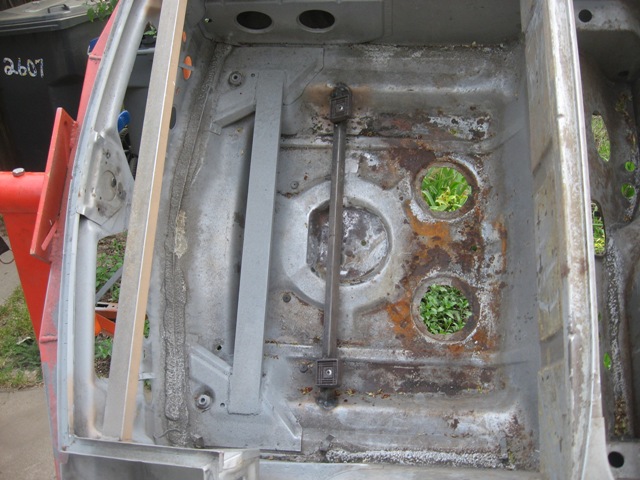 Again, my battery died before I could snap better pictures. I've got a few small patches to complete in the frunk, then I'll strip the entire area and epoxy primer it. |
| strawman |
 Mar 30 2010, 10:33 PM Mar 30 2010, 10:33 PM
Post
#118
|
|
Senior Member    Group: Members Posts: 888 Joined: 25-January 08 From: Los Osos, CA Member No.: 8,624 Region Association: Central California 
|
Last up for tonight are a couple of pictures of the front sway bar mount.
   |
| Justinp71 |
 Mar 31 2010, 12:28 AM Mar 31 2010, 12:28 AM
Post
#119
|
|
Senior Member    Group: Members Posts: 1,629 Joined: 11-October 04 From: Sacramento, CA Member No.: 2,922 Region Association: None 
|
Lookin Good!!! (IMG:style_emoticons/default/biggrin.gif) (IMG:style_emoticons/default/biggrin.gif) (IMG:style_emoticons/default/biggrin.gif) |
| strawman |
 Apr 18 2010, 06:09 PM Apr 18 2010, 06:09 PM
Post
#120
|
|
Senior Member    Group: Members Posts: 888 Joined: 25-January 08 From: Los Osos, CA Member No.: 8,624 Region Association: Central California 
|
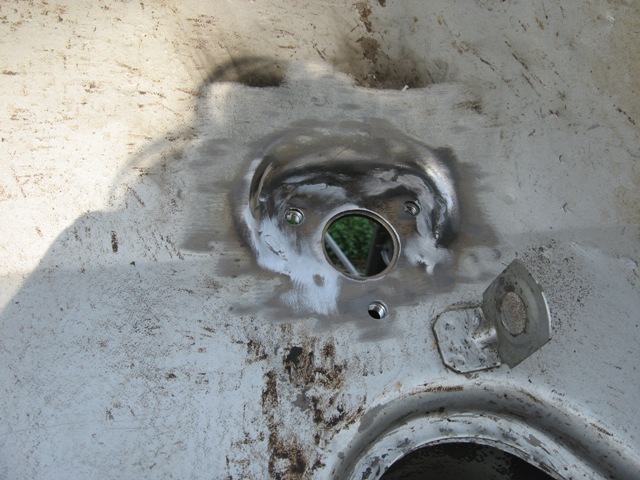
Finally got some time to work on the fuel delivery system. I want to use the Subaru in-tank fuel pump instead of an in-line one, so I had to move the fuel gauge sender so that I could line the Suby pump up with the 914 fuel tank sump. Kinda difficult to explain, so see the pics below.
First up are the two "rings" made out of 1/8" steel stock. These will be welded inside the tank and will be tapped so the Suby pump and 914 sender unit can be screwed in. You can also see where the old sender hole was, which I'll weld up in a pic below. The area where the new pump hole was cut is not perfectly flat, so I had to hammer/dolly most of the area, and shrink the metal at "six o'clock" and "three o'clock." 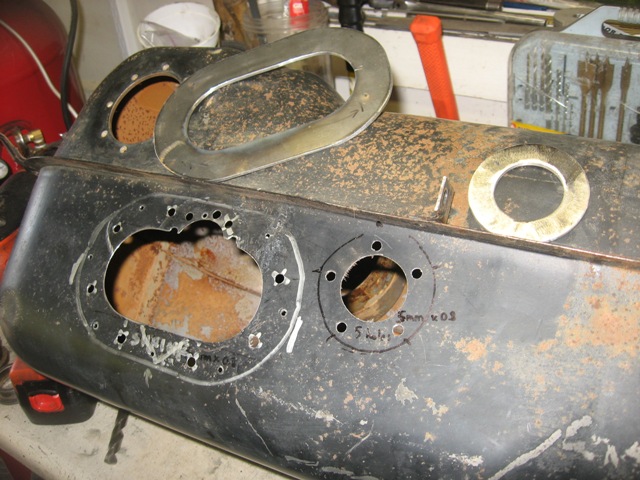 The next two pictures show the stock Suby fuel pump and bracket, as modified to align the fuel pump pickup and the 914 tank sump. In short, I had to cut the Suby bracket to put two elbows in it, bend the output pipe, and weld in a reinforcement/triangulation piece in the "outside" elbow for strength. It barely fits in the new hole cut into the tank, but it will work famously. 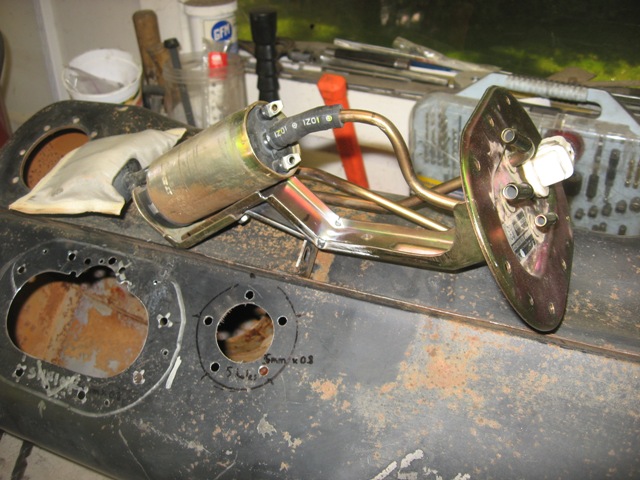 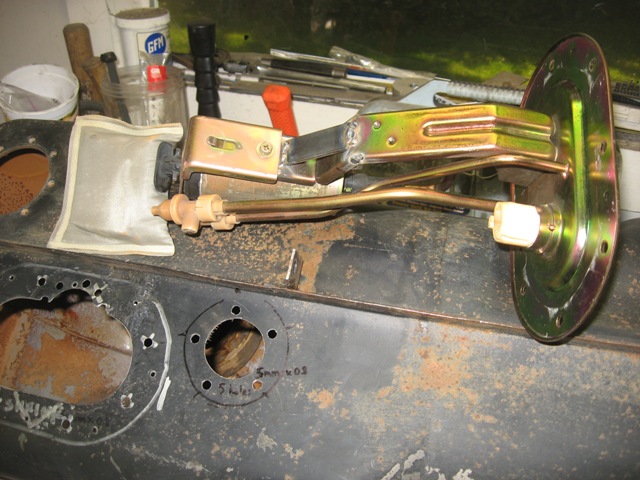 |
  |
1 User(s) are reading this topic (1 Guests and 0 Anonymous Users)
0 Members:

|
Lo-Fi Version | Time is now: 19th April 2025 - 06:25 PM |
Invision Power Board
v9.1.4 © 2025 IPS, Inc.


