|
|

|
Porsche, and the Porsche crest are registered trademarks of Dr. Ing. h.c. F. Porsche AG.
This site is not affiliated with Porsche in any way. Its only purpose is to provide an online forum for car enthusiasts. All other trademarks are property of their respective owners. |
|
|
| strawman |
 Apr 18 2008, 12:19 AM Apr 18 2008, 12:19 AM
Post
#1
|
|
Senior Member    Group: Members Posts: 888 Joined: 25-January 08 From: Los Osos, CA Member No.: 8,624 Region Association: Central California 
|
Hi All --
This is my second post, but I've been lurking on this fine website for a while now. I've wanted a 914 since I was in high school, but always seemed to stumble upon other projects... until recently. My neighbor gave me this 1973 Porsche 914 about a month ago. He told me he blew a head gasket and parked it in his parents' driveway in 1992. When his parents finally told him to move it or they were calling a local junkyard, he offered it to me since he knows I'm a gearhead. In for a penny, in for a pound... I hauled it home, knowing that it has some rust issues in the battery area and rear trunk. But it appears to have never been in a wreck and it is complete. It turns out that an exhaust stud pulled, so he coulda fixed it for a couple hundred and probably kept another 914 from languishing but I guess all things happen for a reason (namely, so I would undertake this project!). I sold the engine to a local Craigslister for use in his Meyers Manx dune buggy, and bought a wrecked but running 1993 Subaru Legacy turbo wagon. This is the closed-deck 2.2 liter engine, and 250 hp is easy with boost control and an open exhaust. I've already done a Subaru into a VW Vanagon and my daily driver is a 1992 Suby Legacy, so this won't be too much of a stretch for me. I plan to use the Suby 5-speed transmission (out of a 1998 Suby Forester) with the Aussie-sourced RWD elimination coupler and custom-mated 914/Suby axles. I've got a suburban home with a crowded two-car garage (my 125 shifter kart and my daughter's FJA kart will likely get lonely!), a MIG welder, and a wide assortment of air/power/hand tools -- so the adventure begins! This project will likely take a year to finish, so please be patient. I've attached some pics of the car as found in the driveway, some rust areas and the rear trunk repairs I've started. I'll chronicle the build as I go, so feel free to chime in! Geoff Attached image(s) 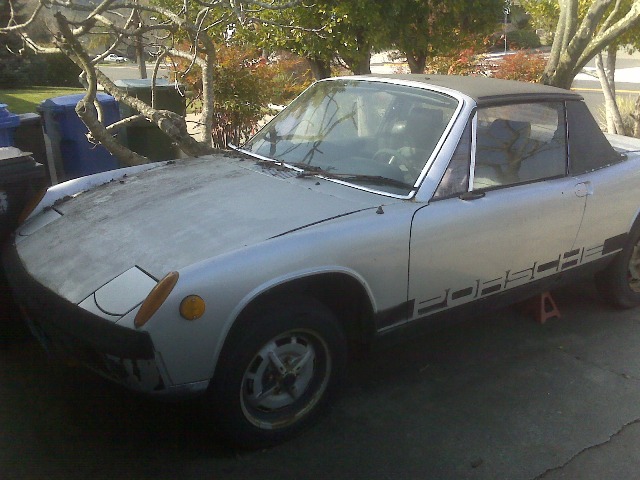 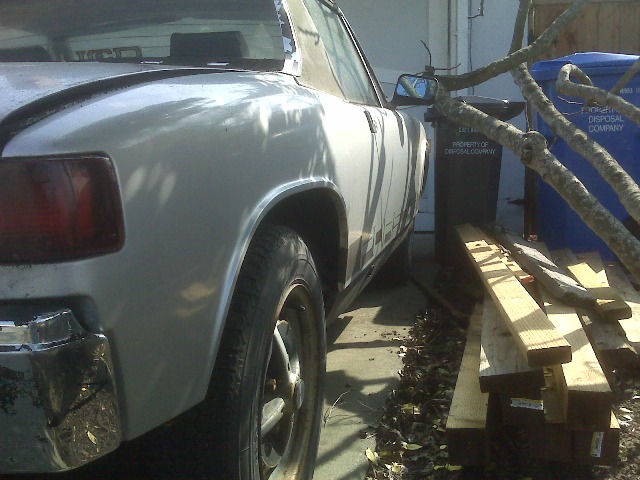 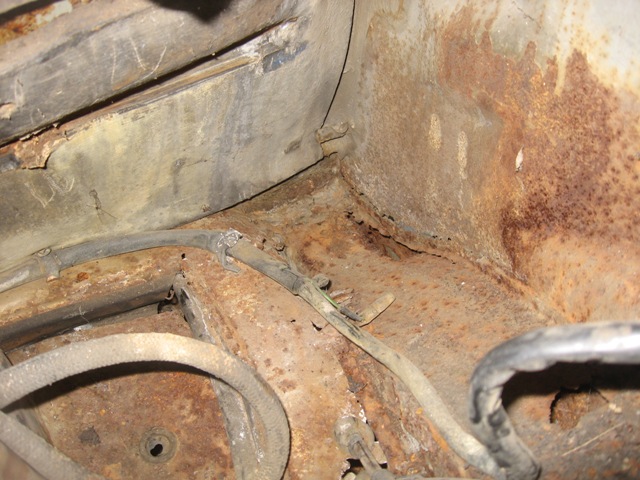
|
  |
Replies(280 - 299)
| ruby914 |
 Jun 25 2013, 10:09 PM Jun 25 2013, 10:09 PM
Post
#281
|
|
Senior Member    Group: Members Posts: 720 Joined: 26-April 09 From: Hawthorne, Ca Member No.: 10,305 Region Association: None |
(IMG:style_emoticons/default/popcorn[1].gif) Beautiful (IMG:style_emoticons/default/first.gif)
You make it look so easy (IMG:style_emoticons/default/biggrin.gif) |
| 76-914 |
 Jun 25 2013, 10:10 PM Jun 25 2013, 10:10 PM
Post
#282
|
|
Repeat Offender & Resident Subaru Antagonist           Group: Members Posts: 13,698 Joined: 23-January 09 From: Temecula, CA Member No.: 9,964 Region Association: Southern California 
|
sweet
|
| wingnut86 |
 Jun 25 2013, 10:14 PM Jun 25 2013, 10:14 PM
Post
#283
|
|
...boola la boo boola boo...    Group: Members Posts: 1,053 Joined: 22-April 10 From: South Carolina Member No.: 11,645 Region Association: South East States |
EXACKERY!!!
Slick plan. |
| effutuo101 |
 Jun 25 2013, 11:27 PM Jun 25 2013, 11:27 PM
Post
#284
|
|
Advanced Member     Group: Members Posts: 2,735 Joined: 10-April 05 From: Lemon Grove Member No.: 3,914 Region Association: Southern California |
Nice work! Giving me ideas. (IMG:style_emoticons/default/sawzall-smiley.gif)
|
| Mike Bellis |
 Jun 25 2013, 11:38 PM Jun 25 2013, 11:38 PM
Post
#285
|
|
Resident Electrician      Group: Members Posts: 8,347 Joined: 22-June 09 From: Midlothian TX Member No.: 10,496 Region Association: None 

|
Cool work!
|
| ruby914 |
 Jun 26 2013, 01:33 AM Jun 26 2013, 01:33 AM
Post
#286
|
|
Senior Member    Group: Members Posts: 720 Joined: 26-April 09 From: Hawthorne, Ca Member No.: 10,305 Region Association: None |
I bought a 4'x8' sheet of 2" polystyrene from Home Despot and went to town -- I used 3M contact cement to glue each layer to the next, and then cut/filed it into shape using a cheese-grater kind of file, a handsaw and 60-grit sandpaper. Hint, don't use polystyrene; use polyurethane instead (so you can melt it with acetone when voiding the buck!). It sounds like you went to Home Depot looking for EPS foam (expanded polystyrene) and they gave you polyurethane? Polyurethane is the one that will not melt with acetone or polyester resin. MEK may break it down? EPS is the stuff with the little white beads stuck together: peanuts, and coffee cups... It's all the better, melting EPS is a sticky mess. Also when you sand EPS the beads get everywhere and you get a lot of static cling. I like EPS it because you can cut it with a hot wire. One thing you can do when building your buck is to build it with a removable core plug. Pull the core plug and it is a lot easier removing foam from around the walls. Anyway, it looks great! Are you going to paint it the same color as the car (IMG:style_emoticons/default/shades.gif) ? |
| Chris H. |
 Jun 26 2013, 08:01 AM Jun 26 2013, 08:01 AM
Post
#287
|
|
Senior Member     Group: Members Posts: 4,054 Joined: 2-January 03 From: Chicago 'burbs Member No.: 73 Region Association: Upper MidWest 
|
(IMG:style_emoticons/default/agree.gif) Awesome man. Definitely stoking the fire on my plan as well. I want to vent through the floor and use louvered panels to keep water and debris to a minimum...that setup would be great to redirect the air right out the bottom. |
| Tilly74 |
 Jun 26 2013, 08:52 AM Jun 26 2013, 08:52 AM
Post
#288
|
|
Member   Group: Members Posts: 96 Joined: 5-June 12 From: Springfield, MO Member No.: 14,522 Region Association: None |
|
| Zaney |
 Jun 26 2013, 11:12 AM Jun 26 2013, 11:12 AM
Post
#289
|
|
Deuchland en der Haus   Group: Members Posts: 461 Joined: 1-March 04 From: Engine 11 Redmond, WA Member No.: 1,738 Region Association: Pacific Northwest |
Looks awesome, Geoff!
Seems we both have been playing with fiberglass! I am making a new gauge plate for my SpeedHut gauges. Your skill and attention to detail is one to be emulated (IMG:style_emoticons/default/aktion035.gif) Nate |
| strawman |
 Jun 26 2013, 06:13 PM Jun 26 2013, 06:13 PM
Post
#290
|
|
Senior Member    Group: Members Posts: 888 Joined: 25-January 08 From: Los Osos, CA Member No.: 8,624 Region Association: Central California 
|
Yup, that is the ultimate plan. But I wanna run this first to see if it meets my expectations for cooling; then I'll make it all purty. Thanks for your advice on the type of foam to use. I'll need to mock up a lip on the leading edge of the hood outlet to create a low-pressure spot after I cut out the hole, so I'll look for the good stuff. I've got some designs rolling around in my head but I haven't settled on one yet. Most of the websites say to use the high-density blue or green urethane for the buck -- but I could only find small bricks that cost too much at craft stores like Michael's or Joann's (which are places that always seems to reduce my testosterone levels...). |
| strawman |
 Jul 1 2013, 07:54 PM Jul 1 2013, 07:54 PM
Post
#291
|
|
Senior Member    Group: Members Posts: 888 Joined: 25-January 08 From: Los Osos, CA Member No.: 8,624 Region Association: Central California 
|
After a terrible weekend at the 24 Hours of Lemons Button Turrible race (our Opel GT only did five laps before destroying the head gasket in 106 degree weather!), I came home and worked out my frustration on the cooling system of my Suby-teener. If I woulda been smart I woulda suffered the extra heat of long-sleeve pants and shirt to keep the fiberglass dust off my sweaty exposed skin. The result is my arms and legs are uber-itchy today!!!
The first picture is of the measuring system I devised to locate the hole I needed to cut in the hood, as well as the height of the shroud under the hood. I placed painter's tape along the top of the inner fenders and along the front/rear edges of the hood area. I then used a straight edge along the sides of the shroud to make Sharpie marks on the blue tape. I then used a 12-foot length of copper ground-wire bent to surround the shroud outlet and to mimic the curvature of the hood. In the picture below, you can see the copper piece and the Sharpie marks on the blue tape. 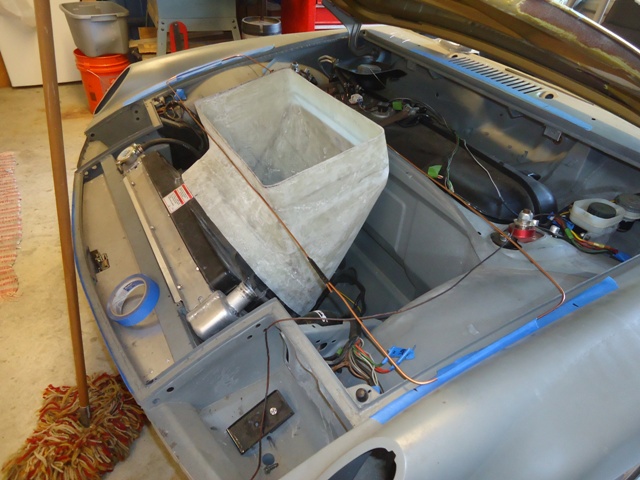 I used the copper wire to also make approximate height cut-marks on the shroud. I then removed the shroud from the radiator to make the first cut of the fiberglass shroud -- I actually made the cut using a saber saw about 1/2" above the Sharpie line to give me a chance to incrementally cut down to the correct height. Below is a picture of the blue tape I lined up with the Sharpie marks along the four edges of the hood. I then drilled holes at the corner of each cut to avoid future cracks that tend to occur at right-angle or straight cuts. I'm not sure if you can see the areas marked "down" -- those ten areas will be for the tabs I'll bend down and use to mount the mesh screen. The front leading edge has two longer areas that will be further sectioned and used to provide a strong support for a forward lip to create a low-pressure zone that should aid in sucking the hot air out. You'll note that there is a curvature to the hood, so you cannot merely bend the long tabs along a straight line or you'll tweak the hood. 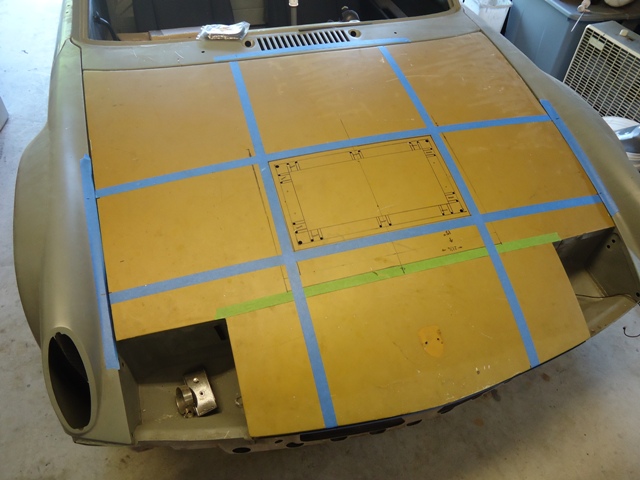 Below you can see the cut-outs; one pic from a rear corner and the other from the front. I used a combination of a 3" cutting wheel (1/16" thick) in a die grinder and a saber saw to make the cuts. I went as slowly as possible to avoid warping the metal too much. 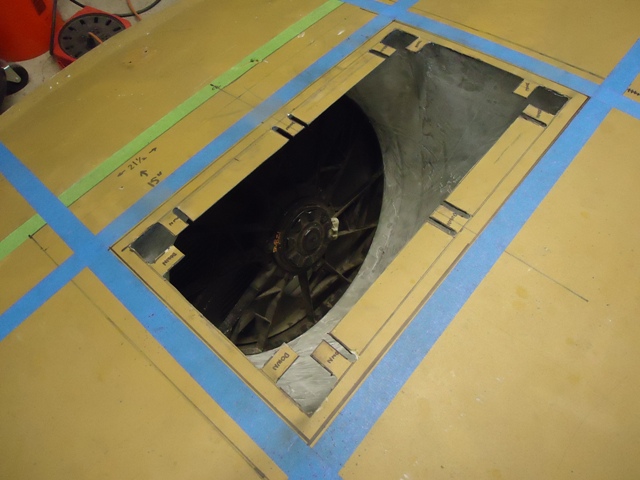 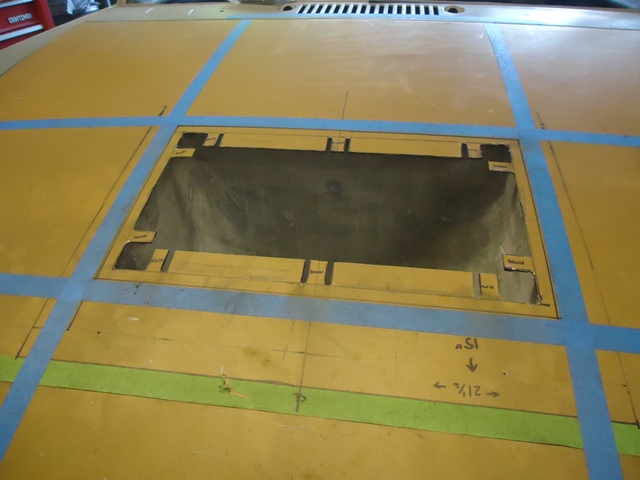 The three pictures below show the rear two pieces cut out, and the area cleaned up a bit. I plan to bend 1/4" steel rod and tack-and-then-fiberglass on the bottom-side of the hood cutout for strength. 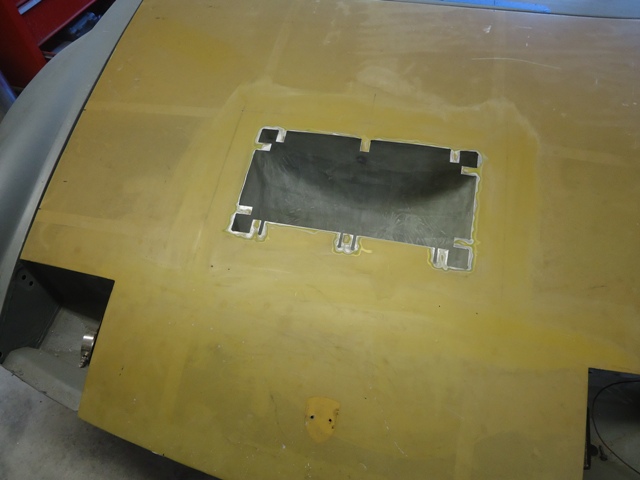 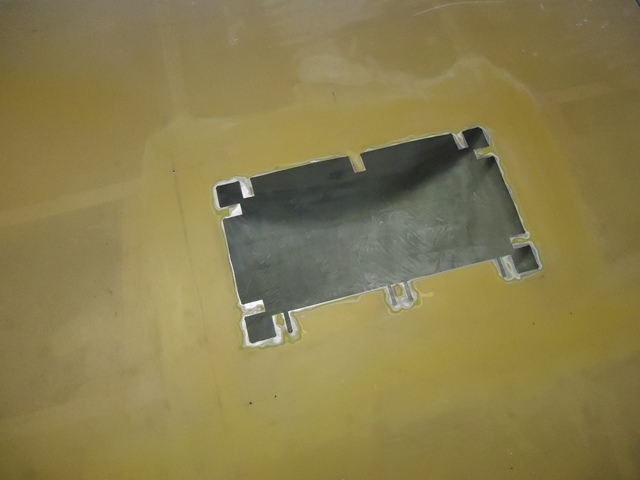 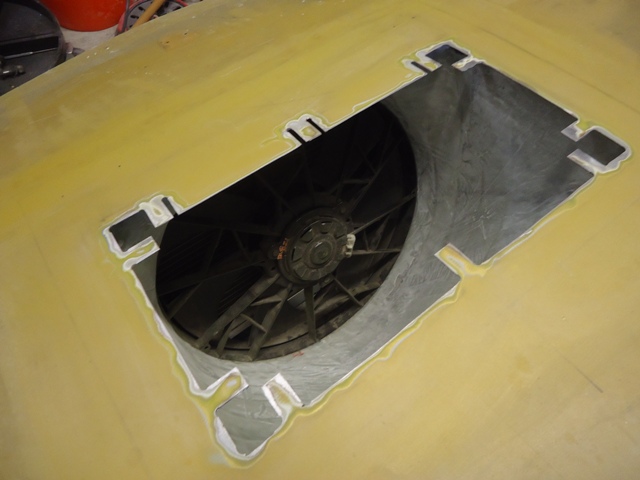 Finally, the two pics below show the shroud trimmed to the correct height -- 3/8" below the bottom of the hood. Honestly, it took about 20 times of measuring, marking & cutting before I "snuck down" to the right height. The hood outlet "box" hole is 1/2" smaller on each side than the inner box size of the shroud. That was done so that the rubber gasket I'll install on the fiberglass shroud top will ensure a good seal that won't rub too much on the bottom of hood box structure. I used 5mm stainless steel hex-head bolts, ss fender washers and ss nylock nuts to mount the fiberglass shroud to the Lincoln plastic shroud. 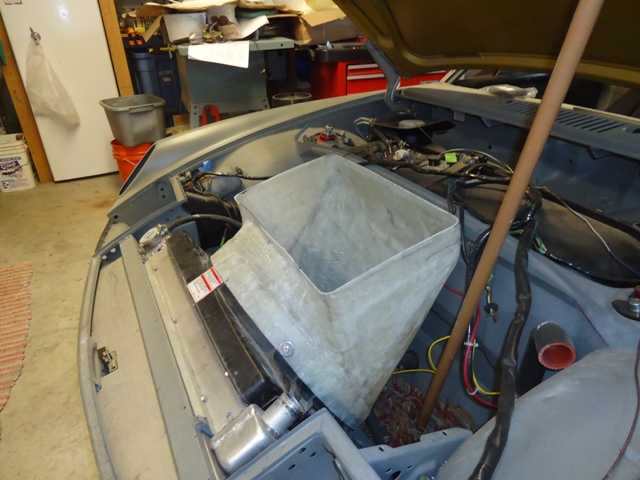 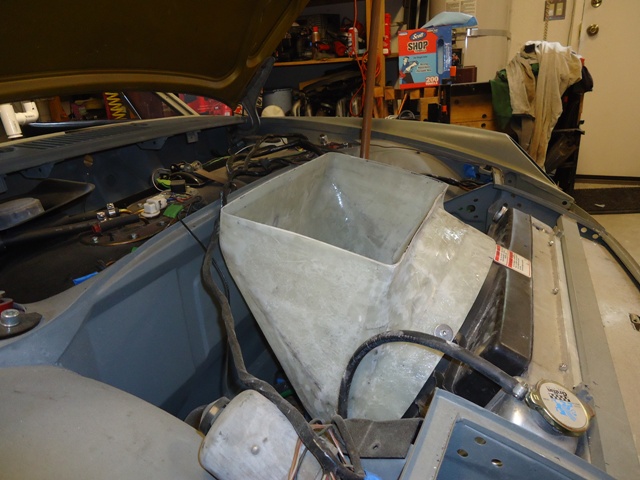 I still need to cut & grommet a hole in the fiberglass shroud to snake through the fan wiring, and to add a grommeted drain hose for any water that might get through the hood hole. Finally, I need to mock up and construct the leading lip and possibly declining side edges (for good looks) for the hood hole. I hope to get to these projects this next weekend. |
| 914forme |
 Sep 30 2013, 01:47 PM Sep 30 2013, 01:47 PM
Post
#292
|
|
Times a wastin', get wrenchin'!     Group: Members Posts: 3,896 Joined: 24-July 04 From: Dayton, Ohio Member No.: 2,388 Region Association: None 
|
(IMG:style_emoticons/default/popcorn[1].gif) Looks great updates (IMG:style_emoticons/default/poke.gif)
|
| CptTripps |
 Oct 17 2013, 07:13 AM Oct 17 2013, 07:13 AM
Post
#293
|
|
:: Punch and Pie ::     Group: Members Posts: 3,585 Joined: 26-December 04 From: Tuscaloosa, AL and Akron, OH Member No.: 3,342 Region Association: Upper MidWest |
Just a thought...
Would you have been able to point that DOWN instead of having to cut the hood? It seems like you'd get almost as much airflow out of the bottom of the trunk floor as you would from up high. I only ask because I am thinking of building something similar and want to explore all the options before I go too far. |
| badmiata |
 Oct 17 2013, 02:23 PM Oct 17 2013, 02:23 PM
Post
#294
|
|
Newbie  Group: Members Posts: 47 Joined: 21-June 07 From: Houston, TX (Clear Lake) Member No.: 7,826 Region Association: None |
That's a good question that I haven't seen anyone answer! It would be nice to preserve the outside look without having to cut into the wheel wells. PLUS what do you do if it rains? will that hold water, were does it drain?
|
| skeates |
 Oct 17 2013, 02:43 PM Oct 17 2013, 02:43 PM
Post
#295
|
|
Member   Group: Members Posts: 218 Joined: 28-February 05 From: Sacramento, ca Member No.: 3,684 Region Association: Northern California |
Your work looks top notch! I had planned on going a very similar route for my radiator venting - your posts here have been very informative (IMG:style_emoticons/default/beerchug.gif)
Would you have been able to point that DOWN instead of having to cut the hood? It seems like you'd get almost as much airflow out of the bottom of the trunk floor as you would from up high. Seems to me that if one were to vent all of the radiator air under the car it would create a high pressure area right where you don't want it - making the front end scary light at higher speeds. Venting through the hood should actually result in a bit of down force at higher speeds. I think others have been successful venting their radiator through the floor, just doesn't seem to be an ideal solution. |
| mgp4591 |
 Oct 17 2013, 04:56 PM Oct 17 2013, 04:56 PM
Post
#296
|
|
914 Guru      Group: Members Posts: 5,608 Joined: 1-August 12 From: Salt Lake City Ut Member No.: 14,748 Region Association: Intermountain Region 
|
Your work looks top notch! I had planned on going a very similar route for my radiator venting - your posts here have been very informative (IMG:style_emoticons/default/beerchug.gif) Would you have been able to point that DOWN instead of having to cut the hood? It seems like you'd get almost as much airflow out of the bottom of the trunk floor as you would from up high. Seems to me that if one were to vent all of the radiator air under the car it would create a high pressure area right where you don't want it - making the front end scary light at higher speeds. Venting through the hood should actually result in a bit of down force at higher speeds. I think others have been successful venting their radiator through the floor, just doesn't seem to be an ideal solution. Maybe split it and vent thru the front of the wheelwells? |
| RonW |
 Oct 20 2013, 09:11 PM Oct 20 2013, 09:11 PM
Post
#297
|
|
Member   Group: Members Posts: 76 Joined: 31-December 05 From: Alameda, CA Member No.: 5,340 Region Association: Northern California |
awesome work. stole a few ideas for my project. keep it going!
|
| ruby914 |
 Mar 8 2014, 02:53 PM Mar 8 2014, 02:53 PM
Post
#298
|
|
Senior Member    Group: Members Posts: 720 Joined: 26-April 09 From: Hawthorne, Ca Member No.: 10,305 Region Association: None |
(IMG:style_emoticons/default/popcorn[1].gif) Looks great updates (IMG:style_emoticons/default/poke.gif) (IMG:style_emoticons/default/agree.gif) Looks great, need an update (IMG:style_emoticons/default/poke.gif) (IMG:style_emoticons/default/icon_bump.gif) |
| CptTripps |
 May 29 2014, 09:26 AM May 29 2014, 09:26 AM
Post
#299
|
|
:: Punch and Pie ::     Group: Members Posts: 3,585 Joined: 26-December 04 From: Tuscaloosa, AL and Akron, OH Member No.: 3,342 Region Association: Upper MidWest |
Bi-Weekly (IMG:style_emoticons/default/icon_bump.gif) for updates!
|
| Andyrew |
 May 29 2014, 01:21 PM May 29 2014, 01:21 PM
Post
#300
|
|
Spooling.... Please wait           Group: Members Posts: 13,377 Joined: 20-January 03 From: Riverbank, Ca Member No.: 172 Region Association: Northern California 
|
Are you going to make a lip in front of the hood cutout to create a low pressure area to draw the air out? If you dont I forsee that you'll have a bit of air turbulance at speed.
|
  |
3 User(s) are reading this topic (3 Guests and 0 Anonymous Users)
0 Members:

|
Lo-Fi Version | Time is now: 20th April 2025 - 06:29 AM |
Invision Power Board
v9.1.4 © 2025 IPS, Inc.


