|
|
|
Porsche, and the Porsche crest are registered trademarks of Dr. Ing. h.c. F. Porsche AG.
This site is not affiliated with Porsche in any way. Its only purpose is to provide an online forum for car enthusiasts. All other trademarks are property of their respective owners. |
|
|

  |

| watsonrx13 |
 Aug 29 2004, 02:54 PM Aug 29 2004, 02:54 PM
Post
#1
|
|
Advanced Member  Group: Members Posts: 2,735 Joined: 18-February 03 From: Plant City, FL Member No.: 312 Region Association: South East States |
Today I began the process of replacing the right rear suspension ear. I purchased my pieces from Restoration-Design. The pieces included the right engine shelf, suspension ear, battery tray and battery support.
I began by removing the center section of the engine tray. This shows the spot-welds drilled out. I used a 1/4" drill bit. Any spotw-welds that weren't completely drilled out I used a air hammer to complete the separation. 1 of 6 Attached image(s) 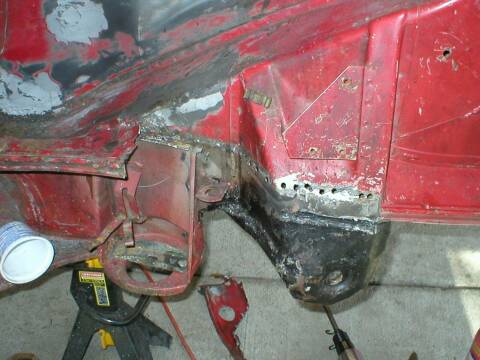
|
   |

 
|
| watsonrx13 |
Aug 29 2004, 02:55 PM
Post
#2
|
|
Advanced Member Group: Members Posts: 2,735 Joined: 18-February 03 From: Plant City, FL Member No.: 312 Region Association: South East States |
Then I removed the front section of the engine tray. I used a disk grinder to grind down the metal edge of the tray because I couldn't get a drill in the correct position. I also cleaned up and straightend the triangle piece at the bottom.
2 of 6 Attached image(s) 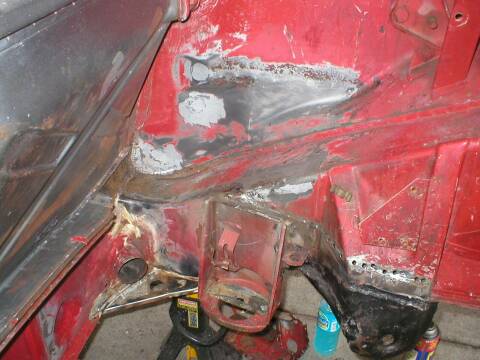
|
|
|
|
| watsonrx13 |
Aug 29 2004, 02:56 PM
Post
#3
|
|
Advanced Member Group: Members Posts: 2,735 Joined: 18-February 03 From: Plant City, FL Member No.: 312 Region Association: South East States |
I removed the rear section of the engine tray next. After the engine tray was completely removed, I began with the suspension ear. I worked on the top section first. Since the ear had been previously repaired, it was difficult to determine where the spot-welds were on the bottom, therefore, I decided to remove the ear in piecemeal. This shows how I used the 3M purple wheel to identify the spot-welds. There were spots welds on the top, sides and in the middle.
3 of 6 Attached image(s) 
|
|
|
|
| watsonrx13 |
Aug 29 2004, 02:56 PM
Post
#4
|
|
Advanced Member Group: Members Posts: 2,735 Joined: 18-February 03 From: Plant City, FL Member No.: 312 Region Association: South East States |
Once I drilled out the spot-welds on the top section, I used a cutting wheel to cut the ear in half. This shows the top section removed. Notice the extra plate welded on the bottom of the ear.
4 of 6 Attached image(s) 
|
|
|
|
| watsonrx13 |
Aug 29 2004, 02:56 PM
Post
#5
|
|
Advanced Member Group: Members Posts: 2,735 Joined: 18-February 03 From: Plant City, FL Member No.: 312 Region Association: South East States |
This shows the top section removed. Notice the heavy rust area, which was the reason the DAPO repaired this ear his way instead of the right way.
5 of 6 Attached image(s) 
|
|
|
|
| watsonrx13 |
Aug 29 2004, 02:57 PM
Post
#6
|
|
Advanced Member Group: Members Posts: 2,735 Joined: 18-February 03 From: Plant City, FL Member No.: 312 Region Association: South East States |
Here's another shot of the patched ear.
6 of 6 Attached image(s) 
|
|
|
|
| Brad Roberts |
Aug 29 2004, 02:57 PM
Post
#7
|
|
914 Freak! Group: Members Posts: 19,148 Joined: 23-December 02 Member No.: 8 Region Association: None |
Yep. Should be 10 factory spot welds at the top of that piece.
B |
|
|
|
| watsonrx13 |
Aug 29 2004, 02:57 PM
Post
#8
|
|
Advanced Member Group: Members Posts: 2,735 Joined: 18-February 03 From: Plant City, FL Member No.: 312 Region Association: South East States |
Finally, these are the tools that I used. Unfortunately in other posts, very few of them have include a list or photo of the tools used. If you get the right tools, it makes the job much easier.
This is all for this weekend, stay tuned for more progress. BTW, I'm hoping to be able to complete this by the end of next month. But, I'll be out of town next weekend, so it will be 2 weeks from now. Attached image(s) 
|
|
|
|
| Brad Roberts |
Aug 29 2004, 02:59 PM
Post
#9
|
|
914 Freak! Group: Members Posts: 19,148 Joined: 23-December 02 Member No.: 8 Region Association: None |
Those two scab plates will take longer than the removal AND install of the ear (if you are trying for a factory look)
What measurement did you get from the firewall dimple to the center of the ear ?? In Metric. B |
|
|
|
| watsonrx13 |
Aug 29 2004, 03:01 PM
Post
#10
|
|
Advanced Member Group: Members Posts: 2,735 Joined: 18-February 03 From: Plant City, FL Member No.: 312 Region Association: South East States |
21 3/8" --
|
|
|
|
| Brad Roberts |
Aug 29 2004, 03:13 PM
Post
#11
|
|
914 Freak! Group: Members Posts: 19,148 Joined: 23-December 02 Member No.: 8 Region Association: None |
Somebody convert that for me...LOL I have gone all metric. The factory Porsche race car manuels are all in metric.... so I practice..
B |
|
|
|
| watsonrx13 |
Aug 29 2004, 03:16 PM
Post
#12
|
|
Advanced Member Group: Members Posts: 2,735 Joined: 18-February 03 From: Plant City, FL Member No.: 312 Region Association: South East States |
Metric, we don't need no stinkn' METRIC.
This is a 'Merica (IMG:style_emoticons/default/flag.gif) home the free, land of the brave and keeper of the foot/inch... |
|
|
|
| SpecialK |
Aug 29 2004, 03:19 PM
Post
#13
|
|
aircraft surgeon Group: Benefactors Posts: 3,211 Joined: 15-March 04 From: Pacific, MO Member No.: 1,797 |
21.375 Inches equals 542.925 Millimeters
|
|
|
|
| Gary |
Aug 29 2004, 03:19 PM
Post
#14
|
|
Senior Member Group: Members Posts: 744 Joined: 12-January 03 From: Mount Airy, MD Member No.: 134 Region Association: MidAtlantic Region |
I think you were kidding... but I get 543mm, give or take a standard paperclip thickness, which I was taught in school measures 1mm. Come to think of it, I've never put a pair of calipers on a paperclip. (IMG:style_emoticons/default/biggrin.gif) (IMG:style_emoticons/default/biggrin.gif)
|
|
|
|
| watsonrx13 |
Aug 29 2004, 03:24 PM
Post
#15
|
|
Advanced Member Group: Members Posts: 2,735 Joined: 18-February 03 From: Plant City, FL Member No.: 312 Region Association: South East States |
So, I guess I'm close enough to the 545mm for government work?
(IMG:style_emoticons/default/smilie_pokal.gif) Who da man now.... (IMG:style_emoticons/default/cool_shades.gif) |
|
|
|
| Brad Roberts |
Aug 29 2004, 03:27 PM
Post
#16
|
|
914 Freak! Group: Members Posts: 19,148 Joined: 23-December 02 Member No.: 8 Region Association: None |
I installed mine at 545mm. I wasnt joking about the MM thing.. I measure just about everything in metric when it comes to cars.
B |
|
|
|
| watsonrx13 |
Aug 29 2004, 03:34 PM
Post
#17
|
|
Advanced Member Group: Members Posts: 2,735 Joined: 18-February 03 From: Plant City, FL Member No.: 312 Region Association: South East States |
Hey B, if I can get this ear replaced, it is the only thing structural wrong with this car. My intent is to finish the engine compartment, clean and upgrade the suspension and after Joe Ricard finishes my engine, put it back in the car. I still have to work on the interior and front and rear trunks, but I'll do them during short down times. This car has been on blocks since Jan 2003.
|
|
|
|
| Brad Roberts |
Aug 29 2004, 03:38 PM
Post
#18
|
|
914 Freak! Group: Members Posts: 19,148 Joined: 23-December 02 Member No.: 8 Region Association: None |
Go man Go. You have the BEST support group right here. There wont be anything on the car that we cant help you with.
Joe is building your engine ?? I didnt know Joe built engines.. B |
|
|
|
| watsonrx13 |
Aug 29 2004, 03:42 PM
Post
#19
|
|
Advanced Member Group: Members Posts: 2,735 Joined: 18-February 03 From: Plant City, FL Member No.: 312 Region Association: South East States |
Personal favor. (IMG:style_emoticons/default/aktion035.gif)
I got his 'burnt' car and we became friends. My wife and I travel to Biloxi, MS (red-neck riviera) for gambling every other month. So I always drop by Joe's place. Once he got his new teener from Washington, he volunteered to rebuild my engine, what a guy. He's doing a standard rebuild, I can't afford a Raby engine. Just another teener club member helping another. (IMG:style_emoticons/default/smilie_pokal.gif) |
|
|
|
| Brad Roberts |
Aug 29 2004, 04:07 PM
Post
#20
|
|
914 Freak! Group: Members Posts: 19,148 Joined: 23-December 02 Member No.: 8 Region Association: None |
|
|
|
|
|
1 User(s) are reading this topic (1 Guests and 0 Anonymous Users)
0 Members:

|
Lo-Fi Version | Time is now: 28th September 2024 - 11:21 AM |
Invision Power Board
v9.1.4 © 2024 IPS, Inc.