|
|
|
Porsche, and the Porsche crest are registered trademarks of Dr. Ing. h.c. F. Porsche AG.
This site is not affiliated with Porsche in any way. Its only purpose is to provide an online forum for car enthusiasts. All other trademarks are property of their respective owners. |
|
|

  |

| Joe Ricard |
 Aug 29 2004, 06:40 PM Aug 29 2004, 06:40 PM
Post
#21
|
|
CUMONIWANNARACEU  Group: Members Posts: 6,811 Joined: 5-January 03 From: Gautier, MS Member No.: 92 |
Just for th record "joe doesn't build engines" But I scrub them up real good. Put them back together with new parts. then I let er rip.
For the last two Sundays I've Been running my 1.7L (early) motor to red line for total of 10 runs AX and 120 miles to the track one way. Slightly over the speed limit. HMM ya'll figure out what 4000 RPM stock trans 205/60-15 rear tires. |
   |

 
|
| Eric_Shea |
Aug 29 2004, 07:16 PM
Post
#22
|
|
PMB Performance Group: Admin Posts: 19,289 Joined: 3-September 03 From: Salt Lake City, UT Member No.: 1,110 Region Association: Rocky Mountains |
205/60-15 = the closest thing you can get to stock tire heigth
|
|
|
|
| Joe Ricard |
Aug 30 2004, 08:55 AM
Post
#23
|
|
CUMONIWANNARACEU Group: Members Posts: 6,811 Joined: 5-January 03 From: Gautier, MS Member No.: 92 |
Comparing it to the Firebird I was traveling with he said he was running 85-90 MPH. He has to use a trailer to haul his shit. all mine fits in the trunks and one tire in passenger foot well.
|
|
|
|
| watsonrx13 |
Sep 19 2004, 02:37 PM
Post
#24
|
|
Advanced Member Group: Members Posts: 2,735 Joined: 18-February 03 From: Plant City, FL Member No.: 312 Region Association: South East States |
Well, after hurrincanes, Frances and Ivan, and a severe ear infection (which I still have), I was able to complete the removal of the suspension ear.
Here's the 'naked' area. Pic 1 of 4 Attached image(s) 
|
|
|
|
| watsonrx13 |
Sep 19 2004, 02:37 PM
Post
#25
|
|
Advanced Member Group: Members Posts: 2,735 Joined: 18-February 03 From: Plant City, FL Member No.: 312 Region Association: South East States |
Here's a shot of the engine shelf and the ear placed in position.
Pic 2 of 4 Attached image(s) 
|
|
|
|
| watsonrx13 |
Sep 19 2004, 02:37 PM
Post
#26
|
|
Advanced Member Group: Members Posts: 2,735 Joined: 18-February 03 From: Plant City, FL Member No.: 312 Region Association: South East States |
Finally, the top view. You'll notice that the engine shelf doesn't exactly fit, so I'll be 'persuading' it into position, using a SFH.
I'm planning the following: Spray all of the new pieces and the engine compartment with a primer before I begin the welding. Drill spot-weld holes (1/4" or 7/16") ? I will position the ear 21 7/16" from the firewall. Recommendation for persuading the engine shelf into place? Any other recommendation? Attached image(s) 
|
|
|
|
| watsonrx13 |
Sep 19 2004, 02:38 PM
Post
#27
|
|
Advanced Member Group: Members Posts: 2,735 Joined: 18-February 03 From: Plant City, FL Member No.: 312 Region Association: South East States |
Finally, here's a shot of all of the pieces removed. I cut the engine shelf in 3 pieces and the rest is the suspension ear.
Pic 4 of 4 Attached image(s) 
|
|
|
|
| BatAc |
Sep 20 2004, 12:18 AM
Post
#28
|
|
Member Group: Members Posts: 120 Joined: 9-July 04 From: seattle Member No.: 2,329 |
Oh, I'm enjoying this in that this is on the project list. Keep up the good work! So would you now use Ospho/Metal Ready solution, then POR-15 it, welder primer than weld it???
|
|
|
|
| thesey914 |
Sep 20 2004, 12:57 AM
Post
#29
|
|
Senior Member Group: Benefactors Posts: 1,155 Joined: 1-January 03 From: Staffordshire -England Member No.: 66 |
I love these kind of posts. Great pics (IMG:style_emoticons/default/smilie_pokal.gif)
|
|
|
|
| indydad |
Sep 20 2004, 10:46 AM
Post
#30
|
|
Member Group: Members Posts: 76 Joined: 16-April 03 From: indy Member No.: 578 |
I am right where you are. Your pics looks so familiar, same color, too. That engine tray is a pain. I assume there needs trimming at the front or bending maybe. I have Osphoed all the new parts and am ready to re-align the console. I made a jig to locate the ear prior to cutting out the oud one. I will bolt on the jig and position the console according to it, should be OK. What size spot weld holes? I've seen 1/8" to 1/4" suggested.
BTW, I've had some medical problems lately that have kept me from working on it. Am better, but not 100%. We have some great weather here now so it sucks just setting and looking at the teener. Old dad in INDY. |
|
|
|
| watsonrx13 |
Oct 8 2004, 05:16 PM
Post
#31
|
|
Advanced Member Group: Members Posts: 2,735 Joined: 18-February 03 From: Plant City, FL Member No.: 312 Region Association: South East States |
Well after 3 hurricanes and a sever ear infection today's the DAY, I've welded the suspension ear back in the car. But, before I show you the new piece, let me show you the preparation. After removing the old ear, in pieces, I carefully ground down any high spots, then painted everything underneath the ear with weldable primer (zinc-phosphate. The zinc-chromate is no longer available).
1 of 4 Attached image(s) 
|
|
|
|
| watsonrx13 |
Oct 8 2004, 05:16 PM
Post
#32
|
|
Advanced Member Group: Members Posts: 2,735 Joined: 18-February 03 From: Plant City, FL Member No.: 312 Region Association: South East States |
I also painted the inside of the suspension ear
2 of 4 Attached image(s) 
|
|
|
|
| watsonrx13 |
Oct 8 2004, 05:17 PM
Post
#33
|
|
Advanced Member Group: Members Posts: 2,735 Joined: 18-February 03 From: Plant City, FL Member No.: 312 Region Association: South East States |
Here's a shot of the suspension welded in. I drilled 3/16" spot weld holes completely around the outside (only where it will be welded). You'll need to carefully fit the ear, which could entail bending or grinding, as needed.
3 of 4 Attached image(s) 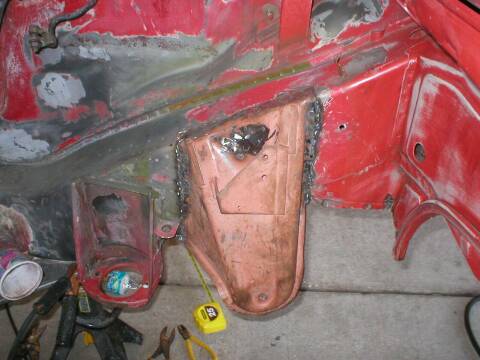
|
|
|
|
| watsonrx13 |
Oct 8 2004, 05:17 PM
Post
#34
|
|
Advanced Member Group: Members Posts: 2,735 Joined: 18-February 03 From: Plant City, FL Member No.: 312 Region Association: South East States |
What a PITA to weld the bottom section. Per Brad's recommendations, I've welded the spot welds and also the edges. I feel that the piece is attached firmly because I grabbed it and shook it, almost pulling the car off the jact stands. Anyway, this weekend I'm planning to finish the grinding, then I'll add the brace underneath.
4 of 4 Attached image(s) 
|
|
|
|
| URY914 |
Oct 8 2004, 06:37 PM
Post
#35
|
|
I built the lightest 914 in the history of mankind. Group: Members Posts: 123,041 Joined: 3-February 03 From: Jacksonville, FL Member No.: 222 Region Association: None |
Rob,
Great job. I know a lot of people are watching this. Paul |
|
|
|
| Joe Ricard |
Oct 8 2004, 07:46 PM
Post
#36
|
|
CUMONIWANNARACEU Group: Members Posts: 6,811 Joined: 5-January 03 From: Gautier, MS Member No.: 92 |
The question is will Rob's motor be done before the car is ready to recieve it. Don't know but there are some side bet going about parts delivery.
If I get the 2.0L carbed motor in my yellow car before the parts for Rob's engine get here I WIN. (IMG:style_emoticons/default/mueba.gif) Should be inplace by Sunday evening. |
|
|
|
| watsonrx13 |
Oct 10 2004, 04:30 PM
Post
#37
|
|
Advanced Member Group: Members Posts: 2,735 Joined: 18-February 03 From: Plant City, FL Member No.: 312 Region Association: South East States |
Here's the final installation pics of the suspension ear. This shows the reinforcing plate added. I created a paper template of the plate before I removed the original. I spent as much time creating, bending, grinding and welding on this plate as I did installing the suspension ear.
1 of 3 Attached image(s) 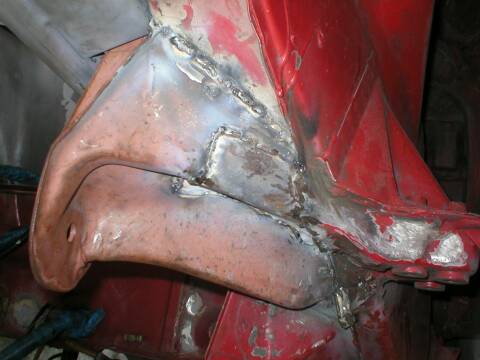
|
|
|
|
| watsonrx13 |
Oct 10 2004, 04:30 PM
Post
#38
|
|
Advanced Member Group: Members Posts: 2,735 Joined: 18-February 03 From: Plant City, FL Member No.: 312 Region Association: South East States |
Here's a shot of the plate from underneath the car.
2 of 3 Attached image(s) 
|
|
|
|
| watsonrx13 |
Oct 10 2004, 04:31 PM
Post
#39
|
|
Advanced Member Group: Members Posts: 2,735 Joined: 18-February 03 From: Plant City, FL Member No.: 312 Region Association: South East States |
Finally, this shows the trial fitting of the engine shelf, next weekend's job, also a new thread.
Well, I hope that this will help anyone that is contemplating this job. It took me 5 weeks to complete this, but, my excuse is/was, we in central Florida had 2 major hurricanes and I personally had a sever ear infection. I think that if I hadn't had the interruptions, that this project could and can be completed in 2 weekends. Good luck and if you have any questions, don't hesitate to ask. 3 of 3 Attached image(s) 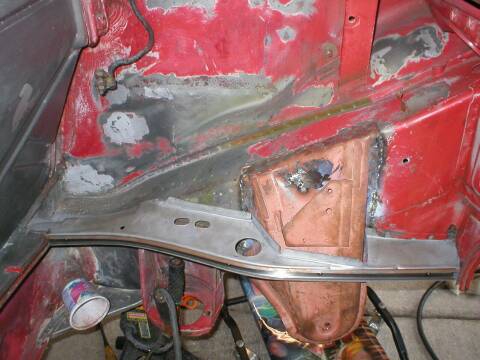
|
|
|
|
|
1 User(s) are reading this topic (1 Guests and 0 Anonymous Users)
0 Members:

|
Lo-Fi Version | Time is now: 28th September 2024 - 09:11 AM |
Invision Power Board
v9.1.4 © 2024 IPS, Inc.