|
|

|
Porsche, and the Porsche crest are registered trademarks of Dr. Ing. h.c. F. Porsche AG.
This site is not affiliated with Porsche in any way. Its only purpose is to provide an online forum for car enthusiasts. All other trademarks are property of their respective owners. |
|
|
  |
| BeatNavy |
 Nov 11 2014, 07:27 PM Nov 11 2014, 07:27 PM
Post
#1
|
|
Certified Professional Scapegoat     Group: Members Posts: 2,942 Joined: 26-February 14 From: Easton, MD Member No.: 17,042 Region Association: MidAtlantic Region 
|
Ok, here goes. I picked up this '75 last April in lower Maryland. It was advertised as a 2.0, it has a 2.0 badge on the back, and it looked pretty good from a distance (or with beer goggles).
Attached thumbnail(s) 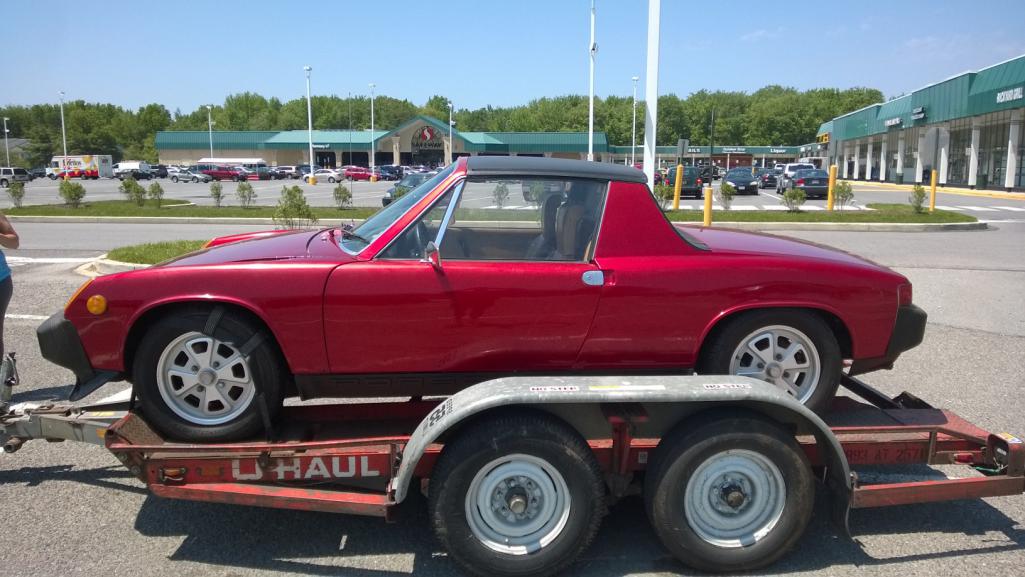
|
| BeatNavy |
 Nov 11 2014, 07:31 PM Nov 11 2014, 07:31 PM
Post
#2
|
|
Certified Professional Scapegoat     Group: Members Posts: 2,942 Joined: 26-February 14 From: Easton, MD Member No.: 17,042 Region Association: MidAtlantic Region 
|
But when I got it home I found that it was actually a 1.8L and it had some ugliness as seen in the hell hole below:
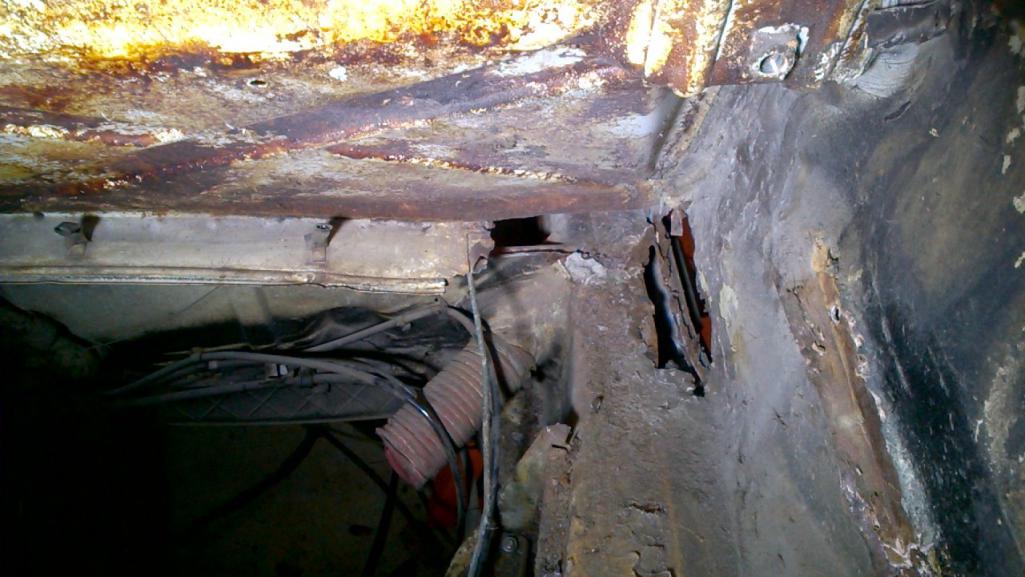 And the floor pans aren't in great shape: 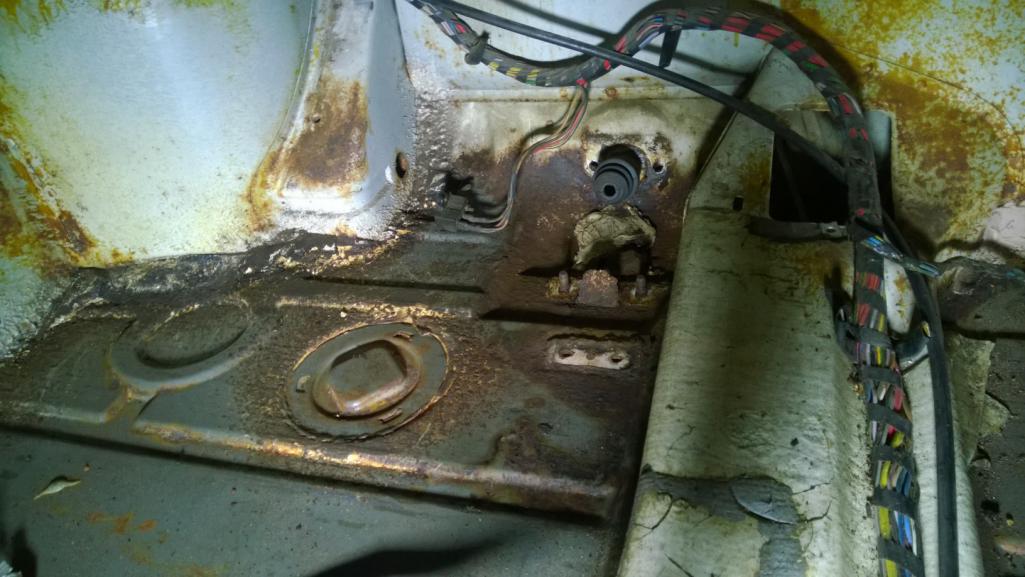 I'm pretty sure the longs need work, so I plan to tear into those in the next couple of weeks. This is going to be a bigger project than I anticipated.... |
| BeatNavy |
 Nov 11 2014, 07:38 PM Nov 11 2014, 07:38 PM
Post
#3
|
|
Certified Professional Scapegoat     Group: Members Posts: 2,942 Joined: 26-February 14 From: Easton, MD Member No.: 17,042 Region Association: MidAtlantic Region 
|
Anyway, I picked up a 2.0 engine that's been built out to a 2056. Now I just need to get serious about fixing up the tub. Today was a big step toward that. David (Half Moon) is letting me "borrow" his rotisserie, so I have no excuses now. I don't know the full genealogy of this rotisserie, but I think it belonged to CptTripps before David inherited it. Anyway, here's David dropping it off and helping me set it up today.
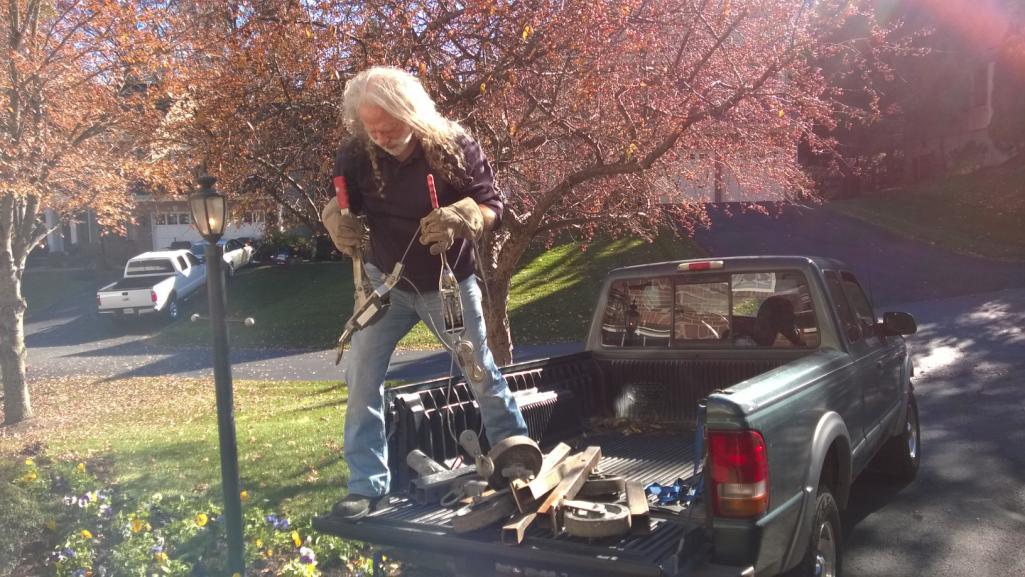 And setting it up in the garage. Honestly, I did help. Some. 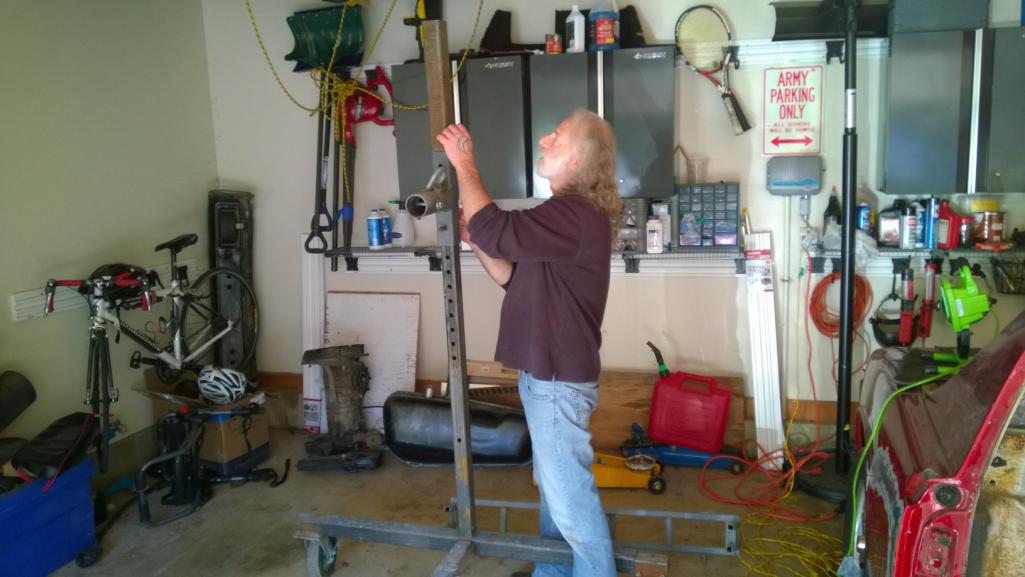 Ready. Sort of. 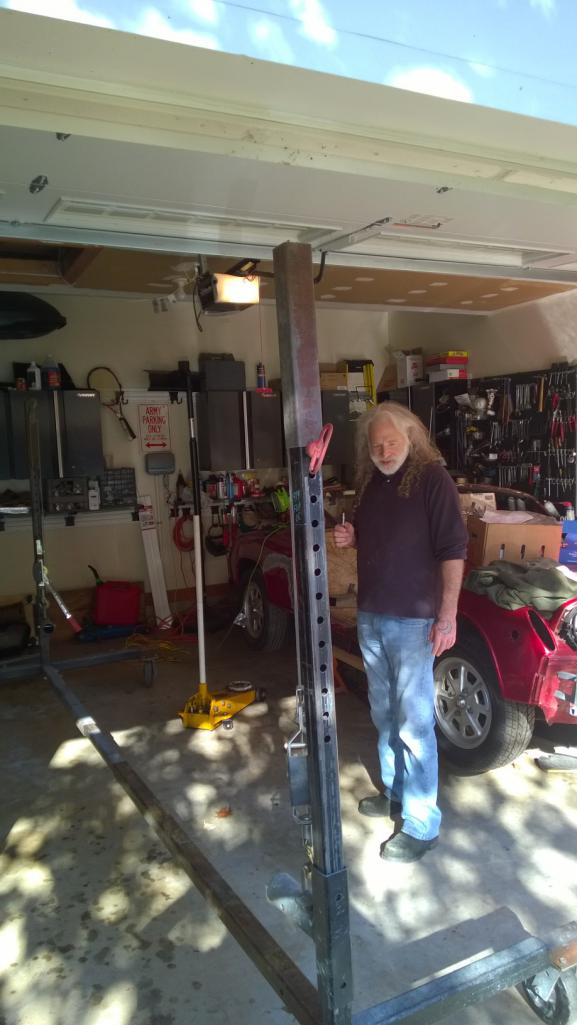 Honestly, I've only been part of this "community" for about a year, but I'm amazed by the cooperation and camaraderie herein. I've already met some great people. |
| Elliot Cannon |
 Nov 11 2014, 07:39 PM Nov 11 2014, 07:39 PM
Post
#4
|
|
914 Guru      Group: Retired Members Posts: 8,487 Joined: 29-December 06 From: Paso Robles Ca. (Central coast) Member No.: 7,407 Region Association: None 

|
Who did your pre-buy inspection? (IMG:style_emoticons/default/poke.gif) (IMG:style_emoticons/default/biggrin.gif)
|
| BeatNavy |
 Nov 11 2014, 07:45 PM Nov 11 2014, 07:45 PM
Post
#5
|
|
Certified Professional Scapegoat     Group: Members Posts: 2,942 Joined: 26-February 14 From: Easton, MD Member No.: 17,042 Region Association: MidAtlantic Region 
|
Now I just need to get this thing up on the rotisserie. Give that this is a '75, I know the mounting solution needs to be modified. It's also a little complicated that it appears the PO, or some PO, appears to have done a pretty piss poor repair to fix the front end following some moderate front end collision:
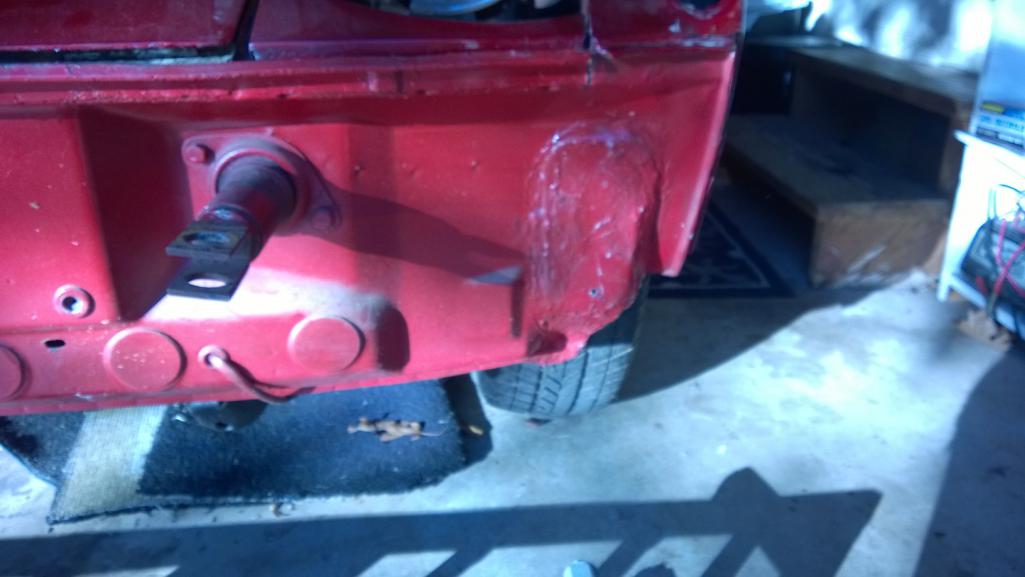 Don't think it's good idea to trust suspending the car on whatever that is. After a little grinding, and a LOT of bondo dust, it looks like this: 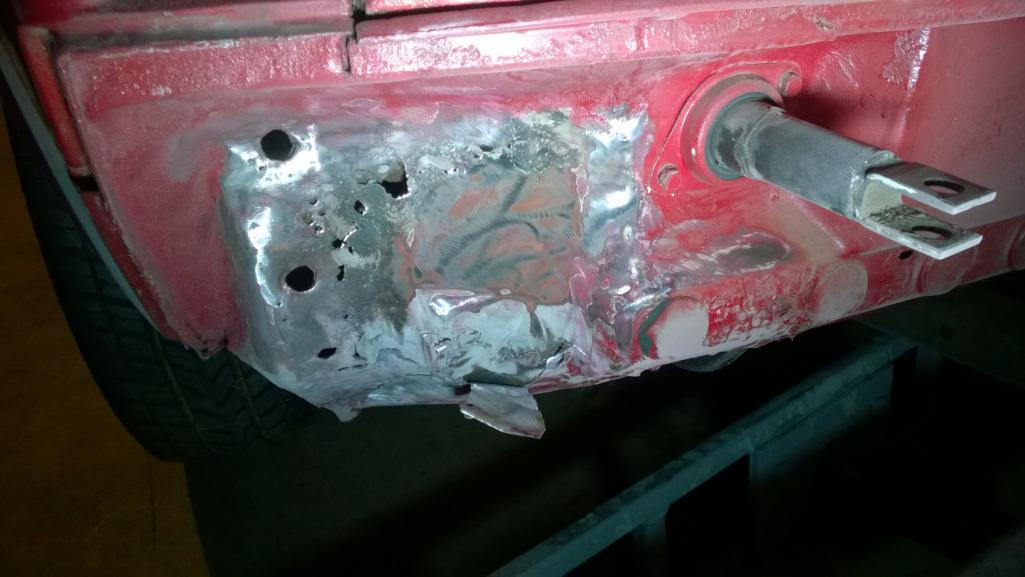 Yeah, that's not going to hold anything. I'm going to see if David's ok if I modify the front mount bracket for the rotisserie so it fits the '75 bumper shocks. I think Zach documented this somewhere, once upon a time. 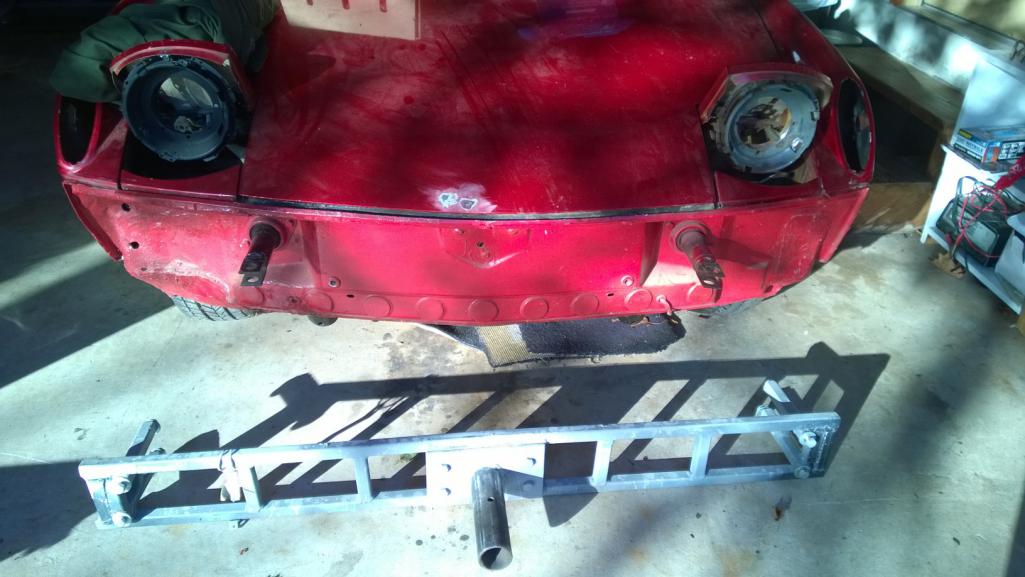 |
| BeatNavy |
 Nov 11 2014, 07:45 PM Nov 11 2014, 07:45 PM
Post
#6
|
|
Certified Professional Scapegoat     Group: Members Posts: 2,942 Joined: 26-February 14 From: Easton, MD Member No.: 17,042 Region Association: MidAtlantic Region 
|
Who did your pre-buy inspection? (IMG:style_emoticons/default/poke.gif) (IMG:style_emoticons/default/biggrin.gif) Some newbie that didn't know what the hell he was doing. I'd fire the guy, if I didn't have to live with him (IMG:style_emoticons/default/biggrin.gif) |
| BeatNavy |
 Nov 11 2014, 07:54 PM Nov 11 2014, 07:54 PM
Post
#7
|
|
Certified Professional Scapegoat     Group: Members Posts: 2,942 Joined: 26-February 14 From: Easton, MD Member No.: 17,042 Region Association: MidAtlantic Region 
|
The rotisserie very conveniently comes with some door braces, which I've rigged with braces I built a month or two ago (picture below shows only my original bracing solution):
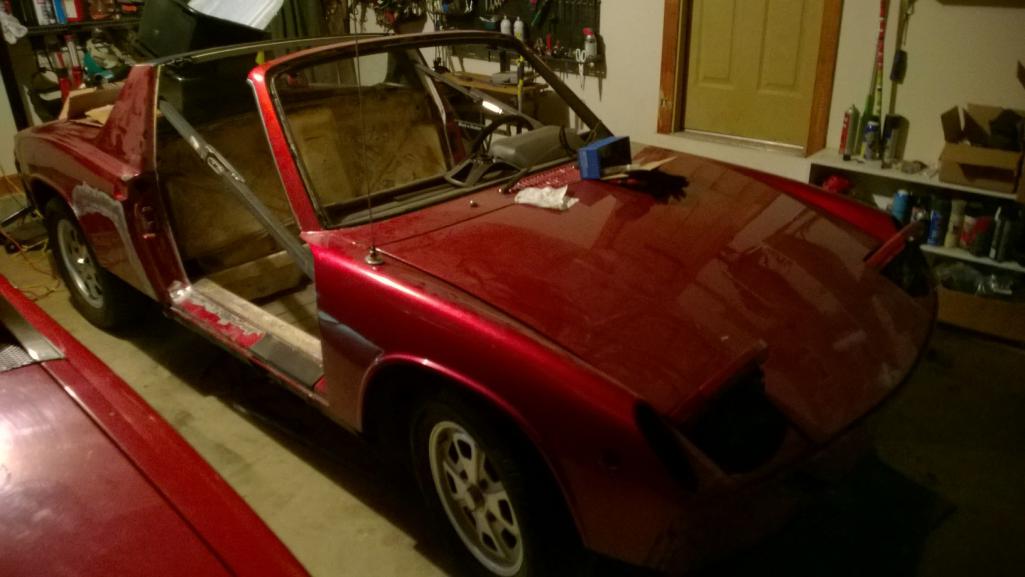 So now I just need to start cutting. I know I'm in over my head. My goal is to take my time and try to follow the examples of guys like Michelko, George (PaintedMan), and many others, and turn this into a solid, if certainly not spectacular, restoration effort. The only other thing I know is that this will not end up red. Wife says we already have too many red cars. I've got my '72 daily driver (red) that seems to demand daily attention (IMG:style_emoticons/default/blink.gif) to enjoy while I work on this. Hopefully I can make a lot of progress on this through the winter. I know I'm going to need lots of advice and help, so I'll try to keep this updated. As always, thanks in advance for your help! |
| ThePaintedMan |
 Nov 11 2014, 08:18 PM Nov 11 2014, 08:18 PM
Post
#8
|
|
Advanced Member     Group: Members Posts: 3,886 Joined: 6-September 11 From: St. Petersburg, FL Member No.: 13,527 Region Association: South East States 
|
Rob,
Awesome man! You've got good folks nearby to help you along. I wasn't so lucky when I started so I did a lot of learning on my own until I met my local buddies. First problem I see though - you said my name as an example of who to follow. BAD IDEA. I was in grad school and did all of mine on jackstands...outside...in my driveway. The way you're going about it is MUCH better. (IMG:style_emoticons/default/beerchug.gif) Good luck man - will be checking in on your progress. |
| BeatNavy |
 Nov 11 2014, 08:24 PM Nov 11 2014, 08:24 PM
Post
#9
|
|
Certified Professional Scapegoat     Group: Members Posts: 2,942 Joined: 26-February 14 From: Easton, MD Member No.: 17,042 Region Association: MidAtlantic Region 
|
Rob, Awesome man! You've got good folks nearby to help you along. I wasn't so lucky when I started so I did a lot of learning on my own until I met my local buddies. First problem I see though - you said my name as an example of who to follow. BAD IDEA. I was in grad school and did all of mine on jackstands...outside...in my driveway. The way you're going about it is MUCH better. (IMG:style_emoticons/default/beerchug.gif) Good luck man - will be checking in on your progress. Yeah, I was pretty amazed how you did restoration...without a garage...in the driveway...while going to school! But I guess it's not that big a deal, as it never really rains in Florida or anything (IMG:style_emoticons/default/biggrin.gif) Thanks, George. I'll be relying on your experience and the collective wisdom of the community. But I WILL be in a garage. |
| altitude411 |
 Nov 11 2014, 08:33 PM Nov 11 2014, 08:33 PM
Post
#10
|
|
I drove my 6 into a tree    Group: Members Posts: 1,306 Joined: 21-September 14 From: montana Member No.: 17,932 Region Association: Rocky Mountains 
|
Subbed to watch Rob build an awesome teener. (IMG:style_emoticons/default/aktion035.gif) Lots of pictures please. It's winter & we need build photo's. (IMG:style_emoticons/default/w00t.gif)
|
| PanelBilly |
 Nov 11 2014, 10:33 PM Nov 11 2014, 10:33 PM
Post
#11
|
|
914 Guru      Group: Members Posts: 5,863 Joined: 23-July 06 From: Kent, Wa Member No.: 6,488 Region Association: Pacific Northwest 
|
I'd strip the suspension off the car before trying to hang it. Lighten the load first
|
| saigon71 |
 Nov 12 2014, 06:56 AM Nov 12 2014, 06:56 AM
Post
#12
|
|
Advanced Member     Group: Members Posts: 2,006 Joined: 1-June 09 From: Dillsburg, PA Member No.: 10,428 Region Association: MidAtlantic Region 

|
A rotisserie will be a big help in bringing this one back to life.
Keep us posted on your progress & good luck! (IMG:style_emoticons/default/beerchug.gif) |
| BeatNavy |
 Nov 12 2014, 07:13 AM Nov 12 2014, 07:13 AM
Post
#13
|
|
Certified Professional Scapegoat     Group: Members Posts: 2,942 Joined: 26-February 14 From: Easton, MD Member No.: 17,042 Region Association: MidAtlantic Region 
|
Subbed to watch Rob build an awesome teener. (IMG:style_emoticons/default/aktion035.gif) Lots of pictures please. It's winter & we need build photo's. (IMG:style_emoticons/default/w00t.gif) Yeah, man. I'll try to keep the pics a'comin as I try to make progress. I'm not always good at that, so I need to make a note to do that. First step is to get this thing on a rotisserie... I'd strip the suspension off the car before trying to hang it. Lighten the load first Good point, and absolutely. A rotisserie will be a big help in bringing this one back to life. Keep us posted on your progress & good luck! (IMG:style_emoticons/default/beerchug.gif) Hey Bob! Yeah, I'm SURE this will be ready by Hershey (IMG:style_emoticons/default/av-943.gif) |
| BeatNavy |
 Jan 1 2015, 05:29 PM Jan 1 2015, 05:29 PM
Post
#14
|
|
Certified Professional Scapegoat     Group: Members Posts: 2,942 Joined: 26-February 14 From: Easton, MD Member No.: 17,042 Region Association: MidAtlantic Region 
|
Happy New Year everyone. It’s been a while since I started this. This project started off like a herd of turtles. Life got in the way (preparing for the holidays, trips out of town, etc.). I also struggled for a while to figure out how to adapt the rotisserie for the ’75 bumper setup, but I managed to weld a bracket on that fits to the bumper shocks just before Christmas. Now I can REALLY get myself in trouble. BTW, even without need to flip the car just yet that rotisserie rocks as I’m able to move the car around the tub. Now that the holidays are actually here and gone I have chunks of time on the weekend to work on the car (in between son’s wrestling tournaments).
Consistent with recommendations, I felt it best to unload the suspension and other unneeded “stuff” both to lighten the car on the rotisserie and also just get it out of the way. I took off the front hubs, and I still need to remove the rest of the front suspension. But I focused on the rear for now. My first challenge was getting that axel nut off without engine/tranny or brakes in car. The wheel kept turning under the torque, but with enough PB Blaster, heat from a propane torch, some blocking leverage, and my son sitting on the car to give it extra weight, I managed to break those free. 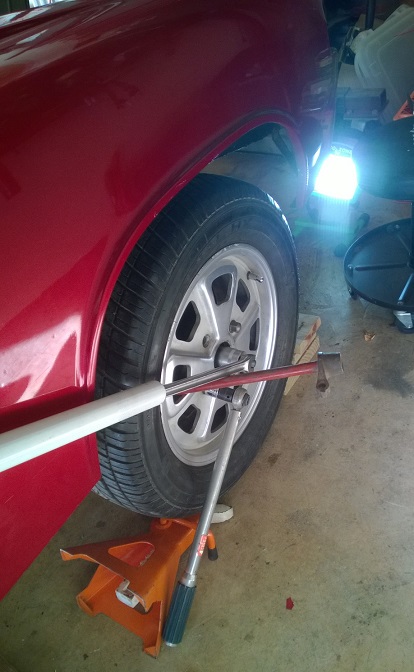 Anyway, after removing the drive axels with a gear puller and banging out the hubs, it was time to take out the rest of the trialing arm. Here’s a picture of the bolts connecting the arm to the body. There were two shims there (don’t know what size), and I know from reading here that these are important to rear wheel alignment. I imagine I did not do correctly whatever I’m supposed to do to make alignment easier upon install. Stupid question #1: is it the number (or total size) of shims present and/or the positioning of the shims that determines the alignment? 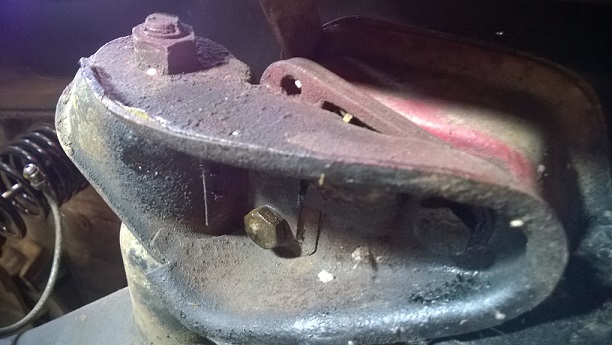 Here is the trailing arm removed. Stupid Question #2: what brand of shock is that? It’s been painted over. 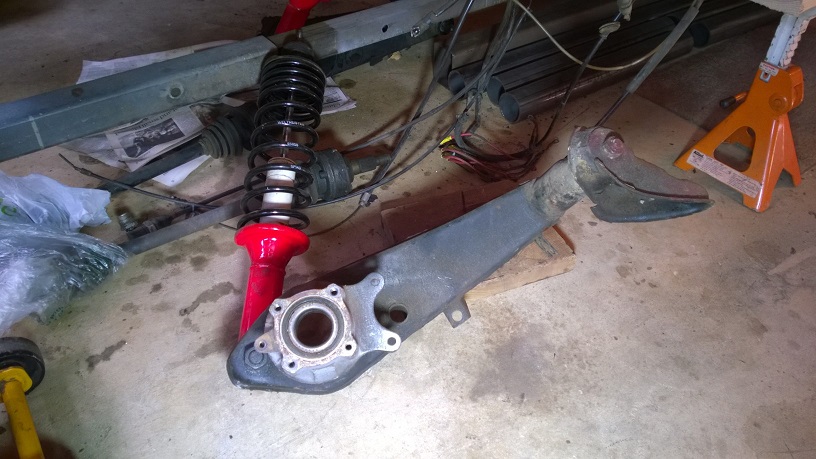 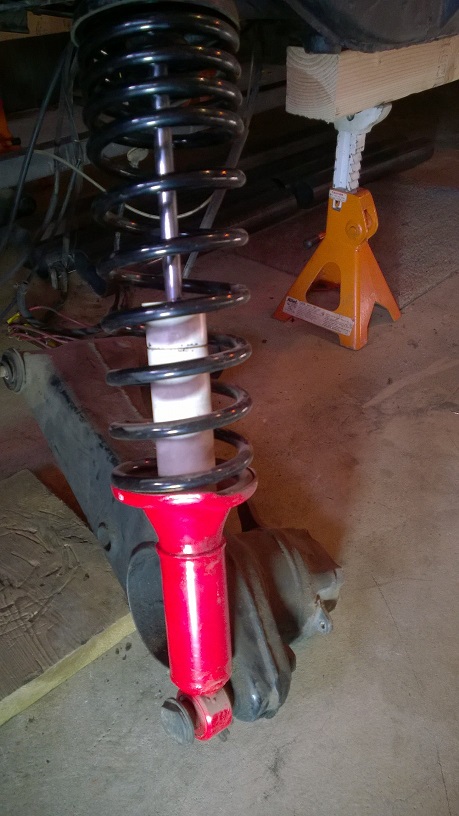 Anyway, now the car has no rear suspension. Much lighter! |
| BeatNavy |
 Jan 1 2015, 05:30 PM Jan 1 2015, 05:30 PM
Post
#15
|
|
Certified Professional Scapegoat     Group: Members Posts: 2,942 Joined: 26-February 14 From: Easton, MD Member No.: 17,042 Region Association: MidAtlantic Region 
|
Then it was time to start cutting. I’ve spent way too much time thinking about it. It’s good to just dive in and commit. My goals are pretty simple: learn and hopefully be pleased with the end result. So after removing the rear suspension, I started cutting. Here’s what I’ve found so far after some exploratory “surgery.”
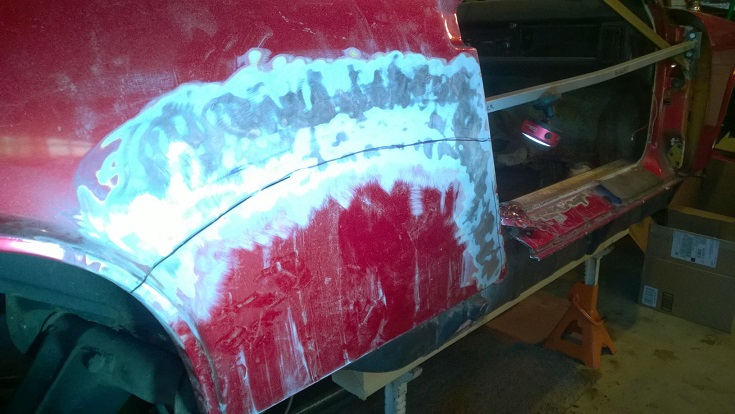 The PO used some pretty funky stuff to do his hell hole and long “repair.” It involved lots of sticky stuff, globs of paint, something resembling tin foil, another substance resembling something ceramic, 18 gauge sheet metal, and unicorn farts. Ok, I’m kidding. There was no sheet metal involved. 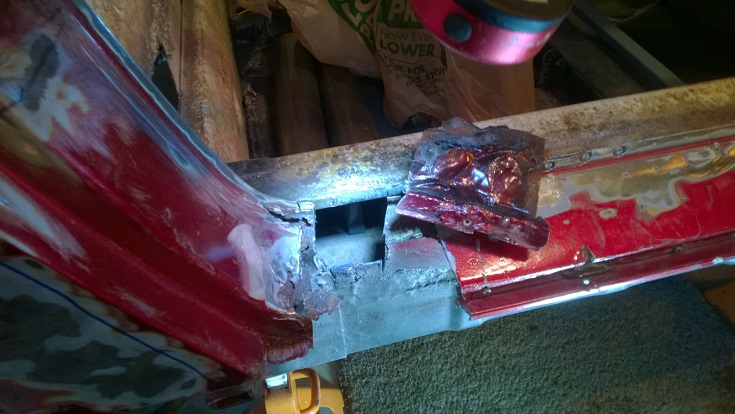 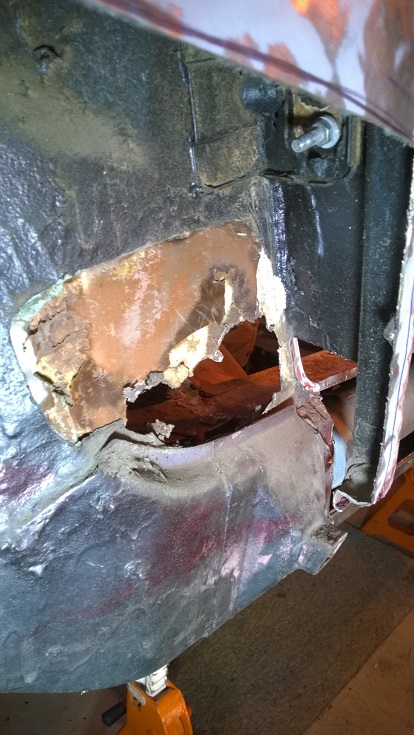 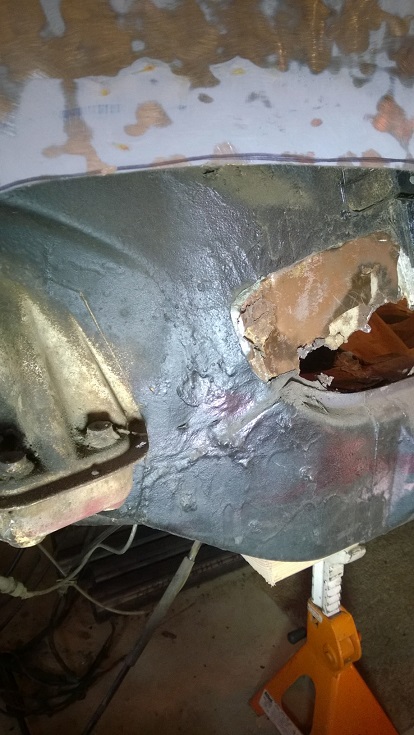 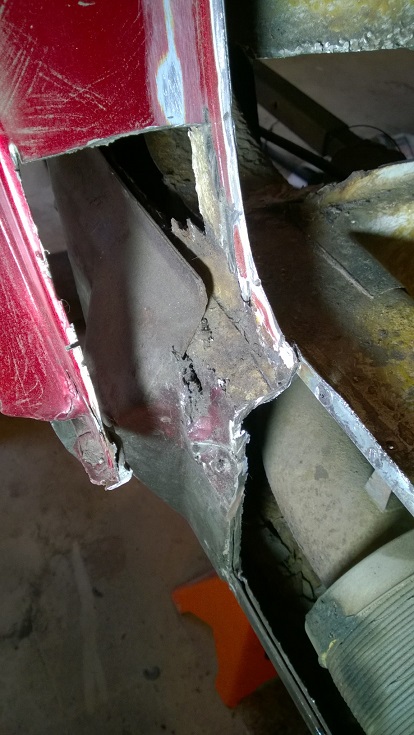 And here’s where I “retired” for today. I’m glad to at least be committed at this point. I’m hoping to do some more cutting into the long this weekend and get the rest (or most) of the outer long removed. 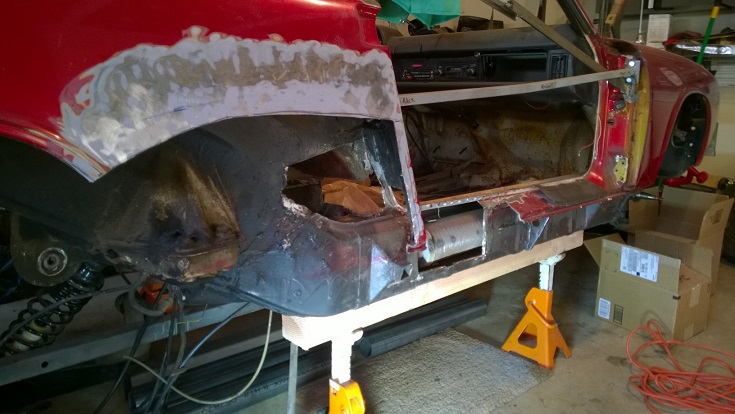 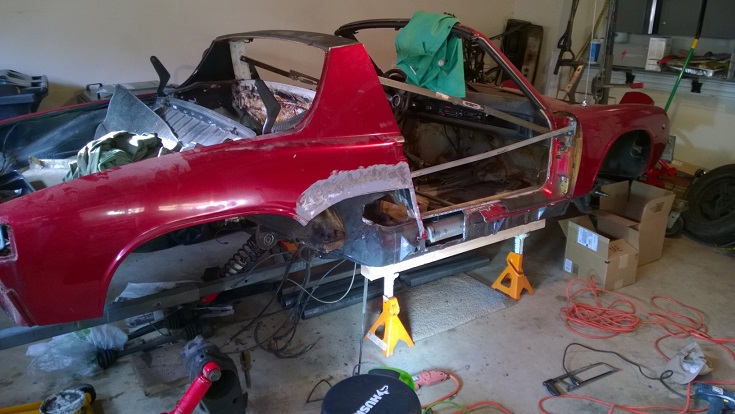 Stupid question #3 (yes, I’m keeping a running total): I guess I’m going to need, as a minimum: outer long and door sill, right? I previously purchased the hell hole restoration kit from Mad Dog, which I need to start shaping. Getting this far required lots of research on previous threads. Thanks for everyone's help. This site is such a great resource, particularly for a noob like me. More soon. |
| rhodyguy |
 Jan 1 2015, 06:10 PM Jan 1 2015, 06:10 PM
Post
#16
|
|
Chimp Sanctuary NW. Check it out.                Group: Members Posts: 22,193 Joined: 2-March 03 From: Orion's Bell. The BELL! Member No.: 378 Region Association: Galt's Gulch |
Wow.
|
| billh1963 |
 Jan 1 2015, 06:19 PM Jan 1 2015, 06:19 PM
Post
#17
|
|
Car Hoarder!     Group: Members Posts: 3,405 Joined: 28-March 11 From: North Carolina Member No.: 12,871 Region Association: South East States |
looks like you are well into it! (IMG:style_emoticons/default/sawzall-smiley.gif)
|
| 993inNC |
 Jan 1 2015, 06:49 PM Jan 1 2015, 06:49 PM
Post
#18
|
|
Member   Group: Members Posts: 194 Joined: 14-August 09 From: at the beach Member No.: 10,676 Region Association: South East States |
Here comes the real fun (IMG:style_emoticons/default/biggrin.gif) Took mine five years to get completed. A lot of time and a LOT of $$ invested. Best of luck!
|
| BeatNavy |
 Jan 1 2015, 06:54 PM Jan 1 2015, 06:54 PM
Post
#19
|
|
Certified Professional Scapegoat     Group: Members Posts: 2,942 Joined: 26-February 14 From: Easton, MD Member No.: 17,042 Region Association: MidAtlantic Region 
|
Here comes the real fun (IMG:style_emoticons/default/biggrin.gif) Took mine five years to get completed. A lot of time and a LOT of $$ invested. Best of luck! Shhh!!! Don't want my wife to hear things like "five years." (IMG:style_emoticons/default/busted.gif) I think she'll want "her" side of the garage back sooner than that. I'll just keep telling her "I'm making progress...." (IMG:style_emoticons/default/smile.gif) |
| scotty b |
 Jan 1 2015, 07:15 PM Jan 1 2015, 07:15 PM
Post
#20
|
|
rust free you say ?                Group: Members Posts: 16,375 Joined: 7-January 05 From: richmond, Va. Member No.: 3,419 Region Association: None |
white shocks indicate KYB....toss them in the trash. Alignment is based on the thickness ( number ) of shims. They only go on one way
Don't buy anything quite yet, but plan on: http://www.restoration-design.com/mm5/merc...tegory_Code=914 P331 P319R P302 P303 P351 P342R P315 P316 P317 P318 (maybe. Can't tell from the pics) Fabricate a hell hole patch Fabricate lower firewall patch Fabricate outer skin if you have to replace the inner long ( P351) in the engine compartment. |
  |
5 User(s) are reading this topic (5 Guests and 0 Anonymous Users)
0 Members:

|
Lo-Fi Version | Time is now: 18th December 2024 - 07:04 AM |
Invision Power Board
v9.1.4 © 2024 IPS, Inc.


