|
|
|
Porsche, and the Porsche crest are registered trademarks of Dr. Ing. h.c. F. Porsche AG.
This site is not affiliated with Porsche in any way. Its only purpose is to provide an online forum for car enthusiasts. All other trademarks are property of their respective owners. |
|
|

  |

| Tom1394racing |
 Oct 14 2024, 05:37 AM Oct 14 2024, 05:37 AM
Post
#1
|
|
Member  Group: Members Posts: 439 Joined: 25-August 07 From: CT Member No.: 8,039 Region Association: North East States |
I am now ready for my first 914-6 engine install as I move forward on my -6 GT project.
http://www.914world.com/bbs2/index.php?sho...8279&st=420 I have the car on my 2-post lift and the engine on my lift table. I am using the Mad Dog Motorsport bulkhead engine mount. 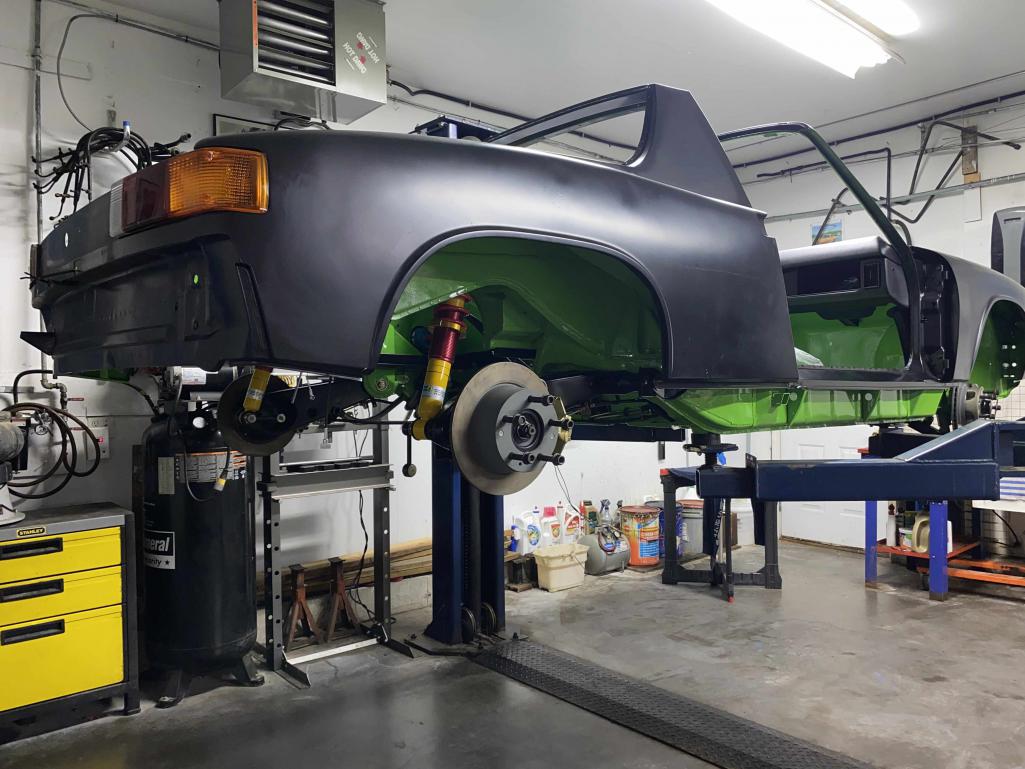 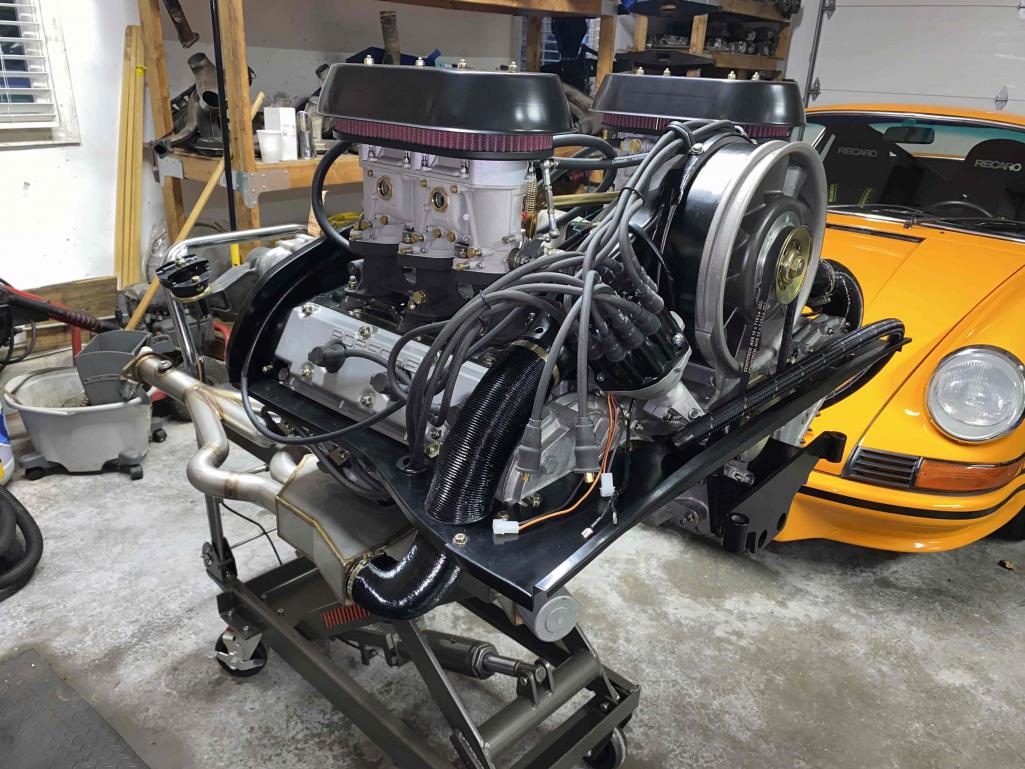 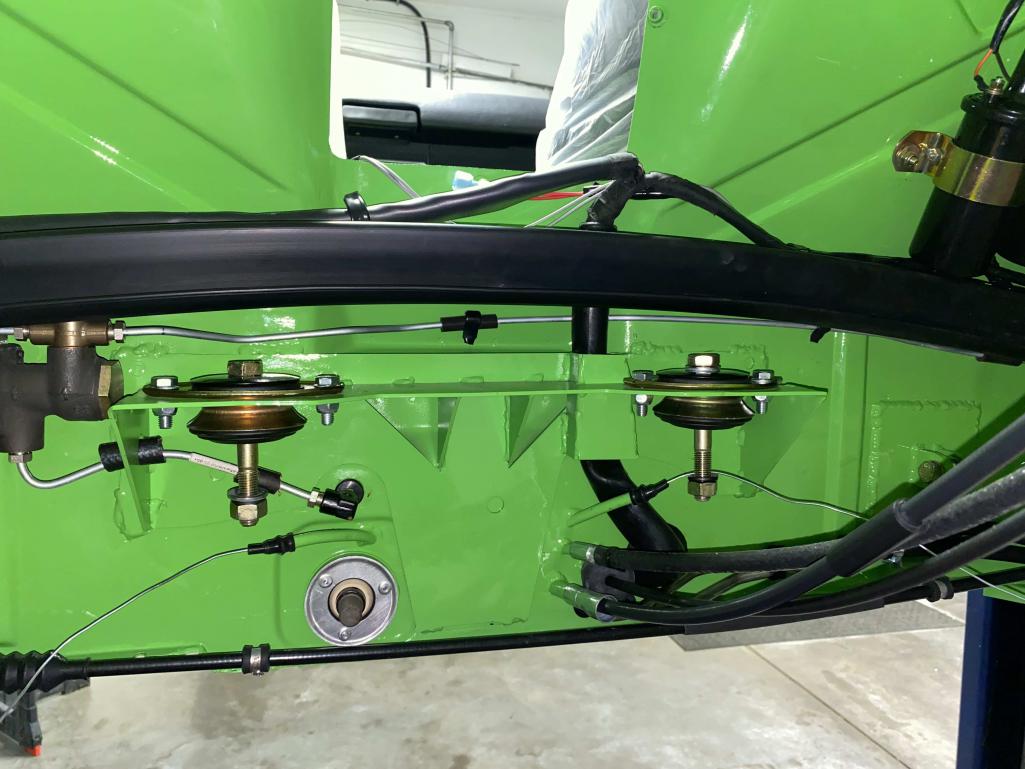 I plan to raise the engine on the lift table, lower the car on the lift and jockey the engine into position One of my concerns is the balance of the car on the lift as the heavy Aluminum case 3.2 short stroke engine is engine gets installed. I noticed that as I was disassembling the car on my lift that car was heavily weighted towards the rear before the engine and gearbox came out. I could almost tip the car backwards. I remedied this by running a jacking strap through the cockpit onto the arms of my lift to hold the car in place.   I am thinking I need to do this again before attempting the -6 engine install. Any thoughts or suggestions? I plan to install the engine without the side tins and carb rain hats but with the heat exchangers and engine oil lines. My oil t-stat, twin coils/MSD boxes and fuel lines are all in place in the engine compartment. I plan to install the CV/axle assemblies, the side tins and the muffler after the engine install. Does this sound about right? Anything I am missing or need to look out for? |
   |

 
|
| sixaddict |
Oct 14 2024, 07:01 AM
Post
#2
|
|
Senior Member Group: Members Posts: 919 Joined: 22-January 09 From: Panama City Beach, FL Member No.: 9,961 Region Association: South East States |
Tom
I am far from expert and most of my experience has been on the ground. I know you do pretty extensive research but my gut says installing engine tin after engine is in may be a bear. Assuming you have 930 lower valve covers, which require machining to clear…..again suspect you know this. Will watch as this unfolds. Super clean detailing……great color . Agree balance is tricky. TOT |
|
|
|
| Cairo94507 |
Oct 14 2024, 07:25 AM
Post
#3
|
|
Michael Group: Members Posts: 10,297 Joined: 1-November 08 From: Auburn, CA Member No.: 9,712 Region Association: Northern California |
Hi Tom,
Very exciting to see the engine getting ready to go in. On my car, we had the driver's side engine tin installed and left the passenger side tin off until the engine was in place. All of the rest should be OK; we had all of the usual stuff on my engine except heat exchangers when it was installed. I would strap the front of the car to counter balance it when you install the engine/transaxle. I guess, in the alternative, a few sacks of concrete in the front trunk would counter balance the engine. A strap seems a lot easier. Have fun- it's a milestone. (IMG:style_emoticons/default/beerchug.gif) |
|
|
|
| mepstein |
Oct 14 2024, 07:27 AM
Post
#4
|
|
914-6 GT in waiting Group: Members Posts: 19,843 Joined: 19-September 09 From: Landenberg, PA/Wilmington, DE Member No.: 10,825 Region Association: MidAtlantic Region |
I would definitely install the tin first. I’ve installed it after. Instead of 15 minutes, it took me hours.
Just keep the lift table in place (an inch or two under the engine) once the engine is bolted in the car and give the car a wiggle. You can also add some weight in the front truck. You can also make a deadman out of 2x4 and prop it under the rear trunk so the car can’t tip. I tend to go towards overkill so using more than one safety device isn’t being overly cautious, I think it’s smart. My large two post lift at the shop seems to place cars in the right spot for engine removals without any additional support. We pull 911 engines out daily and the cars are rock solid. |
 |
|
| Tom1394racing |
Oct 14 2024, 07:27 AM
Post
#5
|
|
Member Group: Members Posts: 439 Joined: 25-August 07 From: CT Member No.: 8,039 Region Association: North East States |
QUOTE(sixaddict @ Oct 14 2024, 09:01 AM)  Tom I am far from expert and most of my experience has been on the ground. I know you do pretty extensive research but my gut says installing engine tin after engine is in may be a bear. Assuming you have 930 lower valve covers, which require machining to clear…..again suspect you know this. Will watch as this unfolds. Super clean detailing……great color . Agree balance is tricky. TOT Thanks TOT I did some reading this weekend and the consensus seemed to be to install the side tin after the engine goes in. Apparently, the clearance with the side tin is very tight. I do have the trimmed Turbo lower valve covers. Interested to hear from others who have already been down this path. |
|
|
|
| Steve |
Oct 14 2024, 07:43 AM
Post
#6
|
|
914 Guru Group: Members Posts: 5,843 Joined: 14-June 03 From: Laguna Niguel, CA Member No.: 822 Region Association: Southern California |
I have this same setup. I used a 2x4 on each side of the motor on the lift table to keep it even. The tin always seems to hang up on the right side. You could just take the bolts out that side and let the right side tin hang down for easier install. Another goofy issue with the bulk head mount is that with a lift table you have to remove the front tin or it will catch on the mount. If you used a floor jack, you could tilt the motor back to get it over the mount. I would remove the bolts from the front tin and let it sit in front so you can flip it up during install. Otherwise it will be a major PIA to try and install it afterwards.
|
|
|
|
| Robarabian |
Oct 14 2024, 08:15 AM
Post
#7
|
|
914 A Roo Group: Members Posts: 680 Joined: 11-February 19 From: Simi Valley, Kalifornia Member No.: 22,865 Region Association: Southern California |
I have done multiple engine in / out days just like this. Mine is a 2.7 with a 901. Like Steve, I use wood to help out. I also install without the side tins on and bring the motor up. Then I pause, install the side tins and lift the remaining distance and bolt it all up. I don't have the same mount, but the principle is the same. Make sure the car comes down "low" onto the lift table... in other words, use the lift table for your "adjustments" in bringing the motor to its final spot, not the lift. The table is more precise. I have trimmed turbo valve covers. Also, keep an eye on your oil cooler fittings, as everything gets real close toward the end of the operation and things shift around. I have a 90 degree fitting on the cooler and I protect the threads with an AN cap.
|
|
|
|
| mskala |
Oct 14 2024, 08:47 AM
Post
#8
|
|
R Group: Members Posts: 1,930 Joined: 2-January 03 From: Massachusetts Member No.: 79 Region Association: None |
One time I decided to install without just the left side tin. It is nearly impossible to get
the screws in the tin after the engine is in place, at least the one furthest to the rear. I don't recommend. My lift is a 4 post, and my table has 4 casters, so lowering the car gradually and moving the cart after the front tin clears the front mount was not too bad. |
|
|
|
| Tom1394racing |
Oct 14 2024, 09:52 AM
Post
#9
|
|
Member Group: Members Posts: 439 Joined: 25-August 07 From: CT Member No.: 8,039 Region Association: North East States |
Thanks all for the quick replies and input. My take aways from this:
1. Leave the side tins on 2. Leave the front tin in place with no screws so it will flip over the mount. 3. Use the jacking strap plus several 50 lb. bags of blasting media in the front trunk for balance 4. Go slow and use the lift table to maneuver the engine I'll plan to give it a go this week and report back. |
|
|
|
| IronHillRestorations |
Oct 14 2024, 10:24 AM
Post
#10
|
|
I. I. R. C. Group: Members Posts: 6,812 Joined: 18-March 03 From: West TN Member No.: 439 Region Association: None |
I’ve always had all the engine tins installed. I made some sheet metal guide plates to cover the inner suspension nuts , as it’s easy to hang up on them. It’s a more work but if you remove the carbs, you have more room to get everything in place. Don’t tighten the M8 fasteners on the engine and transmission mounts. I’ve never had a 914 tip off my 2 post lift.
|
|
|
|
| TJB/914 |
Oct 14 2024, 10:37 AM
Post
#11
|
|
Mid-Engn. Group: Members Posts: 4,400 Joined: 24-February 03 From: Plymouth & Petoskey, MI Member No.: 346 Region Association: Upper MidWest |
Tom, After reading all this excellent advice my issue is safety. Don't try installing by yourself, have at least (2) additional helpers in an emergency. Beautiful build and workmanship (IMG:style_emoticons/default/smilie_pokal.gif) Tom in Michigan |
|
|
|
| rgalla9146 |
Oct 14 2024, 11:19 AM
Post
#12
|
|
Advanced Member Group: Members Posts: 4,736 Joined: 23-November 05 From: Paramus NJ Member No.: 5,176 Region Association: None |
It's no mystery why side tin is always tortured.
As Mark says, it can waste a lot of time. Next time I'm going with the drivers side fully attached and the pass side barely attached by a very loose rear screw . Fingers crossed. |
|
|
|
| gereed75 |
Oct 14 2024, 12:34 PM
Post
#13
|
|
Senior Member Group: Members Posts: 1,342 Joined: 19-March 13 From: Pittsburgh PA Member No.: 15,674 Region Association: North East States |
all good advice and as you can see getting the tins in is a bear. I like the idea of putting the bolts in but not tight. allow it to flap down. once installed tighten the bolts and add the end bolts. Never tried it that way but it sounds good. Might even leave the turbo covers off to get clearer access to the tin bolts, then install covers.
I have a stock mount but this tip should also work on the maddog mount - remove the "stock" bolts from the bulkhead mount and drop some long bolts or all thread or steel rods through the bulkhead mount holes. This allows you to align the motor with the mount while it is still below the fire wall and the extended bolts and associated holes are still visible. Once the motor is raised to mount level it is very hard to see the short stock bolts and getting it all aligned can be sort of trial and error guess. Once the longer bolts are through the engine side holes you can even put nuts on them. the longer bolts then sorta guide the motor up into the mount. Once home, remove one at a time and insert and tighten a stock bolt then the other. It is the right side carbs that are further aft and these tend to interfere with the aft firewall as the engine goes up and forward. The left side not so much so just removing the pax side carbs gets the clearance and only removing that side saves a bit of work try to set your motor on the lift table with a bit of an angle, front fan side high, maybe just 10 - 15 degrees or so. Work the front in and up first and the trans can be lifted, even man handled up once the front is home. i rough cut contour as necessary some 2x4s to set the motor on so it is steady on the lift table, not rockin and twisting. patience, sometimes it slips right in, some times takes aggravating extra time. Where are you in CT?? Ill be in Darien over the weekend. love your car your work and your story!! |
|
|
|
| Tom1394racing |
Oct 14 2024, 12:36 PM
Post
#14
|
|
Member Group: Members Posts: 439 Joined: 25-August 07 From: CT Member No.: 8,039 Region Association: North East States |
QUOTE(rgalla9146 @ Oct 14 2024, 01:19 PM) It's no mystery why side tin is always tortured. As Mark says, it can waste a lot of time. Next time I'm going with the drivers side fully attached and the pass side barely attached by a very loose rear screw . Fingers crossed. Thanks Rory So...By loosening the side tins but not disconnecting them, you get enough movement in the tins to maneuver them around the trailing arm nuts? Tightening them back up after the engine install is much easier than trying to install them? Makes sense. |
|
|
|
| mepstein |
Oct 14 2024, 12:36 PM
Post
#15
|
|
914-6 GT in waiting Group: Members Posts: 19,843 Joined: 19-September 09 From: Landenberg, PA/Wilmington, DE Member No.: 10,825 Region Association: MidAtlantic Region |
One person is all you need with a 1k harbor freight lift table. It’s not going anywhere.
|
|
|
|
| Tom1394racing |
Oct 14 2024, 02:27 PM
Post
#16
|
|
Member Group: Members Posts: 439 Joined: 25-August 07 From: CT Member No.: 8,039 Region Association: North East States |
QUOTE(mepstein @ Oct 14 2024, 02:36 PM) One person is all you need with a 1k harbor freight lift table. It’s not going anywhere. I have done several one man 911 engine removals and re-installs. I am guessing the 914-6 is just a tighter fit. |
|
|
|
| ChrisFoley |
Oct 14 2024, 03:45 PM
Post
#17
|
|
I am Tangerine Racing Group: Members Posts: 7,981 Joined: 29-January 03 From: Bolton, CT Member No.: 209 Region Association: None |
Tom, it looks like you have the firewall bearing flipped around.
Pull out the shift rod and rotate the sphere so the flat side shows. |
|
|
|
| 930cabman |
Oct 14 2024, 04:00 PM
Post
#18
|
|
Advanced Member Group: Members Posts: 4,044 Joined: 12-November 20 From: Buffalo Member No.: 24,877 Region Association: North East States |
QUOTE(mepstein @ Oct 14 2024, 07:27 AM) I would definitely install the tin first. I’ve installed it after. Instead of 15 minutes, it took me hours. Just keep the lift table in place (an inch or two under the engine) once the engine is bolted in the car and give the car a wiggle. You can also add some weight in the front truck. You can also make a deadman out of 2x4 and prop it under the rear trunk so the car can’t tip. I tend to go towards overkill so using more than one safety device isn’t being overly cautious, I think it’s smart. My large two post lift at the shop seems to place cars in the right spot for engine removals without any additional support. We pull 911 engines out daily and the cars are rock solid. (IMG:style_emoticons/default/agree.gif) |
|
|
|
| Tom1394racing |
Oct 14 2024, 05:13 PM
Post
#19
|
|
Member Group: Members Posts: 439 Joined: 25-August 07 From: CT Member No.: 8,039 Region Association: North East States |
QUOTE(ChrisFoley @ Oct 14 2024, 05:45 PM) Tom, it looks like you have the firewall bearing flipped around. Pull out the shift rod and rotate the sphere so the flat side shows. Chris Thanks for catching that one for me! |
|
|
|
| Tom1394racing |
Oct 14 2024, 05:36 PM
Post
#20
|
|
Member Group: Members Posts: 439 Joined: 25-August 07 From: CT Member No.: 8,039 Region Association: North East States |
QUOTE(gereed75 @ Oct 14 2024, 02:34 PM) all good advice and as you can see getting the tins in is a bear. I like the idea of putting the bolts in but not tight. allow it to flap down. once installed tighten the bolts and add the end bolts. Never tried it that way but it sounds good. Might even leave the turbo covers off to get clearer access to the tin bolts, then install covers. I have a stock mount but this tip should also work on the maddog mount - remove the "stock" bolts from the bulkhead mount and drop some long bolts or all thread or steel rods through the bulkhead mount holes. This allows you to align the motor with the mount while it is still below the fire wall and the extended bolts and associated holes are still visible. Once the motor is raised to mount level it is very hard to see the short stock bolts and getting it all aligned can be sort of trial and error guess. Once the longer bolts are through the engine side holes you can even put nuts on them. the longer bolts then sorta guide the motor up into the mount. Once home, remove one at a time and insert and tighten a stock bolt then the other. It is the right side carbs that are further aft and these tend to interfere with the aft firewall as the engine goes up and forward. The left side not so much so just removing the pax side carbs gets the clearance and only removing that side saves a bit of work try to set your motor on the lift table with a bit of an angle, front fan side high, maybe just 10 - 15 degrees or so. Work the front in and up first and the trans can be lifted, even man handled up once the front is home. i rough cut contour as necessary some 2x4s to set the motor on so it is steady on the lift table, not rockin and twisting. patience, sometimes it slips right in, some times takes aggravating extra time. Where are you in CT?? Ill be in Darien over the weekend. love your car your work and your story!! Thanks Gereed I did loosen up the side tins and removed the screws from the front tin to allow all three pieces some freedom of movement to clear the trailing arm nuts and front mount. Your suggestion for using a pair of long bolts to align the mount also sounds like a good one. I am not sure it will work with the Mad Dog mount, but I will check it out. I did not understand Perry's suggestion of removing the carbs before the install, but I did not consider the potential interference with the rear bulkhead. I think I will follow that suggestion as well. The Mad Dog install instructions do suggest tipping the front of the engine upward, so I'll follow up on that as well. I have the heat exchangers installed on the engine and they pride a stable base on the lift table. I am located in Portland, CT. You are welcome to stop by anytime you are in the area. |
|
|
|
|
1 User(s) are reading this topic (1 Guests and 0 Anonymous Users)
0 Members:

|
Lo-Fi Version | Time is now: 19th April 2025 - 06:05 PM |
Invision Power Board
v9.1.4 © 2025 IPS, Inc.