|
|
|
Porsche, and the Porsche crest are registered trademarks of Dr. Ing. h.c. F. Porsche AG.
This site is not affiliated with Porsche in any way. Its only purpose is to provide an online forum for car enthusiasts. All other trademarks are property of their respective owners. |
|
|

  |

| frank_c |
 Mar 18 2025, 10:56 PM Mar 18 2025, 10:56 PM
Post
#1
|
|
Member  Group: Members Posts: 87 Joined: 29-December 24 From: Austin, TX Member No.: 28,542 Region Association: None |
Hello,
I acquired a '76 914 2.0 a little over a month ago. The car had the original '76 exhaust system on it, and as part of many repairs & changes I have made so far, I swapped out the original exhaust with a set of new SSI heat exchangers and a MittelMotor muffler. Note that the original exhaust had what I suspected was a small exhaust leak as the engine would backfire a few seconds after every shutdown. After the exhaust swap (with new copper gaskets), I took the car for a quick test run and it backfired excessively. At first, I thought maybe one of the gaskets became dislodged when I was fitting the HEs, but when I pulled the HEs all the gaskets were in place. Upon further inspection, the leak appears to be coming from cylinder 3. Photo 1 shows Cyl 3 before I removed the copper gasket with signs of the gasket not sealing at the bottom of the port. Photo 1: 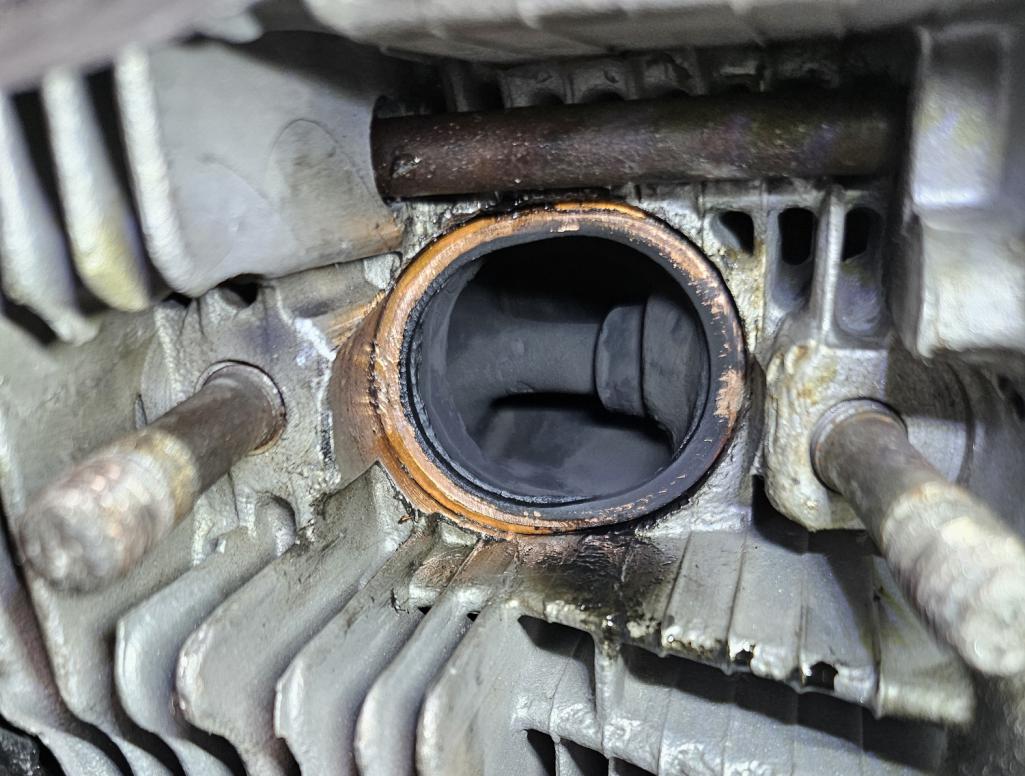 I confirmed that the new SSI HE tubes were flat and parallel where they mated to the head (photo 2). Photo 2: 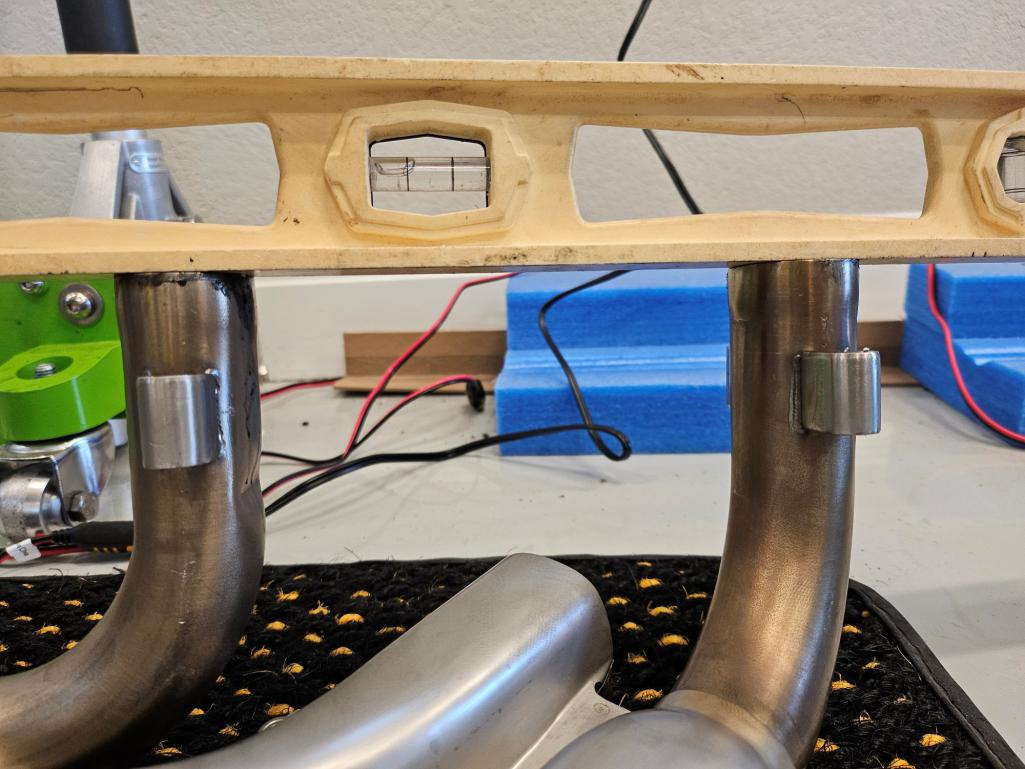 I removed all the gaskets and cleaned the gasket mating surface of all the ports to inspect the heads for damage. Photo 3 shows the Cyl 3 port. It's not easy to see in the photo, but there is a slight indentation in the bottom of the mating surface that corresponds to where the black mark is on the head from the leak. Photo 4 shows the indentation a little better. Photo 3: 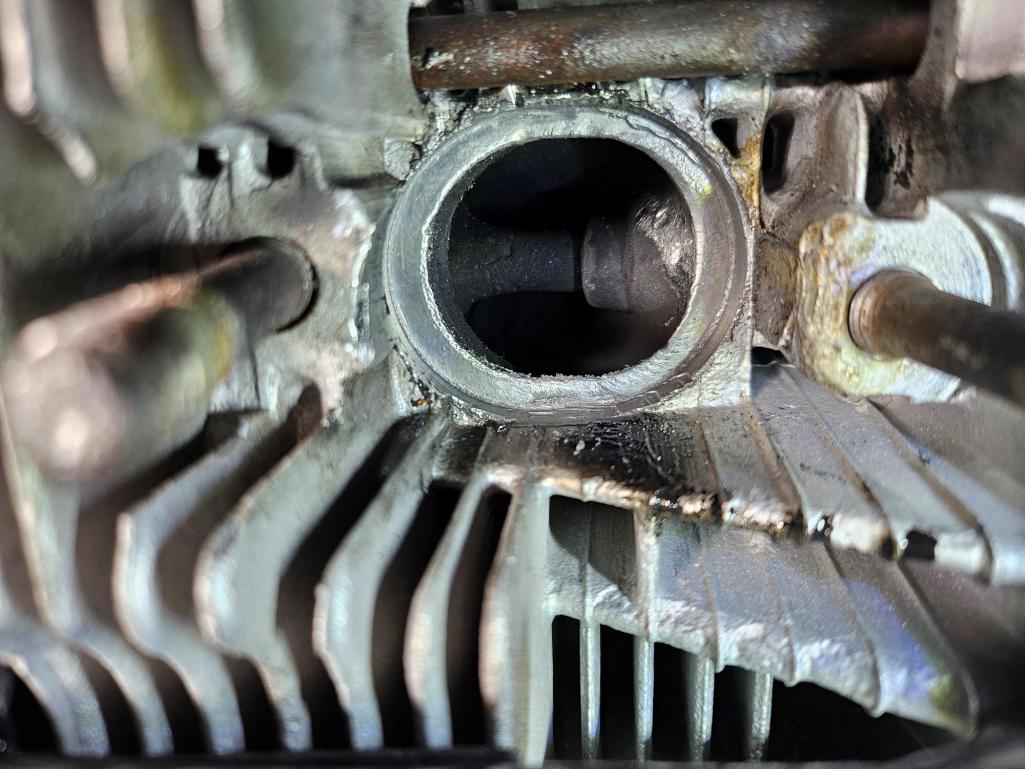 Photo 4: 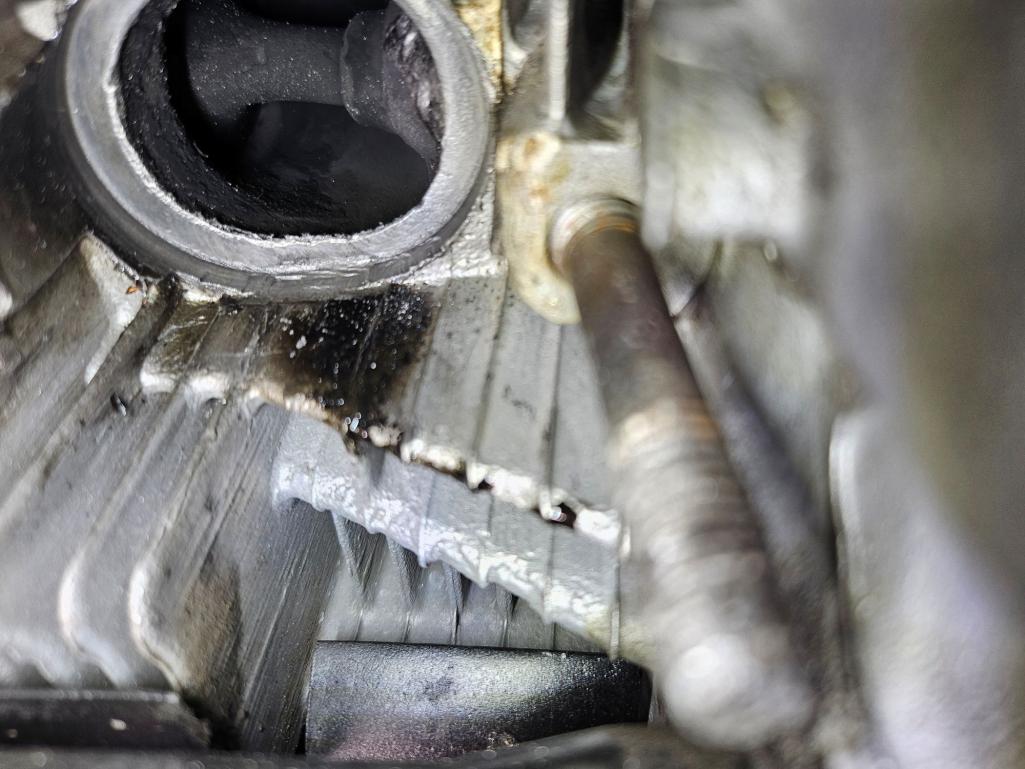 On Cyl 4, I noticed that the port has a strange step in the mating surface at the top of photo 5, but it appears to be sealing ok. Photo 5: 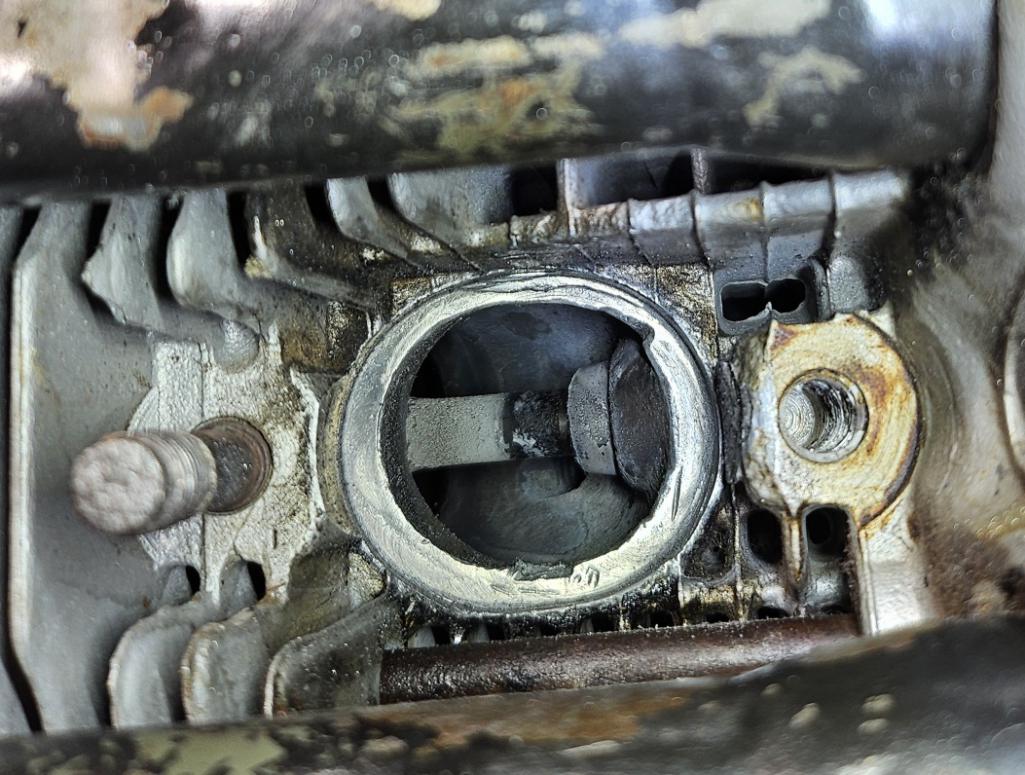 The ports on Cyl 1 & 2 look good. So here's my question - do you think that if I were to anneal the gaskets, and use high-temp copper RTV, that I can get Cylinders 3 & 4 to seal given the non-perfect mating surface on the head? Or does the cyl 3/4 head need to be repaired? Note that I did not anneal the gaskets previously, and only used some grease to hold them in place when fitting the HEs. Thanks for any advice, Frank |
   |

 
|
| TheCabinetmaker |
Mar 19 2025, 10:20 AM
Post
#2
|
|
I drive my car everyday Group: Members Posts: 8,373 Joined: 8-May 03 From: Tulsa, Ok. Member No.: 666 |
Did you anneal the copper gaskets?
|
|
|
|
| 73-914 |
Mar 19 2025, 05:48 PM
Post
#3
|
|
Senior Member Group: Members Posts: 668 Joined: 24-April 10 From: Albany UpstateNY Member No.: 11,651 Region Association: None |
QUOTE(frank_c @ Mar 19 2025, 12:56 AM)  Hello, I acquired a '76 914 2.0 a little over a month ago. The car had the original '76 exhaust system on it, and as part of many repairs & changes I have made so far, I swapped out the original exhaust with a set of new SSI heat exchangers and a MittelMotor muffler. Note that the original exhaust had what I suspected was a small exhaust leak as the engine would backfire a few seconds after every shutdown. After the exhaust swap (with new copper gaskets), I took the car for a quick test run and it backfired excessively. At first, I thought maybe one of the gaskets became dislodged when I was fitting the HEs, but when I pulled the HEs all the gaskets were in place. Upon further inspection, the leak appears to be coming from cylinder 3. Photo 1 shows Cyl 3 before I removed the copper gasket with signs of the gasket not sealing at the bottom of the port. Photo 1: I confirmed that the new SSI HE tubes were flat and parallel where they mated to the head (photo 2). Photo 2: I removed all the gaskets and cleaned the gasket mating surface of all the ports to inspect the heads for damage. Photo 3 shows the Cyl 3 port. It's not easy to see in the photo, but there is a slight indentation in the bottom of the mating surface that corresponds to where the black mark is on the head from the leak. Photo 4 shows the indentation a little better. Photo 3: Photo 4: On Cyl 4, I noticed that the port has a strange step in the mating surface at the top of photo 5, but it appears to be sealing ok. Photo 5: The ports on Cyl 1 & 2 look good. So here's my question - do you think that if I were to anneal the gaskets, and use high-temp copper RTV, that I can get Cylinders 3 & 4 to seal given the non-perfect mating surface on the head? Or does the cyl 3/4 head need to be repaired? Note that I did not anneal the gaskets previously, and only used some grease to hold them in place when fitting the HEs. Thanks for any advice, Frank You HAVE to anneal copper gaskets (IMG:style_emoticons/default/smash.gif) |
|
|
|
| frank_c |
Mar 19 2025, 09:07 PM
Post
#4
|
|
Member Group: Members Posts: 87 Joined: 29-December 24 From: Austin, TX Member No.: 28,542 Region Association: None |
Ok, thanks for confirming that the annealing process is critical for getting the gaskets to seal properly. In my initial reading several weeks ago on installing HEs, the annealing was mentioned by some, but not all. Upon further reading since then, the consensus is clearly that annealing is the way to go (along with some type of sealant).
With the annealed gasket and High Temp RTV (Permatex 81878), does this damaged seat area circled in the photo below have a good chance of sealing? I suppose there is one way to find out.. 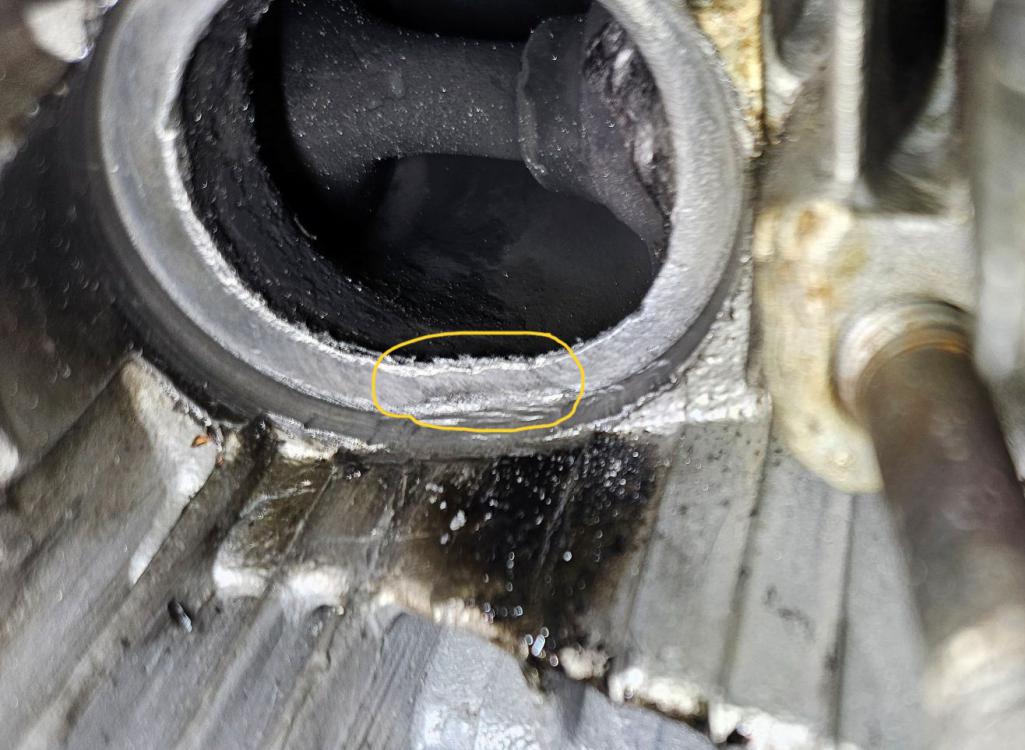 |
|
|
|
| Montreal914 |
Mar 19 2025, 11:28 PM
Post
#5
|
|
Advanced Member Group: Members Posts: 2,073 Joined: 8-August 10 From: Claremont, CA Member No.: 12,023 Region Association: Southern California |
High temp RTV??? (IMG:style_emoticons/default/blink.gif)
|
|
|
|
| barefoot |
Mar 22 2025, 01:25 PM
Post
#6
|
|
Senior Member Group: Members Posts: 1,488 Joined: 19-March 13 From: Charleston SC Member No.: 15,673 Region Association: South East States |
I think you'll have sealing problems with the ports in that condition.
Put a thin layer of Prussian blue or grease on a good copper gasket and hand press it into the port, then look to see if blueing or grease has left a full impression in the port, if not you need to have some work done to true them up. Good luck (IMG:style_emoticons/default/sunglasses.gif) Barefoot |
|
|
|
| bkrantz |
Mar 22 2025, 07:42 PM
Post
#7
|
|
914 Guru Group: Members Posts: 8,647 Joined: 3-August 19 From: SW Colorado Member No.: 23,343 Region Association: Rocky Mountains |
QUOTE(Montreal914 @ Mar 19 2025, 10:28 PM) Be gone, satan! |
|
|
|
| Superhawk996 |
Mar 22 2025, 09:00 PM
Post
#8
|
|
914 Guru Group: Members Posts: 7,768 Joined: 25-August 18 From: Woods of N. Idaho Member No.: 22,428 Region Association: Galt's Gulch |
QUOTE(bkrantz @ Mar 22 2025, 09:42 PM) QUOTE(Montreal914 @ Mar 19 2025, 10:28 PM) Be gone, satan! (IMG:style_emoticons/default/lol-2.gif) On a more serious note, try the annealed seals. If that doesn’t cut it you are going to be looking at some machine work to flatten those ports that look to have been damaged by someone prior. (IMG:style_emoticons/default/headbang.gif) |
|
|
|
| rhodyguy |
Mar 23 2025, 12:00 PM
Post
#9
|
|
Chimp Sanctuary NW. Check it out. Group: Members Posts: 22,252 Joined: 2-March 03 From: Orion's Bell. The BELL! Member No.: 378 Region Association: Galt's Gulch |
Tighten the nuts in an X pattern and in stages increasing the torque values. Tightening one nut fully while the others are loose, is a pretty good way of building in a leak right from the beginning. Double check the piping trueness with a sharpie and a wide long bastard file.
|
|
|
|
|
1 User(s) are reading this topic (1 Guests and 0 Anonymous Users)
0 Members:

|
Lo-Fi Version | Time is now: 5th April 2026 - 02:50 AM |
Invision Power Board
v9.1.4 © 2026 IPS, Inc.