|
|

|
Porsche, and the Porsche crest are registered trademarks of Dr. Ing. h.c. F. Porsche AG.
This site is not affiliated with Porsche in any way. Its only purpose is to provide an online forum for car enthusiasts. All other trademarks are property of their respective owners. |
|
|
  |
| John |
 Mar 4 2006, 09:36 AM Mar 4 2006, 09:36 AM
Post
#1
|
|
member? what's a member?     Group: Members Posts: 3,393 Joined: 30-January 04 From: Evansville, IN (SIRPCA) Member No.: 1,615 Region Association: None |
Has anyone rewired a later model car to that of an early model car to get individual turn signal indiators?
The early style was wired so that each indicator light (in the tach) had one of the turn signal wires (black/white stripe or black/green stripe) and the blue/white stripe. As far as I can tell, the flasher relay is the same, but the wiring is different due to the fact that the 1974 and later cars only had the single indicator light in the tach. The 74 wiring diagram shows the indicator light wired to the blue/white stripe and ground. Is this rihgt or not. maybe I'll wire it up and find out..... |
| bd1308 |
 Mar 4 2006, 09:45 AM Mar 4 2006, 09:45 AM
Post
#2
|
|
Sir Post-a-lot      Group: Members Posts: 8,020 Joined: 24-January 05 From: Louisville,KY Member No.: 3,501 |
(IMG:http://www.914world.com/bbs2/html/emoticons/popcorn[1].gif)
mine doesnt work, light stays lit...this'll be intresting. b |
| Bartlett 914 |
 Mar 4 2006, 02:45 PM Mar 4 2006, 02:45 PM
Post
#3
|
|
Advanced Member     Group: Members Posts: 2,218 Joined: 30-August 05 From: South Elgin IL Member No.: 4,707 Region Association: Upper MidWest |
I have a 75. I was able to do what you wanted. If I remember correctly, I needed to run a additional wire from the flasher. I don't remember how the lamps were setup.
|
| jk76.914 |
 Jul 6 2006, 12:44 AM Jul 6 2006, 12:44 AM
Post
#4
|
|
Senior Member    Group: Members Posts: 809 Joined: 12-April 05 From: Massachusetts Member No.: 3,925 Region Association: North East States |
I figured this out. Do you guys still need to know the secret?
Jim |
| double-a |
 Jul 6 2006, 08:07 AM Jul 6 2006, 08:07 AM
Post
#5
|
|
Senior Member    Group: Members Posts: 989 Joined: 15-September 03 From: vancouver, wa, usa Member No.: 1,162 Region Association: Pacific Northwest |
i did this. not hard, just need to run a new wire from the light switch i think.
~a |
| BigDBass |
 Jul 6 2006, 11:27 AM Jul 6 2006, 11:27 AM
Post
#6
|
|
Dumb Question Champion    Group: Members Posts: 1,438 Joined: 11-January 06 From: Chicago (south 'burbs) Member No.: 5,405 Region Association: Upper MidWest |
(IMG:style_emoticons/default/popcorn[1].gif)
I would like to know the secret. |
| 914MF |
 Jul 6 2006, 12:11 PM Jul 6 2006, 12:11 PM
Post
#7
|
|
Member   Group: Benefactors Posts: 176 Joined: 4-September 03 From: Denver, CO Member No.: 1,112  |
(IMG:style_emoticons/default/boldblue.gif) (IMG:style_emoticons/default/boldblue.gif) Yes, please tell us. (IMG:style_emoticons/default/help.gif) (IMG:style_emoticons/default/smiley_notworthy.gif)
|
| jim_hoyland |
 Jul 6 2006, 01:24 PM Jul 6 2006, 01:24 PM
Post
#8
|
|
Get that VIN ?      Group: Members Posts: 9,582 Joined: 1-May 03 From: Sunset Beach, CA Member No.: 643 Region Association: Southern California 
|
I seen a late model with the turn signal indicator wired to the each of the two smog lights: ERG and XXX?. This seemed like a great way to go because they are so visable.
lPease post the wire hack for converting.... |
| jim_hoyland |
 Jul 6 2006, 03:53 PM Jul 6 2006, 03:53 PM
Post
#9
|
|
Get that VIN ?      Group: Members Posts: 9,582 Joined: 1-May 03 From: Sunset Beach, CA Member No.: 643 Region Association: Southern California 
|
(IMG:style_emoticons/default/popcorn[1].gif) ...
|
| jk76.914 |
 Jul 6 2006, 10:45 PM Jul 6 2006, 10:45 PM
Post
#10
|
|
Senior Member    Group: Members Posts: 809 Joined: 12-April 05 From: Massachusetts Member No.: 3,925 Region Association: North East States |
Hi Folks, well I'm back at it. I will go through this in 3 posts, maybe 4, so bear with me. Sorry if everyone already knew all this, but it was an epiphany for me, so maybe someone else didn't know some piece of this.
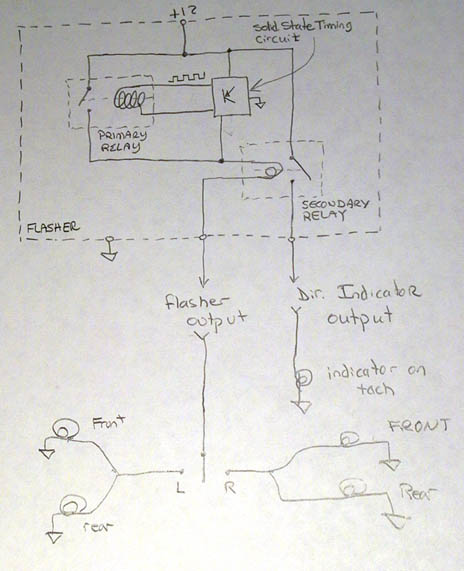
First, it's important to know how the flasher itself works. There's a schematic below.  There are three parts of the flasher. The primary relay (I'll call it) switches on and off and provides an on/off voltage to ANYTHING connected to it. This is controlled by the second part, a solid state timing circuit. When a load is detected, the timing circuit starts pumping out a little square wave to the coil of the primary relay, causing it to turn on and off.... By doing it this way, the frequency of the on-and-off is independent of the load, because the load on the timing circuit (ie, the relay coil) is always the same. Now it gets interesting. Notice that the output of the primary relay actually passes in series THROUGH the coil of the secondary relay. This coil is a special kind of coil that is normally used in magnetic circuit breakers rather than relays. It is a CURRENT COIL, and the secondary relay will close only when enough CURRENT is passing through it. Relays generally have voltage coils that close when the correct minimum voltage is applied. The current coil is designed to minimize voltage drop, so it is only a few turns of relatively heavy gauge wire. After it has passed through the coil of the secondary relay, it exits the flasher to be used for anything in the car that needs to flash- directional signals, hazard warning, emergency brake light, or (at least in my car) the fasten seatbelt light. The secondary relay will create a second flashing output, but only if enough current is passing through the primary flashing relay. The threshold current that trips the secondary coil will cause a secondary flashing output when the turn signals or the hazard flashers are engaged, but not when the emergency brake light or the fasten seatbelt light is engaged. They still flash because they are attached to the primary relay, which is oblivious to load, but their load isn't enough to cause the secondary output to flash. Why bother? Well, the law required a cockpit-visible indication of a burned out direction signal bulb. So if you turn on your left signal and the front bulb, say, is burned out, the rear signal will still flash, but there will be no secondary flashing output. And, you guessed it, the secondary flashing output goes to the indicator light on the dash. You can actually hear it if you sit in your car with the engine off, but turn the ignition on. Pull up on the emergency brake and listen, and then turn on one of the direction signals. The click gets audibly louder because both relays are clicking instead of just the one. I drew the '73.5-'76 circuit first, because it's easier to figure out. This secondary flashing output goes directly to the only turn signal indicator in the tach (via the blue/white wire). The other side of that indicator is grounded..... So, the driver-visible indication of a burned out bulb is- when the turn signal indicator works fine for one direction, but remains dark when you switch to signal for the other direction.... There is a bulb burned out on the latter side. Or something else that can reduce the current flow below what is required to trip the secondary relay... Like corroded contacts, corroded socket, wrong type bulb (not bright enough), bulbs replaced with LEDs, whatever that reduced the current below the flashing threshold. Next post- '70-'73.5. Somebody was on drugs when they figured that one out! |
| jk76.914 |
 Jul 6 2006, 11:35 PM Jul 6 2006, 11:35 PM
Post
#11
|
|
Senior Member    Group: Members Posts: 809 Joined: 12-April 05 From: Massachusetts Member No.: 3,925 Region Association: North East States |
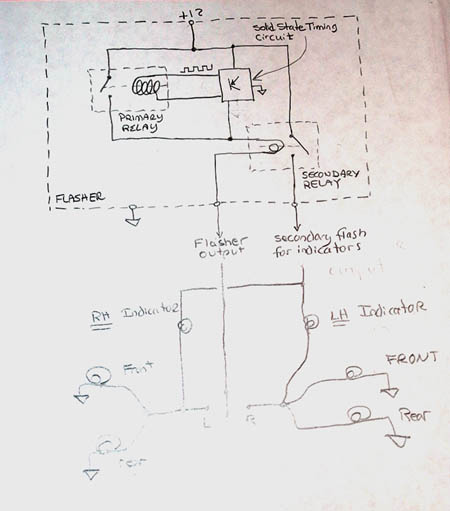
All right. Back again. Here's the schematic for the '70 - '73.5. These are the cars with separate left and right indicators at the top of the tach, and the high beam indicator along on the bottom...
 Thankfully, the flasher works the same as in the later models that only have one indicator, which was covered in my earlier post. When you look the indicators, it gets weird- The same blue/white wire goes to the tach, and it hooks to BOTH bulbs. The other lead of each bulb, instead of going to ground, actually goes to the turn signal circult that goes off to the bulbs themselves. BUT WAIT!!! The LEFT indicator is connected to the RIGHT circuit, and the RIGHT indicator is connected to the LEFT circuit. (IMG:style_emoticons/default/WTF.gif) If you study what's going on, you see it. When the left turn signal is on, the flashing signal trailing out to the bulbs is +12v/0/+12v/0/+12v/0 and on and on. The same signal is coming out from the secondary relay to both indicator lights. This signal is in phase with the primary flashing signal, so the indicator that is connected to the left turn signal WILL NOT FLASH because it will see +12v on both leads at the same time, or 0 on both leads at the same time. There will never be a voltage differential that will cause it to light up. And which indicator do you NOT want to see flash when the left signal is on? That's right- the RIGHT one. So what happens with the left indicator? It flashes! Because one lead is connected to the same secondary flashing output that the other indicator is connected to, but its second lead, which is connected to the RIGHT signal circuit IS GROUNDED THROUGH THE TURN SIGNAL BULB FILAMENTS THEMSELVES! (let sink in) This grounding scheme works because the indicator bulb is much lower wattage (meaning much higher resistance) than the main signal bulbs, so it lights up and limits the current in the circuit to a level below which the main bulbs turn on. So that's pretty tricky, but it's not over yet! What happens when a bulb is out? Well, the secondary relay in the flasher stays open, as before. But what a weird-ass result that has- BOTH INDICATORS FLASH TOGETHER when the side with the missing/wrong/corroded/LED/whatever problem is turned on. (IMG:style_emoticons/default/WTF.gif) If you look at the circuit, you can see what's going on- with the output from the secondary relay floating, you have both indicator bulbs, in series, completing the circuit from the side that's on (+12v or thereabouts) to the side that's off, and grounding through the filaments of the big signal bulbs again! The indicators are a bit dimmer, because they're wired in series, but they flash together. If you replaced your indicators with LEDs, this cannot happen. The back-to-back series LEDs will block current flow. In this case the indicator that a bulb is out is that the indicator LED on the side with the bad bulb will remain off when that side's turn signal is turned on. So that's about it. These two installments show the before and after circuits for incorporating early dual indicators into late tachs... Plus enough info to dispel myths that are drifting around about grounding problems, diodes in the harness, etc, etc, etc..... You can now also figure out how to diagnose problems better. For example, if the dash indicator light is on, but doesn't flash, it has to be a bad flasher. If the signals flash, but the indicator is steady, it's the secondary relay in the flasher. If both stay on, it's the primary relay in the flasher (probably) or the solid state timing circuit in the flasher (unlikely). etc, etc, etc.... |
| bd1308 |
 Jul 6 2006, 11:51 PM Jul 6 2006, 11:51 PM
Post
#12
|
|
Sir Post-a-lot      Group: Members Posts: 8,020 Joined: 24-January 05 From: Louisville,KY Member No.: 3,501 |
|
| John |
 Jul 7 2006, 12:30 AM Jul 7 2006, 12:30 AM
Post
#13
|
|
member? what's a member?     Group: Members Posts: 3,393 Joined: 30-January 04 From: Evansville, IN (SIRPCA) Member No.: 1,615 Region Association: None |
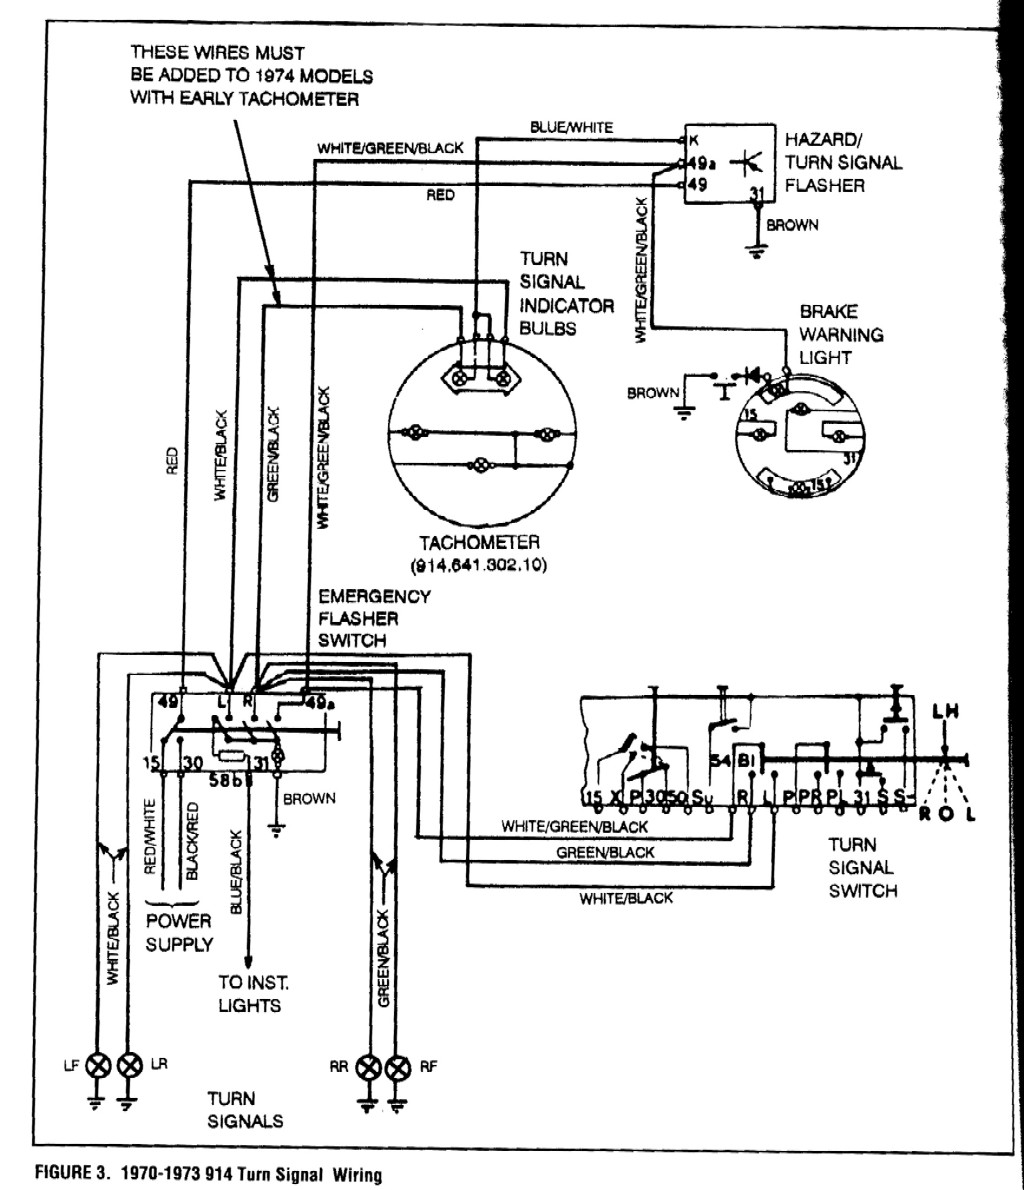
I found the answer several months ago in UpFixin vol IX on Pages 171 and 172.
They show the additional wire required (as was installed in 1970-1973 cars) for the individual indicators to work. jk76.914 has it right. Two wires are added: green/black and white/black are added between the flasher relay and the indicator bulbs. The blue/white wire is terminated to the other side of both bulbs. BTW, did you know that PCA is giving away sets of the UpFixin der Porsche? I saw an add in last month's Panorama and got my set today in the mail. It is missing Vol 7, but otherwise it is complete and only cost me shipping. |
| BigDBass |
 Jul 7 2006, 06:53 AM Jul 7 2006, 06:53 AM
Post
#14
|
|
Dumb Question Champion    Group: Members Posts: 1,438 Joined: 11-January 06 From: Chicago (south 'burbs) Member No.: 5,405 Region Association: Upper MidWest |
Thanks for the excellent description.
|
| Rusty |
 Jul 7 2006, 08:51 AM Jul 7 2006, 08:51 AM
Post
#15
|
|
Wanted: Engine case GA003709      Group: Admin Posts: 7,952 Joined: 24-December 02 From: North Alabama Member No.: 6 Region Association: Galt's Gulch 

|
|
| tdgray |
 Jul 7 2006, 11:41 AM Jul 7 2006, 11:41 AM
Post
#16
|
|
Thank God Nemo is not here to see this      Group: Members Posts: 9,705 Joined: 5-August 03 From: Akron, OH Member No.: 984 Region Association: None |
|
| jim_hoyland |
 Jul 10 2006, 09:07 PM Jul 10 2006, 09:07 PM
Post
#17
|
|
Get that VIN ?      Group: Members Posts: 9,582 Joined: 1-May 03 From: Sunset Beach, CA Member No.: 643 Region Association: Southern California 
|
Good description; would you mind adding a few words to guide me through the rewiring..say I under the dash and have the fuse panel out and I have the speedo loose with the back visable. Which wires am I going to modify...it would be helpful.
I.m going to re route the the signal to the ERG and CAT bulbs Thanks, Jim |
| John |
 Jul 11 2006, 01:13 AM Jul 11 2006, 01:13 AM
Post
#18
|
|
member? what's a member?     Group: Members Posts: 3,393 Joined: 30-January 04 From: Evansville, IN (SIRPCA) Member No.: 1,615 Region Association: None |
Jim,
You would add two wires from the emergency flasher switch to the bulbs you will use (green/black and white/ black). These are the same wires and colors leading out to the turn signal bulbs at the four corners of the car. You will modify the existing blue/white wire to extend to the other side of BOTH bulbs. The blue/white wire terminates at the flasher relay itself. Attached thumbnail(s) 
|
| jk76.914 |
 Jul 11 2006, 08:28 AM Jul 11 2006, 08:28 AM
Post
#19
|
|
Senior Member    Group: Members Posts: 809 Joined: 12-April 05 From: Massachusetts Member No.: 3,925 Region Association: North East States |
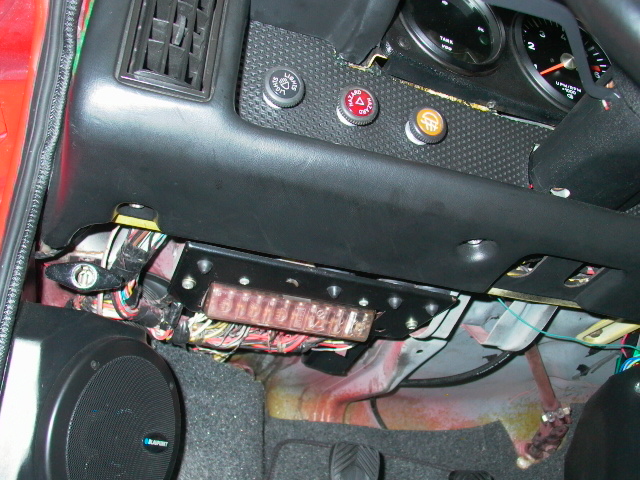
 That's right. I didn't want to pull out the emergency flasher switch though. It looked like too much disassembly, and right now, I'm trying to focus on assembly! So once I dropped the fuse panel, I found the correct wires running overhead of it and cut them and spliced them right there on the spot. In the photo, the spot I found is above the rear edge (rear being toward the rear of the car) of the fuse panel, about just below the hazzard flasher switch. Wire gauge to the indicator lights doesn't matter really. The other place I considered tapping into is under the center console/cushion. This same circuit runs to the rear taillights. Finding the wires above the fuse panel was much easier and more straightforward, but that shows how much I didn't want to remove the hazzard switch.... It's easy to cut and splice a very reliable connection. I always solder and then use shrink wrap. Just be sure to slide the shrink over the cut end before you solder. Guess how many times I've learned that? duh. While I was changing gauges (this is a '76), I rebuilt mine. You may notice the early style gauge faces and pointers, but the later style shallow trim rings... That's because my '76 rings were perfect, but the deep-dish rings on the donar gauges had been repainted with a brush and looked pretty bad. I also kept the early glass lens vs. the later plastic one.... Gave me a chance to fix that blackened high beam indicator lens at the same time. ...I still have to get to the combo gauge.... Looking ahead for once, I also spliced on a second, longer wire lead to each turn signal circuit that I coiled up and stuffed in the console. These will later go to the repeater lights that I am adding later on the sides of the car..... The green wire in the photo is one of these- I've got to dress it better than that! Good Luck! Jim |
| jim_hoyland |
 Jul 11 2006, 08:47 AM Jul 11 2006, 08:47 AM
Post
#20
|
|
Get that VIN ?      Group: Members Posts: 9,582 Joined: 1-May 03 From: Sunset Beach, CA Member No.: 643 Region Association: Southern California 
|
Thanks for the installation detail--makes sense to me. I'll give it a try this weekend, let you know how it works.
Jim Hoyland |
  |
3 User(s) are reading this topic (3 Guests and 0 Anonymous Users)
0 Members:

|
Lo-Fi Version | Time is now: 19th January 2025 - 05:25 AM |
Invision Power Board
v9.1.4 © 2025 IPS, Inc.


