|
|

|
Porsche, and the Porsche crest are registered trademarks of Dr. Ing. h.c. F. Porsche AG.
This site is not affiliated with Porsche in any way. Its only purpose is to provide an online forum for car enthusiasts. All other trademarks are property of their respective owners. |
|
|
  |
| Larry.Hubby |
 Aug 19 2008, 02:10 AM Aug 19 2008, 02:10 AM
Post
#1
|
|
Member who doesn't post much, but has a long time in 914s   Group: Members Posts: 187 Joined: 24-November 04 From: Palo Alto, CA Member No.: 3,172 Region Association: Northern California |
I posted a picture of my approach to this some time back on another thread about the cables problem, and have since gotten some interest from others in more details about it. I’m therefore posting the details of what I did here in case there are more folks out there who might find them useful.
Since the mechanical adaptation of the 911 parking brake assembly to the 914 trailing arms has been well-covered in other threads, I’m going to cover only issues concerning the cables and the anchoring of the parking brake shoes to the trailing arm – things about which there still seems to be a variety of approaches. Just so that we’re all on the same page, a little background first. The diagram below is the one used in the 911 service manual to explain the operation of the parking brake. It shows an edge-on view of the brake assembly without the brake rotor and wheel, both of which would be in a vertical plane at right angles to the plane of the diagram. 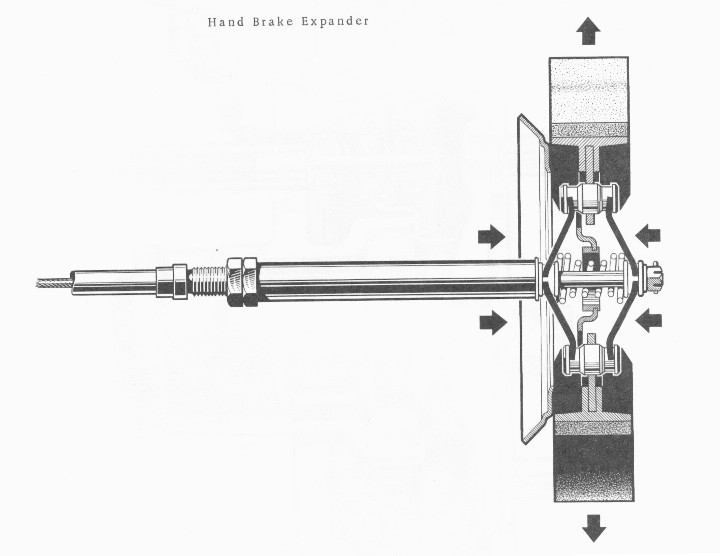 When the cable is pulled within its sheath, the two “bow ties” are squeezed together, the cable pulling on the outer one and the cable sheath pushing on the inner one. Because of the angle at which their arms sit, the bow ties generate tremendous leverage, and force the two parking brake shoes apart and into contact with the drum formed by the inside of the “hat” portion of the brake rotor. Friction forces then tend to lock the two together. Two things are worth noting: first, the cable sheath end must be free to move along the length direction of the cable in order for this to work as described. If it isn’t, i.e. if it’s anchored rigidly to the trailing arm somewhere, the force needed to oppose that of the cable (which would otherwise tend to pull this end of the parking brake assembly out of the rotor) must be supplied by the stamped metal backing plate through the shoes and the single outer bow tie, while the inner bow tie does nothing. While this may be OK under most circumstances, the greatly increased friction between the shoes and the backing plate, and the possibility of slowly progressing deformation of the backing plate due to repeated application of the brake, particularly if the brake is ever used as true emergency brake or for parking on steep hills rather than just to keep the car from rolling on level ground, are significant concerns IMHO. Actually, even if the cable sheath is free, there is some force that must be supplied by the backing plate, but it’s just the much smaller force necessary to flex and move the cable and sheath by half of the cable movement. The second thing is that locking the shoes to the rotor doesn’t stop the car from rolling. That must be done by something which prevents the shoes from rotating with respect to the trailing arm. In the original 911 system, this is done by a feature cast into the trailing arm itself that provides a very strong mechanical stop for the bottom ends of the shoes. These two photos, also from the 911 service manual, show this feature very clearly. 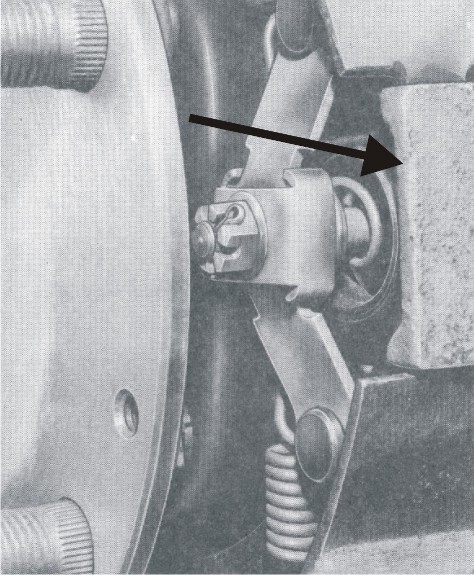 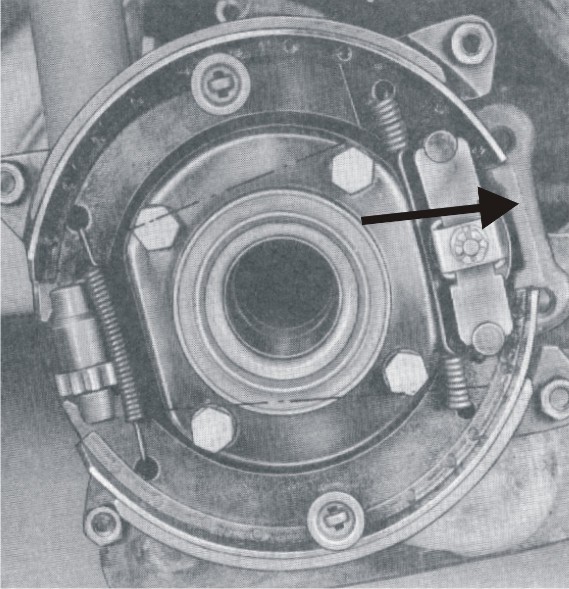 Since the 914 trailing arms lack this feature, something similar must be added. As always, different folks have used different approaches to perform this function. The old Velios trailing arms that were available when you could catch George, and when George felt like it, replaced the entire cast portion of the trailing arms with a custom casting that accepted the 911 parking brakes and included an identical feature. This was a rather high-buck approach, although it also upgraded the wheel bearings to the full 930 dual bearing configuration. Others have welded metal stops of various kinds to the backing plate, or to the trailing arms. Of these, the latter is by far the best approach IMHO, because the former causes the torque from the wheel trying to roll to be transmitted through the relatively flimsy backing plate. My particular solution to this problem was to design and machine steel “anchor blocks”, and TIG-weld them onto the bottom of the trailing arms at the “6 o’clock” position. This is the drawing for those parts: 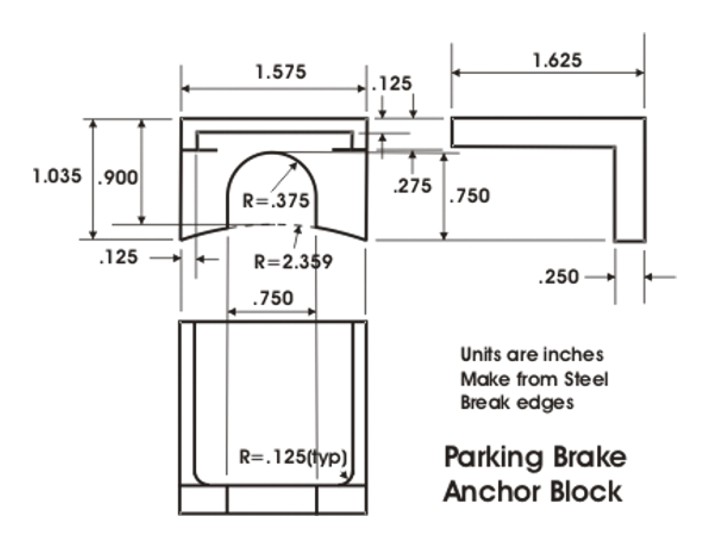 …and this is what they look like installed: 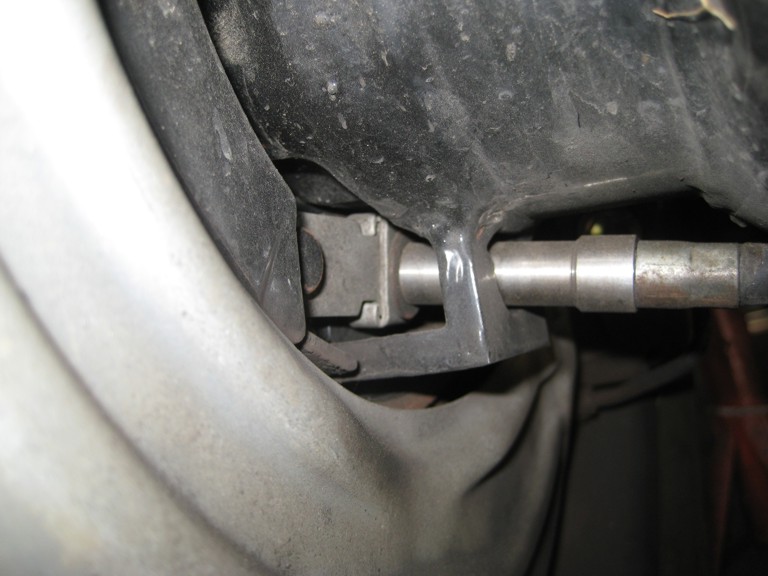 If you go this route, I recommend clamping them onto the arms with the parking brake assemblies in place to get the alignment just right, tack welding, then removing the brakes and finishing the welds. The heat of the welding will nearly always cause enough distortion to bend the long side of the “L” out of the plane where you want it, but this can be easily “adjusted” with a hammer once a solid weld has been formed. My approach to the cable problem was to use the stock 914 cables on the inboard end, the 911 cables on the outboard end, and splice the two together externally, shortening the 911 cables as necessary to match up with the ends of the stock 914 cables. Single, custom-made cables would of course be cleaner, but this was appealing to me for several reasons: 1. It kept everything as stock as possible. All critical hardware is Porsche spec. 2. It kept the non-standard things I did out in a readily-accessible location, in case anything fails. 3. It allowed me to use the 911 cables that I obtained at relatively little additional cost along with the parking brake assemblies. 4. Only three fairly simple special parts per side are required (well, OK, four, if you count the bracket on the trailing arm), and I had, or had access to, all the required tools. This is an overall view of the result: 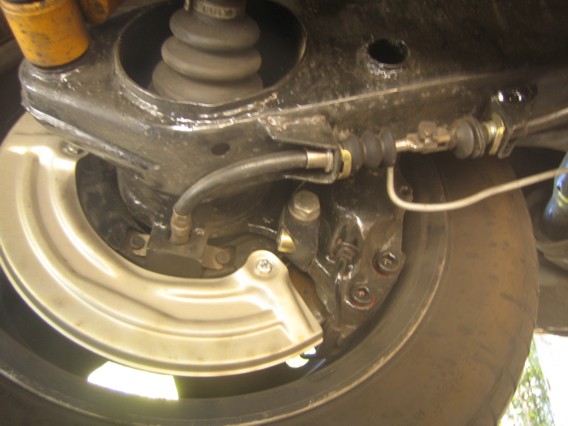 |
| Larry.Hubby |
 Aug 19 2008, 02:18 AM Aug 19 2008, 02:18 AM
Post
#2
|
|
Member who doesn't post much, but has a long time in 914s   Group: Members Posts: 187 Joined: 24-November 04 From: Palo Alto, CA Member No.: 3,172 Region Association: Northern California |
Continuing with the gory details:
To make this work, I fabricated a new end fitting for the cable sheath similar to the one on the outboard end of the 914 cable: 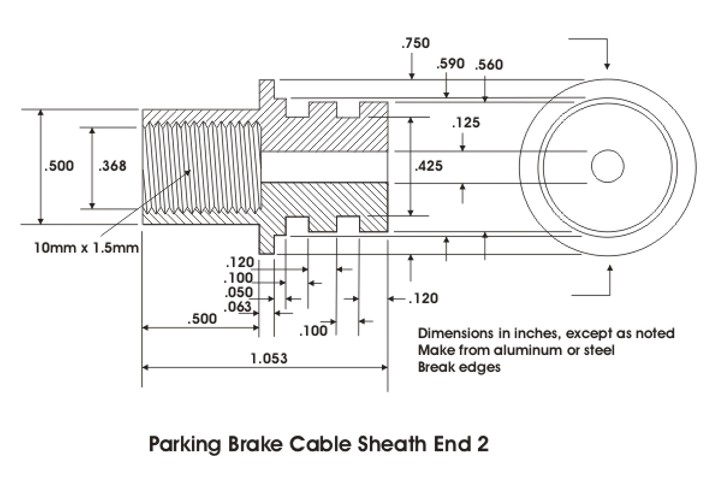 …a tab end for the cable that fits into the clevis on the 914 cable that originally hooked to the arm on the caliper: 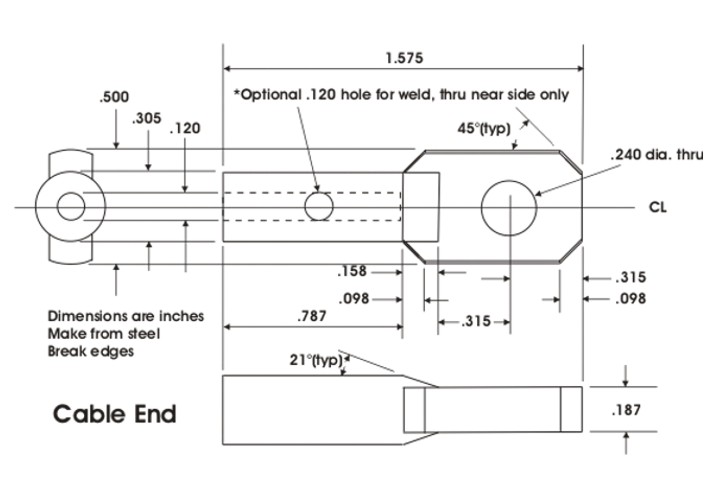 …a shortened tube end for the outboard end of the 911 cable sheath: 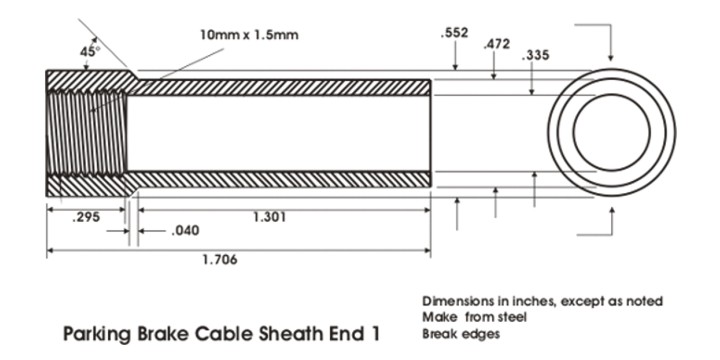 …and another sheet metal “U” bracket to anchor the shortened end of the 911 cable on the bottom of the trailing arm: 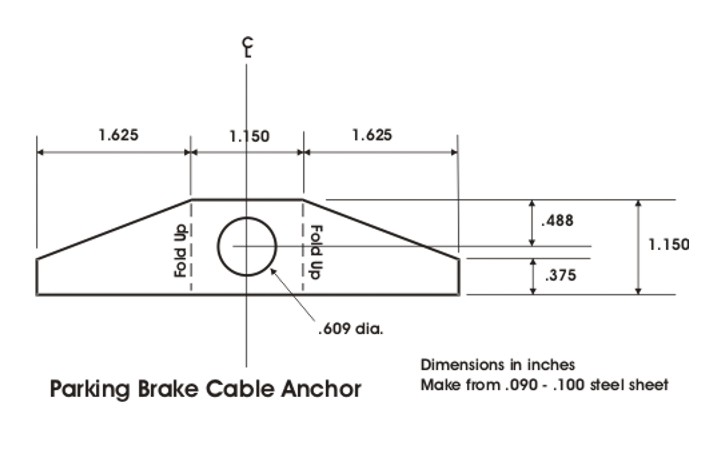 The stock “U” bracket needs to be cut off and re-welded to the arm slightly forward of where it was originally attached, and re-oriented so that the 914 cable points straight down the length of the trailing arm. The new “U” bracket is then added in-line with the re-welded stock one 4 5/8” further down the arm, as shown in this photo: 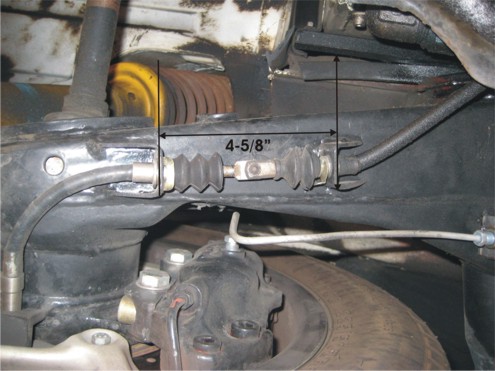 The stock retaining clip (999.166.017.02) and bellows (914.424.591.00) can be used to anchor and nicely finish the new 911 cable end. Both parts were still available from Porsche as of a little over a year ago. I also ground down the seam between the two halves of the trailing arm in the area under the path of the shortened 911 cable, and re-did it as a butt-weld so that the protruding seam wouldn’t rub against the cable jacket, but I’m not sure this is really necessary. Once you have the parts shown above, or their equivalent, modifying the 911 cable is straightforward. A 911 parking brake cable, fresh off the rack of your friendly local Porsche dismantler (in this case, Rich Bontempi’s High Performance House), looks like this: 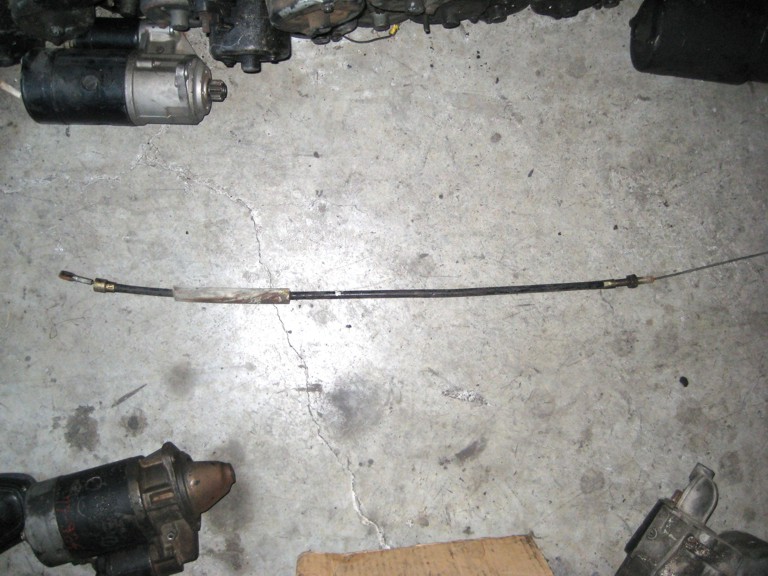 Looking just at the end of the cable that attaches to the parking brake: 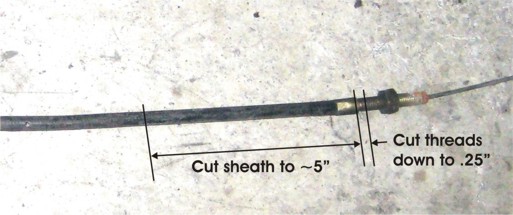 The long section of threads with the two nuts on the end fitting of the cable sheath is the adjuster for the 911 system. We don’t need it for the 914 installation because the 914 cables already have adjusters with sufficient range, and, as you can see from the earlier photo of the installed anchor block, there isn’t enough room for it anyway. The 914 trailing arm bulges out inboard from the casting that holds the wheel bearing and the parking brake, forcing the cable to enter at an angle and causing the cable to lie tight against the arm. This, plus the fact that the cable has to make a fairly sharp right angle turn immediately after exiting the brake assembly, would make it very difficult to have a useful adjuster at this end of the cable. So, we trim these threads down to a length of .25” and loctite-on the non-adjusting shortened cable sheath end. In order to cut the end fitting and the sheath, we first remove the cable from the sheath by cutting off the opposite end fitting and pulling it out. After trimming the threads, cut the sheath to length. The length required depends upon the exact position you choose for the “U’ brackets, but in my case, with the positions shown in the photos, 5” from the shoulder on the end fitting to the cut worked well. The exact length isn’t terribly critical, just as long as there is enough of a loop in the cable that it can move by half the total cable travel from brake-off to brake-on, which is typically .25 - .3”. An abrasive saw works best for cutting the sheath, but a band saw, Sawsall, saber saw, or hacksaw with a fine-pitch blade will also suffice. Next, install the new sheath end fitting by screwing it onto the sheath, letting the threads dig into the sheath covering to hold it on. The bore dimension shown on the drawing should be enough to allow you to do this. If not, you can enlarge the inner dimension slightly. Bear in mind that a very tight, strong connection here isn’t required, since there are no significant forces tending to pull the sheath out of this fitting. Once the end fitting is on, you can thread the cable back through the sheath and install the whole thing to the parking brake and the “U” bracket so that you can measure the length to cut the cable itself. Measure .9” (.78” to fit inside the tab end, and .12” for clearance) from the end of the new sheath end fitting with the cable attached to the bow ties and the slack pulled out of the cable but the brake not applied, mark this location, take the cable back off and cut the cable at the mark. Making sure that you still have the cable in the sheath, slide the tab on the cut end as far as it will go and either crimp it on, or weld it to the cable strands through the optional side hole. I made my tab ends out of 304 stainless steel, which is about as hard as a grade-5 bolt, and consequently doesn’t crimp easily. After an attempted crimp failed, my mechanic, Tony Heyer, suggested welding, and the hole-in-the-side arrangement shown for doing it. The hole in the tab end fits the stock pin for the clevis on the 914 cable that used to connect to the brake caliper. Now do whatever you’re going to do in the way of painting or coating the trailing arms after the welding, install everything, and you’re good to go. I’ve had this arrangement working without problems on my car now for about a year and a half, and I’ve shown it no mercy, often parking, or using the brake to hold while stopped at a light, on steep hills in San Francisco. Everything about the parking brakes works and adjusts like you’d expect, and yet you can use those beefier rear brake calipers you’ve always wanted. In my case, those are 964 turbo rears with 930 rear rotors. |
| Elliot Cannon |
 Aug 19 2008, 02:53 AM Aug 19 2008, 02:53 AM
Post
#3
|
|
914 Guru      Group: Retired Members Posts: 8,487 Joined: 29-December 06 From: Paso Robles Ca. (Central coast) Member No.: 7,407 Region Association: None 

|
Excellent post. It seems very well thought out. My parking break will have to be 1st gear for a while longer. (IMG:style_emoticons/default/av-943.gif)
|
| So.Cal.914 |
 Aug 19 2008, 07:16 AM Aug 19 2008, 07:16 AM
Post
#4
|
|
"...And it has a front trunk too."      Group: Members Posts: 6,588 Joined: 15-February 04 From: Low Desert, CA./ Hills of N.J. Member No.: 1,658 Region Association: None |
I have seen a few different attempts at this, Yours looks the cleanest. Thanks.
|
| Wes V |
 Aug 19 2008, 07:40 AM Aug 19 2008, 07:40 AM
Post
#5
|
|
Member   Group: Members Posts: 482 Joined: 11-October 07 From: Los angeles Member No.: 8,211 |
Thanks!
(any chance you fab'd those parts using a CNC, and could do up others?) Wes Vann |
| Wes V |
 Aug 19 2008, 11:39 AM Aug 19 2008, 11:39 AM
Post
#6
|
|
Member   Group: Members Posts: 482 Joined: 11-October 07 From: Los angeles Member No.: 8,211 |
Larry;
It seems to me that you could avoid making up "cable sheath end 2" if you just started with a 914 sheath, which would already have that end on it. (ya, you still need the 911 cable) I think this piece would be costly to have a machine shop make up. Is the length of "cable sheath end 1" due to the end fitting on the 911 cable having to slide within this section? I looked and couldn't find a photo of this end of the cable and I'm assuming that a portion of the rigid, crimped-on end actually slides into this piece. If that's not the case, and you are using the 914 sheath, then this piece could be simplified. I really don't think the threads would be required due to the fact that the sheathing doesn't go into tension, trying to pull the end piece off (it's not anchored to the spring plate and would just pull away from the spring plate if put in tension). Keep in mind that if you start with a 914 sheathing, the threads are only grabbing onto the outer cover of the sheath. It also seems strange that there isn't any "step" in the fitting where it comes in contact with the spring plate, to prevent any side movement. It may be that there isn't any on the original 911 sheathing and the cable is what keeps it from moving to the side. Thanks again!! Wes Vann |
| Larry.Hubby |
 Aug 19 2008, 01:12 PM Aug 19 2008, 01:12 PM
Post
#7
|
|
Member who doesn't post much, but has a long time in 914s   Group: Members Posts: 187 Joined: 24-November 04 From: Palo Alto, CA Member No.: 3,172 Region Association: Northern California |
Hi Wes,
Unfortunately, the parts weren't done with CNC tools. I just made them up on a manual lathe and mill myself. Regarding your ideas about the sheath end fittings, I probably should have included this photo of the 911 cable end that goes through the bow ties: 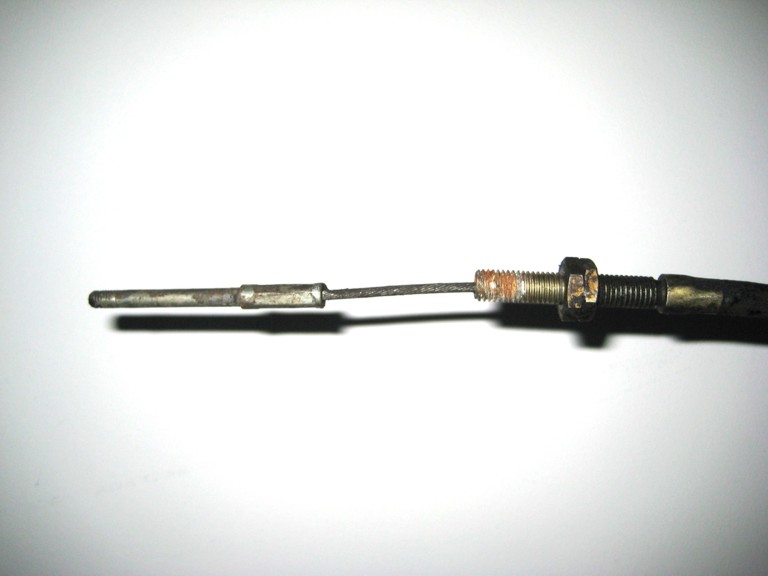 As you can see, the cable end has a long crimp section, and your speculation is correct, the tube length is to cover this plus an allowance for the maximum travel you're likely to need (I think I allowed 1/2", which turns out to be more than necessary). I think your suggestion about the sheath ends is a good one. If you canabalized a 914 cable to get the sheath and end fitting that would replace "End Fitting 2", you could make a simplified end fitting to replace "End Fitting 1". It would still need a straight section to clear the crimp on the stud cable end plus the travel, but the join to the sheath could just be a ~1/2" long straight bore (or you could put in 10mm internal threads to grab the jacket like I did on the other part). As we've both noted, there's no tension on the sheath. It's under slight compression when the brake is off, and heavy compression when the brake is on, so it's not going to come out. You still need something to prevent the sharp bend from trying to pull the end of the sheath out of the fitting, but just a short straight bore section would probably work fine. Larry |
| Larry.Hubby |
 Aug 19 2008, 01:15 PM Aug 19 2008, 01:15 PM
Post
#8
|
|
Member who doesn't post much, but has a long time in 914s   Group: Members Posts: 187 Joined: 24-November 04 From: Palo Alto, CA Member No.: 3,172 Region Association: Northern California |
Oh, yes. You're also correct about the centering. The stud and crimp section are a close enough fit inside the tube of "End Fitting 1" that side-to-side motion isn't a problem.
Larry |
| MartyYeoman |
 Aug 19 2008, 02:30 PM Aug 19 2008, 02:30 PM
Post
#9
|
|
Senior Member    Group: Members Posts: 1,530 Joined: 19-June 03 From: San Ramon, CA Member No.: 839 Region Association: Northern California 
|
Nice work!!
|
  |
1 User(s) are reading this topic (1 Guests and 0 Anonymous Users)
0 Members:

|
Lo-Fi Version | Time is now: 2nd April 2025 - 06:56 PM |
Invision Power Board
v9.1.4 © 2025 IPS, Inc.


