|
|

|
Porsche, and the Porsche crest are registered trademarks of Dr. Ing. h.c. F. Porsche AG.
This site is not affiliated with Porsche in any way. Its only purpose is to provide an online forum for car enthusiasts. All other trademarks are property of their respective owners. |
|
|
| ConeDodger |
 Oct 3 2010, 07:27 PM Oct 3 2010, 07:27 PM
Post
#1
|
|
Apex killer!                Group: Members Posts: 23,859 Joined: 31-December 04 From: Tahoe Area Member No.: 3,380 Region Association: Northern California 
|
Today I got a bunch done on my dash restoration. As some of you may recall, my car found a boulder in the road at WCR which caused about $7K worth of damage. The car spent 2.5 months at Yeaman Autobody in Palo Alto which is about 100 miles away from me but the trouble getting it there and back were well worth the effort. Scott Yeaman loves 914's and I think treats each one as if it were his own.
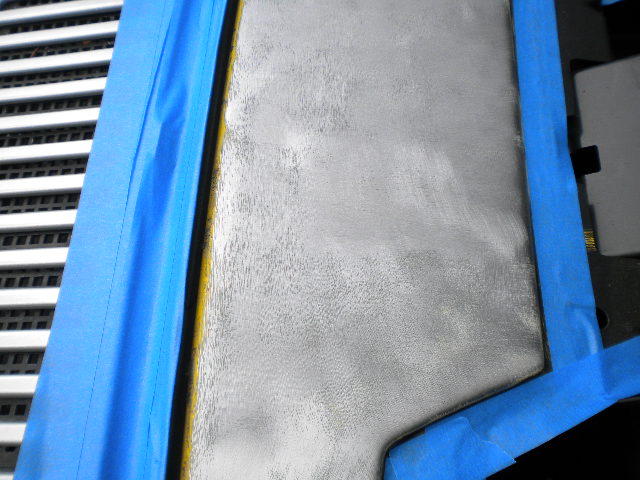
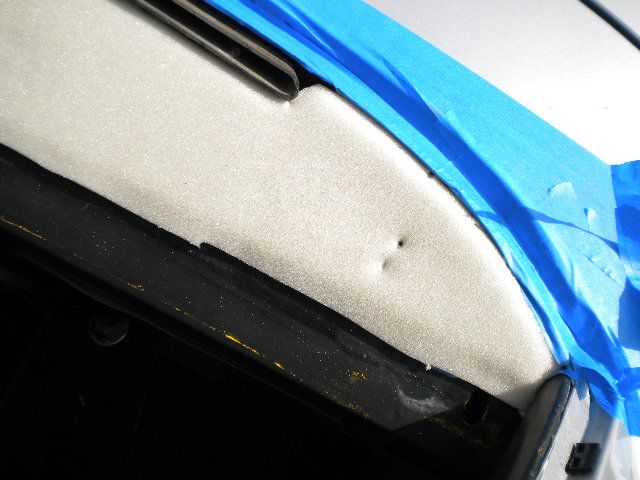
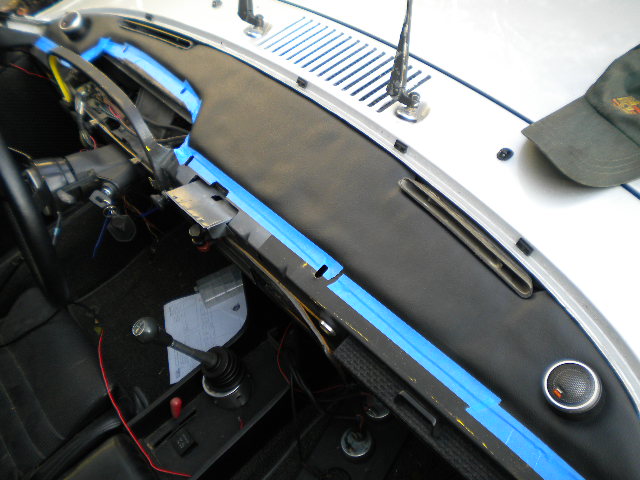
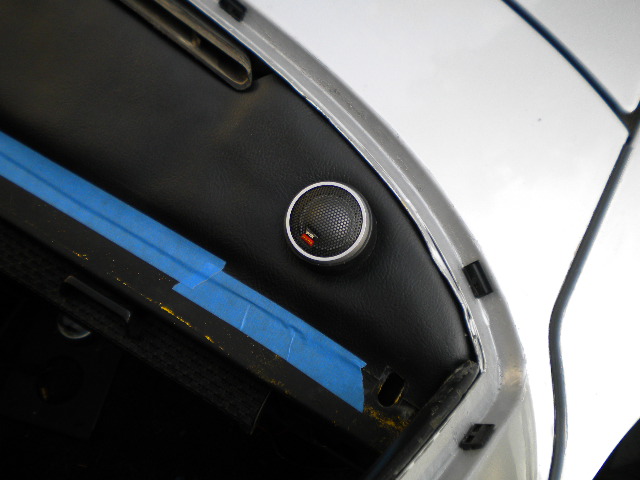
When Scott was straightening the unibody, the windshield cracked. This was ok with me since mine had wiper gouging and I had a new Sigla sitting in the garage for a project down the road a piece. I guess we are now down that road... My project today was to remove the existing dash vinyl and prepare the surface and install new Appearance and Performance vinyl and pad. James and Heidi of Appearance and Performance can be found in our Member Vendor section as well as online at their own website. In addition to this simple restoration, I planned a little bit of an update. You Concours Weenies had better stop reading now and click back. I installed a Blaupunkt St. Louis some time back as well as Appearance and Performance speaker pods and passenger footwell subwoofer box. The sub box got a JL Audio 8" sub with it's own amp while the speaker pods got Polk Audio MOMO component speakers. By themselves, the sub and 6.5" speakers sounded great but as I said, these were component speakers so there were some tweeters that did not get installed. They went in today... (IMG:style_emoticons/default/biggrin.gif) As I said, first I removed the old vinyl which was very easy. It just pulled right up. Unfortunately, this was not true of the pad that goes under the vinyl. For this I took my cordless drill with a wire wheel bit and 'dug' up the pad and cleaned the sub dash down to the paint. Once stripped, I drilled a couple holes on each side for the tweeters. One hole mounts the cup the 'eyeball' tweeter goes into, the other hole is for the wires. Once the holes were drilled, I went about the task of masking off the body and the dash that I didn't want to get contact cement on. With that done, on to the contact cement. First the dash, then the bottom of the pad. When it had dried to tacky I applied the pad to the dash. This is easiest with the dash pad out since the Appearance and Performance vinyl kit comes untrimmed. With the dash off, you just install and trim later. If the dash pad were on, you would be getting contact cement all over your dash pad. YUCK!!! (IMG:style_emoticons/default/sad.gif) Once the pad was on, I painted it with contact cement and then went on to the bottom of the vinyl itself. With this done, I located the holes I had previously drilled and installed the tweeters. Now, all that's left is to reinstall the windshield and dash pad. Attached image(s)    
|
  |
Replies(1 - 9)
| gothspeed |
 Oct 3 2010, 08:14 PM Oct 3 2010, 08:14 PM
Post
#2
|
|
Senior Member    Group: Members Posts: 1,539 Joined: 3-February 09 From: SoCal Member No.: 10,019 Region Association: None |
|
| ConeDodger |
 Oct 3 2010, 09:19 PM Oct 3 2010, 09:19 PM
Post
#3
|
|
Apex killer!                Group: Members Posts: 23,859 Joined: 31-December 04 From: Tahoe Area Member No.: 3,380 Region Association: Northern California 
|
I never saw it, but Scott tells me it cracked coming out. They usually do. It takes a gentle hand to get a correctly installed butyl windshield out. |
| drive-ability |
 Oct 3 2010, 09:51 PM Oct 3 2010, 09:51 PM
Post
#4
|
|
Senior Member    Group: Members Posts: 1,169 Joined: 18-March 05 From: Orange County, California Member No.: 3,782 |
That looks nice, good use of space installing some speekers there too. (IMG:style_emoticons/default/smile.gif)
|
| Mike Bellis |
 Oct 3 2010, 09:59 PM Oct 3 2010, 09:59 PM
Post
#5
|
|
Resident Electrician      Group: Members Posts: 8,346 Joined: 22-June 09 From: Midlothian TX Member No.: 10,496 Region Association: None 

|
That looks great Rob. You will get great sound refraction off the glass. Should sound awesome!
|
| McMark |
 Oct 3 2010, 10:12 PM Oct 3 2010, 10:12 PM
Post
#6
|
|
914 Freak!                Group: Retired Admin Posts: 20,179 Joined: 13-March 03 From: Grand Rapids, MI Member No.: 419 Region Association: None |
Nice! (IMG:style_emoticons/default/thumb3d.gif)
|
| ConeDodger |
 Oct 4 2010, 12:03 AM Oct 4 2010, 12:03 AM
Post
#7
|
|
Apex killer!                Group: Members Posts: 23,859 Joined: 31-December 04 From: Tahoe Area Member No.: 3,380 Region Association: Northern California 
|
Thanks guys. My original plan had been to use the other mount the tweeters came with. This would have sunk them in the dash and the tweeters would have been at dash vinyl level. But when I took a closer look this morning I realized that there is a frame under the dash top that might have interfered. It turned out nice... Now to get the windshield back in place so I can drive the thing... |
| raw1298 |
 Oct 4 2010, 04:12 PM Oct 4 2010, 04:12 PM
Post
#8
|
|
Senior Member    Group: Members Posts: 616 Joined: 9-March 09 From: Rocklin,Ca. Member No.: 10,148 Region Association: Northern California |
Looks great! Now I know how to do mine.
|
| Sleepin |
 Oct 4 2010, 04:44 PM Oct 4 2010, 04:44 PM
Post
#9
|
|
Advanced Member     Group: Members Posts: 3,647 Joined: 20-November 07 From: Grand Junction, Co. Member No.: 8,357 Region Association: Rocky Mountains |
They don't pop up? (IMG:style_emoticons/default/WTF.gif) (IMG:style_emoticons/default/slap.gif) (IMG:style_emoticons/default/poke.gif) (IMG:style_emoticons/default/happy11.gif)
Looks good! |
| nsr-jamie |
 Oct 4 2010, 09:40 PM Oct 4 2010, 09:40 PM
Post
#10
|
|
914 guy in Japan    Group: Members Posts: 1,182 Joined: 7-November 07 From: Nagoya, Japan Member No.: 8,305 Region Association: None |
Looking good, what speakers are you using? The DB651 ones? I have the same Morph speaker pod kit and am just about to order speakers too and wondering what is the biggest size I can go with? On the A and P site it says 6.5 inches...I was thinking about the DB651 speakers than I came across a slightly higher end Polk speaker from the MM series, the MM 651...some sites list these as 6.5 inch speakers, other sites list these as 6 3/4 inch speaker....I would prefer to get the MM series but worried if they will fit my Morph speaker pods.....anybody ever use these speakers before?
|
  |
2 User(s) are reading this topic (2 Guests and 0 Anonymous Users)
0 Members:

|
Lo-Fi Version | Time is now: 4th January 2025 - 10:53 PM |
Invision Power Board
v9.1.4 © 2025 IPS, Inc.


