|
|
|
Porsche, and the Porsche crest are registered trademarks of Dr. Ing. h.c. F. Porsche AG.
This site is not affiliated with Porsche in any way. Its only purpose is to provide an online forum for car enthusiasts. All other trademarks are property of their respective owners. |
|
|


| KaptKaos |
 Dec 17 2007, 12:05 AM Dec 17 2007, 12:05 AM
Post
#1
|
|
Family  Group: Members Posts: 4,009 Joined: 23-April 03 From: Near Wausau Member No.: 607 Region Association: Upper MidWest |
I finally got my car moved around in the back so that I can get it up onto jack stands and take a look around.
My short term goal is to get the oil changed, swap the gas tank, charge the battery and try and fire her up. I took a few steps towards that today. First, I was under there cleaning stuff up. I noticed this on the passenger side of the trans. 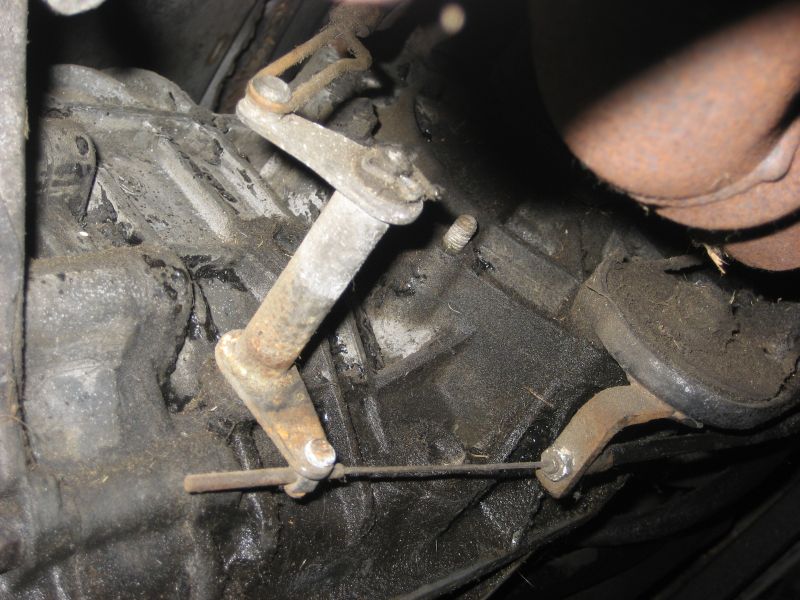 I assume that it is the throttle cable, but being this is my first /6, I need to confirm. Secondly, I drained the oil from the case and the tank. For those that don't recall, here is my 911 tank, cut into the floor. 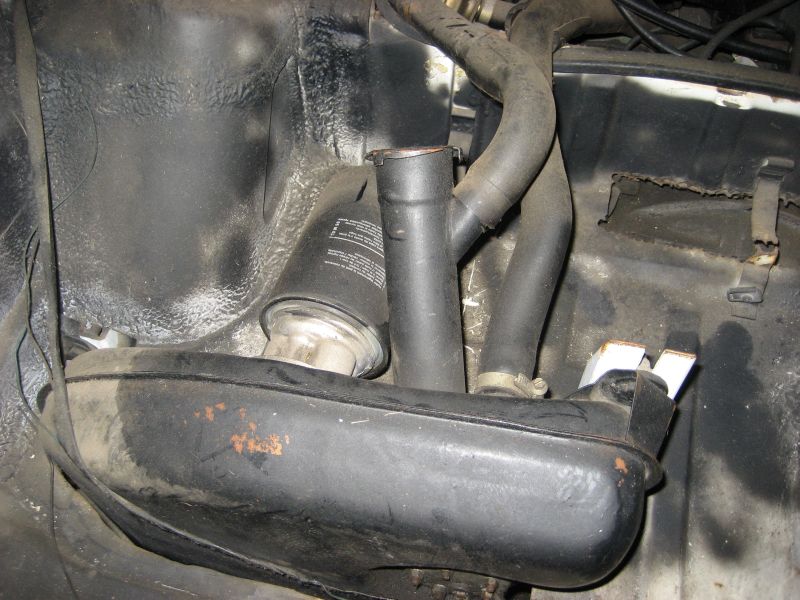 Problem is that when I drained the case and the tank, I only got 1/2 gallon of oil. I was expecting about 3.5 gallons (14 qts +/-). Not even close. This is my first dry sump motor, so am I missing something? Here is a picture of the engine mount bar. 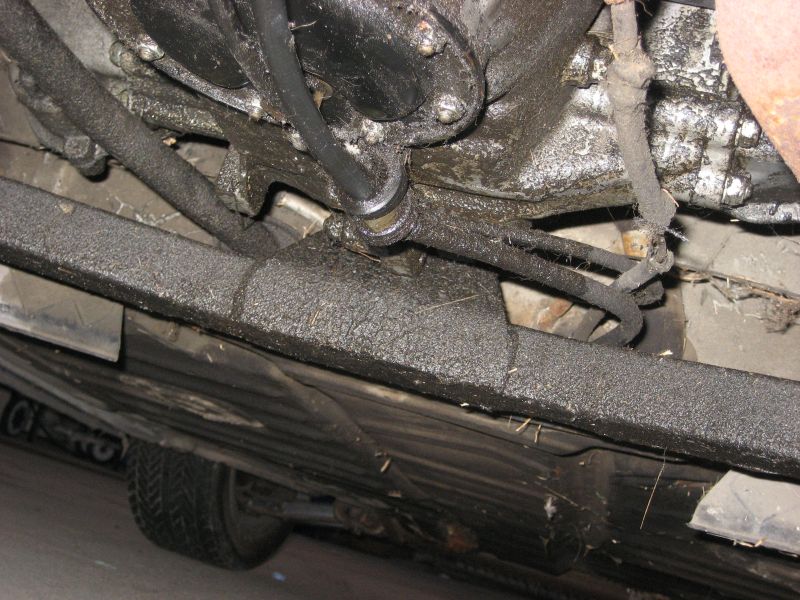 I don't know if this is stock, custom, aftermarket or ??? A little help pls. The mount bar sits so low that the side shift trans rod is above it. Lastly, when I got the car, the PO said that he had buggered up the trans. Its a side shifter. I cleaned it up a little and took off the shift rod head and the ball socket. It's a new socket bushing which is nice. I was able to move the selector through all gears. I noticed that the shift rod head was about an inch longer than the one on my car. In fact, it looked as if it was extended somehow. It's odd. I noticed this because I had to put the bushing on the ball and snap it down, before inserting it into the shift rod head. If I didn't do that, the shift rod head was so deep that I couldn't push it on. I am hoping that I get lucky with this. Also, the cone set screw was replaced with a longer set screw, with a square head, that is drilled so it can be wired for additional safety. Anyway, more to come soon. I have my work cut out for me. |
   |

 
|
  |
Replies
| SLITS |
Mar 30 2008, 08:11 AM
Post
#2
|
|
"This Utah shit is HARSH!" Group: Benefactors Posts: 13,602 Joined: 22-February 04 From: SoCal Mountains ... Member No.: 1,696 Region Association: None |
Joe, the center piston is what HAS TO BE FREE. It is the metering piston for the CIS. If stuck in the up position (pushed into the body of the fuel distibutor) you have WOT fuel flow, which is why you filled the exhaust will gas.
Cleaning that unit, the warm up regulator and injectors was what the post on NARP was all about. Tedious, but it can be done. There is a nut on the side of the fuel distributor that holds in a shim, spring and piston ... it is the main pressure regulator. If you take it out, don't loose ANYTHING. Clamp the exposed tit of the center plunger in a vise and pull to see if you can get it out of the housing. Clamp only on the tit as it is a machined piece matched to the bore of the fuel distributor. I will be at the shop today (Sunday) if you feel like driving to Riverside. I can give you a Fuel Distributor I have already cleaned up (bring your old one). In lieu of that ... couple of cans of Brake/Carb cleaner. Once you have pulled the center piston ... fill the cavity with brake cleaner and let it sit. Clean the piston carefully (don't scratch it) and set it aside. Flip the fuel distributor over and carefully fill each of the outlets with brake cleaner and let sit. Using a blow gun (rubber tipped is nice), start blowing back from the outlets on the top of the FD - don't use full pressure - trigger the gun slowly. When the passage is clear, you will feel air coming from the center cavity. Once all six are cleaned and clear, coat the piston with 3 in One oil and put it back in. Make sure it slides freely (the oil will give some resistance). Pull the injectors with the tool I described ... straight claw framing hammer and wood block. Using the brake cleaner can with the red plastic tube, insert tube into inlet of injector and trigger ... it has enough pressure to overcome the spring inside. You will see the spray from the injector change from dribbles to a fine conical spray when clean. The warm up regulator has a fuel in and a fuel out. Fill each hole with brake cleaner and let it sit for a while. Apply gentle air pressure with the gun until air flows freely through the holes (even in reverse). Once it's clean, you're ready to give the start a try. Warm up regulator modifys system fuel pressure according to temperature of the heating coil inside the unit and, depending upon the year, by vacuum also. Oh, the car will run without the Fuel Accumulator, but will not hot start. It smooths out pulses from the fuel pump and maintains pressure in the system for about 20 minutes after shutdown. I bought one from a member for $75 and one off eBay for $65. PS Gint ... I started to write this up for your site, but I HATE your template and gave up for the moment. Fixing The Dead |
|
|
|
| Gint |
Mar 30 2008, 01:25 PM
Post
#3
|
|
Mike Ginter Group: Admin Posts: 16,093 Joined: 26-December 02 From: Denver CO. Member No.: 20 Region Association: Rocky Mountains |
QUOTE(SLITS @ Mar 30 2008, 08:11 AM)  PS Gint ... I started to write this up for your site, but I HATE your template and gave up for the moment. Fixing The Dead (IMG:style_emoticons/default/WTF.gif) I don't get it. The post in your link follows the basic template almost exactly. And you don't need to follow it exactly for that matter. What you wrote there would be great as a tech article. In fact I'm going to need all of this info when I'm ready to get mine running. If you want to put it up as a tech article, email it to me. We'll work it out and get it posted. |
|
|
|
| SLITS |
Mar 31 2008, 12:44 PM
Post
#4
|
|
"This Utah shit is HARSH!" Group: Benefactors Posts: 13,602 Joined: 22-February 04 From: SoCal Mountains ... Member No.: 1,696 Region Association: None |
QUOTE(Gint @ Mar 30 2008, 12:25 PM) QUOTE(SLITS @ Mar 30 2008, 08:11 AM) PS Gint ... I started to write this up for your site, but I HATE your template and gave up for the moment. Fixing The Dead (IMG:style_emoticons/default/WTF.gif) I don't get it. The post in your link follows the basic template almost exactly. And you don't need to follow it exactly for that matter. What you wrote there would be great as a tech article. In fact I'm going to need all of this info when I'm ready to get mine running. If you want to put it up as a tech article, email it to me. We'll work it out and get it posted. No worries Gint .... your tag coding is a little different from what I learned and use. I just thought I would pitch a bitch. I'll get around to setting it up 'cause it can save you $400 for a rebuilt fuel distributor and about $300 for a warm up regulator. I also need to write up how one checks the system cold and warm pressures and how they can be adjusted with gentle taps from a hammer,but then you can get the CIS service manual too! It won't tell you how to adjust the warmup reguator with a hammer though. |
|
|
|
Posts in this topic
 KaptKaos '7X 2.7-6 Projekt Thread Dec 17 2007, 12:05 AM
 rick 918-S Yes, that's your throttle linkage. I think you... Dec 17 2007, 08:51 AM KaptKaos So does anyone have any clue as to why I only got ... Dec 18 2007, 11:54 AM sixnotfour From the looks of the motor it has leaked a couple... Dec 18 2007, 03:40 PM KaptKaos Do I check the level with the motor running? How ... Dec 18 2007, 05:48 PM Jeffs9146
Yes, put in about 9qts, start and check, Yes and... Dec 18 2007, 06:02 PM KaptKaos Thanks Jeff :trophy:
Oh, and what weight oel shou... Dec 18 2007, 06:35 PM Jeffs9146 That is a personal preferance. I am sure you will ... Dec 18 2007, 06:48 PM KaptKaos I picked up a clean gas tank from Bruce out in Riv... Dec 23 2007, 08:06 PM
rick 918-S Yes, that's your throttle linkage. I think you... Dec 17 2007, 08:51 AM KaptKaos So does anyone have any clue as to why I only got ... Dec 18 2007, 11:54 AM sixnotfour From the looks of the motor it has leaked a couple... Dec 18 2007, 03:40 PM KaptKaos Do I check the level with the motor running? How ... Dec 18 2007, 05:48 PM Jeffs9146
Yes, put in about 9qts, start and check, Yes and... Dec 18 2007, 06:02 PM KaptKaos Thanks Jeff :trophy:
Oh, and what weight oel shou... Dec 18 2007, 06:35 PM Jeffs9146 That is a personal preferance. I am sure you will ... Dec 18 2007, 06:48 PM KaptKaos I picked up a clean gas tank from Bruce out in Riv... Dec 23 2007, 08:06 PM
 Grimstead
1) There are two bolts that bolt the steering ra... Dec 27 2007, 11:01 AM KaptKaos Oh, one other thing. The gas sender is enclosed i... Dec 23 2007, 08:08 PM Headrage 3/8th and 5/16 on the hose.
The sender is a seale... Dec 23 2007, 08:27 PM Markeydoo Kapt
I have a 2.0l six with the quick six engine b... Dec 23 2007, 08:48 PM KaptKaos Thanks Allan & Mark.
I'll be stopping a... Dec 23 2007, 09:27 PM Twystd1 Do you have a oil line that runs from the trunk mo... Dec 23 2007, 09:48 PM KaptKaos I drained from the bottom of the case and the bott... Dec 24 2007, 12:14 AM swood Where is this "Flaps" of which you speak... Dec 24 2007, 02:31 AM KaptKaos
Where is this "Flaps" of which you spea... Dec 24 2007, 08:31 AM swood Just givin you xmas sheet.
Hope you have enough t... Dec 24 2007, 02:41 PM Twystd1 Crack (Loosen) all your oil lines that go from the... Dec 27 2007, 01:24 AM SLITS 1.) Line one goes from the bottom of the tank to ... Dec 27 2007, 07:58 AM dfwteenerpr for what it's worth, a mechanic advised my bro... Dec 27 2007, 10:02 AM KaptKaos Update
It's not seized!!!
:tr... Dec 29 2007, 08:19 PM euro911 Who the Fuch is this Mark character you mention, a... Dec 30 2007, 01:25 AM KaptKaos
Who the Fuch is this Mark character you mention, ... Dec 30 2007, 10:11 AM KaptKaos So I went out there again today to try and start h... Dec 30 2007, 05:29 PM euro911 Have at it ... Pick your poison
... doing a litt... Dec 30 2007, 06:32 PM Aaron Cox Get off your ass and get it running ! LOL
... Jan 4 2008, 08:04 PM Brando How's the teener running Aaron? Jan 4 2008, 08:10 PM KaptKaos :rotfl: :rotfl:
Yeah, and this rain is gonna he... Jan 4 2008, 08:27 PM Headrage
How's the teener running Aaron?
No one will... Jan 4 2008, 08:39 PM Aaron Cox I drove it today......(around the block)
I need t... Jan 4 2008, 09:08 PM Gint This thing running yet? :driving: Jan 5 2008, 09:03 AM KaptKaos Depending on the weather, I plan to pull the fuel ... Jan 5 2008, 10:35 AM KaptKaos A little progress so far today.
1) It's not t... Jan 31 2008, 02:19 PM KaptKaos Ok, so I got the fuel pump back in, and it's s... Jan 31 2008, 05:06 PM swood Was it another holiday today...? :confused:
:ch... Jan 31 2008, 10:59 PM KaptKaos
Was it another holiday today...? :confused:
:c... Jan 31 2008, 11:22 PM KaptKaos So today, I got some FI fuel line, and rigged it u... Feb 2 2008, 05:12 PM KaptKaos :barf:
Checked PP. The first thing is a fuel ac... Feb 2 2008, 05:19 PM KaptKaos I put a new fuel filter on it today, and I "t... Feb 16 2008, 06:40 PM racerx9146 try pull the intake boot off the cis fuel distribu... Feb 16 2008, 08:23 PM KaptKaos I was following Slits' CIS issues.
IIRC - h... Mar 29 2008, 09:52 PM KaptKaos :trophy: :trophy: :trophy: :trophy: :trophy: ... Mar 30 2008, 09:45 AM euro911 ... Danka Herr Doktor!
I'd love to come o... Mar 30 2008, 02:25 PM KaptKaos :rotfl:
We really should build one of these.
E... Mar 30 2008, 02:50 PM Eric_Shea
It's "Professor" H-E-L-L-O!
... Mar 30 2008, 06:19 PM Dr Evil :popcorn: Mmm, Vicodin Apr 1 2008, 02:43 AM KaptKaos IT IS ALIVE! :trophy: :trophy:
But.......... May 4 2008, 06:24 PM SLITS
[size=7][color=#FF0000]IT IS ALIVE! :trophy... May 4 2008, 11:23 PM shoguneagle Great job and excellent support as always from fol... Aug 17 2009, 09:03 PM
Grimstead
1) There are two bolts that bolt the steering ra... Dec 27 2007, 11:01 AM KaptKaos Oh, one other thing. The gas sender is enclosed i... Dec 23 2007, 08:08 PM Headrage 3/8th and 5/16 on the hose.
The sender is a seale... Dec 23 2007, 08:27 PM Markeydoo Kapt
I have a 2.0l six with the quick six engine b... Dec 23 2007, 08:48 PM KaptKaos Thanks Allan & Mark.
I'll be stopping a... Dec 23 2007, 09:27 PM Twystd1 Do you have a oil line that runs from the trunk mo... Dec 23 2007, 09:48 PM KaptKaos I drained from the bottom of the case and the bott... Dec 24 2007, 12:14 AM swood Where is this "Flaps" of which you speak... Dec 24 2007, 02:31 AM KaptKaos
Where is this "Flaps" of which you spea... Dec 24 2007, 08:31 AM swood Just givin you xmas sheet.
Hope you have enough t... Dec 24 2007, 02:41 PM Twystd1 Crack (Loosen) all your oil lines that go from the... Dec 27 2007, 01:24 AM SLITS 1.) Line one goes from the bottom of the tank to ... Dec 27 2007, 07:58 AM dfwteenerpr for what it's worth, a mechanic advised my bro... Dec 27 2007, 10:02 AM KaptKaos Update
It's not seized!!!
:tr... Dec 29 2007, 08:19 PM euro911 Who the Fuch is this Mark character you mention, a... Dec 30 2007, 01:25 AM KaptKaos
Who the Fuch is this Mark character you mention, ... Dec 30 2007, 10:11 AM KaptKaos So I went out there again today to try and start h... Dec 30 2007, 05:29 PM euro911 Have at it ... Pick your poison
... doing a litt... Dec 30 2007, 06:32 PM Aaron Cox Get off your ass and get it running ! LOL
... Jan 4 2008, 08:04 PM Brando How's the teener running Aaron? Jan 4 2008, 08:10 PM KaptKaos :rotfl: :rotfl:
Yeah, and this rain is gonna he... Jan 4 2008, 08:27 PM Headrage
How's the teener running Aaron?
No one will... Jan 4 2008, 08:39 PM Aaron Cox I drove it today......(around the block)
I need t... Jan 4 2008, 09:08 PM Gint This thing running yet? :driving: Jan 5 2008, 09:03 AM KaptKaos Depending on the weather, I plan to pull the fuel ... Jan 5 2008, 10:35 AM KaptKaos A little progress so far today.
1) It's not t... Jan 31 2008, 02:19 PM KaptKaos Ok, so I got the fuel pump back in, and it's s... Jan 31 2008, 05:06 PM swood Was it another holiday today...? :confused:
:ch... Jan 31 2008, 10:59 PM KaptKaos
Was it another holiday today...? :confused:
:c... Jan 31 2008, 11:22 PM KaptKaos So today, I got some FI fuel line, and rigged it u... Feb 2 2008, 05:12 PM KaptKaos :barf:
Checked PP. The first thing is a fuel ac... Feb 2 2008, 05:19 PM KaptKaos I put a new fuel filter on it today, and I "t... Feb 16 2008, 06:40 PM racerx9146 try pull the intake boot off the cis fuel distribu... Feb 16 2008, 08:23 PM KaptKaos I was following Slits' CIS issues.
IIRC - h... Mar 29 2008, 09:52 PM KaptKaos :trophy: :trophy: :trophy: :trophy: :trophy: ... Mar 30 2008, 09:45 AM euro911 ... Danka Herr Doktor!
I'd love to come o... Mar 30 2008, 02:25 PM KaptKaos :rotfl:
We really should build one of these.
E... Mar 30 2008, 02:50 PM Eric_Shea
It's "Professor" H-E-L-L-O!
... Mar 30 2008, 06:19 PM Dr Evil :popcorn: Mmm, Vicodin Apr 1 2008, 02:43 AM KaptKaos IT IS ALIVE! :trophy: :trophy:
But.......... May 4 2008, 06:24 PM SLITS
[size=7][color=#FF0000]IT IS ALIVE! :trophy... May 4 2008, 11:23 PM shoguneagle Great job and excellent support as always from fol... Aug 17 2009, 09:03 PM |
4 User(s) are reading this topic (4 Guests and 0 Anonymous Users)
0 Members:

|
Lo-Fi Version | Time is now: 26th September 2024 - 05:22 PM |
Invision Power Board
v9.1.4 © 2024 IPS, Inc.