|
|

|
Porsche, and the Porsche crest are registered trademarks of Dr. Ing. h.c. F. Porsche AG.
This site is not affiliated with Porsche in any way. Its only purpose is to provide an online forum for car enthusiasts. All other trademarks are property of their respective owners. |
|
|
| FourBlades |
 Dec 15 2007, 02:02 PM Dec 15 2007, 02:02 PM
Post
#1
|
|
From Wreck to Rockin     Group: Members Posts: 2,056 Joined: 3-December 07 From: Brevard, FL Member No.: 8,414 Region Association: South East States 
|
Hello 914 World Members!
I am starting on restoring a $500 914 that was left in a field for several years with no windshield. The car belonged to the POs older brother and thus has sentimental value. The sold it to me on the condition that I not part it out. I was looking for a project so this was fine with me. This is my first restoration project so I figured I would learn a lot (IMG:style_emoticons/default/biggrin.gif) (IMG:style_emoticons/default/biggrin.gif) (IMG:style_emoticons/default/biggrin.gif) The car is a mixture of really good sections, appears to have suffered no major accidents, is straight, never been repainted--but it has totally rusted out floors and hell hole. All the suspension mounting points are not rusted. The door gaps are all even and good. If I can replace the floors, I think it will be a good straight car. Many small parts were stolen while it was "stored" and the wiring loom is a complete loss. Thanks for any comments...John |
  |
Replies
| FourBlades |
 Apr 27 2008, 08:03 PM Apr 27 2008, 08:03 PM
Post
#2
|
|
From Wreck to Rockin     Group: Members Posts: 2,056 Joined: 3-December 07 From: Brevard, FL Member No.: 8,414 Region Association: South East States 
|
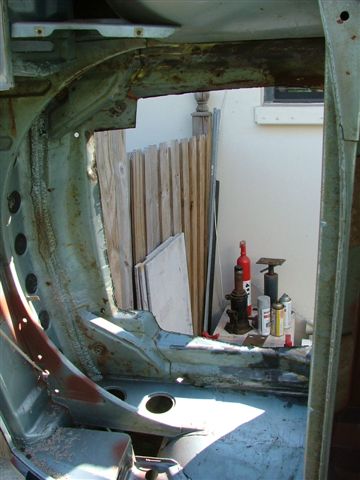
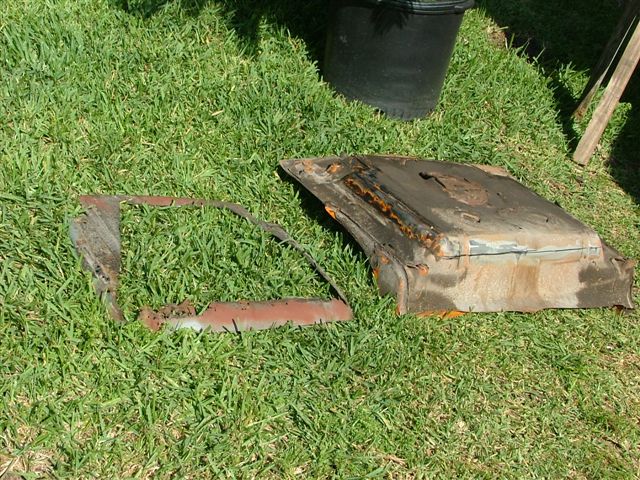
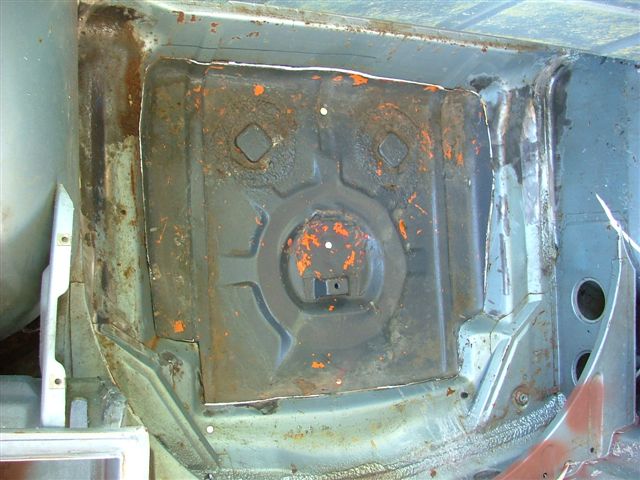
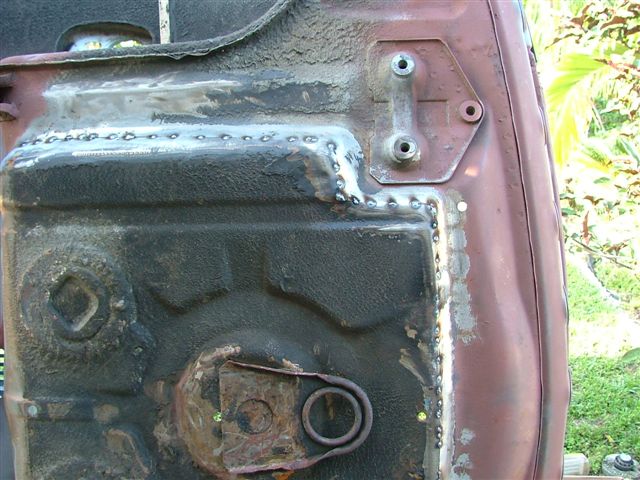
Cut out the front trunk. About now you start wondering if this is such a good
idea and if you really know what the hell you are doing. (IMG:style_emoticons/default/blink.gif)  Cut the center out of the old piece (left side of picture) so it will lay flat on top of the new trunk section and then carefully draw around it. The cutting wheel cuts a kerf about two of them teeny ruler marks wide so draw the cut line a little wide around the edge of the old piece. It is easier to cut more later than to fill in a big gap with the welder.  The new piece actually fits pretty well. A little trimming here and there and it is good to go. I have learned not to try to perfect the fit of a patch. Otherwise you start out with big patch that is pretty close and you keep trimming it and trimming it and it is always too short no matter how much you cut off. (IMG:style_emoticons/default/huh.gif)  Cleaned the edges to bare metal on both sides. Tack welded the corners, then the middles, then in between. Then the cycle repeats itself until the tacks are an inch or so apart. It is easier to hammer a patch to fit once it is partly tacked on. Once part of a patch is held rigidly by welding the other parts bend easily with the hammer.  |
Posts in this topic
 FourBlades Starting a 1973 restoration Dec 15 2007, 02:02 PM
 FourBlades Some pictures in my restoration "garage... Dec 15 2007, 02:09 PM
 David_S
Hello 914 World Members!
I am starting on re... Dec 15 2007, 02:13 PM
 Joe Owensby Start digging into it to see how bad the rust is. ... Dec 15 2007, 03:09 PM
 roadster fan :wttc:
Dig In, and see what you have. The under... Dec 15 2007, 03:16 PM
 Chuck :wttc:
As Yogi would say, its deja vu all over a... Dec 15 2007, 03:42 PM

 FourBlades
:wttc:
As Yogi would say, its deja vu all over ... Dec 15 2007, 10:18 PM

 Chuck
If you decide to go the big 4 route check out Ja... Dec 16 2007, 05:34 PM

 Jake Raby
If you decide to go the big 4 route check out Ja... Dec 17 2007, 07:58 AM
 FourBlades Thanks for the encouragement. I can see this is a... Dec 15 2007, 10:15 PM
 Chuck You're correct. The floorpan is spot welded to... Dec 15 2007, 10:20 PM
 swl I hate to be a spoil sport but that interior pictu... Dec 16 2007, 07:46 AM

 FourBlades
I hate to be a spoil sport but that interior pict... Dec 16 2007, 09:40 AM
 swl Just for the record that wasn't me on the digg... Dec 16 2007, 03:48 PM
 FourBlades Thanks guys, I am seriously interested in a 2270 4... Jan 17 2008, 06:38 PM
 FourBlades Cleaned to good metal, primed, patched and added h... Jan 17 2008, 06:43 PM
 tracks914 Nice work, I think you will do well.
I just did a... Jan 17 2008, 07:36 PM
 swl Indeed that was one awful looking chassis you brou... Jan 18 2008, 03:10 PM
 FourBlades Thanks Doug, I will most likely be asking for advi... Jan 18 2008, 08:13 PM

 tracks914
Thanks Doug, I will most likely be asking for adv... Feb 3 2008, 04:16 PM
 FourBlades Hell hole finally makes it to primer heaven! ... Feb 2 2008, 07:44 PM
 SirAndy nice progress! :trophy:
did 'ya add th... Feb 2 2008, 07:46 PM
 FourBlades Cut rust out of front of passenger long. Notice t... Feb 2 2008, 07:56 PM
 FourBlades Innermost sheet metal welded in.
Sleeving the i... Feb 2 2008, 08:03 PM
 FourBlades Welded and cleaned. Nothing better than shiny new... Feb 2 2008, 08:10 PM
 FourBlades VIN number added to 914 World database. I'll ... Feb 2 2008, 08:15 PM
 FourBlades Note that I use weldable primer on anything that w... Feb 2 2008, 08:22 PM
 Bartlett 914 Looks pretty good. Keep up the nice work and keep ... Feb 3 2008, 10:03 AM
 rjames Looking great!
And I couldn't agree mor... Feb 3 2008, 12:57 PM
 sendjonathanmail Wow Doug, that was some serious rust. Lookin' ... Feb 3 2008, 05:16 PM
 FourBlades Man Doug, looks like the heater tube was the only ... Feb 3 2008, 09:51 PM
 jd74914 McMaster Carr should have the right size tubing (s... Feb 3 2008, 10:06 PM
 FourBlades Fixing the driver side footwell and long. It is m... Feb 22 2008, 06:44 PM
 FourBlades :blink: :blink: Peeling the rust bucket onion :... Feb 22 2008, 06:53 PM
 FourBlades Rebuilding the first layer of the onion.
Made a p... Feb 22 2008, 06:58 PM
 FourBlades Rebuilding the second layer of the onion.
Made a ... Feb 22 2008, 07:14 PM
 FourBlades Now I have this pristine pedal and brake master cy... Feb 22 2008, 07:38 PM
 FourBlades Afew more gratuitous Roebling pictures...
Now... Feb 22 2008, 07:41 PM
 FourBlades Welded on a patch to the lower part of the passeng... Mar 14 2008, 08:16 PM
 FourBlades Now it is time to fix the "Heck Hole" wh... Mar 14 2008, 08:21 PM
 Van Fantastic work! Mar 14 2008, 08:38 PM
 FourBlades Thanks Van, but I am really just an amateur at thi... Mar 19 2008, 06:02 PM
 TINCAN914 :worship: :worship: :welder: Keep it up.. :head... Mar 19 2008, 06:37 PM
 charliew John good work. I have used por 15 for many years ... Mar 26 2008, 01:04 PM
 sean_v8_914 you guys are true 914 champions.
the POR 15 need... Mar 26 2008, 01:25 PM
 Richard Casto John,
Great work. It is nice to see someone save... Mar 26 2008, 03:41 PM
 FourBlades Thanks for all the responses. Its nice to know I ... Mar 27 2008, 08:36 PM
 FourBlades Fixing the driver's side jacking point. I cut... Mar 31 2008, 08:31 PM
 SirAndy :trophy: Mar 31 2008, 08:38 PM
 FourBlades One more major longitudinal problem to fix. Made ... Mar 31 2008, 08:44 PM
 FourBlades I got a rear half of a tunnel plus cross member fr... Mar 31 2008, 09:06 PM
 solex John,
I''m impressed not only do you have ... Mar 31 2008, 09:18 PM
 FourBlades Thanks Dan. I'm telling you, it really helps ... Mar 31 2008, 09:26 PM
 FourBlades Two big milestones today. Finished off a 10 pound... Apr 8 2008, 07:29 PM
 Sleepin Great work! I really enjoyed the read so far... Apr 8 2008, 11:37 PM
 jbyron Wow! Very educational. Keep up the good work... Apr 9 2008, 10:11 AM
 FourBlades Flip Your 914 the CSOB Way
I got fed up with work... Apr 13 2008, 06:15 PM
 FourBlades Flip Your 914 Part Deux
When the car was tipped a... Apr 13 2008, 06:21 PM

 slow914 dude, that is badass Apr 13 2008, 06:50 PM

 TROJANMAN
Flip Your 914 Part Deux
It's like a 914 ... Apr 15 2008, 08:38 PM

 ericread
Flip Your 914 Part Deux
It's like a 914... Apr 16 2008, 12:15 AM
 FourBlades No, it is cheap ass! I think this cost about ... Apr 13 2008, 06:59 PM
 Bartlett 914 Looks pretty good. My car is on a rotisserie. It i... Apr 14 2008, 09:04 AM
 FourBlades Mark,
My motivation for doing it this way was to ... Apr 15 2008, 08:13 AM
 Gint That's kickass! Thanks for posting that. Apr 15 2008, 08:21 PM
 tracks914 That's just insane!!! For the 914 ... Apr 15 2008, 09:14 PM
 McMark Either way you were gonna be famous. This way you... Apr 16 2008, 02:16 AM
 tdgray Congrats... now there is thinking outside the box.... Apr 16 2008, 08:28 AM
 Eric_Shea Way to go... cool thread! :trophy: Apr 16 2008, 09:12 AM
 FourBlades Wow, thanks everyone. I'm glad people liked t... Apr 16 2008, 12:45 PM
 Eric_Shea
Make me a Resonator! :D Apr 16 2008, 02:17 PM
 FourBlades Eric,
I can make you a Dobro style guitar with a ... Apr 16 2008, 10:28 PM
 FourBlades Finished welding on the floor pans and primed them... Apr 25 2008, 12:03 PM
 FourBlades Primed front of passenger compartment and floor pa... Apr 26 2008, 05:44 PM
 McMark Lookin' GREAT!!!! Apr 27 2008, 01:22 AM
 swl Just freakin' awesome. I'm so impressed w... Apr 27 2008, 07:07 AM
 scotty b :lol: That's awesome !!! I 'v... Apr 27 2008, 09:50 AM
 FourBlades Thanks Scotty, you should see the ballista I built... Apr 27 2008, 07:42 PM
 FourBlades Seam welded in between the tacks on the new front ... Apr 27 2008, 08:07 PM
 ericread AMAZING JOB!!! :headbanger:
Keep up... Apr 27 2008, 08:40 PM
 FourBlades Building the armageddon proof clutch tube!... May 29 2008, 08:11 PM
 FourBlades Took me a while to figure out what tubes and cable... May 29 2008, 08:23 PM
 Bartlett 914 John you make these things look easy. I did the sa... May 30 2008, 08:41 AM
 Richard Casto John,
Keep it up! I love this thread. :) B... May 30 2008, 08:49 AM

 FourBlades
John,
Keep it up! I love this thread. :) ... Jun 2 2008, 05:06 PM
 Slider Nice Job!
Im glad to see someone bringing ano... Jun 2 2008, 07:48 PM
 FourBlades More work on the tunnel for welding porn fans. Bo... Jun 11 2008, 09:18 PM
 craig downs Awesome work
I'm glad I didn't have to go ... Jun 12 2008, 12:36 AM
 FourBlades It does not make a lot of sense. I wish they had ... Jun 12 2008, 07:49 AM

 914Tom great motivation to get my lacy butt off the coutc... Jun 12 2008, 02:22 PM
 FourBlades All right, 914Tom, lets see some pictures of your ... Jun 12 2008, 05:12 PM
 Eric_Shea Ut-ummm... :WTF:
All this welding seems to be t... Jun 12 2008, 06:58 PM
 FourBlades That is freaking crazy. How big a tire can you fi... Jun 12 2008, 09:09 PM

 914Tom OK, here is my projekt.
bough it winter 2003-2004... Jun 14 2008, 06:43 AM
 Eric_Shea Awesome :trophy:
I've always loved Zebra. Jun 12 2008, 10:27 PM
 FourBlades Tom,
Great work! Looks like you are making s... Jun 14 2008, 10:58 AM
 FourBlades Got some rebuilt calipers recently from Eric Shea.... Jul 7 2008, 08:18 PM
 FourBlades Closing up the firewall. I salvaged the e-brake t... Jul 7 2008, 08:35 PM
 FourBlades Inside of the firewall.
Firewall and tunnel spr... Jul 7 2008, 08:46 PM
  |
21 User(s) are reading this topic (21 Guests and 0 Anonymous Users)
0 Members:

|
Lo-Fi Version | Time is now: 27th December 2024 - 04:10 AM |
Invision Power Board
v9.1.4 © 2024 IPS, Inc.


