|
|

|
Porsche, and the Porsche crest are registered trademarks of Dr. Ing. h.c. F. Porsche AG.
This site is not affiliated with Porsche in any way. Its only purpose is to provide an online forum for car enthusiasts. All other trademarks are property of their respective owners. |
|
|
| Richard Casto |
 Oct 31 2007, 09:13 PM Oct 31 2007, 09:13 PM
Post
#1
|
|
Blue Sky Motorsports, LLC    Group: Members Posts: 1,465 Joined: 2-August 05 From: Durham, NC Member No.: 4,523 Region Association: South East States |
A little history first...
This is my third 914 and it will be a keeper. First two are from my college days in the late 1980's but both of those are gone (1st was totalled in a crash, the second had terminal rust and eventually became a parts car) Fast forward roughly 20 years. Got married, had two kids and I decided I could not continue to put off building my dream car. While I had always wanted an original 914/6, I also wanted a general purpose fun car (Street, Autocross and Track) that would have had more power and safety features than a stock 914/6. I can't afford to have multiple 914s (a stock 914/4, a 914/4 with a modern Type IV, a stock 914/6, a 914/6 GT Clone, a track only 914, etc.), so rather than molest a "real" 914/6 to build my dream "six", I decided to start with a regular 914/4 and do a six swap. This car was purchased in 8/2005. Over the past two years I have disassembled the entire car and am now at the point of doing repair and refurbishment. Which is why I picked now as the time to do the progress thread (who wants to read about the dis-assembly of a car!) Goals for the car...
I have my own website that contains a higher level of detail on specific sections of the car as well as a more detailed general Blog. I currently host this at home and sometimes the server is down, but it is up most of the time. You can find that here... http://motorsport.zyyz.com/project_914.htm |
  |
Replies
| Richard Casto |
 Jan 21 2009, 10:57 AM Jan 21 2009, 10:57 AM
Post
#2
|
|
Blue Sky Motorsports, LLC    Group: Members Posts: 1,465 Joined: 2-August 05 From: Durham, NC Member No.: 4,523 Region Association: South East States |
It's hard to believe that it's been nearly a year since I created the replacement floor section, but it is now welded in.
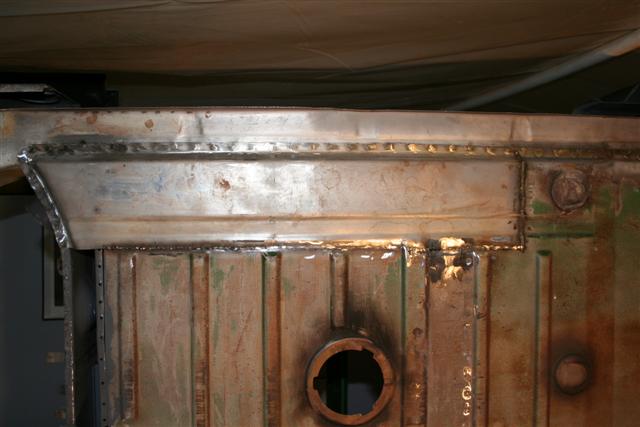
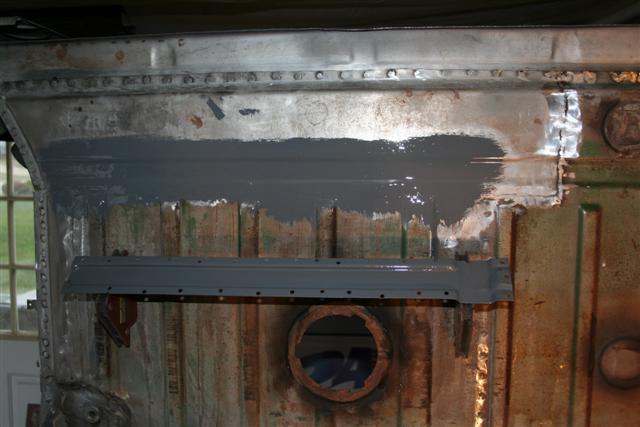
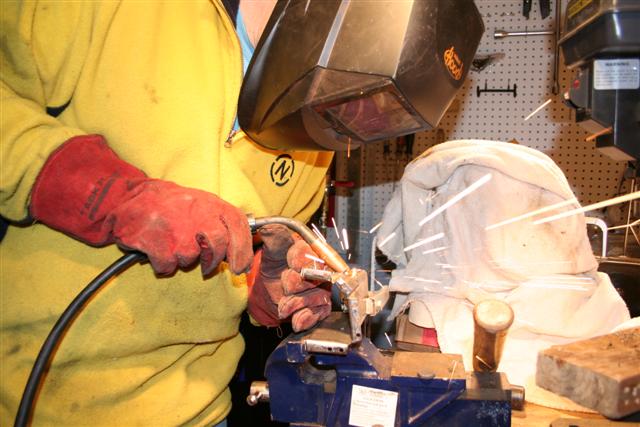
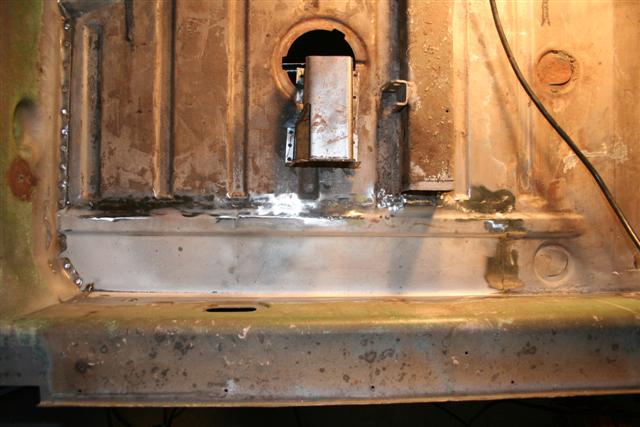
 After welding, but before I finished grinding down the welds  Welds grinded flush, treated with Metal Ready and POR-15. I also removed the factory "U channel" reinforcement from the old floor. It was in pretty good shape. I media blasted it, treated with Metal Ready and POR-15. It just needs to be welded. When I test fit, I mark the locations that the plug welds will be done and then grind the POR-15 off a small circle so I am getting a good weld. You can't weld through POR-15. You can also see that I welded in the last floor patch on the passenger side right under the firewall bulkhead.  Action shot of me working on fabricating the small section of the cross member that is on the interior of the car. This is the box section that runs left to right. I had to cut out the passenger side as it was swiss cheese and could not be repaired.  Here is a top view of the replacement floor section and the replacement end for the box section (it still needed work) Well, that's it for now. I hope to finish up much of the interior of the passenger longitudinal in the very near future. Then I need to work on recreating the section right under the jack receiver tube. I have the replacement tube and pyramid, but I need to fabricate the section below that. Comments and questions are welcome! |
Posts in this topic
 Richard Casto Richard's progress thread Oct 31 2007, 09:13 PM
 Richard Casto In 2005 when I decided to get back on the horse, a... Oct 31 2007, 09:18 PM
 Richard Casto Fast forward to June of this year. Over the sprin... Oct 31 2007, 09:26 PM
 Richard Casto Sometime earlier I had realized that in addition t... Oct 31 2007, 09:32 PM
 Richard Casto This past week, I decided to dive in and really st... Oct 31 2007, 09:47 PM
 Richard Casto In the hell hole area, as mentioned earlier I have... Oct 31 2007, 09:57 PM
 Richard Casto More cutting. I probably am going to be cutting a... Oct 31 2007, 10:01 PM

 TeenerTim You REALLY need to tack in some bracing with the c... Nov 1 2007, 08:01 AM
 rick 918-S Good start. we'll be watching :popcorn: Oct 31 2007, 10:36 PM
 iamchappy What an ambitious start, I wish you the courage to... Nov 1 2007, 08:08 AM
 URY914 Great job so far. But yes add some door opening br... Nov 1 2007, 08:24 AM

 jdogg Richard-
Great progress!!! With the p... Nov 1 2007, 09:50 AM

 Richard Casto
Richard-
Great progress!!! With the ... Nov 1 2007, 10:30 AM
 roadster fan Richard,
Awesome pics of your progress, keep em c... Nov 1 2007, 12:32 PM

 Richard Casto
Richard,
Awesome pics of your progress, keep em ... Nov 1 2007, 12:47 PM

 Richard Casto
[quote name='roadster fan' post='962704' date='No... Nov 6 2007, 04:17 PM
 tdgray Great Start :beer2: :Qarl:
Keep it up... belie... Nov 1 2007, 04:04 PM
 dfwteenerpr This is fascinating to see. I have a 74 and a 76 ... Nov 1 2007, 09:16 PM
 jaminM3 Nice!!
I am starting a very similar proje... Nov 1 2007, 09:21 PM
 Rand Way to go Richard! I love the way you're t... Nov 1 2007, 09:41 PM
 BIGKAT_83 Great write up on the rotisserie build.....It sure... Nov 6 2007, 05:31 PM
 Eric_Ciampa just a thought... you might want to include some p... Nov 6 2007, 09:18 PM
 roadster fan Richard,
Thanks for doing the write up on the rot... Nov 9 2007, 01:56 AM

 Richard Casto
Richard,
Thanks for doing the write up on the ro... Nov 9 2007, 10:09 AM
 roadster fan Richard,
That is exactly the info I needed. I wi... Nov 10 2007, 03:35 AM
 Richard Casto Sorry for the lack of an update. Between various ... Dec 30 2007, 10:58 PM
 Richard Casto I am still working on the passenger side longitudi... Dec 30 2007, 11:10 PM
 Richard Casto
I drilled out the spot welds on the bottom. The... Dec 30 2007, 11:26 PM
 Richard Casto Thats pretty much it for tonight. Over the next f... Dec 30 2007, 11:30 PM
 michelko Hi Richard,
nice project. i love that kind of stuf... Dec 31 2007, 03:11 AM

 Richard Casto
Hi Richard,
nice project. i love that kind of stu... Jan 2 2008, 09:48 AM
 John It looks like you are making good progress with yo... Jan 2 2008, 12:34 PM

 Richard Casto
It looks like you are making good progress with y... Jan 2 2008, 02:10 PM
 Richard Casto Time for an update
As always my site has more in ... Feb 26 2008, 10:58 PM
 Richard Casto Last month I had been working on cleaning up stuff... Feb 26 2008, 11:01 PM
 Richard Casto Earlier this month I started to fabricate replacem... Feb 26 2008, 11:09 PM
 Richard Casto
Here is the actual part I plan to put on the car... Feb 26 2008, 11:12 PM
 Richard Casto
Here I have marked up the lower section of the bu... Feb 26 2008, 11:16 PM
 Lou W Richard, this is amazing, you're doing a great... Feb 26 2008, 11:16 PM
 Richard Casto
By using a combination of the metal brake and ham... Feb 26 2008, 11:22 PM
 Richard Casto Thats it for now. Any comments or questions are w... Feb 26 2008, 11:24 PM
 michelko Hi richard,
your metal working skills are amazing ... Feb 27 2008, 03:02 AM
 jeeperjohn56 Hey Richard, Your doing a great job of metal work,... Feb 27 2008, 09:47 AM

 Richard Casto
Hey Richard, Your doing a great job of metal work... Feb 27 2008, 11:02 AM
 BenNC Richard, it looks like your having too much fun wi... Feb 27 2008, 11:53 AM

 Richard Casto
Richard, it looks like your having too much fun w... Feb 27 2008, 01:02 PM
 Richard Casto I reached a cool milestone this weekend. I actual... Mar 10 2008, 07:50 PM
 Richard Casto First I needed to mostly finish up the replacement... Mar 10 2008, 07:52 PM
 Richard Casto Now for the fun stuff!!
I don't want ... Mar 10 2008, 07:57 PM
 Richard Casto
All welded up. What has worked best for me is s... Mar 10 2008, 08:03 PM
 Richard Casto Thats it for now. I am pretty excited to be weldi... Mar 10 2008, 08:05 PM
 Rand That's choice Richard! And I wasn't ev... Mar 10 2008, 08:10 PM
 roadster fan Hey Richard,
It's been awhile since I checked... Mar 10 2008, 11:44 PM
 jdogg Holy shit, Richard!!! Great stuff... Mar 11 2008, 12:31 PM
 Richard Casto Its been awhile since I have posted an update. As... Jul 7 2008, 12:13 PM
 Richard Casto
For the new skin, I want to replicate the indent... Jul 7 2008, 12:14 PM
 Richard Casto
Back of skin with tack welds
99% Finished pro... Jul 7 2008, 12:35 PM
 Richard Casto
On the left is part of the double wall that will... Jul 7 2008, 12:40 PM
 Richard Casto Here I am starting a test to see what is the best ... Jul 7 2008, 12:48 PM
 Richard Casto Ok, back to the passenger longitudinal. I had sta... Jul 7 2008, 12:57 PM
 Richard Casto Thats it for today.
I am taking off next week and... Jul 7 2008, 01:02 PM
 Cupomeat This is great stuff, thanks!
It gives me insp... Jul 8 2008, 10:41 AM
 Richard Casto Made some progress last week. I had taken the wee... Jul 22 2008, 09:45 PM
 Richard Casto
Close up of the rosette "spot welds" n... Jul 22 2008, 09:50 PM
 SGB "thass purty" Jul 22 2008, 09:56 PM
 Richard Casto
Next I fabricated this piece. As you can see it... Jul 22 2008, 09:58 PM
 3d914 Richard,
THis is awesome stuff. I have taken on a... Jul 23 2008, 08:40 PM

 Richard Casto
Richard,
THis is awesome stuff. I have taken on ... Jul 24 2008, 08:54 AM
 Richard Casto It has been quite awhile since I have updated this... Nov 11 2008, 03:01 PM
 Richard Casto Now we move onto the inner passenger suspension co... Nov 11 2008, 03:11 PM
 Richard Casto I generally do the welding stuff on the weekends w... Nov 11 2008, 03:18 PM
 Travis Neff Great attention to detail! Nov 11 2008, 03:20 PM

 Richard Casto
Great attention to detail!
Thanks! I t... Nov 11 2008, 03:22 PM
 Richard Casto Now comes the fun that I have been looking forward... Nov 11 2008, 03:34 PM
 Richard Casto Ok, that is it for now. I hope to work on powder ... Nov 11 2008, 03:37 PM
 r_towle this is awesome and I love the work...great detail... Nov 11 2008, 03:39 PM

 Richard Casto
this is awesome and I love the work...great detai... Nov 11 2008, 03:45 PM
 charliew I wonder if in a emergency and you don't have ... Jan 5 2009, 09:34 PM

 Richard Casto
I wonder if in a emergency and you don't have... Jan 6 2009, 07:42 AM
 Gint Very nice work.
How's that diff cover comin... Jan 17 2009, 09:13 AM

 Richard Casto
Very nice work.
How's that diff cover comi... Jan 17 2009, 07:48 PM
 Gint That's what I was curious about. I bought som... Jan 17 2009, 09:41 PM
 Richard Casto Here are the photos of the diff cover. It sat in ... Jan 21 2009, 09:51 AM
 Richard Casto It may be hard to see the corrosion from the last ... Jan 21 2009, 09:55 AM
 Richard Casto Ok, back to fabrication and welding!!
Now... Jan 21 2009, 10:46 AM
 Richard Casto Brackets and the metal heater tubes all welded int... Jan 21 2009, 10:49 AM
 FourBlades Its looking good man! :Qarl:
Did you say t... Jan 21 2009, 11:21 AM

 Richard Casto
Its looking good man! :Qarl:
Did you say ... Jan 21 2009, 11:30 AM
 Richard Casto Ok, it's been months since I have updated this... Mar 31 2009, 07:14 PM
 Richard Casto Car is upside down so this is driver side...
PO... Mar 31 2009, 07:19 PM
 Richard Casto
Media blasted and treated with Metal Ready. I h... Mar 31 2009, 07:24 PM
 Richard Casto
All welded on. Fabrication takes a lot of... Mar 31 2009, 07:29 PM
 Richard Casto
Just need to grind down the welds and add in the... Mar 31 2009, 07:35 PM
 Richard Casto
About 1/2 done with my welding.
While the c... Mar 31 2009, 07:41 PM
 Richard Casto
Mostly welded and about 90% ground down. Just m... Mar 31 2009, 07:46 PM
 Richard Casto Well that is it for now. I am going to continue t... Mar 31 2009, 07:50 PM
 veltror Excellent work, it really is encouraging to see th... Apr 1 2009, 05:34 PM
 FourBlades Really nice quality work Richard! :Qarl: :t... Apr 1 2009, 07:19 PM
 dlo914 Nice welds! :) ...what are you using? I'm ... Apr 1 2009, 09:38 PM
  |
13 User(s) are reading this topic (13 Guests and 0 Anonymous Users)
0 Members:

|
Lo-Fi Version | Time is now: 6th April 2025 - 03:17 PM |
Invision Power Board
v9.1.4 © 2025 IPS, Inc.


