|
|
|
Porsche, and the Porsche crest are registered trademarks of Dr. Ing. h.c. F. Porsche AG.
This site is not affiliated with Porsche in any way. Its only purpose is to provide an online forum for car enthusiasts. All other trademarks are property of their respective owners. |
|
|


| Tom |
 Jun 2 2007, 11:56 AM Jun 2 2007, 11:56 AM
Post
#1
|
|
Advanced Member  Group: Members Posts: 2,139 Joined: 21-August 05 From: Port Orchard, WA 98367 Member No.: 4,626 Region Association: None |
After putting new bushings in the trans bracket for the shifter rod, I still had a lot of slop. Taking it apart and measuring found the following. New Bushings are 0.600 inside dia and 0.815 outside dia. My bracket hole for the bushing is 0.830 and my rod is 0.588. Made another bushing for the rod that is slightly larger. Will get back later to let all know how it turns out.
Also made a couple of bushings for the yoke at the fire wall. Press fit and hone to fit pin. This tightened up that area very well. I used a white delrin material to make the bushings out of as this material is supposed to be good for this type of application. 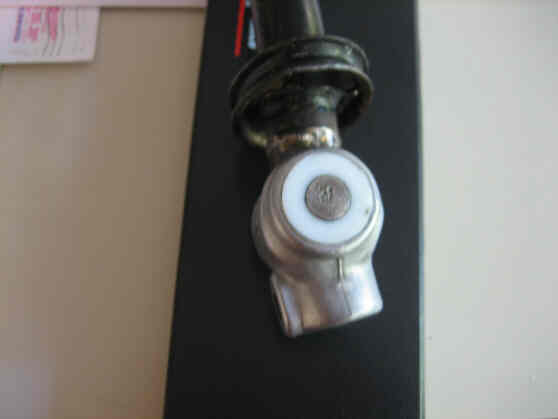 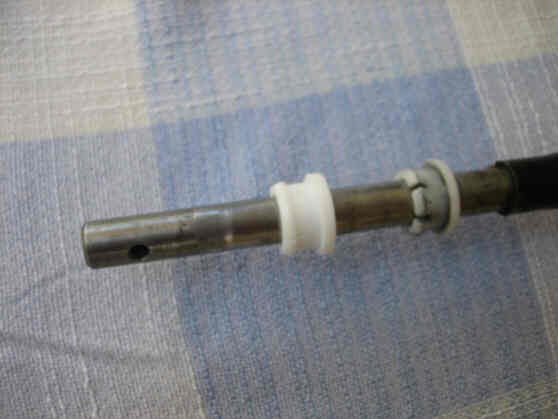 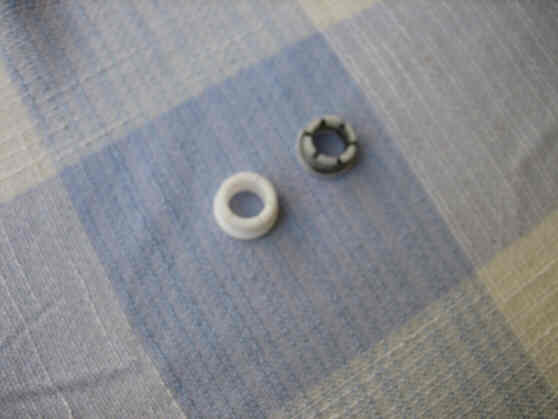 Later, Tom |
   |

 
|
  |
Replies
| Nürburg Nomad |
May 16 2010, 01:05 AM
Post
#2
|
|
914Rubber.com! Group: Members Posts: 296 Joined: 30-March 10 From: Buckeye State Member No.: 11,536 Region Association: Upper MidWest |
Okay well everything arrived in short order and I've got it all in hand!
The rear plastic cover came off with just a bit of PB Blaster penetrating oil which immediately loosened up all the gunk and aluminum oxidation securing it in place. Rear cone screw is removed but now I can't seem to get the dowel pin out?!? As I lay underneath my 914 now typing this via phone; I attempted the trick noted elsewhere here to have someone quickly move the shifter forward into 2nd while holding the rear ball cup segment in place. Unfortunately since the bushings at the other dowel pin further up are 100% gone it applies no substantial force and would be more likely to damage the aluminum piece... Unrelated but I also just noticed two segments of fuel line in bad need to replacment... And yes my neighbors are used to seeing me work on cars at this hour; they're usually quite a bit larger though and less German than the 914 over me at the moment. So perhaps there's a tool or trick to removing the 2 dowel pins that I've missed? Time to get this 914 back on the road! : ) Thanks everyone! |
|
|
|
| Dave_Darling |
May 16 2010, 11:52 AM
Post
#3
|
|
914 Idiot Group: Members Posts: 15,047 Joined: 9-January 03 From: Silicon Valley / Kailua-Kona Member No.: 121 Region Association: Northern California |
QUOTE(Nürburg Nomad @ May 16 2010, 12:05 AM)  So perhaps there's a tool or trick to removing the 2 dowel pins that I've missed? What dowel pins? With a side-shifter, you just remove the cone screw and wiggle the shift rod head off of the rear shift rod. Then you can slide the rod out of the side shifter console to replace the castellated bushing, and pull the shift rod head off of the gear selector to replace the cup bushing. No dowel pin removal needed. --DD |
|
|
|
| Nürburg Nomad |
May 27 2010, 03:12 PM
Post
#4
|
|
914Rubber.com! Group: Members Posts: 296 Joined: 30-March 10 From: Buckeye State Member No.: 11,536 Region Association: Upper MidWest |
QUOTE(Dave_Darling @ May 16 2010, 01:52 PM) QUOTE(Nürburg Nomad @ May 16 2010, 12:05 AM) So perhaps there's a tool or trick to removing the 2 dowel pins that I've missed? What dowel pins? With a side-shifter, you just remove the cone screw and wiggle the shift rod head off of the rear shift rod. Then you can slide the rod out of the side shifter console to replace the castellated bushing, and pull the shift rod head off of the gear selector to replace the cup bushing. No dowel pin removal needed. --DD Heh correct... (IMG:style_emoticons/default/blink.gif) I wasn't sure what I was dealing with until I totally got under there and tore everything apart. Clearly all this linkage hadn't been dismantled in quite some time so it took quite a bit more persuasion than a wiggle... (IMG:style_emoticons/default/welder.gif) but it really wasn't that bad! But yes, thanks again for everyones advice, haven't had much time to work on the ole' 914 but the plan is to complete it today. The new black bushings from Pelican at the aluminum yoke piece right behind the firewall fit exceptionally well and took a bit of ingenuity to press them in myself so thats now reassembled to the rear shifter linkage bar. I know this is the primary culprit as these bushings were missing entirely by the time I removed the boot concealing it; so the front rod & shifter would be fully in the Rev/1st or 4th/5th while it would only tilt the rear linkage bar a fraction of what it should have been. The new Pelican rear rod bushing located where the black plastic access cover is, is better than the one I just took out but probably still .10" of slop so I could see a measurable advantage using Delrin as pictured in the first post. The new Pelican cup bushing appears to be Grade A also; just a matter of forcing it on and surpasing the pressure of the air pocket created in there! Otherwise it looks like the Pelican firewall bushing should fit snugly assuming I can ever get it installed! Tried boiling it in water to the point where air bubbles were rising from it within the Pyrex measuring cup and I swore it was going to melt but even then no luck since there's soo little room to swing a dead blow mallet or hammer under there, I just had a super hot bushing that didn't seem any more pliable!? Soooo any surefire suggestions for getting the firewall bushing in would be handy; perhaps a tool I can craft to apply equal pressure to either side of the bushing before wailing on it with a hammer? (IMG:style_emoticons/default/biggrin.gif) |
|
|
|
Posts in this topic
 Tom shifter bushings Jun 2 2007, 11:56 AM
 Dr Evil Very cool, is the delrin you are using more plyabl... Jun 2 2007, 12:04 PM sean_v8_914 celcon (delrin) is typically stiffer
Tom? Jun 2 2007, 02:55 PM Bartlett 914
I got some bushings form ebay. They fit terribl... Jun 2 2007, 03:14 PM Tom Well, the bushing went in and things work better. ... Jun 5 2007, 09:08 AM Tom Well, it has been over a year and the shifting is ... Oct 27 2008, 10:03 PM Nürburg Nomad Hello 914 World... technically this is my first po... May 9 2010, 10:51 AM bandjoey I got a complete set from Pelican and they fit tig... May 9 2010, 02:48 PM Nürburg Nomad Hmm well I see they have part number PEL-SKS914-03... May 10 2010, 09:46 AM underthetire I bought some from AA a while back, although they ... May 10 2010, 10:40 AM Tom Well, it has been several years now and shifting i... May 10 2010, 01:19 PM
Dr Evil Very cool, is the delrin you are using more plyabl... Jun 2 2007, 12:04 PM sean_v8_914 celcon (delrin) is typically stiffer
Tom? Jun 2 2007, 02:55 PM Bartlett 914
I got some bushings form ebay. They fit terribl... Jun 2 2007, 03:14 PM Tom Well, the bushing went in and things work better. ... Jun 5 2007, 09:08 AM Tom Well, it has been over a year and the shifting is ... Oct 27 2008, 10:03 PM Nürburg Nomad Hello 914 World... technically this is my first po... May 9 2010, 10:51 AM bandjoey I got a complete set from Pelican and they fit tig... May 9 2010, 02:48 PM Nürburg Nomad Hmm well I see they have part number PEL-SKS914-03... May 10 2010, 09:46 AM underthetire I bought some from AA a while back, although they ... May 10 2010, 10:40 AM Tom Well, it has been several years now and shifting i... May 10 2010, 01:19 PM underthetire
Well, it has been several years now and shifting ... May 10 2010, 01:39 PM Nürburg Nomad
Well, it has been several years now and shifting ... May 11 2010, 12:46 AM
underthetire
Well, it has been several years now and shifting ... May 10 2010, 01:39 PM Nürburg Nomad
Well, it has been several years now and shifting ... May 11 2010, 12:46 AM Bartlett 914
Well, it has been several years now and shifting ... Dec 7 2011, 05:55 PM ClayPerrine Put in new cone screws. They have a nylon lock ma... May 11 2010, 06:08 AM Vacca Rabite I bought the complete side shift bushing set from ... May 11 2010, 07:40 AM Tom Nomad,
Yes, I would replace the cone screws a... May 11 2010, 11:51 AM Nürburg Nomad
Nomad,
Yes, I would replace the cone screws ... May 11 2010, 02:08 PM rwilner maybe try hitting it with a heat gun to soften it ... May 11 2010, 06:48 PM Drums66
Soooo any surefire suggestions for getting the ... May 27 2010, 03:59 PM Nürburg Nomad
Soooo any surefire suggestions for getting the... May 27 2010, 10:43 PM kwales Delrin is a great choice for bearings. I've u... May 16 2010, 09:46 AM Nürburg Nomad Update: my 914 officially has all 6 gears function... Jun 3 2010, 05:16 PM Tom It has been over 4 years with these installed and ... Dec 7 2011, 02:09 PM
Bartlett 914
Well, it has been several years now and shifting ... Dec 7 2011, 05:55 PM ClayPerrine Put in new cone screws. They have a nylon lock ma... May 11 2010, 06:08 AM Vacca Rabite I bought the complete side shift bushing set from ... May 11 2010, 07:40 AM Tom Nomad,
Yes, I would replace the cone screws a... May 11 2010, 11:51 AM Nürburg Nomad
Nomad,
Yes, I would replace the cone screws ... May 11 2010, 02:08 PM rwilner maybe try hitting it with a heat gun to soften it ... May 11 2010, 06:48 PM Drums66
Soooo any surefire suggestions for getting the ... May 27 2010, 03:59 PM Nürburg Nomad
Soooo any surefire suggestions for getting the... May 27 2010, 10:43 PM kwales Delrin is a great choice for bearings. I've u... May 16 2010, 09:46 AM Nürburg Nomad Update: my 914 officially has all 6 gears function... Jun 3 2010, 05:16 PM Tom It has been over 4 years with these installed and ... Dec 7 2011, 02:09 PM |
1 User(s) are reading this topic (1 Guests and 0 Anonymous Users)
0 Members:

|
Lo-Fi Version | Time is now: 22nd September 2024 - 12:10 PM |
Invision Power Board
v9.1.4 © 2024 IPS, Inc.