|
|
|
Porsche, and the Porsche crest are registered trademarks of Dr. Ing. h.c. F. Porsche AG.
This site is not affiliated with Porsche in any way. Its only purpose is to provide an online forum for car enthusiasts. All other trademarks are property of their respective owners. |
|
|


| ThePaintedMan |
 Dec 29 2011, 07:02 PM Dec 29 2011, 07:02 PM
Post
#121
|
|
Advanced Member  Group: Members Posts: 3,886 Joined: 6-September 11 From: St. Petersburg, FL Member No.: 13,527 Region Association: South East States |
Hello all,
I'm finally getting around to documenting my restoration after the past several months of work. This may not get updated immediately as I'm trying to get as much done as possible before grad school kicks in again in January. However, I'm going to try and post pics when I can. I purchased this car from a gentleman less than ten minutes from my house named Ray. He apparently is/was a member on the forum as well and was a very cool guy to meet. We talked several times about the car and he was very up-front about its condition (to the best of his own knowledge). He recommended it be used only for the drivetrain, which at this point seems like it was the correct suggestion. However, being 27 and stubborn, I saw it as an opportunity. Most of my experience in the past has been with American and Japanese cars from the the 1980s and newer, and most of that spent doing body work. This car I saw as a chance to learn something (mostly because I figured I couldn't make it any worse than it already was (IMG:style_emoticons/default/biggrin.gif) . So, after seeing the thing run and falling in love, I gave Ray 1,000 for it and convinced my girlfriend to help me tow it home. Unfortunately I do not have pictures of this, but wish I did! The look on her embarased face was something like, "Oh my God, now I've become trailer trash." We towed it five miles clunking the whole way because Ray failed to mention that the CV joints had been disconnected from the wheel. What a ride home. I then set to work on it immediately, replacing a broken clutch fork and cable over the span of a weekend. Drove it around for two weeks to make sure I was still crazy enough to keep it, then began tearing it down. I should mention several things. First of all, this car always had an intention of being raced, which initially was to be in Chumpcar. However, I realized the amount of work needed just to get the thing safe to drive warranted me keeping it for more than just track use. So, at the moment, its going to race Chumpcar next August, and I'm going to PRAY it doesn't get clobbered so that it can be driven afterward. Trust me, I already know I'm (IMG:style_emoticons/default/wacko.gif) . Second, I have made it a point and a promise (to my forever understanding girlfriend) that I'm going to keep the cost to a minimum. That means a minimum of pre-fabbed parts, which also forces me to learn more about metal working as well. This build is certainly not up the past quality work of many of the folks on this board, but like I said, I'm a cheapskate (student loans ain't what they used to be). So, here it goes! I'll try to explain more as I go along. Attached thumbnail(s) 
|
   |

 
|
  |
Replies
| ThePaintedMan |
Dec 30 2011, 10:10 PM
Post
#122
|
|
Advanced Member Group: Members Posts: 3,886 Joined: 6-September 11 From: St. Petersburg, FL Member No.: 13,527 Region Association: South East States |
This pic is of the bend that goes up toward the engine mount area of the inner long. Make a paper template using the old piece if you have it. I did not have enough left to do so, so I sorta guessed (IMG:style_emoticons/default/unsure.gif). Unfortunately I'll just have to do with what I have till I have enough to move a jackstand underneath this area with the rebuilt donut. Then, I can use the rear suspension console and frame piece that Bruce Stone sent me to verify that. Again, I'll keep everyone posted.
If you need to make this piece yourself, I started with a paper template, then slotted it in several parts. The slots should only extend to the parts where you'll put the 90 degree bends in. No need to go further. Then put in the 90 degree bends. Then, simply hammer the middle until you reach the shape you desire. Some of the slots are going to narrow and possibly overlap. Grind the overlap off and then weld the slots shut. Compare the bottom piece with the piece above it. Make sure you put the slots in the second piece in the same spots as the first. This will ensure you have two almost identical pieces. You will weld both of these together using rosette welds since this section should be double-walled just like the outsides. Attached thumbnail(s) 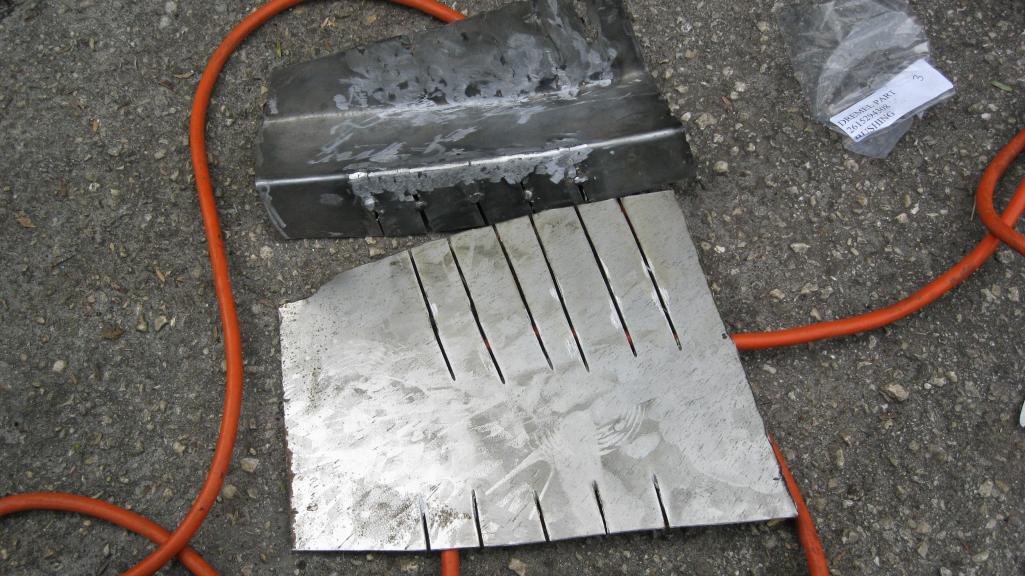
|
|
|
|
Posts in this topic
 ThePaintedMan College budget restoration Dec 29 2011, 07:02 PM
 ThePaintedMan Here is our old friend, the passenger long, or wha... Dec 29 2011, 07:09 PM
 stewteral
Here is our old friend, the passenger long, or wh... Dec 30 2011, 11:20 PM ThePaintedMan
Hey Terry,
Thanks for the kind words. We are... Jan 12 2012, 07:05 AM ThePaintedMan Oh man, is this fun. I'll have another picture... Dec 29 2011, 07:12 PM Ed_F
Oh man, is this fun. I'll have another pictur... Jan 24 2012, 02:44 AM Germancar-Junkie
Yikes! Sounds like the mess the in between o... Jan 24 2012, 12:20 PM ThePaintedMan "Fuel cell" for a gastank. Seems someone... Dec 29 2011, 07:14 PM billh1963 Sounds like a great learning opportunity. I'm ... Dec 29 2011, 07:14 PM ThePaintedMan A great day! After dropping the transmission w... Dec 29 2011, 07:17 PM wndsrfr Can't help myself....looking at that drivetrai... Dec 29 2011, 07:46 PM wingnut86 ...I like the HF idea.
He should go CAMO like my ... Dec 29 2011, 08:59 PM ThePaintedMan
...I like the HF idea.
He should go CAMO like my... Dec 29 2011, 09:08 PM ThePaintedMan BTW, can anyone confirm that those are Enkei wheel... Dec 29 2011, 09:10 PM moparrob
Also, does anyone have the dimensions for the ce... Dec 30 2011, 12:38 AM ThePaintedMan
Also, does anyone have the dimensions for the c... Dec 30 2011, 07:10 AM bembry They're either Enkei 92s or copies of Enkei 92... Dec 29 2011, 09:56 PM Thestigz06
They're either Enkei 92s or copies of Enkei 9... Dec 30 2011, 12:02 AM ThePaintedMan
They're either Enkei 92s or copies of Enkei ... Dec 30 2011, 07:12 AM carr914 Hi George :wttc:
I don't remember seeing yo... Dec 30 2011, 01:18 AM ThePaintedMan
Hi George :wttc:
I don't remember seeing y... Dec 30 2011, 07:20 AM kevin311 If you want Empi rims I have a black set I would ... Dec 30 2011, 07:20 AM carr914
Hi George :wttc:
I don't remember seeing ... Dec 30 2011, 08:14 AM ThePaintedMan
[quote name='ThePaintedMan' post='1597086' date='... Dec 30 2011, 08:22 AM carr914 Yep, all the time :D Dec 30 2011, 08:55 AM rnellums What are you in grad school for? I am in a simila... Dec 30 2011, 12:43 PM ThePaintedMan
What are you in grad school for? I am in a simil... Dec 30 2011, 06:30 PM ThePaintedMan Okay, a little fast forward. I forgot to take pics... Dec 30 2011, 09:24 PM ThePaintedMan The pieces I fabbed here are made from 18 gauge st... Dec 30 2011, 09:40 PM ThePaintedMan "Hey Jim Bob, you got any rivets laying aroun... Dec 30 2011, 09:53 PM ThePaintedMan Okay, here is the hole in the long behind the fire... Dec 30 2011, 10:05 PM ThePaintedMan And this is it. I welded the back part in today an... Dec 30 2011, 10:17 PM carr914
I could use a battery tray and support as well a... Dec 31 2011, 06:26 AM ThePaintedMan T.C.,
Sounds great! Over the course of a w... Dec 31 2011, 10:04 PM hot_shoe914 Might I also suggest that you put a list of parts ... Dec 31 2011, 09:23 AM ThePaintedMan
Might I also suggest that you put a list of parts... Dec 31 2011, 08:47 PM windforfun How's the job market for your major? Dec 31 2011, 05:48 PM ThePaintedMan
How's the job market for your major?
Ehh, i... Dec 31 2011, 08:59 PM ThePaintedMan Parts Needed
As per Shoe's recommendation, I... Dec 31 2011, 09:16 PM rnellums
Parts Needed
As per Shoe's recommendation, I... Jan 11 2012, 08:58 PM saigon71 :beer2:
Great work man!
I too rebuilt my ... Jan 1 2012, 10:35 AM ThePaintedMan
:beer2:
Great work man!
I too rebuilt my... Jan 2 2012, 09:42 PM ThePaintedMan Wow, what a day!
Today I had the opportun... Jan 2 2012, 09:53 PM ThePaintedMan A little update. So classes have started again. Ug... Jan 11 2012, 01:10 AM ThePaintedMan After entering the VIN in the database, I also fou... Jan 11 2012, 01:14 AM ThePaintedMan Marc and I fabricated a new floorboard for the pas... Jan 11 2012, 01:22 AM billh1963 Good looking progress!
Safety note: welding (... Jan 11 2012, 06:03 AM ThePaintedMan Bill,
I have reminded him of this a million ti... Jan 11 2012, 11:14 AM carr914
Good looking progress!
Safety note: welding ... Jan 11 2012, 11:28 AM matthepcat Flip flop car work is a fine art.....just like fli... Jan 11 2012, 11:35 AM ThePaintedMan Thanks for the kind words fellas. Been raining all... Jan 11 2012, 12:07 PM ThePaintedMan I also pulled the pedal cluster apart yesterday. W... Jan 11 2012, 12:14 PM kevin311 Thats scary to look at and think that I drove it..... Jan 11 2012, 12:52 PM Krieger Trash that pedal assembly. There isn't a whole... Jan 11 2012, 07:45 PM ThePaintedMan
Trash that pedal assembly. There isn't a whol... Jan 12 2012, 06:59 AM carr914
I also pulled the pedal cluster apart yesterday. ... Jan 12 2012, 08:57 AM ThePaintedMan T.C.,
If you do indeed find one, let me know.... Jan 12 2012, 10:35 AM bulitt When Ferrari first started building cars there was... Jan 12 2012, 11:43 AM ThePaintedMan
When Ferrari first started building cars there wa... Jan 12 2012, 06:08 PM SUNAB914 Do not Por15 the pedal assembly when you get the p... Jan 13 2012, 01:01 PM clow Its looking good. Keep up the great work. There wi... Jan 13 2012, 01:11 PM ThePaintedMan Thanks Clow, been following your work as well. Tru... Jan 23 2012, 10:02 PM broomhandle agreed, good work. and looks like the trans is reb... Jan 13 2012, 01:43 PM ThePaintedMan
agreed, good work. and looks like the trans is re... Jan 13 2012, 07:51 PM arkitect Good luck on your build. Looks like you got the ri... Jan 13 2012, 10:17 PM ThePaintedMan Hello again all,
Sorry I haven't done a gr... Jan 23 2012, 10:12 PM porbmw [quote.
Also, I'm probably being anal
Gee... Jan 24 2012, 09:08 AM ThePaintedMan While I was already busy getting covered in POR, I... Jan 23 2012, 10:23 PM ThePaintedMan The floorboard we fabbed. When you see the whole f... Jan 23 2012, 10:31 PM ThePaintedMan And finally, the front windshield channel. I disco... Jan 23 2012, 10:33 PM windforfun :popcorn: Jan 23 2012, 11:05 PM ThePaintedMan I'm pretty sure I'm not going to get any f... Jan 23 2012, 11:22 PM Valy
I'm pretty sure I'm not going to get any ... Jan 23 2012, 11:33 PM VOX good luck on your build! mines is a college bu... Jan 23 2012, 11:16 PM ThePaintedMan VOX,
I seem to remember hearing that about yo... Jan 23 2012, 11:28 PM dlo914
VOX,
I seem to remember hearing that about y... Jan 26 2012, 01:55 AM rnellums In my experience, having a diversion from studies ... Jan 24 2012, 08:38 AM ThePaintedMan Thanks for the positive replies all. Dawn, I don... Jan 24 2012, 04:40 PM mepstein
Also, one of these posts I'm going to list so... Jan 27 2012, 10:17 AM rwilner updates?
I like this thread Feb 23 2012, 02:42 PM rnellums I have one solid susp. console. I cant remember i... Jan 25 2012, 11:58 AM al weidman George, you are doing great and you will have a go... Jan 26 2012, 09:44 PM ThePaintedMan
George, you are doing great and you will have a g... Jan 26 2012, 10:35 PM shuie With the POR cans...
I usually just buy the littl... Jan 26 2012, 10:09 PM ThePaintedMan
With the POR cans...
I usually just buy the litt... Jan 26 2012, 10:37 PM OU8AVW
With the POR cans...
I usually just buy the lit... Jan 27 2012, 10:06 AM ThePaintedMan Man, I had no idea anyone was even really followin... Feb 23 2012, 06:32 PM ThePaintedMan Obviously the outer skin on the inside was trash. ... Feb 23 2012, 06:35 PM ThePaintedMan Bruce Stone (bdstone914) sent me a whole inner fra... Feb 23 2012, 06:39 PM carr914 George, I'm sure there are a bunch of us follo... Feb 23 2012, 06:40 PM dlee6204 Yeah dude. We are all watching and waiting. :po... Feb 23 2012, 06:41 PM ThePaintedMan Cut the whole thing out to replace it all as once ... Feb 23 2012, 06:44 PM ThePaintedMan The "new" piece. Feb 23 2012, 06:45 PM ThePaintedMan And the portions I used to line up the cuts. If yo... Feb 23 2012, 06:48 PM ThePaintedMan Once I got the piece cut to size, I then had to go... Feb 23 2012, 06:51 PM ThePaintedMan Of course, I took measurements before all of this.... Feb 23 2012, 06:55 PM ThePaintedMan A couple other things are done (well actually a lo... Feb 23 2012, 07:01 PM ThePaintedMan Hole that existed before, plus a little extra cut ... Feb 23 2012, 07:03 PM ThePaintedMan The piece that Mark (76911s) sent me cut and fitte... Feb 23 2012, 07:06 PM
stewteral
Here is our old friend, the passenger long, or wh... Dec 30 2011, 11:20 PM ThePaintedMan
Hey Terry,
Thanks for the kind words. We are... Jan 12 2012, 07:05 AM ThePaintedMan Oh man, is this fun. I'll have another picture... Dec 29 2011, 07:12 PM Ed_F
Oh man, is this fun. I'll have another pictur... Jan 24 2012, 02:44 AM Germancar-Junkie
Yikes! Sounds like the mess the in between o... Jan 24 2012, 12:20 PM ThePaintedMan "Fuel cell" for a gastank. Seems someone... Dec 29 2011, 07:14 PM billh1963 Sounds like a great learning opportunity. I'm ... Dec 29 2011, 07:14 PM ThePaintedMan A great day! After dropping the transmission w... Dec 29 2011, 07:17 PM wndsrfr Can't help myself....looking at that drivetrai... Dec 29 2011, 07:46 PM wingnut86 ...I like the HF idea.
He should go CAMO like my ... Dec 29 2011, 08:59 PM ThePaintedMan
...I like the HF idea.
He should go CAMO like my... Dec 29 2011, 09:08 PM ThePaintedMan BTW, can anyone confirm that those are Enkei wheel... Dec 29 2011, 09:10 PM moparrob
Also, does anyone have the dimensions for the ce... Dec 30 2011, 12:38 AM ThePaintedMan
Also, does anyone have the dimensions for the c... Dec 30 2011, 07:10 AM bembry They're either Enkei 92s or copies of Enkei 92... Dec 29 2011, 09:56 PM Thestigz06
They're either Enkei 92s or copies of Enkei 9... Dec 30 2011, 12:02 AM ThePaintedMan
They're either Enkei 92s or copies of Enkei ... Dec 30 2011, 07:12 AM carr914 Hi George :wttc:
I don't remember seeing yo... Dec 30 2011, 01:18 AM ThePaintedMan
Hi George :wttc:
I don't remember seeing y... Dec 30 2011, 07:20 AM kevin311 If you want Empi rims I have a black set I would ... Dec 30 2011, 07:20 AM carr914
Hi George :wttc:
I don't remember seeing ... Dec 30 2011, 08:14 AM ThePaintedMan
[quote name='ThePaintedMan' post='1597086' date='... Dec 30 2011, 08:22 AM carr914 Yep, all the time :D Dec 30 2011, 08:55 AM rnellums What are you in grad school for? I am in a simila... Dec 30 2011, 12:43 PM ThePaintedMan
What are you in grad school for? I am in a simil... Dec 30 2011, 06:30 PM ThePaintedMan Okay, a little fast forward. I forgot to take pics... Dec 30 2011, 09:24 PM ThePaintedMan The pieces I fabbed here are made from 18 gauge st... Dec 30 2011, 09:40 PM ThePaintedMan "Hey Jim Bob, you got any rivets laying aroun... Dec 30 2011, 09:53 PM ThePaintedMan Okay, here is the hole in the long behind the fire... Dec 30 2011, 10:05 PM ThePaintedMan And this is it. I welded the back part in today an... Dec 30 2011, 10:17 PM carr914
I could use a battery tray and support as well a... Dec 31 2011, 06:26 AM ThePaintedMan T.C.,
Sounds great! Over the course of a w... Dec 31 2011, 10:04 PM hot_shoe914 Might I also suggest that you put a list of parts ... Dec 31 2011, 09:23 AM ThePaintedMan
Might I also suggest that you put a list of parts... Dec 31 2011, 08:47 PM windforfun How's the job market for your major? Dec 31 2011, 05:48 PM ThePaintedMan
How's the job market for your major?
Ehh, i... Dec 31 2011, 08:59 PM ThePaintedMan Parts Needed
As per Shoe's recommendation, I... Dec 31 2011, 09:16 PM rnellums
Parts Needed
As per Shoe's recommendation, I... Jan 11 2012, 08:58 PM saigon71 :beer2:
Great work man!
I too rebuilt my ... Jan 1 2012, 10:35 AM ThePaintedMan
:beer2:
Great work man!
I too rebuilt my... Jan 2 2012, 09:42 PM ThePaintedMan Wow, what a day!
Today I had the opportun... Jan 2 2012, 09:53 PM ThePaintedMan A little update. So classes have started again. Ug... Jan 11 2012, 01:10 AM ThePaintedMan After entering the VIN in the database, I also fou... Jan 11 2012, 01:14 AM ThePaintedMan Marc and I fabricated a new floorboard for the pas... Jan 11 2012, 01:22 AM billh1963 Good looking progress!
Safety note: welding (... Jan 11 2012, 06:03 AM ThePaintedMan Bill,
I have reminded him of this a million ti... Jan 11 2012, 11:14 AM carr914
Good looking progress!
Safety note: welding ... Jan 11 2012, 11:28 AM matthepcat Flip flop car work is a fine art.....just like fli... Jan 11 2012, 11:35 AM ThePaintedMan Thanks for the kind words fellas. Been raining all... Jan 11 2012, 12:07 PM ThePaintedMan I also pulled the pedal cluster apart yesterday. W... Jan 11 2012, 12:14 PM kevin311 Thats scary to look at and think that I drove it..... Jan 11 2012, 12:52 PM Krieger Trash that pedal assembly. There isn't a whole... Jan 11 2012, 07:45 PM ThePaintedMan
Trash that pedal assembly. There isn't a whol... Jan 12 2012, 06:59 AM carr914
I also pulled the pedal cluster apart yesterday. ... Jan 12 2012, 08:57 AM ThePaintedMan T.C.,
If you do indeed find one, let me know.... Jan 12 2012, 10:35 AM bulitt When Ferrari first started building cars there was... Jan 12 2012, 11:43 AM ThePaintedMan
When Ferrari first started building cars there wa... Jan 12 2012, 06:08 PM SUNAB914 Do not Por15 the pedal assembly when you get the p... Jan 13 2012, 01:01 PM clow Its looking good. Keep up the great work. There wi... Jan 13 2012, 01:11 PM ThePaintedMan Thanks Clow, been following your work as well. Tru... Jan 23 2012, 10:02 PM broomhandle agreed, good work. and looks like the trans is reb... Jan 13 2012, 01:43 PM ThePaintedMan
agreed, good work. and looks like the trans is re... Jan 13 2012, 07:51 PM arkitect Good luck on your build. Looks like you got the ri... Jan 13 2012, 10:17 PM ThePaintedMan Hello again all,
Sorry I haven't done a gr... Jan 23 2012, 10:12 PM porbmw [quote.
Also, I'm probably being anal
Gee... Jan 24 2012, 09:08 AM ThePaintedMan While I was already busy getting covered in POR, I... Jan 23 2012, 10:23 PM ThePaintedMan The floorboard we fabbed. When you see the whole f... Jan 23 2012, 10:31 PM ThePaintedMan And finally, the front windshield channel. I disco... Jan 23 2012, 10:33 PM windforfun :popcorn: Jan 23 2012, 11:05 PM ThePaintedMan I'm pretty sure I'm not going to get any f... Jan 23 2012, 11:22 PM Valy
I'm pretty sure I'm not going to get any ... Jan 23 2012, 11:33 PM VOX good luck on your build! mines is a college bu... Jan 23 2012, 11:16 PM ThePaintedMan VOX,
I seem to remember hearing that about yo... Jan 23 2012, 11:28 PM dlo914
VOX,
I seem to remember hearing that about y... Jan 26 2012, 01:55 AM rnellums In my experience, having a diversion from studies ... Jan 24 2012, 08:38 AM ThePaintedMan Thanks for the positive replies all. Dawn, I don... Jan 24 2012, 04:40 PM mepstein
Also, one of these posts I'm going to list so... Jan 27 2012, 10:17 AM rwilner updates?
I like this thread Feb 23 2012, 02:42 PM rnellums I have one solid susp. console. I cant remember i... Jan 25 2012, 11:58 AM al weidman George, you are doing great and you will have a go... Jan 26 2012, 09:44 PM ThePaintedMan
George, you are doing great and you will have a g... Jan 26 2012, 10:35 PM shuie With the POR cans...
I usually just buy the littl... Jan 26 2012, 10:09 PM ThePaintedMan
With the POR cans...
I usually just buy the litt... Jan 26 2012, 10:37 PM OU8AVW
With the POR cans...
I usually just buy the lit... Jan 27 2012, 10:06 AM ThePaintedMan Man, I had no idea anyone was even really followin... Feb 23 2012, 06:32 PM ThePaintedMan Obviously the outer skin on the inside was trash. ... Feb 23 2012, 06:35 PM ThePaintedMan Bruce Stone (bdstone914) sent me a whole inner fra... Feb 23 2012, 06:39 PM carr914 George, I'm sure there are a bunch of us follo... Feb 23 2012, 06:40 PM dlee6204 Yeah dude. We are all watching and waiting. :po... Feb 23 2012, 06:41 PM ThePaintedMan Cut the whole thing out to replace it all as once ... Feb 23 2012, 06:44 PM ThePaintedMan The "new" piece. Feb 23 2012, 06:45 PM ThePaintedMan And the portions I used to line up the cuts. If yo... Feb 23 2012, 06:48 PM ThePaintedMan Once I got the piece cut to size, I then had to go... Feb 23 2012, 06:51 PM ThePaintedMan Of course, I took measurements before all of this.... Feb 23 2012, 06:55 PM ThePaintedMan A couple other things are done (well actually a lo... Feb 23 2012, 07:01 PM ThePaintedMan Hole that existed before, plus a little extra cut ... Feb 23 2012, 07:03 PM ThePaintedMan The piece that Mark (76911s) sent me cut and fitte... Feb 23 2012, 07:06 PM |
10 User(s) are reading this topic (10 Guests and 0 Anonymous Users)
0 Members:

|
Lo-Fi Version | Time is now: 28th September 2024 - 07:16 AM |
Invision Power Board
v9.1.4 © 2024 IPS, Inc.