|
|

|
Porsche, and the Porsche crest are registered trademarks of Dr. Ing. h.c. F. Porsche AG.
This site is not affiliated with Porsche in any way. Its only purpose is to provide an online forum for car enthusiasts. All other trademarks are property of their respective owners. |
|
|
| Eric_Shea |
 Mar 30 2014, 09:36 PM Mar 30 2014, 09:36 PM
Post
#1
|
|
PMB Performance                Group: Admin Posts: 19,299 Joined: 3-September 03 From: Salt Lake City, UT Member No.: 1,110 Region Association: Rocky Mountains  |
We've been playing with this one in our spare time. I don't think I ever put an official thread up here on the site so, here goes!
This piece of crap will soon become "Project 914 ORV". Actually what looks pretty bad on the surface; is pretty bad "on the surface". As many 914's go, someone tried to make this one something it isn't. It isn't a "slant nose" no matter what you do to the fenders. And, I don't care how many Miami Vice episodes you've watched, that rubber whale tail thingy and the rear reflector are just plain "wrong". But wait... Speaking of "just plain wrong", were going to carve this late model, big bumpered version of of 80's lust into a high-rise, fiberglass skinned, tubed tub that's ready for Utah's backcountry. That's right; White Rim Trail here we come! Fear not, we're still thinking "all things vintage" so, we'll be pouring over factory rally pictures and builds to make sure we can learn all we can from the engineers at Porsche who went before us. Here it is as it arrived: (IMG:http://www.914world.com/bbs2/uploads_offsite/fbcdn-sphotos-d-a.akamaihd.net-1110-1396236965.1.jpg) Mmmm purdy huh? (IMG:style_emoticons/default/wub.gif) (IMG:http://www.914world.com/bbs2/uploads_offsite/scontent-b-dfw.xx.fbcdn.net-1110-1396236967.2.jpg) Time to get busy. Shovel loads of crud came out of the trunks and interior: (IMG:http://www.914world.com/bbs2/uploads_offsite/scontent-b-dfw.xx.fbcdn.net-1110-1396236967.3.jpg) Bummer... (IMG:style_emoticons/default/sad.gif) (IMG:style_emoticons/default/lol3.gif) (IMG:http://www.914world.com/bbs2/uploads_offsite/scontent-a-dfw.xx.fbcdn.net-1110-1396236967.4.jpg) Getting there: (IMG:http://www.914world.com/bbs2/uploads_offsite/scontent-a-dfw.xx.fbcdn.net-1110-1396236968.5.jpg) Buuuu-Bye: (IMG:http://www.914world.com/bbs2/uploads_offsite/fbcdn-sphotos-e-a.akamaihd.net-1110-1396236968.6.jpg) Ooooh, the comedy never stops when you're working on a 914. Farm and Fleet tractor implement lights silly-coned on for turn signals! Yee-Haw!! (IMG:http://www.914world.com/bbs2/uploads_offsite/scontent-a-dfw.xx.fbcdn.net-1110-1396236968.7.jpg) Rio inspecting the progress: (IMG:http://www.914world.com/bbs2/uploads_offsite/fbcdn-sphotos-b-a.akamaihd.net-1110-1396236969.8.jpg) Off come the body panels. Special thanks to Elli-rot who went before us. He sent a bunch of pictures of his Dzuz fastener locations and offered advice on where to put them as we cut the panels off. Here you see pictures of his cars taped to the body as we taped and cut. (IMG:style_emoticons/default/wink.gif) (IMG:http://www.914world.com/bbs2/uploads_offsite/scontent-b-dfw.xx.fbcdn.net-1110-1396236969.9.jpg) That there's a good 1 1/2" of Bondo. (IMG:style_emoticons/default/lol3.gif) (IMG:http://www.914world.com/bbs2/uploads_offsite/fbcdn-sphotos-c-a.akamaihd.net-1110-1396236969.10.jpg) Done: (IMG:http://www.914world.com/bbs2/uploads_offsite/scontent-b-dfw.xx.fbcdn.net-1110-1396236970.11.jpg) Nice solid tub is what we were looking for and it appears that's what we got. (IMG:http://www.914world.com/bbs2/uploads_offsite/scontent-a-dfw.xx.fbcdn.net-1110-1396236970.12.jpg) More panel cutting: (IMG:http://www.914world.com/bbs2/uploads_offsite/scontent-a-dfw.xx.fbcdn.net-1110-1396236970.13.jpg) (IMG:http://www.914world.com/bbs2/uploads_offsite/scontent-b-dfw.xx.fbcdn.net-1110-1396236971.14.jpg) Here you can see what we're aiming for. All of the QRS panels from Jeff are laid on the car in a mock assembly. Already looking 100% better! Next it's off to sand and soda blasting. (IMG:http://www.914world.com/bbs2/uploads_offsite/fbcdn-sphotos-c-a.akamaihd.net-1110-1396236971.15.jpg) |
  |
Replies
| Eric_Shea |
 Dec 10 2014, 10:45 PM Dec 10 2014, 10:45 PM
Post
#2
|
|
PMB Performance                Group: Admin Posts: 19,299 Joined: 3-September 03 From: Salt Lake City, UT Member No.: 1,110 Region Association: Rocky Mountains  |
I've decided to use our "PerformancePolyâ„¢" brand of bushings on this project. These are the hardest durometer poly bushings available and can withstand over 10,000 PSI.
I can think of nothing more brutal than Utah's back country for a full on acid test. This should silence a few. Poly bushings get a bad rap because most units sold are the softer durometer versions and, yes, those do compress and fail, and squeak over time. These have been honed on our lathe with an adjustable reamer set to the perfect size of our freshly plated shafts. Here we're taking the face down so the knurled end of the shaft protrudes beyond the bushing just enough to grab the inner ear and outer mount. 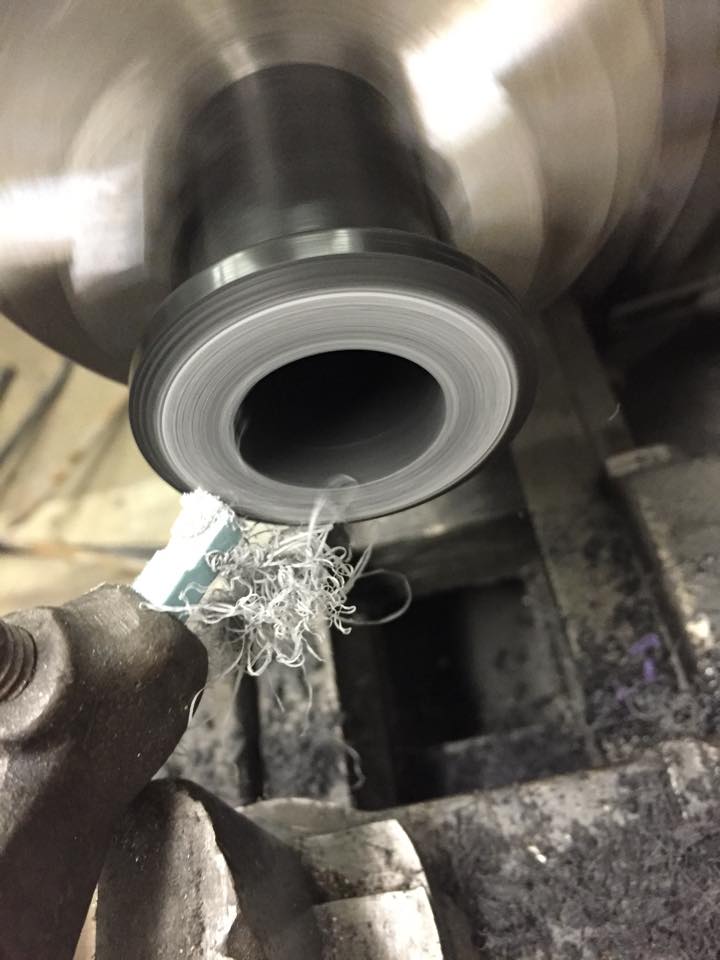 Here's a test fit on the shaft and, you can see the knurled section "just" protruding from the bushing. This is the look we'll be after once they're mounted. 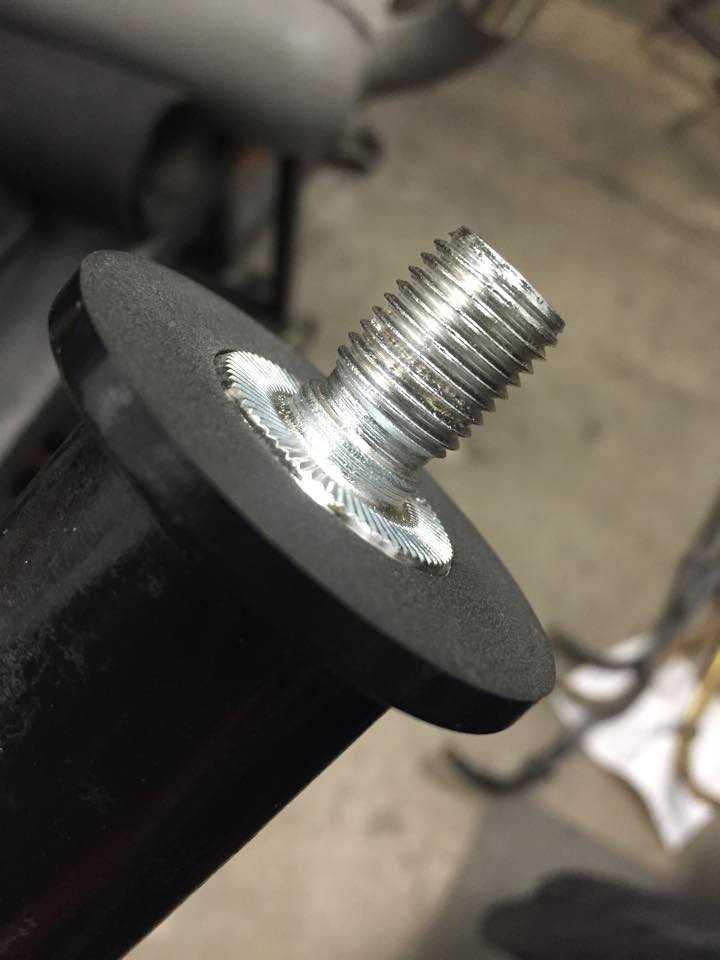 This bushing is being test fit into the arm. Notice the grease ring cut inside. We'll measure this and mark the arm off for a grease zerk here. 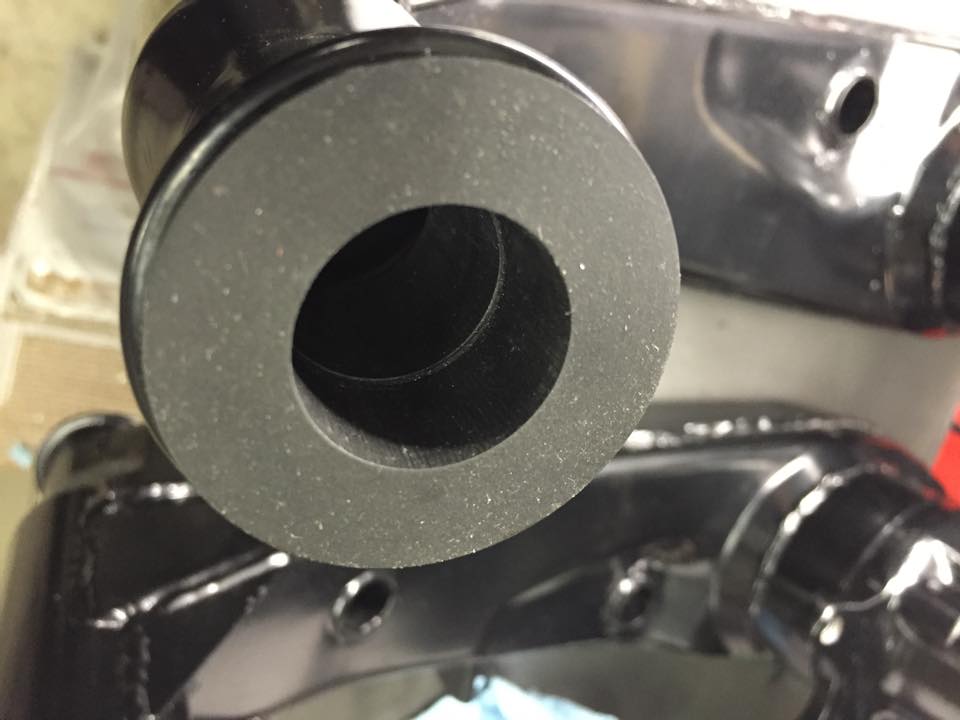 Here, both bushings are test fit onto the shaft. It's a perfect fit. No slop, in fact, it's a bit tight because, once the grease is added, the nuts are torqued to spec. (over 100lbs.) and a 1900lb car is riding on top of them, they will spin easily and be totally noise free. 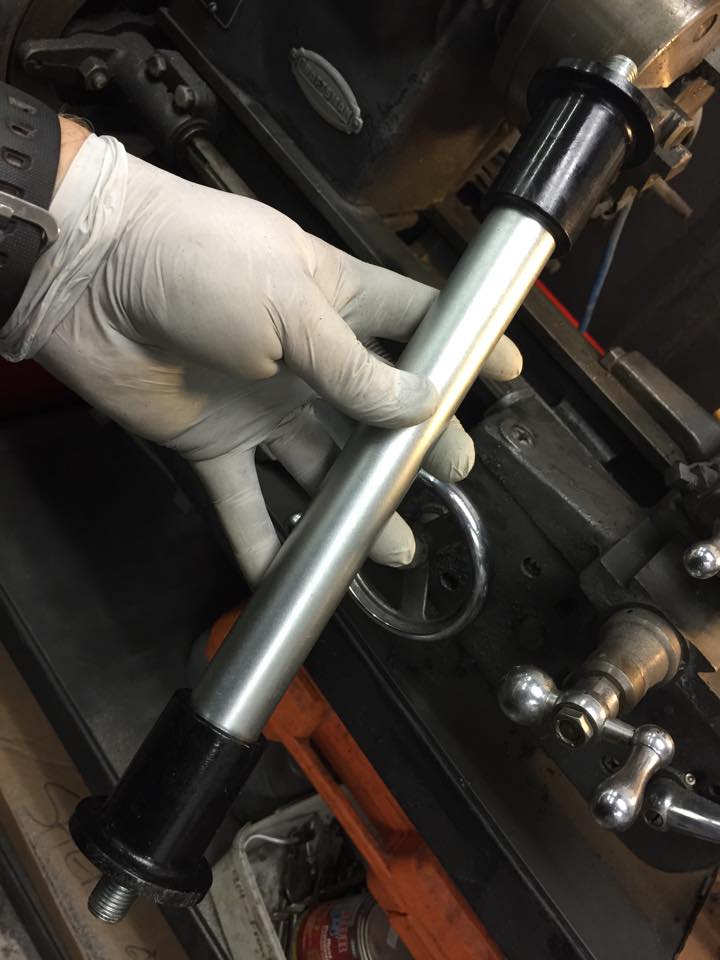 What's a 914 without a little "Wonder Glue"? Better known as JB Weld... These bushings were twisted in and stayed over the weekend allowing the epoxy to set-up properly. 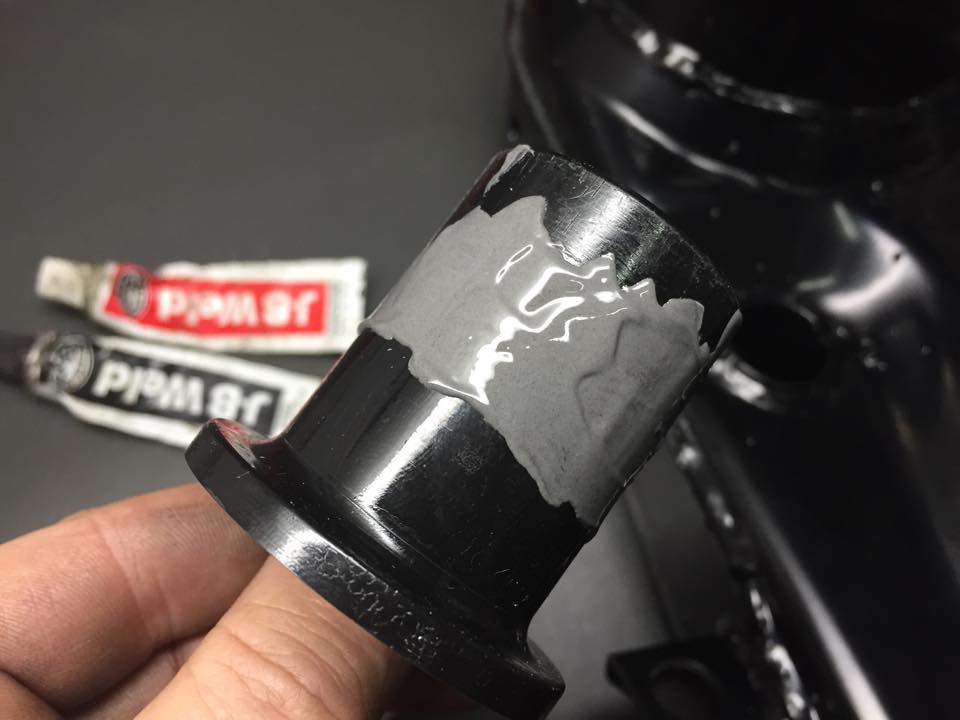 Using the drill press, a perfect 5mm hole is punched through right in the middle of the grease groove we cut in earlier. 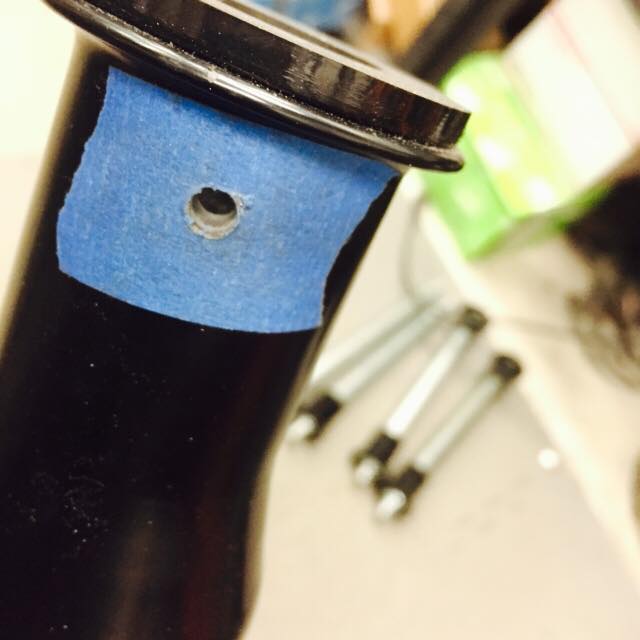 A 6x1 tap finishes things off nicely here... 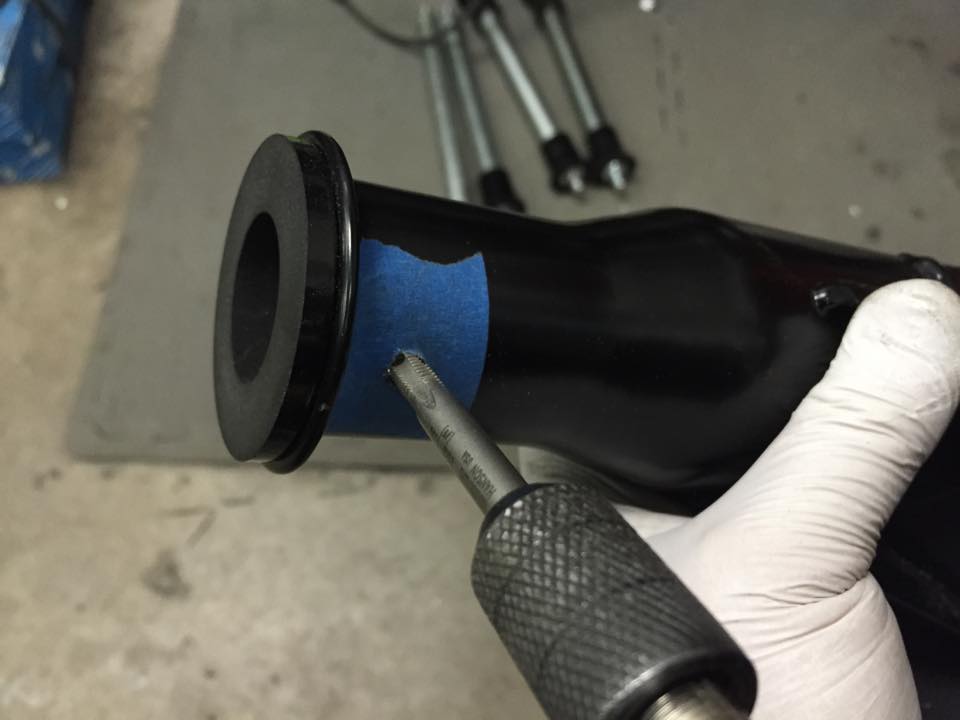 Here you can see how it lands in the grease journal. 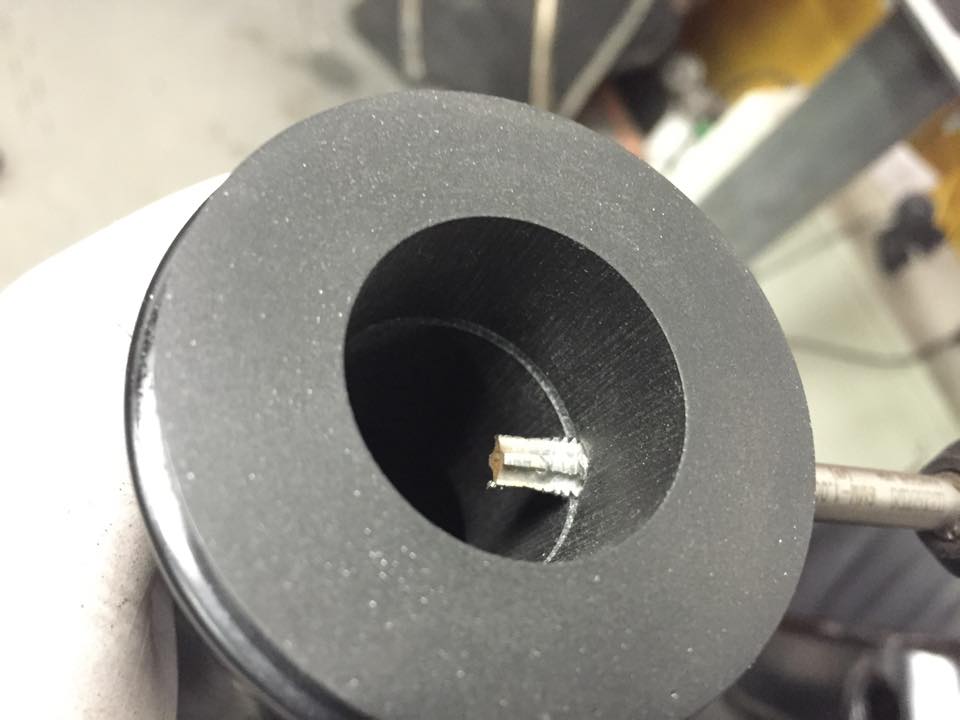 ..and, the zerk. 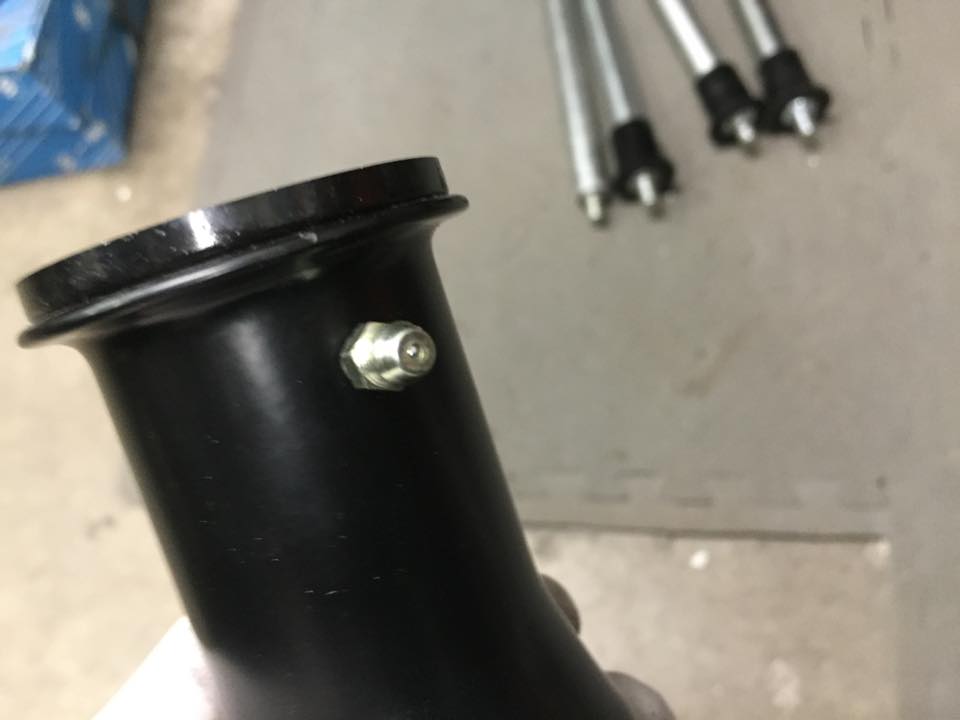 And here's the end result. Notice the knurled end of the shaft standing just proud of the bushing face. Too much and the arm would slap around with lateral movement. Too little and the bushing would bind on the body after the shaft was torqued to spec. I like how the beehive bleeder caps snap over the zerks! 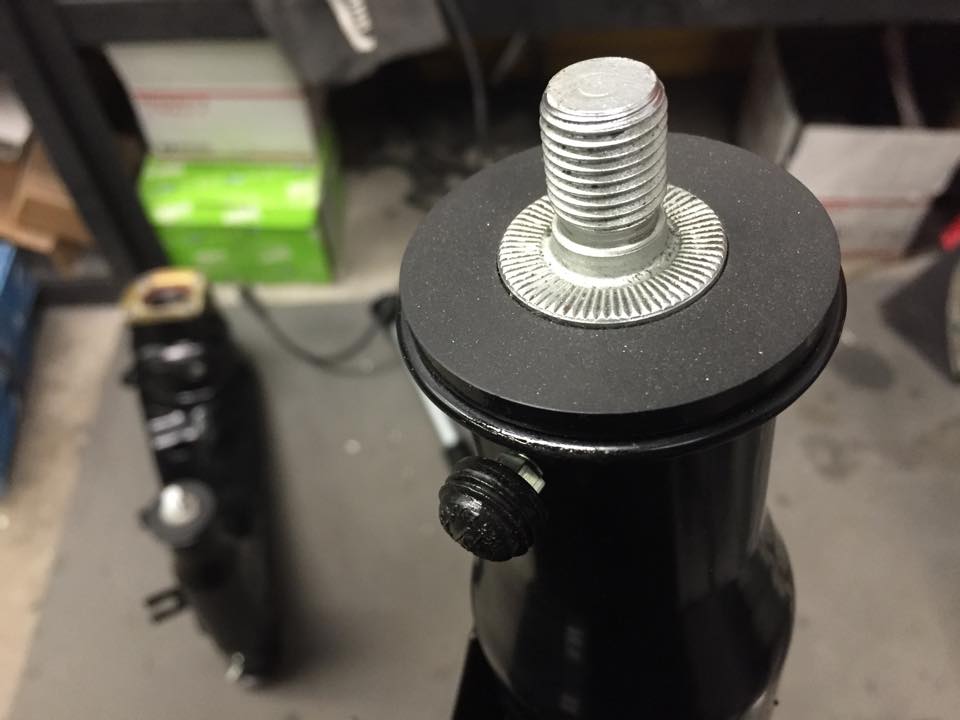 Longer studs were pressed in the rear hubs to allow for the 930 spacers. 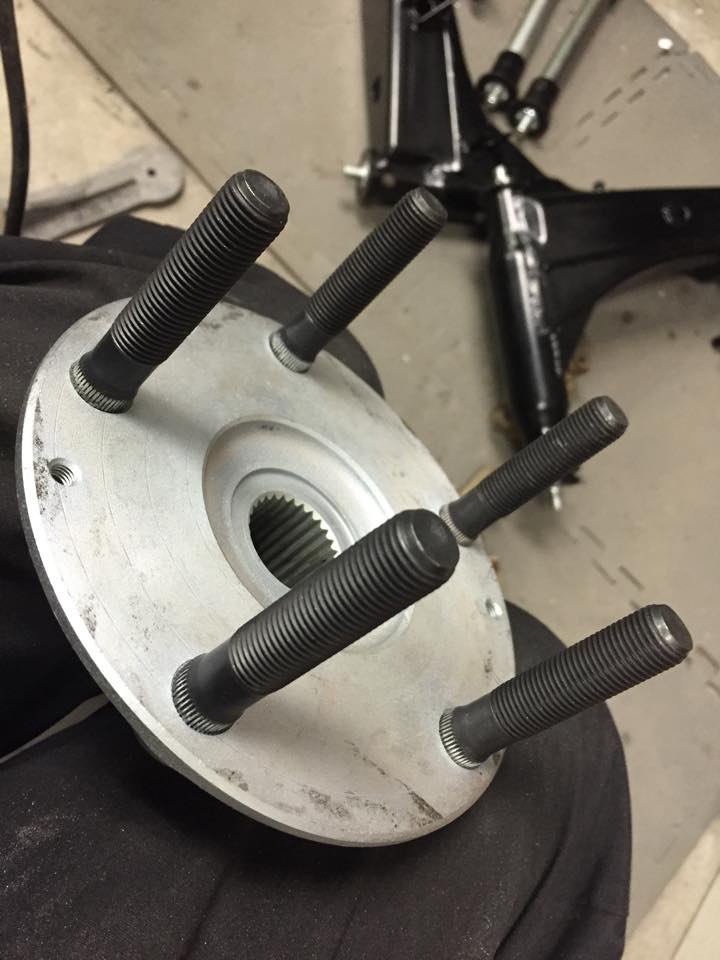 The hubs were pulled into the arms and topped off with new 914-6 rotors which match up with the mounting holes on the 911 hubs. This project should never require a vented rotor in the rear so... why bother. Special calipers are on the way. Stay tuned. 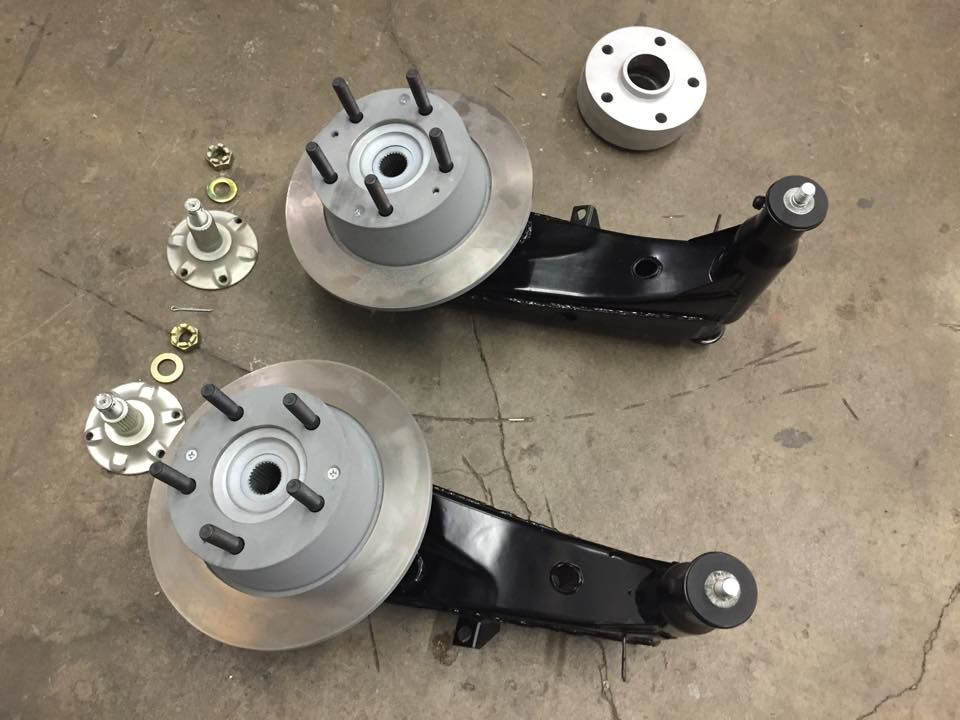 The Stub Axle and castellated nut are in place and ready to go on. 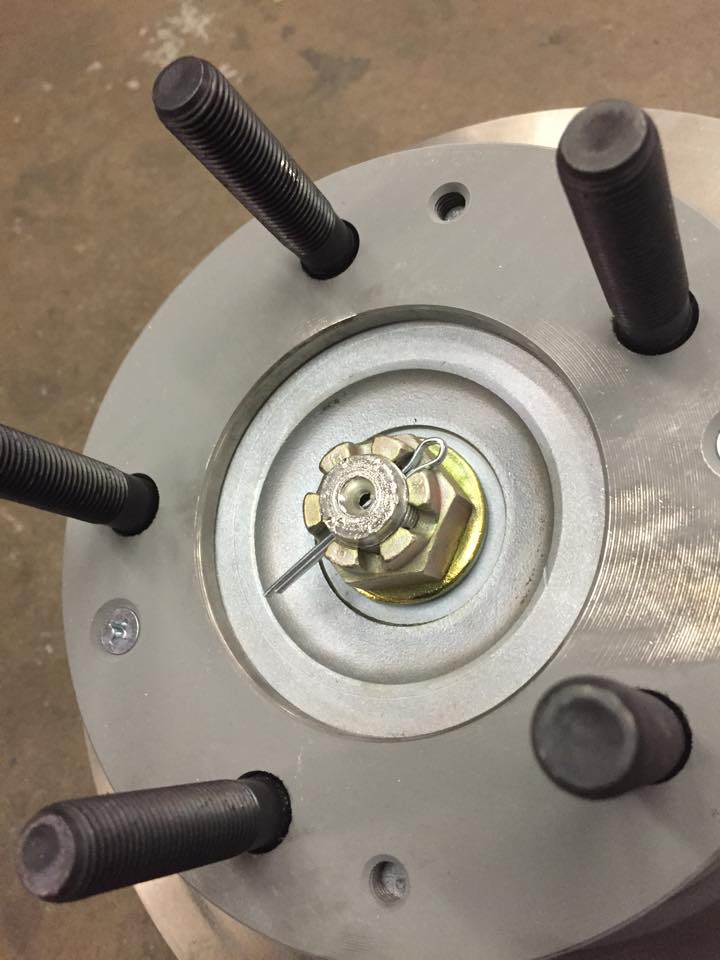 |
Posts in this topic
 Eric_Shea PMB Performance - Project 914 ORV! Mar 30 2014, 09:36 PM
 ruby914 This is going to be good :D :popcorn: Mar 30 2014, 09:51 PM
 Eric_Shea Here's the tub at the media blasters shop. We... Mar 30 2014, 09:51 PM
 Eric_Shea We did a little something different with these con... Mar 30 2014, 10:08 PM
 porbmw Can't wait to watch this thread....will be int... Mar 30 2014, 10:13 PM
 Socalandy This will be fun to watch, nice progress Mar 30 2014, 10:20 PM
 Mike Bellis Subscribed! Mar 30 2014, 10:23 PM
 Eric_Shea The tub is currently at Insane Buggy Werks getting... Mar 30 2014, 10:26 PM
 Eric_Shea A few other tid-bits I left off.
Let there be lig... Mar 30 2014, 10:34 PM
 siverson Neat! Mar 30 2014, 11:40 PM
 ruby914 Have you considered extending your rear control ar... Mar 31 2014, 12:05 AM

 bulitt
Have you considered extending your rear control a... Mar 31 2014, 05:55 AM
 CptTripps That's pretty bad-ass. Ask me about my next pr... Mar 31 2014, 06:53 AM
 rick 918-S Cool! :beer2: Mar 31 2014, 07:39 AM
 76-914 Pat Garvey is looking for you Erc and he ain't... Mar 31 2014, 08:12 AM

 Eric_Shea
Pat Garvey is looking for you Erc and he ain... Mar 31 2014, 08:37 AM
 r_towle its the FOUR lights on the roof that make the car.... Mar 31 2014, 11:21 AM

 worn
its the FOUR lights on the roof that make the car... Mar 31 2014, 07:40 PM
 IanS Way cool! Saw a lot of these pics on your fac... Mar 31 2014, 11:43 AM
 scotty b :popcorn: Mar 31 2014, 11:54 AM
 2mAn Awesome! Mar 31 2014, 01:42 PM
 MDG :mellow:
:unsure: Mar 31 2014, 02:07 PM
 Eric_Shea Dave... can you reel him in please? Mar 31 2014, 02:10 PM
 balljoint Yes. Mar 31 2014, 05:31 PM
 balljoint And no.
:unsure:
Which one were you talking abou... Mar 31 2014, 05:31 PM
 Eric_Shea Not too much to report here as this is our little ... Apr 30 2014, 07:15 AM
 mepstein :popcorn: Oct 8 2014, 06:43 AM
 Eric_Shea Ooopsie... I've been so swamped. Business wen... Nov 29 2014, 08:36 PM

 rick 918-S
Ooopsie... I've been so swamped. Business we... Nov 29 2014, 09:06 PM
 Mike Bellis Awesome progress!
The roll bar hoop looks awf... Nov 29 2014, 08:54 PM

 SirAndy The roll bar hoop looks awfully low. Might be a he... Nov 29 2014, 10:04 PM
 Chris Pincetich Fuchin cool :beer2:
14" rims?
This 914 will... Nov 29 2014, 09:22 PM
 Krieger Awesome work Eric. This will be too nice to get d... Nov 29 2014, 09:43 PM
 Eric_Shea We may yank the bar. That section was done without... Nov 30 2014, 08:38 AM

 r_towle
We may yank the bar. That section was done withou... Nov 30 2014, 09:29 AM
 sixnotfour :agree: :blink: Nov 30 2014, 11:09 AM
 Larmo63 Have you read the article on cracked Fuchs wheels ... Nov 30 2014, 02:10 PM
 RobW Looks like you're going to have the only zombi... Nov 30 2014, 06:59 PM
 Mueller Way cool build...plans for nerf type bars up front... Nov 30 2014, 07:29 PM
 Eric_Shea Everyone can breath... the bar is coming out. I p... Nov 30 2014, 07:54 PM
 jd74914 Not to keep beating on your cage guy but...Indepen... Dec 1 2014, 07:33 AM
 Eric_Shea Oh pa-leeeeze... :stooges:
:D Dec 1 2014, 02:09 PM
 eric9144 :headbanger: :popcorn: Dec 1 2014, 03:07 PM
 Jeffs9146 FYI
When you attach the calipers you will probab... Dec 1 2014, 05:16 PM

 Elliot Cannon
FYI
When you attach the calipers you will proba... Dec 1 2014, 06:16 PM

 JRust
Good advice since this guy don't know shit ab... Dec 1 2014, 07:59 PM

 Elliot Cannon
Good advice since this guy don't know shit a... Dec 1 2014, 11:07 PM
 Larmo63 I actually wondered about that because I powder co... Dec 1 2014, 06:37 PM

 bdstone914
I actually wondered about that because I powder c... Dec 1 2014, 10:16 PM
 colingreene Id just file the powder coat off but thats me.
To ... Dec 1 2014, 06:50 PM
 Eric_Shea I was going to make a list of everything that... Dec 2 2014, 11:20 AM
 balljoint Hey Ricky, very cool project, I think it's goi... Dec 2 2014, 11:38 AM
 bulitt Bought these same wheels for my utility trailer at... Dec 2 2014, 11:48 AM
 blackmoon Very cool, great project :sawzall: Dec 2 2014, 05:13 PM
 Eric_Shea What's wrong here? :lol4:
Dec 8 2014, 08:08 PM

 914Timo
What's wrong here? :lol4:
Not sure if it ... Dec 9 2014, 11:02 AM
 r_towle Shield missing?
I would not put one on an ORV anyw... Dec 8 2014, 08:12 PM
 bigkensteele Metallic green Bilsteins? Dec 8 2014, 09:33 PM
 Eric_Shea Ummm no... guess again. Oliver Green which is cor... Dec 8 2014, 09:49 PM
 altitude411 * edit Dec 8 2014, 09:52 PM
 Larmo63 Raised spindles. (or lowered) Dec 8 2014, 10:15 PM
 eric9144 Spindles lowered on them to give some lift and a l... Dec 8 2014, 10:23 PM
 bigkensteele Powder coating in the dust shield holes? No brake... Dec 8 2014, 10:26 PM
 r_towle They are not on the car slacker. Dec 8 2014, 11:08 PM
 euro911 How the fuch did I miss seeing this until now? :bl... Dec 8 2014, 11:17 PM

 oldschool
How the fuch did I miss seeing this until now? :b... Dec 9 2014, 11:31 PM
 veekry9
Sniff,is that mouse or weed?
Rio find it. Dec 8 2014, 11:34 PM
 eric9144 :toke: Dec 9 2014, 08:43 AM
 bozo914 The struts were welded back together backwards? Up... Dec 9 2014, 10:21 AM
 Jeffs9146 You forgot the brake pads! Dec 9 2014, 11:05 AM
 tomeric914 Wedge bolt struts with a regular bolt and vinyl ca... Dec 9 2014, 08:39 PM
 altitude411 I'm gonna jump thru this window..... Please, ... Dec 9 2014, 09:51 PM
 euro911 Can't contest that, can I :shades2:
I've... Dec 10 2014, 02:10 AM
 Eric_Shea
That would be wrong. Check the factory manual.
... Dec 10 2014, 06:38 AM

 914Timo
I'm not sure what is wrong in the picture but... Dec 10 2014, 09:59 AM
 r_towle Db Dec 10 2014, 08:02 AM

 bulitt
Db
:lol4: Well said. Dec 10 2014, 08:57 AM
 majkos Bleeder valve? Dec 10 2014, 08:53 AM
 r_towle Eric,
You are starting to remind me of a great gu... Dec 10 2014, 11:04 PM
 Eric_Shea Gotz ta get all the parts before ya can start bolt... Dec 10 2014, 11:14 PM

 DavidSweden The work your doing looks very nice.
I have a que... Dec 11 2014, 05:40 AM
 Eric_Shea Thank you!
Regarding the bushings - You bet. ... Dec 11 2014, 09:02 AM
 tomeric914 Don't confuse what Eric sells with the Weltmei... Dec 11 2014, 01:09 PM
 Eric_Shea We can machine them for our customers as well:
pk... Dec 11 2014, 10:51 PM
 euro911 Hey Eric, if going with the delrin/poly type, do y... Dec 12 2014, 01:17 AM

 DavidSweden
Regarding the bushings - You bet. The Elephant Po... Dec 12 2014, 05:21 AM
 Eric_Shea We used a micrometer to measure the shaft(s) at th... Dec 12 2014, 06:54 AM
 ThePaintedMan I used PMB's bushings and installed everything... Dec 12 2014, 07:39 AM
 euro911 I musta missed something ... why was the JB needed... Dec 13 2014, 12:30 AM

 r_towle
I musta missed something ... why was the JB neede... Dec 13 2014, 08:34 AM
 Eric_Shea
Hey George, Thanks.
Yes, I'm going to get... Dec 13 2014, 08:33 AM
 euro911 OK, got it. Dec 13 2014, 02:12 PM
 ThePaintedMan I'm ready for a set of those front bushings. J... Jan 30 2015, 02:53 PM
 Eric_Shea I think the trip is in pen.
I have the fronts an... Jan 31 2015, 11:01 AM
 tomeric914 Any ORV update pics? :) Feb 1 2015, 05:11 PM
 OU8AVW Yeah, seriously Eric, starting a great thread, put... Feb 2 2015, 08:07 AM
 siverson I beat you to it! :)
-Steve Feb 2 2015, 07:26 PM

 sixnotfour
I beat you to it! :)
-Steve
Love the Iris... Feb 2 2015, 07:43 PM
 JmuRiz ...with the kid seat = bonus points! Feb 2 2015, 07:41 PM
  |
2 User(s) are reading this topic (2 Guests and 0 Anonymous Users)
0 Members:

|
Lo-Fi Version | Time is now: 3rd April 2025 - 01:51 AM |
Invision Power Board
v9.1.4 © 2025 IPS, Inc.


