|
|

|
Porsche, and the Porsche crest are registered trademarks of Dr. Ing. h.c. F. Porsche AG.
This site is not affiliated with Porsche in any way. Its only purpose is to provide an online forum for car enthusiasts. All other trademarks are property of their respective owners. |
|
|
| seanpaulmc |
 Dec 25 2016, 04:26 PM Dec 25 2016, 04:26 PM
Post
#1
|
|
Member   Group: Members Posts: 373 Joined: 6-December 16 From: Orlando, FL Member No.: 20,649 Region Association: South East States 
|
I've just purchased a '73 914 and owned it long enough to ship it to Orlando and take it to go get titled. With only having it for this short period my list of concerns is growing. I have no intentions of driving the car around until I can assess how rusty it is. I appreciate the support and responses to the questions about transportation and engine identification. This is a superb community.
What advice do you have for lifting the car to inspect underneath and such without having access to a lift? I have read some of the build threads on here and you guys have some amazing shops and do incredible work! ...one day. But, at this point I don't have that. For now I'd like to lift the car, take the wheels off, and take the longitudinal covers off to get a good look at the structural areas of the car. However, I have concerns because this is a snowbelt car and I've read the stories about putting a floor jack through a rusted out car. Where should I lift with the floor jack (trust the jacking points?, other areas) and where should I put the jack stands so that I can poke around some and get pictures? Merry Christmas!!! |
  |
Replies
| seanpaulmc |
 Jan 31 2017, 05:01 PM Jan 31 2017, 05:01 PM
Post
#2
|
|
Member   Group: Members Posts: 373 Joined: 6-December 16 From: Orlando, FL Member No.: 20,649 Region Association: South East States 
|
I finally got some time and pulled the covers off the longs, and Branston, thanks for your pictures because it looks a lot like what I found. The pass side had been off before because of the hardware used to reattach it but the driver's had not. I drilled out the rivets and broke all the undercarriage bolts when taking off the driver's side cover.
I also started pulling out the carpet, interior, and began chipping away at the floor pan on the passenger side. Not liking what I'm finding. When I get back to it I'll pull the plugs from the insides of the longitudinal but for now here are some pictures of what I'm finding. So, what does the group think thus far? Passenger side: 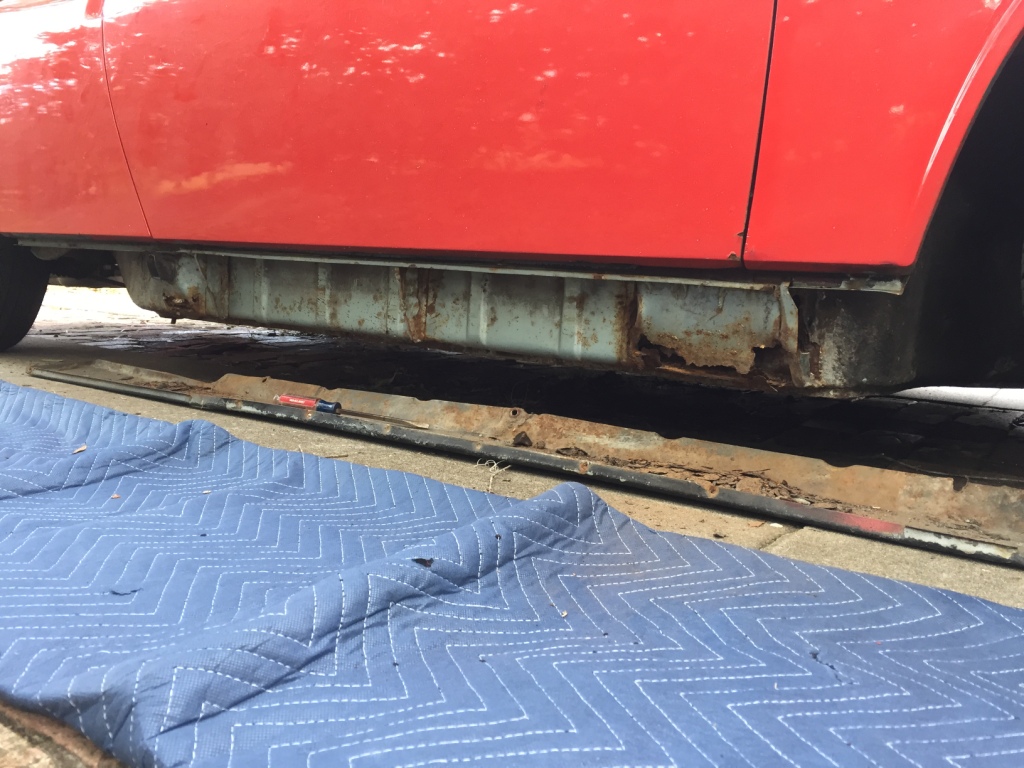 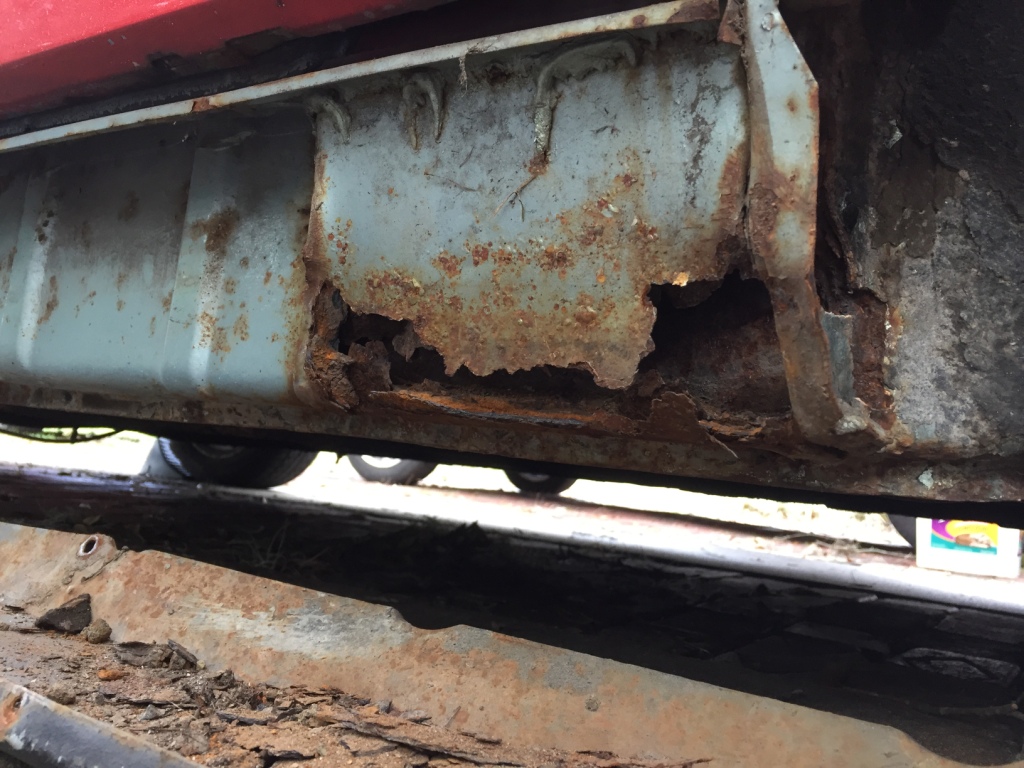 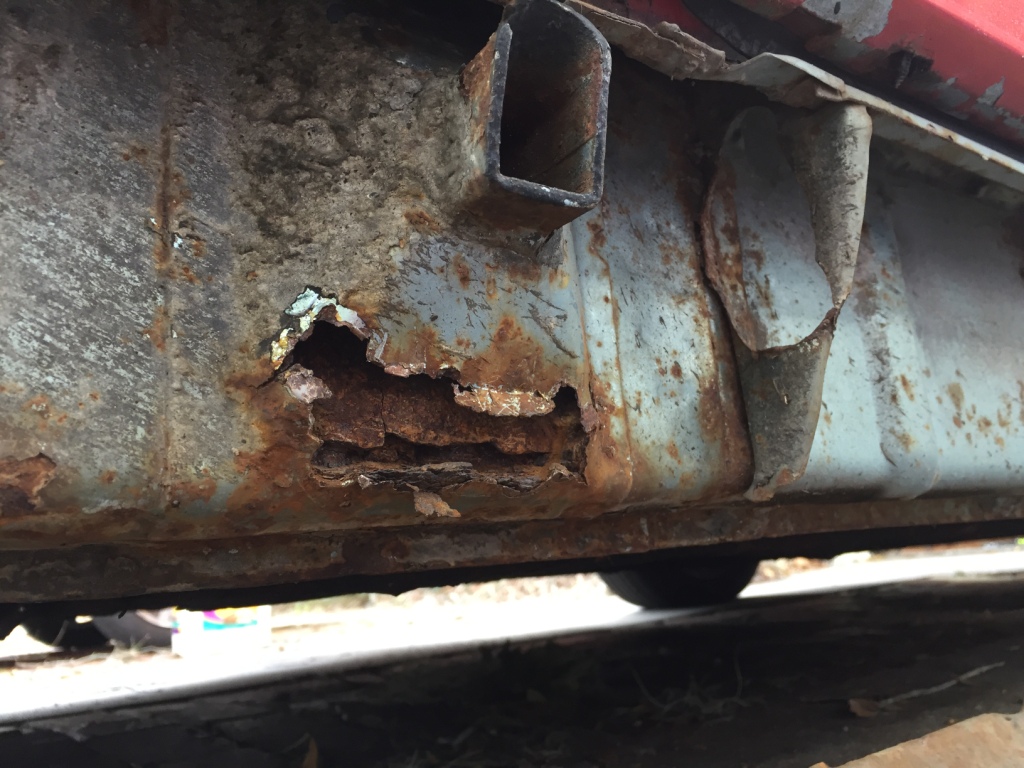 Driver side: 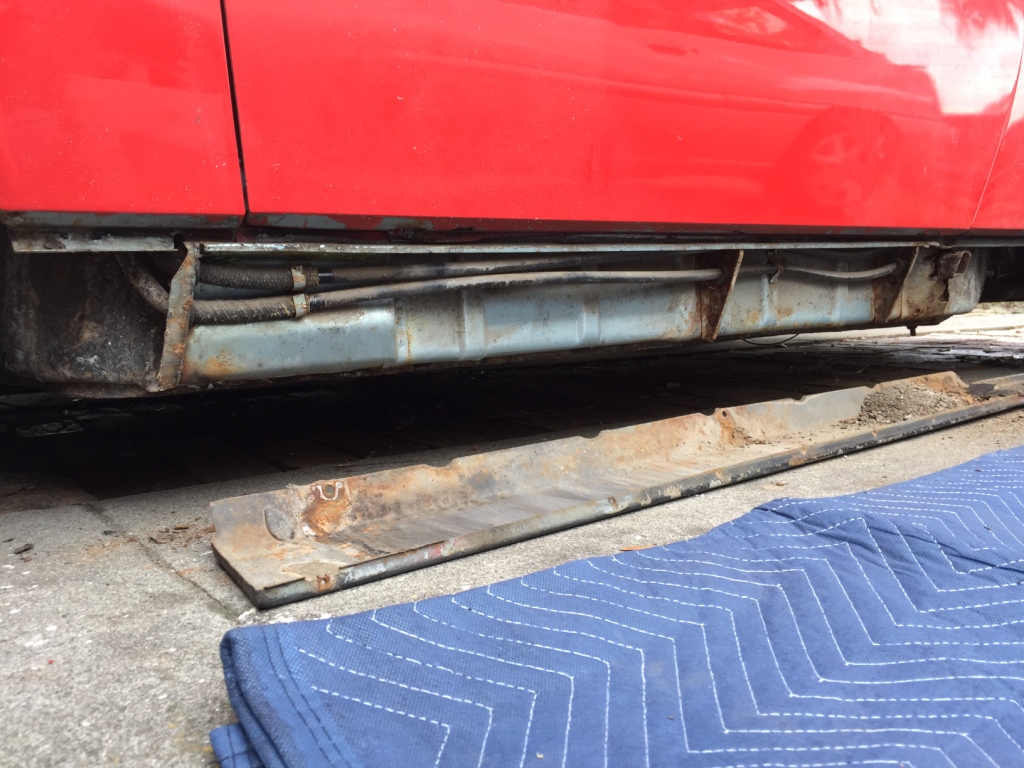 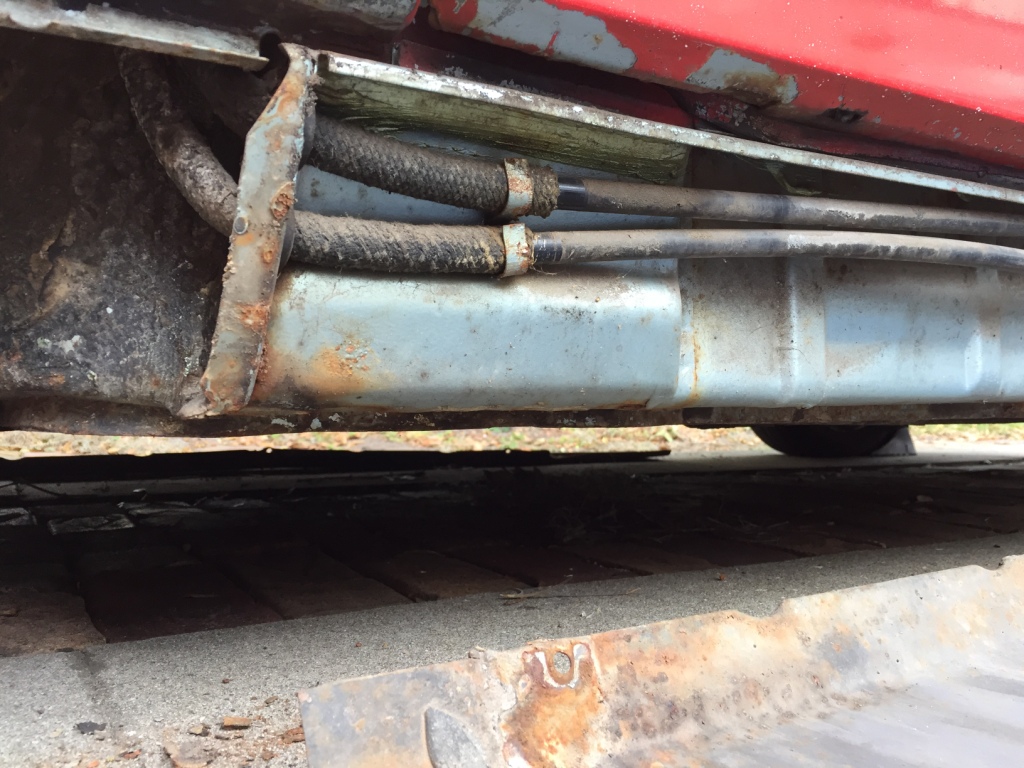 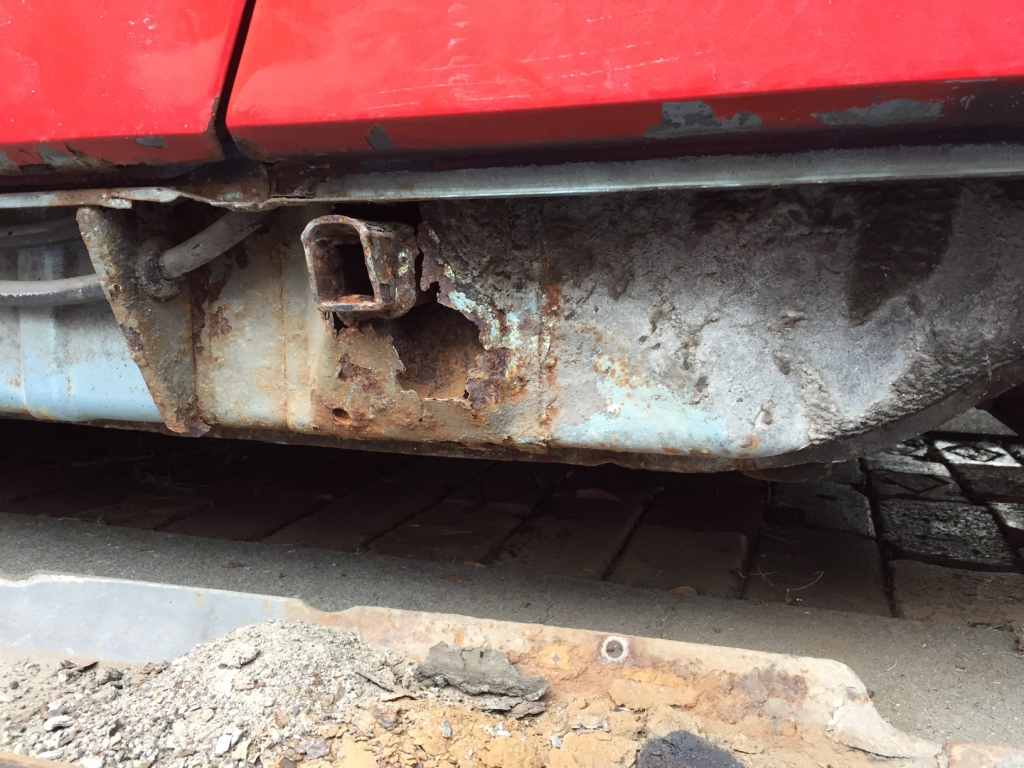 Inside: 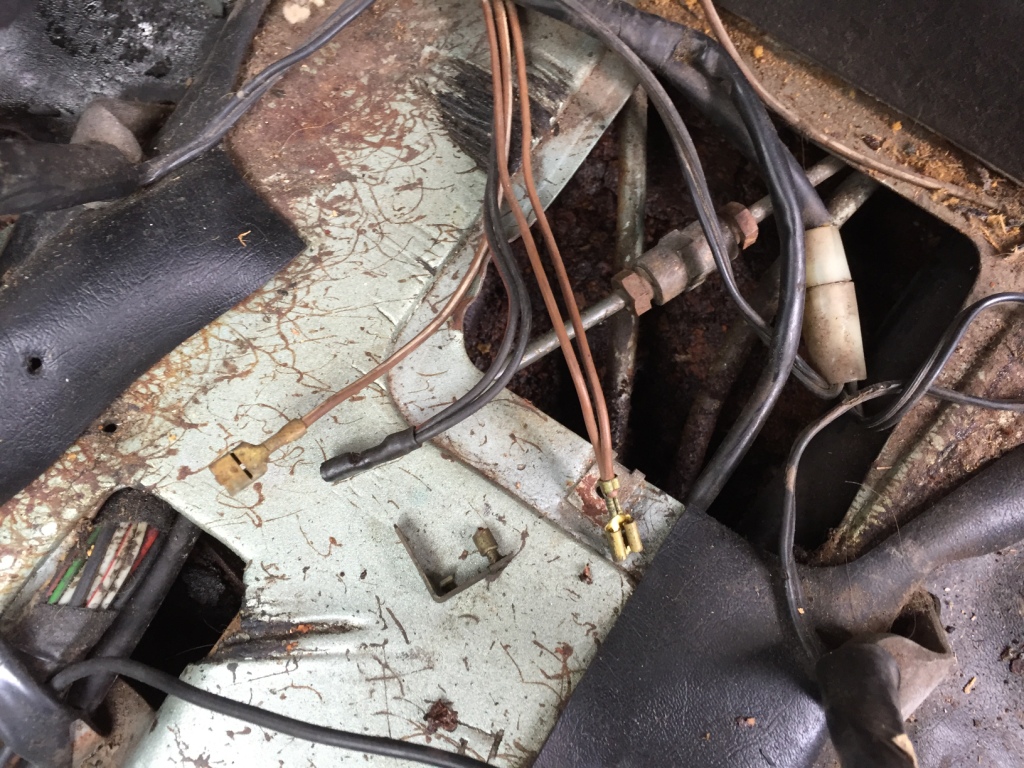 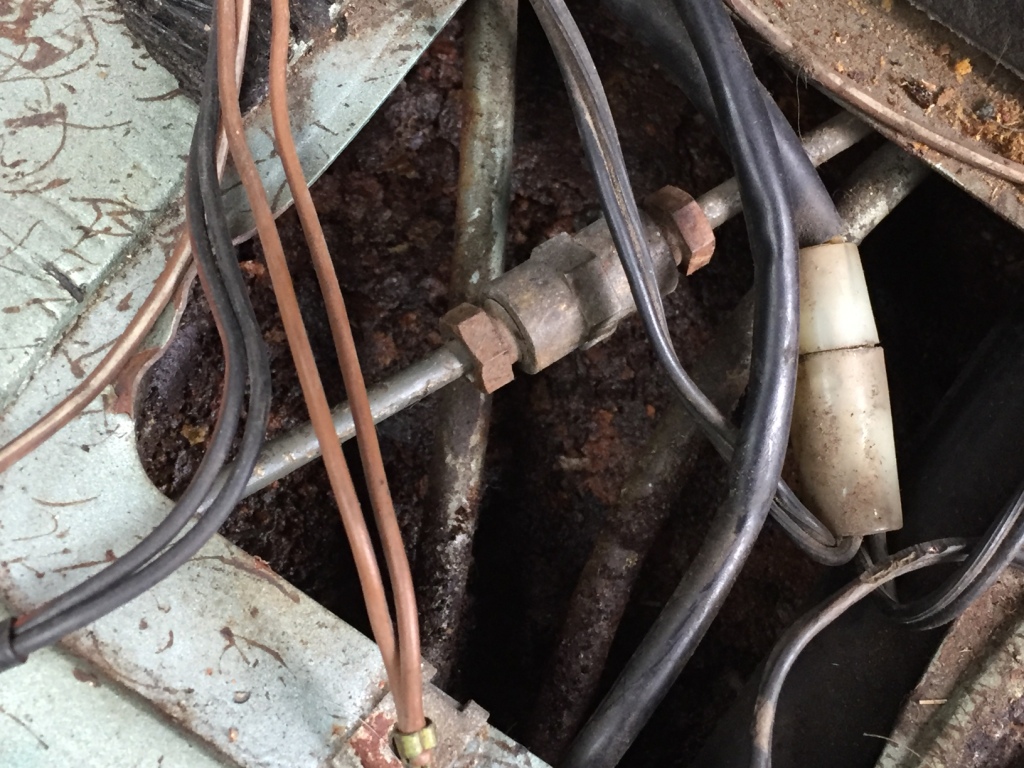 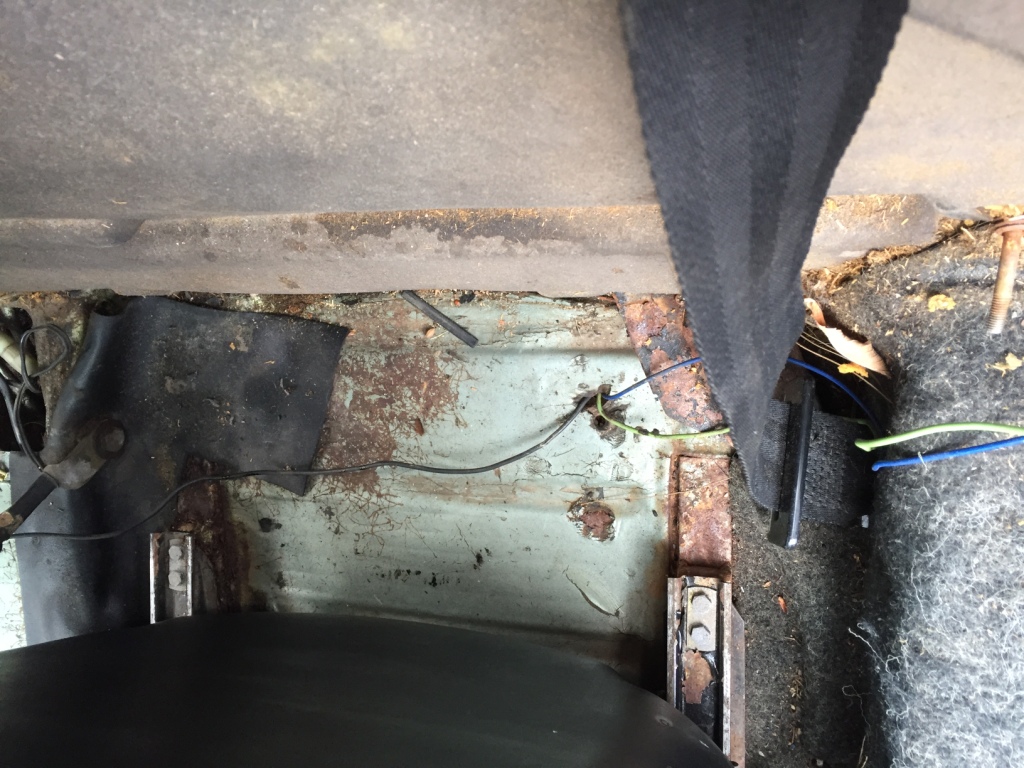 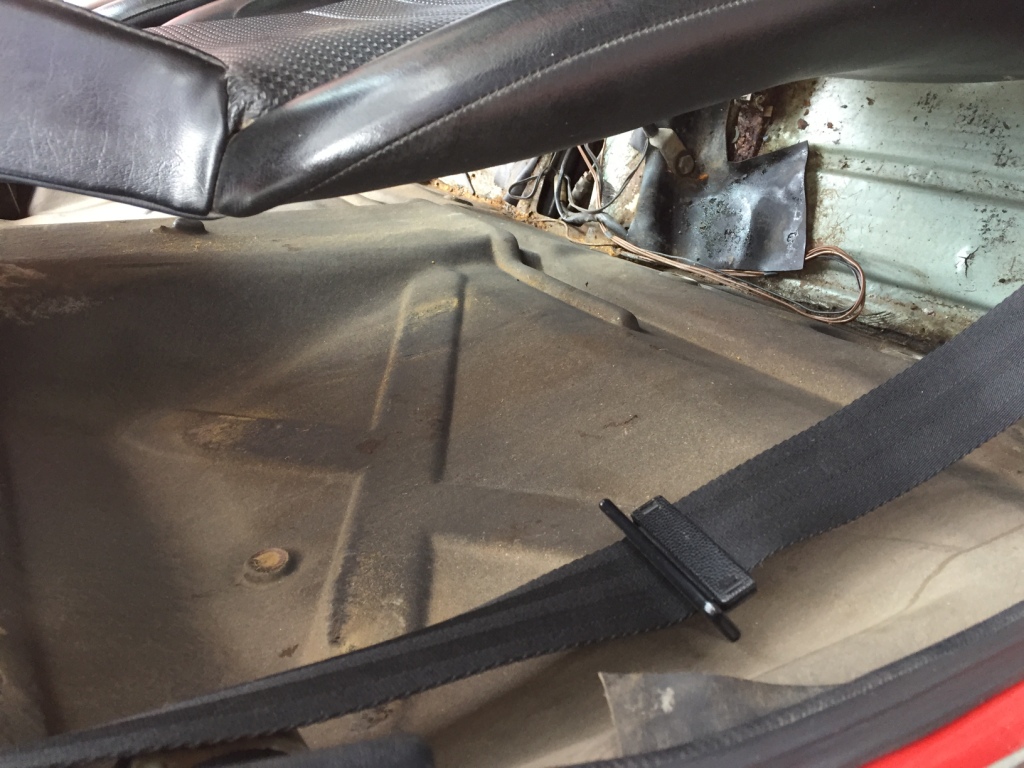 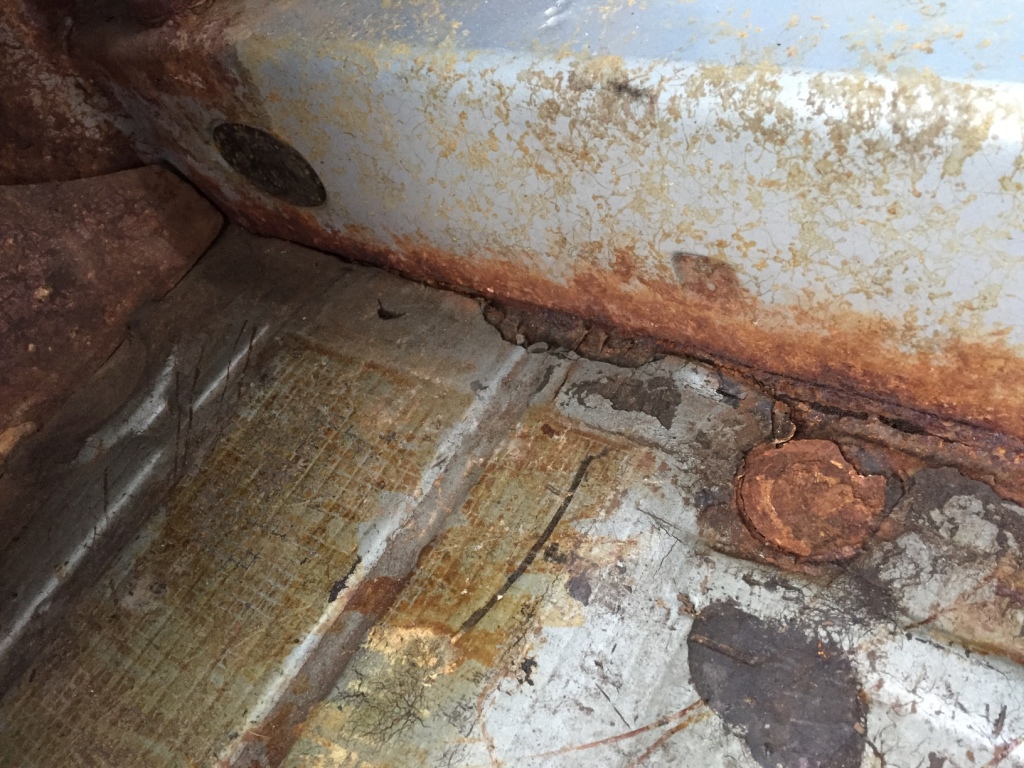 A few questions/observations: 1. Are those unconnected wires laying at the back of the tunnel (brown and black) for the light that is supposed to be in the backpad? (Missing) 2. Any idea what the little brass metal piece laying next to the wires is for? It doesn't seem to be for the light. 3. Looks moist and nasty inside that tunnel. 4. How is the pad affixed to the firewall? How is it removed? Should it be retained and reused? 5. Behind the driver's seat you can see three new wires (black, green, and blue) going through the floor to routed to the engine bypassing whatever original equipment isn't working. 6. After chipping away at the loose material on the floor daylight is observed along the passenger long. 7. Retaining bolt for the passenger seatbelt at the floor was a total PITA to get out. 8. How does the wooded piece on the passenger footwell come out? Seems brittle. Thanks in advance! Attached image(s) 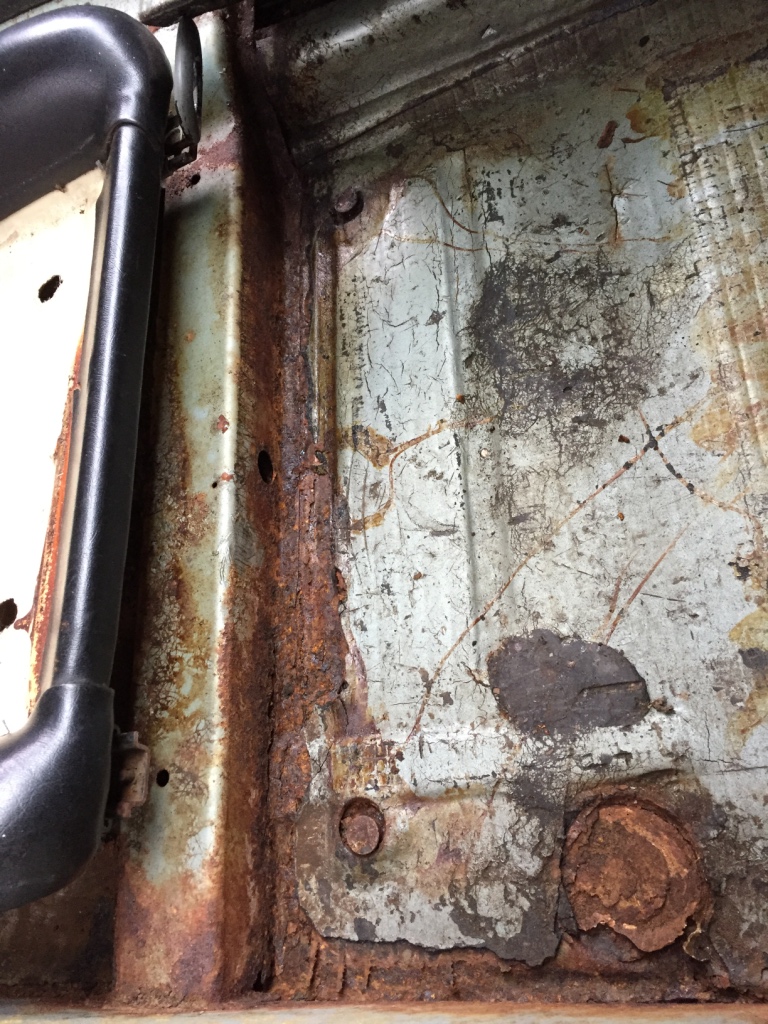
|
| Dave_Darling |
 Jan 31 2017, 05:39 PM Jan 31 2017, 05:39 PM
Post
#3
|
|
914 Idiot                Group: Members Posts: 15,062 Joined: 9-January 03 From: Silicon Valley / Kailua-Kona Member No.: 121 Region Association: Northern California 
|
A 2x4 can distribute the load from the jack across a larger area of the floor pan. You can try that if you want to lift the car.
A few questions/observations: 1. Are those unconnected wires laying at the back of the tunnel (brown and black) for the light that is supposed to be in the backpad? (Missing) Yes, that's what they're for. Tape up the black wire to keep it from shorting to ground; it should be "live" all the time. QUOTE 2. Any idea what the little brass metal piece laying next to the wires is for? It doesn't seem to be for the light. It isn't for the light. Not sure what it might be for, possibly something inside the turn signal switch mechanism? There is an angled brass piece in there that loves to go AWOL when the steering column is taken apart. QUOTE 3. Looks moist and nasty inside that tunnel. Kinda typical. Worse than most I've seen here in CA, but we are a bit less rust-prone than many other areas. QUOTE 4. How is the pad affixed to the firewall? How is it removed? Should it be retained and reused? Which pad? There are three that I can think of. 1- The "back pad" that is the upholstered part that sits on the firewall. The interior light snaps into this part. It is held on by a pair of clips and four screws. The screws are about 6" up from the floor, I think, two in each seat well. Remove those screws, remove the engine-lid pull knob and the "escutcheon" around the knob, slide the bottom of the back pad forward and push the top of the pad down. It should come away from the firewall. (The seats need to be out, obviously.) 2- The tar insulation on the interior of the firewall, that is uncovered when the back pad is removed. This must be scraped off, like the other insulation. 3- The heavy rubber-covered mat on the engine side of the firewall. This is held in with a combination of glue and screws with very large plastic washers, and metal tabs on the edges. The actual function of this pad is to trap water against the firewall, leading to rust perforations. Ditch it. QUOTE 5. Behind the driver's seat you can see three new wires (black, green, and blue) going through the floor to routed to the engine bypassing whatever original equipment isn't working. Learn the acronym DAPO. (The PO stands for "previous owner". I'll let you guess the rest.) You may wind up using it a lot. QUOTE 6. After chipping away at the loose material on the floor daylight is observed along the passenger long. Never a good thing. I see door braces and welding in your future... QUOTE 7. Retaining bolt for the passenger seatbelt at the floor was a total PITA to get out. Penetrating oil, like PB Blaster or Aero Kroyl, can help a lot. WD-40 is a lousy penetrating oil, BTW. QUOTE 8. How does the wooded piece on the passenger footwell come out? Seems brittle. Wooded? Do you mean the styrofoam plug in the front of the passenger footwell? I think that may be glued in--I haven't messed with it myself, but have seen several out of the car. The wood floorboard on the driver's side is held in with two or three bolts (likely Allen-head) and has to be turned to a fairly specific angle in order to maneuver it off of the pedals. --DD |
Posts in this topic
 seanpaulmc How to inspect the underside and longs without a lift Dec 25 2016, 04:26 PM
 Rand Don't worry about lifts and jacks yet. Just st... Dec 25 2016, 04:34 PM
 mepstein Start cleaning the trunks and interior of your car... Dec 25 2016, 04:59 PM
 branston I don't jack my '74 under the body, I tend... Dec 25 2016, 10:01 PM
 JoeDees You're gonna need to buy a welder. Jan 31 2017, 05:11 PM

 r_towle
You're gonna need to buy a welder.
Yup May 8 2022, 07:06 PM
 mepstein You need long and floor pan repair. Once you scrap... Jan 31 2017, 05:16 PM
 seanpaulmc Thanks for the feedback, All.
About that welder... Feb 1 2017, 04:49 PM

 DennisV
About that welder, is there advice for a recommen... Aug 27 2023, 04:15 PM
 Ferg Whats the code for the original color on this car?... Feb 1 2017, 04:57 PM
 seanpaulmc
L96M
Original is a light blue metallic. Current... Feb 1 2017, 05:35 PM

 Ferg
L96M
Original is a light blue metallic. Curren... Feb 1 2017, 05:47 PM
 amfab Your longs and pans look like they have similar is... Feb 1 2017, 05:52 PM
 JoeDees There will be a lot of opinions on the welder (and... Feb 1 2017, 06:06 PM

 branston
There will be a lot of opinions on the welder (an... Apr 1 2017, 07:32 PM
 PanelBilly There's some smart people with the skills to h... Feb 1 2017, 07:29 PM
 mepstein How about the hell hole?
You can see the suspensi... Feb 1 2017, 08:03 PM
 Larmo63 You should assess everything under the tar padding... Feb 1 2017, 08:10 PM
 seanpaulmc Here's the initial look underneath. I'm p... Apr 1 2017, 06:52 PM

 Dave_Darling
The engine cradle is cockeyed (i.e. not vertical)... Apr 2 2017, 01:16 PM

 Robarabian Duplicate post. Sorry.
Here's the initial lo... Mar 3 2021, 10:33 PM
 branston
If your webbing doesn't clean up or the retr... Apr 2 2017, 01:42 PM
 boxsterfan You are definitely going to need to order from the... Apr 2 2017, 02:26 PM

 seanpaulmc
You are definitely going to need to order from th... Mar 3 2021, 07:11 PM
 930cabman Time, patience, basic skills, repeat, repeat and d... Mar 3 2021, 07:24 PM
 seanpaulmc Hard to believe this tread was stared four years a... Mar 3 2021, 07:30 PM
 seanpaulmc Let's see what we're working with. Or, wi... Mar 3 2021, 07:55 PM
 seanpaulmc 5/8/22 - might as well make it a project thread.
... May 8 2022, 05:30 PM
 seanpaulmc I'm using 18 gage gavaneal and a lot of self t... May 8 2022, 05:41 PM
 seanpaulmc Links to threads on some of the other repairs: :t... May 8 2022, 05:50 PM
 seanpaulmc Starting to patch the firewall.
Using those c... May 8 2022, 06:06 PM
 seanpaulmc Passenger Jack Point repair:
Peeing back the ... May 8 2022, 06:33 PM
 930cabman Great looking work, keep your focus and she will b... May 9 2022, 07:06 AM
 seanpaulmc Been a while for an update. With it raining like i... Aug 14 2022, 02:43 PM
 seanpaulmc Now that I've cut my teeth on the Hell hole re... Aug 14 2022, 03:01 PM
 seanpaulmc Clearly the plan was to work on getting the new fl... Aug 14 2022, 03:21 PM
 seanpaulmc And, for a change of pace worked on something else... Aug 14 2022, 03:27 PM
 Puebloswatcop Hey, things are looking good so far. as for the c... Aug 14 2022, 05:33 PM
 seanpaulmc Working on the passenger side floor fit up. :saw... Aug 22 2022, 03:33 PM
 DRPHIL914 good work! keep on trucking! great you are... Aug 22 2022, 04:28 PM
 Dave_Darling Double-check the roll pin on your pedal cluster th... Aug 22 2022, 05:22 PM

 seanpaulmc
Double-check the roll pin on your pedal cluster t... Aug 22 2022, 05:26 PM
 930cabman Great progress and all this while working on your ... Aug 23 2022, 08:37 AM
 seanpaulmc For a Safe, Quick, and simple way to remove the sp... Aug 26 2022, 08:09 AM
 seanpaulmc Working towards installation of the passenger side... Aug 26 2022, 08:24 AM
 930cabman From what I know it was coated with cosmoline when... Aug 26 2022, 04:51 PM
 seanpaulmc Well it’s been a while.
Where was I?
Right, a ... Feb 21 2023, 06:57 PM

 bajafreaks
Well it’s been a while.
Where was I?
Right, a... May 29 2023, 08:06 AM
 Cairo94507 Great work and progress. :beer2: Feb 22 2023, 08:25 AM
 seanpaulmc Looking for some pictures of how this section at t... Feb 23 2023, 09:15 AM
 930cabman Quality of workmanship looks great, keep it going ... Feb 23 2023, 10:13 AM

 seanpaulmc
Quality of workmanship looks great, keep it going... Feb 23 2023, 10:40 AM

 930cabman
Quality of workmanship looks great, keep it goin... Feb 23 2023, 11:26 AM
 Cairo94507 Here is the best shot I have of my car when we wer... Feb 23 2023, 10:18 AM
 Root_Werks Marc and I used a Borescope camera to inspect insi... Feb 23 2023, 10:36 AM
 seanpaulmc Today…
…all day. :headbang:
Remarkably... Feb 25 2023, 06:54 PM
 seanpaulmc Another patch panel. :welder:
Passenger footwel... Mar 11 2023, 07:43 PM
 seanpaulmc Moved on to peeling back the rusty onion of the A-... Mar 11 2023, 07:53 PM
 seanpaulmc Really for the first time I feel like I am making ... Apr 20 2023, 12:32 PM
 930cabman Lookin good, keep on truckin and you will be motor... Apr 20 2023, 01:25 PM
 seanpaulmc Mmmmmm parts!
Had to share my excitement. Apr 26 2023, 04:14 PM
 East coaster Good metal work. I just did some of those same spo... Apr 26 2023, 08:01 PM
 seanpaulmc Been a while for an update… floors are done. At... May 27 2023, 05:20 PM

 mgarrison
Been a while for an update… floors are done. A... May 27 2023, 07:20 PM
 Dave_Darling Herculiner? Make sure you don't get it on you... May 27 2023, 05:41 PM
 East coaster Just sprayed my tub with Custom Coat bedliner (fro... May 28 2023, 05:18 AM
 seanpaulmc Thanks for the references on the bed / raptor line... May 28 2023, 09:12 AM
 seanpaulmc @bajafreaks
The passenger floor pan I bought fro... May 29 2023, 01:45 PM

 bajafreaks
@[url=http://www.914world.com/bbs2/index.php?show... May 29 2023, 06:09 PM
 seanpaulmc For review, we last left off with completion of th... Jul 6 2023, 01:27 PM
 930cabman Great progress, currently I am repairing some mino... Jul 6 2023, 02:23 PM
 seanpaulmc Back at it.
I made up my own replacement corner... Aug 27 2023, 03:29 PM

 bkrantz
Back at it.
I made up my own replacement corne... Jul 17 2024, 07:24 PM

 seanpaulmc
Back at it.
I made up my own replacement corn... Jul 23 2024, 12:08 PM
 seanpaulmc With a little help from you guys I was able to fig... Sep 2 2023, 07:29 PM
 930cabman +1 with your progress, all the while working outdo... Sep 3 2023, 05:51 AM
 seanpaulmc Put back the old door sill.
Mostly. Almost done ... Sep 9 2023, 06:14 PM
 seanpaulmc Sometimes a project reaches a tipping point…
... Jul 7 2024, 07:17 PM
 Artfrombama Impressed with your work and tenacity.
Keep up th... Jul 8 2024, 09:24 PM
 seanpaulmc Between the rain (daily), family life, and regular... Jul 17 2024, 08:04 AM
 seanpaulmc Kind of a wash out last week when outside of day j... Jul 23 2024, 12:21 PM
 friethmiller Good job! :trophy: Glad to know I'm not... Jul 23 2024, 01:55 PM

 seanpaulmc
Good job! :trophy: Glad to know I'm no... Jul 23 2024, 06:51 PM

 friethmiller
[quote name='friethmiller' post='3158074' date='J... Jul 24 2024, 06:37 AM

 930cabman
[quote name='friethmiller' post='3158074' date='... Jul 24 2024, 01:29 PM
 seanpaulmc Rain delay today. Workshop closed.
But yesterday ... Jul 25 2024, 06:00 PM
 seanpaulmc Roll over jig
I did not come up with this but cou... Jul 26 2024, 07:19 PM
 seanpaulmc What’s behind your seam sealer? :angry:
Jul 27 2024, 07:21 PM
 seanpaulmc Looking to the weekend ahead and hoping to put in ... Aug 27 2024, 09:27 AM
 Geezer914 That's what I did, coated the underside with t... Aug 27 2024, 11:37 AM
 friethmiller [Not trying to hijack the thread here with my pics... Aug 27 2024, 12:22 PM

 seanpaulmc
[Not trying to hijack the thread here with my pic... Aug 27 2024, 12:50 PM
 friethmiller So true about being outside! Part of any rest... Aug 27 2024, 01:26 PM
 seanpaulmc Need a waterproof car cover. Thought this was fine... Aug 31 2024, 06:24 PM
 seanpaulmc Hot!
No rain today. Welding could be done. :... Aug 31 2024, 06:31 PM

 930cabman
Hot!
No rain today. Welding could be done. ... Sep 1 2024, 05:22 AM

 seanpaulmc
Hot!
No rain today. Welding could be done. ... Sep 1 2024, 01:56 PM
 seanpaulmc Got the rest of it in just before the heavens brok... Sep 1 2024, 02:01 PM
  |
40 User(s) are reading this topic (40 Guests and 0 Anonymous Users)
0 Members:

|
Lo-Fi Version | Time is now: 28th November 2024 - 06:48 AM |
Invision Power Board
v9.1.4 © 2024 IPS, Inc.


