|
|

|
Porsche, and the Porsche crest are registered trademarks of Dr. Ing. h.c. F. Porsche AG.
This site is not affiliated with Porsche in any way. Its only purpose is to provide an online forum for car enthusiasts. All other trademarks are property of their respective owners. |
|
|
| doug_b_928 |
 Jun 3 2016, 08:12 PM Jun 3 2016, 08:12 PM
Post
#1
|
|
Senior Member    Group: Members Posts: 714 Joined: 17-January 13 From: Winnipeg Member No.: 15,382 Region Association: Canada |
Sorry in advance for the longish post. My 73 was hit before I bought it as a naive kid of 15 (the car was badly rusted and poorly repaired or not repaired at all, more than 30 years ago). A few years ago I set out to begin the slow process of restoring the car only to find out how extensive the rust is and that the chassis is twisted. I wish I could drop it off to Rick or Scotty but that's not in the budget (especially with the exchange on the CAD). I know I should abandon any hope of restoring it, and it may well become my parts car, but it keeps sucking me back in.
Case in point: When looking at the car from the rear the twist is obvious, it's 1.25" higher on the passenger side. I've done the measurements on the car and the only part that's off is the rear end. The trunk is square but the 'length of rear body assembly' (q measurement) is 8mm short (and, as shown below, shorter on the driver's than passenger's side as well), the width of the trunk opening (r measurement) is a bit wide at the top (2-3mm), perfect at the point above the transmission crossmember, and narrow at the very back (-7mm). The diagonal across the trunk (s measurement) is square but 8mm short. I also measured from various points under the car down to a flat surface (trailer floor) and was quite shocked to find symmetry side to side all of the way from the firewall back to the transmission crossmember and even a bit past that point. As well, I measured these points from the firewall and to the suspension mounting brackets and found symmetry. I was able to check measurements on another shell that does not appear to have ever been hit and they were either identical or almost identical to mine (except the ones that are off on mine mentioned above). The PO had put in a homemade engine bar, so I theorized that perhaps the bowing of the front of the fenders meant that the engine mounts bowed as well, but I acquired an engine bar and it fit like a glove. Then I thought that perhaps the trans mounts were shifted (necessitating a custom engine bar so the trans would mount), but the symmetry side to side from the attached measurements below as well as the consistency with the measurements I took from another shell suggest that's not the case either. This all suggests to me that the car is only twisted at the very back, including the rear trunk floor pan but not the trans crossmember. Even the pinch weld of the "frame" a bit behind the trans cross member is not different side to side as measured to the floor of the trailer. The fender(s) are pushed in at the very back and maybe slightly bowed toward the front (at the bottom front the fenders they are bowed significantly past the doors). The inner wheel wells in the trunk area are also off from one another a bit in terms of height from the trailer floor, but not by much (I calculate at most 5mm). Attached are my measurements (that are supplementary to the ones on the list of 'Body Dimensions' as well as some pics that show the asymmetry in the rear of the car. It is clear that the rear trunk floor was pushed in, it took the hardest hit on the driver's side and there is a poor patch on that side (but there was also damage to the tail light area of the passenger fender). Looking from underneath you can see the difference in distance between the underside of the trunk floor and the tail section. It almost looks as if they welded on a different tail section crooked, but given the repair I doubt that any panels were replaced (even the broken tail liight housing was re-used with puddy to seal it up). When you look from the back of the car into the trunk you can see how crooked the tail piece is in relationship to the trans crossmember (see pic below). So I have all of these data but I still can't figure out whether the driver's side is low or the passenger side is high, or both. Does anyone have any advice on what I can do to figure that out? Do the pics below showing the difference in distance from the underside of the trunk floor to the bottom of the tail piece give any clues? Here's the view from the back where you can see how the tail section is off relative to the trans crossmember: 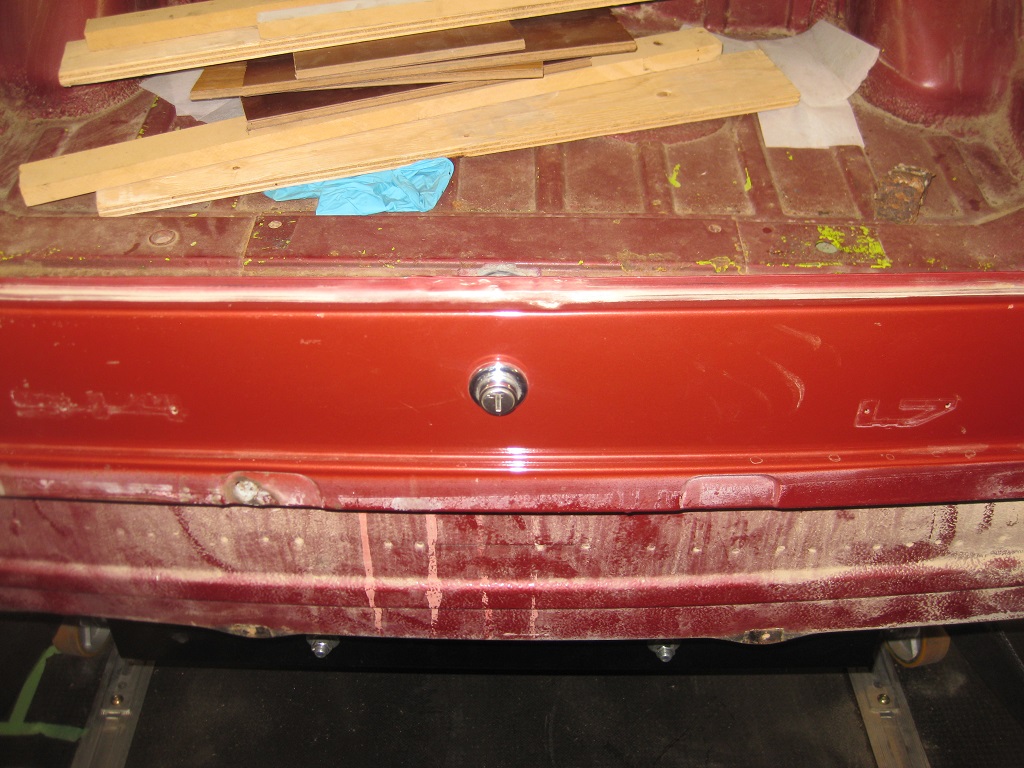 Here's a view of the underside where you can see, sort of, how the distance from the underside of the trunk floor to the bottom of the tail section is quite different from side to side (it's more obvious in real life): 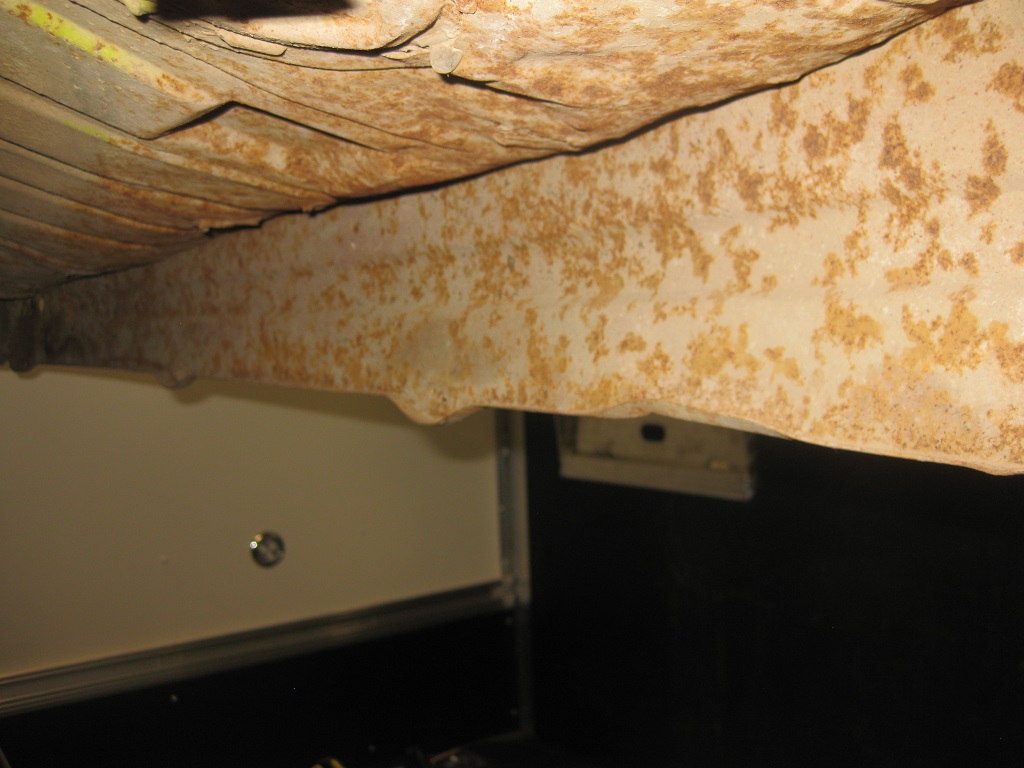 Here's the view from the underside of the dirver's side: 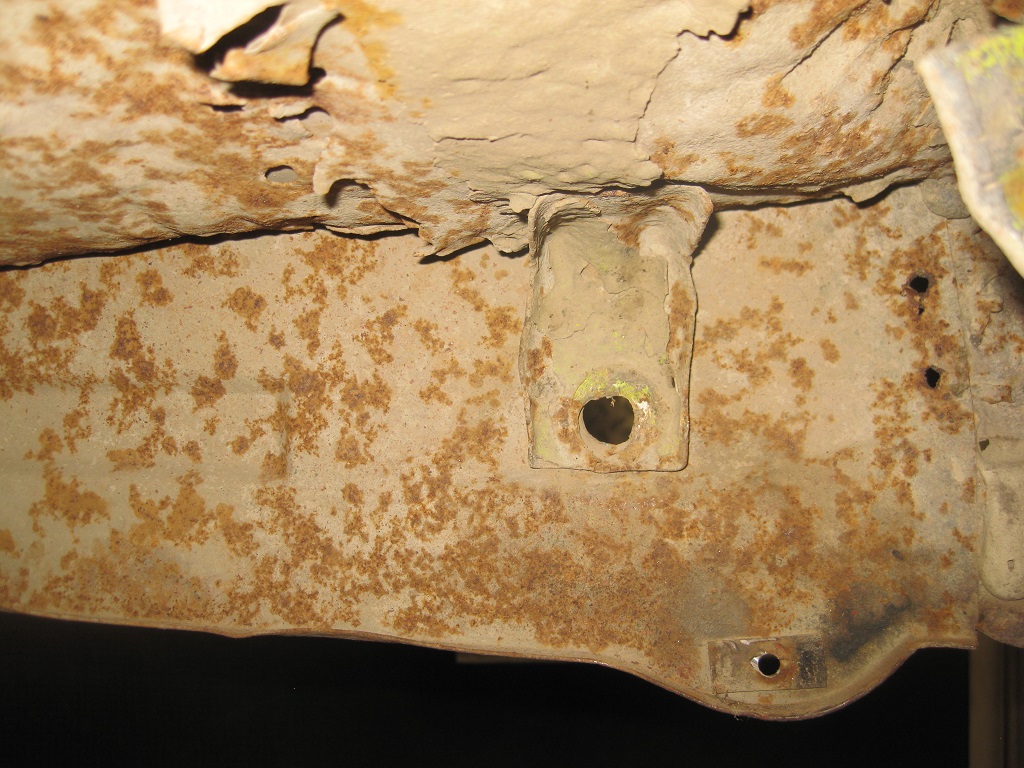 Here's the view from the underside of the passenger's side: 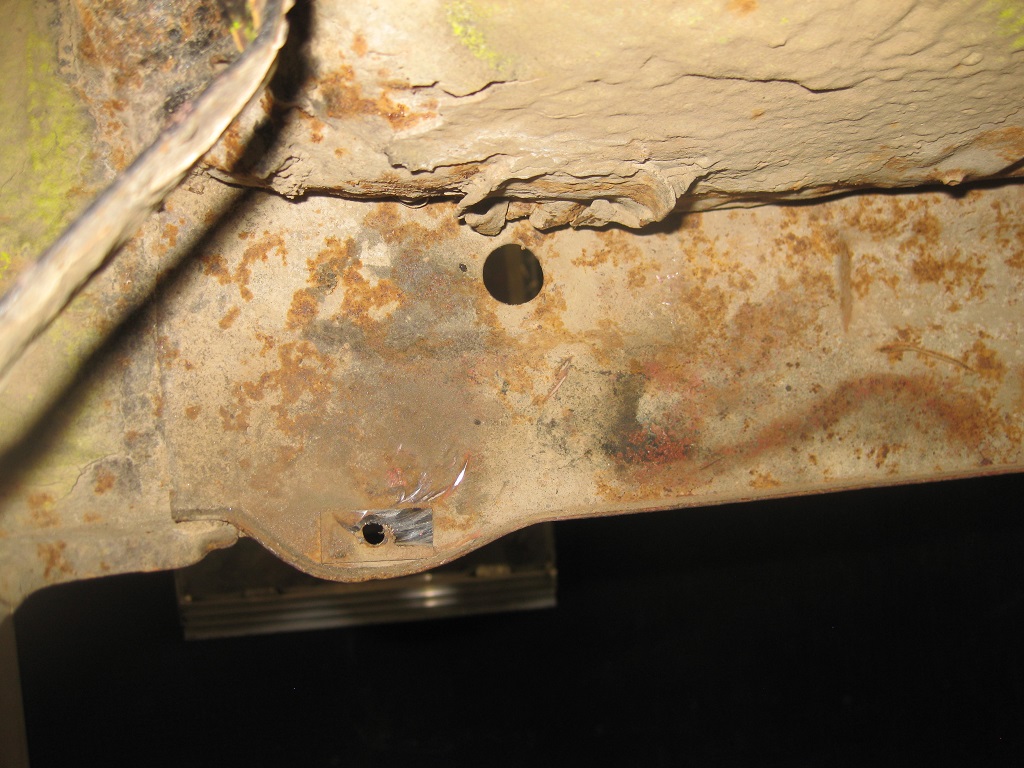 I'm hoping the latter two pics might give some clues as to which side is (more) off. Here is a pdf attachment of the measurements that I took:  914_Supplementary_measurements_June_1_2016.pdf ( 1.06mb )
Number of downloads: 728
 |
  |
Replies
| doug_b_928 |
 May 23 2017, 09:06 PM May 23 2017, 09:06 PM
Post
#2
|
|
Senior Member    Group: Members Posts: 714 Joined: 17-January 13 From: Winnipeg Member No.: 15,382 Region Association: Canada |
I've finally had some time to work on this (IMG:style_emoticons/default/sawzall-smiley.gif) (It took a lot of planning and thinking; even waking up in the middle of the night designing tools to do the job). I think I have the car straight. I'll know better once I get the donor quarters and tail section from the shell I'm getting from Rick.
I made a jig out of threaded rod and couplers. I made it so that I can bolt it to, or remove it from, the bench attachment that supports the rear of the car. Once I had it made, I unbolted the attachment that supports the rear of the car and bolted it to the trans mounts of the another shell that a fellow 914World member has in the city (Many thanks to 914World member Krank!). Then I set the jig per the shell. Then re-installed the jig on my bench. 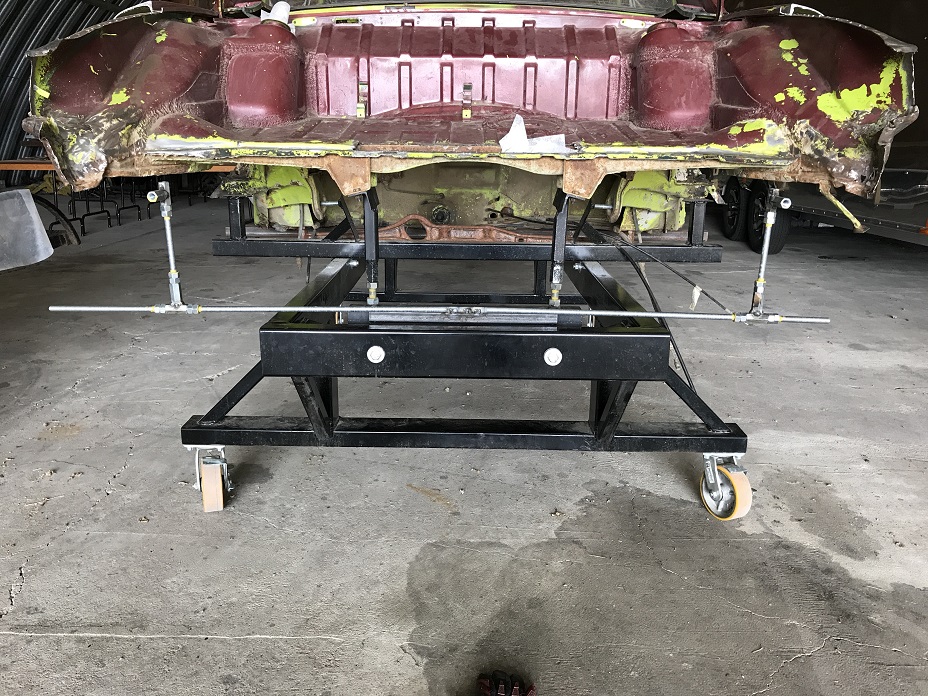 I should have used 5/8' threaded rod so it would be much less flexible and more precise, but it served the purpose for me to show me where my car was off. As you can see by looking at the tail section, which is set by the jig and suspended by a rack that I made (I'll also use it for hanging parts to prime and paint), the right side is correct and the left side was low (see how the tail light area is 1.25" low on the left; also note how the tail section is straight relative to the inside of the trunk). 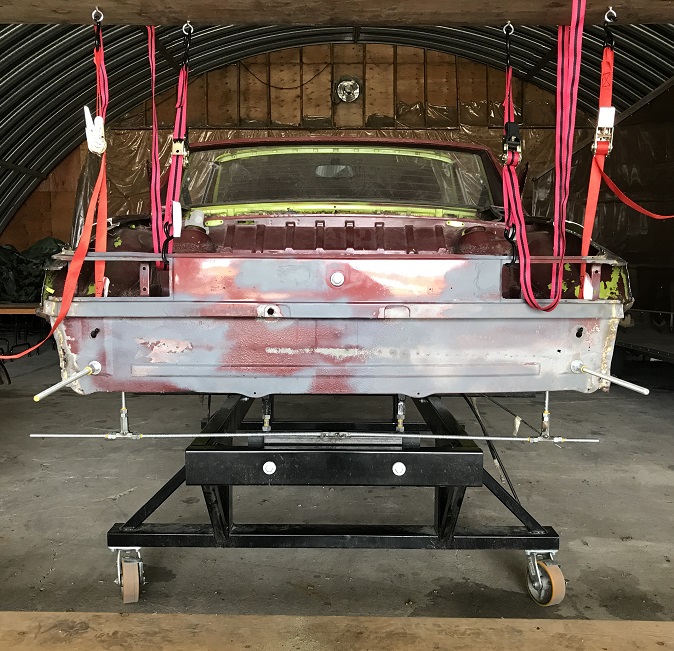 So, time to do some bending. I had to make a hold down to counter the force of pushing up the left rear. I used vise-grip pliers, with the adapter from my slide hammer, and made a receiver for the chain hook out of a large bolt with the correct fine threads that the slide hammer has and two washers welded to the bolt and to each other. Then chained and anchored to an existing anchor in the floor. It worked perfectly. I marked measurements on the tops of the inner fenders based on distance from the trunk seal flange at the front of the trunk where it meets the inner fender on each side. I then used a straight piece of metal with a plum bob hanging off of each end, set the piece of metal on a given measurement on both sides, and measured from the piece of metal down to a straight bar resting on the bench. That way I could check the measurement of each side relative to the true bench. 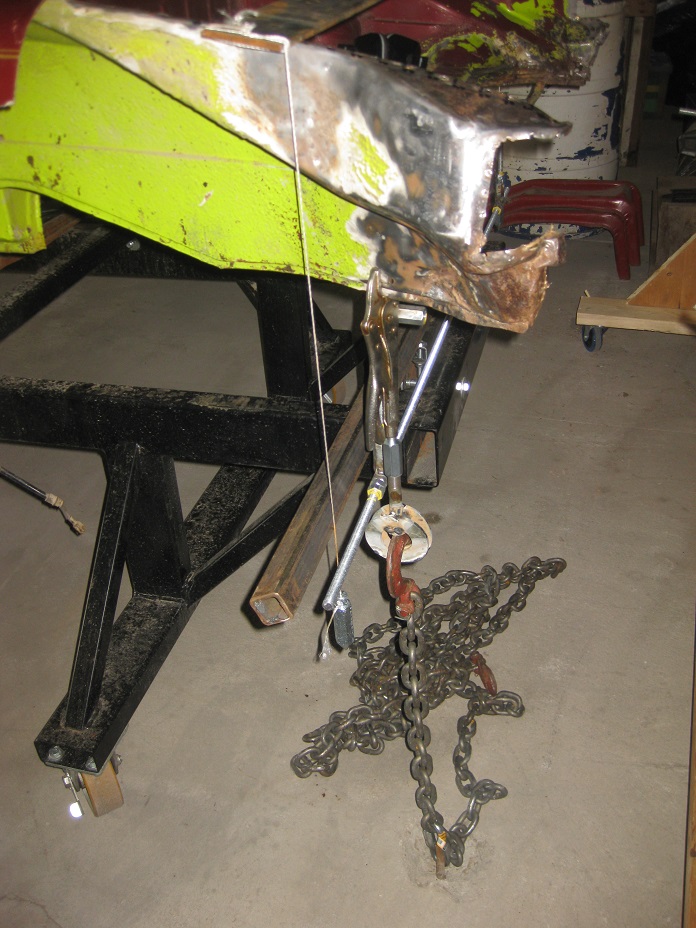 Then came the porta power. 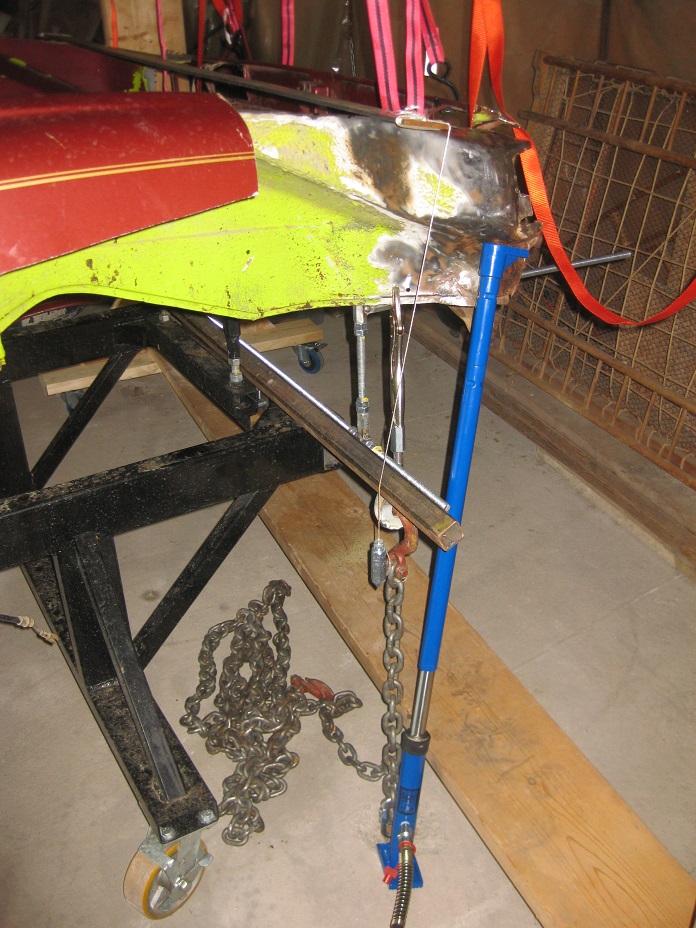 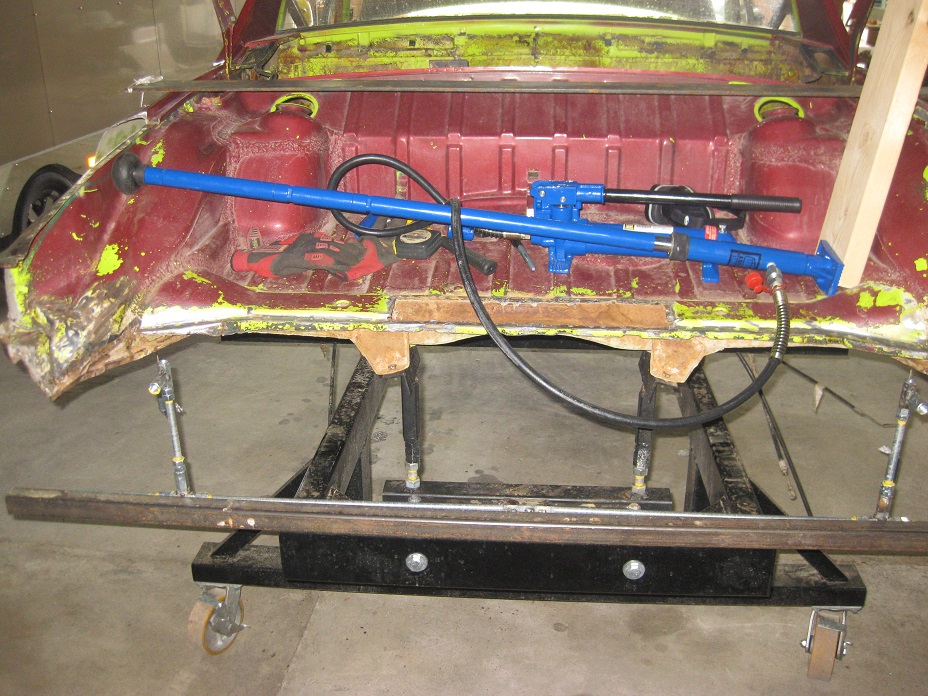 The car is now straight. I put some tape on it to assist with seeing some of the lines, but the tape is sagging. This pic is not perfectly square, but it's pretty close. As you can see, everything looks pretty good relative to the bench. 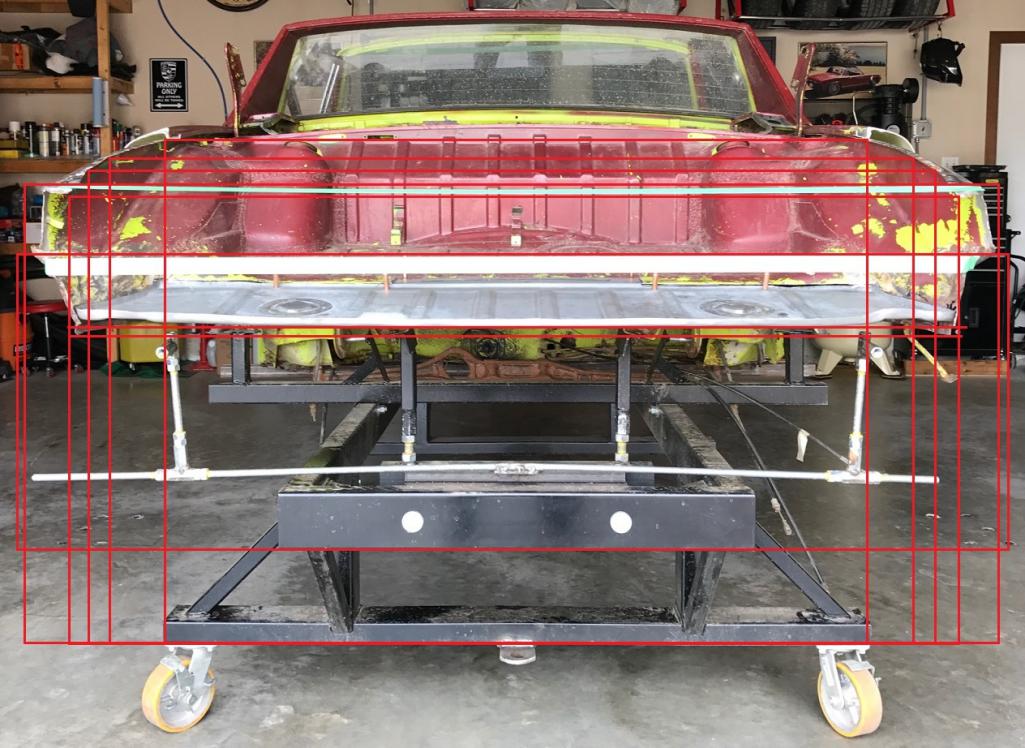 Finished off with some hammer and dolly work to smooth out the crash damage. Before straightening 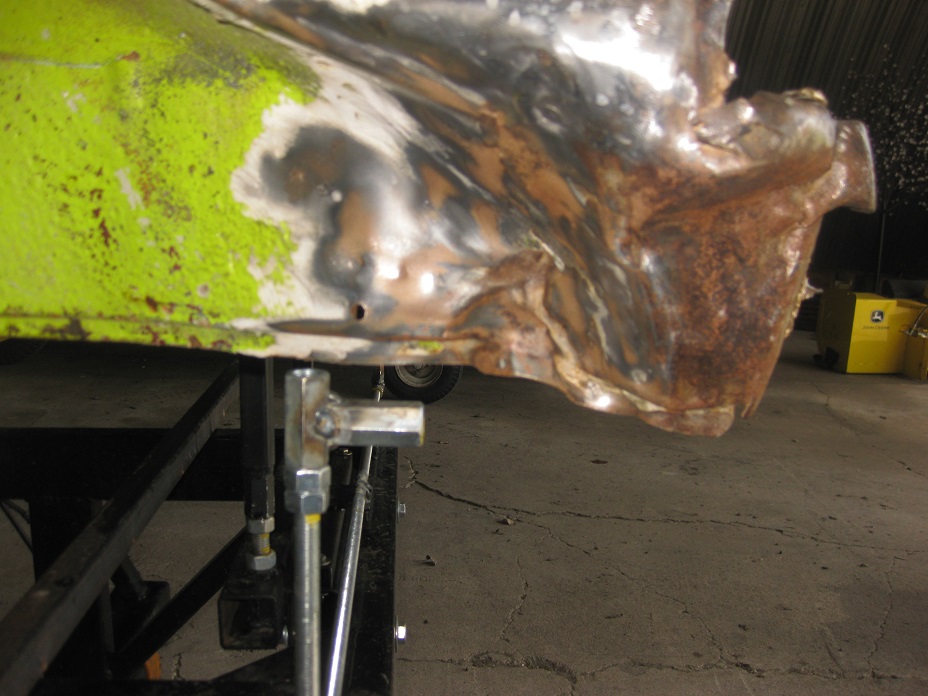 After 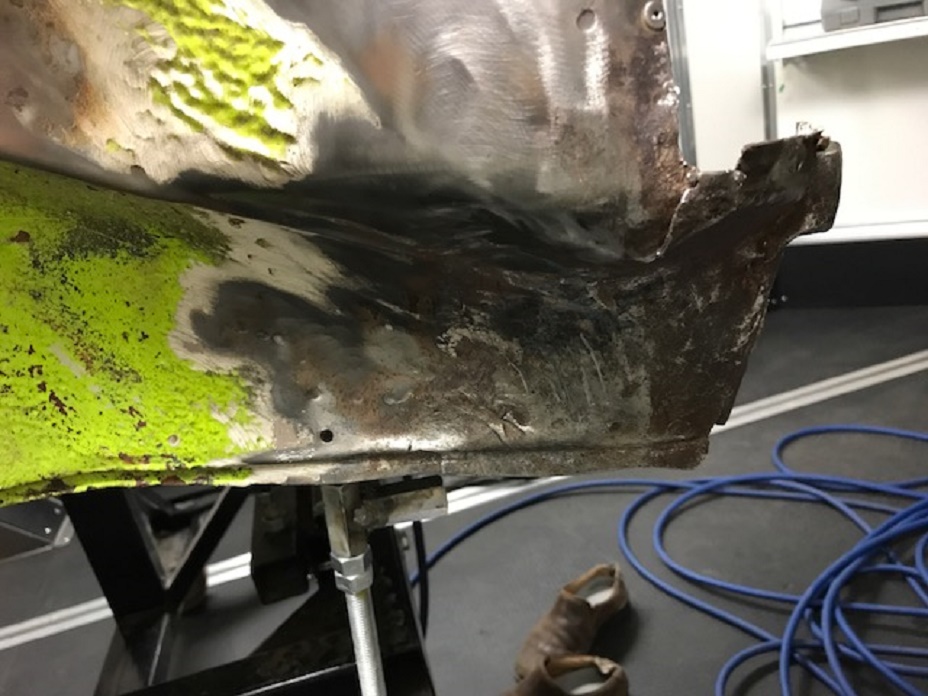 I'm not going to weld the crack etc. because there will undoubtedly be some adjustment needed once I get the new quarters (I just hope I don't need to make any major adjustments again). Overall, for my first attempt at doing something like this I'm pleased with the result. Now that this is done I have to undo some of the poorly done repairs from more than 33 years ago before I can start the undoubtedly long process of making my own rust repairs. |
Posts in this topic
 doug_b_928 puzzling body twist Jun 3 2016, 08:12 PM
 doug_b_928 No replies yet, and I'm not surprised as this ... Jun 4 2016, 11:04 AM
 rick 918-S I like chassis puzzles. Before I read the entire p... Jun 4 2016, 12:43 PM
 doug_b_928 Thanks very much for chiming in, Rick. The delta ... Jun 4 2016, 01:55 PM
 Jon H. Is your suspension and tires still on? If so, if ... Jun 5 2016, 05:44 AM
 doug_b_928 The car is a shell, on a bench made from Jeff Hail... Jun 5 2016, 06:13 AM
 rick 918-S Take a photo of the chassis rails, right and left ... Jun 5 2016, 06:17 AM
 rick 918-S Your like 7 hrs. away from me. If I wasn't ups... Jun 5 2016, 06:19 AM
 doug_b_928 That would be terrific, Rick! That's why ... Jun 5 2016, 07:31 AM
 sixnotfour
that maybe from the trunk torsion bar slapping d... Jun 5 2016, 08:25 AM
 doug_b_928 Interestingly, that crack is exactly where the top... Jun 5 2016, 09:52 AM
 rick 918-S Here
And the more I look at it the more I see. ... Jun 5 2016, 10:51 AM
 rick 918-S Closest I get to Canada is Grand Portage. Jun 5 2016, 11:05 AM
 doug_b_928 I had to look up Grand Portage (third biggest city... Jun 5 2016, 11:43 AM

 rick 918-S
I had to look up Grand Portage (third biggest cit... Jun 5 2016, 11:50 AM
 doug_b_928 Excellent, thanks Rick! What do you make of t... Jun 5 2016, 12:10 PM

 rick 918-S
Excellent, thanks Rick! What do you make of ... Jun 5 2016, 01:08 PM
 doug_b_928 Okay, thanks Rick. There is a lot of filler on th... Jun 5 2016, 01:20 PM
 rick 918-S H,I and Y need to be verified. Then F and X If you... Jun 5 2016, 01:44 PM
 doug_b_928 Okay, will do. Thank you so much! Jun 5 2016, 02:55 PM
 emoze your first instinct was the best
unless you have ... Jun 5 2016, 05:26 PM

 rick 918-S
your first instinct was the best
unless you have... Jun 5 2016, 05:28 PM
 doug_b_928 Very unfortunately no jillion here. That's w... Jun 5 2016, 06:48 PM

 OU812
Very unfortunately no jillion here. That's ... Jun 5 2016, 08:08 PM
 doug_b_928 Took the 914 to the farm this weekend to do some o... Jul 3 2016, 06:13 PM
 DirtyCossack For what it's worth:
My car was way worse tha... Jul 3 2016, 09:36 PM
 doug_b_928 Agreed. I know that no one else would save this c... Jul 4 2016, 06:22 AM

 Claus Graf
Agreed. I know that no one else would save this ... Sep 14 2016, 08:52 PM
 doug_b_928 Paging Rick Ollah.... Curious to know what your ap... Jul 4 2016, 07:36 PM
 rick 918-S Watching the fireworks show. I'll get a look o... Jul 4 2016, 08:44 PM
 doug_b_928 My bad Rick....You'll have to forgive a Canuck... Jul 4 2016, 08:46 PM
 rick 918-S Great American day. Had a 3 day weekend that went ... Jul 5 2016, 04:03 PM
 doug_b_928 Thanks, Rick. I'm glad you had a good holiday... Jul 5 2016, 05:20 PM
 doug_b_928 Oh yeah, I was also curious as to why the welds th... Jul 5 2016, 05:22 PM
 injunmort gold welds=brazing. should be eliminated before w... Jul 5 2016, 05:30 PM
 doug_b_928 How do they get eliminated? Cut out or heated wit... Jul 5 2016, 05:31 PM
 Jeff Hail Nice bench.
Now we have 6 in the US, would have b... Jul 5 2016, 06:26 PM
 doug_b_928 Thanks Jeff. Yes, as I mentioned in my email corr... Jul 5 2016, 06:57 PM
 doug_b_928 Hey guys,
I was away for most of the last half of... Sep 14 2016, 06:34 PM
 doug_b_928 I checked out your thread, Claus. Holy ingenuity ... Sep 17 2016, 08:15 AM
 doug_b_928 Here's what I'm thinking (see pic below). ... Sep 18 2016, 10:31 AM
 doug_b_928 Yesterday I spent the day at the farm removing the... Oct 23 2016, 12:23 PM
 rick 918-S I agree those out panels had to go. Here's a t... Oct 24 2016, 08:09 AM
 doug_b_928 Hi Rick. Thanks for chiming in. Great idea and t... Oct 24 2016, 09:35 AM
 Cairo94507 This is turning into a terrific thread. I like th... Oct 25 2016, 08:12 AM
 altitude411 Yeah Rick :first:
Another of the long list of s... Oct 25 2016, 08:16 AM
 doug_b_928 ^^^^ +914 Oct 25 2016, 08:44 AM
 mbseto This thread is quite the clinic. Oct 25 2016, 12:11 PM
 Jamie I continue to be amazed at the testicular fortitud... Oct 25 2016, 12:19 PM
 doug_b_928 Well...I can handle the cutting part, but putting ... Oct 25 2016, 01:39 PM
 76-914 :thumbsup: This turned out to be quite the project... May 24 2017, 07:47 AM
 doug_b_928 Thanks very much :beer3: May 24 2017, 09:38 AM
 rick 918-S Looks like your on track. May 26 2017, 03:54 AM
 doug_b_928 Thanks very much, Rick. Your sage advice has been... May 26 2017, 04:46 AM
 defianty Well done! Great work. May 26 2017, 05:31 AM
 doug_b_928 I spent the weekend at the farm and finally had a ... Jun 24 2019, 03:12 PM
 bbrock Holy smoke Doug! How have I missed this threa... Jun 24 2019, 03:50 PM
 doug_b_928
Holy smoke Doug! How have I missed this thre... Jun 24 2019, 05:46 PM
  |
3 User(s) are reading this topic (3 Guests and 0 Anonymous Users)
0 Members:

|
Lo-Fi Version | Time is now: 2nd April 2025 - 11:59 PM |
Invision Power Board
v9.1.4 © 2025 IPS, Inc.


