|
|
|
Porsche, and the Porsche crest are registered trademarks of Dr. Ing. h.c. F. Porsche AG.
This site is not affiliated with Porsche in any way. Its only purpose is to provide an online forum for car enthusiasts. All other trademarks are property of their respective owners. |
|
|

 914World Classifieds Rules
We've established the following rules to help make your sales/purchases as successful as possible!
- Please List WTB:, FS:, TRADE: etc (want to buy, for sale, and trade respectively) before your add title.
- You *must* put a price in your ad and state how you would like payment!
- If you'd like to bump your ads, feel free to do so every two days.
- DO NOT MAKE YOUR ADS IN ALL CAPITAL LETTERS! It's considered rude.
- All eBay ads belong in the eBay category.
- Please consolidate your ads into one big lump... listings and pictures together in one thread. Please be considerate of other classified users!!
- Mark your items "SOLD" once you sell them. Please do not ask to have ads removed. Ads will automatically hide themselves after 30 days. We also ask that you leave your pricing in the ads to help others determine fair market value for future sales.

| Marek |
 Oct 27 2018, 01:38 PM Oct 27 2018, 01:38 PM
Post
#1
|
|
Newbie  Group: Members Posts: 20 Joined: 27-April 15 From: Copenhagen , Denmark Member No.: 18,672 Region Association: None |
FS: Through-the-Hood Filler Kit for 914
Finally The kit contains all you need, to make your "through the hood filler look" complete with out any welding or painting !!!! the kit includeds * Original 100mm vented Blau fuel cap, in stainless steel with a 5 hole fin * A bolt on fuel neck you screw direct on to your tank , gaskets to adjust the height you can combine the gasket depending on the height you need * A "Dog bowl" to overfill fuel or rain it has a 1 m long drain tube, on top it has a rubber seal, so its tight closing against the hood, without damage * A Stainless bezel to mount on the hood, by screwing it on, with the incl 6 screws btw every bolt , screw etc you need are included incl a shortl instruction the only work you have to do your self is *messure up and drill a hole 127 mm in your bonnet , use some epoxy primer on the edge *remove the expansion tank on top of the tank by unscrewing the 8 bolts *screw on the Fuel kneck , it got the correct angle put gaskets under it to get the height ( BE AWARE YOU CAN ADJUST THE TANK IT SELF A BIT ,SO MAKE SURE ITS STRAP´ ON THIGHT BEFORE YOU DO ANYTHING ) *put on the dog bowl ,mount the gasket and drain tube ,use silicone to set the height of the dogbowl *screw on the top stainless or silver bezel with the included 6 stainless screws to the "under the hood" bezel , you might need to shorten the screws os they dont scrath the rubber seal , and use a drop of loctite to be sure the screws a lock thight A silver mat painted cap / bezel option is available , see pics later in the post For those of you that are not a fan of the screw on bezel on the hood , there is a option! For the 911 kit we offered a square adapter you see on the last picture its easy and simple and you get the perfect "hole in you hood" but its requiers welding / paint job This version is also on stock now with a Silver or polished Price 350 EURO + shipping ( to USA 37€ ) - 445 USD incl postage to US Importen Do note !!! I am shipping by DHL from Germany which is the cheapest option, I have been using them the last 10 years , so full tracking number never had a problem BUT expect up to 4 weeks delivery , DHL said its long security checks in at US customs Paypal ok, BUT save 25 EURO by a direct bank wire By interest drop me a mail early911parts@gmail.com I have posted some pictures below and much more to come ASAP Regards Marek ( Denmark ) Attached thumbnail(s) 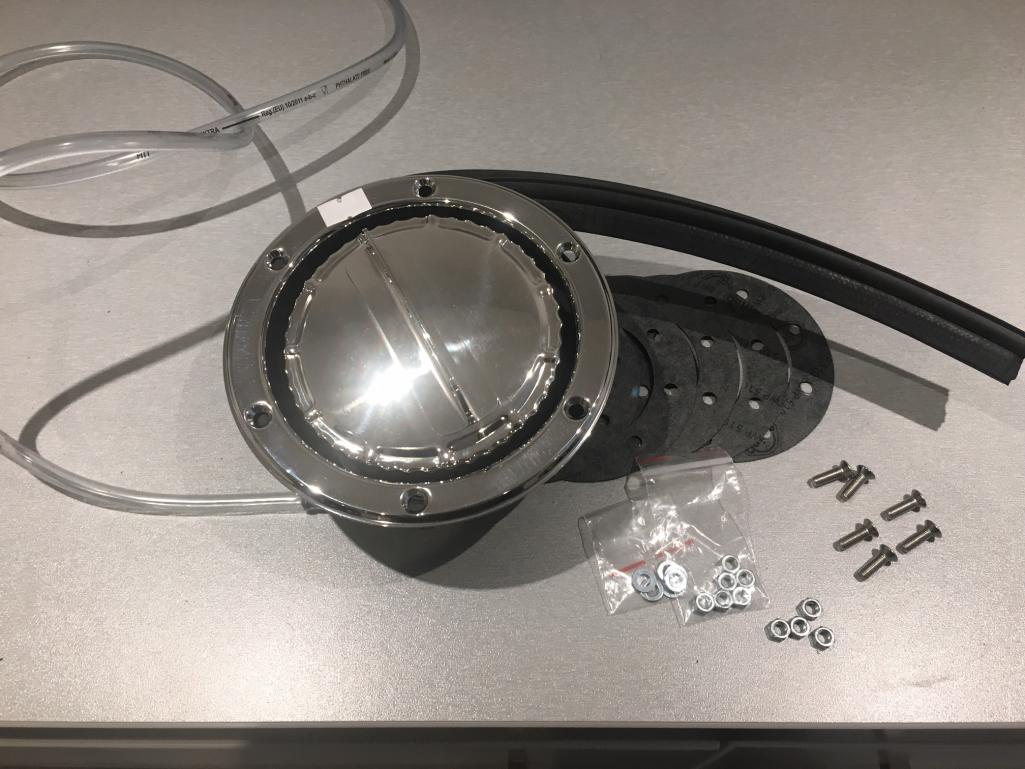 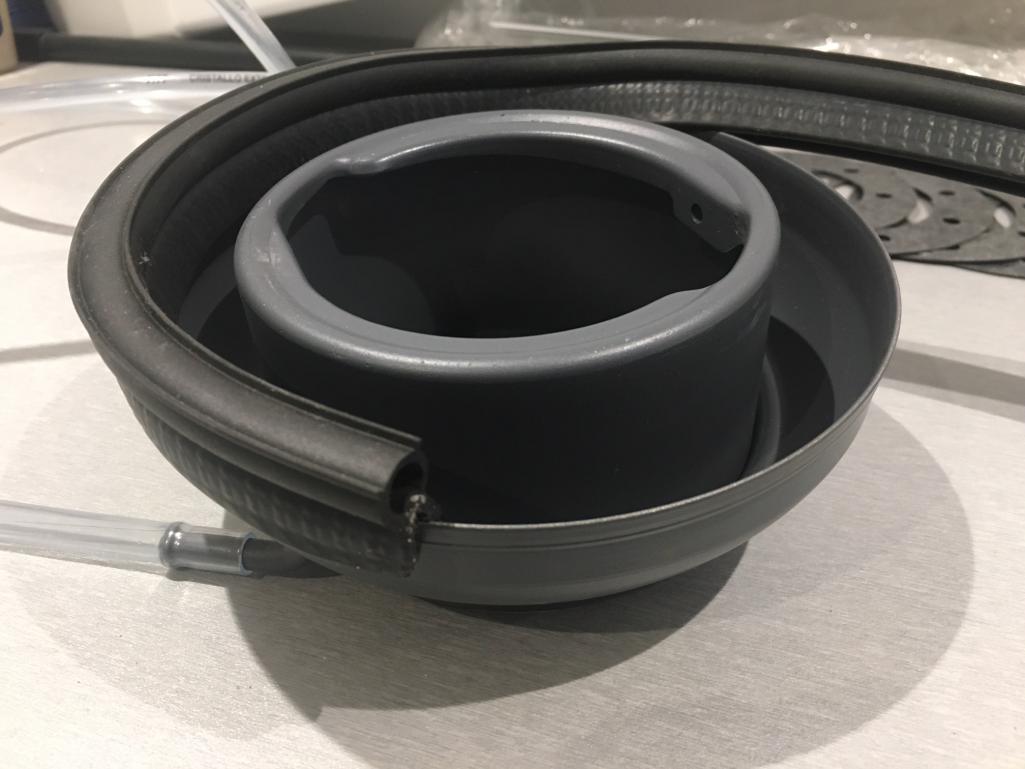 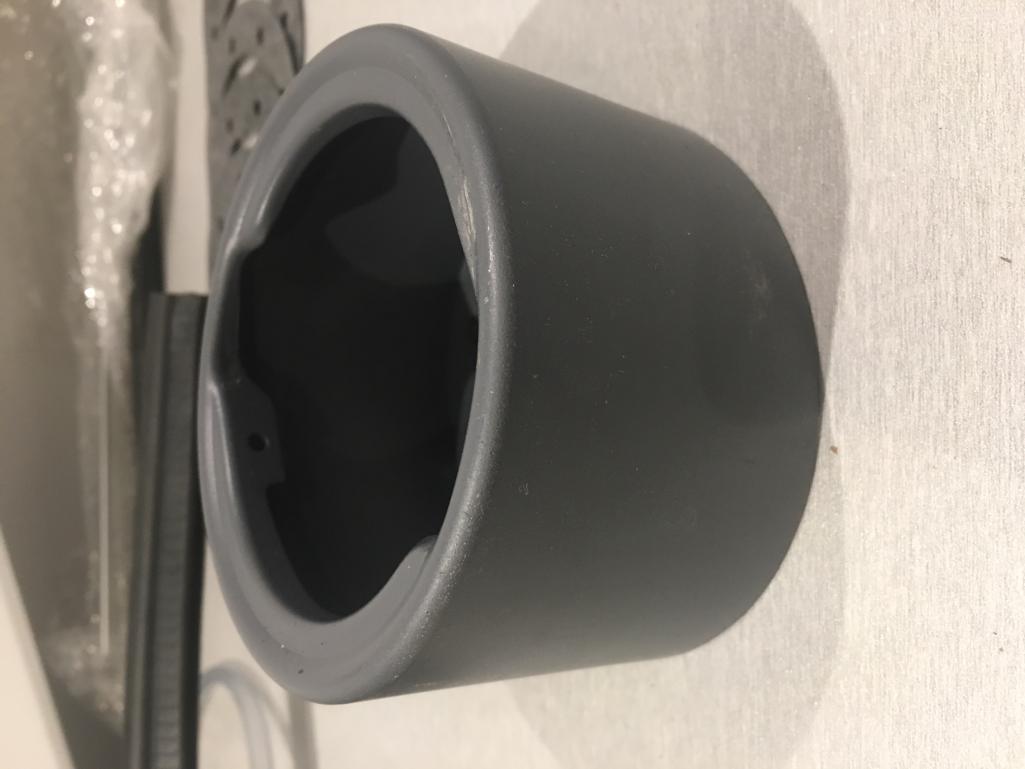 Attached image(s) 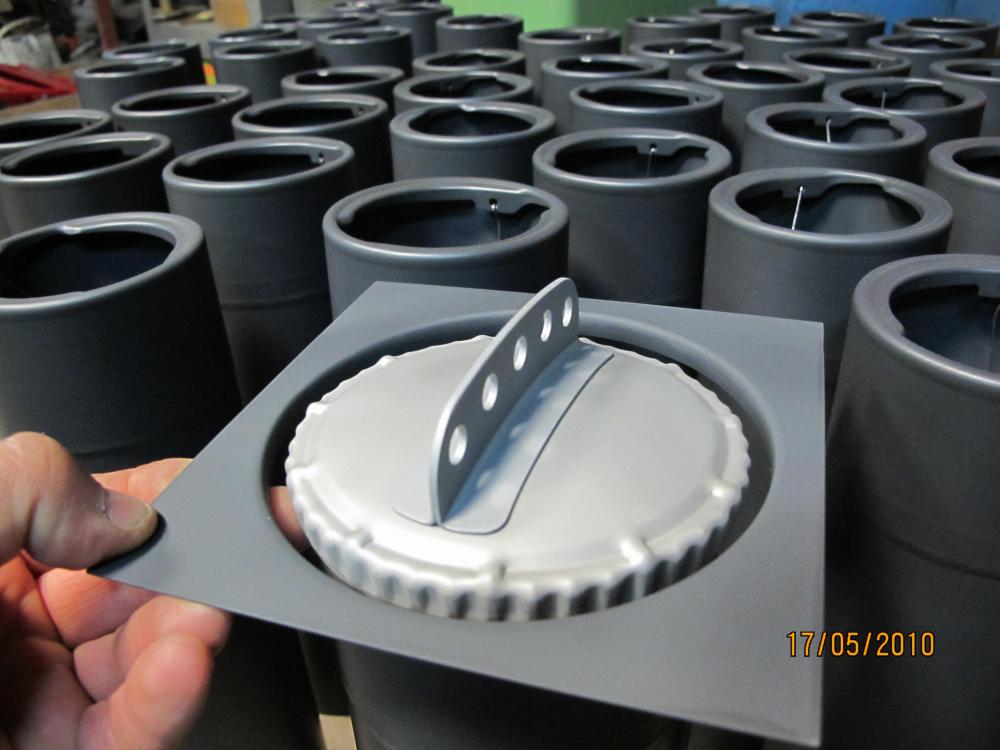
|
   |

 
|
  |
Replies
| johnvan8 |
Nov 20 2018, 04:08 PM
Post
#2
|
|
Newbie Group: Members Posts: 2 Joined: 21-October 14 From: Orange, CA Member No.: 18,044 Region Association: None |
Very interested. What is the best way to figure out exact location to cut hood? Is there a template or is it better to cut specifically to where your tank/hood are located in relation to each other?
|
|
|
|
| Marek |
Nov 20 2018, 04:57 PM
Post
#3
|
|
Newbie Group: Members Posts: 20 Joined: 27-April 15 From: Copenhagen , Denmark Member No.: 18,672 Region Association: None |
QUOTE(johnvan8 @ Nov 20 2018, 02:08 PM)  Very interested. What is the best way to figure out exact location to cut hood? Is there a template or is it better to cut specifically to where your tank/hood are located in relation to each other? Well john , no template but I can post some ruff messurements to point you in a direction , but we can not make a template due to the bonnet and tank can be a few mm off in messurement on every car so it requiers some messuring , I can tell how we did we removed the expansion tank on top of the tank by unscrewing the 8 bolts we tape the fuel opening with papper tape we marked a cross on the center of the fuel openning then we drilled a small hole 20 mm or so ,as closed to the center mark as we could predict and when we saw we are close to center we did the hole larger and larger step by step hope it gives an idea Marek |
|
|
|
| johnvan8 |
Nov 20 2018, 05:33 PM
Post
#4
|
|
Newbie Group: Members Posts: 2 Joined: 21-October 14 From: Orange, CA Member No.: 18,044 Region Association: None |
QUOTE(Marek @ Nov 20 2018, 02:57 PM) QUOTE(johnvan8 @ Nov 20 2018, 02:08 PM) Very interested. What is the best way to figure out exact location to cut hood? Is there a template or is it better to cut specifically to where your tank/hood are located in relation to each other? Well john , no template but I can post some ruff messurements to point you in a direction , but we can not make a template due to the bonnet and tank can be a few mm off in messurement on every car so it requiers some messuring , I can tell how we did we removed the expansion tank on top of the tank by unscrewing the 8 bolts we tape the fuel opening with papper tape we marked a cross on the center of the fuel openning then we drilled a small hole 20 mm or so ,as closed to the center mark as we could predict and when we saw we are close to center we did the hole larger and larger step by step hope it gives an idea Marek That makes sense. Start with a small hole and go larger to center the opening, not the other way around! How long to ship to California? |
|
|
|
| ValcoOscar |
Nov 20 2018, 05:40 PM
Post
#5
|
|
Garage Life Group: Members Posts: 2,482 Joined: 19-November 13 From: SoCal Member No.: 16,669 Region Association: Southern California |
QUOTE(johnvan8 @ Nov 20 2018, 03:33 PM) QUOTE(Marek @ Nov 20 2018, 02:57 PM) QUOTE(johnvan8 @ Nov 20 2018, 02:08 PM) Very interested. What is the best way to figure out exact location to cut hood? Is there a template or is it better to cut specifically to where your tank/hood are located in relation to each other? Well john , no template but I can post some ruff messurements to point you in a direction , but we can not make a template due to the bonnet and tank can be a few mm off in messurement on every car so it requiers some messuring , I can tell how we did we removed the expansion tank on top of the tank by unscrewing the 8 bolts we tape the fuel opening with papper tape we marked a cross on the center of the fuel openning then we drilled a small hole 20 mm or so ,as closed to the center mark as we could predict and when we saw we are close to center we did the hole larger and larger step by step hope it gives an idea Marek That makes sense. Start with a small hole and go larger to center the opening, not the other way around! How long to ship to California? Hey John- If you buy a kit also maybe we can have a mini tech install session at my house. (IMG:style_emoticons/default/beerchug.gif) Oscar |
|
|
|
| johnvan8 |
Nov 20 2018, 07:31 PM
Post
#6
|
|
Newbie Group: Members Posts: 2 Joined: 21-October 14 From: Orange, CA Member No.: 18,044 Region Association: None |
QUOTE(ValcoOscar @ Nov 20 2018, 03:40 PM) QUOTE(johnvan8 @ Nov 20 2018, 03:33 PM) QUOTE(Marek @ Nov 20 2018, 02:57 PM) QUOTE(johnvan8 @ Nov 20 2018, 02:08 PM) Very interested. What is the best way to figure out exact location to cut hood? Is there a template or is it better to cut specifically to where your tank/hood are located in relation to each other? Well john , no template but I can post some ruff messurements to point you in a direction , but we can not make a template due to the bonnet and tank can be a few mm off in messurement on every car so it requiers some messuring , I can tell how we did we removed the expansion tank on top of the tank by unscrewing the 8 bolts we tape the fuel opening with papper tape we marked a cross on the center of the fuel openning then we drilled a small hole 20 mm or so ,as closed to the center mark as we could predict and when we saw we are close to center we did the hole larger and larger step by step hope it gives an idea Marek That makes sense. Start with a small hole and go larger to center the opening, not the other way around! How long to ship to California? Hey John- If you buy a kit also maybe we can have a mini tech install session at my house. (IMG:style_emoticons/default/beerchug.gif) Oscar Oscar, are you getting a kit? If so, I'm definitely interested in a tech install session! John |
|
|
|
Posts in this topic
 Marek Through-the-Hood Filler Kit Oct 27 2018, 01:38 PM
 Marek The finish look mounted
More installation picture... Oct 27 2018, 01:44 PM sfrenck :popcorn:
Take some pics of the finished product... Oct 27 2018, 03:38 PM pdlightning Sure looks pretty! Oct 27 2018, 09:13 PM jmitro looks great; i'll be interested pending your o... Oct 28 2018, 06:46 AM Chi-town Can I get it in non-polished? Oct 28 2018, 09:24 AM
Marek The finish look mounted
More installation picture... Oct 27 2018, 01:44 PM sfrenck :popcorn:
Take some pics of the finished product... Oct 27 2018, 03:38 PM pdlightning Sure looks pretty! Oct 27 2018, 09:13 PM jmitro looks great; i'll be interested pending your o... Oct 28 2018, 06:46 AM Chi-town Can I get it in non-polished? Oct 28 2018, 09:24 AM
 burton73
Can I get it in non-polished?
If you send it ou... Oct 28 2018, 09:41 PM BuddyV
Can I get it in non-polished?
If you send it o... Oct 28 2018, 10:53 PM Chi-town
Can I get it in non-polished?
If you send it o... Oct 28 2018, 11:31 PM Marek Hi Guys
I will post more pics asap from the inst... Oct 29 2018, 01:52 AM Chi-town Silver painted works :D Oct 29 2018, 10:18 AM ValcoOscar FOR ME...I like the last image of Post #1...weld i... Oct 29 2018, 10:38 AM mb911
FOR ME...I like the last image of Post #1...weld ... Nov 20 2018, 04:38 PM Marek Hi Oscar the weld in trim is included,
Marek
... Nov 20 2018, 05:00 PM ValcoOscar
Hi Oscar the weld in trim is included,
Marek
[... Nov 20 2018, 05:20 PM Marek Sure no problem just drop me a mail when you are r... Nov 20 2018, 05:23 PM rgalla9146
FOR ME...I like the last image of Post #1...weld ... Nov 20 2018, 09:36 PM Marek Sorry guys , forgot that the boys in the shop had ... Nov 5 2018, 01:01 PM Marek Silver painted version , tested and on stock
The... Nov 19 2018, 02:54 PM ValcoOscar
[quote name='ValcoOscar' post='2667239' date='Nov... Nov 20 2018, 08:00 PM Marek Sorry to California you should expect UP to 4 week... Nov 20 2018, 05:43 PM larryM long time back, Martin Baker was making & sell... Nov 22 2018, 11:26 PM johnvan8 @Marek : are there any unwanted consequences to re... Nov 23 2018, 09:47 AM pdlightning
[b]@[url=http://www.914world.com/bbs2/index.php?s... Mar 22 2019, 10:18 AM 914forme I'll be in for one with the weld on ring trim.... Nov 24 2018, 09:07 AM Marek BUMP
But I am mostly interested in any feedback :... Jan 9 2019, 11:03 AM totle Nice looking kit Jan 9 2019, 04:57 PM Marek 3 more kits in the mail to US :-) Thanks Mar 11 2019, 03:47 AM Niclas_Swe Would be great to have a pic where you see more of... Mar 22 2019, 07:35 AM Marek Bumped
Come on guys show some pics :-) of your b... Sep 12 2019, 01:36 PM
burton73
Can I get it in non-polished?
If you send it ou... Oct 28 2018, 09:41 PM BuddyV
Can I get it in non-polished?
If you send it o... Oct 28 2018, 10:53 PM Chi-town
Can I get it in non-polished?
If you send it o... Oct 28 2018, 11:31 PM Marek Hi Guys
I will post more pics asap from the inst... Oct 29 2018, 01:52 AM Chi-town Silver painted works :D Oct 29 2018, 10:18 AM ValcoOscar FOR ME...I like the last image of Post #1...weld i... Oct 29 2018, 10:38 AM mb911
FOR ME...I like the last image of Post #1...weld ... Nov 20 2018, 04:38 PM Marek Hi Oscar the weld in trim is included,
Marek
... Nov 20 2018, 05:00 PM ValcoOscar
Hi Oscar the weld in trim is included,
Marek
[... Nov 20 2018, 05:20 PM Marek Sure no problem just drop me a mail when you are r... Nov 20 2018, 05:23 PM rgalla9146
FOR ME...I like the last image of Post #1...weld ... Nov 20 2018, 09:36 PM Marek Sorry guys , forgot that the boys in the shop had ... Nov 5 2018, 01:01 PM Marek Silver painted version , tested and on stock
The... Nov 19 2018, 02:54 PM ValcoOscar
[quote name='ValcoOscar' post='2667239' date='Nov... Nov 20 2018, 08:00 PM Marek Sorry to California you should expect UP to 4 week... Nov 20 2018, 05:43 PM larryM long time back, Martin Baker was making & sell... Nov 22 2018, 11:26 PM johnvan8 @Marek : are there any unwanted consequences to re... Nov 23 2018, 09:47 AM pdlightning
[b]@[url=http://www.914world.com/bbs2/index.php?s... Mar 22 2019, 10:18 AM 914forme I'll be in for one with the weld on ring trim.... Nov 24 2018, 09:07 AM Marek BUMP
But I am mostly interested in any feedback :... Jan 9 2019, 11:03 AM totle Nice looking kit Jan 9 2019, 04:57 PM Marek 3 more kits in the mail to US :-) Thanks Mar 11 2019, 03:47 AM Niclas_Swe Would be great to have a pic where you see more of... Mar 22 2019, 07:35 AM Marek Bumped
Come on guys show some pics :-) of your b... Sep 12 2019, 01:36 PM |
11 User(s) are reading this topic (11 Guests and 0 Anonymous Users)
0 Members:

|
Lo-Fi Version | Time is now: 8th February 2025 - 09:51 AM |
Invision Power Board
v9.1.4 © 2025 IPS, Inc.