|
|

|
Porsche, and the Porsche crest are registered trademarks of Dr. Ing. h.c. F. Porsche AG.
This site is not affiliated with Porsche in any way. Its only purpose is to provide an online forum for car enthusiasts. All other trademarks are property of their respective owners. |
|
|
| pencap914 |
 Jun 18 2020, 02:21 PM Jun 18 2020, 02:21 PM
Post
#1
|
|
Member   Group: Members Posts: 77 Joined: 16-April 06 Member No.: 5,872 Region Association: Northern California |
Hi all,
Picked up project car about 2 weeks ago. I'm very excited to get started on this build, I'll try to document and share my progress as I go. I originally created a profile here at 914World back in 2006 when I was in High school, and had bought a 74 914 as my first car for $1200. It was a great first car, I had a lot of fun fixing it up while using it as my daily. When I went off to college, I sold the car, but felt like I had unfinished business to do. Recently I started lurking here again looking to get back into a project 914 to hopefully take the car where I wanted to, but didn't have the funds, skills, or space to do so. I posted a WTB ad, and was contacted by a member here who had a good start to a project I plan on finishing (Thanks Montreal914!) My plan is to build my dream 914 that I absolutely drooled over when I was in High School. I've always loved the GT look, so my plan is to basically create as close to a GT clone as my budget will allow. Steel GT flares, 5-lug Fuch's (or replicas...) and a tastefully somewhat period correct interior. The car I recently purchased did include a freshly rebuilt 2.0 4cyl engine, so I need to make a decision on if I would want to run that engine for a while, and save my pennies to slowly build a 2.2, 2.4 or 2.7 flat 6 then do a swap later down the road. I'm happy to see the 914 community thriving. Back in 2004 when I first bought the 914, Porsche snobs seemed to turn their nose at them which made them affordable enough for a high-school kid to own one. It seems like the 914 is getting more recognition in the collector community, so I'm happy I picked one up before they become too out of my price range! I'll post some progress photos tonight and general status of the car tonight after work, but here's a few shots of the day I unloaded it off the trailer. Cheers, pencap914 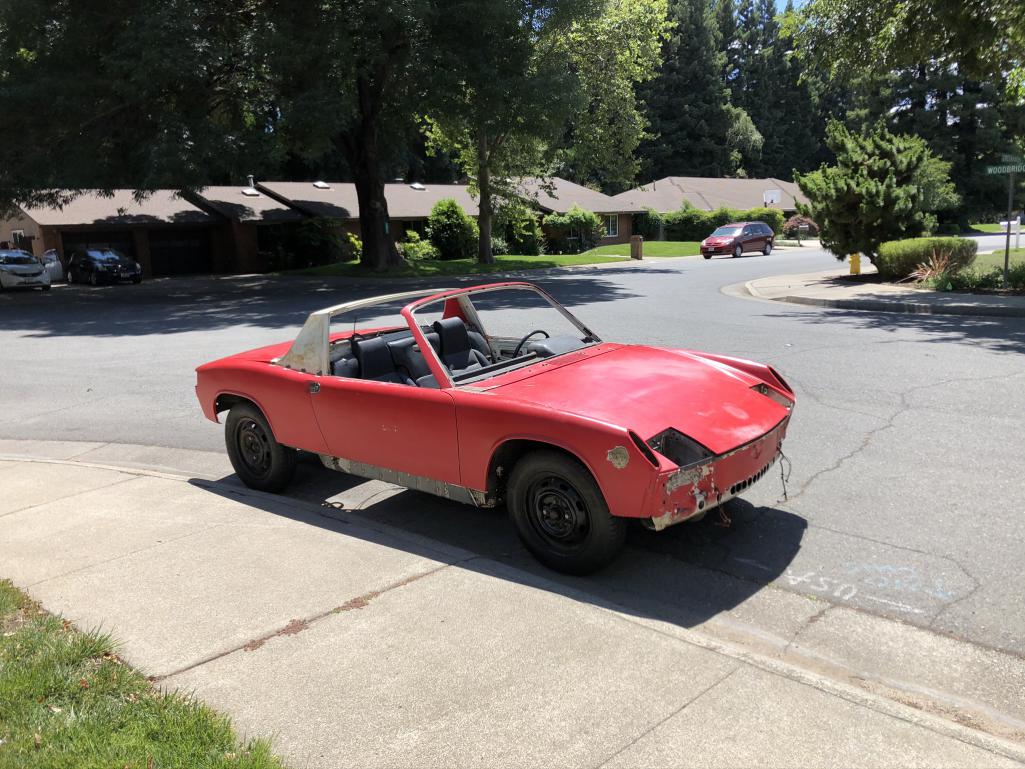 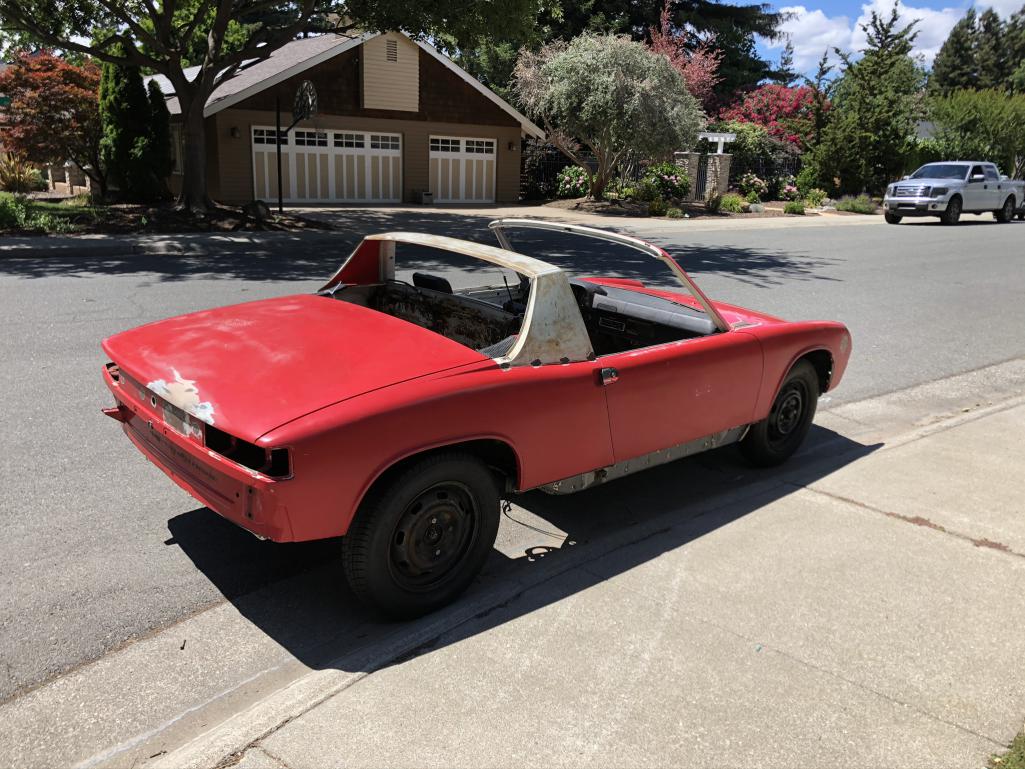 |
  |
Replies
| pencap914 |
 Jan 5 2021, 01:37 PM Jan 5 2021, 01:37 PM
Post
#2
|
|
Member   Group: Members Posts: 77 Joined: 16-April 06 Member No.: 5,872 Region Association: Northern California |
|
| Luke M |
 Mar 24 2021, 07:17 AM Mar 24 2021, 07:17 AM
Post
#3
|
|
Senior Member    Group: Members Posts: 1,394 Joined: 8-February 05 From: WNY Member No.: 3,574 Region Association: North East States 
|
Almost finished with the flat plate that I'll weld in between the two suspension pivot points to mount the oil cooler and perhaps add some rigidity. Found someone in town that has a dimple die set. Wish I squeezed a few more holes to keep things light as possible... 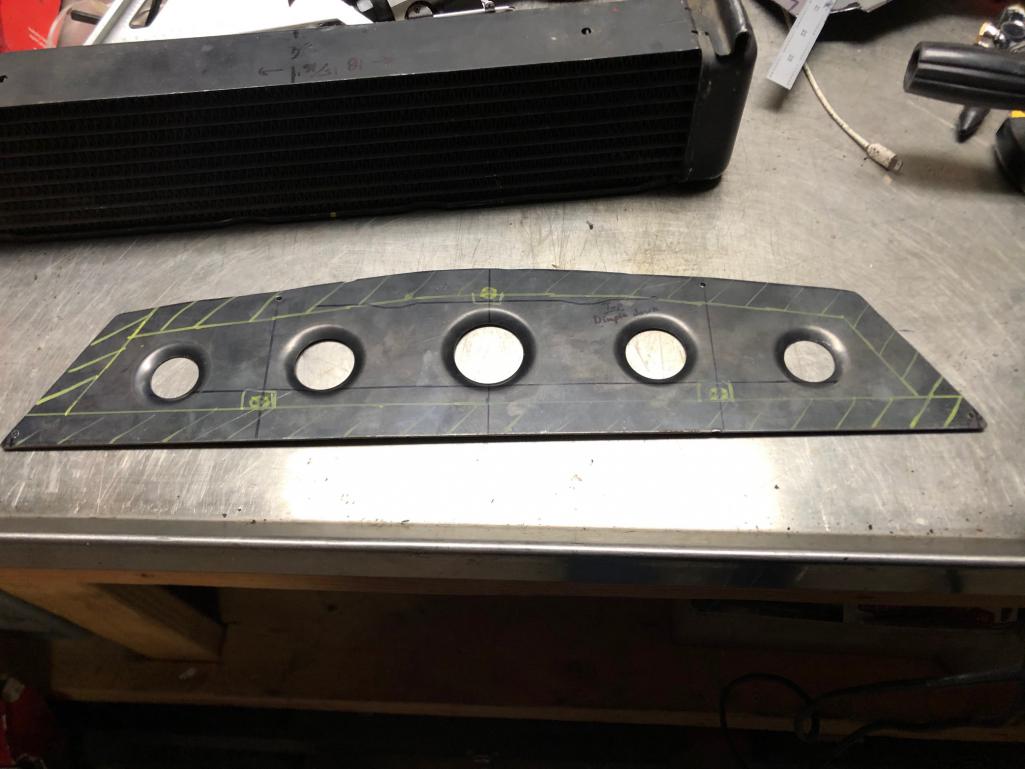 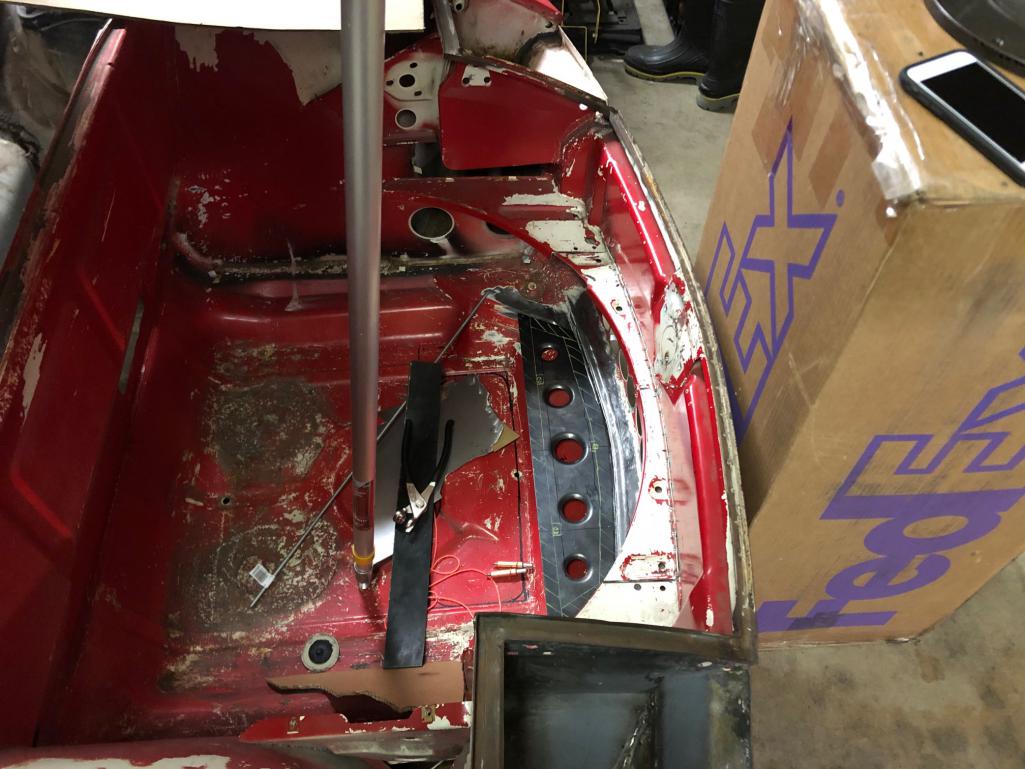 I like this approach to the front cooler mount/reinforcement. Anymore pics you could add/share? What was the steel thickness used for this? Keep up the the great work. |
| pencap914 |
 May 23 2021, 03:18 PM May 23 2021, 03:18 PM
Post
#4
|
|
Member   Group: Members Posts: 77 Joined: 16-April 06 Member No.: 5,872 Region Association: Northern California |
[/quote]
I like this approach to the front cooler mount/reinforcement. Anymore pics you could add/share? What was the steel thickness used for this? Keep up the the great work. [/quote] The main plate with the dimples is 14 gauge steel, which I'll admit seems overkill for this application, but the price was right (free scrap!). I welded a few M6 nuts on the bottom of the plate for retaining clips for the oil cooler. Then welded a 3/4" -1/16" wall square tube between the two suspension plates set this 14 gauge steel plate on top. Hopefully, will add some rigidity to the front suspension pickup points, but probably nothing really noticeable. It took me a while to get the shape correct for the side walls of the duct, as you can see its a pretty complicated shape. A pin contour gage and using CAD (Cardboard Aided Design...) came in handy for this. I removed the upper portion of the steel that was spot welded to the front of the car, just under where the hood latch mechanism lives, welded a few M6 nuts to the bottom of it to secure the top of the duct, which I plan on fabricating out of aluminum. Seen here is the extra holes punched in the front for air intake: 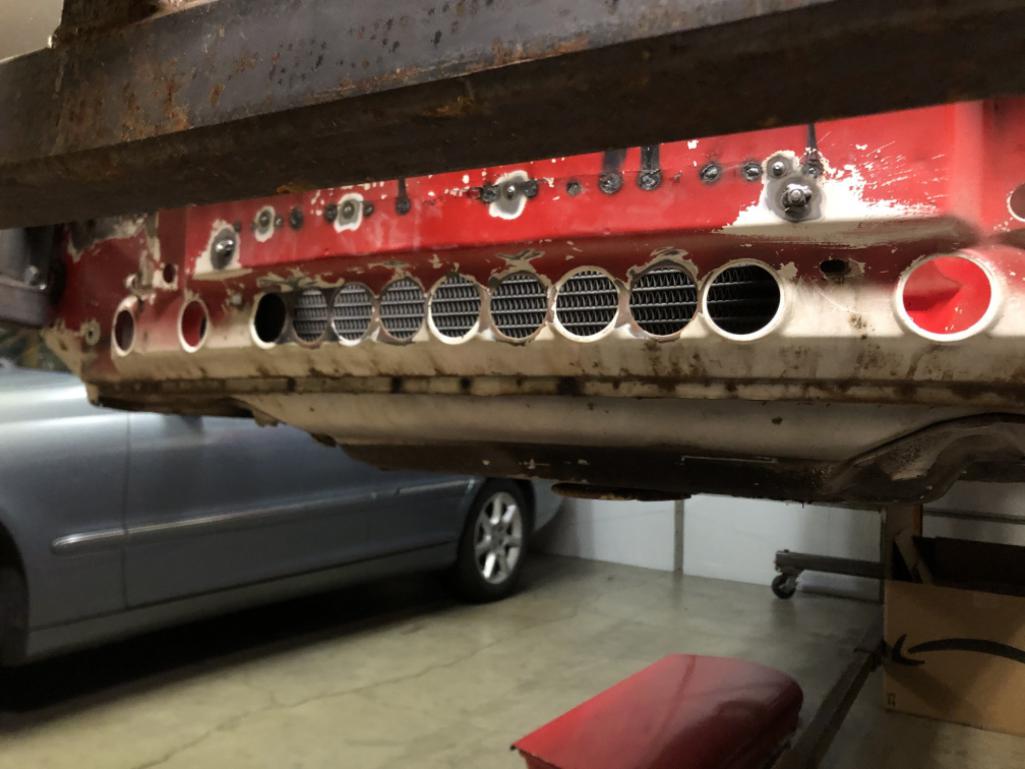 Oil cooler, rubber 1/8" rubber pad and sidewalls to direct airflow: 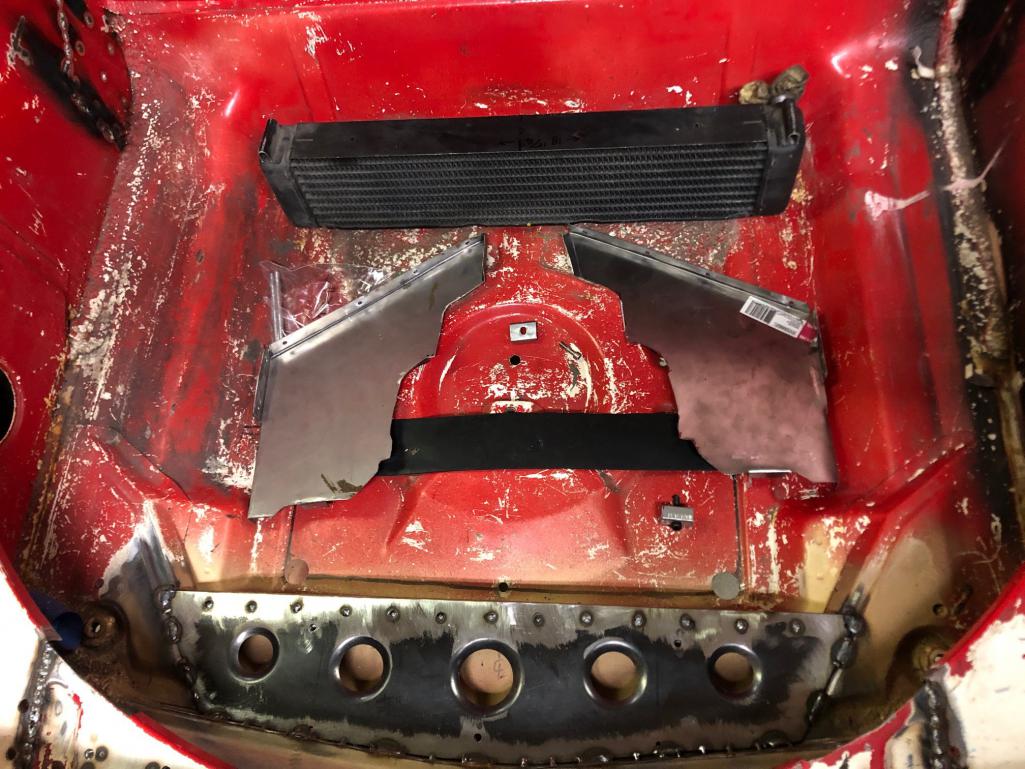 And how it sits in the car: 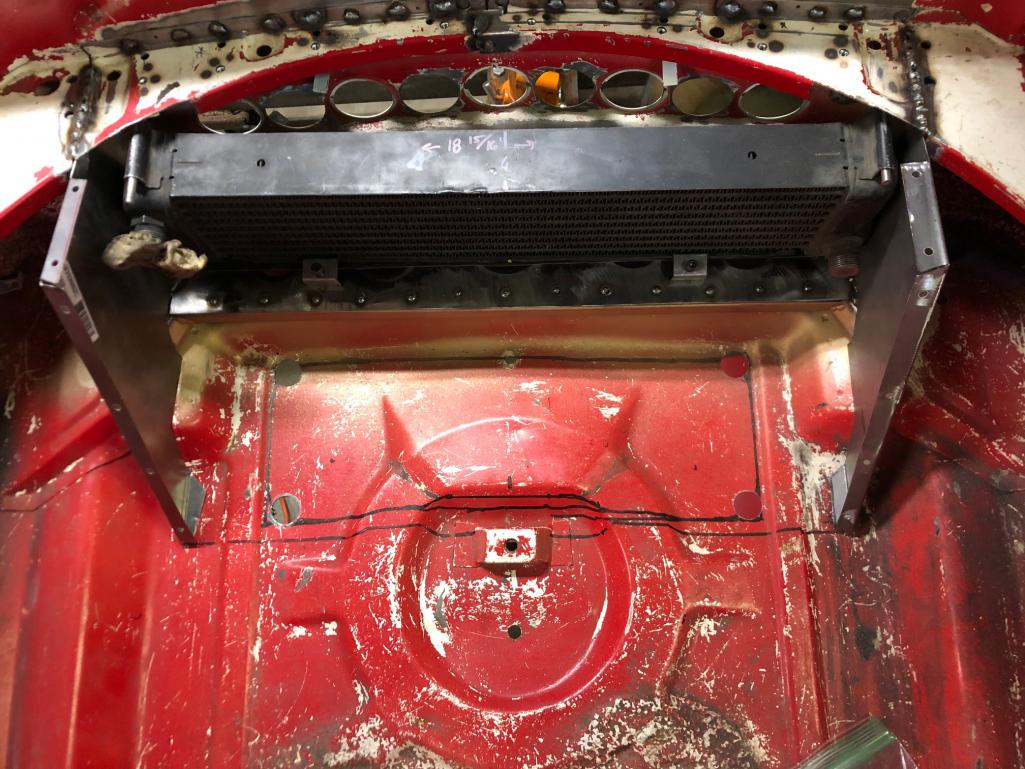 Top left you can see a M6 all-thread to secure the top, and bottom center of the photo one of my clips to secure the bottom of the oil cooler. 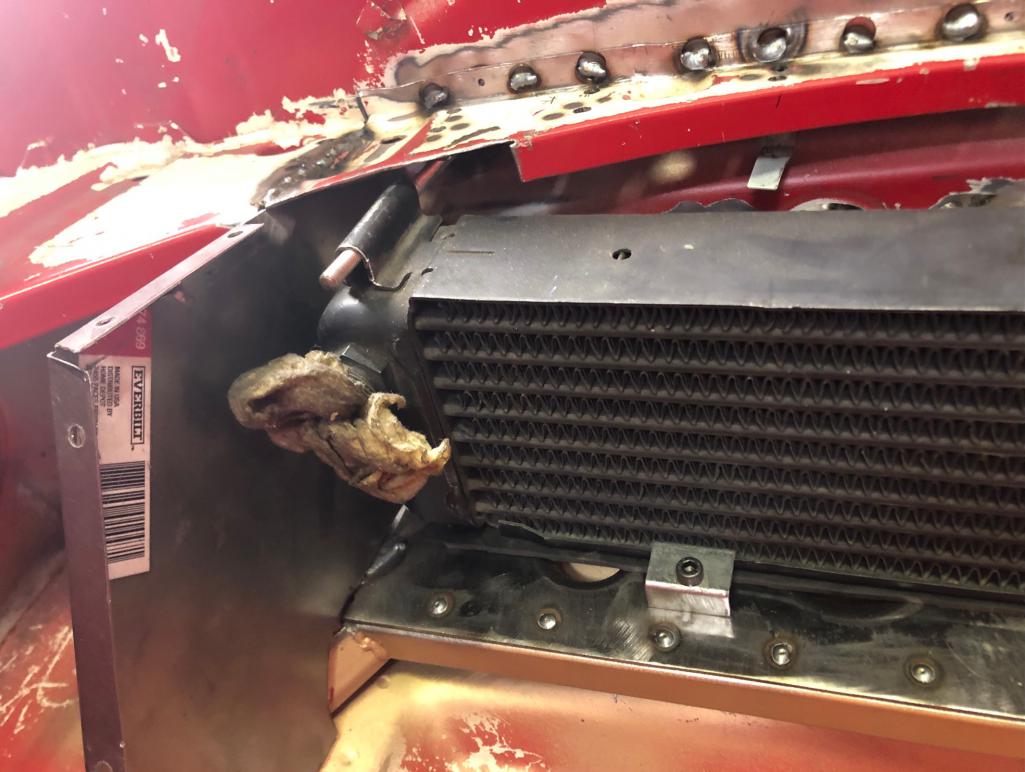 |
Posts in this topic
 pencap914 My '74 Budget GT Tribute build Jun 18 2020, 02:21 PM
 cuddy_k Welcome back! Excited to see how your build pr... Jun 18 2020, 02:31 PM
 ValcoOscar Great @pencap914
What a great decision to jum... Jun 18 2020, 02:41 PM
 Cairo94507 :wttc: Welcome back to the fold. You will have a ... Jun 18 2020, 03:32 PM
 pencap914 Previous to the last owner, the rear floor pans, h... Jun 19 2020, 12:05 PM
 Nojoah Seems like a good car to start your build. More pi... Jun 19 2020, 03:11 PM
 pencap914 Summer is the busy season for work, so I haven... Oct 5 2020, 08:54 PM
 pencap914 RE: My '74 Budget GT Tribute build Oct 5 2020, 08:55 PM
 pencap914 RE: My '74 Budget GT Tribute build Oct 5 2020, 08:55 PM
 pencap914 RE: My '74 Budget GT Tribute build Oct 5 2020, 08:57 PM
 pencap914 Next move: Steel Flare installation :-)
Oct 5 2020, 09:04 PM
 JeffBowlsby Nevermind, carry on. Oct 5 2020, 09:10 PM
 pencap914 Made some progress on adding the flares. Still a b... Nov 17 2020, 11:16 PM
 seanpaulmc Sweet work!
Not looking budget to me. What s... Nov 18 2020, 06:00 AM

 pencap914
Sweet work!
Not looking budget to me. What ... Nov 18 2020, 04:50 PM

 seanpaulmc
[quote name='seanpaulmc' post='2867509' date='Nov... Nov 18 2020, 06:41 PM
 mb911 Looks great so far. Let me know if I can help with... Nov 18 2020, 06:59 AM

 pencap914
Looks great so far. Let me know if I can help wit... Nov 18 2020, 07:13 PM

 mb911
Looks great so far. Let me know if I can help wi... Nov 18 2020, 07:16 PM
 rgalla9146 Your welding skills are just fine if the patch und... Nov 18 2020, 07:19 AM
 930cabman Great looking work so far, I missed your favorite ... Jan 5 2021, 06:11 PM
 Montreal914 I am seeing this for the first time and am very ha... Jan 6 2021, 09:59 AM

 pencap914
BTW, I think I might recognize that tall FedEx ... Jan 6 2021, 10:19 AM
 pencap914 Update:
So I bought this car knowing the tub was ... Mar 14 2021, 10:29 PM
 mate914 Most all of the rear pillar strength comes from be... Mar 15 2021, 07:27 AM

 pencap914
Most all of the rear pillar strength comes from b... Mar 15 2021, 10:15 AM
 pencap914 Well, finding more issues with some of the previou... Mar 23 2021, 11:04 PM

 mate914
Well, finding more issues with some of the previo... Mar 24 2021, 09:02 AM
 pencap914 Well before I weld on the motor mount for the 911 ... May 23 2021, 03:35 PM
 bkrantz I fixed some lap joints the PO left on my car, inc... May 23 2021, 08:36 PM

 pencap914
I fixed some lap joints the PO left on my car, in... May 24 2021, 07:01 PM
 gereed75 Where possible, you might consider the “cut and ... May 24 2021, 06:06 AM

 pencap914
Where possible, you might consider the “cut and... May 24 2021, 07:11 PM
 nditiz1 I too have the same 3/8 gap at the bottom of my ma... May 24 2021, 07:31 PM
 pencap914 Made some progress this summer:
Clutch tube repai... Sep 2 2021, 10:34 PM
 pencap914 I had a few distractions this summer... Not to men... Sep 2 2021, 10:51 PM
 pencap914 Installed the rear suspension stiffening kit: Was ... Sep 2 2021, 11:13 PM
 pencap914 So now I have a problem to solve: What to do about... Sep 2 2021, 11:29 PM
 Cairo94507 :popcorn: :beer2: Sep 3 2021, 06:30 AM
 Montreal914 Glad to see all of this progress being done on the... Sep 3 2021, 12:14 PM
 pencap914 Thanks Eric! Yeah its been a great project for... Sep 3 2021, 09:41 PM
 pencap914 Figuring out the oil system for the 2.7. Was on th... Nov 7 2021, 10:22 AM
 pencap914 Also working on restoring the fiberglass engine sh... Nov 7 2021, 10:26 AM

 roundtwo [quote name='pencap914' date='Nov 7 20... Oct 25 2022, 11:19 AM
 tscrihfield Really like where this thread is headed! :po... Nov 7 2021, 08:18 PM
 pencap914 Got the 4cyl motor mount removed yesterday! Wa... Nov 12 2021, 02:16 PM
 Retroracer Thx for posting progress on this build!
Lots... Nov 13 2021, 04:00 AM
 Luke M Your car is coming along well. I'm at the poin... Nov 13 2021, 08:57 AM
 Montreal914 Great progress Glenn!
I really like the crafts... Nov 13 2021, 12:22 PM
 pencap914 Tony-
Just found your handle on IG. Holy cow that... Nov 15 2021, 10:38 AM
 Luke M I've been following Ben's thread on the oi... Nov 15 2021, 12:05 PM

 pencap914
I've been following Ben's thread on the o... Nov 15 2021, 12:24 PM
 Retroracer re: Just found your handle on IG. Holy cow that... Nov 15 2021, 04:16 PM
 pencap914 Thanks Tony! I should be able to work from tha... Nov 16 2021, 02:48 PM
 Luke M Question on the SS oil lines going down the driver... Nov 18 2021, 10:24 AM

 pencap914
Question on the SS oil lines going down the drive... Nov 30 2021, 05:30 PM

 Luke M
Question on the SS oil lines going down the driv... Dec 1 2021, 05:49 PM
 pencap914 Slowly pecking away at the tub, getting distracted... Apr 7 2022, 01:38 PM
 roundtwo Inspirational metal work! Way to solder on th... Apr 7 2022, 05:06 PM
 pencap914 Well progress has been slow this spring/summer. Ha... Sep 18 2022, 10:14 PM
 pencap914 KTM engine mid-rebuild. Hopefully it will get some... Sep 18 2022, 10:27 PM
 Graydingo Great thread! Thanks for documenting the 4cyl ... Sep 20 2022, 08:34 AM
 pencap914 Finally after a year of avoiding it I decided to o... Sep 29 2022, 08:48 PM
 Montreal914 I like the approach you are using. Seems like you ... Sep 29 2022, 09:29 PM
 Montreal914 This is what I am referring to... <_<
Th... Sep 29 2022, 09:37 PM
 pencap914 @montreal914
Thanks for sharing that. Yeah I... Sep 29 2022, 11:23 PM
 pencap914 RE: My '74 Budget GT Tribute build Sep 29 2022, 11:24 PM
 pencap914 Made some more progress on the cowl repair:
Oct 23 2022, 08:42 PM
 pencap914 RE: My '74 Budget GT Tribute build Oct 23 2022, 08:45 PM
 pencap914 RE: My '74 Budget GT Tribute build Oct 23 2022, 08:46 PM
 Graydingo Inspiring metal work! Oct 24 2022, 06:15 AM
 Cairo94507 That is looking very, very good. :beer2: Oct 24 2022, 06:42 AM
 Retroracer Nice skills there! Keep the posts coming....
... Oct 24 2022, 02:55 PM
 pencap914 Todd,
I used a PPG 2K paint in a "SprayMax... Oct 27 2022, 10:12 AM
 pencap914 I know its been...*looks at watch* 10 months since... Aug 7 2023, 10:01 PM
 pencap914 Made a patch panel inside the passenger side frunk... Aug 7 2023, 10:18 PM
 TRS63 Slowly but surely you will be driving it ! Tha... Aug 8 2023, 02:47 AM
 Montreal914 Very nice progress! Both of these cowl repairs... Aug 8 2023, 07:37 AM

 pencap914
Very nice progress! Both of these cowl repair... Aug 8 2023, 09:58 PM
 pencap914 Car is back on the rotisserie to take care of a fe... Dec 6 2023, 10:07 PM
 pencap914 Well this idea backfired a bit...I painted the wel... Dec 13 2023, 05:21 PM
 TheRuttmeister On clean dry air:
There are lots of options for i... Dec 13 2023, 07:12 PM
 Ishley I paint the inside of both panels… then use a sh... Dec 19 2023, 09:18 PM
 rhodyguy What is the continuous duty cycle pressure for you... Dec 22 2023, 09:35 AM

 pencap914
What is the continuous duty cycle pressure for yo... Mar 11 2024, 02:50 PM
 pencap914 Finally got the shell dropped off at the media bla... Mar 11 2024, 02:58 PM
 mepstein I’m using lizard skin. I’m not sure it’s the... Mar 11 2024, 04:22 PM
 pencap914 While the car is off to media blast/epoxy primer, ... Apr 24 2024, 09:55 AM
 pencap914 Some overdue progress photos from summer:
Biggest... Nov 22 2024, 06:05 PM
 Cairo94507 Excellent progress. It just takes time but you wi... Nov 22 2024, 06:40 PM
 Montreal914 Very nice progress!! :cheer:
Did you re... Nov 23 2024, 10:09 AM
  |
17 User(s) are reading this topic (17 Guests and 0 Anonymous Users)
0 Members:

|
Lo-Fi Version | Time is now: 24th November 2024 - 11:27 AM |
Invision Power Board
v9.1.4 © 2024 IPS, Inc.


