|
|

|
Porsche, and the Porsche crest are registered trademarks of Dr. Ing. h.c. F. Porsche AG.
This site is not affiliated with Porsche in any way. Its only purpose is to provide an online forum for car enthusiasts. All other trademarks are property of their respective owners. |
|
|
| Doug Leggins |
 Oct 4 2005, 08:55 PM Oct 4 2005, 08:55 PM
Post
#1
|
|
Senior Member    Group: Benefactors Posts: 1,358 Joined: 6-February 03 From: Nashville, Indiana Member No.: 261 Region Association: None 
 |
The teener kicked my ass tonight! I simply wore myself out trying to get the rear trunk torsion bar behind the trunk roller.
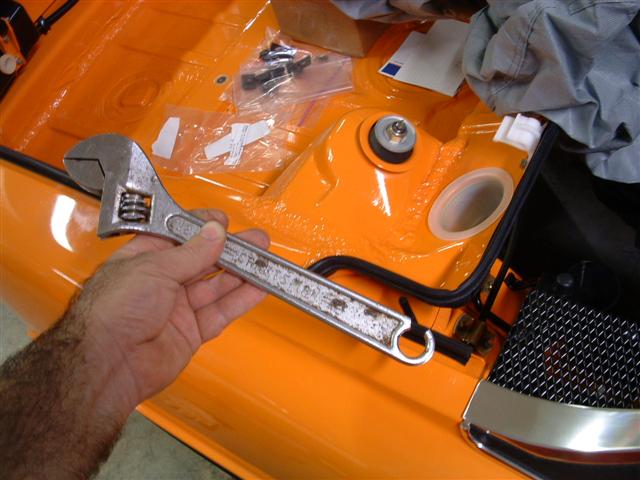
I searched for as much info as I cold find before beginning this task. I modified my 12" adjustable wrench as mentioned on other threads on this topic. This tool proved to be a very good lever for pushing the torsion bar back. I could get the torsion bar pushed/twisted back well enough but I could not get it around the hinge roller/pin. I tried several times but could not find a way to get the roller behind the pin on the hinge. I tried to remove the hinge then hold the torsion bar back as far as I could and then reinstall the hinge -This is the task the wore me out! No matter how or what I tried I could not find a way to get the bar behind the roller. Anyone know the secret/technique to get the torsion bar in place? Here is a pic of the wrench with a notch cut out on the end. Attached image(s) 
|
  |
Replies
| jrmdir |
 Aug 10 2021, 08:57 AM Aug 10 2021, 08:57 AM
Post
#2
|
|
Member   Group: Members Posts: 224 Joined: 13-May 21 From: Central Ohio Member No.: 25,544 Region Association: Upper MidWest 
|
Older thread but Doug still deserves kudos for the write up and photos of the sectioned crescent wrench technique. I tried all day Saturday (and busted my a##) with a set up that I thought would work using 1/2" square steel tubing for leverage but couldn't figure out how to hold the spring up in order to get another "bite" on the end. On Sunday, a $9 Harbor Freight wrench and about 7 Dremel disks later and I was able to finish the job in about 5 min. Fantastic!
Thanks again Doug! Ron  |
| NARP74 |
 Aug 10 2021, 09:58 AM Aug 10 2021, 09:58 AM
Post
#3
|
|
Senior Member    Group: Members Posts: 1,300 Joined: 29-July 20 From: Colorado, USA, Earth Member No.: 24,549 Region Association: Rocky Mountains |
Older thread but Doug still deserves kudos for the write up and photos of the sectioned crescent wrench technique. I tried all day Saturday (and busted my a##) with a set up that I thought would work using 1/2" square steel tubing for leverage but couldn't figure out how to hold the spring up in order to get another "bite" on the end. On Sunday, a $9 Harbor Freight wrench and about 7 Dremel disks later and I was able to finish the job in about 5 min. Fantastic! Thanks again Doug! Ron  How did you determine the location of the JWest brackets? I have them and the tool to do this job. Was the engine installed when you did it? |
| ClayPerrine |
 Aug 10 2021, 01:21 PM Aug 10 2021, 01:21 PM
Post
#4
|
|
Life's been good to me so far.....                Group: Admin Posts: 15,950 Joined: 11-September 03 From: Hurst, TX. Member No.: 1,143 Region Association: NineFourteenerVille 
|
How did you determine the location of the JWest brackets? I have them and the tool to do this job. Was the engine installed when you did it? I bolt them to the hinges, and put the lid on the car. Then I mark where the brackets are on the walls. Then I take the lid back off, and line up the hinges with the marks I made. Once they are on the body, I can adjust them up and down to make the decklid fit perfect. Clay |
Posts in this topic
 Doug Leggins I need help with rear trunk torsion bar Oct 4 2005, 08:55 PM
 Doug Leggins Trying to bet the black torsion bar behind the bra... Oct 4 2005, 09:03 PM
 Rand Taking mine OUT was a careful process... putting o... Oct 4 2005, 09:07 PM
 Joe Sharp Doug: I take my 1/4 screw driver extention and a d... Oct 4 2005, 10:06 PM
 Air_Cooled_Nut Though I can't help, this topic is perfect bec... Oct 4 2005, 10:19 PM
 olav To get that puppy on you need to:
Preload torsion... Oct 4 2005, 10:51 PM
 Doug Leggins I thought about the shock kits, even had it on the... Oct 4 2005, 10:53 PM
 olav There's a "special" tool to do this with and t... Oct 4 2005, 10:59 PM
 Doug Leggins


