|
|

|
Porsche, and the Porsche crest are registered trademarks of Dr. Ing. h.c. F. Porsche AG.
This site is not affiliated with Porsche in any way. Its only purpose is to provide an online forum for car enthusiasts. All other trademarks are property of their respective owners. |
|
|
| 76-914 |
 Jan 26 2022, 10:07 PM Jan 26 2022, 10:07 PM
Post
#1
|
|
Repeat Offender & Resident Subaru Antagonist           Group: Members Posts: 13,634 Joined: 23-January 09 From: Temecula, CA Member No.: 9,964 Region Association: Southern California 
|
In 2009 I bought this '76 from The LeMay Museum. It had been donated to the museum by one of their members. They in turn decided to sell it and use the proceeds towards other projects they had in their inventory. Google them and you'll see it would not have been a good fit.
Upon delivery I discovered there were areas where rust had staked it's claim. The sail panels had, as I now know, the usual rust; the battery tray and the area immediately behind it plus a small area on top of the long beneath; and finally a few spots along the front rain channel. To say I was distraught would be an understatement. Thirteen years and 2 more 914's later I know it was a good deal. Did I mention I paid $1600 for it delivered. The longs were solid as was the rest of the car. I removed the wiring mess for the car alarm & CB radio then reconnected all the wires to their original terminals. Next I replaced the Fuel Pump relay, added gas. After a turn of the key it coughed, farted and started. That's pretty much the Reader's Digest version but little more was done than that. I hadn't worked on any cars since I was a teen and none of those needed rust repair. However, after building an airplane years earlier, I had some experience with aluminum and fiberglass. Do you see where this is going? I thought it time that I go back and do a proper repair job on the old girl. Don't get me wrong. I thought that the aluminum angle patch pieces on the rain channel, the fiberglass in the Hell Hole and Bondo on the sail panels was "good enough"! Looking back, I didn't know Shit from Apple Butter. It has remained as such but Since both of my Subaru conversions are basically finished, sans a paint job on the '73, I decided to go back and correct my "Get're done" repairs. I bought the rail repair pieces from 914rubber which in turn gave me an excuse to buy a metal shrinker/stretcher. Bore yourself if you will, as there are more interesting and detailed metal restorations going on here, but I thought I'd better post these improvements for the next owner. 1 of 4 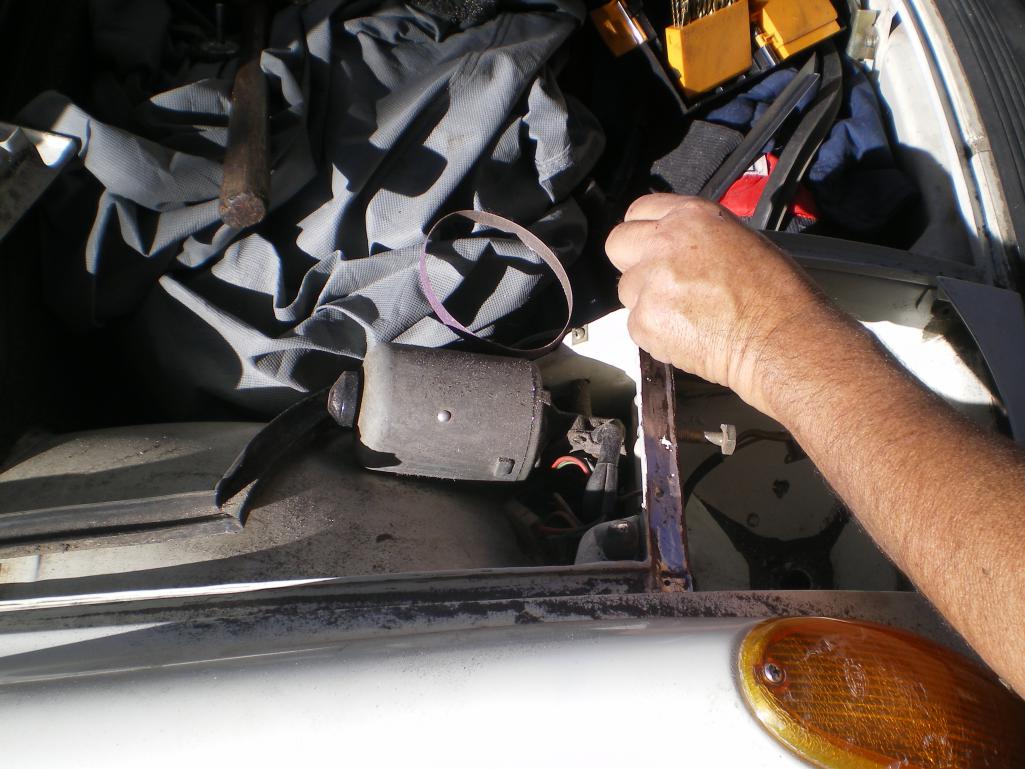 2 of 4 and I just noticed I need to resize my camera so bear with me. The next update will have more pics per post. 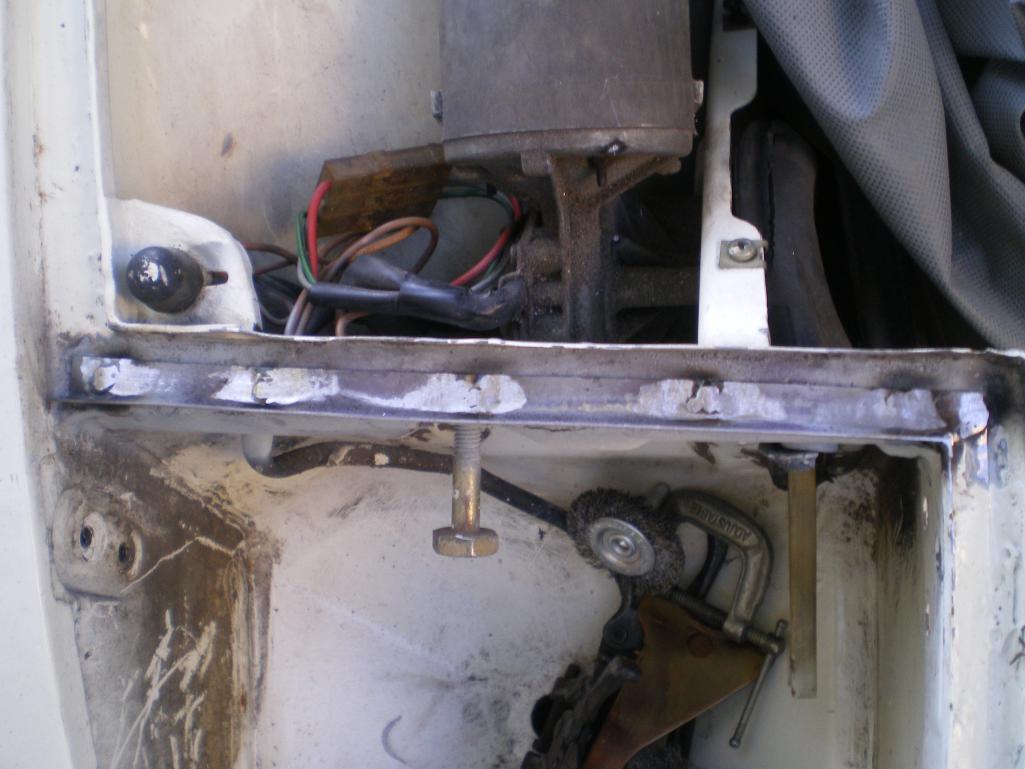 |
  |
Replies
| 76-914 |
 May 13 2022, 10:28 AM May 13 2022, 10:28 AM
Post
#2
|
|
Repeat Offender & Resident Subaru Antagonist           Group: Members Posts: 13,634 Joined: 23-January 09 From: Temecula, CA Member No.: 9,964 Region Association: Southern California 
|
Six weeks since an update but I have a valid excuse or two. I've always lived by this motto; In life you either have reasons or results. So here are my reasons for the lapse in posting. My wife and I went to Europe for what was to be 15 days. After one week we were quarantined in Frankfort for the next 10 days with Covid at the downtown Hilton Hotel. Three thousand Euro's later we were allowed to depart Germany and return home. I was weaker than a politicians promise during elections but finally got back to the metal repairs 3 days ago. I ended up repairing one section twice because the metal was too thin. I discovered that out when welding in a patch piece. (IMG:style_emoticons/default/headbang.gif) I still need to weld in the right rear jack point panel, a piece on the bottom of the long and the new battery tray/stand. I'm sure there will be a few pin holes to weld up after grinding down the welds but in my world that's to be expected. (IMG:style_emoticons/default/hissyfit.gif)
This was my first attempt at repairing the panel behind the battery tray. After I ground down the welds I discovered that the metal was too thin in that small section midway up the left side where it juts out. The reason that I only replaced a small area (that small jutted out section) is because there are compound curvatures outside that which I wanted to avoid. (IMG:style_emoticons/default/slap.gif) The biggest repair piece was the easiest (where you see "BEND" written) to fab and replace. You can also see the the repair on the top of the long in this pic. I used 14ga there. 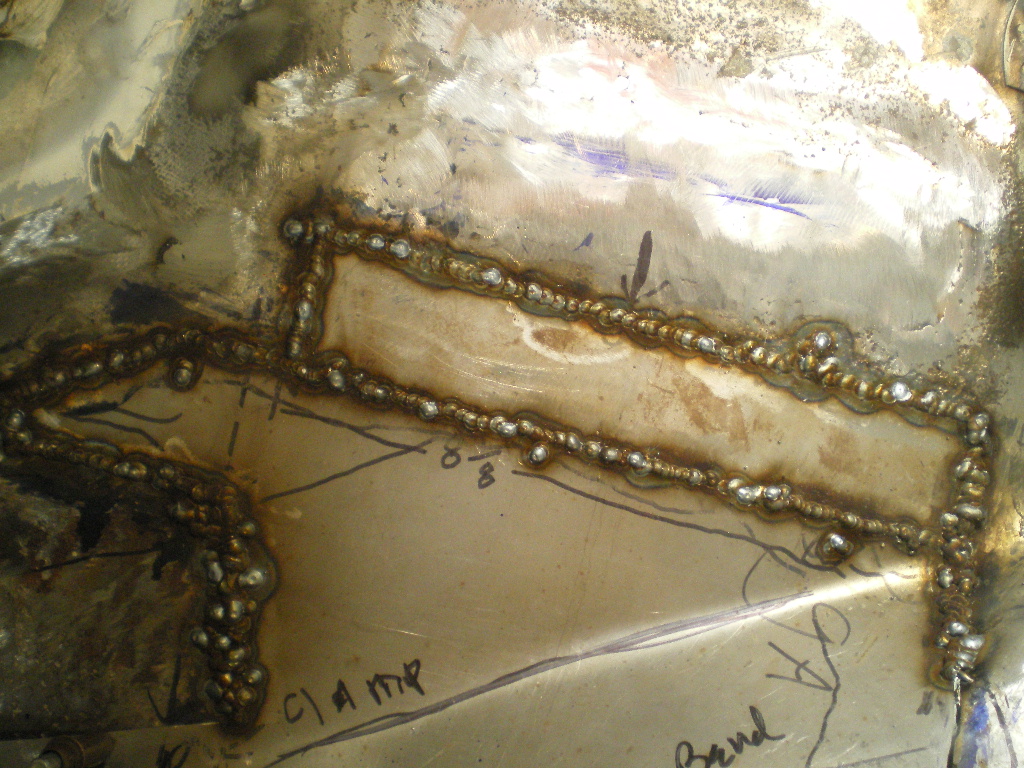 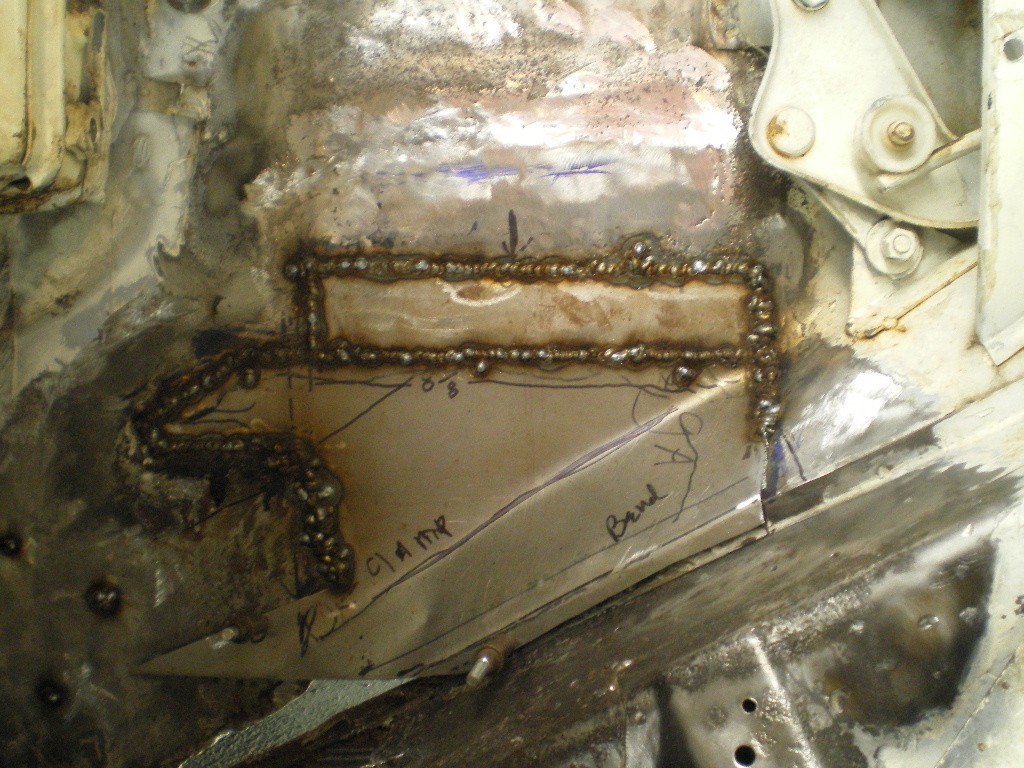 This is the section I cut out to correct the first attempt at a repair. Section 1&2 ended up being one piece with a bend. Section 3 was a PITA. It had 2 "S" bends and took a few extra cuss words to fit. 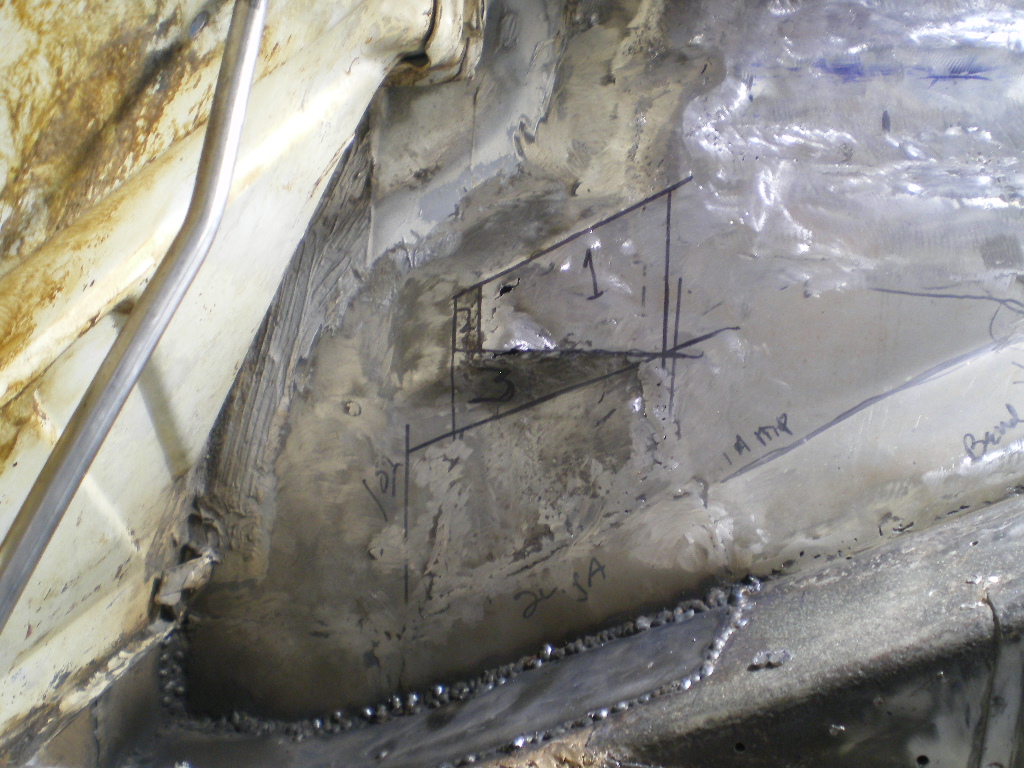 And finally the two pieces in place. Look closely at the bottom pic and you'll see the curvatures I spoke of. 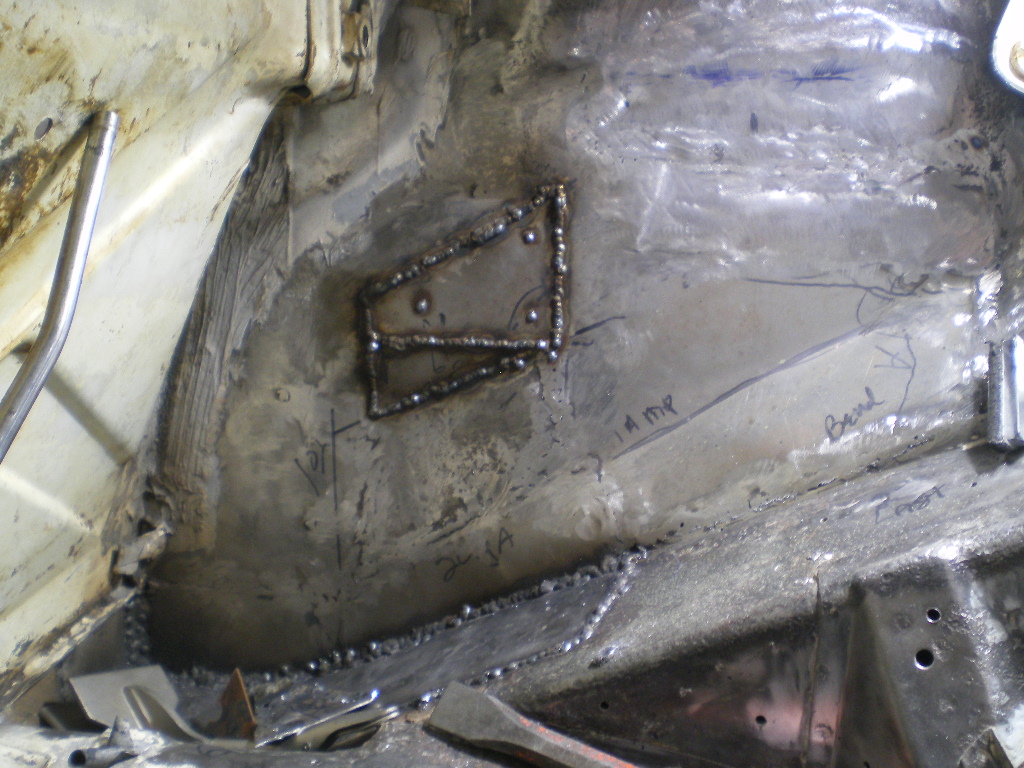  Attached image(s) 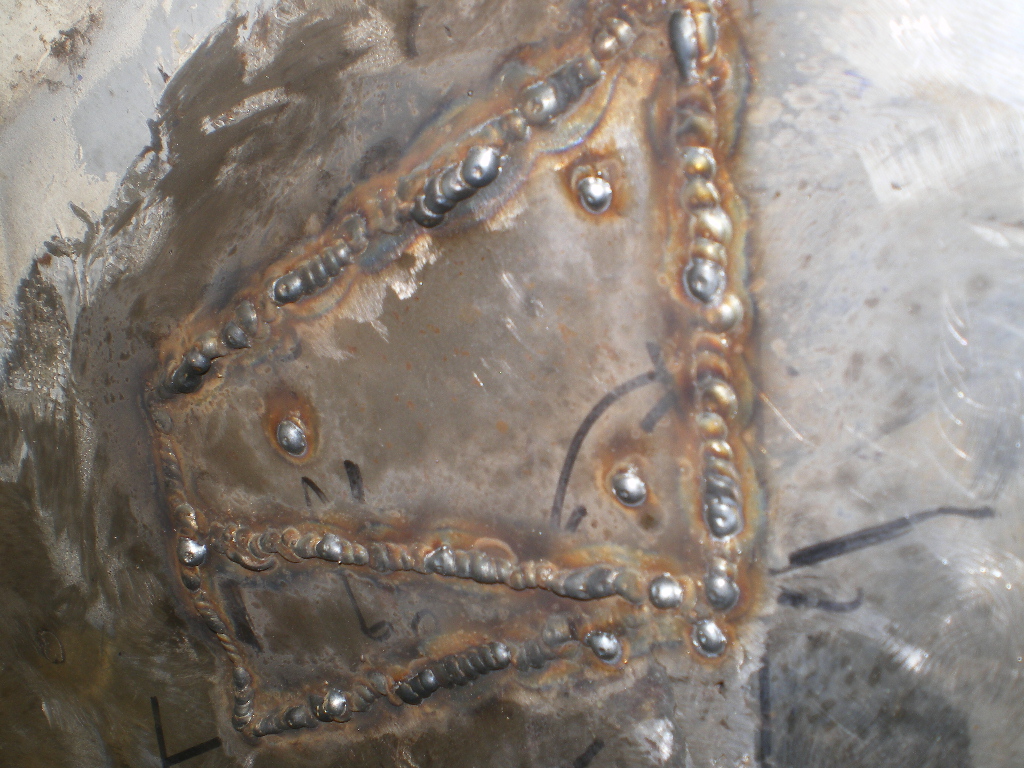
|
Posts in this topic
 76-914 The '76 - doing it right this time Jan 26 2022, 10:07 PM
 76-914
2 of 4
Jan 26 2022, 10:10 PM
 76-914 another angle from 2 of 4
3 of 4
Jan 26 2022, 10:14 PM
 76-914 This is one of the aluminum pieces I had riveted i... Jan 26 2022, 10:20 PM
 76-914 New toys!
Jan 26 2022, 10:23 PM
 76-914 On the operating table
Jan 26 2022, 10:25 PM
 Chris H. Really cool Kent. Was wondering when you'd ge... Jan 27 2022, 11:40 AM

 76-914
Really cool Kent. Was wondering when you'd g... Jan 27 2022, 08:16 PM
 rick 918-S :smash: :sawzall: :welder: Jan 27 2022, 11:48 AM
 Superhawk996 :trophy: Get Er' Done right! Jan 27 2022, 12:07 PM
 Mayne Nice work. I was just looking at those rail replac... Jan 27 2022, 04:53 PM

 76-914
Nice work. I was just looking at those rail repla... Jan 27 2022, 08:25 PM
 76-914 Trivia question: Who here knows where else the cha... Jan 27 2022, 08:32 PM

 rgalla9146
Trivia question: Who here knows where else the ch... Jan 27 2022, 09:07 PM

 76-914
Trivia question: Who here knows where else the c... Jan 28 2022, 10:15 PM
 rhodyguy This is the car I drove for the Rt66? I had no ide... Jan 28 2022, 08:30 AM

 76-914
This is the car I drove for the Rt66? I had no id... Jan 28 2022, 10:10 PM
 Root_Werks Keep the pics coming, looks great! Looks like... Jan 28 2022, 10:44 AM
 76-914 Moving forward - actually I started at the front a... Jan 28 2022, 09:54 PM
 76-914 Opps. Hit the wrong button but the previous pic wa... Jan 28 2022, 10:08 PM
 StarBear Yep- the pad goes under the jack; the carpet goes ... Jan 29 2022, 07:48 AM
 76-914 Well thank you for the compliments but it's ti... Jan 30 2022, 08:51 PM
 rick 918-S It is not attached. The factory used a butyl type ... Jan 31 2022, 06:44 AM
 76-914 Perfect Rick. Thank you very much. I know what I n... Jan 31 2022, 10:51 AM
 76-914 Thx to Rick's fast reply I was able to keep mo... Jan 31 2022, 08:35 PM
 76-914 Left side is done. God willing and the creeks don... Feb 1 2022, 10:31 PM
 76-914 Dang, that took longer than I thought. Now I know ... Feb 3 2022, 08:54 PM
 Chris H. Nice work Kent! Don't see any distortion ... Feb 4 2022, 08:24 AM
 76-914 Thx Chris but there is a little shrinkage at the w... Feb 5 2022, 06:46 PM
 76-914 I couldn't sleep thinking about those low spot... Feb 9 2022, 08:26 PM
 bkrantz OCD and 914--a dangerous combination. Ask me how ... Feb 9 2022, 08:45 PM

 76-914
OCD and 914--a dangerous combination. Ask me how... Feb 9 2022, 09:38 PM

 bkrantz
[quote name='bkrantz' post='2980797' date='Feb 9 ... Feb 10 2022, 12:16 PM
 Chris H. A negative PORSCHE side stripe would look really n... Feb 9 2022, 09:35 PM

 76-914
A negative PORSCHE side stripe would look really ... Feb 9 2022, 09:43 PM
 rick 918-S :agree: ditch the mirrors for stock. :welder: I... Feb 10 2022, 07:17 AM
 Chris H. The side stripe was a dealer option and comes in p... Feb 10 2022, 09:23 AM
 930cabman OCD and 914, how can those go together?
Great loo... Feb 12 2022, 06:59 AM
 76-914 Well thx for the vote of confidence. I'll do m... Feb 14 2022, 08:32 PM
 76-914 And I won't need to repair any of the rain cha... Feb 14 2022, 08:41 PM
 76-914 Continued with removing pieces before paint. The f... Feb 15 2022, 08:13 PM
 76-914 RE: The '76 - doing it right this time Feb 15 2022, 08:14 PM
 76-914 3 of the 4 attach points had cracks, tears or rust... Feb 17 2022, 08:40 PM
 76-914 One more item off my list.
Feb 18 2022, 07:45 PM
 rjames Any signs of your front clip being replaced earlie... Feb 18 2022, 09:45 PM

 76-914
Any signs of your front clip being replaced earli... Feb 19 2022, 09:57 AM
 76-914 First let me respond to @rjames question. No evi... Feb 23 2022, 10:48 PM
 Root_Werks You never really know what you have until you star... Feb 24 2022, 01:53 PM

 76-914
You never really know what you have until you sta... Feb 27 2022, 08:55 PM
 Mayne Looking really good, Kent! The Copperweld is i... Feb 28 2022, 07:37 AM
 Superhawk996 Really nice body work.
It’s pretty atrocious ... Feb 28 2022, 08:16 AM
 Chris H. Looks great Kent! That takes quite a bit of t... Mar 1 2022, 08:29 AM
 rhodyguy And Texan determination. Mar 2 2022, 03:07 PM
 FL000 Nice work Kent. Motivates me to get started on som... Mar 3 2022, 08:10 AM
 tygaboy Kent - REALLY excellent work! :smash: :wub: ... Mar 3 2022, 09:12 AM
 76-914
Looking really good, Kent! The Copperweld is ... Mar 3 2022, 12:11 PM
 76-914 Continuing down the Rabbit Hole I began the attack... Mar 24 2022, 09:13 PM
 76-914 A few pics of the Crime Scene:
Mar 24 2022, 09:16 PM
 Root_Werks Good progress! Wait until you get it all pain... Mar 25 2022, 12:43 PM

 76-914
Good progress! Wait until you get it all pai... Mar 25 2022, 02:28 PM
 autopro Yup, I remember welding in those areas, not a fun ... May 13 2022, 04:04 PM
 rhodyguy Nice work Kent. May 14 2022, 10:40 AM
 76-914 Thank you Pedro & Kevin. Here is the backside ... May 18 2022, 07:54 PM
 TRS63 Looking good!
Antoine May 19 2022, 12:03 AM
 76-914 I think that I'm finished with the rust repair... May 26 2022, 05:35 PM
 914_teener Nice metal work and MIG work Kent.
Looks like it... May 26 2022, 06:20 PM
 Root_Werks That is a ton of progress in a short time. Nice... May 26 2022, 07:55 PM
 76-914
Nice metal work and MIG work Kent.
Looks like it... May 26 2022, 09:25 PM
 76-914 Now that it's painted I can say the Hell Hole ... Jun 9 2022, 02:57 PM
 Chris H. Very nice work Kent! She'll be a real bea... Jun 9 2022, 04:44 PM

 76-914
Very nice work Kent! She'll be a real be... Jun 9 2022, 07:24 PM
 rhodyguy You're kickin' ass. Jun 10 2022, 10:44 AM

 76-914
You're kickin' ass.
More like I'm ge... Jun 12 2022, 09:56 AM
 76-914 I got one heater diverter valve cleaned up before ... Jun 15 2022, 08:29 PM
 76-914 The
'Long Awaited" fun part has begun. ... Jul 10 2022, 05:54 PM
 76-914 It seems as though I've been goofing off. Resu... Aug 15 2022, 04:55 PM
 76-914 This door took me a few hours to hang it so that t... Aug 15 2022, 05:10 PM
 FL000 Good progress Kent. IIRC humidity isn’t much of ... Aug 16 2022, 02:41 PM

 76-914
Good progress Kent. IIRC humidity isn’t much of... Aug 16 2022, 09:12 PM
 autopro Great progress, looks like you are close to shooti... Aug 16 2022, 08:56 PM

 76-914
Great progress, looks like you are close to shoot... Aug 16 2022, 09:15 PM
 bbrock Wow Kent! I completely missed your thread. L... Aug 16 2022, 09:05 PM

 76-914
Wow Kent! I completely missed your thread. ... Aug 16 2022, 09:20 PM

 bbrock
Wow Kent! I completely missed your thread. ... Aug 16 2022, 09:32 PM
 76-914 It's been a few weeks since I got anything acc... Sep 18 2022, 08:24 PM
 914forme I'm like the bare metal Kent I liking it a lot... Sep 18 2022, 09:01 PM

 76-914
I'm like the bare metal Kent I liking it a lo... Sep 21 2022, 04:59 PM
 bbrock So shiny! That's a lot of work there. Sep 18 2022, 10:02 PM

 76-914
So shiny! That's a lot of work there.
9... Sep 21 2022, 05:03 PM
 sb914 Clear coat … Sep 19 2022, 07:01 AM

 76-914
Clear coat …
I expected Carnauba Wax! :ro... Sep 21 2022, 05:06 PM
 rhodyguy OH MY! Sep 19 2022, 08:42 AM
 76-914 So I covered the naked lass whilst my senses were ... Sep 21 2022, 04:48 PM
 76-914 RE: The '76 - doing it right this time Sep 21 2022, 04:53 PM
 Dion Kent your work is nothing short of amazing. That ... Sep 21 2022, 06:00 PM
 76-914 Thanks Dion. Don't look too closely. :lol: Dan... Nov 27 2022, 08:48 PM
 76-914 RE: The '76 - doing it right this time Nov 27 2022, 08:58 PM
 Root_Werks Primer!
:trophy:
Gotta mean the color coat... Nov 28 2022, 12:42 PM
 76-914 Wow, almost 5 months since my last update. I thoug... Apr 24 2023, 09:02 PM
  |
8 User(s) are reading this topic (8 Guests and 0 Anonymous Users)
0 Members:

|
Lo-Fi Version | Time is now: 24th November 2024 - 10:24 PM |
Invision Power Board
v9.1.4 © 2024 IPS, Inc.


