|
|
|
Porsche, and the Porsche crest are registered trademarks of Dr. Ing. h.c. F. Porsche AG.
This site is not affiliated with Porsche in any way. Its only purpose is to provide an online forum for car enthusiasts. All other trademarks are property of their respective owners. |
|
|


| TINKERGINEERING |
 Jun 6 2024, 06:26 PM Jun 6 2024, 06:26 PM
Post
#1
|
|
Member  Group: Members Posts: 207 Joined: 15-March 20 From: Sierra Madre, CA Member No.: 24,031 Region Association: Southern California |
Currently working on the wiring harness and found a couple wires in desperate need of replacement but they go through this plastic sheathing on the harness. Has anybody replaced wires through this sheathing? Should I just pull the wires out and try and jam them back in? I was also thinking I could just replace the sheathing, because it is 50 years old now, but how would I put new sheathing back on?
Thanks so much Attached thumbnail(s) 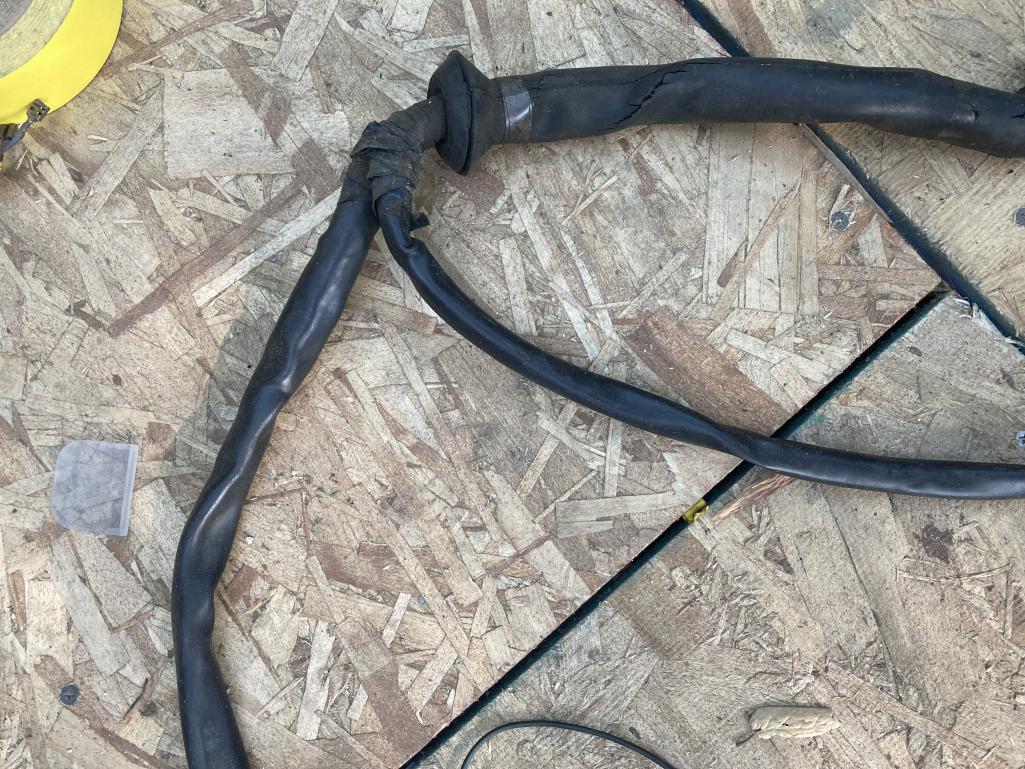
|
   |

 
|
  |
Replies
| technicalninja |
Jun 10 2024, 12:41 AM
Post
#2
|
|
Senior Member Group: Members Posts: 1,821 Joined: 31-January 23 From: Granbury Texas Member No.: 27,135 Region Association: Southwest Region |
Francis, decide for yourself which method is best for a specific joint.
Just saying "always solder" or "always crimp" is short sighted IMO. Soldering takes more skill to do properly and more prep than crimping. If you have a bunch of wires going into gang plug crimping is better. Usually crimping works better on new installations. Crimping is ONLY effective if you use exactly the correct tools, terminals, and nothing goes sideways. Splicing old stuff together below 16 gauge I'm normally soldering but I have a BUNCH of little things I do that most others don't. I use more heat than necessary and as little solder as I can. I "spot-weld" my joints in a very short amount of time. I don't have much trouble with wicking. I use a small drop of solder on the gun tip as my complete load. I'm not adding solder after applying the gun. I'm under magnification and the solder has to go "chrome like" before I'm happy. It will "wick" up into the joint if you're doing it right. Takes less than 1 second. Most of the time I'll get a little tiny mushroom cloud from the flux I previously added to the wires. Fans should be used for ventilation. I don't have problems with "cold" soldered joints. I fan the individual strands out and apply flux to all then twist them back together and remove the extra flux with a paper towel. Two pair of hemostats are used as "heat sinks" on either side of my joints. I quench my joints with a fairly damp cotton dish towel. This happens instantly after the gun is removed. This removes the extra flux that surfaced during the melt phase. If I'm repairing multiple wires, I stagger my joints as to not have the connections next to each other. If you solder 20 wires at the same point you end up with a big bulge in the harness. When I'm done there is no increase in resistance and the joint is stronger than the original wire. All soldered joints are heat shrunk with #2 style shrink. This is the stuff with the glue on the insides and I verify glue "filets" at each end after the shrink. I use a Gar-tech heat gun (made in Germany!) for all shrinking and I've made a special "tip" for it that forms an almost complete circle. The "shrinking" happens evenly and quickly. Using a lighter is not an option. I don't have problems with corrosion down the road. Crimping takes FAR less finesse but requires perfection in the tools and terminals. Crimping is far easier to achieve nice looking harness, especially if your using brand-new high-end stuff like they do in the video. Crimped gang plugs CAN be taken apart and re-assembled. This might be a hyper-critical feature to have. When I'm done with a solder joint it's NEVER coming apart again and should I have to go back in, it has to be chopped out of the circuit, and sometimes replace with a small section of wire with a soldered connection on both ends. This is the NASA style connection I use for splicing individual wires https://www.youtube.com/watch?v=uhzXRIj5FaY That guy would NOT like working for me! His joint looks like crap. He took 10 times too long to get it done. He left a huge amount of exposed wire on either side of the twisted sections. Mine looks like a 1/8 inch long rolled copper section that is the same size as the OD of the insulation. After the heat shrink is applied you CANNOT tell exactly where the joint is in the shrink. So, rules are for fools, wise men (and women) use good judgment! I've been making electrical connections in cars for 40 years. I've paid the price in burns, blood, and having to eat comebacks. There definitely is a place for soldering in car repairs. I have not had a failure in a solder repair in 25+ years. Above 16 gauge I'll use a molex butt splice (as SH shows) and add the solder INTO the tiny open hole in the center. When you see the wires exiting the crimp go chrome, you're done. This takes a bit more time but never more than 3 seconds. The best "standard" crimpers are made by Thomas & Betts Co out of Elizabeth NJ. https://www.amazon.com/Thomas-Betts-WT111M-...mp;gad_source=1 I don't know if they are still built in New Jersey. Mine are old and NOT for sale. And the Molex butt splice SH showed is the seamed style, I prefer seamless. When using a seamed style, the "tooth" of the crimper HAS to hit exactly on the seam. You have to bend BOTH sides of the seam in. Hope this helps. |
|
|
|
Posts in this topic
 TINKERGINEERING Wiring Harness Plastic Sheathing? Jun 6 2024, 06:26 PM
 windforfun Tie or tape a string to the wire you're replac... Jun 6 2024, 06:40 PM bdstone914 Pulling the new wire thru by attaching it to the o... Jun 6 2024, 10:00 PM Chris914n6 There is no reason not to modernize it. A split lo... Jun 8 2024, 12:11 AM
 SirAndy
There is no reason not to modernize it.
:agree:... Jun 8 2024, 09:39 AM IronHillRestorations I have some sizes of black PVC tubing (I call it j... Jun 8 2024, 06:13 AM dr914@autoatlanta.com Jeff Bowlsby Jun 8 2024, 10:58 AM Superhawk996 If you really want to do wiring to a high standard... Jun 8 2024, 11:11 AM tygaboy
If you really want to do wiring to a high standar... Jun 8 2024, 02:41 PM TINKERGINEERING Thanks everyone! So if I were to replace the P... Jun 8 2024, 11:31 AM Superhawk996 Spend some time on YouTube learning how to de-pin ... Jun 8 2024, 11:38 AM TINKERGINEERING
Spend some time on YouTube learning how to de-pin... Jun 8 2024, 03:15 PM SirAndy
so the spade ends that go into them will fit thro... Jun 8 2024, 06:16 PM windforfun
so the spade ends that go into them will fit thr... Jun 8 2024, 06:46 PM Superhawk996
Crimp, solder, & then cover with shrink tubi... Jun 8 2024, 11:20 PM windforfun
[quote name='windforfun' post='3149909' date='Jun... Jun 9 2024, 07:53 PM Superhawk996
This is as clear as mud. So what do you recomm... Jun 9 2024, 10:20 PM ClayPerrine I am currently adding lots of wires to my harness ... Jun 8 2024, 06:20 PM Chris914n6 You can get bailing wire at lowes/hd. Smaller in d... Jun 8 2024, 11:09 PM technicalninja I'll add another issue you will have to overco... Jun 9 2024, 12:06 AM TINKERGINEERING Thanks so much for looking out for me! I am cu... Jun 10 2024, 09:51 AM technicalninja @TINKERGINEERING
This is a message I want your f... Jun 9 2024, 12:26 AM TINKERGINEERING
[b]@[url=http://www.914world.com/bbs2/index.php?s... Jun 9 2024, 02:37 PM Superhawk996 Francis - this link to video from HP academy is a ... Jun 9 2024, 10:32 PM Superhawk996 One more item of note.
For what ever reason when... Jun 9 2024, 10:56 PM TINKERGINEERING This is awesome! This is actually really simil... Jun 10 2024, 09:55 AM windforfun
Francis, decide for yourself which method is best... Jun 10 2024, 08:51 PM
SirAndy
There is no reason not to modernize it.
:agree:... Jun 8 2024, 09:39 AM IronHillRestorations I have some sizes of black PVC tubing (I call it j... Jun 8 2024, 06:13 AM dr914@autoatlanta.com Jeff Bowlsby Jun 8 2024, 10:58 AM Superhawk996 If you really want to do wiring to a high standard... Jun 8 2024, 11:11 AM tygaboy
If you really want to do wiring to a high standar... Jun 8 2024, 02:41 PM TINKERGINEERING Thanks everyone! So if I were to replace the P... Jun 8 2024, 11:31 AM Superhawk996 Spend some time on YouTube learning how to de-pin ... Jun 8 2024, 11:38 AM TINKERGINEERING
Spend some time on YouTube learning how to de-pin... Jun 8 2024, 03:15 PM SirAndy
so the spade ends that go into them will fit thro... Jun 8 2024, 06:16 PM windforfun
so the spade ends that go into them will fit thr... Jun 8 2024, 06:46 PM Superhawk996
Crimp, solder, & then cover with shrink tubi... Jun 8 2024, 11:20 PM windforfun
[quote name='windforfun' post='3149909' date='Jun... Jun 9 2024, 07:53 PM Superhawk996
This is as clear as mud. So what do you recomm... Jun 9 2024, 10:20 PM ClayPerrine I am currently adding lots of wires to my harness ... Jun 8 2024, 06:20 PM Chris914n6 You can get bailing wire at lowes/hd. Smaller in d... Jun 8 2024, 11:09 PM technicalninja I'll add another issue you will have to overco... Jun 9 2024, 12:06 AM TINKERGINEERING Thanks so much for looking out for me! I am cu... Jun 10 2024, 09:51 AM technicalninja @TINKERGINEERING
This is a message I want your f... Jun 9 2024, 12:26 AM TINKERGINEERING
[b]@[url=http://www.914world.com/bbs2/index.php?s... Jun 9 2024, 02:37 PM Superhawk996 Francis - this link to video from HP academy is a ... Jun 9 2024, 10:32 PM Superhawk996 One more item of note.
For what ever reason when... Jun 9 2024, 10:56 PM TINKERGINEERING This is awesome! This is actually really simil... Jun 10 2024, 09:55 AM windforfun
Francis, decide for yourself which method is best... Jun 10 2024, 08:51 PM |
17 User(s) are reading this topic (17 Guests and 0 Anonymous Users)
0 Members:

|
Lo-Fi Version | Time is now: 16th September 2024 - 01:18 PM |
Invision Power Board
v9.1.4 © 2024 IPS, Inc.